warning lights AUDI A4 SEDAN 2013 Owner's Guide
[x] Cancel search | Manufacturer: AUDI, Model Year: 2013, Model line: A4 SEDAN, Model: AUDI A4 SEDAN 2013Pages: 294, PDF Size: 73.71 MB
Page 202 of 294
200 Cleaning and protec tio n
Automatic car wash
The vehicle can be washed in almost any
modern automatic car wash .
The vehicle paint is so durable that the vehicle
can normally be washed without problems in
an automatic car wash. However, the effect on
the paint depends to a large extent on the de
sign of the facility, the filtering of the wash
water, the type of wash and care mater ial , etc.
I f the pa int has a dull appearance afte r going
through the car wash or is scratched, bring
this to the attention of the operator immedi
ately.
If necessary, use a different car wash.
Before going through a car wash, be sure to
take the usual precautions such as closing the
windows and the roof . Factory installed an
tennas must not be removed.
I f you have installed additional accessor ies on
the vehicle - such as spoilers, roof rack, etc. -
it is best to ask the car wash operator if these
should be removed .
A WARNING
Always read and heed all WARNINGS and
other information
c;, page 199.
Before washing the vehic le in an automatic
car wash, p lease make sure to retract the
exterior m irrors to prevent them from be
ing damaged.
Washing the vehicle by hand
A lot of water is needed when washing a vehi cle by hand.
• Before you start washing, make sure you
have read and understood the WARNINGS
r:::;, A in General information on page 199 .
• First soak all dried di rt until it is soft, then
rinse it off .
• As you clean your vehicle, start with the
roof and work your way down to the bottom,
us ing a sponge, a sponge glove o r a clean
brush. •
Rinse the sponge or the sponge g love often,
flushing it clean each time .
• Use spec ial car shampoo only for very per
sistent d irt .
• Rinse the car thoroughly with wa ter .
• Use a chamo is leather to gently w ipe the ex-
ter ior dry .
Use a separate sponge for cleaning the
wheels, door sills and other regions exposed
to road dirt . In this way, you will not scratch
the pa int with coarse particles imbedded in
the sponge the next t ime you wash the car.
&_ WARNING
- Do not clean the underside of the chas
sis, fenders, wheel covers, or o ther ha rd
to reach parts withou t protecting you r
hands and arms. You may cut yourself on
sharp-edged metal parts .
-A lways read and heed a ll WARNINGS and
other info rmation
c;, page 199.
{D Note
- N ever try to remove dirt, mud or dust if
t he su rface of the veh icle is dry . Neve r
use a dry cloth or sponge, since this
cou ld scratch your vehicle's paint or win
dows .
- Never wash your car in bright s unli ght .
Drops of wate r act as magn ifying lenses
and may damage your paint .
- When you wash your car in the winter: if
you rinse yo ur vehicle with a hose, be
careful not to aim the stream of water
directly at locks, or at door or hatch
openings - they can freeze shut .
- Never use sponges designed to remove
insects, or any k itchen scouring sponges
o r simi lar p roducts . They can damage
your pai nt finish .
- You should remove debris (such as in
sects) from the headlight lenses on a
regu lar basis, for example when refuel
ing your vehicle . Never use a d ry cloth o r
sponge to clean the headlights. On ly use
wet cloths o r sponges to prevent
scratches. It is best to use soapy water.
-
Page 203 of 294
@ For the sake of the environment
In the interest of the environment, the ve
hicle should only be washed in special
wash bays.
Washing your vehicle with a power
washer
Cleaning the ex terior of your car wi th a high
pressure power washer is safe as long as you
observe a few simple rules .
11-Before using the power washer, make su re
you have read and understood the WARN
INGS
c:::> A in General information on
page 199 .
11-Always fo llow the operating instructions for
the power washer .
11-Make sure that the jet on the spray hose
produces a "fan shaped spray".
11-Do not ho ld the spray nozzle too close to
soft materia ls.
When cleaning the vehicle with a power wash
er
always fo llow the operating instructions .
This applies particularly to the
operati ng
p re ssu re
and the s p ra yin g distance . Maintain
a sufficient d istance to soft mater ials such as
rubber hoses and sound/vibra tion deadening
materials (particularly on the underside of the
engine hood) . Do not use a jet wh ich sprays
water in a
direct stream or one that has a ro·
tat in g
jet.
Water temperature should not exceed 140 °F
(60 °() .
A WARNING
Never wash tires w it h a jet that sprays wa
t er in a direc t stream. This cou ld cause in
visib le damage to t he tires and weake n
them, even if the spray is from a relatively
long distance and for a short time . Dam
aged and weakened t ires can fai l and cause
accidents and persona l injury.
(D Note
To avo id damag ing your vehicle, always
make sure t hat there is sufficient distance
Cleaning and protec tion 20 1
between the spray head and soft materia ls
like rubber hoses, plastic parts and sound
deaden ing mater ia ls. Never aim the spray
head at the same point for a long time.
This also applies to cleaning headlights
and painted bumpers . Remember: the
closer the nozzle is to the surface of the
mater ia l, the greater the st ress on the ma
terial.
Sensors and camera lenses
- Remove snow w ith a hand br ush and remove
ice with a de -icing sp ray that does not con
tain so lvents.
- Clean the senso rs (adap tive c ruise co ntrol *,
parking system *) with a cleaning so lution
that does not contain so lvents and a soft
cloth.
(D Note
- If you wash your vehicle with a pressure
washer,
- make sure there is enough distance to
sensors i n the rear bumper.
- do not clean the camera lenses and the
area a ro und them with the press ure
washer.
- Never use warm or hot water to remove
snow o r ice from the camera lens . This
cou ld caus e the lens to crack .
- Never clean the camera lens with abra
sive products .
Waxing and Polishing
Waxing
A good wax coating protects the vehicle paint
t o a la rge extent agains t the envi ronmental
f actors lis ted under
c:::> page 199, Washing and
even against s light scra tches .
You can use a liquid car wax to protect yo ur
paint as soon as one wee k afte r you r vehicle
has been delivered.
Even if you regularly use a
wa xing process in
automat ic car washes, we recommend that
you manually apply a coat of wax to g ive the .,.
•
•
Page 221 of 294
temperatures stay below freezing point for l ong periods.
Detergent add itives in the o il w il l make fresh
oil look dark after the eng ine has been run
ning fo r a short time . This is norma l and is not
a reason to change the oi l more often than
recommended.
D am ag e or m alfun ction s due to lack of
ma intenanc e
It is essential that you change your oil at the
r ecommended inte rva ls using only engine o il
t hat complies wi th A udi oi l standard
VW 502 00 . Your Limited New Vehicle War
ranty does not cover damage or malfunctions
d ue to fa ilure to fo llow recommended mainte
nance and use requ irements as set forth in
the Audi Owner's Manua l and Warranty
&
Maintenance book let . Your dea ler will have to
deny warranty coverage u nless you present to
the dea ler p roof in the fo rm of Serv ice or Re
pa ir Orde rs that all s chedu led maintenance
wa s pe rformed in a t imely manner .
Engine oil consumption
The engine in your vehicle dep ends on an ade
quate amount of oil to lubricate and cool all
of its moving parts.
In o rder to provide effective lubrication and
cool ing of i nternal engine components, a ll in
ternal comb ustion eng ines consume a cert ain
amo unt of o il. Oil cons umption varies from
engine to engine and may change significantly
over the life of the engine. Typ ica lly, engines
with a specified break-in per iod (see
¢
page 192) consume more oil during the
break-in per iod than they consume after oil
consumption has stabilized .
Under norma l conditions, the rate of oil con
sumpt ion depends on the quality and viscosity
of the oil, the RPM (revo lutions per m inute) at
which the engine is operated, the amb ient
temperature and road condit ions. Furthe r fac
tors ar e the amount of o il d ilution from wate r
condensation or fuel residue and the ox ida
tion level of the oi l. As any engine is s ubje ct to
Checkin g and fillin g 219
wear as m ileage builds up, the oil consump
tion may increase over time until replacement
of worn components may become necessary.
Wi th a ll these variab les coming into p lay, no
standard rate of oil consumpt ion can be es
tablished or specified. There is no alternative
to regular and frequent check ing of the o il lev
el, see
Note .
If the yellow engine oil leve l warning symbo l
1\1 in the instrument cluster lights up , you
sho uld check the oil leve l as soon as possib le
¢
page 220. Top off the oil at your earliest
convenience ¢
page 220.
A WARNING
Before you check anythi ng i n the engi ne
compartment, always read a nd heed all
WARNINGS¢ .&.
in Working in th e engine
c ompartment on page 215.
(D Note
D riving w ith an insufficient o il level is like
ly to cause sever e damage to the engine .
(D Tips
- The oil pressure warning display. is
not an indicator of the oil le vel. Do not
rely on it . Instead, check the oil level in
your engine at regu lar intervals, pref
erably ea ch time you refuel, and always
before going on a long trip .
-If you have the impression yo ur engi ne
c ons umes ex ce ss ive amoun ts of o il, we
recommend that you consul t an a uthor
ized Aud i dea ler to have the cause of
your concern properly d iagnosed. Keep in
mind that the accurate measu rement of
oil consumption requ ires great care and
may take some t ime. An authorized Aud i
dealer has instructions about how to
measu re oil consumption accurately.
-
•
•
Page 228 of 294
226 Check ing and filling
Have the battery checked when you take your
vehicle in for service. You are well advised to replace a battery that is older than 5 years.
W ith certa in types o f airbag deployment, the
battery is disconnected from the vehicle elec
trica l system for safety reasons¢
& in Re
pair, core and disposal of the airbags on
page 158.
Disconn ect ing the battery terminal s
Some vehicle functions (power window regu
lators, for example) are lost if the battery ter
minals are disconnected . These functions have
to be re learned after the battery terminals are
connected again. To prevent this, the battery
should only be disconnected from the vehicle
electrical system when absolutely necessary
for repairs .
Vehicles not dri ven fo r lo ng p eriod s
If you do not drive your vehicle over a period
of several days or weeks, electrical compo
nents are gradually cut back or switched off.
This reduces energy consumption and main
tains starting capabil ity over a longer period
¢ page 190.
Some of the conven ience functions may not
operate, such as the inter ior lights or the
power seat adjustment. The conven ience
functions will be ava ilable again when you
turn on the ignition and start the eng ine.
Winter operati on
During the winter months, battery capacity
tends to decrease as temperatu res drop . This
is because more power is also consumed while
start ing , and the headlights, rea r window de
fogger, etc., are used more often .
Avoid unnecessary power consumption, par
ticularly in c ity traffic or when traveling on ly
short distances. Let you r authorized Audi
dea ler check the capacity of the vehicle bat
tery before winter sets in
¢ page 228. A well
charged batte ry w ill not only prevent sta rting
prob lems when the weather is cold, but wi ll
a lso last longer.
(D Tips
If your vehicle is left standing for seve ral
weeks at extremely low temperatures, the
vehicle battery sho uld be removed and
stored where it w ill not freeze . This will
prevent it from be ing damaged and having
to be replaced .
Working on the battery
Be especially careful when working on or near
the battery.
The battery is located in the luggage compart
ment under the floor. Before you check any
t hi ng in the luggage compartment,
read and
heed all WARNINGS
¢ ,& .
Always heed the safety warnings , when work
ing on the vehicle battery or the vehicle e lec
trical system to prevent injury.
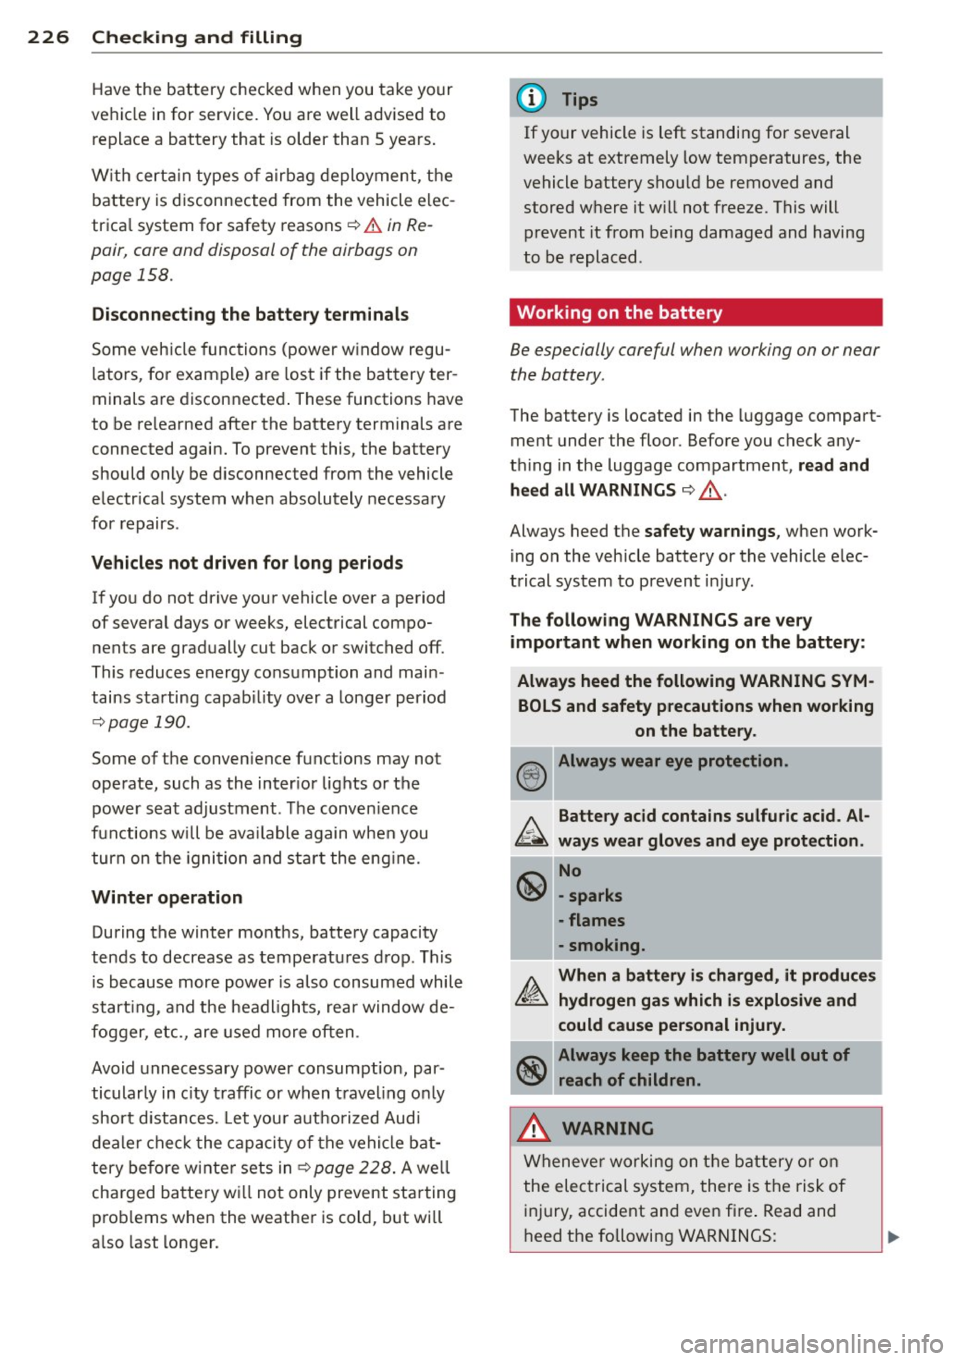
Th e follo wing WARNINGS are very
important when working on the battery :
Al ways heed the follo wing WARNING SYM
BOLS and safety prec aution s when working
on the battery .
® Always wear eye protection .
,0,. Battery acid contains sulfuric acid . Al
~ way s wear glov es and ey e prot ectio n.
~ No
\!SI -sparks
-flames
-smoking.
A Wh en a battery is charged , it produ ce s
~ hydro gen gas which is e xplosi ve and
c o uld cau se pe rson al injur y.
~ Always keep the battery well out of
'if!:11 reach of children .
_& WARNING
Whenever working on the battery or on
the electrical system, there is the risk of
injury, accident and even fire . Read and
heed the following WARNINGS:
-
Page 229 of 294
-Always wear eye protection. Do not let
battery acid or any lead particles get on
your skin or clothing. Shield your eyes .
Explosive gases can cause blindness or
other injury.
- Battery acid contains sulfuric acid . Sulfu
ric acid can cause blindness and severe
burns.
- Always wear gloves and eye protection.
Do not tilt the battery because acid
could leak out of the ventilation open
ings.
- If you get battery acid in your eyes or
on your skin, immediately rinse with
cold water for several minutes and get
medical attention .
- If you should ingest any battery acid,
seek medical attention immediately.
- Do not expose the battery to an open
flame, electric sparks or an open light.
- Do not smoke.
- Do not interchange the positive and neg-
ative cables .
= When working on the battery, be sure
not to short-circuit the terminals with
tools or other metal objects. This would cause the battery to heat up very quickly,
which could lead to damage or explosion and personal injury.
- When a battery is charged, it produces
hydrogen gas which is explosive and
could cause personal injury .
- Always keep the battery well out of the
reach of children.
- Before work is done on the electrical sys
tem, disconnect the negative ground ca ble .
- Before performing any work on the elec
trical system, switch off the engine and
ignition as well as any electrical equip
ment. The negative cable on the battery
must be disconnected . If you are just go
ing to replace a light bulb, then it is
enough to switch off the lights.
- Before disconnecting the battery, switch
off the anti-theft alarm system! Other
wise you will set off the alarm.
Checking and filling 22 7
-When disconnecting the battery, first
disconnect the negative cable and then
the positive cable.
- Before reconnecting the battery, make
sure all electrical consumers are switch
ed off. Reconnect the positive cable first
and then the negative cable . Never inter
change the cables -this could start a fire!
- Never charge a frozen or a thawed-out
battery . It could explode! If a battery has
frozen , then it must be replaced . A dis
charged battery can freeze over at 32°F
(QOC),
-Make sure the vent hose is always attach
ed to the opening on the side of the bat
tery .
- Never use batteries which are damaged.
There is the danger of an explosion! Al
ways replace a damaged battery.
&_ WARNING
California Proposition 65 Warning:
- Battery posts, terminals and related ac
cessories contain lead and lead com
pounds, chemicals known to the State of
California to cause cancer and reproduc
tive problems. Wash hands after han dling.
(D Note
- Do not disconnect the vehicle battery
when the ignition is switched on or when the engine is running, otherwise, you will
damage electronic components in the
electrical system.
- If your vehicle is going to stand for a
long period of time without being driven,
protect the battery from "freezing", oth
erwise it will be damaged and will then
have to be replaced.
•
•
Page 263 of 294
Bulbs
Replacing bulbs
For your safety, we recommend that you have
your authorized Audi dealer replace any bulbs
for you .
It is becoming increasingly more and more
difficult to replace vehicle light bulbs since in
many cases, other parts of the car must first
be removed before you are able to get to the
bu lb . T his appl ies especially to the light bu lbs
in the front of your car which you can on ly
reach through the engine compartment .
Sheet metal and bulb ho lders can have sharp
edges that can cause ser ious cuts, parts must
be correctly taken apart and then p roperly put
back together to help prevent breakage of
parts and long term damage from water that
can enter housings that have not been proper
l y resealed.
F or your safety, we recommend that you have
your authorized Audi dealer replace any bulbs
for you, since your dealer has the proper tools,
the correct bu lbs and the expertise.
G as disch arge la mp s (Xe no n li ght s)*:
Due to the high electrical vo ltage, have the
bu lbs rep laced by a qualified technician.
H eadlights with Xenon l ight a re identified by
the high voltage sticker.
& WARNING
Changing Xenon lamps without the neces
sary equipment can cause serious personal
injury.
- Bul bs are pressurized and can exp lode
when being changed . Potential risk of in
jury!
- On vehicles equipped with gas discharge
bulbs (Xenon light) * life-threatening in
jur ies can result from improper handling
of the high-voltage portions of such
lamps!
- Only your authorized Aud i dea ler or a
qualified workshop should change the
bulbs in gas discharge lamps. There a re
Fu ses and bulb s 261
parts with sharp edges on the open ings
and on the bulb holders that can cause
serious cuts. If you are uncertain about
what to do, have the work performed by
an author ized Audi dealer or other quali
fied workshop . Ser ious personal injury
may result from improperly perfo rmed
wo rk.
(j) Tips
- If you still prefer to replace the light
bulbs yourself , be aware that the engine
compartment is a hazardous area to
work in
c::> page 208, Engine compart
ment
o=:> ,& .
-It is best to ask your authorized Audi
dealer whenever yo u want to change a
bulb .
•
•
Page 265 of 294
@ Tips
The discharged battery must be properly
connected to the vehicle's electrical sys
tem. When jump starting or charg ing the
battery, never connect the negative
ground cable to the batte ry negat ive post
because the ba tte ry manager system must
be ab le to detect the battery's state of
charge. Always connect the negative
g round cab le to the negative ground pos t
of t he battery manager cont ro l unit.
Use of jumper cables
Make sure to connect the jumper coble
clomps in exactly the order described b elow!
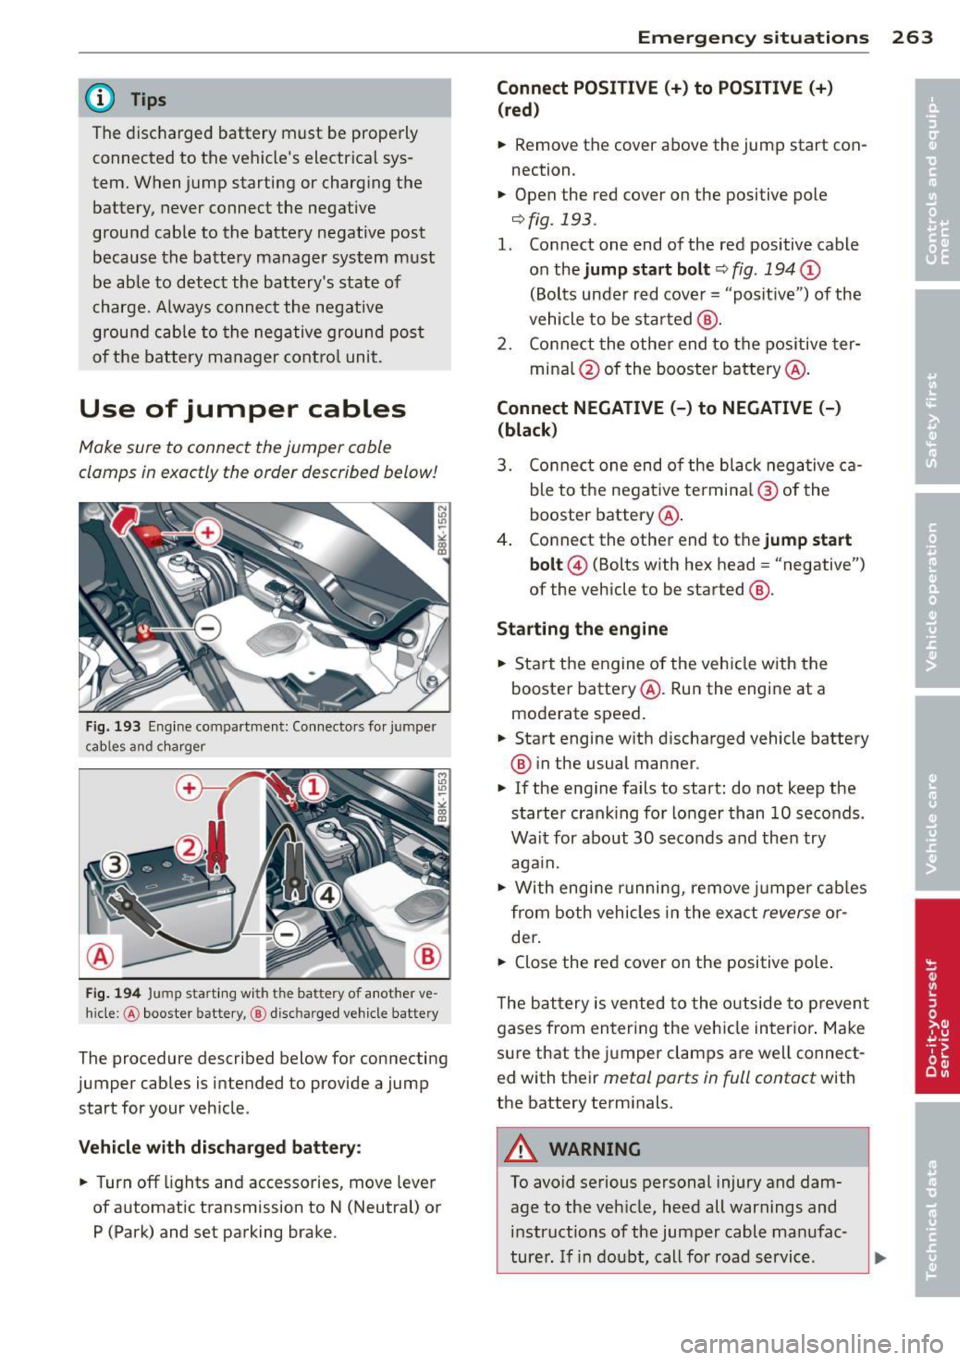
Fi g. 193 Eng ine co mpar tment: Co nnecto rs fo r jum per
c ab les a nd c har ge r
F ig. 1 94 Jump start in g w ith t he ba ttery of a not her ve ·
hi cle :@ booster battery, @ disc harged veh icle battery
The procedure described below for connecting
jumper cables is intended to provide a jump
start for your veh icle .
Vehicle with di scharged battery :
~ Turn off lights and accessories, move leve r
of automatic transmission to N (Neutral) or P (Park) and set parking brake .
Emergency situ ation s 263
Connect POSITIVE(+) to POSITIVE(+ )
(red )
~ Remove the cover above the jump start con
nection .
~ Open the red cover on the positive pole
¢fig. 193 .
1. Connect one end of the red positive cable
on the
jump sta rt bolt c::;, fig. 194 (D
(Bolts under red cove r= "positive ") of the
vehicle to be sta rted @.
2 . Conne ct the othe r end to the pos itive ter -
mina l@ of the booster battery @.
Connect NEGATIVE (-) to NEGATIVE (-)
(black )
3. Co nnect one end o f the b lack neg ative c a
ble to the nega tive te rmi na l@ of the
booster battery @.
4 . Connect the other end to the
jump start
bolt @
(Bolts with hex head = "negative")
of the vehicle to be started @.
Starting the engine
~ Start t he e ngine o f the veh icle w ith the
booste r batte ry @ . Run the engine at a
moderate speed.
~ Start engine w ith d ischarged vehicle battery
® in the usual man ner .
~ If the eng ine fails to start : do not keep the
s tarter cran king for lo nger than 10 seconds .
Wait for about 30 seco nds and the n try
aga in.
~ With engi ne r unni ng , remove j umper cab les
from both vehicles in the exa ct
reverse o r
der .
~ Close the red cover on the positive pole .
T he b attery is vented to the o utside to p reven t
gases from en tering the veh icle in ter ior . Ma ke
s ur e that the j umper clamps a re well connect
ed with their
metal ports in full contact with
the batte ry term inals.
A WARNING
To avoid serious personal injury and dam
age to the vehicle, heed all warnings and
in structions of the jumper cable ma nufac-
turer . If i n dou bt, call for road servic e.
Ill>
Page 279 of 294
A
Accessories . . . . . . . . . . . . . . . . . . . . 60, 274
AC (automatic climate control) ... .. .. .. 69
adaptive cruise control Vehicles with manual transmission 99
Adaptive cruise control ...... .. .. .. .. .. 97
C leaning sensors/camera ... ... .. .. . 201
Messages .. ................ ... ... 105
Request for driver intervention . . . . . . . 103
Setting the driving program .. .. .. .. . 102
Adaptive dampers .......... .. .. .. .. . 111
Adaptive light ................ ... ... . 44
Adaptive Light (defective) ......... .. .. 22
Adding Engine coolant ........... .. .. .. .. .
Engine oil .. ................ ... .. .
Windshield washer fluid ......... .. .
Additional accessories
Additives 223
220
229
274
Engine oil .. ............. .... .. .. . 220
Adjustable steering column ... ... .. .. .. 72
Adjusting Air distribution (automatic climate con-
trol) . . . . . . . . . . . . . . . . . . . . . . . . . . . . . . 70
I nstrument illumination ... .. .. .. .. .. 47
Steering column .................... 72
Temperature (automatic climate control) 70
Airbag Warning/indicator lights ... .. .. .. .. .. 20
Airbag system . . . . . . . . . . . . . . . . . 144 , 161
Advanced Airbag System ....... ... .. 148
Advanced Airbag System components . 151
Care . .. ... . .... ... ..... ..... .. ... 157
Children . .. ............. .... .. .. . 166
Child restraints ........... .. .. .. ... 167
Components (front airbags) . . . . . . . . . 151
Danger of fitting a child safety seat on
the front passenger seat . . . . . . . . . . . . 145
Disposal . .. .. ........... .. .. .. ... 157
Front airbags . . . . . . . . . . . . . . . . 148, 149
How do the front airbags work? . . . . . . 153
How many airbags does my vehicle
have? 151
How the Advanced Airbag System com-
ponents work together .... .. .. .. .. . 152
Important things to know .. .. .. .. .. . 144
Index 277
Indicator light ..... ............... 155
Monitoring . ... .... ............... 155
PASSENGER AIR BAG OFF light ....... 155
Repairs ... .. .. .. ................. 157
Safety instructions ................. 157
Side airbags ..... .. ............... 159
Side curtain airbags .. .... .. .... .... 162
Weight-sensing mat ............... 166
When must the system be inspected? . 155
all-wheel drive .. .. ................. 189
Alloy wheels .. .... .. ............... 204
All wheel drive Winter tires . .. .. .... ........... .. 245
Anti-free ze
refer to Engine coolant system ... .. .. 222
Anti-lock braking system ............ . 184
Warning/indicator lights ............ . 19
Anti-slip regulation ................. 184
Anti-theft alarm warning system ... .. .. . 32
Anti-theft systems Electronic immobilizer ............... 38
Armrest .. .. .. .. .. .. . ... ...... ... .. . 56
Ashtray ...... .. .. .................. 59
Asterisk What does it mean when something is
marked with an asterisk? . . . . . . . . . . . . . . 6
Audi braking guard
refer to braking guard . ........... .. . 97
Audi drive select . . . . . . . . . . . . . . . . . . . . 111
Adaptive dampers .. .............. . 111
Description . . . . . . . . . . . . . . . . . . . . . . . 111
Dynamic steering . .... ......... .. .. 111
Setting the driving mode ........ .. .. 112
Sport differential . .... ............. 111
Audi Service Repair Manuals and Litera-
ture 272
AU TO
Automatic climate control . . . . . . . . . . . . 70
Automatic headlights . ...... ... .. .. . 44
Auto Lock ... ... .... ................ 32
Automatic belt retractor ............. 139
Automatic car wash
refer to Washing . .. ........... .... 200
Automatic climate control Air vents . . . . . . . . . . . . . . . . . . . . . . . . . . 70
Operation . . . . . . . . . . . . . . . . . . . . . . . . . 69
Setup ........ .. .. . ............... 71
•
•
Page 280 of 294
278 Index
Automatic Shift Lock (ASL) . . . . . . . . . . . . 86
Automatic transmission . . . . . . . . . . . 83, 89
Automatic Shift Lock (ASL) . . . . . . . . . . . 86
Driving .. .. .... .. ... .... .. .. .. .. .. 84
Dynamic shift program . . . . . . . . . . . . . . 87
Emergency mode . . . . . . . . . . . . . . . . . . . 88
Emergency release . . . . . . . . . . . . . . 89, 95
Kick-down . . . . . . . . . . . . . . . . . . . . . . . . . 87
Manual shift program . . . . . . . . . . . . . . . 88
multitronic . . . . . . . . . . . . . . . . . . . . . . . . 83
Removal lock (ignition key) ..... .. .. .. 72
Selector lever . . . . . . . . . . . . . . . . . . . . . . 85
S tron ic .. .. ................ ... ... . 89
tiptronic . . . . . . . . . . . . . . . . . . . . . . . . . . 83
also refer to S tron ic transmission ..... 89
Automatic wipers . . . . . . . . . . . . . . . . . . . . 50
Auto Safety Hotline ................. 134
Average speed . . . . . . . . . . . . . . . . . . . . . . . 25
Avoid damaging the vehicle .. .. .. .... . 192
B
Battery ..... ................ .. 17,225
Battery location inside the luggage com-
partment ........ ....... .. .. .... .
226
Charging . .. ... .. ..... ... .... .. .. . 228
Important warnings when working on
the battery .... ... .... ..... .. .. .. .
226
Jump starting . ........... .. .. .. .. . 262
Low . .. .. .. ............. .. .. .. .. . 190
Replacing the battery . .. .. .. .. .. .. . 229
State of charge ............ ... .... . 190
Winter operation .......... ... .... . 225
Working on the battery ..... .... ... . 226
Before driving .. ........... .... .... . 126
Bio-ethanol (Fuel) ............ .. .. .. . 211
Blended gasoline ................... 210
Blower (automatic climate control) . . . . . . 70
Body cavity sealing ........... .. .. .. . 204
Booster seats ...... ....... .. .. .... . 173
Brake fluid
Changing the brake flu id . ........ .. .
225
Check ing the brake fluid level . .. .. ... 224
Reservoir ... ............ .. .. .. .. . 224
What is the correct brake fluid level? . . 224
What should I do if the brake fluid warn-
ing light comes on? ........ ... .. ...
224
Brake system .... .. ............. .... 224
Anti- lock braking system ............. 19
Brake assist system ................ 184
Brake fluid .... .. ......... .... .... 224
Brake fluid specifications for refill and re-
placement ...... ................ .
225
Brake light defective . . . . . . . . . . . . . . . . 21
Brake power assist unit .......... ... 187
Brakes .. .. .. .. . ............ .... .. 187
Ceramic brakes . .. ... ... ... .... .. .. 187
Electromechanical parking brake ...... 77
Warning/indicator lights .......... .. . 15
Worn brake pads symbol . . . . . . . . . . . . . 20
Braking
Emergency braking funct ion ... .. .. .. .
79
braking guard . . . . . . . . . . . . . . . . . . . . . . . 97
Messages ..... .. .. ... ........... . 105
Settings .. ... ... .. .............. . 104
Break-in period . . . . . . . . . . . . . . . . . . . . . 192
Tires . .. .. .. .. .. ............. .. .. 192
Bulbs .......... .. ............. .... 261
C
Californ ia Proposition 65 Warn ing . .... 216
Battery specific .. ... .......... .. .. 227
Capac1t1es .. ... ... .. .............. . 270
Car care ........ .. ............. .... 199
Interior . .. .. .. .. ............. .. .. 205
Plastic and vinyl .. ... ...... .... .. .. 202
Care of exterior .... ................. 199
Cargo area
refer to Luggage compartment. . . 64, 132
Catalytic converter . . . . . . . . . . . . . . . . . . 193
Center armrest . . . . . . . . . . . . . . . . . . . . . . 56
Central lock ing .. .. .......... ...... .. 32
Central lock ing switch .... ...... .. .. . 36
Convenience key . . . . . . . . . . . . . . . . . . . . 36
Remote control key ............ .... . 35
Ceramic b rake ro tors
New brake pads .. ..... ........... .
18 7
Certification . ..... ................ . 275
Changing a flat t ire . ......... .... .... 252
Changing a wheel .. ......... .... .... 252
Changing engine oil
Chassis 221
Undercoating .. .. ... .. ... ..... .. .. 204
Page 282 of 294
280 Index
Cornering light ................ .... .. 44
Cruise control Changing speed .......... .... .... .. 81
Presetting your speed . . . . . . . . . . . . . . . 82
Sw itching off ............ .. .. .... .. 82
Switching on . .. . ...... ... .. .. .... .. 81
Cruising range . . . . . . . . . . . . . . . . . . . . . . . 25
(upho lder ..... ........... ........ .. 61
D
Data .. .... .. .............. ... .... .
Data recorder
Date display 270
184
12
Daytime ru nning lights . . . . . . . . . . . . 44, 45
Declaration of compl iance
Adaptive cruise control ...... .. .. ... 275
Audi side assist .......... .. .. .. .. . 275
Cell phone package ........... .... . 275
Conven ience key .......... .... .. .. . 275
Electronic immobilize r ............. . 275
Homelink ® universal remote control .. 275
Remote control key ....... .... .... . 275
Tire pressure monitoring system ..... 275
Defective light bulb warning . . . . . . . . . . . 21
Defrosting (w indows) ......... .. .. .... 70
Determining correct load limit .... ... . 239
Digital clock ... ........... .... .... .. 12
Digital compass ............. .. .... .. 52
Dimensions .. ... .... ......... ..... . 269
Dimming the rearview mirror .. .... .. .. 48
Doors Ch ild safety locks ......... .... ...... 40
emergency lock ing ... ... .. .... .. .. . . 37
Driver information system
Enhanced sh ift indicator ....... .... . . 28
Open door or front lid warning . . . . . . . . 24
Outside temperature display .. .. .. .. . . 24
Sound system display . . . . . . . . . . . . . . . 24
Driver seat
refer to Seating position ....... .. .. . 127
D . . f l riving sa e y .. ........... .. .. .. .. . 126
Driving through water ...... .... .... . 192
Driving time ............. .... ..... .. 25
D . t . ynam1c s eermg . . . . . . . . . . . . . . 111, 188
E
E85 (Fuel)
Efficiency program ........ ........ .. . 211
27
Fuel economy messages . . . . . . . . . . . . . 29
Memo ry levels ................ .. .. . 25
Other equipment .... .......... .. ... 28
Shift indicator . . . . . . . . . . . . . . . . . . . . . 28
Electro-mechanical power assist . .. .. .. 188
E lectromechanical parking brake
Emergency braking ............ .... . 79
Indicator light .................... . 77
Parking ....... .. .. ... ....... ... .. . 78
Releas ing and closing . ...... ... .. .. . 77
Starting assist . . . . . . . . . . . . . . . . . . . . . 78
Starting from rest ............. .. .. . 78
Starting off with a tra iler . . . . . . . . . . . . . 79
Warning/indicator lights ............. 16
Electronic differential lock (EDL) . .. .. .. 184
Warning/indicator lights ........ .. .. . 19
E lectronic immobilizer . . . . . . . . . . . . 12, 38
El ectronic power control
(EPC) warning/indicator ligh t . . . . . . . . . 20
Electronic speed limiter .... ........ .. . 31
E lectronic Stabilization Contro l (ESC) ... 184
Warning/ind icator lights ........ .... . 19
Emergency actuation
Doors .. .. .... .. .. .......... ..... . 37
Ignition key ..... ... .......... ..... 35
Rear lid . . . . . . . . . . . . . . . . . . . . . . . . . . . 39
Slid ing/tilting sunroof .......... ..... 42
Emergency braking .............. .... . 79
Emergency flasher .... ........... ... . 46
Warning/indicator lights ..... ..... .. . 23
Emergency key .. .. ............. .... . 33
Starting engine .. ... .......... ..... 74
Emergency operation
Emergency braking function (parking
brake) ........ .. .. ......... .... .. . 79
Emergency re lease
Selector lever .. .. ............. .... . 89
Emergency starting ....... ........ .. 262
Emergency towing .... .......... .. .. 264
En ergy management .............. .. 190
Battery power . . . . . . . . . . . . . . . . . . . . . 17
Driver notification . . . . . . . . . . . . . . . . . . 17