fuel reserve AUDI A5 2008 8T / 1.G Owners Manual
[x] Cancel search | Manufacturer: AUDI, Model Year: 2008, Model line: A5, Model: AUDI A5 2008 8T / 1.GPages: 313, PDF Size: 12.13 MB
Page 3 of 313

ForewordThank you for choosing the Audi A5.
The new Audi A5 combines the latest technology with numerous features for your comfort and
convenience. To help you get the best out of these features in everyday use, we recommend that
you read this Manual carefully so you can quickly become familiar with your vehicle in detail.
As well as information on how to use the controls and equipment, the Owner's Manual contains
important notes on care and maintenance. These are relevant to your safety and will help preserve
your car's value. The Manual also offers useful driving tips and advice, together with some sugges-
tions on how to drive your car with minimum impact on the environment.
In addition to this Owner's Manual, the Service Wallet also includes the Service Schedule for your
vehicle. This booklet contains important information on Audi service requirements and lists the
vehicle's fuel consumption figures. The Service Wallet also includes operating manuals for
optional on-board systems such as the radio, navigation and telephone. We recommend that you
keep the Service Wallet in the car at all times.
Should you have any further questions regarding your car or if you suspect that your owner's liter-
ature is not complete, please contact your Audi dealer or importer. They are always glad to answer
your queries and note any suggestions you may have.
We wish you safe and enjoyable motoring with your Audi A5.
AUDI AG
document_0900452a8179700c.book Seite 1 Donnerstag, 22. März 2007 10:19 10
Page 21 of 313

Instruments and warning/indicator lamps19
Controls
Safety
Driving tips
General maintenance
Self-help
Technical data
Electro-mechanical parking brake
This warning lamp monitors the electro-mechanical
parking brake.The warning lamp
lights up when the parking brake is applied
with the ignition on. After the ignition has been switched off the
lamp will stay on for about 30 seconds. The warning lamp will light
up for about 30 seconds if the parking brake is applied with the igni-
tion switched off.
The warning lamp should go out when the parking brake is released.
If the warning lamp flashes continuously after the parking brake has
been applied, the brake may not be strong enough to hold the
vehicle on a slope. This may be due to the brakes overheating.
Please note the following points:
•
If the gradient is too steep to park the vehicle safely, the display
will show the message Caution: Vehicle parked too steep.
•
In the event of a fault in the parking brake system the symbol
will also appear in the instrument cluster display together with the
message Parki ng b rake! You should have the fault corrected by a
qualified workshop without delay.
Brake system
The warning lamp flashes if the brake fluid level is too low
or if there is a fault in the ABS system or the parking
brake.If the warning lamp
flashes, there is a fault in the brake system.
The symbol
in the instrument cluster display will flash at the
same time. You can press the button to obtain a message
explaining the fault ⇒page 31.
If a failure should occur in the ABS, the ABS warning lamp
will
light up together with the brake warning lamp
⇒.
WARNING
•
Before opening the bonnet and checking the brake fluid level,
observe the warning information on ⇒page 231, “Working on
components in the engine compartment”.
•
If the brake warning lamp does not go out, or if it lights up
when driving, the brake fluid level in the reservoir is too low – this
may cause an increased accident risk. Stop the vehicle and do not
drive on. You should obtain professional assistance.
•
If the brake warning lamp lights up together with the ABS
warning lamp, this can mean that the control function of the ABS
is out of action. As a result the rear wheels can lock relatively
easily when braking. This could cause the tail of the vehicle to skid
sideways. Drive carefully to the nearest qualified workshop and
have the fault rectified.
Fuel gaugeThe gauge only works when the ignition is switched on.
When the needle reaches the reserve zone, the symbol
lights up
in the instrument cluster display ⇒page 36 together with the
message Please refuel. At this point there are still about 8 litres of
fuel left in the tank. This is your reminder to fill up soon.
The tank capacity of your vehicle is given in the Technical data
section ⇒page 293.
Caution
Never run the tank completely dry. If there is an irregular fuel supply,
misfiring can occur. This allows unburnt fuel to enter the exhaust
system, which could cause overheating and damage the catalytic
converter.
SET
document_0900452a8179700c.book Seite 19 Donnerstag, 22. März 2007 10:19 10
Page 113 of 313

Heating and cooling111
Controls
Safety
Driving tips
General maintenance
Self-help
Technical data
Auxiliary heating and auxiliary
ventilationApplies to vehicles: with auxiliary heating - under development at the time of printingDescription
The auxiliary heating and ventilation systems heat and
cool the interior independently of the engine.The auxiliary heating
works in conjunction with the air condi-
tioner system, but does not rely on heat from the engine. Instead of
this, the system burns fuel. The system's main function is to warm
up the interior of the vehicle and to defrost the windows in cold
weather.
The auxiliary heating system can be used both when the vehicle is
stationary and when driving (to provide extra heat while the engine
is warming up).
The auxiliary ventilation also operates independently of the
engine. This feature can be used to cool the interior with the blower
when the vehicle is left parked in the sun.
The system will automatically activate either the auxiliary heating or
the auxiliary ventilation mode, depending on the actual tempera-
ture measured inside the car and the temperature you have set with
the air conditioner controls. It is possible to alter the temperature
setting while the auxiliary heating/ventilation is running.
Switching on and off
There are two different ways of switching on the auxiliary
heating/ventilation system.
•
Immediate start: You can switch the auxiliary heating/ventilation
on and off at any time in the MMI Car menu ⇒page 112. You can
also switch the system on and off using the remote control
⇒page 114.
•
Switching on via timer: You can programme various start times
using the timers ⇒page 112. However you must first activate the timer before the auxiliary heating/ventilation system will switch on
automatically.
The auxiliary heating/ventilation will switch itself off at the end of
the programmed running time. The running time can be set to 15,
30, 45 or 60 minutes ⇒page 113.
WARNING
•
The auxiliary heating must not be allowed to run when the
vehicle is in a confined space because it can give off toxic fumes.
•
To avoid any possible fire risk, never have the auxiliary heating
switched on when refuelling the vehicle.
•
Because of the high temperatures which occur when the auxil-
iary heating is running, make sure when parking the car that the
exhaust outlet under the car is not obstructed in any way and that
the exhaust gases do not come into contact with flammable mate-
rials (fire risk).Note
•
It is advisable to open the air outlets when using the auxiliary
heating/ventilation.
•
The auxiliary heating/ventilation will not switch on if the fuel in
the tank has reached the reserve zone.
•
The auxiliary heating/ventilation will not switch on if the battery
charge level is low.
•
The symbols
(auxiliary ventilation) or
(auxiliary heating)
flash in the instrument cluster next to the clock display when the
auxiliary heating/ventilation is switched on. Both symbols light
continuously when the timer is activated.
•
At low outside temperatures some visible water vapour may
form in the engine compartment. This is a normal phenomenon,
and no reason for concern.
document_0900452a8179700c.book Seite 111 Donnerstag, 22. März 2007 10:19 10
Page 116 of 313

Heating and cooling 114Applies to vehicles: with auxiliary heating - under development at the time of printingRemote control
The auxiliary heating and auxiliary ventilation can also be
switched on or off with the remote control.Switching on
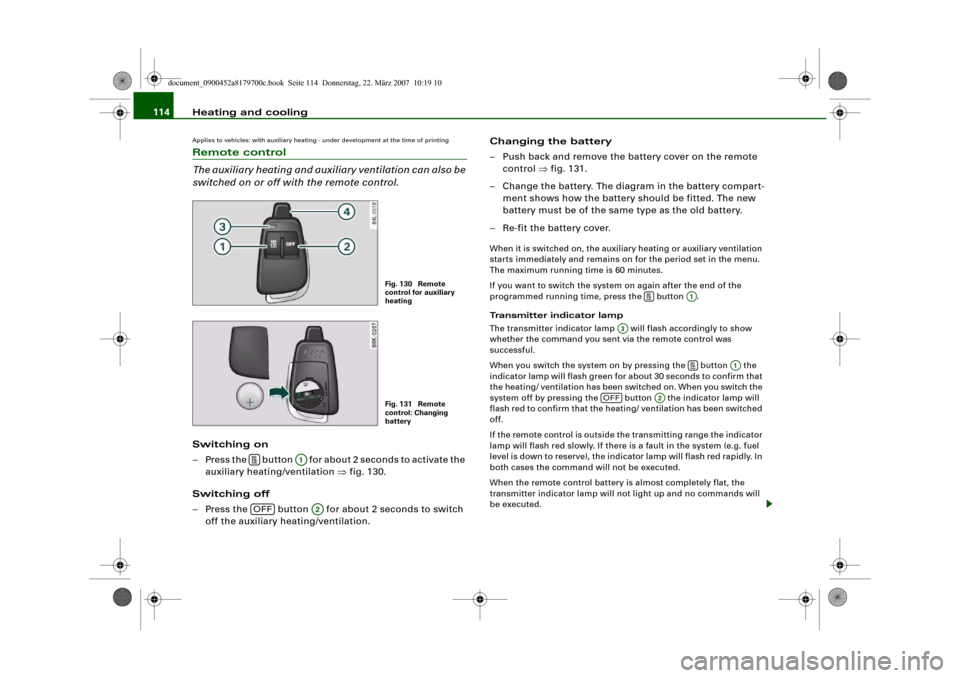
– Press the button for about 2 seconds to activate the
auxiliary heating/ventilation ⇒fig. 130.
Switching off
– Press the button for about 2 seconds to switch
off the auxiliary heating/ventilation.Changing the battery
– Push back and remove the battery cover on the remote
control ⇒fig. 131.
– Change the battery. The diagram in the battery compart-
ment shows how the battery should be fitted. The new
battery must be of the same type as the old battery.
– Re-fit the battery cover.
When it is switched on, the auxiliary heating or auxiliary ventilation
starts immediately and remains on for the period set in the menu.
The maximum running time is 60 minutes.
If you want to switch the system on again after the end of the
programmed running time, press the button .
Transmitter indicator lamp
The transmitter indicator lamp will flash accordingly to show
whether the command you sent via the remote control was
successful.
When you switch the system on by pressing the button the
indicator lamp will flash green for about 30 seconds to confirm that
the heating/ ventilation has been switched on. When you switch the
system off by pressing the button the indicator lamp will
flash red to confirm that the heating/ ventilation has been switched
off.
If the remote control is outside the transmitting range the indicator
lamp will flash red slowly. If there is a fault in the system (e.g. fuel
level is down to reserve), the indicator lamp will flash red rapidly. In
both cases the command will not be executed.
When the remote control battery is almost completely flat, the
transmitter indicator lamp will not light up and no commands will
be executed.
Fig. 130 Remote
control for auxiliary
heatingFig. 131 Remote
control: Changing
battery
A1
OFF
A2
A1
A3
A1
OFF
A2
document_0900452a8179700c.book Seite 114 Donnerstag, 22. März 2007 10:19 10