remote control AUDI A5 2015 Owner´s Manual
[x] Cancel search | Manufacturer: AUDI, Model Year: 2015, Model line: A5, Model: AUDI A5 2015Pages: 264, PDF Size: 66.83 MB
Page 16 of 264
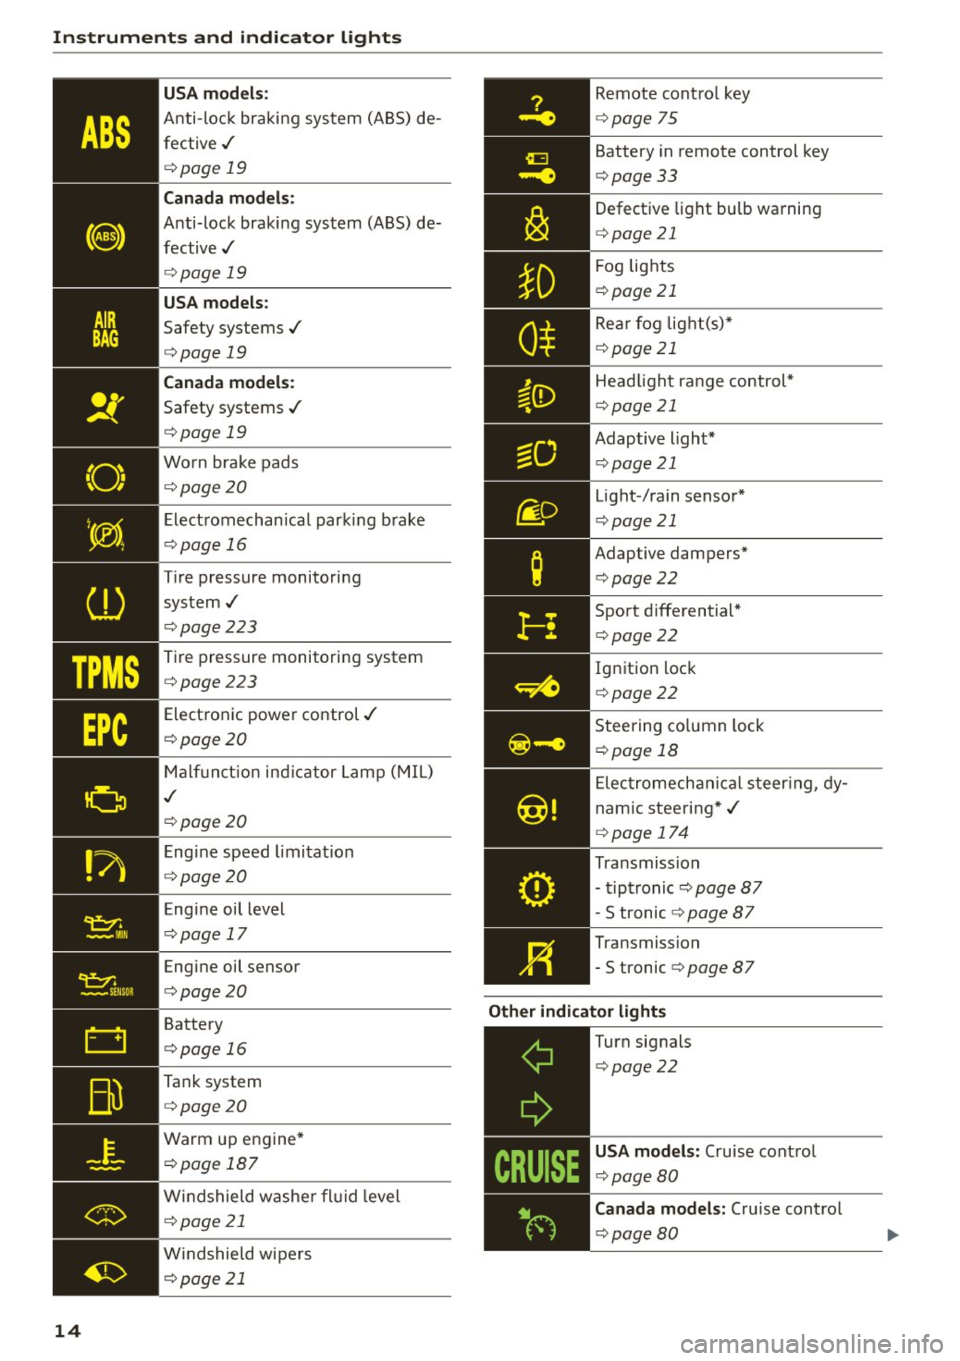
Instruments and indicator lights
TPMS
-~--
14
USA m odel s:
Anti-loc k braking system (ABS) de
fective,/
¢ page 19
Canada mod els :
Anti-lock braking system (ABS) de
fective,/
¢ page 19
USA models :
Safety systems./
¢page 19
Canada model s:
Safety systems ./
¢page 19
Worn brake pads
¢ page20
Elect romechanical parking b rake
¢page 16
Tire pressure monitoring
system,/
¢ page 223
Tire pressure monitoring system
¢page223
Electronic power control./
¢page20
Malf unct ion ind icator Lamp (MIL)
,I
c::>page 20
Engine speed limitat ion
c::> page20
Engine oil level
c::> page 17
Engine oil sensor
c::>page20
Battery
c::>page 16
Tank system
c::>page20
Warm up engine*
¢page 187
Windshield washe r flu id leve l
¢page 21
Windshield wipers
¢page 21
Remote cont ro l key
¢ page 75
Battery in remote control key
¢page 33
Defect ive light bulb wa rning
<=> page 21
Fog lights
¢page 21
Rear fog lig ht(s)*
c> page 21
Headlight range control*
c>page 21
Adaptive light*
c>page 21
Light-/rain sensor*
c>page 21
Adaptive dampers*
c>page22
Sport d ifferential *
<=>page22
Ig nition lock
c>page22
Steering co lumn lock
¢ page 18
Elec tromechanical s teer ing, dy
nam ic stee ring* ,/
c>page 174
Transmission
- tiptronic
c> page 87
-S tronic c::> page 87
Transmission
-5 tronic
<=> page 87
Other indicator light s
~--==------------Turn signals
<=>page22
USA mod els: Cruise cont rol
c> page80
Canada mod els : Cru ise contro l
c>page 80
Page 34 of 264
Opening and closing
-If the power locking system should fail, you
can still open the fuel tank flap in an emer
gency ~
page 190.
-You are well advised not to keep valuables
inside an unattended vehicle, visible or not.
Even a properly locked vehicle cannot pro
vide the security of a safe.
- If the LED in the upper edge of the driver's
door panel comes on for about 30 seconds
after the vehicle is locked, there is a mal
function in the power locking or the anti
theft warning system. Have the malfunction
corrected by an authorized Audi dealership
or qualified repair facility.
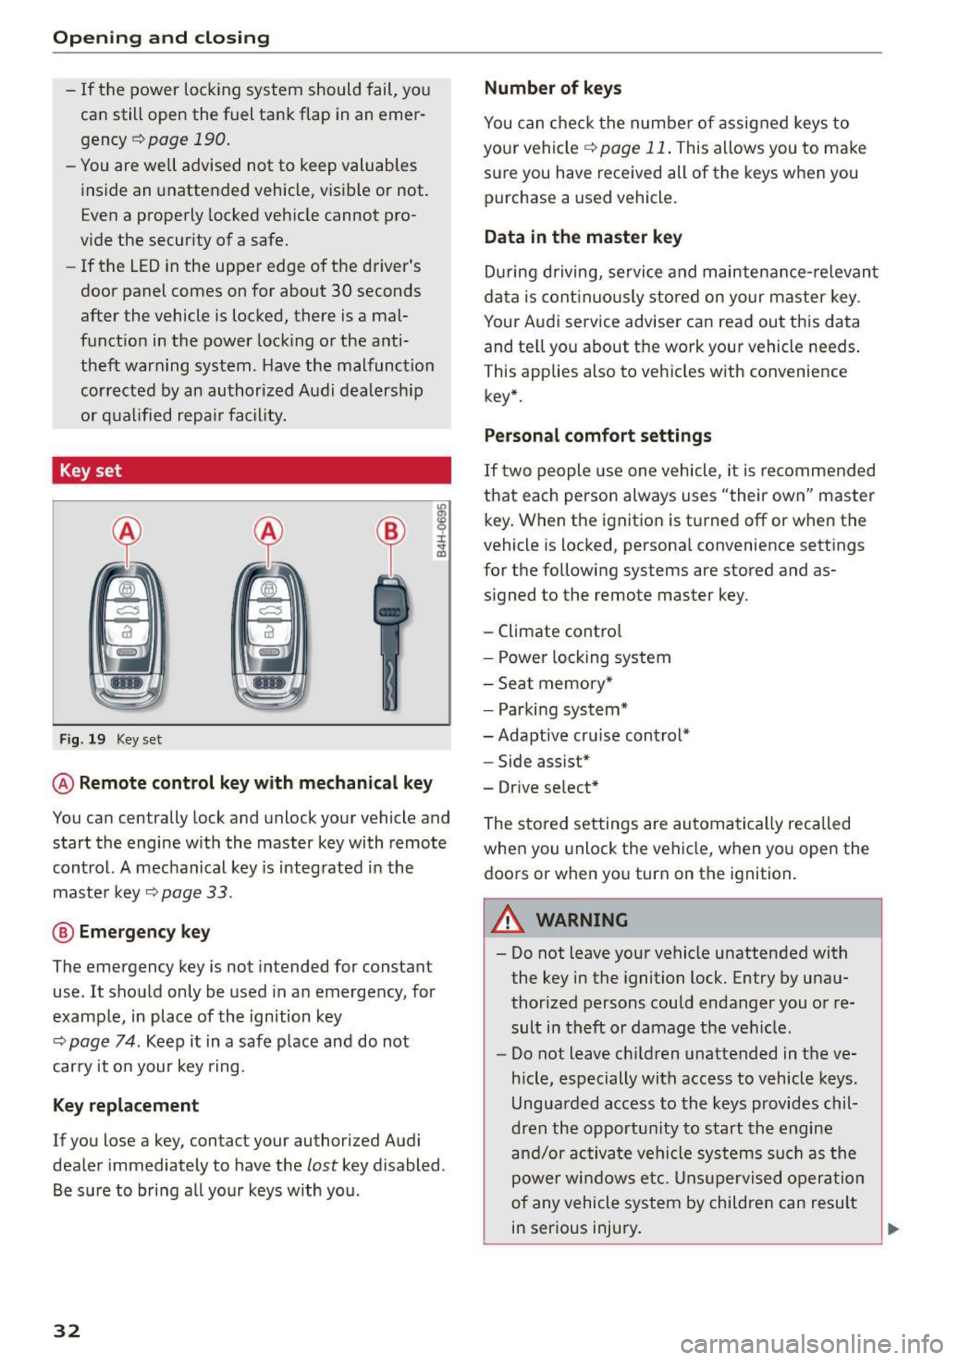
Key set
Fig . 19 Key set
m 0 ±
~
@ Remote control key with mechanical key
You can centrally lock and unlock your vehicle and
start the engine with the master key with remote
control. A mechanical key is integrated in the
master key
~ page 33.
@ Emergency key
The emergency key is not intended for constant
use . It should only be used in an emergency, for
example, in place of the ignition key
~ page 7 4 . Keep it in a safe place and do not
carry it on your key ring.
Key replacement
If you lose a key, contact your authorized Audi
dealer immediately to have the
lost key disabled.
Be sure to bring all your keys with you .
32
Number of keys
You can check the number of assigned keys to
your vehicle
¢ page 11. This allows you to make
sure you have received all of the keys when you purchase a used vehicle.
Data in the master key
During driving, service and maintenance-relevant
data is continuously stored on your master key .
Your Audi service adviser can read out this data
and tell you about the work your vehicle needs.
This applies also to vehicles with convenience
key*.
Personal comfort settings
If two people use one vehicle, it is recommended
that each person always uses "their own" master key. When the ignition is turned off or when the
vehicle is locked, personal convenience settings
for the following systems are stored and as
signed to the remote master key.
- Climate control
- Power locking system
- Seat memory*
- Parking system*
- Adaptive cruise control* - Side assist*
- Drive select*
The stored settings are automatically recalled
when you unlock the vehicle, when you open the
doors or when you turn on the ignition.
A WARNING
-Do not leave your vehicle unattended with
the key in the ignition lock. Entry by unau
thorized persons could endanger you or re
sult in theft or damage the vehicle.
- Do not leave children unattended in the ve
hicle, especially with access to vehicle keys.
Unguarded access to the keys provides chil
dren the opportunity to start the engine
and/or activate vehicle systems such as the
power windows etc. Unsupervised operation
of any vehicle system by children can result
in serious injury.
.
Page 35 of 264
-Do not remove the key from the ignition lock
until the vehicle has come to a complete
stop. Otherwise the steering column lock
could suddenly engage -causing the risk of
an acc ident.
(D Tips
- The operation of the remote control key can
be temporar ily disrupted by interference
from transmitters in the vicinity of the vehi
cle work ing in the same frequency range
(e .g. a cell phone, rad io equipment) .
- For security reasons, replacement keys are only available from author ized Audi dealer.
- For Declarat ion of Compliance to United
States FCC and Industry Canada regulations
<::>page 247.
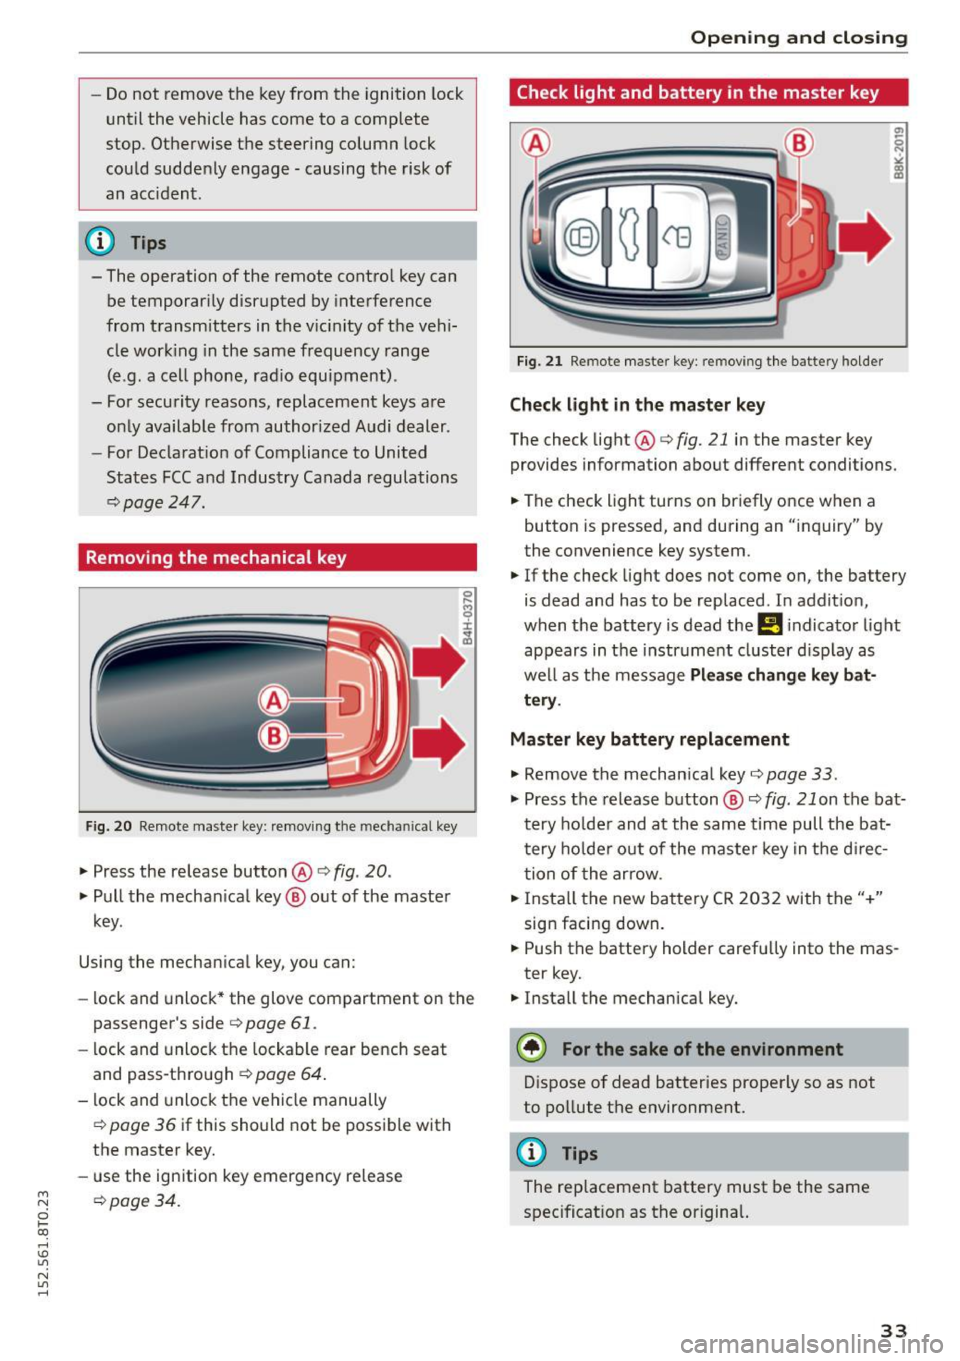
Removing the mechanical key
F ig. 20 Remote maste r key: remov ing the mechanical key
.,. Press the release button @ i:> fig. 20.
.,. Pull the mechan ical key @ out of the master
key .
Using the mechan ical key, you can:
- lock and unlock* the glove compartment on the
passenger's side
i:> page 61 .
-lock and unlock the lockable rear bench seat
and pass-through
c:> page 64 .
-lock and unlock the vehicle manually
i=> page 36 if this should not be possible with
the master key.
- use the ign ition key emergency release
~ i=> page 34.
0 loo
rl I.O
"' N
"' rl
Open ing and clo sing
Check light and battery in the master key
Fig. 2 1 Remote master key: removing th e battery holder
Check light in the master key
The check light @i=> fig. 21 in the master key
provides information about different conditions.
.,. The check light turns on briefly once when a
button is pressed, and during an "inquiry" by
the convenience key system.
.,. If the check light does not come on, the battery
is dead and has to be replaced. In addit ion,
when the battery is dead the
!I i ndicator light
appears in the instrument cluster d isp lay as
well as the message
Pl ea se change k ey bat
tery .
Master key battery replacement
.,. Remove the mechan ical key i=> page 33 .
.,. Press the release button @ c:> fig. 21 on the bat·
tery ho lder and at the same time pull the bat
tery ho lder out of the maste r key in the d irec
tion of the arrow .
.,. Insta ll the new battery CR 2032 with the"+"
sign facing down .
.,. Push the battery holder carefu lly into the mas·
ter key.
.,. Insta ll the mechanical key.
@) For the sake of the env ironment
Dispose of dead batteries properly so as not
to pollute the environment.
@ Tips
The replacement battery must be the same
spec ificat ion as the origina l.
33
Page 36 of 264
Opening and closing
Emergency unlocking of the ignition key
In the event of malfunctions in the electrical sys
tem, it may happen that you cannot remove the
ignition key.
.,. Remove the mechanical key <=>page 33.
.,. Lock the vehicle using the mechanical key
<=>page 36.
.,. Have the e lectrica l system inspected by an au
thorized Aud i dea lership.
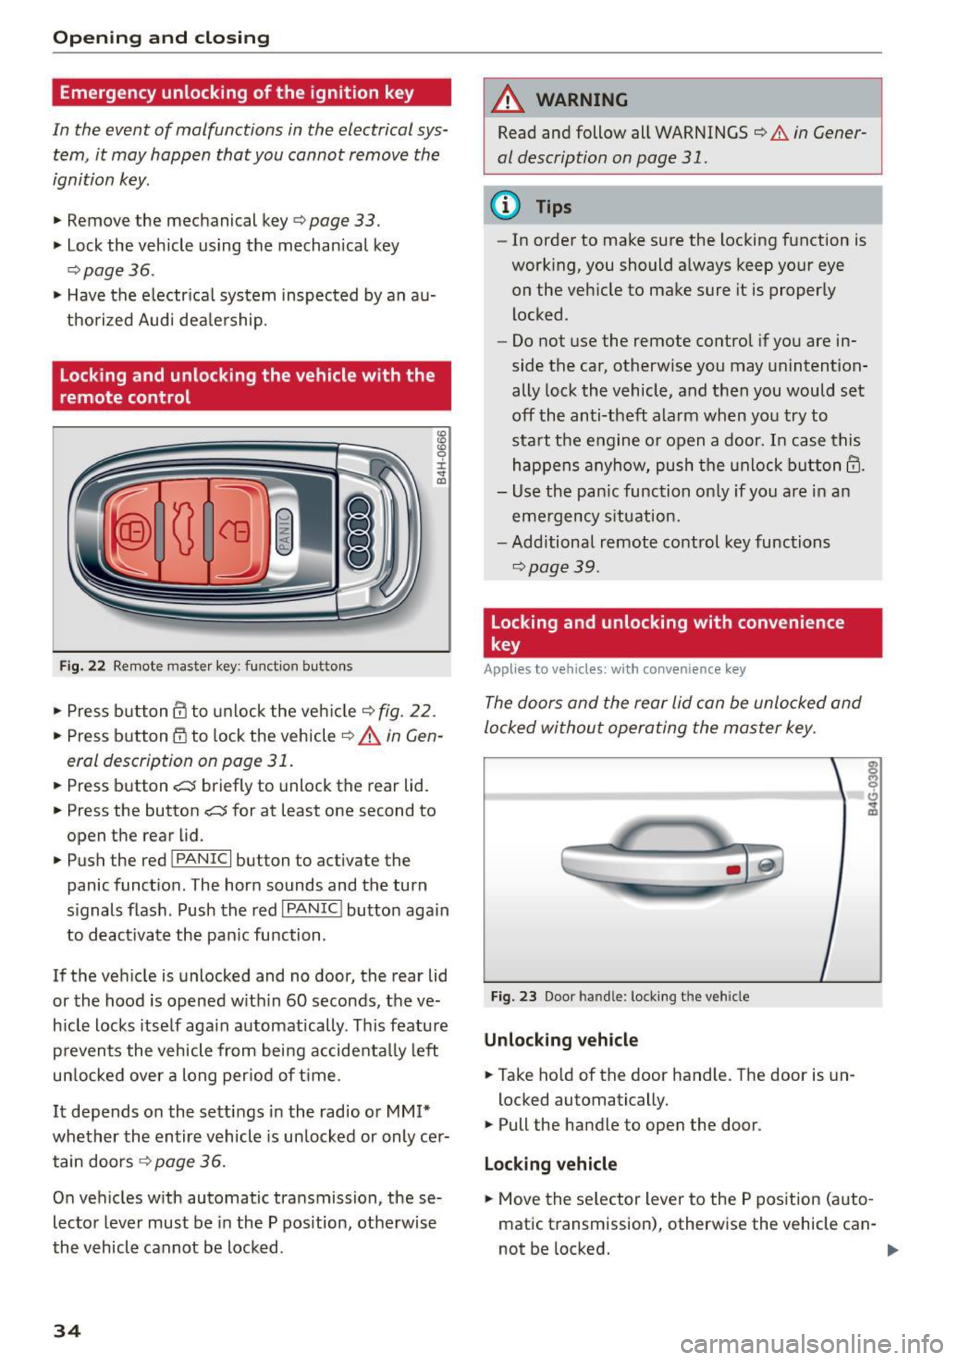
Locking and unlocking the vehicle with the
remote control
Fig. 22 Remote master key: funct ion bu tto ns
:8
"' 0 ±
"' OJ
.,. Press b utton ill to unlock the vehicle<=> fig. 22.
... Press button m to lock the vehicle ¢ A in Gen
eral description on page 31 .
.,. Press button c::5 briefly to unlock the rear lid .
.,. Press the button
c::5 for at least one second to
open the rear lid .
.,. Push the red
!PANIC I button to activate the
panic function. The horn sounds and the turn
s ignals flash . Push the red
I PANIC! button aga in
to deactivate the pan ic function .
If the vehicle is unlocked and no door, the rear lid
or the hood is opened w ith in 60 seconds, the ve
hicle locks itself again automatically . This feature
prevents the vehicle from being accidenta lly left
un locked over a long per iod of time .
It depends on the settings in the radio or
MM!*
whether the entire vehicle is unlocked or only cer
tain doors <=>
page 36.
On vehicles with automatic transmission, these
lector lever must be in the P pos ition, otherwise
the vehicle cannot be locked .
34
A WARNING
Read and follow all WARNINGS
<=> .&. in Gener
al description on page 31.
(D Tips
- In order to make sure the locking function is
work ing, you should always keep your eye
on the vehicle to make sure it is properly
locked .
- Do not use the remote control if you are in
side the car, otherwise you may unintention
ally lock the vehicle, and then you would set
off the anti-theft alarm when you try to
start the engine or open a door. In case this
happens anyhow, push the unlock button@.
- Use the pan ic function on ly if you are in an
emergency situation.
- Additional remote control key functions
¢page 39.
Locking and unlocking with convenience
key
Applies to vehicles: wit h co nvenience key
The doors and the rear lid can be unlocked and
locked without operating the master key .
Fig. 23 Door handle: lock ing the vehicle
Unlocking vehicle
.,. Ta ke hold of the door handle. The door is un-
locked automatically.
.,. Pull the handle to open the door .
Locking vehicle
.,. Move the se lector lever to the P position (auto
matic transmission), otherwise the vehicle can-
not be locked. .,..
Page 37 of 264
M N
0 loo
rl I.O
"' N
"' rl
"'To lock the vehicle, close the door and touch
the sensor in the door hand le
once ¢ fig. 23
¢ A in General description on page 31 . Do not
reach inside the door handle.
The vehicle can be locked and unlocked at any
door. The remote control key cannot be more
than 1.5 m away from the door hand le. It makes
no difference whether the master key is in your
jacket pocket or in your brief case .
If you g rip the door handle while locking, this can
adversely affect the locking function.
It is not possible to re -open the door for a brief
pe riod directly after closing it . This allows yo u to
ensure that the doors are properly locked .
It depends o n the se ttings i n the radio or MM I*
whether the entire vehicle is un locked or one o f
the doors ¢
page 36.
A WARNING
Read and follow all WARNINGS ¢ A in Gener·
al description on page 31.
@ Tips
I f your vehicle has been stand ing fo r an ex
tended period, please note the following:
- The proximity sensors are deac tivated after
a few days to save power. Yo u then have to
pull on the door handle once to unlock the
vehicle and a second time to open the vehi
cle.
- To prevent the battery from being dis
charged and to preserve your veh icle's abili
ty to start for as long as possible, the ener
gy management system g radually switc hes
off unnecessary convenience functions. It is poss ible that you w ill not be ab le to unlock
you r vehicle using these convenie nce func
tions .
- Fo r Decla rat ion of Compliance to Uni ted
Sta tes FCC a nd Industry Canada regulations
~ page 24 7.
Open ing and clo sing
Locking and unlocking the vehicle from
inside
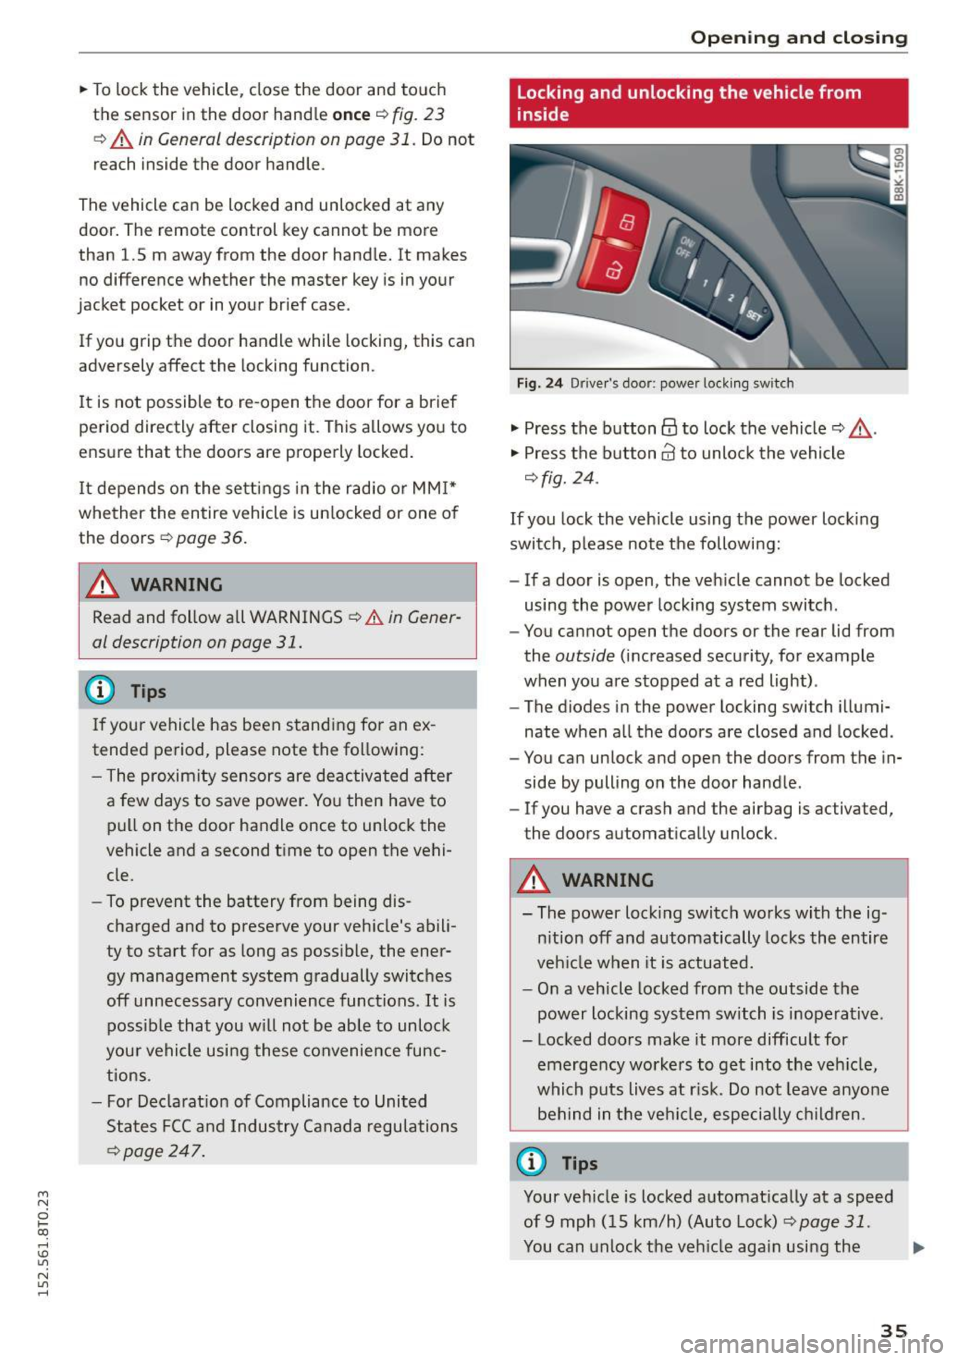
F ig. 2 4 Driver's door; power lock ing sw itch
"' Press the button@ to lock the vehicle¢_& .
"' Press the button@ to unlock the vehicle
¢fig. 24 .
If you lock the veh icle using the power loc king
swit ch, p lease note the following:
- If a door is open, the veh icle cannot be locked
using the power locking system switch .
- You cannot open the doors or the rear lid from
the
outside (increased security, for example
when you are stopped at a red light) .
- The diodes in the power locking switch illumi
nate when a ll the doors are closed and locked .
- You can unlock and open the doors from the in
side by pulling on the door hand le .
- If you have a crash and the airbag is activated,
the doors automa tically unlock .
A WARNING
-- The power lock ing switch works with the ig-
n ition off and automatically locks the entire
veh icle when it is actuated.
- On a vehicle locked from the outside the
power locking sy stem switch is inoperative .
- Locked doors make it more difficult for
emerge ncy worke rs to get into the veh icle,
which puts liv es at r isk. Do not leave anyone
be hind in the vehi cle, especially children .
@ Tips
Your vehicle is locked a utomat ically at a speed
of9 mph ( 15 km/h) (Auto Loc k)
¢ page 31.
You can unlock the veh icle aga in using the .,.
35
Page 38 of 264
Opening and closing
opening f unct ion in the power lock ing system
switch
l:@J .
Setting power locking
In th e radio/MM!*, you can set which doors the
central locking system will unlock .
.,. Se lect : ICA RI funct ion button > Central locking .
Or
.,. Se lect : IC AR I functio n button> Car sy stem s*
control button > Vehicle settings > (Central
loc king )*.
Single door unlocking /Unl ock door s* -
you can
specify which doo rs unlock whe n you open the ve
hicle.
- Se lecting
off / All and pressing the~ button o n
the remote con tro l key unlocks the entire veh i
cle .
- Se lecting
on/ Driver and pressing the~ button
on the remote control key once unlocks on ly the
driver 's door. In vehicles with a conve nience
key*, only the door whose handle you pull will
u nlock . If you press the[@] button twice , the en
tire vehicle w ill unlock. If you press the [@) but
ton, the ent ire vehicle will always lock .
Luggage comp. lock/Lock ex terior trunk handle
-If you se lect On , you can no longe r open the
luggage compartment using the rear lid handle
c::>
page 3 7 , fig. 28 . In this case, the rear lid can
be opened wi th the ~ button on the master key
c::>
page 34 , fig . 22 or with the~* button in the
d river's doo r
c::> page 3 7, fig. 2 7 .
Tone when locking -if you select On, a tone w ill
sound w hen you Lock the vehicle .
Auto Lock/Loc k when driving -if you select On,
the entire vehicle will lock automatically when
the speed reaches 9 mph (15 km/h) .
36
Emergency locking
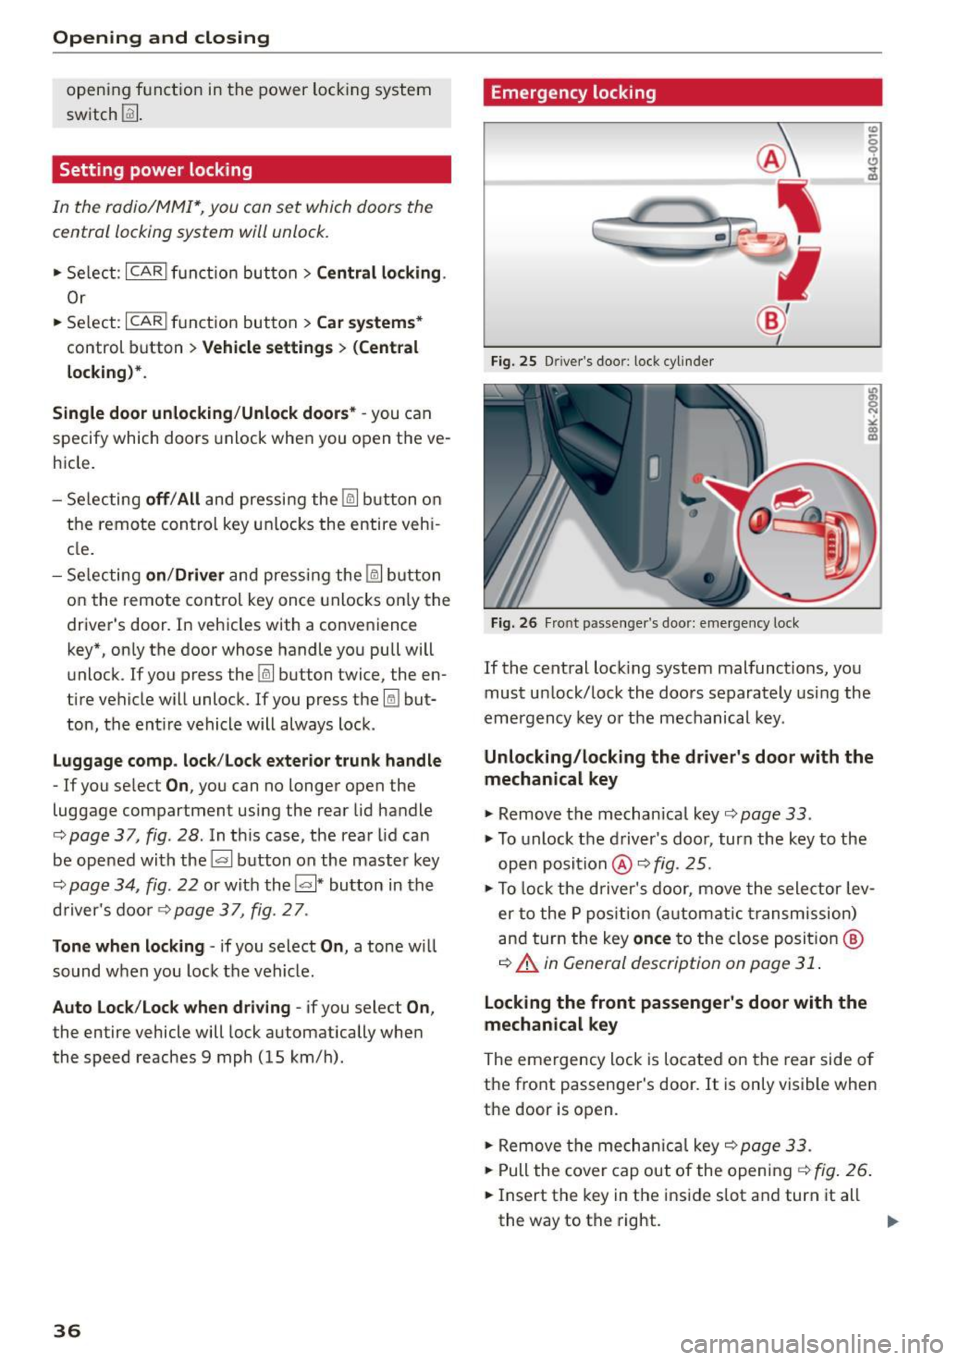
Fig. 25 Drive r's doo r: lock cylind er
Fig. 26 Fro nt p assenge r's doo r: e merge ncy lock
If the cent ral lock ing system malfunct ions, you
must un lock/Lock the doo rs separately using the
emergency key or the mechanical key .
Unlocking/locking the driver's door with the
mechanical key
.,. Remove the mechanical key c::> page 33.
.,. To unlock the driver's doo r, turn the key to the
open position @c::>
fig. 25 .
.,. To lock the driver's door, move the selector lev
er to the P pos ition ( automatic transmission)
an d tur n the key
once to the close posit io n @
c::> A in General description on page 31 .
Locking the front passenger's door with the
mechanical key
The emergency lock is located on the rear side o f
the fro nt passenger 's door. It is only visible when
the door is open .
.,. Remove the mechanica l key
c::> page 33 .
.,. Pull the cover cap out of the open in g c::> fig . 26 .
.,. Insert the key in the i nside s lot a nd turn it all
the way to th e right. ..,.
Page 39 of 264
M N
0 loo
rl I.O
"' N
"' rl
Once the front passenger's door has been closed,
you cannot open it again from the outside. The
doo r can be opened from the inside by pulling
t he door hand le.
A WARNING
Read and follow all WARNINGS q .&. in Gener
al description on page 31 .
@ Tips
After the ignition is switched on, the power
locking system sw itch and the unlocking but
ton for the rear lid
.c::5 in the door are ena
bled .
Electronic immobilizer
The immobili zer prevents your vehicle from being
s tarted by unauthorized persons .
Inside the key there is a computer chip. This chip
automatically activates/deact ivates the electron
ic immobili zer.
Applie s to vehicl es with ign ition lock :
The electronic immobilizer deactivates automati
cally when you insert the remote control key into
the ignition lock . It activates again automatically
when you remove the remote control key from
t he ignition lock .
Applies to v eh icl es with conven ienc e key :
If t he remote control key is located inside the ve
hicle and you press the
! S TAR T ENGINE ST OPI
button, the electronic immobilizer deactivates
au tomatically . If you switch the igni tion off and
remove the remote control key from the ve hicle,
the electronic immobilizer activates again auto
mat ica lly.
A WARNING
Always take the key with you when you leave
the vehicle. The key ca n disa rm the electron ic
eng ine immob ilizer and permit an unau thor
ized pe rson to start the eng ine and enable op
eration of the vehicle systems such as power
w indow or power sunroof leading to serious
personal in jury.
Open ing and clo sing
(D Tips
- The vehicle cannot be started if an una u
thorized key is used . The vehicle may not
start if another radio device s uch as a key
for another ve hicle or a transponder is locat
ed on the key ring.
- For Declaration of Comp liance to United
States FCC and Industry Canada regulations
¢ page 247.
Luggage compartment
Lid
Opening/closing rear lid
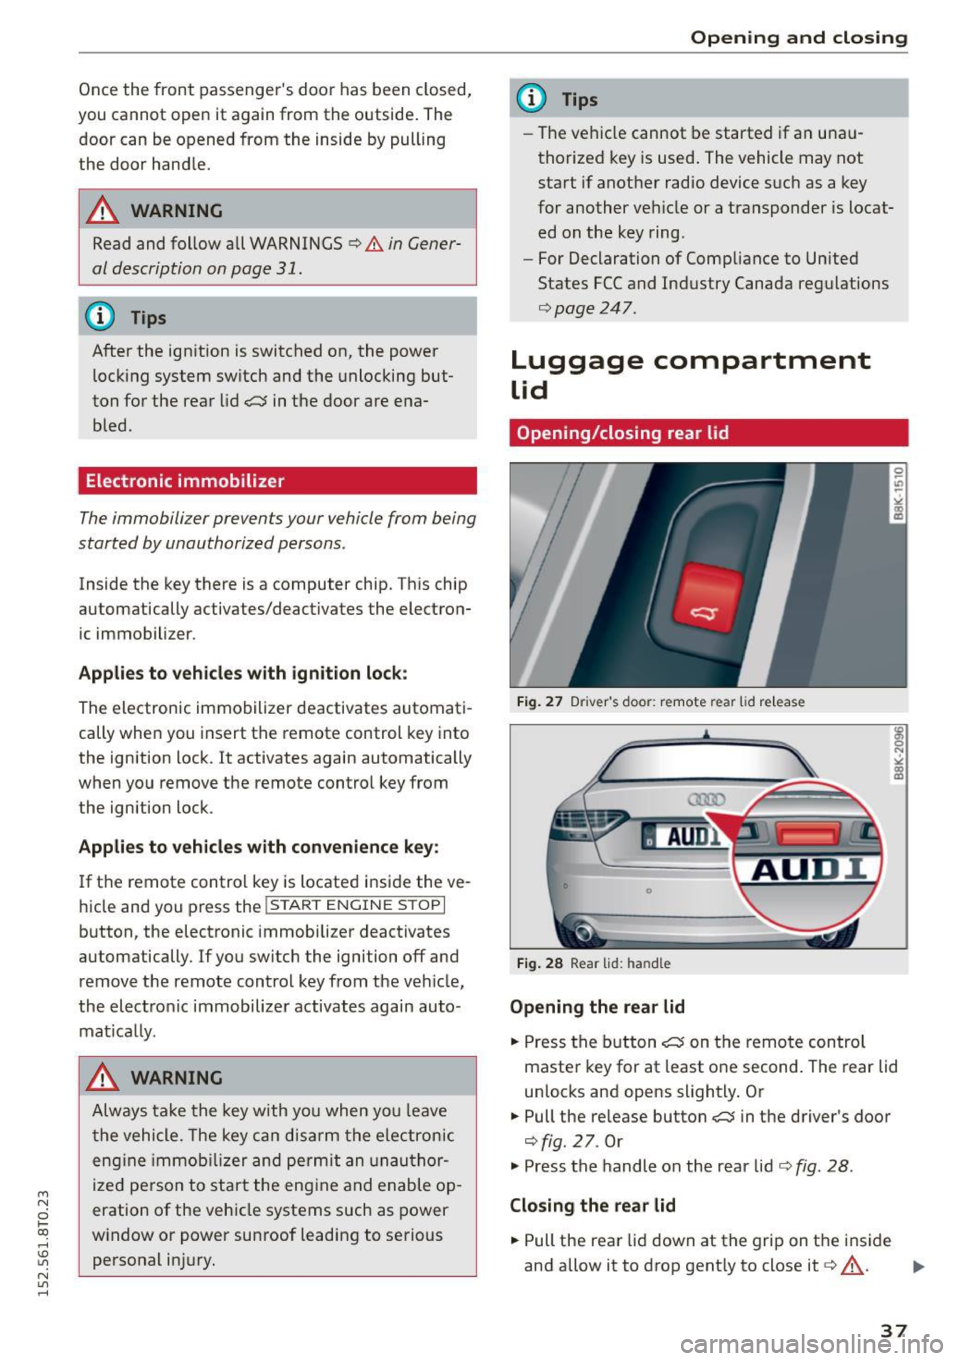
Fig. 2 7 Drive r's doo r: remot e rear lid re le a se
Fig . 2 8 Rea r lid : han d le
Opening the rear lid
.. Press the b utton .c::5 on t he remote control
maste r key for at least o ne second. The rear lid
unlocks and opens slightly. Or
.,. Pull the release button
.c::5 in the driver's door
¢fig. 27. Or
.,. Press the handle on the rear lid¢
fig. 28 .
Closing the rear lid
.. Pull the rea r lid down at the grip on t he i nside
and allow it to drop gent ly to close it¢,&. .
II>-
37
Page 44 of 264
Opening and closing
Programming or reprogramming buttons
.. Swi tch the ignition on .
.. Press and ho ld the button in the roof head liner
¢ page 41, fig. 35 that you would like to pro
gram for at least 10 seconds. O r
.. Se lect:
ICARI function button> Car system s*
control button > Vehicle settings > Garage
door opener > Program garage door opener .
If
th is path is not available, program the butto n
as descr ibed in version B ¢
page 42 .
.., Fo llow the inst ruc tions in the MM I.
Erasing button programming
The programmed buttons cannot be erased indi
vidually. They must all be erased together. Repro
g ram t he b uttons if necessa ry .
.. Se lect :
ICARI funct ion button> Car systems *
control button > Vehicle sett ings > Garage
door opener > Clear program settings > Yes .
D isplaying the version /status /country code
.. Se lect: I CARI function button > Car sy stem s*
control button > Vehicle sett ings > Garage
door opene r> Version inform ation.
@ Tips
- Programming through the MM!* is not pos
sible with all infotainment systems. If this
i s the case, program the buttons as descri
bed in ve rsion B ¢
page 42.
-The requ ired distance between the hand
transmitter and the Homelink module in
the rad iator g rille
9 page 42, fig . 36 de
pends on the system that you a re program
ming.
- Depend ing on the model of the system, you
may need to release the b utton on the re
mote cont rol during programmi ng a nd
p ress it again. H old each pos ition you try for
at least 15 seconds before try ing another
p osition . Kee p t he turn signa ls o n your ve hi
cle in view when doing t his.
- After programmi ng the gar age door opener,
i t may be necessary to sync hronize the mo
tor with the system. Refer to the manufac
ture r's instructions .
42
Programming the buttons (version B)
Applies to vehicles: with garage door opener (Homelink)
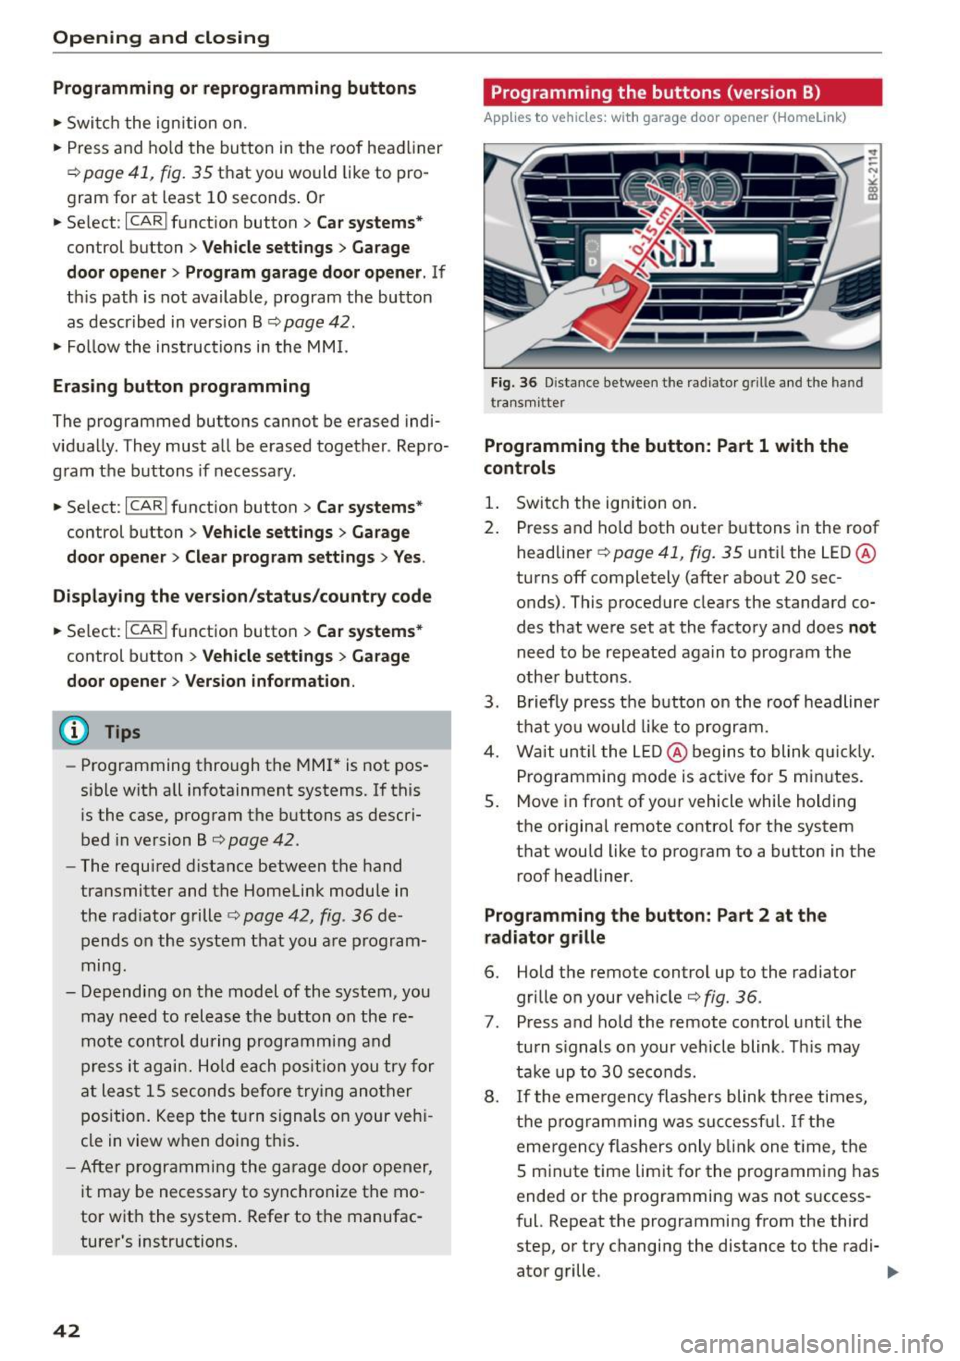
Fig. 36 Dista nce be tween the radiato r grille a nd the hand
tra nsmi tter
Programming the button: Part 1 with the
controls
1. Swi tch the ign ition on .
2. Press and ho ld both outer b uttons in the roof
headline r¢
page 41, fig. 35 unti l the LED @
turns off completely (after about 20 sec
onds). This procedure clears the standard co
des that were set at the factory and does
not
need to be repeated aga in to program the
other buttons .
3 . Briefly press the button on the roof headliner
t h at you wo uld like to program.
4. Wai t until the LED@ begins to blink q uickl y.
Programming mode is act ive for 5 min utes.
5. Move in front of yo ur vehicle while holding
the or iginal remote control for t he system
t h at wou ld like to program to a button in the
roof headliner.
Programming the button: Part 2 at the
radiator grille
6. Hold the remote control up to the radiator
grille on your vehicle¢
fig. 36.
7. Press and ho ld the remote control unt il the
tu rn s ignals on your vehicle blink . Th is may
tak e up to 30 seco nds.
8. If the eme rgency flashers blink t hree times,
the programming w as suc ces sful. I f the
emergency flashers only blink one t ime, the
S minute time limit for the programm ing has
ended or the programming was not s uccess
f ul. Repeat the programming from the third
step, or try changing the distance to the radi-
ator grille .
IJ,,
Page 52 of 264
Lights and Vi sion
You can adju st the settings for the rear sun shade
so the shade retracts a utomatica lly when you se
lect the reverse gear. To do this, se lect the
I CAR !
function button
> Windows > Rea r blind > au to
matic > on
or! CA R! function button> Car sys
tems *
control button > Vehicle sett ings > Auto
matic rear blind > On .
The cur ren t setting is au
tomatically stored and assigned to the remote
key. The sun shade is extended again as soon as
the vehicle is traveling forwa rd at a speed gre ater
than
9 mph (15 km/h) if the ignition has not
been switched off in t he meantime .
_& WARNING
Whe n lowe ring or raising the sunshade, make
sure there is nothing in its way and that it has
a free path to t ravel. Th is co uld cause perso n
al injury.
@ Tips
- Pressing t he button ru several times con
secutively can trigger the over load protec
tion. The sun shade can only be extended/ r etracted aga in after a br ief waiting period.
- The rear window sun shade only f unctions
when the vehicle interior is warmer tha n
14°F (-10°C).
Windshield wipers
Switching the windshield wipers on
Fig . 48 W inds hield w iper leve r
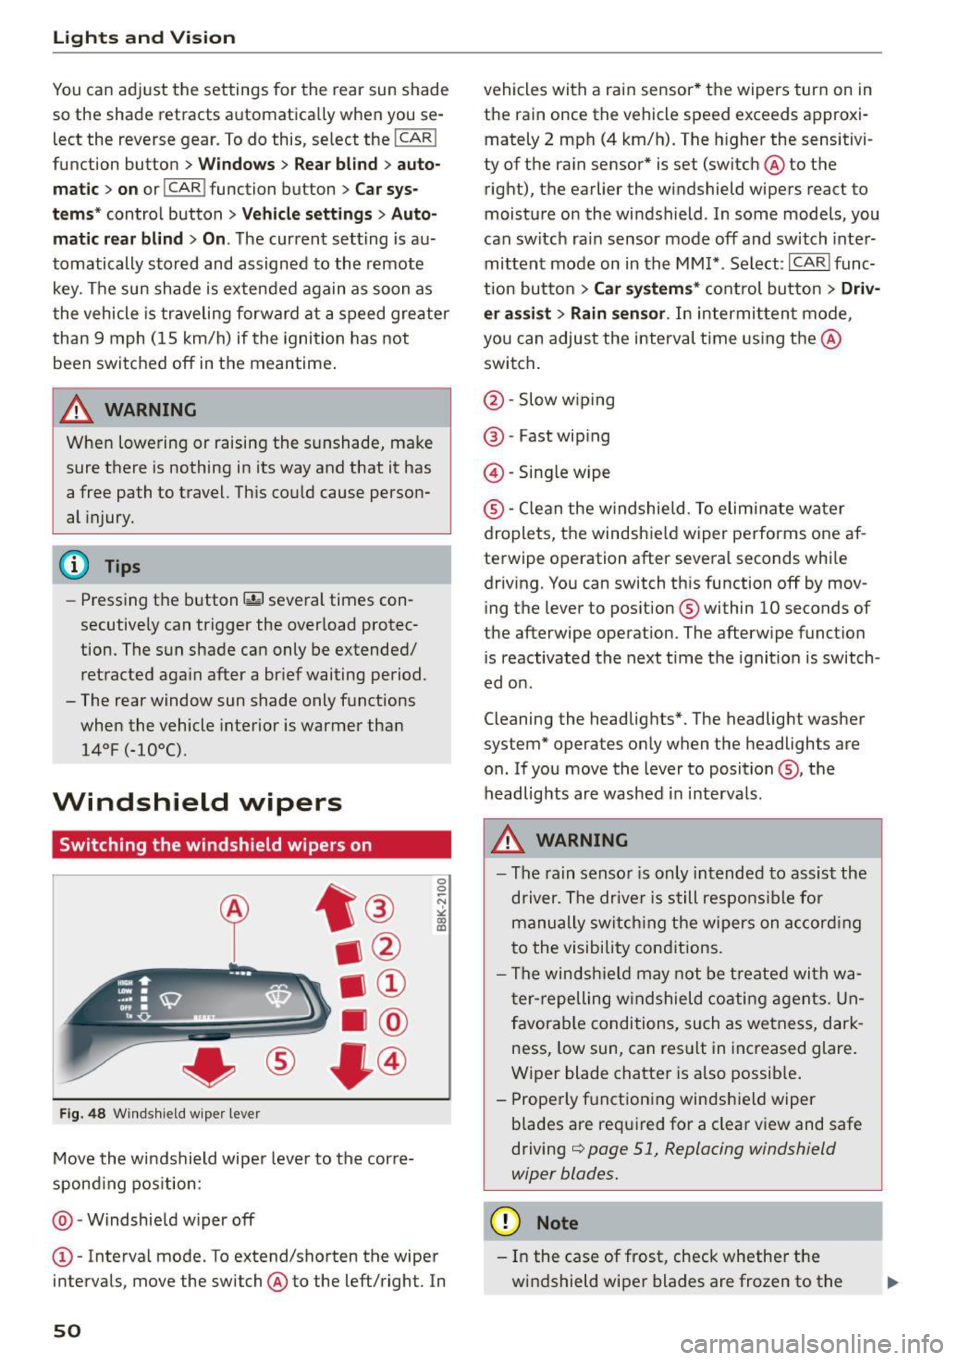
Move the windshield wipe r leve r to the corre
spond ing pos ition:
@ -Windshie ld w iper off
0 0 -N st co Ul
© -Interva l mode. To extend/shorten the wiper
i n tervals , move the switch @to the left/right. In
50
vehicles with a rain sensor * the wipers turn on in
the rain once the vehicle speed exceeds approxi
mately 2 mph (4 km/h). The higher the sensitivi
ty of the ra in sensor * is set (switch @to the
right), the earlier the windshield wipe rs react to
moist ure o n the windsh ield . In some models, you
can switc h ra in sensor mode off and switch inte r
mittent mode on in the MM !* . Se lect :
I CAR I func
t ion but to n
> Car systems * cont rol bu tton > Driv
er assi st > Rain sensor .
In intermi tten t mode,
you can a djus t the interval time using the @
swi tch .
@ -Slow w iping
@ -Fast wip ing
@ -Sing le wipe
® -C le a n the w indshield. To elim inate water
droplets, the windsh ie ld wiper pe rforms one af
te rwipe operation after several seconds whi le
driv ing. You can switch th is function off by mov
ing the lever to pos ition ® within
10 seconds of
the afterwipe operation. The afterw ipe funct io n
i s reactivated the next t ime t he ignit ion is switch
ed o n.
C leaning the headlig hts". The headlight was her
system* operates on ly when the headlights are
o n. If you move the lever to position @, the
headlig hts are washed in in terva ls .
_& WARNING
- The rain senso r is only intended to assis t the
d river. The drive r is s till respons ible for
manu ally swi tching the wipers on a ccor din g
t o the visibility con ditions.
- The winds hiel d may not be treate d wi th w a
t er -repelling w ind shiel d coati ng a gents. Un
f avor able conditions, su ch as wetness, dar k
ness, low sun , can res ult in inc reased glare.
Wiper blade chatte r is a lso possib le .
- Properly f unctioning windsh ie ld wiper
b lades are req uired for a clear v iew and safe
driving
c::> page 51, Replacing windshield
wiper blades.
(D Note
- In the case of fr ost, check whether the
wi ndshie ld wipe r blades are frozen to t he
Page 54 of 264
Lig hts a nd Vis io n
_&. WARNING
For your safety, you should replace the wiper
blades once or tw ice a year. See your author
ized Aud i dealer for replacement blades .
(D Note
- The windshield wiper blades must only be
replaced when in the service position! Oth
erwise, you risk damaging the paint on the hood or the windsh ield wiper motor .
- You should not move your vehicle or press
the w indshield w iper lever when the wiper
arms are folded away from the windshield .
The windshield wipers would move back in
to their original position and could damage
the hood and windshield .
- To he lp prevent damage to the wiper sys
tem, a lways loosen blades which are frozen
to the windshie ld before ope rating wipers.
- To he lp prevent damage to w iper blades, do
not use gasoline, kerosene, paint th inner, or
other solvents on or near the w iper blades.
- To he lp prevent damage to the wiper arms
or other components, do not attempt to move the wipers by hand .
@ Tips
-Commerc ial hot waxes applied by automatic
car washes affect the how easily the glass
surface can be cleaned.
- You can a lso use the service pos ition, for ex
ample, if you want to protect the windshield
from icing by using a cover.
52
Digital compass
Switching the compass on and off
Applies to vehicles: with digital compass
The compass direction is shown in the rearview
mirror.
Fig . SO Rea rv iew mir ror: Digita l compass ac tivat ed
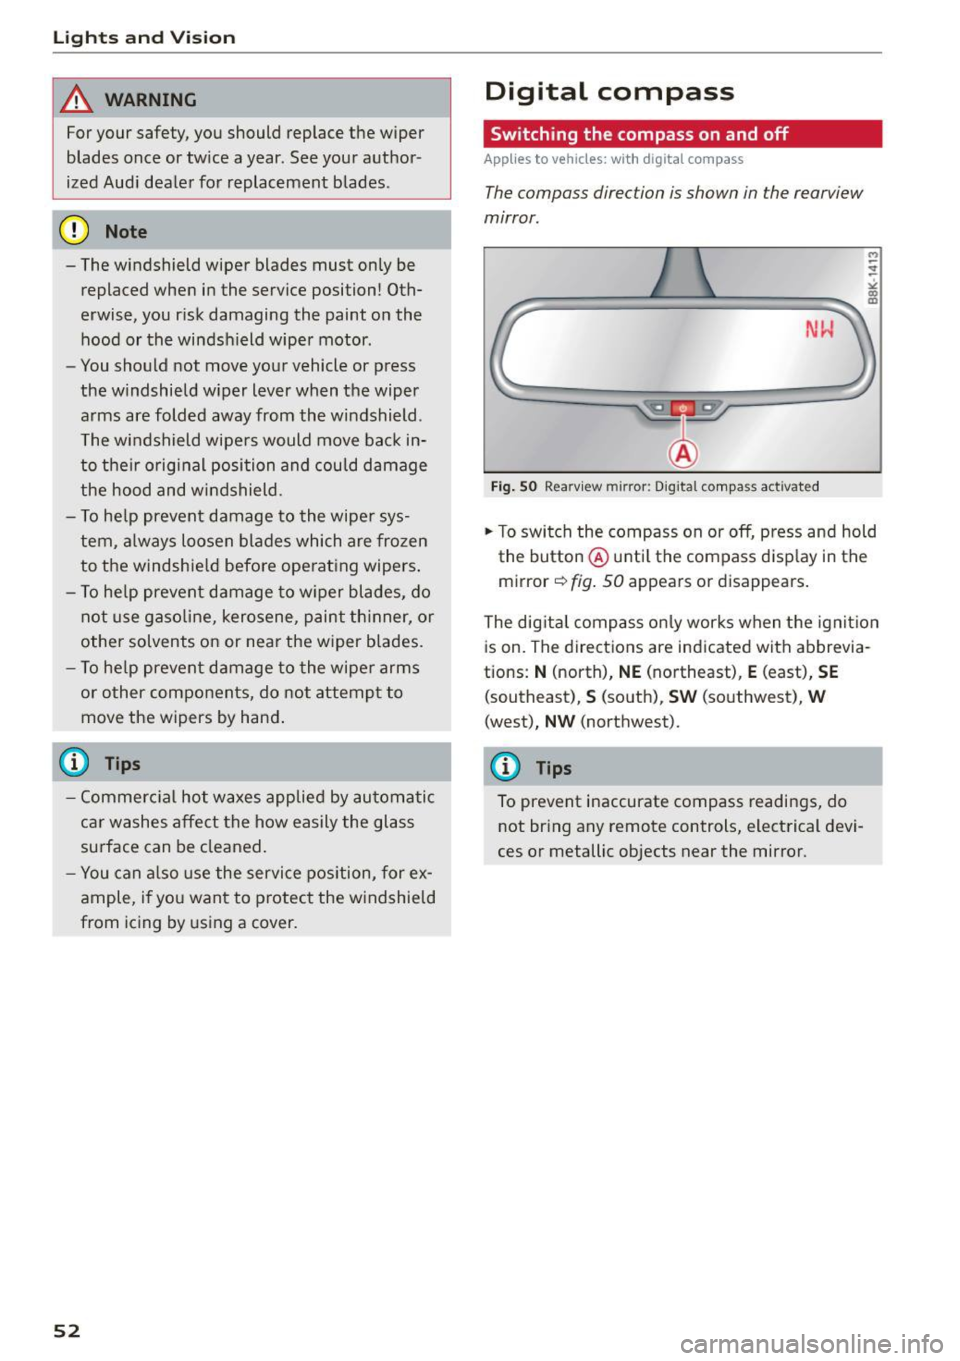
.. To switch the compass on or off, press and hold
the button @until the compass disp lay in the
mirror ~
fig. 50 appears or disappears.
The dig ital compass on ly works when the ignit ion
is on. The directions are indicated with abbrevia
tions:
N (north), NE (northeast), E (east), SE
(southeast) , S (south), SW (southwest), W
(west), NW (northwest).
(D Tips
To prevent inaccurate compass readings, do
not bring any remote controls, electrical devi
ces or metallic objects near the mirror.