ad blue AUDI A5 2020 Owners Manual
[x] Cancel search | Manufacturer: AUDI, Model Year: 2020, Model line: A5, Model: AUDI A5 2020Pages: 302, PDF Size: 81.67 MB
Page 5 of 302
8W7012721BA
Table of contents
All wheel drive (quattro).............. 115
Electronic Stabilization Control......... 116
Trailer towing.................0.. Eg.
Driving with atrailer................. 119
Assist systems................... 121
Assist systems................... 21
General information. . 121,
Surrounding area detection............ 122
Driving information.............. £25
Speed warning systeM...........00 005 12S
Camera-based traffic sign recognition... 125
Traffic light information.............. 127
LAPAIMED ws = = sees 5 2 pee ae eee 2s ee 128
Driver assistance................. 130
Cruise control system.............0-5 130
Efficiency assist sins <2 sew 2s eeu 2 eens 131
Audi adaptive cruise control........... 134
Traffic jam assist.............0.-000. 141
Distance warning « «cies 2s cease cnees es 143
Audi active lane assist................ 144
Audi presense............ 0.0 eee eee 146
SIGG'ASSISE secsye = 2 orm = 2 oie 4 & tease 8 Ge 150
EXIE WARMING sssovne oo caxneie © © omenaine @ 0 exmnene «9 152
Parking and maneuvering....... 154
TiErOMUCTION « 2 asacees < a asomee wo wma swans 154
Parking aid plus......... 0... e eee eae 154
Rearview camera and peripheral cameras. 156
Rear cross-traffic assist............... 159
Assisted
parking...............--005- 160
Park assist: sacs « x wean = a awe = 2 cee 162
Infotainment system............ 165
Telephone....................005- 165
INEFODUCKION « » sie x « caus 4 2 wasn 3 & Rees 165
SOGUP cscceis « + emaneus x © snatteue © « etevine oe mene © 165
Using the Audi phone box............. 167
Using the telephone.................. 169
SEE MGStoiais oo urvanie « 6 awinasen © eveneeoe «sate H T72
MessageS .... 0... cece eee 173
TROUBLESHOOLING awe + wen & 2 nee se tame 175
PAC COMIMBCE 's. cesses 5 6 cise 6 v eseees wo one 176
General information................- 176
Audi connect Infotainment............ 176
Using a Wi-Fi hotspot................ 177
Audi connect Infotainment services..... 177
Functions on demand................ 178
Audi connect vehicle control services.... 178
Settings...............0 000. e eee 179
TRSUBIESHOOUING ses ¢ 3 seen s 5 wae 5 x ce 180
Emergency call................... 181
Overview... ... 2... eee eee 181
Emergency'call « css «sce ss ews o + come 181
Online roadside assistance............ 182
NaVIGSEIGtis: « « meus s x meu + « peme ¢ eo 183
Opening navigation.................. 183
myAudi navigation...............0005 183
Entering a destination................ 184
Stopping route guidance.............. 187
Map... . cece eee cece eee 187
Alternative
routes.............2--00. 189
Additional functions................. 190
Satellite map 190
Map update.... 191
Traffic information w. «sess 2 2 even as sore 192
SETEIIGS sense oo smemeze © oxiettom i © viata w 9 eaoitens 193
RAGIG:: «ccs cs neces & s pomg 2 ¢ eww +o eee 195
General information................. 195
Radio functions................00055 196
Online radio's: ss sees = + ewes sv Hewes ee 198
Options and settings..............00e 200
Troubleshooting.............---000ee 201
PROS wesc as soaen 6 3 sonweme 3 7 meen 6 eo 202
Generalinformation................. 202
Bluetooth audio player............... 202
Multimedia connections.............. 203
Playing media...........-..02--00005 204
Options and settings................. 208
Supported media and file formats...... 208
Troubleshooting. ..........e eee eee ee 210
Page 22 of 302
Touch display
Configuring the display area
> Press and hold a button on the home screen
display area.
> To adjust the placement of the buttons, pull
them to the desired locations.
> Press Done to complete the configuration.
Switching between menu pages
If a menu contains multiple menu pages, Es] is
displayed in the display area. The white bar
shows the location of the current menu page.
> To switch between menu pages, swipe your fin-
ger to the right or Left.
Of OB of
O88 of a
O88 OB of
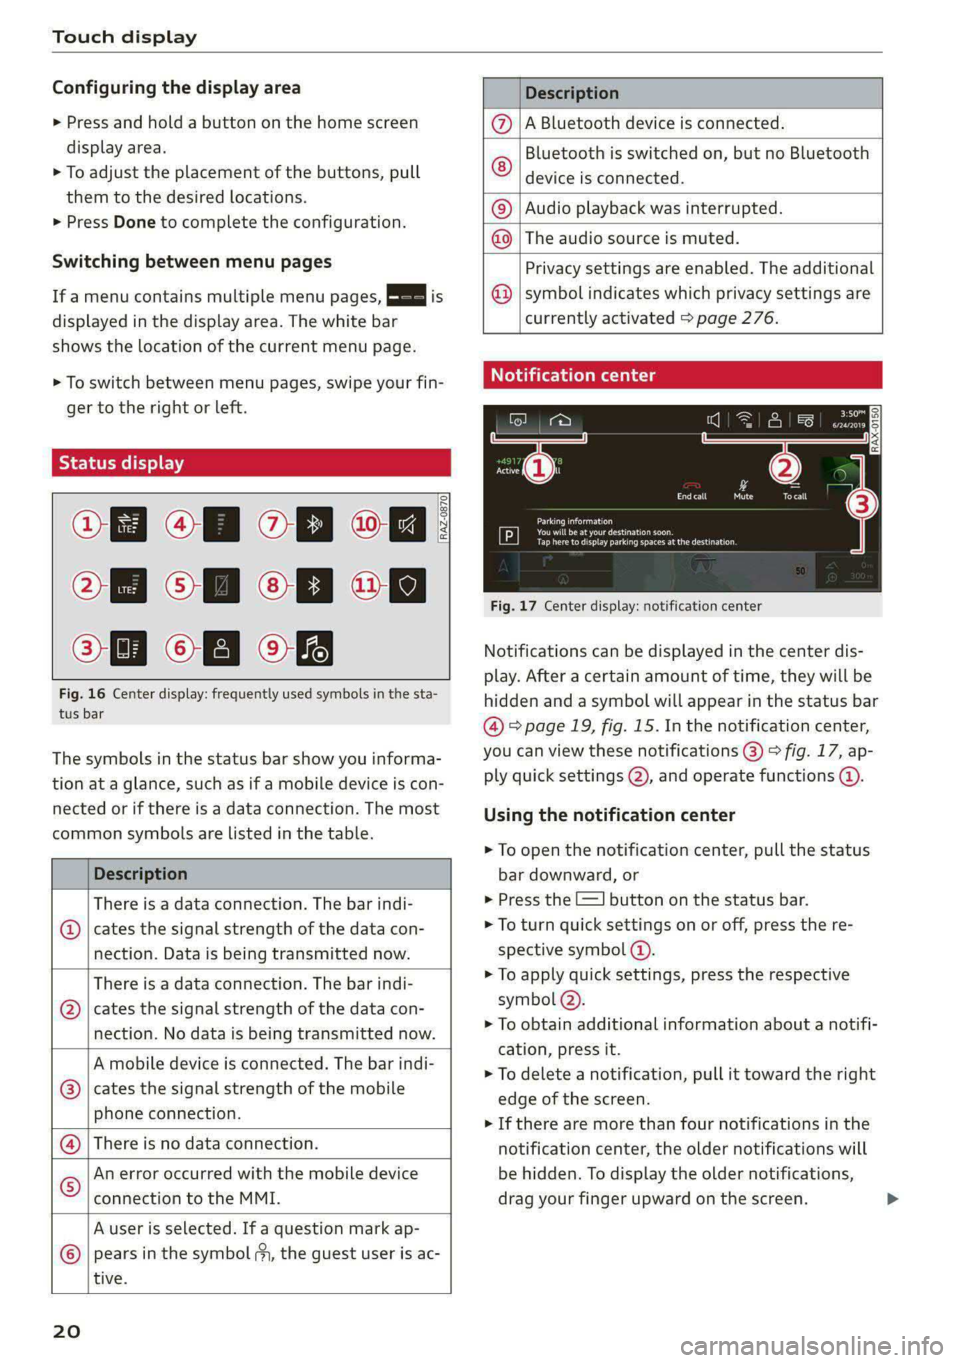
Fig. 16 Center display: frequently used symbols in the sta-
tus bar
RAZ-0870
The symbols in the status bar show you informa-
tion at a glance, such as if a mobile device is con-
nected or if there is a data connection. The most
common symbols are listed in the table.
Description
There is a data connection. The bar indi-
@ | cates the signal strength of the data con-
nection. Data is being transmitted now.
There is a data connection. The bar indi-
cates the signal strength of the data con-
nection. No data is being transmitted now.
®
A mobile device is connected. The bar indi-
cates the signal strength of the mobile
phone connection.
There is no data connection.
An error occurred with the mobile device
connection to the MMI.
A user is selected. If a question mark ap-
pears in the symbol ;y, the guest user is ac-
tive.
®©®
|%/e
©
20
Description
A Bluetooth device is connected.
Bluetooth is switched on, but no Bluetooth
device is connected. ©
|O
Audio playback was interrupted.
The audio source is muted. ©|©
Privacy settings are enabled. The additional
symbol indicates which privacy settings are
currently activated > page 276.
©
Notification center
=a Ee
id (on ome’
& = =
—
Corral nricy Tocall
Ce ay
eects
Tap here to display parking spaces atthe destination
Fig. 17 Center display: notification center
Notifications can be displayed in the center dis-
play. After a certain amount of time, they will be
hidden and a symbol will appear in the status bar
@ = page 19, fig. 15. In the notification center,
you can view these notifications @) > fig. 17, ap-
ply quick settings @), and operate functions @.
Using the notification center
> To open the notification center, pull the status
bar downward, or
> Press the -=] button on the status bar.
> To turn quick settings on or off, press the re-
spective symbol (2).
> To apply quick settings, press the respective
symbol @).
> To obtain additional information about a notifi-
cation, press it.
> To delete a notification, pull it toward the right
edge of the screen.
> If there are more than four notifications in the
notification center, the older notifications will
be hidden. To display the older notifications,
drag your finger upward on the screen.
Page 58 of 302

Lights and Vision
— High beam assistant is only intended to as-
sist the driver. The driver is still responsible
for controlling the headlights and may need
to switch them on and off manually depend-
ing on light and visibility conditions.
— High beams can cause glare for other driv-
ers, which increases the risk of an accident.
For this reason, only use the high beams or
the headlight flasher when they will not cre-
ate glare for other drivers.
@ Tips
Certain settings are automatically stored and
assigned to the active user.
Applies to: vehicles sam laser lighting
RAZ-0948,
Fig. 53 Headlights: label
The laser high beams increase the range of the
headlights.
Technical
changes to the headlights have signifi-
cantly increased the range. An additional module
integrated in the headlight converts a blue laser
light into a white light using a luminescent mate-
rial.
56
Switching laser lights on and off
The high beam is controlled by the high beam as-
sistant. The laser high beams switch on shortly
after activating the LED high beams if the re-
quirements that follow are met.
Requirement: the AUTO light function must be
set, and the high beam assistant and the laser
lights must be switched on in the MMI
=> page 57.
> To switch on the high beam assistant, tap the
lever
forward @) > page 55, fig. 52. The fa in-
dicator light appears in the instrument cluster
display and the high beams are switched on or
off automatically.
The laser high beams are switched on at speeds
above approximately 44 mph (70 km/h), when
the high beams are activated. The Ed indicator
light turns on if the high beams are switched on.
The +2] indicator light turns on if the laser lights
are switched on.
The laser beam is switched back off when the
speed decreases below approximately 30 mph
(50 km/h) or when the high beam assistant
switches the LED headlights off.
Z\ WARNING
— Follow the safety precautions and note the
limits of the assist systems, sensors, and
cameras > page 121.
— All repair procedures on the headlights must
be performed by an authorized Audi dealer
or authorized Audi Service Facility that will
perform the work according to Audi factory
specifications. Incorrect repairs could result
in eye injury, impair the function, and may
void the vehicle's operating license.
— Opening the laser module is not permitted
and could cause permanent injuries to the
eyes.
— Dangerous exposure to laser beams may oc-
cur if the covers are removed or if the head-
lamp module housing is opened.
Page 61 of 302

8W7012721BA
Lights and Vision
> To activate the manual dimming function*,
touch the surface while the light is switched off
“¥ @ and keep touching it until the desired
brightness is reached.
Interior lighting
Applies to: vehicles with interior lighting
The ambient lighting turns on when the ignition
is switched on. The ambient lighting is deactivat-
ed when the light function is OFF.
You can adjust the interior lighting individually.
The settings depend on the vehicle equipment.
> Applies to: MMI: Select on the home screen:
VEHICLE > Light & Visibility > Interior light-
ing.
You can choose among predefined color profiles,
such as Maritime.
Additional settings and profiles:
— Brightness: you can adjust the brightness for
all of the interior lighting.
— Individual: you can adjust the brightness and
color of the interior lighting separately, divided
into contour and surface lighting.
— Drive select: the contour and surface lighting
color changes depending on the selected Audi
drive select* mode.
G) Tips
— Depending on vehicle equipment, when the
Drive select function is activated, the color
of the contour and surface lighting may
briefly change to red or blue when the inte-
rior temperature is manually increased or
decreased.
— Certain settings are automatically stored
and assigned to the active user.
Display brightness
You can adjust the instrument and display illumi-
nation separately. The settings depend on the ve-
hicle equipment.
> Applies to: MMI: Select on the home screen:
SETTINGS > Display & brightness.
Possible settings in the MMI:
— Cockpit dimming
— Head-up display
—MMI
— Virtual cockpit
stiide aaa tela)
Fig. 57 Light switch: instrument illumination
You can adjust the background brightness of the
instruments and display illumination.
> Press the knob (@ to release it.
> Turn the knob toward "-" or "+" to reduce or in-
crease the brightness.
> Press the knob again to return it to its original
Position.
@ Tips
Depending on vehicle equipment, the instru-
ment illumination (needles and gauges) may
turn on when the lights are off and the igni-
tion is switched on. The illumination for the
gauges reduces automatically and eventually
turns off as brightness outside increases. This
function reminds the driver to turn the low
beams on at the appropriate time.
s9
Page 100 of 302

Warm and cold
—} Neck heating*
Applies to: vehicles with neck heating
The neck heating temperature can be set at mul-
tiple levels. Press the J button once to switch on
the highest level. Press the 3 button again to de-
crease the temperature one level at a time. The
neck heating is off when all of the LEDs are off.
a Seat heating and ventilation*
Applies to: vehicles with seat heating/ventilation
If you press the # button, you can turn either the
seat ventilation or the seat heating on or off.
— If you turn the knob @ clockwise, you will turn
the seat heating down to the lowest level (1).
The red LED in the button turns on. To increase
the temperature, keep turning clockwise to the
highest level (3).
— If you turn the knob @ counterclockwise, you
will turn the seat ventilation down to the low-
est level (1). The blue LED in the button turns
on. To increase the ventilation, keep turning
counterclockwise to the highest level (3).
® Defrosting
The windshield and side windows are defrosted
or cleared of condensation as quickly as possible.
The maximum amount of air flows mainly from
the vents below the windshield. Recirculation
mode switches off. The temperature should be
set at +72°F (+22°C) or higher. The temperature
is controlled automatically.
You can switch the defroster on or off using the
X& button. You can switch the function off by
pressing a knob ().
@ Rear window defogger
The rear window defogger only operates when
the engine is running. It switches off automati-
cally after 10 to 20 minutes, depending on the
outside temperature.
To prevent the rear window defogger from
switching off automatically, press and hold & for
more than three seconds. This is stored until the
ignition is switched off.
98
Vents
You can open or close the center and rear vents in
the cockpit and the vents in the rear center con-
sole using the ridged thumbwheels. The levers
adjust the direction of the airflow from the vents.
Residual heat
You can activate the residual heat function when
the ignition is switched off by pressing the knob
@ (left side). The residual heat from the coolant
is used to heat the vehicle interior. The residual
heat function switches off automatically after
about 15 minutes.
ZA WARNING
— You should not use the recirculation mode
for an extended period of time, because no
fresh air is drawn in and the windows can
fog
when cooling mode is switched off. This
increases the risk of an accident.
— Individuals with reduced sensitivity to pain
or temperature could develop burns when
using the seat heating* or neck heating*
functions. To reduce the risk of injury, these
individuals must not use the seat or neck
heating*.
— If the air vents in the seats are covered by
clothing or similar objects when the neck
heating* is switched on, the output from the
neck heating may become very hot tempora-
rily. This can cause burns on unprotected
skin exposed directly to the vents.
@) Note
To reduce the risk of damage to the seat heat-
ing* elements, do not kneel on the seats or
place heavy pressure on one area of the seat.
@) Tips
— When the power top” is closed, the neck
heating* will switch automatically from set-
ting 3 to setting 2 after approximately six
minutes.
— The heat output from the neck heating" is
lower when the power top* is closed than
when it is open.
Page 159 of 302
8W7012721BA
Parking and maneuvering
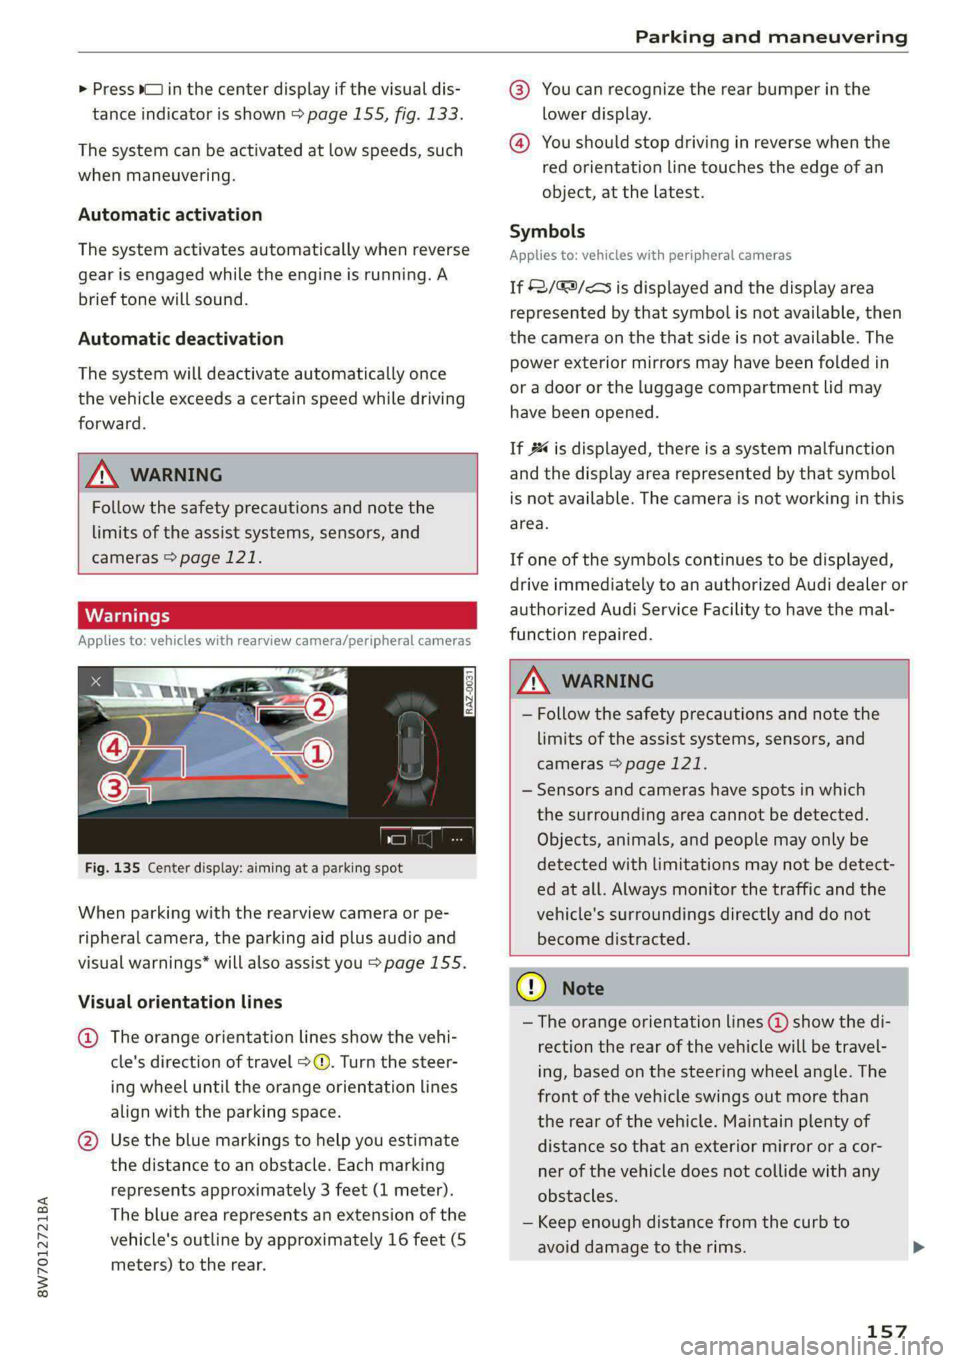
> Press bin the center display if the visual dis- @® You can recognize the rear bumper in the
tance indicator is shown > page 155, fig. 133. lower display.
@ You should stop driving in reverse when the
red orientation line touches the edge of an
object, at the latest.
The system can be activated at low speeds, such
when maneuvering.
Automatic activation
Symbols
The system activates automatically when reverse Applies to vehicles with peripheral cameras
gear is engaged while the engine is running. A
brief tone will sound. If 2/&9/< is displayed and the display area
represented by that symbol is not available, then
Automatic deactivation the camera on the that side is not available. The
power exterior mirrors may have been folded in
or a door or the luggage compartment lid may
have been opened.
The system will deactivate automatically once
the vehicle exceeds a certain speed while driving
forward.
If # is displayed, there is a system malfunction
TN WARNING and the display area represented by that symbol
Follow the safety precautions and note the is not available. The camera is not working in this
area.
limits of the assist systems, sensors, and
cameras > page 121. If one of the symbols continues to be displayed,
drive immediately to an authorized Audi dealer or
authorized Audi Service Facility to have the mal-
Applies to: vehicles with rearview camera/peripheral cameras function repaired.
Z\ WARNING
— Follow the safety precautions and note the
limits of the assist systems, sensors, and
cameras > page 121.
— Sensors and cameras have spots in which
the surrounding area cannot be detected.
Objects, animals, and people may only be
Fig. 135 Center display: aiming at a parking spot detected with limitations may not be detect-
ed at all. Always monitor the traffic and the
When parking with the rearview camera or pe- vehicle's surroundings directly and do not
ripheral camera, the parking aid plus audio and become distracted.
visual warnings* will also assist you > page 155.
CG) Note
— The orange orientation lines @) show the di-
rection the rear of the vehicle will be travel-
ing, based on the steering wheel angle. The
front of the vehicle swings out more than
the rear of the vehicle. Maintain plenty of
@ Use the blue markings to help you estimate distance so that an exterior mirror or a cor-
the distance to an obstacle. Each marking ner of the vehicle does not collide with any
represents approximately 3 feet (1 meter). obstacles.
The blue area represents an extension of the
vehicle's outline by approximately 16 feet (5
meters) to the rear.
Visual orientation lines
@ The orange orientation lines show the vehi-
cle's direction of travel > ©. Turn the steer-
ing wheel until the orange orientation lines
align with the parking space.
— Keep enough distance from the curb to
avoid damage to the rims.
157
Page 167 of 302
8W7012721BA
Telephone
Telephone
Introduction
Applies to: vehicles with telephone
You can operate various telephone functions easi-
ly through the MMI in your vehicle.
Depending on the country and the vehicle equip-
ment, the following options may be available:
— Connecting a cell phone with Bluetooth
— Using two telephones
— Using the Audi phone box
ZA WARNING
— Medical experts warn that mobile devices
can interfere with the function of pacemak-
ers. Always maintain a minimum distance of
about 7.9 inches (20 cm) between the mo-
bile device antennas and the pacemaker.
— Do not carry the mobile device in a pocket
directly over the pacemaker when the
phone is switched on.
— Switch the mobile device off immediately
if you suspect it may be interfering with
the pacemaker.
— Do not use the voice recognition system*
=> page 24 in emergencies because your
voice may change in stressful situations. The
system may take longer to dial the number
or may not be able to dial it at all. Dial the
emergency number manually.
— Switch your mobile device off in areas where
there is a risk of an explosion. These loca-
tions are not always clearly marked. This
may include gas stations, fuel and chemical
storage facilities or transport vehicles, or lo-
cations where fuel vapors (such as propane
or gasoline vapor in vehicles or buildings),
chemicals or large quantities of dust parti-
cles (such as flour, sawdust or metal) may
be present in the air. This also applies to all
other locations where you would normally
turn your vehicle engine off.
— The demands of traffic require your full at-
tention. Always read the chapter > page 18,
Traffic safety information.
CG) Note
Read the information about Audi connect, and
be sure to note the connectivity costs section
=> page 176.
G@) Tips
— The Bluetooth connection range is limited
to inside the vehicle.
—Aselection of supported Bluetooth devices
can be found in the database for tested mo-
bile devices at www.audi.com/bluetooth.
Setup
Connecting a cell phone via Bluetooth
Applies to: vehicles with telephone
Requirement: the vehicle must be stationary and
the ignition must be switched on. The Bluetooth
settings must be open on your mobile device dur-
ing the connection setup. The mobile device to be
connected must not be actively connected to any
other Bluetooth device. The MMI must only be
connected to one mobile device.
> Enable the Bluetooth function and visibility on
the MMI => page 213 and the mobile phone.
> Applies to: MMI: Select on the home screen:
PHONE.
> Follow the system instructions. The available
Bluetooth devices will be displayed after sever-
al seconds.
> Press on the desired mobile device in the list of
displayed Bluetooth devices.
> To update the list, press OQ.
A PIN for a secure Bluetooth connection will be
generated.
> Confirm the PIN on your mobile device.
> Follow the system instructions.
>» Pay attention to any other system prompts on
the MMI and on your cell phone.
After connecting successfully
The cell phone contacts are automatically loaded
in the MMI. This process can take several mi-
nutes, depending on the number of contacts.
Depending on your cell phone and the connection
type, you can use the following functions:
165
>
Page 168 of 302

Telephone
Handsfree
Requirement: your cell phone must be connected
to the MMI via a Bluetooth Hands Free Profile
(Bluetooth HFP).
You can use the hands-free system. You can make
calls using the antenna on your mobile device.
Sending and receiving messages
See > page 173.
@) Tips
— Pay attention to any system prompts dis-
played on your mobile device or the MMI,
for example if the system should connect
automatically in the future. Depending on
the mobile device, you may need to down-
load contacts and confirm access to your
messages separately.
— You can also search for the MMI on your mo-
bile device using the Bluetooth device
search.
— You only have to pair your device one time.
Bluetooth devices that are already paired
automatically connect to the MMI when the
Bluetooth function is switched on, when
they are within range, and when the ignition
is switched on. The last connected mobile
device is given first priority.
— You can manage additional settings for con-
nected mobile devices in the Connected de-
vices menu > page 214.
— When leaving the vehicle, the Bluetooth
connection to the mobile device will auto-
matically disconnect. Depending on your
mobile device, phone calls in progress may
be automatically redirected from the MMI
to your mobile device so that you can con-
tinue the call on your phone.
Using two telephones
Applies to: vehicles with telephone, and Audi phone box
You can connect two mobile phones to the MMI
at the same time using the Bluetooth HFP, for ex-
ample a business phone and a private phone. You
can be reached in your vehicle through both cell
phones.
166
Applies to: mobile devices with Bluetooth Mes-
sage Access Profile (MAP): You can send and re-
ceive messages with both mobile devices
=> page 173.
Connecting another mobile device
Requirement: a mobile device must be connected
to the MMI.
> Applies to: MMI: Select on the home screen:
PHONE > (?. Follow the system instructions, or
> Applies to: MMI: Select on the home screen:
SETTINGS > Connected devices > Telephone 1
or Telephone 2 > New connection.
See > page 165, Connecting a cell phone via
Bluetooth.
Switching between two mobile devices
Requirement: phone 1 and phone 2 must be con-
nected to the MMI.
> Applies to: MMI: Select on the home screen:
PHONE >
Read the information about Audi connect, and
be sure to note the connectivity costs section
=> page 176.
Disconnecting a mobile device
Applies to: vehicles with telephone
> To disconnect a Bluetooth device from the MMI,
use the Connected devices menu > page 214.
Page 170 of 302
Telephone
> Switch the Mobile device wireless charging
function on.
> To charge your mobile device wirelessly, lay it
on the @ symbol @ = page 167, fig. 141 in the
center of the Audi phone box with the display
facing up.
Z\ WARNING
— The mobile device may become hot during
wireless charging. Pay attention to the tem-
perature of your mobile device and be care-
ful when removing it from the Audi phone
box.
— An alternating magnetic field is used for
wireless charging. Maintain a minimum dis-
tance of approximately 2.4 in (6 cm) to the
Audi phone box charging plate. The thresh-
olds for prolonged exposure at this distance
comply with ICNIRP1998. Therefore, inter-
actions such as irritation of sensory organs,
malfunctions of active implants (such as
pacemakers, infusion pumps, or neurosti-
mulators) or effects on passive implants
(such as prosthetic limbs) is highly unlikely.
If you have an implant, consult a medical
specialist if you have any questions. You can
also switch the function for wireless charg-
ing in the Audi phone box on and off. You
can continue to charge your mobile device
using a cable connection.
@) Note
Applicable to U.S.A.
Operation of the Audi phone box is subject to
the following requirements of the Federal
Communications Commission:
— This is a CONSUMER device.
— BEFORE USE, you MUST REGISTER THIS DE-
VICE with your wireless provider and have
your provider’s consent. Most wireless pro-
viders consent to the use of signal boosters.
Some providers may not consent to the use
of this device on their network. If you are
unsure, contact your service provider.
— You MUST operate this device with approved
antennas
and cables as specified by the
manufacturer. Antennas MUST be installed
at least 20 cm (8 inches) from any person.
168
— You MUST cease operating this device im-
mediately if requested by the FCC or a li-
censed wireless service provider.
— WARNING: E911 location information may
not be provided or may be inaccurate for
calls served by using this device.
@) Note
Applicable to Canada
In Canada, operation of a Zone Enhancer,
such as an Audi Phone Box, is subject to the
following requirements of the Innovation,
Science and Economic Development Canada
(ISED):
—This is a CONSUMER device.
— BEFORE USE, you MUST meet all require-
ments set out in CPC-2-1-05.
— You MUST operate this device with approved
antennas and cables as specified by the
manufacturer. Antennas MUST NOT be in-
stalled within 20 cm of any person.
— You MUST cease operating this device im-
mediately if requested by ISED or a licensed
wireless service provider.
— WARNING: £911 location information may
not be provided or may be inaccurate for
calls served by using this device.
G) Tips
—The maximum charging output is 5 W.
—The charging time and temperature will vary
depending on the mobile device being used.
Mobile device reminder signal
Applies to: vehicles with Audi phone box
When the device reminder signal is switched on,
you will be notified that your mobile device is still
in the Audi phone box when you leave the vehicle.
Requirement: your mobile device must be located
in the Audi phone box (if Qi capable) or connected
to the Audi music interface with a USB adapter,
and the Audi smartphone interface must be ac-
tive or your iPhone must be connected to the
MMI via Bluetooth and charging using a USB
adapter connected to the Audi music interface. >
Page 172 of 302
Telephone
Managing favorites
Applies to: vehicles with telephone
You can store contacts for all connected mobile
devices as shortcuts in the favorites list.
Selecting favorites using the MMI
> Applies to: MMI: Select on the home screen:
PHONE > Favorites.
Opening favorites using the multifunction
steering wheel
> Select in the instrument cluster: Telephone tab
> ) button > Favorites.
Storing favorites
> Press Y¥ = page 170 in the business card, or
> Press Store as favorite in the options
=> page 169.
Deleting favorites
> Press W © page 170 in the business card, or
> Select: Favorites > Z > one or multiple favor-
ites or Select all > Delete > Done.
Managing the directory
Applies to: vehicles with telephone
You can manage up to four directories in the
MMI.
Requirement: a mobile device must be connected
to the MMI.
Opening the directory
> Applies to: MMI: Select on the home screen:
PHONE > Contacts.
The contacts will be displayed. You can change
the sort order > page 173, Sort order.
Deleting imported contacts
Requirement: you must have imported at least
one contact.
> Select: Contacts > Z > one or more text mes-
sages > Delete > Done. The imported contacts
are deleted.
170
Directory options
Press and hold a contact in the directory until the
Options menu appears.
Depending on your mobile device, the following
options may be available:
— Store as favorite > page 170
— Send text message > page 173.
— Send e-mail > page 174.
G) Tips
— Pay attention to any synchronization
prompts on your mobile device when down-
loading contacts.
— The contacts from the mobile device may
not be transferred in alphabetical order. If
there are too many entries, contacts with
different first letters may be missing in the
MMI.
— Only the contacts from the active connected
mobile device are displayed.
— The contacts in the local MMI memory are
always visible and can be accessed by other
users.
— After switching off the ignition and exiting
the vehicle, the mobile device directory will
be loaded when the MMI is started again if
the mobile device is within range and the
Bluetooth function is switched on in the mo-
bile device and the MMI.
— Only the contacts in the local MMI memory
can be deleted.
Opening business cards
Applies to: vehicles with telephone
The business card shows you details about a con-
tact.
> To open a business card, press on a contact in
the directory, or
> Press @ in the call list ©) > page 169, fig. 143.
Possible options in the business card:
> Call: press on a phone number.
> Storing a favorite: press WY.
> Deleting a favorite: press W.
> Sending a text message: press {.
> Starting navigation: press on an address. >