turn signal AUDI A5 2020 Owners Manual
[x] Cancel search | Manufacturer: AUDI, Model Year: 2020, Model line: A5, Model: AUDI A5 2020Pages: 302, PDF Size: 81.67 MB
Page 8 of 302
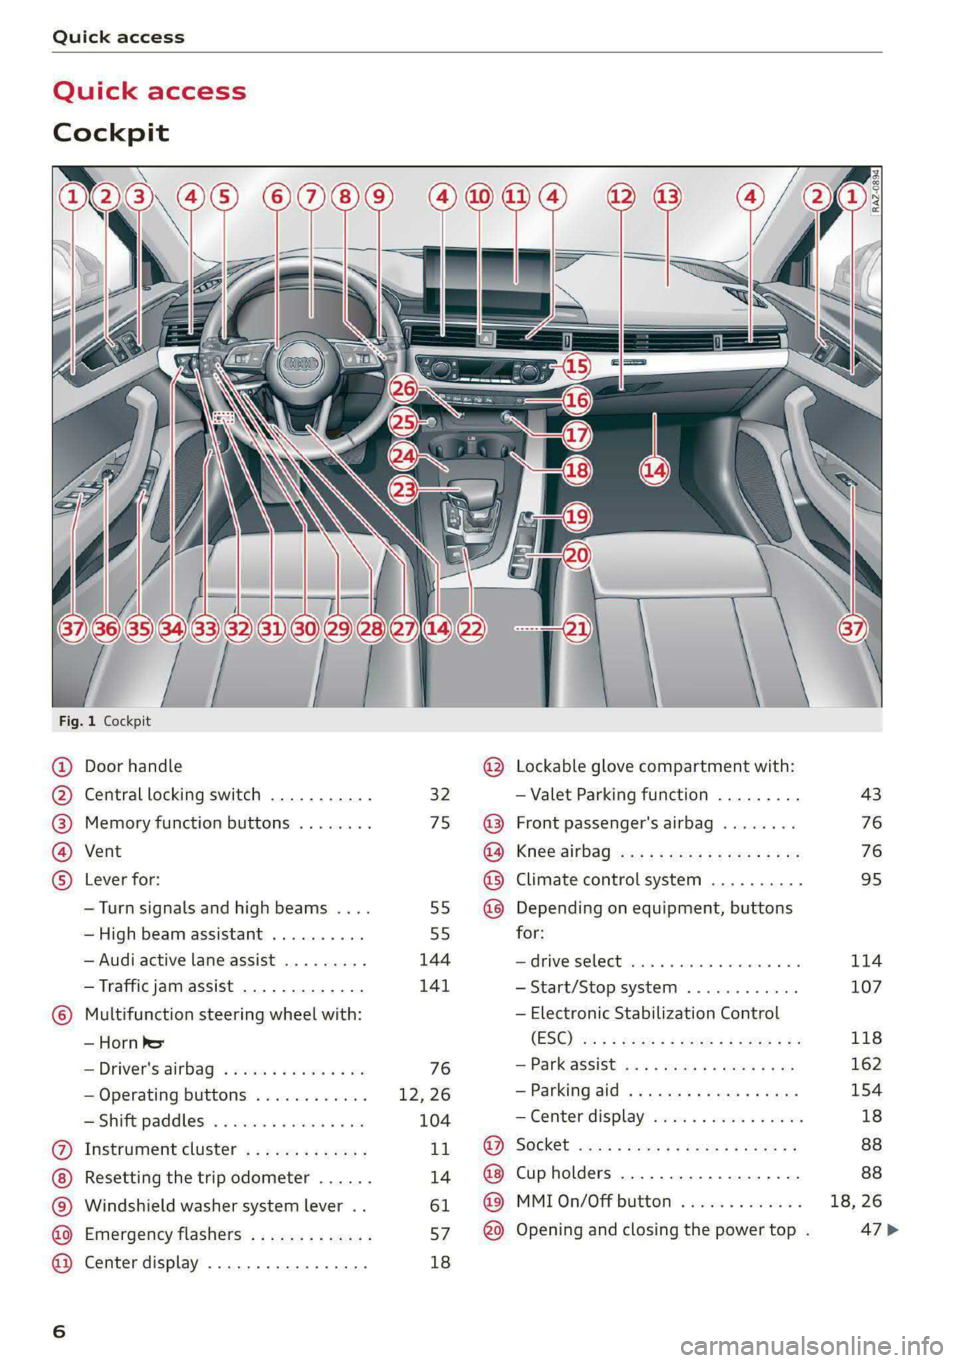
Quick access
Quick access
Cockpit
Fig. 1 Cockpit
@ @ @ @ ©
©
OO©eCOS
Door handle
Central locking switch
Memory function buttons
Vent
Lever for:
— Turn signals and high beams ....
— High beam assistant ..........
— Audi active lane assist .........
— Traffic jam assist .............
Multifunction steering wheel with:
— Horn he
— Driver's airbag
— Operating buttons
Shift paddles: « « cwwws « « savaxe w 0 von
Instrument cluster .............
Resetting the trip odometer ......
Windshield washer system lever ..
Emergency flashers .............
Center display .................
32
75
55)
55
144
141
76
12, 26
104
11
14
61
a7
18
®
OOO®
©OO®
Lockable glove compartment with:
— Valet Parking function
Front passenger's airbag
Knee airbag
Climate control system ..........
Depending on equipment, buttons
for:
drive SElLCCE cscs «6 soe © 4 enero © eve
— Start/Stop system
— Electronic Stabilization Control
(ESC)
— ParkeaSsist wx 5 2 came « x ga « ae
— Parking aid
—Center display ..............00.
Cup holders ...........-...0-0.
MMI On/Off button
Opening and closing the power top .
[RAZ-0894)
43
76
76
95
114
107
118
162
154
Page 9 of 302
8W7012721BA
Quick access
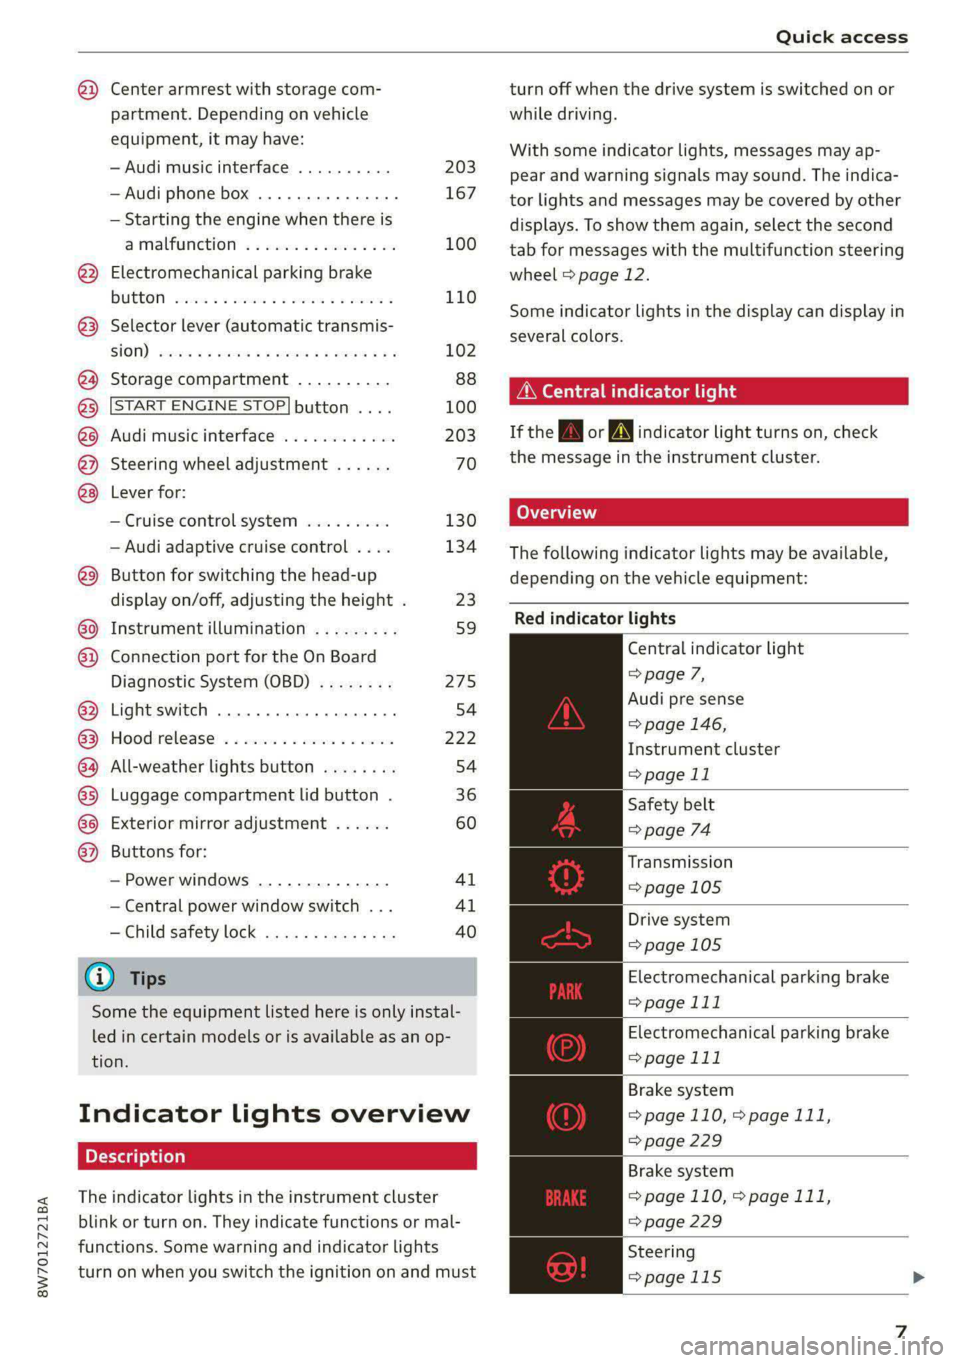
@) Center armrest with storage com-
partment. Depending on vehicle
equipment, it may have:
— Audi music interface .......... 203
—Audi phone box ............... 167
— Starting the engine when there is
A
MALPUNGEION 2 2 aceon 2 wom © & ae 100
@ Electromechanical parking brake
BUTEON scece: oo samen 2 oom 2 x ene 9 110
@ Selector lever (automatic transmis-
SION) seve & # sere & o ES Go OE GB 102
@4 Storage compartment .......... 88
@) [START ENGINE STOP] button .... 100
@ Audi music interface ............ 203
@) Steering wheel adjustment ...... 70
Lever for:
— Cruise control system ......... 130
— Audi adaptive cruise control .... 134
@9) Button for switching the head-up
display on/off, adjusting the height . 23
G0) Instrument illumination ......... 59
62 Connection port for the On Board
Diagnostic System (OBD) ........ 275
@) Light switch ................00. 54
@3 Hood release .........0...0.0.. 222
G4 All-weather lights button ........ 54
@5) Luggage compartment lid button . 36
G6 Exterior mirror adjustment ...... 60
62 Buttons for:
— Power windows .............. 41
— Central power window switch ... 41
—Child safety lock .............. 40
@) Tips
Some the equipment listed here is only instal-
led in certain models or is available as an op-
tion.
Indicator lights overview
The indicator lights in the instrument cluster
blink or turn on. They indicate functions or mal-
functions. Some warning and indicator lights
turn on when you switch the ignition on and must
turn off when the drive system is switched on or
while driving.
With some indicator lights, messages may ap-
pear and warning signals may sound. The indica-
tor lights and messages may be covered by other
displays. To show them again, select the second
tab for messages with the multifunction steering
wheel > page 12.
Some indicator lights in the display can display in
several colors.
OMe elle Lins
If the wA or N indicator light turns on, check
the message in the instrument cluster.
The following indicator lights may be available,
depending on the vehicle equipment:
Red indicator lights
Central indicator light
=> page 7,
Audi pre sense
=> page 146,
Instrument cluster
=> page 11
Safety belt
=> page 74
Transmission
=> page 105
Drive system
=>page 105
Electromechanical parking brake
> page 111
Electromechanical parking brake
=> page 111
Brake system
=> page 110, > page 111,
=> page 229
Brake system
=> page 110, > page 111,
=> page 229
Steering
=>page 115
Page 11 of 302
8W7012721BA
Quick access
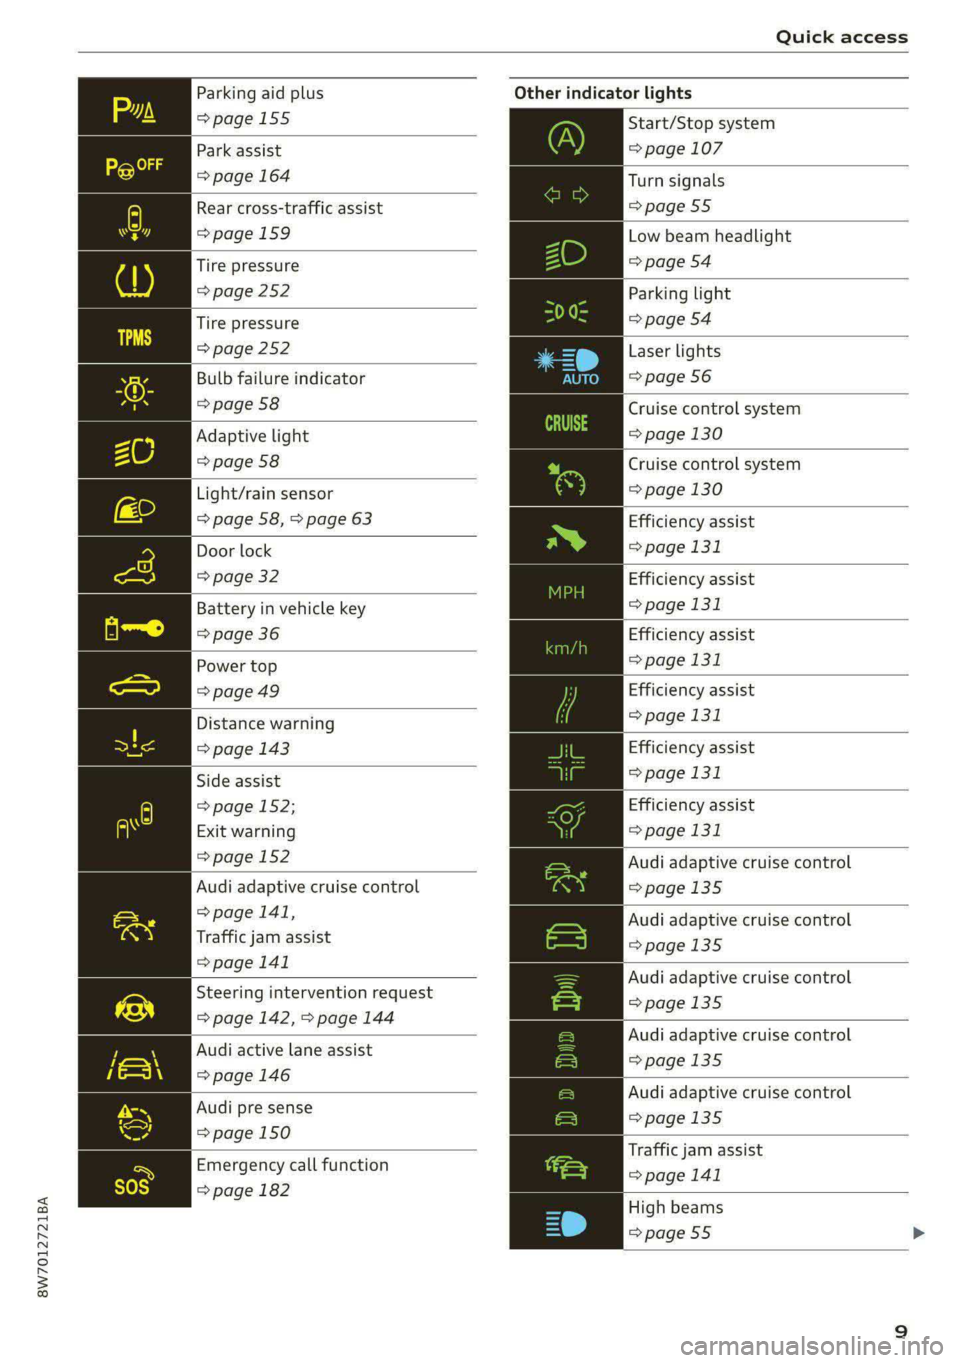
Parking aid plus
=>page 155
Park assist
=> page 164
Rear cross-traffic assist
=> page 159
Tire pressure
=> page 252
Tire pressure
=> page 252
Bulb failure indicator
=> page 58
Adaptive light
=> page 58
Light/rain sensor
=> page 58, > page 63
Door lock
=> page 32
Battery in vehicle key
=> page 36
Power top
=> page 49
Distance warning
=> page 143
Side assist
=> page 152;
Exit warning
=> page 152
Audi adaptive cruise control
=> page 141,
Traffic jam assist
=> page 141
Steering intervention request
=> page 142, > page 144
Audi active lane assist
=> page 146
Audi pre sense
=> page 150
Emergency call function
=> page 182
Other indicator lights
Start/Stop system
= page 107
Turn signals
=>page 55
Low beam headlight
=> page 54
Parking light
=> page 54
Laser lights
=> page 56
Cruise control system
=> page 130
Cruise control system
=> page 130
Efficiency assist
=> page 131
Efficiency assist
=> page 131
Efficiency assist
=> page 131
Efficiency assist
> page 131
Efficiency assist
=> page 131
Efficiency assist
> page 131
Audi adaptive cruise control
=>page 135
Audi adaptive cruise control
=>page 135
Audi adaptive cruise control
=>page 135
Audi adaptive cruise control
=>page 135
Audi adaptive cruise control
=>page 135
Traffic jam assist
> page 141
High beams
=> page 55
Page 22 of 302
Touch display
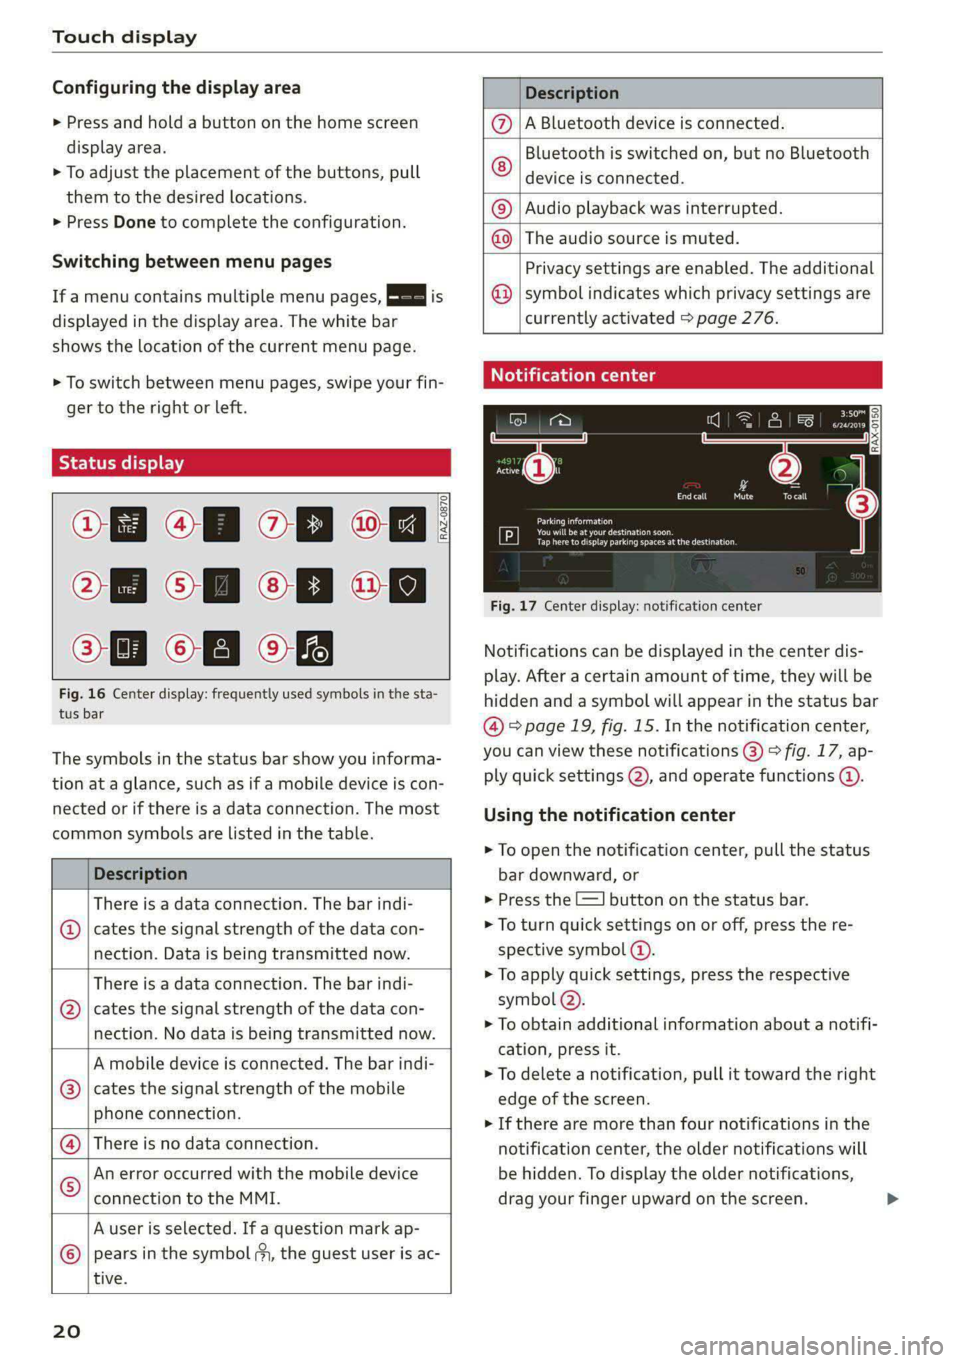
Configuring the display area
> Press and hold a button on the home screen
display area.
> To adjust the placement of the buttons, pull
them to the desired locations.
> Press Done to complete the configuration.
Switching between menu pages
If a menu contains multiple menu pages, Es] is
displayed in the display area. The white bar
shows the location of the current menu page.
> To switch between menu pages, swipe your fin-
ger to the right or Left.
Of OB of
O88 of a
O88 OB of
Fig. 16 Center display: frequently used symbols in the sta-
tus bar
RAZ-0870
The symbols in the status bar show you informa-
tion at a glance, such as if a mobile device is con-
nected or if there is a data connection. The most
common symbols are listed in the table.
Description
There is a data connection. The bar indi-
@ | cates the signal strength of the data con-
nection. Data is being transmitted now.
There is a data connection. The bar indi-
cates the signal strength of the data con-
nection. No data is being transmitted now.
®
A mobile device is connected. The bar indi-
cates the signal strength of the mobile
phone connection.
There is no data connection.
An error occurred with the mobile device
connection to the MMI.
A user is selected. If a question mark ap-
pears in the symbol ;y, the guest user is ac-
tive.
®©®
|%/e
©
20
Description
A Bluetooth device is connected.
Bluetooth is switched on, but no Bluetooth
device is connected. ©
|O
Audio playback was interrupted.
The audio source is muted. ©|©
Privacy settings are enabled. The additional
symbol indicates which privacy settings are
currently activated > page 276.
©
Notification center
=a Ee
id (on ome’
& = =
—
Corral nricy Tocall
Ce ay
eects
Tap here to display parking spaces atthe destination
Fig. 17 Center display: notification center
Notifications can be displayed in the center dis-
play. After a certain amount of time, they will be
hidden and a symbol will appear in the status bar
@ = page 19, fig. 15. In the notification center,
you can view these notifications @) > fig. 17, ap-
ply quick settings @), and operate functions @.
Using the notification center
> To open the notification center, pull the status
bar downward, or
> Press the -=] button on the status bar.
> To turn quick settings on or off, press the re-
spective symbol (2).
> To apply quick settings, press the respective
symbol @).
> To obtain additional information about a notifi-
cation, press it.
> To delete a notification, pull it toward the right
edge of the screen.
> If there are more than four notifications in the
notification center, the older notifications will
be hidden. To display the older notifications,
drag your finger upward on the screen.
Page 28 of 302
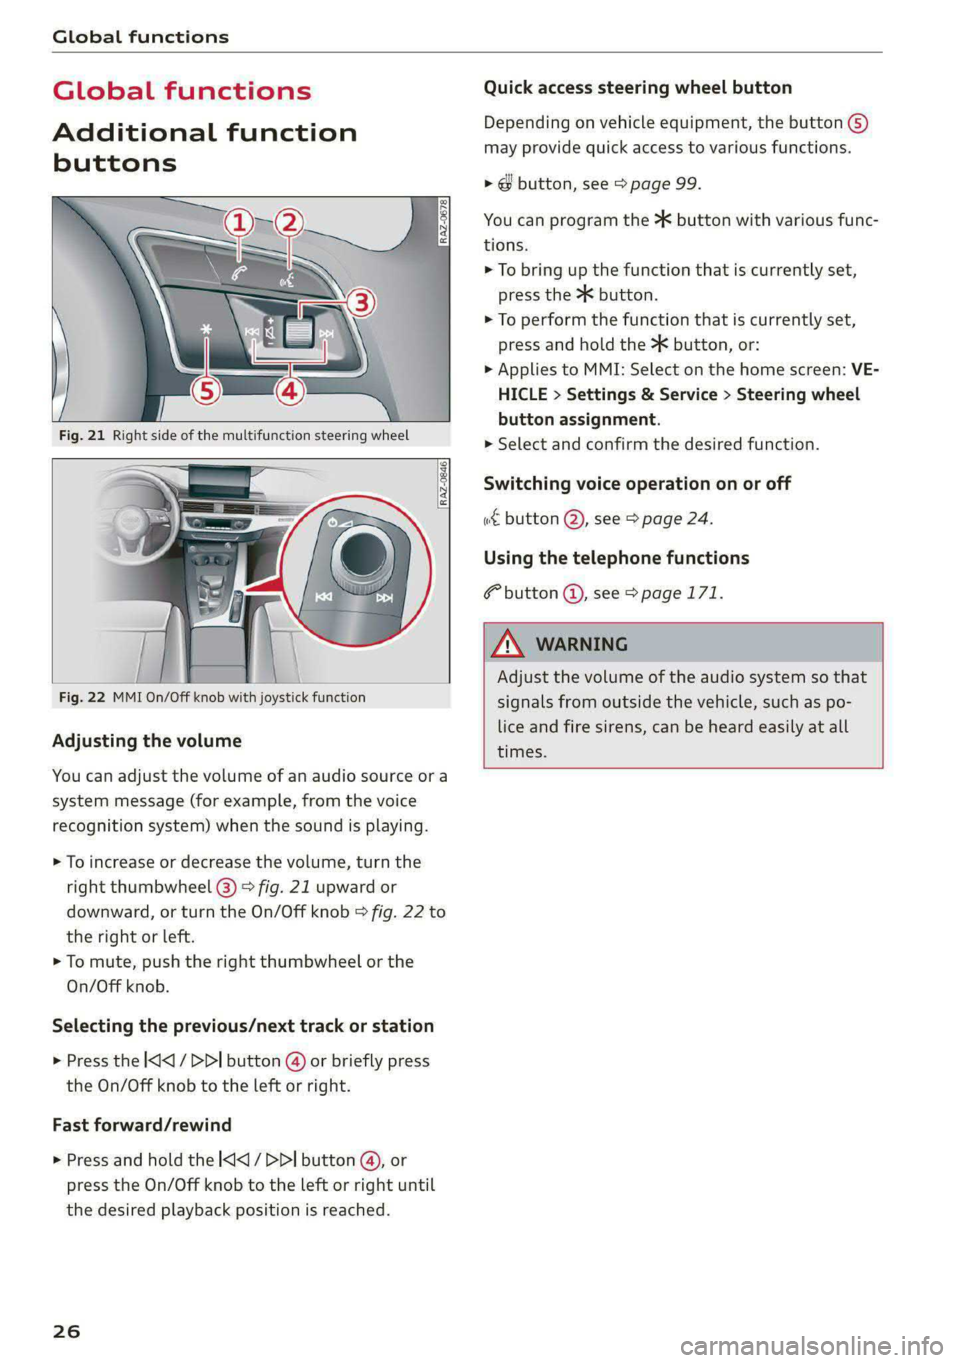
Global functions
Global functions
Additional function
buttons
Adjusting the volume
You can adjust the volume of an audio source or a
system message (for example, from the voice
recognition system) when the sound is playing.
> To increase or decrease the volume, turn the
right
thumbwheel @) © fig. 21 upward or
downward, or turn the On/Off knob & fig. 22 to
the right or left.
> To mute, push the right thumbwheel or the
On/Off knob.
Selecting the previous/next track or station
> Press the l
Fast forward/rewind
> Press and hold the
the desired playback position is reached.
26
Quick access steering wheel button
Depending on vehicle equipment, the button @)
may provide quick access to various functions.
> @ button, see > page 99.
You can program the >K button with various func-
tions.
> To bring up the function that is currently set,
press the button.
> To perform the function that is currently set,
press and hold the >K button, or:
» Applies to MMI: Select on the home screen: VE-
HICLE > Settings & Service > Steering wheel
button assignment.
> Select and confirm the desired function.
Switching voice operation on or off
«€ button @, see > page 24.
Using the telephone functions
button @, see > page 171.
Adjust the volume of the audio system so that
signals from outside the vehicle, such as po-
lice and fire sirens, can be heard easily at all
times.
Page 32 of 302
Opening and closing
Opening and closing
Central locking
erasure)
ZA WARNING
— If you leave the vehicle, switch the ignition
off and take the key with you. This applies
particularly when children remain in the ve-
hicle. Otherwise, children could start the ve-
hicle or operate electrical equipment (such
as power windows), which increases the risk
of an accident.
— Applies to: vehicles with anti-theft alarm
system: When the vehicle is locked from the
outside, no one - especially children - should
remain in the vehicle, because the windows
can no longer be opened from the inside
=> page 33, Anti-theft alarm system.
Locked doors make it more difficult for
emergency workers to enter the vehicle,
which puts lives at risk.
All doors and the luggage compartment lid can
be centrally unlocked and locked at once. You can
select in the MMI if the entire vehicle or only the
driver's door should unlock when unlocking the
vehicle > page 31. The turn signals flash twice
when you unlock the vehicle and flash once when
you lock the vehicle. If they do not flash when
locking, check if all doors and lids are closed.
Depending on the vehicle equipment, you may
have different options for centrally unlocking and
locking your vehicle.
— Vehicle key > page 35
— Sensors in the door handles > page 35
— Lock cylinder on the driver's door > page 32
— Central locking switch inside > page 32
Vehicle key
The term “vehicle key” refers to the remote con-
trol key or convenience key*. The convenience
key* is a remote control key with special func-
tions > page 35 and > page 100.
30
Automatic locking
If you unlock the vehicle but then do not open
any of the doors, the luggage compartment, or
the hood within a short period time, the vehicle
locks again automatically. This feature prevents
the vehicle from being accidentally left unlocked
for a long period of time.
Automatic locking (Auto Lock)
The Auto Lock function locks all doors and the
luggage compartment lid once the speed has ex-
ceeded approximately 9 mph (15 km/h). The ve-
hicle will unlock again if the unlock function in
the central locking switch is pressed, the “P” gear
is engaged, or the ignition is switched off.
You can open the doors individually from the in-
side by pulling the door handle one time. To open
the rear doors individually, you must pull the
door handle twice.
In the event of a crash with airbag deployment,
the doors will also automatically unlock to allow
access to the vehicle.
Unintentionally locking yourself out
Only lock your vehicle when all of the doors and
the luggage compartment lid are closed and
there is no key in the vehicle. This reduces the
risk of locking yourself out accidentally.
The
following features help to reduce the risk of
locking your vehicle key in the vehicle:
— If the driver's door is open, the vehicle cannot
be locked by pressing the & button on the re-
mote control key or by touching the locking
sensor* on a door.
— If the vehicle key that was used most recently is
inside the luggage compartment, the luggage
compartment lid will automatically open again
after it closes >@.
— If the vehicle key that was last used is detected
inside the vehicle, then the vehicle cannot be
locked from the outside > ©.
Z\ WARNING
Follow the safety precautions > page 30. >
Page 33 of 302
Opening and closing
8W7012721BA
@) Note Tati ma Reciee lela aate Rest)
The following applies when locking the vehi- You can adjust the central locking system to your
cle: preferences. The settings depend on the vehicle
— If the vehicle key that was last used is de- equipment.
tected inside the passenger compartment,
then the vehicle cannot be locked from the
outside using the sensor. Take the vehicle
key with you and lock the vehicle again. Oth-
erwise, the vehicle will not be protected Door unlocking
against unauthorized access.
— If you try to lock the vehicle using the but-
ton on the vehicle key while the front pas-
senger's or rear door is open, and you acci-
dentally place the key inside the passenger
compartment and close the door, the vehi-
cle will lock at first. But if the keyless sys-
tem detects a vehicle key inside the vehicle
after it locks, then the vehicle will unlock
again. The turn signals will flash several
times to indicate this. If you do not open
the vehicle to remove the vehicle key within
a brief period, then the vehicle will lock au- The entire vehicle will always be locked when you
tomatically. This prevents the vehicle from press the f@ button.
being left unlocked for long periods of time.
The key will then be locked inside the vehi-
> Applies to: MMI: Select on the home screen:
VEHICLE > Settings & Service > Central lock-
ing.
—If you select All, all doors and the luggage
compartment lid will be unlocked when unlock-
ing the vehicle.
— If you select Driver's door, only the driver's
door will be unlocked. To unlock all doors and
the luggage compartment lid, press the & but-
ton on the vehicle key twice. In vehicles with a
convenience key*, only the driver's door will un-
lock when you pull the driver's door handle. If
you pull another door handle, the entire vehicle
will be unlocked.
Long press to open windows
cle. You can select if all windows and the panoramic
— If the luggage compartment lid closes and glass roof* should open using the vehicle key
the system detects that the last vehicle key > page 42, Convenience opening and closing. If
that was used is inside the luggage com- you press and hold the & button on the vehicle
partment, then the luggage compartment key, all of the windows and the panoramic glass
lid will open again. The turn signals will roof* will close.
flash several times to indicate this. The
. . Disable rear lid handle
doors will lock. Always take the vehicle key
with you, or unauthorized persons may be You can select if the luggage compartment lid
able to enter the vehicle. can open with the handle. If you activate this
function, the luggage compartment lid can only
@ Tips be opened with the <3 or 4s button on the vehi-
cle key or in the driver's door. In vehicles with a
convenience key*, you can still open the luggage
compartment lid using the handle if an author-
ized convenience key is detected > page 36.
— Do not leave valuables unattended in the ve-
hicle. A locked vehicle is not a safe!
—The LED in the driver's door rail blinks when
you lock the vehicle. If the LED turns on for
approximately 30 seconds after locking, Fold mirrors
there is a malfunction in the central locking
system. Have the problem corrected by an
authorized Audi dealer or authorized Audi
Service Facility.
You can select if the exterior mirrors automatical-
ly fold in when locking. >
31
Page 34 of 302
Opening and closing
Tone when locking)
You can select if an audio signal sounds when
locking the vehicle.
Open with convenience key
Applies to: vehicles with convenience key
You can deactivate the feature for unlocking us-
ing
the sensor. The function for locking via the
sensor will still be enabled > page 35.
@) Tips
The settings are automatically stored and as-
signed to the active personal profile.
Cette] mole aire muda)
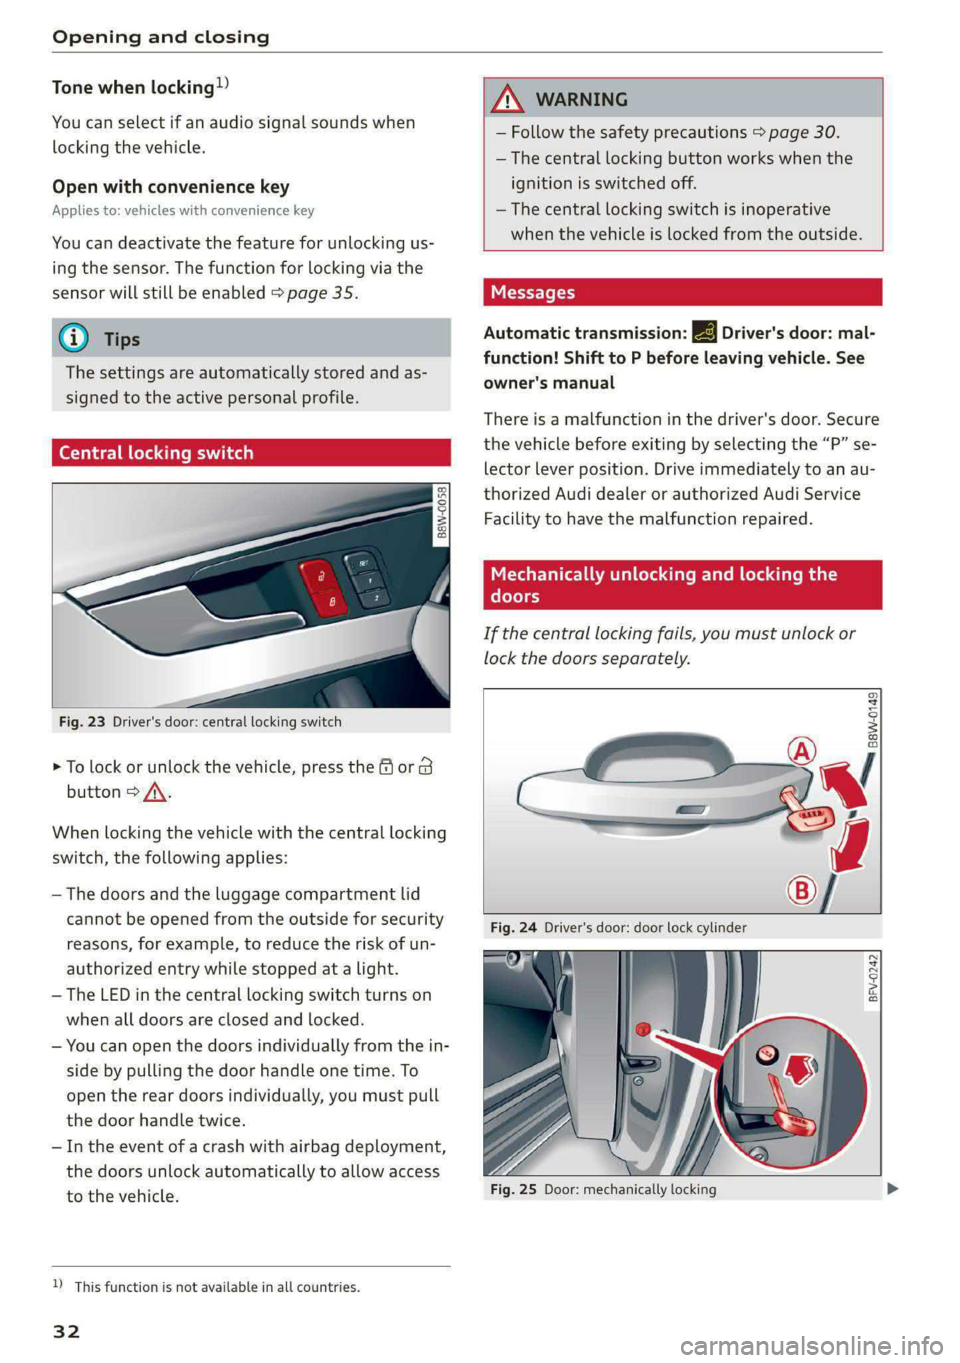
B8W-0058
:
Fig. 23 Driver's door: central locking switch
> To lock or unlock the vehicle, press the @ or B
button > /\.
When locking the vehicle with the central locking
switch, the following applies:
— The doors and the luggage compartment lid
cannot be opened from the outside for security
reasons, for example, to reduce the risk of un-
authorized entry while stopped at a light.
— The LED in the central locking switch turns on
when all doors are closed and locked.
— You can open the doors individually from the in-
side by pulling the door handle one time. To
open the rear doors individually, you must pull
the door handle twice.
— In the event of a crash with airbag deployment,
the doors unlock automatically to allow access
to the vehicle.
D This function is not available in all countries.
32
ZA WARNING
- Follow the safety precautions > page 30.
— The central locking button works when the
ignition is switched off.
—The central locking switch is inoperative
when the vehicle is locked from the outside.
Automatic transmission: 2B Driver's door: mal-
function! Shift to P before leaving vehicle. See
owner's manual
There is a malfunction in the driver's door. Secure
the vehicle before exiting by selecting the “P” se-
lector lever position. Drive immediately to an au-
thorized Audi dealer or authorized Audi Service
Facility to have the malfunction repaired.
Mechanic ELAN Cle date Race m Cole diile mal
doors
If the central locking fails, you must unlock or
lock the doors separately.
“SS
Baw-0149
BFV-0242
Fig. 25 Door: mechanically locking
Page 35 of 302
8W7012721BA
Opening and closing
Unlocking and locking the driver's door with
the mechanical key
> Remove the mechanical key > page 34.
> To unlock the driver's door, turn the key to the
unlock position @) > fig. 24.
> To lock the driver's door, select the "P" position
(automatic transmission) and turn the key once
to the closing position (8)> page 30, General
information.
Locking the front passenger's door or rear
doors* with the mechanical key
The mechanical lock is located on the edge of the
front passenger's door and the rear doors*. It is
only visible when the door is open.
> Remove the mechanical key > page 34.
> Remove the cap from the opening > fig. 25.
> Insert the key in the inside slot and turn it all
the way to the right (right door) or left (left
door).
Once the front passenger’s door or rear doors
close, it will no longer be possible to open them
from the outside. The door can be unlocked from
the inside by pulling on the door handle one time
and then opened by pulling the door handle
again. If the child safety lock in one of the rear
doors is activated, you must first pull the door
handle from the inside. Then you can open the
door from the outside.
ZA WARNING
Follow the safety precautions > page 30.
Naa
Applies to: vehicles with anti-theft alarm system
If the anti-theft alarm system detects a vehicle
break-in, audio and visual warning signals are
triggered. The anti-theft alarm system is switch-
ed on or off when locking or unlocking your vehi-
cle. If the alarm is triggered, it will shut off auto-
matically after a certain amount of time.
Switching the alarm off manually
> To switch the alarm off, press the G button on
the vehicle key or switch the ignition on.
Depending on the vehicle equipment, the anti-
theft alarm system may have the following fea-
tures:
Break-in security feature
The alarm will sound if there is a break-in at the
doors, hood, and/or luggage compartment lid.
Interior/towing protection monitor
The alarm will be triggered if there are move-
ments detected in the vehicle interior (for exam-
ple, by animals) or if there is a change in the vehi-
cle angle (for example, when the vehicle is being
towed).
You can prevent the alarm from being triggered
by deactivating the interior/towing protection
monitor.
Deactivating the interior/towing protection
monitor
There are the following options for deactivating
the interior/towing protection monitor:
> Press the ff button on the vehicle key a second
time within two seconds. Or
» Applies to: vehicles with convenience key:
Touch the sensor on the door handle a second
time within two seconds. Or
> Turn the mechanical key in the door lock to the
close position a second time within 2 seconds.
> Applies to: vehicles with MMI: Select on the
home screen: VEHICLE > Settings & Service >
Interior monitoring.
If you lock the vehicle, then the interior/towing
protection monitor will stay off until the next
time the vehicle is unlocked.
Z\ WARNING
No one, especially children, should stay in the
vehicle when it is locked from the outside, be-
cause the windows can no longer be opened
from the inside. Locked doors make it more
difficult for emergency workers to enter the
vehicle, which puts lives at risk. >
33
Page 44 of 302

Opening and closing
— Never close the windows carelessly or in an
uncontrolled manner, because this increases
the risk of injury.
Gi) Tips
— The windows will automatically open slight-
ly when you open the doors.
— If the window in the driver's or front pas-
senger's door is completely open, it will
raise slightly when the door is opened. The
window will lower again when you close the
door.
— You can still open and close the windows for
several minutes after turning the ignition
off. The power windows do not switch off
until the driver's door or front passenger's
door has been opened.
— The power windows are equipped with pinch
protection. The automatic window may stop
closing and will open all the way again even
if no obstacle is detected. Pull the power
window switch up until the window is com-
pletely raised.
Convenience opening and closing
Applies to: vehicles with convenience key
For power top* convenience opening/closing, re-
fer to the information in > page 48.
Convenience opening and closing the
windows and roof*
You can set in the MMI if all windows or the roof*
should open or close all at once > page 31, Set-
ting the central locking system.
> Press and hold the {@ or &@ button on the vehicle
key until all windows and the roof* have
reached the desired position > A\.
> Touch the sensor* on the door handle until all
of the windows and the roof* are closed. Do not
place your hand in the door handle when doing
this.
When all of the windows and the roof* are
closed, the turn signals will flash once.
42
AN WARNING
— Never close the windows or the roof* care-
lessly or in an uncontrolled manner, because
this increases the risk of injury.
— For security reasons, the windows and the
roof* can only be opened and closed with
the vehicle key at a maximum distance of
approximately 6.5 feet (2 m) away from the
vehicle. Always pay attention when using
the & button to close the windows and the
roof* so that no one is pinched. The closing
process will stop immediately when the fj
button is released.
Panoramic glass roof
Operating the panoramic glass roof and
roof sunshade
Applies to: vehicles with panoramic glass roof and roof sun-
shade
Fig. 38 Headliner: panoramic glass roof and sunshade*
buttons
The control buttons are equipped with a two-
stage function.
Operating the roof sunshade
> Opening and closing the sunshade: push the
switch in the headliner @) briefly toward the
rear or forward to the second level.
> Partially opening the sunshade: press the
switch to the first level until the sunshade
reaches the desired position.
Operating the roof
> Tilting the roof: press the 4> switch in the
headliner briefly upward to the second level (@).
> Closing the tilted roof: pull the > switch
downward briefly to the second level.