ESP AUDI A5 2021 Service Manual
[x] Cancel search | Manufacturer: AUDI, Model Year: 2021, Model line: A5, Model: AUDI A5 2021Pages: 318, PDF Size: 85.96 MB
Page 124 of 318

Driving dynamic
Power steering
The ESC can also support vehicle stability
through steering.
ZA WARNING
— The ESC and its integrated systems cannot
overcome the limits imposed by natural
physical laws. This is especially important on
slippery or wet roads. If the systems begin
acting to stabilize your vehicle, you should
immediately alter your speed to match the
road and traffic conditions. Do not let the in-
creased safety provided tempt you into tak-
ing risks. This could increase your risk of a
collision.
— Please note the risk of a collision increases
when driving fast, especially through curves
and on slippery or wet roads, and when driv-
ing too close to objects ahead. There is still
a risk of accidents because the ESC and its
integrated systems cannot always prevent
collisions.
— Accelerate carefully when driving on
smooth, slippery surfaces such as ice and
snow. The drive wheels can spin even when
these control systems are installed and this
can affect driving stability and increase the
risk of a collision.
@) Tips
The ABS and ASR only function correctly when
all four wheels have a similar wear condition.
Different tire sizes can lead to a reduction in
engine power.
The So button (or 2, depending on the model)
for controlling the ESC is located in the center
console, in front of the selector lever. The ESC is
automatically switched on when the ignition is
switched on.
Limiting ESC
In some situations, it may make sense to limit
the stabilizing function of the ESC so that the
wheels can spin, for example to rock a vehicle to
free it when it is stuck or to drive with snow
122
chains. The ESC can also be limited to provide
more sporty driving characteristics with fewer
stabilizing corrective actions.
—To limit the ESC, press the S20 button briefly.
The B indicator light will turn on.
— To completely reactivate the ESC stabilization
function, press the button again. The indicator
light turns off.
Switching off ESC
For a more active control of the vehicle where the
stabilizing functions of the ESC cannot intervene,
the ESC can be switched off.
—To switch off the ESC, press and hold the or
button for more than three seconds. The B
and Ea indicator lights turn on.
— To completely reactivate the ESC stabilization
function, press the button again. The indicator
lights turn off.
ZA\ WARNING
— When the ESC is switched off or limited,
there will be no vehicle stabilization or it will
be limited. The driving wheels could spin
and the vehicle could swerve, especially on
slick or slippery road surfaces, which in-
creases the risk of an accident.
— Because of the increased risk of an accident,
only drive with the ESC switched off or Limit-
ed when it is necessary. Reactivate the ESC
as soon as possible.
@) Tips
— If the ESC is limited, switched off, or mal-
functioning, systems with an automatic
braking intervention function may not be
fully available.
— If malfunctions occur in other systems or
certain driver assist systems are active, the
ESC must be switched on by the system. The
ESC
may switch on automatically and can-
not be operated with the button.
B fs / B © Stabilization control (ESC/
ABS): malfunction! See owner's manual
Page 126 of 318
Trailer towing
Trailer towing
Driving with a trailer
er else)
Your vehicle is primarily intended for transport-
ing people and luggage. However, if you drive
with a trailer, follow the technical requirements,
the operation and driving tips, and the legal reg-
ulations.
Driving with a trailer affects the vehicle's energy
usage, performance, and wear. It also requires
higher concentration from the driver.
Z\ WARNING
Do not transport any people in a trailer due to
the risk of fatal injury.
Technical requirements
Trailer hitch
Only use a trailer hitch with a removable ball
hitch mount and ball hitch. The trailer hitch must
be permitted for the vehicle, the trailer and the
permitted total weight of the trailer being
pulled. Above all, it must be securely and safely
attached to the vehicle trailer.
Never mount a trailer hitch on the bumper. The
trailer hitch must be mounted in a way that does
not impair the function of the bumper. Do not
make any changes to the exhaust system and the
brake system.
Check regularly if the trailer hitch is securely
mounted. Always follow the instructions given by
the trailer hitch manufacturer.
Trailer brakes
If the trailer has its own brake system, then fol-
low the manufacturer specifications. However,
the brake system on the trailer must never be
connected to the vehicle brake system.
Engine cooling system
Driving with a trailer means a higher load on the
engine and the cooling system. The cooling sys-
tem must be designed for additional load and
contain enough coolant > @.
124
C@) Note
Longer inclines cannot be driven without a
suitable cooling system, especially if the out-
side temperatures are high. Otherwise, this
increases the risk of engine damage.
Operating instructions
Towing capacity
Your vehicle can only be operated with class 1 or
class 2 trailers.
Load distribution
Poor cargo load and distribution can negatively
impact vehicle handling. Load the trailer based
on the following criteria as much as possible:
— Store objects in the vehicle luggage compart-
ment, if possible. The vehicle should always
carry the heaviest possible load and the trailer
should have the lightest possible load.
— Distribute the load in the trailer so that the
heavy objects are as close to the axle as possi-
ble.
— Secure objects so that they do not slide.
— Utilize the maximum permitted tongue weight
if possible.
Tires
Set the tire pressure on your vehicle for a “full
load”; see the tire pressure sticker > page 254. If
necessary, also adjust the tire pressure on the
trailer according to the manufacturer's specifica-
tions.
The trailer and the vehicle should be equipped
with winter tires when driving in winter tempera-
tures.
Outside mirrors
If you cannot see the traffic behind the trailer
with the standard exterior mirrors, then you
must attach additional exterior mirrors. Adjust
them so you have a sufficient visibility behind
you.
Exterior lighting
Follow the legal regulations for lighting on your
trailer that are applicable in the country where >
Page 127 of 318
8W7012721BB
Trailer towing
you are operating the vehicle. Contact an author-
ized Audi dealer or authorized Audi Service Facili-
ty for more information.
Before you start driving, check all lighting equip-
ment on the trailer while it is hitched to the vehi-
cle.
The headlight range control automatically ad-
justs the light range of the headlights.
Safety chains
Make sure the safety chains are correctly applied
when pulling a trailer. The chains should hang
enough so that the trailer can drive around
curves. However, they must not touch the
ground.
@) Note
Attachments retrofitted on the vehicle may
cause damage, especially on the trailer hitch
ball head. In cases of damage, have the func-
tion checked by an authorized Audi dealer or
authorized Audi Service Facility.
@ Tips
— Block the wheels with chocks when parking
on inclines if the trailer is loaded.
— Audi recommends having the vehicle in-
spected between the inspection intervals if
you tow a trailer frequently.
— Avoid driving with a trailer during the vehi-
cle break-in period.
Driving with a trailer
Driving with a trailer requires extra caution.
Speed
Adhere to the legal speed limits. Follow the legal
regulations that are applicable in the country
where you are operating the vehicle.
As the speed increases, the driving stability of
the trailer decreases. Therefore you should not
exceed the maximum legal speed limit when
there are unfavorable road, weather, and/or wind
conditions. This especially applies when driving
downhill.
Hill
When you start driving uphill or downhill, trailers
may tilt or sway sooner than when driving ona
level surface. If small swaying movements have
already occurred, you can stabilize the trailer by
firmly braking immediately. Never attempt to
“straighten out” the trailer by accelerating.
Downshift before driving on hills to utilize the en-
gine braking effect > A\.
Brakes
When using a trailer with overrun brakes, first
brake gently then quickly. This reduces the risk of
jerking while braking if the trailer wheels lock up.
Engine coolant temperature
Pay attention specifically to the coolant tempera-
ture display when there are high outside temper-
atures, and when driving on long inclines
=> page 14. Shift to a higher gear in a timely man-
ner.
JN WARNING
Constant braking causes the brakes to over-
heat and can substantially reduce braking per-
formance, increase braking distance, or cause
complete failure of the brake system.
125
Page 128 of 318
Assist systems
Assist systems
General information
SP ae eel idol ay
ZA WARNING
— As the driver, you are always completely re-
sponsible for all driving tasks. The assist
systems cannot replace the driver's atten-
tion. Give your full attention to driving the
vehicle, and be ready to intervene in the
traffic situation at all times.
— Activate the assist systems only if the sur-
rounding conditions permit it. Always adapt
your driving style to the current visual,
weather, road, and traffic conditions.
— Loose objects can be thrown around the ve-
hicle interior during sudden driving or brak-
ing maneuvers, which increases the risk of
an accident. Store objects securely while
driving.
— For the assist systems to be able to react
correctly, the function of the sensors and
cameras must not be restricted. Note the in-
formation on sensors and cameras
=> page 127.
@ Tips
— Pay attention to applicable local regulations
relating to driving tasks, leaving space for
emergency vehicles, vehicle distance, speed,
parking location, wheel placement, etc. The
driver is always responsible for following
the laws that are applicable in the location
where the vehicle is being operated.
— You can cancel a steering or braking inter-
vention by the system, by braking or accel-
erating noticeably, steering, or deactivating
the respective assist system.
— Always check the assist systems settings be-
fore driving. The settings could have been
changed, for example by other drivers.
126
System limitations
ZA\ WARNING
—The use of an assist system cannot over-
come the natural laws of physics. A collision
cannot be prevented in certain circumstan-
ces.
— Warnings, messages, or indicator lights may
not be displayed or initiated on time or cor-
rectly, for example, if vehicles are approach-
ing very fast.
— Corrective interventions by the assist sys-
tems, such as steering or braking interven-
tions, may not be sufficient or they may not
occur. Always be ready to intervene.
G) Tips
— Due to the system limitations when detect-
ing the surrounding area, the systems may
warn or intervene unexpectedly or too late
in certain situations. The assist systems may
also interpret a driving maneuver incorrectly
and then warn the driver unexpectedly.
— The systems may not function as expected
in unusual driving situations, such as driving
offroad, on unpaved roads, on loose ground,
on inclines, or on grooves in the road.
— The systems may not function correctly in
unclear traffic situations, such as turning
lanes, exit ramps, construction zones, rises
or dips that obstruct visibility, intersections,
toll stations, or city traffic.
— The detection of the surrounding area can
be limited, for example by vehicles driving
ahead or by rain, snow, heavy spray, or light
shining into the camera.
— The steering wheel touch recognition may
be limited when you wear gloves. Steering
intervention requests from the steering as-
sist systems may occur more frequently.
— If accessories have been mounted on the
steering wheel, the steering assist systems
may
be limited. The frequency of steering
intervention requests from the steering as-
sist systems may vary as well.
Page 134 of 318
Driving information
Traffic light information
Applies to: vehicles with traffic light information
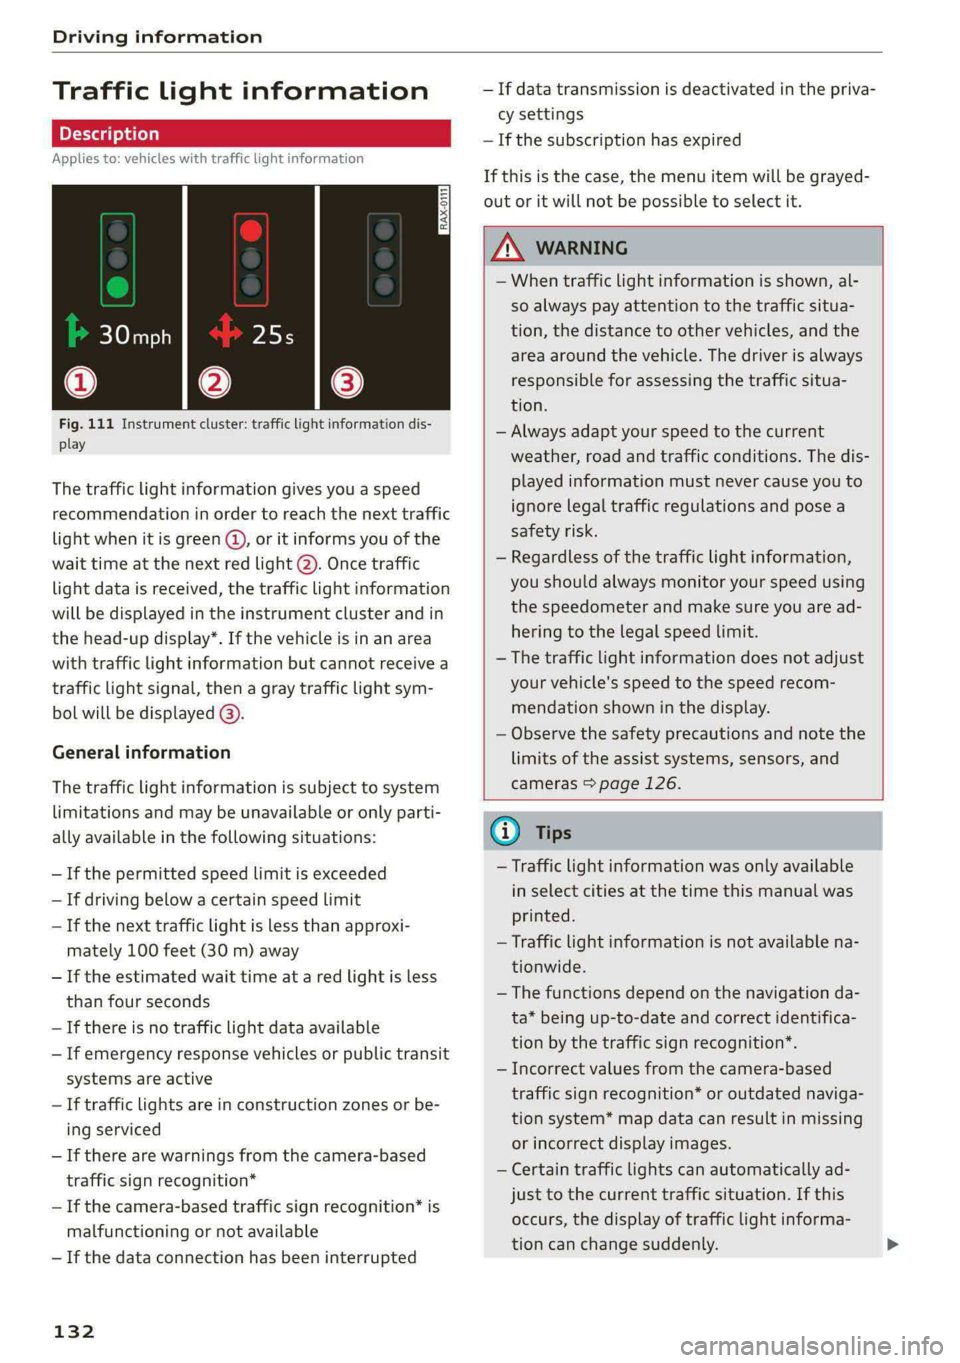
Fig. 111 Instrument cluster: traffic light information dis-
play
The traffic light information gives you a speed
recommendation in order to reach the next traffic
light when it is green @, or it informs you of the
wait time at the next red light (2). Once traffic
light data is received, the traffic light information
will be displayed in the instrument cluster and in
the head-up display*. If the vehicle is in an area
with traffic light information but cannot receive a
traffic light signal, then a gray traffic light sym-
bol will be displayed @).
General information
The traffic light information is subject to system
limitations and may be unavailable or only parti-
ally available in the following situations:
— Ifthe permitted speed limit is exceeded
— If driving below a certain speed limit
— If the next traffic light is less than approxi-
mately 100 feet (30 m) away
— Ifthe estimated wait time at a red light is less
than four seconds
—If there is no traffic light data available
— If emergency response vehicles or public transit
systems are active
— If traffic lights are in construction zones or be-
ing serviced
— If there are warnings from the camera-based
traffic sign recognition*
— If the camera-based traffic sign recognition* is
malfunctioning or not available
— If the data connection has been interrupted
132
— If data transmission is deactivated in the priva-
cy settings
— If the subscription has expired
If this is the case, the menu item will be grayed-
out or it will not be possible to select it.
ZA\ WARNING
— When traffic light information is shown, al-
so always pay attention to the traffic situa-
tion, the distance to other vehicles, and the
area around the vehicle. The driver is always
responsible for assessing the traffic situa-
tion.
— Always adapt your speed to the current
weather, road and traffic conditions. The dis
played information must never cause you to
ignore legal traffic regulations and pose a
safety risk.
— Regardless of the traffic light information,
you should always monitor your speed using
the speedometer and make sure you are ad-
hering to the legal speed limit.
— The traffic light information does not adjust
your vehicle's speed to the speed recom-
mendation shown in the display.
— Observe the safety precautions and note the
limits of the assist systems, sensors, and
cameras > page 126.
(i) Tips
— Traffic light information was only available
in select cities at the time this manual was
printed.
— Traffic light information is not available na-
tionwide.
— The functions depend on the navigation da-
ta* being up-to-date and correct identifica-
tion by the traffic sign recognition*.
— Incorrect values from the camera-based
traffic sign recognition* or outdated naviga-
tion system* map data can result in missing
or incorrect display images.
— Certain traffic lights can automatically ad-
just to the current traffic situation. If this
occurs, the display of traffic light informa-
tion can change suddenly.
Page 135 of 318
8W7012721BB
Driving information
— The traffic signs on the road always take pri-
ority over the display. The driver is always
responsible for adhering to the regulations
applicable in the country where the vehicle
is being operated.
— Units of measurement and language set-
tings are displayed based on how they were
set in the MMI system settings > page 221.
Applies to: vehicles with traffic light information
Switching traffic light information on and
off
» Applies to: MMI: Select on the home screen:
VEHICLE > Driver assistance > Traffic light in-
formation.
Accessing traffic light information
> Select in the instrument cluster: vehicle func-
tions tab > Traffic signs.
G) Tips
If another tab or another function is selected
in the instrument cluster, the traffic light in-
formation will appear in the status bar on the
instrument cluster.
Messages
Applies to: vehicles with traffic light information
Malfunction! See owner's manual
The system could not be configured, for example
due to a network malfunction. Switch the igni-
tion off and shut down the vehicle to restart the
system. Wait several minutes until the vehicle
has shut down completely and then switch the
ignition back on.
Function currently unavailable. See owner's
manual
There is a temporary system malfunction. Check
if one or more of the following situations applies
and correct the issue if necessary:
— Traffic light information is switched off
— Data transmission is deactivated
— The vehicle is not equipped with traffic sign rec-
ognition.
— There is no valid license
— Traffic light information is not available in that
area
Lap timer
Introduction
Applies to: vehicles with lap timer
You can record and evaluate lap times with the
lap timer. You can operate the lap timer using the
multifunction steering wheel > page 13.
Opening the lap timer
> Select in the instrument cluster: Vehicle func-
tions tab > [| button > Lap times.
An additional indicator appears in the head-up
display*.
/Z\ WARNING
Your focus should always be on driving your
vehicle safely. As the driver, you have com-
plete responsibility for safety in traffic. To re-
duce the risk of an accident, only use the lap
timer functions in such a way that you always
maintain complete control over your vehicle in
all traffic situations.
(i) Tips
You can retrieve information from the trip
computer while the lap timer stopwatch is
running.
ey eae |
Applies to: vehicles with lap timer
Requirement: the lap timer must be open
=> page 133.
Timing laps
> To start timing manually, select Start lap 1 in
the menu.
> To start timing automatically as soon as you be-
gin
to drive, select Start lap 1 by driving off or
Start by driving off in the menu. >
133
Page 136 of 318
Driving information
> To start timing a new lap after driving a lap, se-
lect New lap in the menu. This starts timing
the next lap at the same time.
After completing a lap, the difference between
the last lap and the previous best lap time will be
won un indicated with a “~” or “+”.
Pausing timing and displaying a split time
> To insert a pause @ select Pause in the menu.
> To resume timing, select Resume in the menu.
> To display a split time, select Split time in the
menu. The split time appears for approxi-
mately ten seconds in the instrument cluster.
The current lap timing will continue running.
Canceling lap timing
The timing of the current lap will stop. The lap
time will be erased and will not be included in the
statistics.
> Select Cancel lap in the menu.
Resetting the time
> Select Reset lap times in the menu.
G) Tips
—A maximum of 99 lap times can be meas-
ured.
— If timing is paused, you can continue it later
even if you switch the ignition off.
— Saved lap times cannot be individually de-
leted from the total results.
— The saved lap timer values will remain after
switching the ignition off.
Eye e latte)
Applies to: vehicles with lap timer
Displaying lap statistics
You can display the number of laps driven
the fastest lap “+”, the slowest lap “-”, and the
average time “®” in the instrument cluster.
>» Select in the instrument cluster: Vehicle func-
tions tab > ] button > Lap statistics.
D_ Not available in all countries
134
> Turn the thumbwheel down or up to display the
individual lap times.
> To return to the lap timing that was started, se-
lect the =] button > Lap times.
Resetting lap statistics
Requirement: the lap statistics menu must be
displayed.
> To reset the lap statistics, press and hold the
left thumbwheel until the message No lap
times have been recorded yet. appears.
G) Tips
The lap statistics list the lap times for the last
30 laps. The fastest and slowest lap times out
of up to 99 measured laps are also displayed.
Acceleration
measurement”)
Introduction
Applies to: vehicles with acceleration measurement
With the acceleration measurement, you can
measure the time that you need to reach a specif-
ic speed/distance. Keep in mind that the environ-
mental conditions and tire properties can affect
the results of the measurement.
Opening the acceleration measurement
> Select in the instrument cluster: vehicle func-
tions tab > =] button > Acceleration measure.
ZA\ WARNING
Your focus should always be on driving your
vehicle safely. As the driver, you have com-
plete responsibility for safety in traffic. Only
use the acceleration measurement function
on closed courses to reduce the risk of acci-
dents.
Using the acceleration measurement
Applies to: vehicles with acceleration measurement
Requirement: the acceleration measurement
must be opened.
Page 137 of 318
![AUDI A5 2021 Service Manual 8W7012721BB
Driving information
> Bring the vehicle to a full stop.
> Select and confirm the desired speed or dis-
tance.
> Wait briefly until the FQ] symbol appears in the
instrument cluster AUDI A5 2021 Service Manual 8W7012721BB
Driving information
> Bring the vehicle to a full stop.
> Select and confirm the desired speed or dis-
tance.
> Wait briefly until the FQ] symbol appears in the
instrument cluster](/img/6/57567/w960_57567-136.png)
8W7012721BB
Driving information
> Bring the vehicle to a full stop.
> Select and confirm the desired speed or dis-
tance.
> Wait briefly until the FQ] symbol appears in the
instrument cluster next to the time measure-
ment.
> To start the acceleration measurement, acceler-
ate the vehicle. The measurement ends auto-
matically once you have reached the selected
speed or distance.
Integrated Toll Module
Applies to: vehicles with Integrated Toll Module
Depending on the region, you can pay toll fees in
certain countries using the Integrated Toll Mod-
ule (ITM). It replaces a separate transponder for
detecting toll fees. The system electronics are in-
tegrated in the rearview mirror housing.
To use the ITM in toll zones, you must register
and activate it.
Registration
» Applies to MMI: Select on the home screen: VE-
HICLE > Settings & Service > Vehicle informa-
tion Toll module.
> Note the Integrated Toll Module ID.
> To register the ITM, go to the displayed web ad-
dress and follow the instructions.
Activation
> To activate the ITM, press CD in the MMI.
Entering the number of passengers
Depending on the number of passengers and the
region, a lower toll fee may be charged. You must
either enter the number of passengers or deacti-
vate the ITM based on the laws applicable in the
area where you are driving.
> To enter the number of passengers, select the
appropriate button in the MMI.
> To deactivate the ITM, press @ in the MMI.
@) Tips
— The driver is responsible for specifying the
correct number of passengers and activat-
ing or deactivating the ITM.
— Malfunctions can occur when detecting tolls
if both the ITM and transponder are activat-
ed. Deactivate the system not being used or
remove it as necessary.
—Ifa rearview mirror is replaced, you must
register the new ITM and remove the old
ITM from the account.
— The system complies with United States FCC
regulations and ISED regulations
=> page 297.
Display
Applies to: vehicles with Integrated Toll Module
The selected number of passengers is displayed
in the MMI status bar > page 23.
The i symbol in the status bar and a notifica-
tion in the MMI will indicate if there is a faulty
connection between the ITM and the MMI or if
the ITM is faulty. If the connection interference
continues or the ITM is faulty, drive immediately
to an authorized Audi dealer or authorized Audi
Service Facility.
135
Page 138 of 318
Driver assistance
Driver assistance
Cruise control system
Applies to: vehicles with cruise control system
The cruise control system assists the driver in
maintaining a constant speed above approxi-
mately 15 mph (20 km/h). The system maintains
the desired speed by braking and accelerating.
ZA\ WARNING
— Always pay attention to the traffic around
your vehicle when the cruise control system
is in operation. As the driver, you are always
responsible for controlling your vehicle
speed and the distance between your vehicle
and
other vehicles.
— For safety reasons, cruise control should not
be used in the city, in stop-and-go traffic, on
winding roads, and when road conditions are
poor (such as ice, fog, gravel, heavy rain,
and conditions that could lead to hydroplan-
ing), because this increases the risk of an ac-
cident.
— Switch the cruise control off temporarily
when driving in turning lanes, highway exits,
or in construction zones.
—To reduce the risk of an accident, you should
only resume the stored speed if it is suitable
for the current traffic conditions.
C) Note
Before driving downhill a long distance ona
steep hill, decrease your speed and select a
lower gear. This makes use of the engine brak-
ing effect and reduces the load placed on the
brakes.
@) Tips
The brake lights turn on when the brakes are
applied automatically.
136
Switching the system on
Applies to: vehicles with cruise control system
BFV-0220
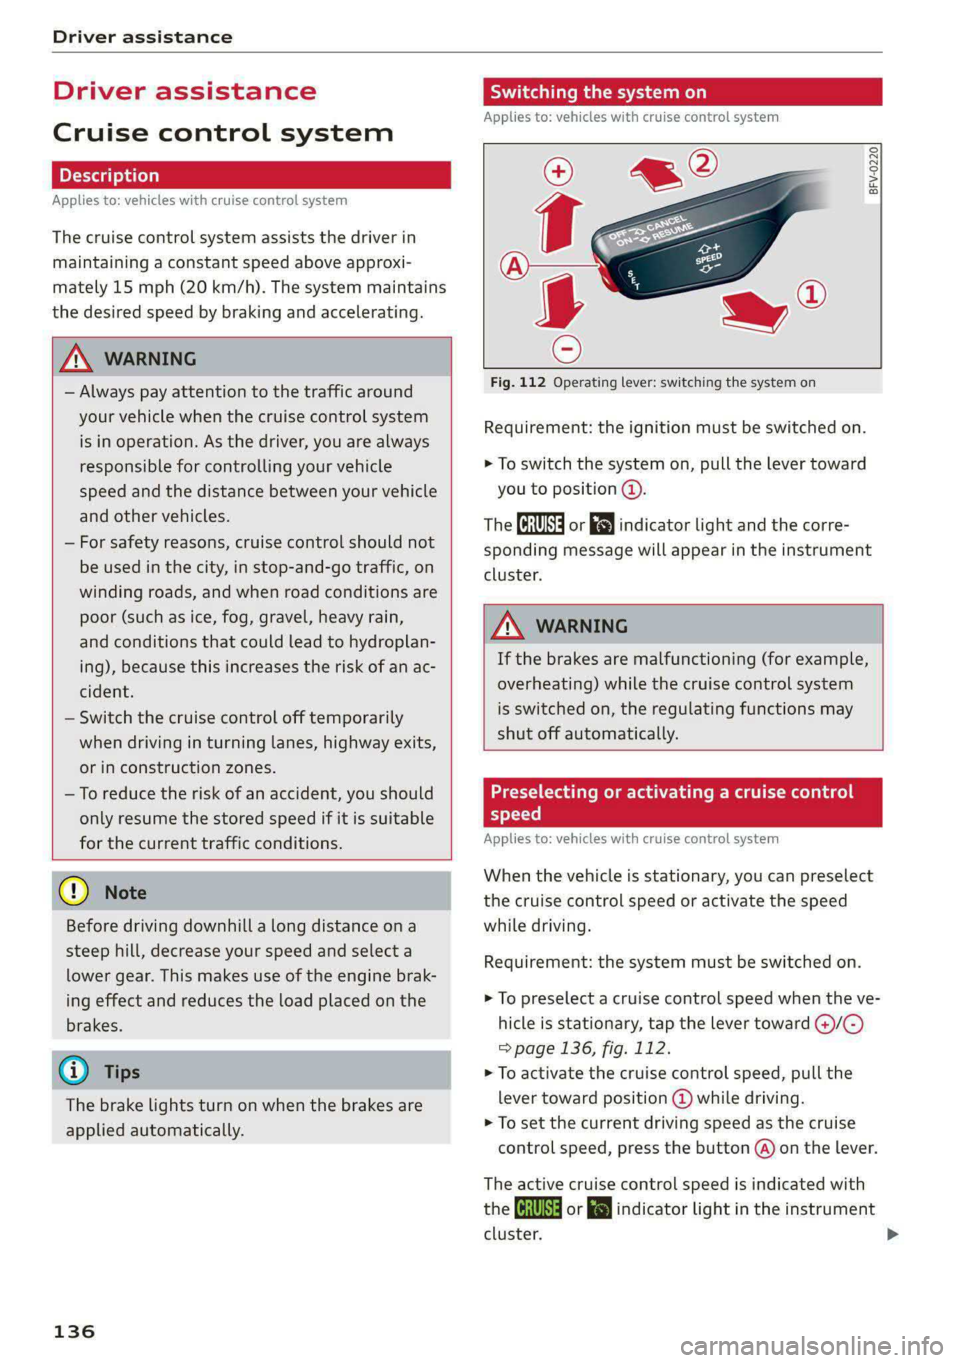
Fig. 112 Operating lever: switching the system on
Requirement: the ignition must be switched on.
> To switch the system on, pull the lever toward
you to position (@).
The Ga or i$) indicator light and the corre-
sponding message will appear in the instrument
cluster.
A WARNING
If the brakes are malfunctioning (for example,
overheating) while the cruise control system
is switched on, the regulating functions may
shut off automatically.
acyl (ladies Meme Laelia me Mem elaldace) |
speed
Applies to: vehicles with cruise control system
When the vehicle is stationary, you can preselect
the cruise control speed or activate the speed
while driving.
Requirement: the system must be switched on.
> To preselect a cruise control speed when the ve-
hicle is stationary, tap the lever toward @)/G)
> page 136, fig. 112.
> To activate the cruise control speed, pull the
lever toward position (@ while driving.
> To set the current driving speed as the cruise
control speed, press the button @) on the lever.
The active cruise control speed is indicated with
the ICRUISE| or indicator light in the instrument
cluster.
Page 140 of 318
Driver assistance
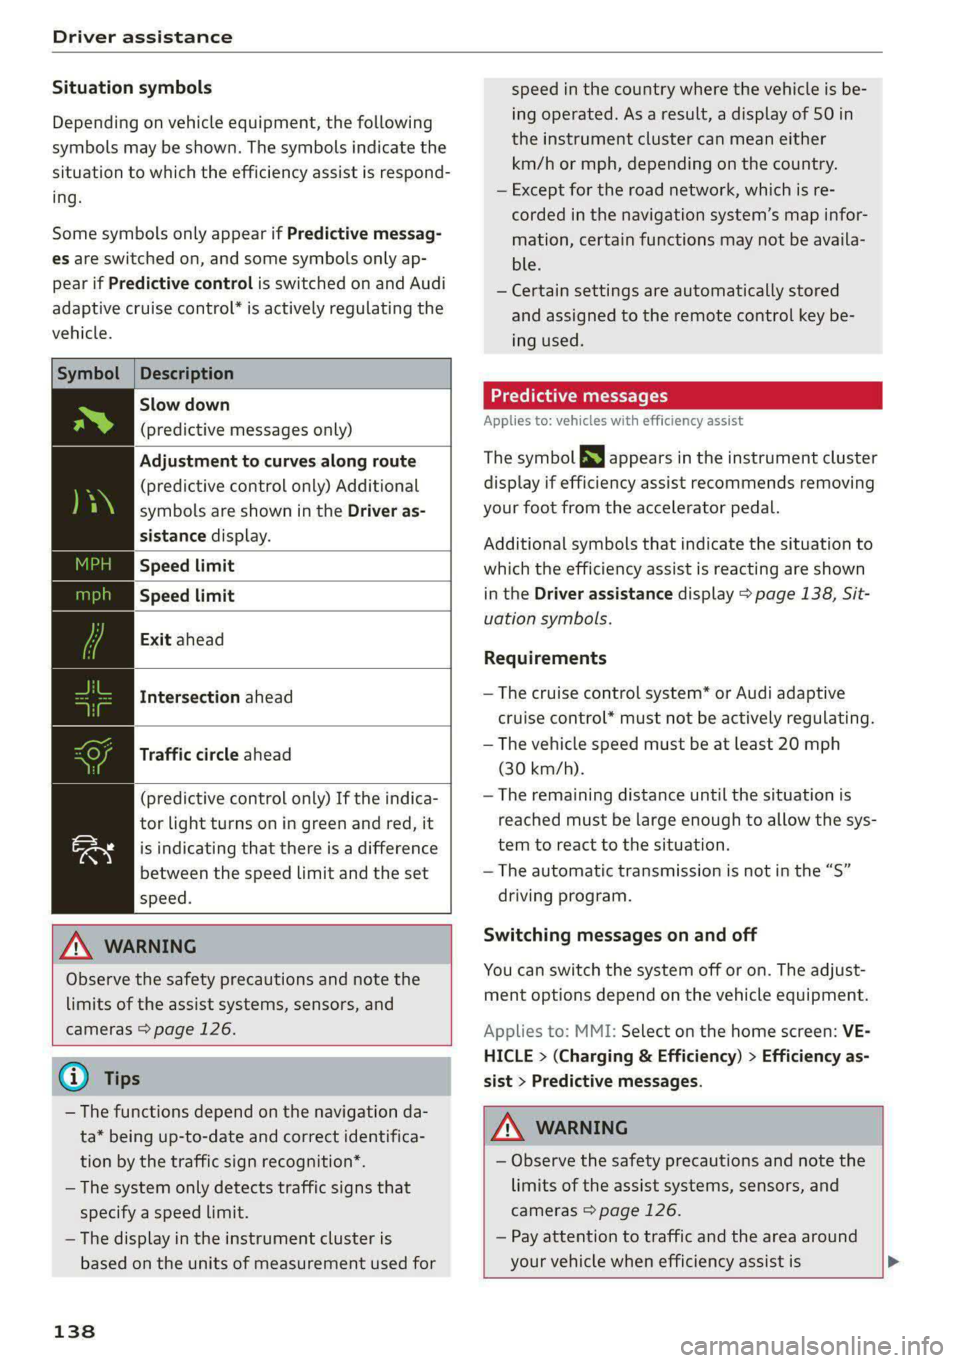
Situation symbols
Depending on vehicle equipment, the following
symbols may be shown. The symbols indicate the
situation to which the efficiency assist is respond-
ing.
Some symbols only appear if Predictive messag-
es are switched on, and some symbols only ap-
pear if Predictive control is switched on and Audi
adaptive cruise control* is actively regulating the
vehicle.
Symbol |Description
Slow down
(predictive messages only)
Adjustment to curves along route
(predictive control only) Additional
symbols are shown in the Driver as-
sistance display.
Speed limit
Speed limit
Exit ahead
Intersection ahead
Traffic circle ahead
(predictive control only) If the indica-
tor light turns on in green and red, it
is indicating that there is a difference
between the speed limit and the set
speed.
Z\ WARNING
Observe the safety precautions and note the
limits of the assist systems, sensors, and
cameras > page 126.
@) Tips
— The functions depend on the navigation da-
ta* being up-to-date and correct identifica-
tion by the traffic sign recognition*.
— The system only detects traffic signs that
specify a speed limit.
— The display in the instrument cluster is
based on the units of measurement used for
138
speed in the country where the vehicle is be-
ing operated. As a result, a display of 50 in
the instrument cluster can mean either
km/h or mph, depending on the country.
— Except for the road network, which is re-
corded in the navigation system’s map infor-
mation, certain functions may not be availa-
ble.
— Certain settings are automatically stored
and assigned to the remote control key be-
ing used.
Predictive messages
Applies to: vehicles with efficiency assist
The symbol BS appears in the instrument cluster
display if efficiency assist recommends removing
your foot from the accelerator pedal.
Additional symbols that indicate the situation to
which the efficiency assist is reacting are shown
in the Driver assistance display > page 138, Sit-
uation symbols.
Requirements
— The cruise control system* or Audi adaptive
cruise control* must not be actively regulating.
— The vehicle speed must be at least 20 mph
(30 km/h).
—The remaining distance until the situation is
reached must be large enough to allow the sys-
tem to react to the situation.
— The automatic transmission is not in the “S”
driving program.
Switching messages on and off
You can switch the system off or on. The adjust-
ment options depend on the vehicle equipment.
Applies to: MMI: Select on the home screen: VE-
HICLE > (Charging & Efficiency) > Efficiency as-
sist > Predictive messages.
Z\ WARNING
— Observe the safety precautions and note the
limits of the assist systems, sensors, and
cameras > page 126.
— Pay attention to traffic and the area around
your vehicle when efficiency assist is >