latch AUDI A5 2021 Owners Manual
[x] Cancel search | Manufacturer: AUDI, Model Year: 2021, Model line: A5, Model: AUDI A5 2021Pages: 318, PDF Size: 85.96 MB
Page 39 of 318

8W7012721BB
Opening and closing
Mechanically unlocking and locking the
doors
If the central locking fails, you must unlock or
lock the doors separately.
Fig. 24 Driver's door: door lock cylinder
[RAz-1149|
Fig. 25 Door: mechanically locking
Unlocking or locking the driver's door with
the mechanical key
> Remove the mechanical key > page 38.
> To unlock the driver's door, turn the mechanical
key to the unlock position in the direction of ar-
row @) ° fig. 24.
> Pull the door handle to open the driver's door.
> To lock the driver's door, select the "P" position
and turn the mechanical key once to the close
position @=> A\.
Locking the front passenger's door and rear
doors* using the mechanical key
The mechanical lock is located on the edge of the
doors (@) or in the latch opening @) > fig. 25. It is
only visible when the door is open.
> Remove the mechanical key > page 38.
> If necessary, remove the cap from the opening
> fig. 25.
> Insert the mechanical key into the slot on the
inside and turn it all the way to the right (right
door) or left (left door).
> If necessary, install the cap in the opening and
close the door.
Once the front passenger’s door or rear doors*
close, it will no longer be possible to open them
from the outside. The front doors can be opened
from the inside by pulling the door handle one
time. The rear doors* can be unlocked from the
inside by pulling the door handle one time and
then opened by pulling the door handle again. If
the child safety lock in one of the rear doors is ac-
tivated, you must first pull the door handle from
the inside. Then you can open the door from the
outside.
Z\ WARNING
Observe the safety precautions > page 34.
OMe aa)
Applies to: vehicles with anti-theft alarm system
If the anti-theft alarm system detects a vehicle
break-in, audio and visual warning signals are
triggered. The anti-theft alarm system is switch-
ed on or off when locking or unlocking your vehi-
cle. If the alarm is triggered, it will shut off auto-
matically after a certain amount of time.
Switching the alarm off manually
> To switch the alarm off, press the G button on
the vehicle key or switch the ignition on.
Depending on the vehicle equipment, the anti-
theft alarm system may have the following fea-
tures: >
37
Page 43 of 318

8W7012721BB
Opening and closing
ZA WARNING
If batteries or coin cell batteries are swal-
lowed or enter the body in any other way, they
can cause serious or fatal injuries within a
short period of time. There is a risk of chemi-
cal burns.
— Keep vehicle keys and key fobs with batter-
ies out of the reach of children.
— Keep new or used batteries away from chil-
dren.
— If the battery compartment on a vehicle key
does not close securely, stop using the key
and keep it away from children.
— Seek medical attention immediately if you
suspect that a battery was swallowed or has
entered the body in any other way.
@ For the sake of the environment
Discharged batteries must be disposed of us-
ing
methods that will not harm the environ-
ment. Do not dispose of them in household
trash.
G) Tips
Replacement batteries for the vehicle key
must meet the same specifications as the
original battery.
Luggage compartment
lid
General information
inside it. To reduce the risk of injury, do not
allow children to play in or around the vehi-
ley
—To reduce the risk of injuries by pinching,
make sure that no one is in the operating
area of the luggage compartment lid, in-
cluding the hinge areas and the upper and
lower edge of the luggage compartment lid.
— After closing the luggage compartment lid,
make sure that it is latched. The luggage
compartment lid could open suddenly while
driving, which would increase the risk of an
accident.
— Never drive with the luggage compartment
lid ajar or open, because poisonous gases
from the surrounding area can enter the ve-
hicle interior and increase the risk of asphyx-
iation.
— If there is a luggage rack (such as a bicycle
rack) on the luggage compartment lid, the
luggage compartment lid may not open
completely under certain circumstances or it
could close by itself if open due to the extra
weight. Therefore, the open luggage com-
partment lid must be given additional sup-
port or the cargo must first be removed
from the luggage rack.
— Applies to vehicles with power-operated or
sensor-controlled luggage compartment lid:
Pay careful attention when closing the lug-
gage compartment lid. Otherwise, you could
cause serious injury to yourself or others de-
spite the pinch protection.
ZA\ WARNING
— Applies to vehicles with anti-theft alarm sys-
tem: When the vehicle is locked from the
outside, no one - especially children - should
remain in the vehicle, because the windows
can no longer open from the inside
= page 37. Locked doors make it more diffi-
cult for emergency workers to enter the ve-
hicle, which puts lives at risk.
— Always close and lock the luggage compart-
ment lid and the doors when the vehicle is
not in use. Otherwise someone such as a
child could enter the vehicle through the
luggage compartment and become locked
@) Note
The luggage compartment lid can bump into
objects such as the garage ceiling when open-
ing and become damaged.
@) Tips
— When the vehicle is locked, the luggage
compartment lid can be unlocked separately
by pressing the “S button twice on the vehi-
cle key. The luggage compartment lid locks
automatically when it is closed again.
— The ability to open the luggage compart-
ment lid using the handle can be deactivat-
ed or activated in the MMI > page 35.
41
>
Page 58 of 318
Power top
compartment lid
Applies to: vehicles with power top
B8W-0260
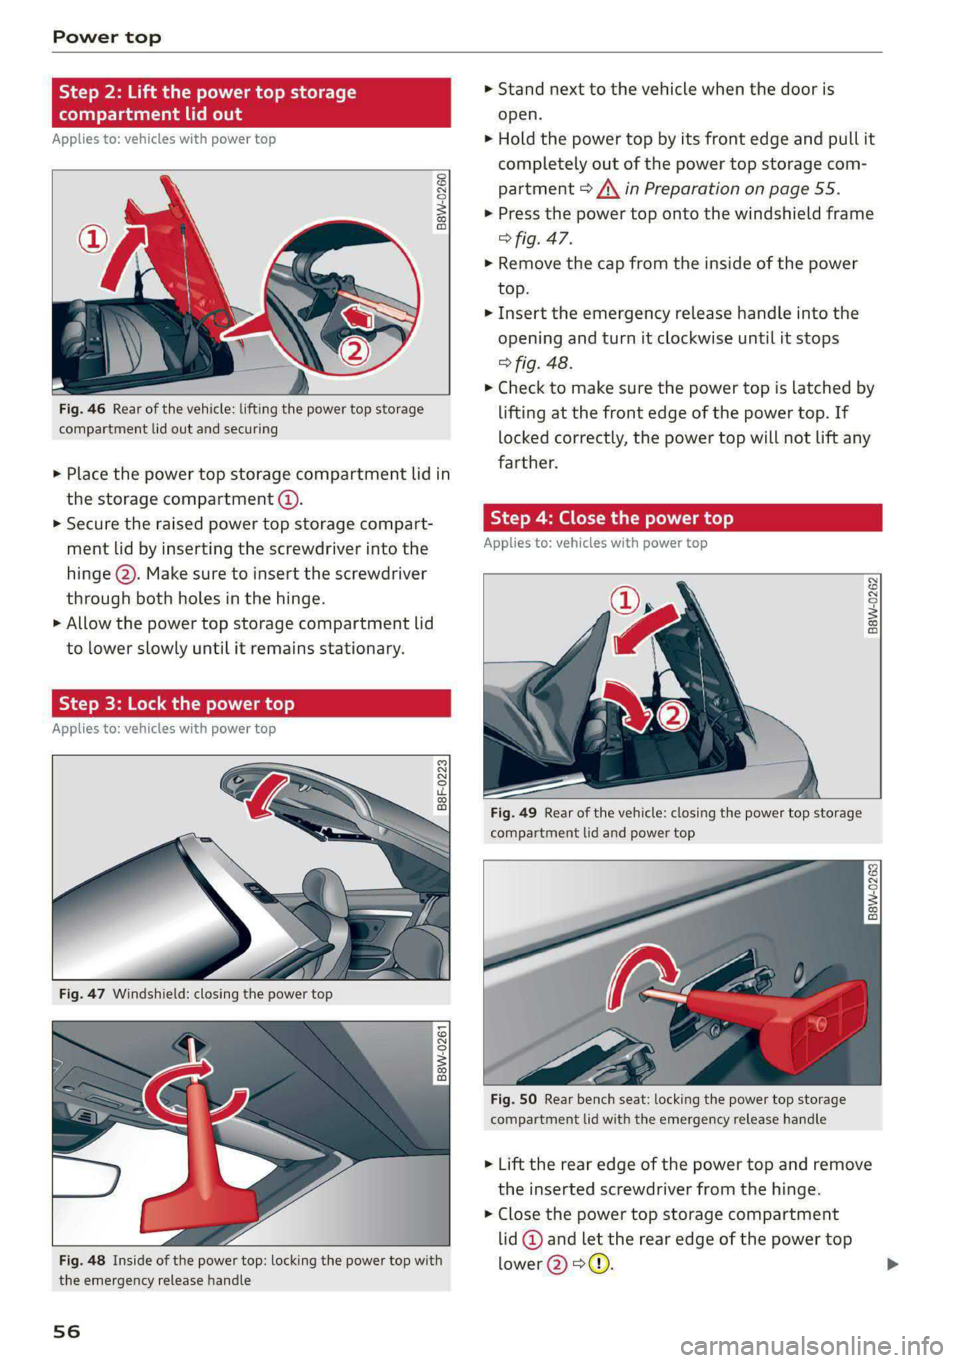
Fig. 46 Rear of the vehicle: lifting the power top storage
compartment lid out and securing
> Place the power top storage compartment lid in
the storage compartment ().
> Secure the raised power top storage compart-
ment lid by inserting the screwdriver into the
hinge @). Make sure to insert the screwdriver
through both holes in the hinge.
> Allow the power top storage compartment lid
to lower slowly until it remains stationary.
Step 3: Lock the power top
Applies to: vehicles with power top
B8F-0223
oS q
g|
a a
Fig. 48 Inside of the power top: locking the power top with
the emergency release handle
56
> Stand next to the vehicle when the door is
open.
> Hold the power top by its front edge and pull it
completely out of the power top storage com-
partment > A\ in Preparation on page 55.
> Press the power top onto the windshield frame
> fig. 47.
> Remove the cap from the inside of the power
top.
> Insert the emergency release handle into the
opening and turn it clockwise until it stops
> fig. 48.
> Check to make sure the power top is latched by
lifting at the front edge of the power top. If
locked correctly, the power top will not lift any
farther.
Step 4: Close the power to
Applies to: vehicles with power top
B8W-0262
Fig. 49 Rear of the vehicle: closing the power top storage
compartment lid and power top
B8W-0263
Fig. 50 Rear bench seat: locking the power top storage
compartment lid with the emergency release handle
> Lift the rear edge of the power top and remove
the inserted screwdriver from the hinge.
> Close the power top storage compartment
lid @ and let the rear edge of the power top
lower @>@.
Page 66 of 318

Lights and Vision
0 - Deactivates all adjustment functions.
Q/ #- Selects the left or right exterior mirror.
To adjust the mirror glass in a mirror, press the
knob in the desired direction.
GA - Heats the mirror glass depending on the
outside temperature.
©) - Folds the exterior mirrors*. To fold the mir-
rors out, turn the knob to one of the other posi-
tions. In the MMI, you can select if the mirrors
fold in automatically when you lock the vehicle
=> page 35.
Front passenger's exterior mirror tilt
function*
Requirement: the knob must be in the position
for the front passenger’s exterior mirror.
The mirror surfaces tilt slightly when reverse
gear is selected to provide a better view, for ex-
ample of the edge of the curb.
You can adjust the mirror surface by turning the
knob in the desired direction.
The mirror moves from the reversing position
back to the original position:
— When you switch the ignition off
— When you drive forward at speeds faster than 9
mph (15 km/h).
— When the knob is no longer in the position for
the front passenger exterior mirror
Z\ WARNING
Curved mirror surfaces (for example convex)
enlarge the field of vision. However, they
make objects in the mirror appear smaller and
farther away. When using these mirrors to es-
timate your distance to vehicles behind you
when changing lanes, you could estimate in-
correctly, which increases the risk of an acci-
dent.
@) Note
— Applies to: vehicles with power folding exte-
rior mirrors: If the mirror housing was
moved by outside forces (such as an impact
when maneuvering), you must use the pow-
er folding function to fold the mirror all the
64
way out. The mirrors will make a loud noise
when they latch into place. The mirror hous-
ing must not be moved back into place by
hand because this could impair the function
of the mirror mechanism.
— Applies to: vehicles without power folding
exterior mirrors: If the mirror housing was
moved by outside forces (such as an impact
when maneuvering), you must move it back
in place by hand.
— If you wash the vehicle in an automatic car
wash, you must fold the exterior mirrors in
to reduce the risk of damage to the mirrors.
Never fold power folding exterior mirrors*
by hand. Only fold them in and out using
the power controls.
@) Tips
If the power adjusting function malfunctions,
the glass in both mirrors can be adjusted by
pressing on the edge of it by hand.
Dimming the mirrors
Manual dimming rearview mirror
> Pull the lever on the bottom of the mirror back.
Automatic dimming rearview mirror
Applies to: vehicles with automatic dimming mirrors
> The interior and exterior mirrors dim automati-
cally when light shines on them, for example
from headlights on a vehicle behind you.
ZA WARNING
Applies to: vehicles with automatic dimming mirrors
— Electrolyte fluid can leak out from broken
mirror glass. This liquid can irritate the skin,
eyes and respiratory system. If there is con-
tact with the fluid, flush immediately with
plenty of water. Consult a physician if neces-
sary.
— Repeated or long-term exposure to electro-
lyte fluid can lead to irritation of the air-
ways, especially in people with asthma or
other respiratory conditions. Take deep
breaths immediately after leaving the vehi-
cle or, if this is not possible, open all of the
doors and windows as wide as possible.
Page 77 of 318

8W7012721BB
Sitting correctly and safely
> Press the button (2) and slide the head restraint
all the way down. It should not be possible to
remove the head restraint from the backrest
without pressing the button.
Safety belts
Each seat is equipped with a three-point safety
belt. Safety belts that are worn correctly are the
most effective way to reduce the risk of serious or
fatal injuries in a collision. Therefore, wear your
safety belt correctly and make sure that all vehi-
cle passengers are also wearing their safety belts
correctly when the vehicle is moving.
Even though your vehicle is equipped with an air-
bag system, every vehicle passenger must still al-
ways wear the appropriate safety belt. In addi-
tion to their normal protective function, safety
belts also hold vehicle occupants in the correct
seating position in the event of a collision so that
the airbags can deploy correctly and provide addi-
tional protection. Safety belts provide protection
during collisions when the airbags do not deploy
or if they have already deployed.
ZA WARNING
The risk of serious or fatal injury increases if
the safety belt is not fastened, if it is worn in-
correctly, or if it is damaged.
— All vehicle occupants, including the driver,
must fasten their safety belts correctly be-
fore every trip and must always keep their
safety belts fastened during the trip, regard-
less of whether the seat is equipped with an
airbag or not. This also applies to children
that are seated in a child safety seat that is
appropriate for their weight and age and
that is secured with a safety belt.
— In the event of a collision, vehicle occupants
that are not wearing safety belts could be
propelled through the vehicle interior and
collide with vehicle components, such as the
steering wheel, instrument panel, wind-
shield, or doors. In some situations, vehicle
occupants could also be ejected from the ve-
hicle. Vehicle occupants in the rear seats
who do not wear safety belts not only en-
danger themselves, but also other people in
the vehicle.
— Only one person may be fastened with a
safety belt at a time. Never secure more
than one person, including children, with a
single safety belt.
— Never allow children or infants to ride on an-
other person's lap and be belted into the
safety belt with them.
— Insert the belt buckle only in the belt latch
belonging to the corresponding seat, so that
the protective function is not impaired.
— To ensure the maximum protective function
of the safety belts, all vehicle passengers
must sit in the correct seating position
=> page 69.
— Check the condition of your vehicle’s safety
belts regularly > page 268. If you find dam-
age to the belt webbing, the belt connec-
tions, the retractor, or the buckle, have the
damaged safety belt replaced by an author-
ized Audi dealer or authorized Audi Service
Facility.
— The safety belts must not be removed or
modified in any way. Do not attempt to re-
pair the safety belts yourself.
— Safety belts that are strained during an acci-
dent must be replaced by an authorized
Audi dealer or authorized Audi Service Facili-
ty.
75
Page 79 of 318

8W7012721BB
Sitting correctly and safely
rivets on clothing in the area where the safety
belt is worn. Otherwise, the safety belt could
be damaged.
Belt po: tig
Applies to: vehicles with belt positioners
E 8 g
g
= a a
Fig. 75 Driver’s seat: belt positioner
Belt positioners make it easier to fasten the safe-
ty belts on the front seats.
The belt positioner extends automatically when
you close the door and switch the ignition on.
The belt positioner retracts automatically again
when the belt tongue locks into the belt latch, if
the safety belt is not fastened, if you switch the
ignition off, or if you open the door.
The belt positioners can cause injury or dam-
age if they pinch people or objects when ex-
tending or retracting.
em ee ale et Li1 am Loe
B4H-0462
Fig. 76 Belt buckle and belt latch
Fig. 77 Releasing the belt buckle from the belt latch
Observe the safety precautions > page 75.
Fastening the safety belt
> Pull the safety belt by the belt buckle evenly
across your chest and lap.
2 & a
2 a + a
> Insert the belt buckle in the belt latch belong-
ing to the seat until it audibly engages
> fig. 76.
> Pull on the belt to make sure that the belt is se-
curely locked in the latch.
Unfastening the safety belt
> Press the red button on the belt latch > fig. 77.
The belt buckle will pop out.
> Guide the belt back by hand so that the safety
belt can roll up more easily.
Safety belt monitoring system
Ba - If the indicator light turns on or flashes, a
safety belt is not fastened or it has been unbuck-
led while driving. Above certain speeds, addition-
al warning tones will sound.
Adjusting the height of the safety belt
B4G-0004
Fig. 78 Belt height adjustment for the front seats - safety
belt relay
77
>
Page 85 of 318

8W7012721BB
Sitting correctly and safely
According to these requirements, the front Ad-
vanced Airbag System on the passenger’s side
has been certified for “suppression” for infants
approximately 12 months old and younger, and
for “low risk deployment” for children aged 3 to
6 years old (as defined in the standard).
The advanced airbag system will activate or deac-
tivate the front passenger's airbag based on the
occupancy of the seat. If a front airbag deploys
during an accident, the deployment force will
adapt to the passenger.
Components
The advanced airbag system consists of the fol-
lowing components:
— Front airbags in the steering wheel and in the
instrument panel on the front passenger's side:
these can protect the front passengers during
an accident
— Passenger occupant detection sensor in the
front
passenger's seat: this detects if the front
passenger's seat is occupied (for example, by a
person or a small child in a child safety seat)
— Seat position sensors on the front seats: these
determine the distance between the seat and
the steering wheel or instrument panel
— Sensors in the front seat belt latch: these de-
tect if the safety belts are fastened
— PASSENGER AIR BAG OFF 8; ON ® indi-
cator light in the headliner:this indicates if the
front passenger's airbag is activated or deacti-
vated
- indicator light in the instrument cluster:
this monitors the function of the Advanced Air-
bag System components to ensure they are
functioning correctly
How the components function together
The passenger occupant detection sensor in the
front passenger's seat detects if the front pas-
senger's seat is occupied. The passenger occu-
pant detection sensor measures the electrical ca-
pacity on the front passenger’s seat. The pas-
senger's airbag is activated or deactivated de-
pending on the electrical capacity that is meas-
ured.
The passenger's airbag is activated if:
— The electrical capacity is higher than the
threshold stored in the control module
— The electrical capacity is the same as or greater
than the electrical capacity of a typical adult
The passenger's airbag is deactivated if:
— The electrical capacity is lower than the thresh-
old stored in the control module
— The electrical capacity is the same as or less
than the electrical capacity of a typical one-
year-old child in a child safety seat that has
been used for certification in accordance with
FMVSS 208
If the front passenger's airbag is activated, the
PASSENGER AIR BAG ON @ indicator light
will turn on. If the front passenger's airbag is de-
activated, the PASSENGER AIR BAG OFF #;
indicator light will turn on.
The deployment force of the front airbags adapts
based on whether or not the safety belt is used
and the distance between the seat and the steer-
ing wheel/instrument panel. For example, if a
person is too close to the front airbag, the front
airbag will deploy with less force to help reduce
the risk of injury.
Meaning of PASSENGER AIR BAG OFF #4, ON
® indicator light
When the ignition is switched on, the system de-
tects whether the front passenger's seat is occu-
pied. PASSENGER AIR BAG OFF #; ON @
will turn on for several seconds during this proc-
ess. Then it will indicate whether the front pas-
senger's airbag is activated or deactivated.
— PASSENGER AIR BAG OFF 8%: the front
passenger's airbag is deactivated and will not
deploy in the event of an accident.
— PASSENGER AIR BAG ON ®: the front pas-
senger's airbag is activated and could deploy in
the event of an accident.
If a change to the occupancy status of the front
passenger's seat is detected
PASSENGER AIR BAG OFF #; ON @ will
flash for several seconds and will then display the
status of the front passenger's airbag.
83
>
Page 88 of 318
Sitting correctly and safely
Facility and have the airbag system in-
spected.
— If you must use a forward-facing child safety
seat on the front passenger's seat, move the
seat as far back as possible so that it is as
far as possible from the front passenger's
airbag. While doing this, make sure the seat
can be adjusted all the way. A child in a child
safety seat on the front passenger's seat can
receive a severe impact if the front passeng-
er's airbag deploys, which increases the risk
of serious or fatal injury.
— Replace the child safety seat after an acci-
dent because there could be damage that is
not visible.
— Even if a child is not sitting in the child safe-
ty seat, the child safety seat must be se-
cured. An unsecured child safety seat may
be thrown through the vehicle interior dur-
ing sudden braking maneuvers or an acci-
dent.
Correct positioning for children
Always secure children in a child safety seat de-
signed for the body size, weight, and age of the
child.
You can secure child safety seats in your vehicle
using the lower LATCH anchors or the safety
belts. You can also secure child safety seats to
the top tether anchor. Depending on the child
safety seat, it may also be necessary to secure it
to the top tether anchor. In Canada, securing for-
ward-facing child safety seats to the top tether
anchors is required by law.
Always transport children in the rear seats
Accident statistics show that children that are se-
cured correctly in the rear seats are safer than in
front seats. Always transport children in suitable
child safety seats secured on the rear seats.
In exceptional circumstances: transporting
children in the front passenger's seat
If exceptional circumstances require the child
safety seat to be placed on the front passenger's
seat, then the front passenger's airbag must be
deactivated. Please note the important informa-
86
tion for this > page 82, Advanced airbag system.
If you must secure a forward-facing child safety
seat, move the front passenger's seat as far back
as possible so that it is as far as possible from the
front passenger's airbag. While doing this, make
sure the seat can be adjusted all the way.
Only switch to a larger child safety seat when
absolutely necessary
Switch to a larger child safety seat only when ab-
solutely necessary. Secure your child using a safe-
ty belt without a child safety seat only if all of the
following statements are true:
— The child is large enough to sit upright in the
seat
— The child is able to sit with his or her back rest-
ing completely on the seat backrest
—The child is able to sit with his or her knees
bent over the edge of the seat surface
—The child is able to sit with both of his or her
feet completely touching the floor in the foot-
well
— The lap portion of the safety belt lies flat and
securely over the hip area and never over the
stomach
— The shoulder portion of the safety belt lies flat
and securely over the center of the shoulder
and
the chest, and never under the arm, behind
the back, or over the neck or face.
—The child is able to maintain this seating posi-
tion throughout the entire trip
Read and follow the important information and
warnings regarding the correct use of safety belts
=> page 75.
G) Tips
— Child safety seats can also be secured to
seats with side airbags. In the event of an
accident, children can also be protected by
the side airbags if the child is correctly se-
cured in a suitable child safety seat that is
attached correctly.
— The lower LATCH anchors as well as the
safety belt may be required to correctly in-
stall some child safety seats. Using both at
the same time is permitted, provided that >
Page 89 of 318
8W7012721BB
Sitting correctly and safely
the fastening systems or safety belts do not
impair those in an adjacent seating position.
— All child safety seats are constructed so that
they can be secured using the lap safety belt
in the vehicle.
— Child safety seats with a load leg can only
be secured to the outer rear seats and to the
front passenger's seat.
Yate ie Man Cm eA Lm RMCLICLe
LATCH anchors
Lt Lg ce gpa lil
ATA aS
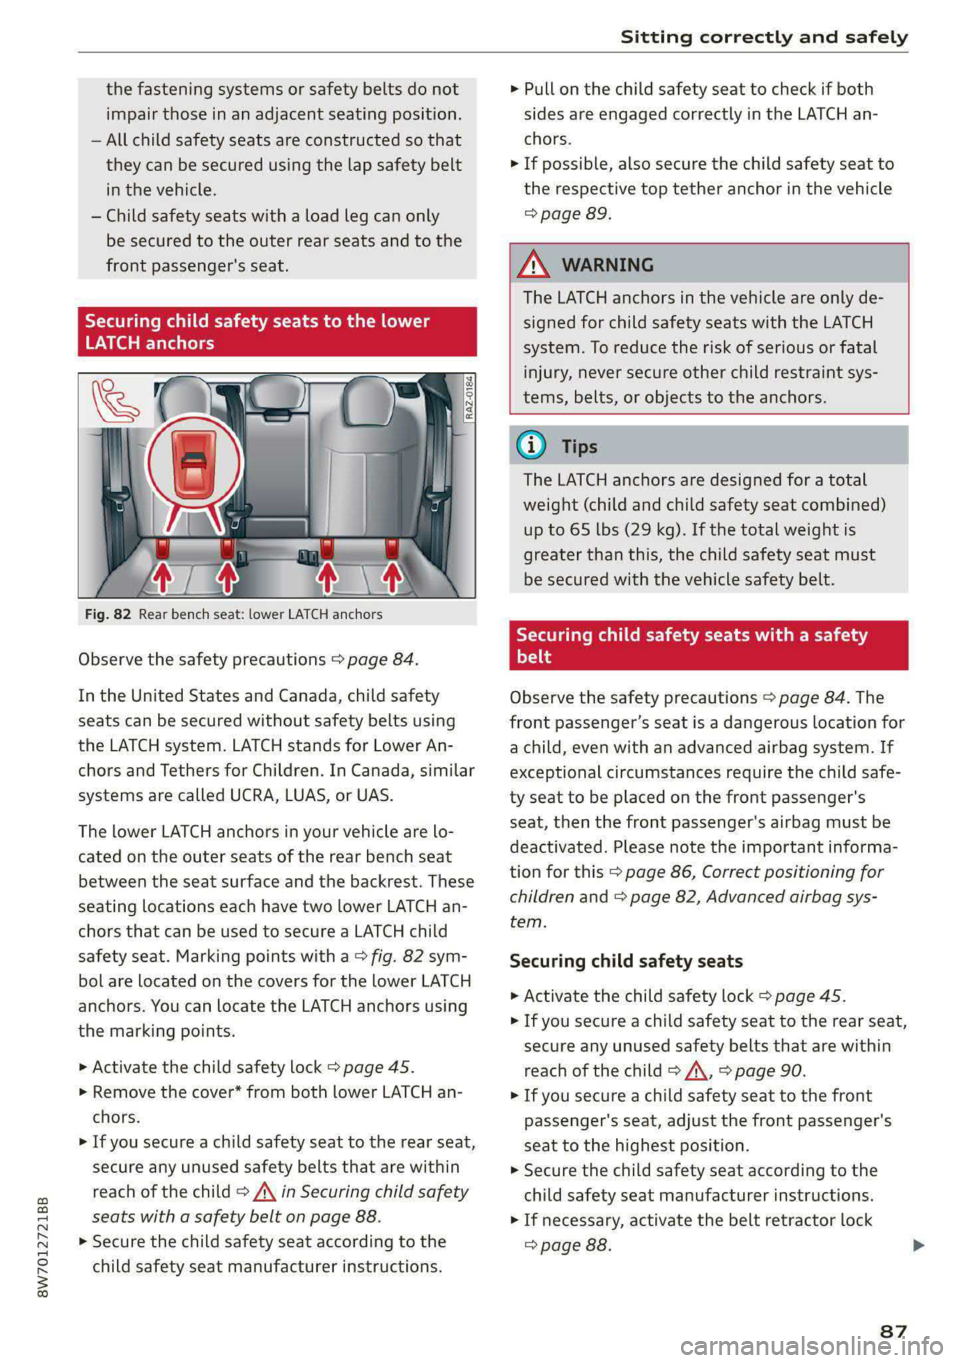
Fig. 82 Rear bench seat: lower LATCH anchors
Observe the safety precautions > page 84.
In the United States and Canada, child safety
seats can be secured without safety belts using
the LATCH system. LATCH stands for Lower An-
chors and Tethers for Children. In Canada, similar
systems are called UCRA, LUAS, or UAS.
The lower LATCH anchors in your vehicle are lo-
cated on the outer seats of the rear bench seat
between the seat surface and the backrest. These
seating locations each have two lower LATCH an-
chors that can be used to secure a LATCH child
safety seat. Marking points with a > fig. 82 sym-
bol are located on the covers for the lower LATCH
anchors. You can locate the LATCH anchors using
the marking points.
> Activate the child safety lock > page 45.
> Remove the cover* from both lower LATCH an-
chors.
> If you secure a child safety seat to the rear seat,
secure any unused safety belts that are within
reach of the child > A\ in Securing child safety
seats with a safety belt on page 88.
> Secure the child safety seat according to the
child safety seat manufacturer instructions.
> Pull on the child safety seat to check if both
sides are engaged correctly in the LATCH an-
chors.
> If possible, also secure the child safety seat to
the respective top tether anchor in the vehicle
=> page 89.
ZA WARNING
The LATCH anchors in the vehicle are only de-
signed for child safety seats with the LATCH
system. To reduce the risk of serious or fatal
injury, never secure other child restraint sys-
tems, belts, or objects to the anchors.
@® Tips
The LATCH anchors are designed for a total
weight (child and child safety seat combined)
up to 65 lbs (29 kg). If the total weight is
greater than this, the child safety seat must
be secured with the vehicle safety belt.
Securing child safety seats with a safety
Phy
Observe the safety precautions > page 84. The
front passenger’s seat is a dangerous location for
a child, even with an advanced airbag system. If
exceptional circumstances require the child safe-
ty seat to be placed on the front passenger's
seat, then the front passenger's airbag must be
deactivated. Please note the important informa-
tion for this > page 86, Correct positioning for
children and > page 82, Advanced airbag sys-
tem.
Securing child safety seats
> Activate the child safety lock > page 45.
> If you secure a child safety seat to the rear seat,
secure any unused safety belts that are within
reach of the child > A\, > page 90.
> If you secure a child safety seat to the front
passenger's seat, adjust the front passenger's
seat to the highest position.
> Secure the child safety seat according to the
child safety seat manufacturer instructions.
> If necessary, activate the belt retractor lock
=> page 88.
87
Page 90 of 318
Sitting correctly and safely
> If the child safety seat is secured on the front
passenger's seat, adjust the front passenger's
seat backrest until it rests flat against the child
safety seat. Also make sure that the upper safe-
ty belt fixture is behind the child safety seat.
> If you secure a child safety seat on the rear
seat, also secure it to the correct top tether an-
chor if possible > page 89.
Activating the belt retractor lock
If you secure a child safety seat using the vehicle
safety belt, you must activate the belt retractor
lock. Follow the child safety seat manufacturer
instructions.
The belt retractor lock prevents the safety belt
from becoming loose while driving, which could
result in the child safety seat no longer being ad-
equately secured.
> Secure the child safety seat according to the
child safety seat manufacturer instructions.
While doing so, pull out the safety belt. Insert
the safety belt into the belt latch that belongs
to that seat until it audibly locks.
> Pull the upper belt out completely and then al-
low it to retract. You will hear a clicking sound
while the belt is retracting. It will not be possi-
ble to pull the safety belt out any farther.
> Push the child safety seat into the seat and al-
low the belt to retract more.
> Make sure that the child safety seat cannot
move more than 1 inch (2.5 cm).
Deactivating the belt retractor lock
> Unbuckle the safety belt from the belt latch.
> Remove the child safety seat according to the
manufacturer instructions.
> Allow the safety belt to retract completely. The
belt retractor lock is deactivated.
vated if the child safety seat manufacturer
instructions require it.
— Due to the risk of fatal injury, never place a
rear-facing child safety seat on the front
passenger's seat when the front passenger's
airbag is switched on.
— For the child safety seat to offer the maxi-
mum protection, it is especially important
to route the vehicle safety belt correctly. Al-
ways follow the instructions from the child
safety seat manufacturer for routing the
safety belt correctly. Incorrectly fastened
safety belts can cause injuries, even during
minor accidents.
Z\ WARNING
— A safety belt that is not locked by the belt
retractor lock or a locking device cannot se-
cure a child safety seat while driving or in
the event of an accident, which increases the
risk of fatal injury. Always make sure the
belt retractor lock on the safety belt is acti-
88