ESP AUDI A5 CABRIOLET 2011 Service Manual
[x] Cancel search | Manufacturer: AUDI, Model Year: 2011, Model line: A5 CABRIOLET, Model: AUDI A5 CABRIOLET 2011Pages: 364, PDF Size: 86.48 MB
Page 147 of 364
________________________________________________ A_u_ d_i_ d_ r_iv _ e_ s_ e _ le_ c_t __ _
Audi drive select
Driving settings
Applies to veh icles : with Aud i driv e select
Introduction
Audi dr ive select makes it possible to exper ience d ifferent types of
vehicle set tings in one vehi cle. For ins tance, using the three
COMFORT, AUTO and DYNAMIC modes, the driver can switch from a
sporty to a com fortab le dr iv ing mode with the p ress of a bu tton .
Add itionally, in ve hicles with MMI*, the veh icle se tup for I NDI
VIDUAL * mode can be customized by you. This makes it poss ib le to
combi ne sett ings such as a sporty engi ne tuning w it h light stee ring.
& WARNING
• Improper use of the Audi drive select can cause collisions,
other accident s and serious personal injury.
• Never drive at speeds that are too high for traffic , road and
weather conditions. •
Applies to veh icles: wit h Aud i dri ve select
Description
Depending on the mode, the engine and automatic transmission
respond more quickly or in a more balanced ma nner to a ccelera tor
peda l movements.
The
Ser votron ic (power steering assistance)=> page 246 can also be
adapted to d riving situat ions.
Dynamic steering changes the steering rat io as a function of the
driv ing speed in order to op tim ize t he d river's required steer ing
effort . This sets the steer ing to be less sensitive at highe r sp eeds in
Controls and equip
ment Safety first
orde
r to provid e greate r contro l over the ve hicle. At r educ ed spe eds,
howeve r, steering is mo re direct in order to keep the stee ring effort
as minimal as possible whe n the drive r is maneuve ring the vehi cle. At
low and average speeds, dynamic steering add itiona lly p rovides more
responsive steer ing perfo rm ance. The driver can set the basi c
steering rat io characteristics.
Th e
adaptive damper s use sensors to recor d informat ion regar ding
stee rin g movements, b raking and accele ration ope ra tions by the
dr iver, road sur face , d riving speed, and load. This makes it possib le to
adapt damp ing to t he d riving situat ion virt ua lly in rea l time . Audi
dr ive select a lso makes it poss ible to satisfy the desire for sporty
s us pension (DY NAM IC) and comfort able suspension ( COMFOR T)
without giving up balanced tun ing (AUTO).
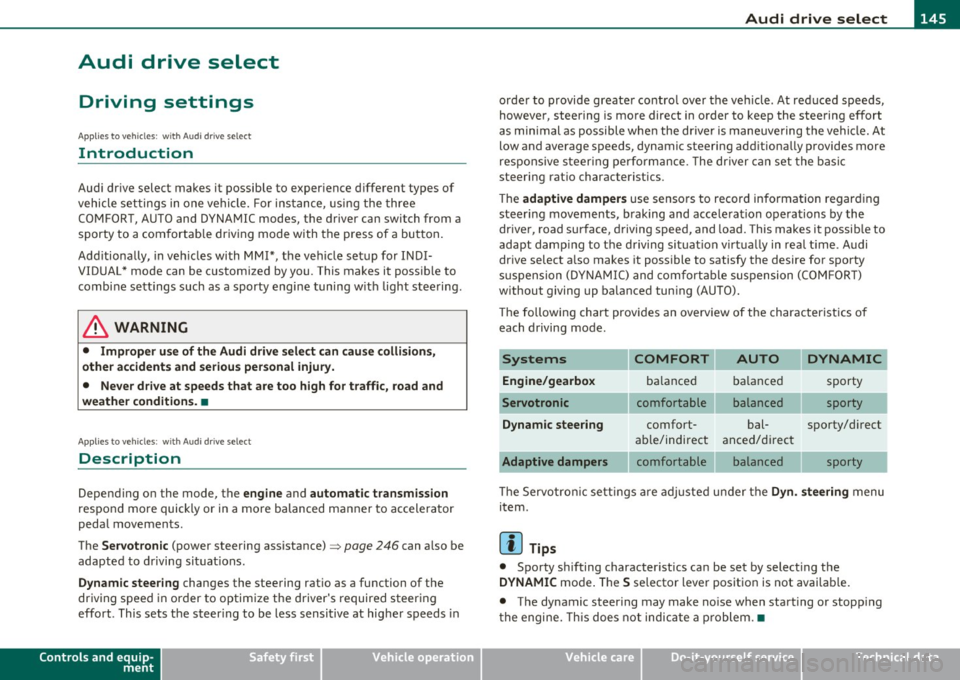
Th e followi ng chart prov ides an overv iew of t he char acteristics of
each driving mode .
Systems COMFORT AUTO DYNAMIC
Engine/gearbox bala nce d b ala nce d sporty
comfortable balanced sporty
Dynamic steering comfort- bal- sporty/d irect
ab le/indirect
anced/direc t
comfortable balanced sporty
Th e Servo tro nic sett in gs are a djusted und er the
Dyn. steering menu
item .
[I] Tips
• Spo rty sh ifting character istics can be se t by select ing the
DYNAMIC mo de. The S se lector lever posit io n is not avai lab le.
• The dynamic steer ing may make no ise when start ing or stopp ing
t he e ngine. This does no t indic ate a p roblem. •
Vehicle care Technical data
Page 148 of 364
llffl..__A_ u_d_ i _d _r_ i_v _e _ s_e _ l_ e _ c_ t _______________________________________________ _
Applie s to veh icl es : w ith A udi d riv e se lect
Selecting the driving mode
You can choose between COMFORT, AUTO, DYNAMIC and
INDIVIDUAL* modes.
en • 2 ,;
~- =========::::: LP
Fig. 149 Shift gate:
Control for Audi drive
select
Fig . 1S0 Ce nter
console: Control for
Audi drive select
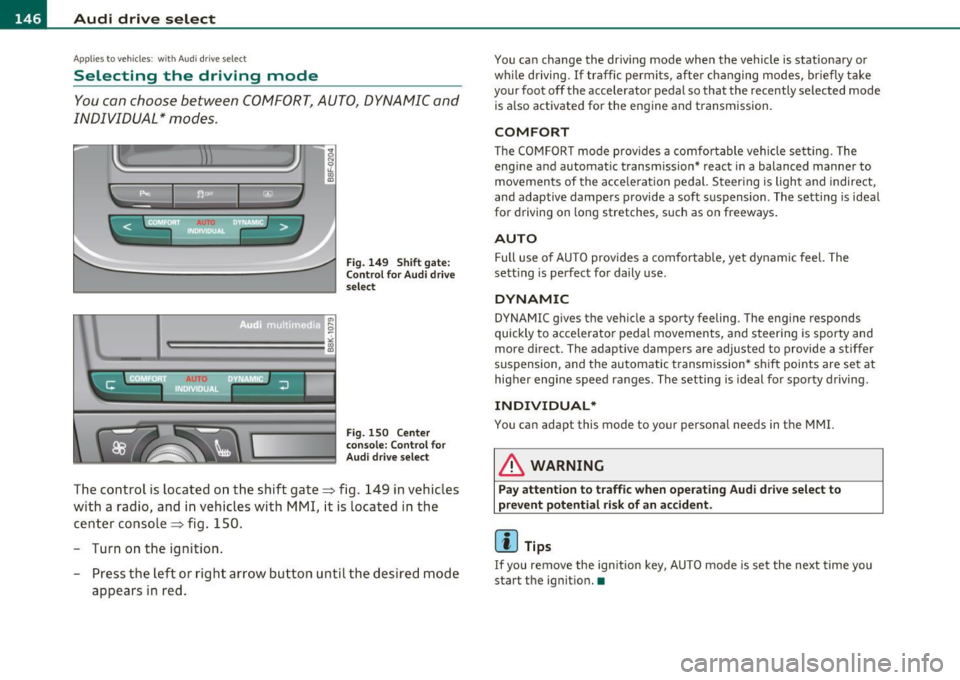
The control is located on the shift gate~ fig. 149 in vehicles
with a radio, and in vehicles with MMI, it is located in the
center console~ fig. 150.
- Turn on the ignition .
- Press the left or right arrow button u ntil the desired mode
appears in red.
You can change the driving mode when the vehicle is stationary or
whil e driving. If traffic permits, after changing modes, briefly take
your foot off the accelerator pedal so that the recently selected mode
is also activated for the eng ine and transmission .
COMFORT
The COMFORT mode provides a comfo rtable vehicle se tting. The
engine and automatic t ransm ission* react in a balanced manner to
movements of the acce leration pedal. Steering is light and indirect,
and adaptive dampe rs provide a soft s uspension . The setting is ideal
for driving on long stretches, such as on freeways .
AUTO
Full use of AUTO provides a comfortable, yet dynamic feel. The
sett ing is perfect for daily use .
DYNAMIC
DYNAMIC gives the vehicle a sporty feeling. The eng ine responds
quickly to accelerator pedal movements, and steering is sporty and
more direct. The adaptive dampers are adjusted to provide a stiffer
suspension, and the automatic transmission* shift points are set at
higher engine speed ranges. The setting is ideal for sporty driving.
INDIVIDUAL*
You can adapt this mode to your personal needs in the MMI.
& WARNING
Pay attention to traffic when operating Audi drive select to
prevent potential risk of an accident .
(I] Tips
If you remove the ignition key, AUTO mode is set the next time you
start the ignition. •
Page 165 of 364

______________________________________________________ P_a _ r_ k_ a_ s_s _i _ s _t __ _
Please note that low objects already signaled by a warning can disap
pear from the system's detection range and will not continue to be
signaled.
If the distance to an obstacle remains the same, the vo lume of the
distance warning is gradually reduced after about 4 seconds.
Approaching another obstacle will result in the distance warning
sounding at the normal volume again.
Malfunctions in the system
If a warning tone is aud ible for about five seconds when you turn on
the ignition , there is a malfunction in the system. Have the problem
corrected by your authorized Audi dealer.
Keep the sensors in the rear bumper clean and free from ice so that
the acoustic park assist system can function properly.
& WARNING
• Sensors have dead spaces in which objects cannot be detected.
Be especially alert for small children and animals, since they are
not always detected by the sensors.
• The Acoustic Parking System is not a substitute for the driver's
own caution and alertness. Ultimate respon sibility always
remains with the driver during parking and similar maneuvers.
Always watch where you are driving.
• You should always adjust the volume and frequency of the
chimes so that you can easily hear the acoustic distance warning
even if the radio is playing, the air-conditioner blower is on High
or there is a high level of outside noise .
- Check the settings whenever anyone else has driven the
vehicle before you.
0 Note
• Remember that low obstacles for which a warning has already
been issued may "dive" below the system 's sensing zone if the veh icle
is be ing backed up closer . In this case, the warning sound shutting off
Controls and equip
ment Safety first
does not ind
icate that you have cleared the obstacle . Instead, impact
is immin ent.
• Objects such as trai ler hitches, chains, narrow posts or fences
covered by a thin layer of paint may not always be detec ted by the
system . They can still damage your vehicle w ithout warning .
lI] Tips
Keep the sensors in the rear bumper clean and free of snow and ice so
that the aco ustic parking assist system can function properly.•
Applies to ve hicle s: wit h pa rkin g system (re ar)
Adjusting the chimes
The volume and the pitch (frequency) of the chimes can
be adjusted in the radio or in the /11/111*.
Rear volume adjustment
-Select: [CAR]> Parking system .
- Select Rear volume if you want to change the volume of
the rear signal generator.
Rear frequency adjustment
- Select: [CAR]> Parking system.
- Select Rear frequency when you want to change the
frequency of the rear audible signal generator.
When adjusting the volume and frequency, the new sett ing will
sound for approx. 2 seconds from each audib le signal generator. The
vol ume and frequency settings are automatically stored and assigned
to the master key with remote control. .,_
Vehicle care Technical data
Page 166 of 364
llffl..__P_ a_r_ k_ a_ s_ s_ is_t ____________________________________________________ _
& WARNING
• You should always adjust the volume and frequ ency of the
chime s so that you can easily hear the a cou stic di stan ce warning
ev en if the radio i s playing , th e air-conditioner blower is on High
or there i s a high level of outside noise .
- Check the setting s whenever anyone else ha s driven the
v ehicle before you. •
Parking system (rear , with rear
view camera)
App lies to vehicles : with park ing system (rea r) an d rear -v iew camera
Introduction
0 110
9
"' 110 m
Fig . 167 Parking
mo de 1 : rev er se
par king
Fi g. 168 P arking
mode 2: parallel
par kin g
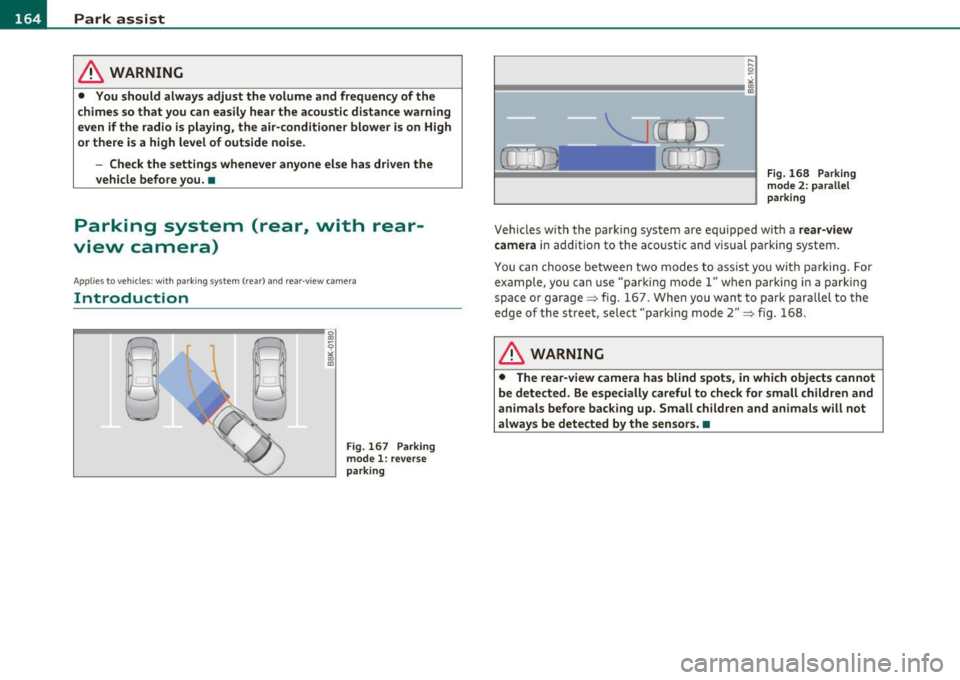
Vehicles wit h the park ing system are equ ipped with a rear-v iew
camera
in add ition to the aco ustic and v is u al parking system .
You can choose between two modes to ass ist yo u wit h pa rking . For
example, you can use "parking model" when par king in a parking
spa ce o r garage ~ fig. 16 7. When you wan t to park parallel to the
edge of the street, select "pa rking mode 2"
~ fig. 168.
& WARNING
• The rear-view camera has blind spot s, in which objects cannot
be detected. Be especially c areful t o check for small children and
animals before backing up . Small child ren and animals will not
alway s be dete cted by the sensor s. •
Page 168 of 364
lffll.__ __ P_a _ r_ k_ a_ s_ s_is _ t ____________________________________________________ _
• Remove snow with a hand brush and ice preferab ly w ith a de- ic ing
spray =:>0.
& WARNING
• The parking aid cannot repla ce the driv er' s att ention. The
d river alone is re spons ible for parking and sim ilar driving maneu
ver s.
• Alwa ys keep your e yes on the vehicle 's sur round ings, us ing the
rear -view mirror as well.
• Do not allow yourself t o be d istr acted fr om tr affic by the r ear·
vi ew cam era pictur es.
• If the posit ion and the installati on ang le of th e came ra ha s
changed, for ex ample, after a rear en d collision, do not continue
to us e the system for s afe ty reaso ns. Hav e it che cked b y a qualified
deale rship .
0 Not e
• Low obstacles a lready s ignaled by a wa rning can disappear from
the system's detection range as they are approached and will not
cont inue to be s ignaled. Objects such as barrie r cha ins, trailer draw
bars, thin painted vertical poles or fences may not be detected by the
system, posing risk of damage .
• Never use warm or hot water to remove snow or ice from the rear
view came ra lens - dange r of crack format io n on the lens!
• When cleaning the lens, never use products that are abrasive.•
Applies to vehic les: with pa rk ing syst em (rear) and rear-v iew camera
Switching on /off
The rearview camera switches on automatically together
with the acoustic and optical park assist when you put the
vehicle in reverse.
Activation
- Put the vehicle in reverse gear, the acoustic parking
system with rear-view camera is activated automatically .
Activation of the acoustic parking system is confirmed by
a brief acknowledgement sound .
Switching between the rearview camera and
optical display
-Press the Graphic control button~ page 167, fig. 171 ®
to see the optical display .
- Press the
Rear view control button to see the rearv iew
camera image.
Deactivation
-Take the vehic le out of reverse gear . The acoust ic parking
system is immed iate ly deactiva ted, and the rear-view
camera picture is deactivated automatically after a period
of about 15 seconds , or
- Switch the ignition off, the entire acoustic pa rkin g system
is automatica lly deactivated .
The rear-view came ra will dea ct ivate au tomatically when yo u shift
into a forward gear and drive faster than about 9 mph (15 km/h).
T he de lay in deactivating the camera provides an uninterrupted view
beh ind the vehicle espec ially when maneuver ing in tight park ing
spaces and prevents the picture from tu rning off the every time you
shift out of reve rse .
~
Page 169 of 364

___________________________________________________ P_ a_ r_k _ a _ s_s _ i_s _t _ __.fflll
If the warning message appears in the display but not the rear-view
camera picture, read and confi rm the warn ing message . The aco ustic
distance signal is always act ive.
If you press a function button on the MMI control console, the rear
view camera picture disappears. The rear-view camera picture reap
pears the next time you park .
Further information on the wa rning message and the MMI contro l
console can be found in the MMI instruct io n booklet.
(I] Tips
• The rear-view camera picture is ava ilable as soon as the MMI
Display or the MMI is .switched on, or the start-up phase is completed.
• Keep the sensors in the rear bumper and the rear-view camera lens
clean and free of snow and ice, so that the parking system can work
properly . Please follow the additional notes on=>
page 170. •
App lies to veh icles : w ith parking system (r ear) and rear-view camera
Reverse Parking
Parking mode 1 can be used when parking in a garage or
parking space.
Con tro ls a nd e quip
m en t
Fig. 17 1 MMI D ispla y:
Aim ing at a par king
sp ot
Vehicle OP-eration
Fig.172 MMI D ispl ay:
A lig ning the vehicl e
-Switch th e MMI on and select the reverse gea r.
- Turn the steering wheel until the orange orientation lines
(D appear in the parking spot=> fig. 171. Use the mark
ings @to help you es timate the distance from an
obstacle. Each marking co rres ponds to 3 ft (1 m). The
blue area repr esen ts an ext ension of the vehicle 's outline
by approximately 16 ft (S m) to the rear .
- While driving in reverse gear, adjust the steering wheel
angle to fit the parking space wi th the aid of the orange
orienta tion lines=>
0. ® marks th e re ar bumper . You
should sto p driving in reverse as soon as and no later than
when the red orientation line © abuts an object=> &!
& WARNING
• The re ar- vie w came ra doe s not sh ow th e entire are a behind the
veh icl e=>
pag e 165, fig. 169. Watch out espe ciall y for small chil
dr en and anim als. Th e rear-view cam era cannot alwa ys dete ct
th em, posing ri sk of an a ccident!
• Plea se note that objec ts not tou ching th e ground can appear to
be furthe r awa y than the y reall y are ( for e xample , th e bump er of
a p arked vehi cle, a trailer hitch , or the rear of a truck ). In thi s ca se, .,_
Vehicle care Do-it-yourselt service iTechnical data
Page 178 of 364
........ _D_ r_iv _i_ n .... g=-- S_ a_f _e _Ly :,.._ ______________________________________________ _
Driving Safely
General notes
Safe driving habits
Please remember -safety first!
Th is chapter contains important information, t ips, instructions and
warnings that you need to read an d observe fo r you r own safe ty, the
safety of you r passengers and others . We have summarized here
w hat you need to know about sa fety belts, airbags, child restra ints as
we ll as child safety . You r safety is for us
priority number 1. Always
observe the information and warnings in this section -for your own
safety as well as t hat of your passengers.
The informat ion in this section applies to all mode l versions of yo ur
veh icle . Some of the fe atures des cribed in this se ctions m ay be st an
dard equ ipment on some models, or may be optional eq uipment on
others. If you a re not sure, ask your a uth o rized Audi dealer.
& WARNING
• Always make sure that you follow the instructions and heed
the WARNINGS in th is Manual. It is in your interest and in the
intere st of your passengers.
• Always keep the complete Owner's Literatu re in your Audi
when you lend or sell your vehicle so that this important informa
tion will always be available to the driver and passengers .
• Always keep the Owner's literature handy so that you can find
it easily if you have questions . •
Safety equipment
The safety features are part of the occupant restraint
s y stem and wor k together to he lp reduce the ris k of injury
in a wide variety of accident situations.
Your sa fety and t he safety o f yo ur passenge rs shou ld no t be left to
chance . Adva nces in technology have made a variety of features avai l
a b le to help re duce the risk of injury in an a cc ident . The fo llow ing is a
list of jus t a few of the safety features in your Audi:
• sophisticated safety belts for driver and a ll passenger seating
p osi tion s,
• belt force limiters for the front seats,
• belt pr etensioners fo r th e sea ts,
• hea d restrain ts f or eac h se ating posi tion,
• front airbags,
• side airbags i n the fro nt s eats,
• special LATCH anchorages fo r chi ld restra in ts,
• adjustable steering co lumn.
T hese individual safety feat ures, can work together as a system to
he lp protect you and yo ur passengers in a wide range of accidents .
T hese feat ures cannot work as a system if they are not a lways
c o rrect ly adjusted and cor rect ly used .
Safety is everybody's responsibility! •
Page 179 of 364
Driving Safely ---------------------"~'----
Important things to do before driving
Safety is everybody's job! Vehicle and occupant safety
always depends on the informed and careful driver.
For your safety and the safety of your passengers, before
driving always:
- Make sure that all lights and signals are operating
correctly.
- Make sure that the tire pressure is correct.
- Make sure that all windows are clean and afford good visi-
bility to the outside.
- Secure all luggage and other items carefully::::>
page 87.
-Make sure that nothing can interfere with the pedals.
- Adjust front seat, head restraint and mirrors correctly for your height .
- Instruct passengers to adjust the head restraints according to their height.
- Make sure to use the right child restraint correctly to
protect children ::::,
page 221, "Child Safety".
- Sit properly in your seat and make sure that your passen gers do the same::::,
page 77, "General recommenda
tions".
- Fasten your safety belt and wear it properly. Also instruct
your passengers to fasten their safety belts properly
=:> page 189. •
Controls and equip
ment Safety first Vehicle operation
What impairs driving safety?
Safe driving is directly related to the condition of the
vehicle, the driver as well as the driver's ability to concen
trate on the road without being distracted .
The driver is responsible for the safety of the vehicle and all
of its occupants. If your ability to drive is impaired, safety
risks for everybody in the vehicle increase and you also
become a hazard to everyone else on the road::::,,& . There
fore:
Do not let yourself be distracted by passengers or by using
a cellular telephone.
NEVER drive when your driving ability is impaired (by
medications, alcohol, drugs, etc.).
- Observe all traffic laws, rules of the road and speed limits
and plain common sense .
- ALWAYS adjust your speed to road, traffic and weather
conditions.
- Take frequent breaks on long trips. Do not drive for more than two hours at a stretch.
- Do NOT drive when you are tired, under pressure or when
you are stressed .
& WARNING
Impaired driving safety increases the risk of serious personal
injury and death whenever a vehicle is being used.•
Vehicle care Do-it-yourself service Technical data
Page 183 of 364
________________________________________________ D_ r_ i_ v _i_n ""'g "-- S_a_ f_ e_ l _,,y'-- __
Adjusting head restraints=> page 82.
& WARNING
Driving without head rest raints or with head restraint s that are
not properl y adju sted increa se s the risk of seriou s or fatal neck
injuriy dram atically. To help reduce the risk of injury :
• Always drive w ith the h ead restraints in place and properly
adjusted.
• Every person in the vehicle must have a prope rly adju sted head
restraint.
• Always make sure each person in the vehicle properly ad justs
their head restraint. Adju st the head restraints so the upper edge
i s as even a s pos sible with th e top of your head . If that i s not
possible, try to adjust the head re straint so that it is as close to
this position as po ssible.
• Never attempt to adjust head restraint while driving. If you
have driven off and must adjust the driver headrest for any reason ,
first stop the vehicle safely before attempting to adju st the head
restraint.
• Children must alwa ys be properly restrained in a child re straint
that is appropriate for their age and size
=> page 221 . •
Examples of improper seating positions
The occupant res traint sy stem can o nly redu ce the risk of
injury i f veh icle occup ants are properly sea ted .
Im proper seati ng positio ns can caus e ser ious inju ry o r death .
Safety belts can on ly work w hen t hey are pro perly posi tio ned
on t he body. Impro per sea tin g posit io ns re duce the effect ive
ness of safety belts and w ill even increase the risk of i njury
and deat h by moving the s afety belt to crit ic a l areas of the
body. Imp roper seati ng positions also increase the r is k of
serious injury and death when an airbag deploys and str ikes
Controls and equip
ment Safety first Vehicle operation
an occ
upan t who is not in th e proper s eati ng pos ition . A
d river is respons ib le f or t he safe ty o f all vehic le occu pants
a nd especial ly for children . Therefore:
- Never allow anyone to a ssum e an in correc t sea ting pos i-
t ion whe n the v ehic le is bei ng us ed::::;, &.
The follow ing b ulletins list only some sample positions that will
increase the risk of serious in ju ry and death. O ur hope is that these
examples will ma ke you mo re awa re of seat ing posi tions t hat are
dangero us.
Therefore, whenever the vehicle is moving :
• never stand up in the vehicle
• never stand on the seats
• never knee l on t he se ats
• never ride with the seatback reclined
• never lie down on the rear seat
• never le an up agains t th e ins tru ment panel
• never sit on the edge of the seat
• neve r sit s ideways
• never lean o ut the win dow
• never put your feet out the window
• never p ut yo ur feet on the ins trumen t panel
• never rest your feet on the seat c ush ion or back of the seat
• never ride in the footwell
• never ride in the cargo area
& WARNING
Improper seating position s in crease the ri sk of seriou s personal
injury and death whenever a vehicle is being used. _,.
Vehicle care Do-it-yourself service Technical data
Page 186 of 364
• ....__D_ r_iv _i_ n_, g=-- S_ a _ f_e _,Ly _ ______________________________________________ _
in. WARNING
Improperly stored luggage or other items can fly through the
vehicle causing serious personal injury in the event of hard braking
or an accident. To help reduce the risk of serious personal injury:
• Always put objects, for example, luggage or other heavy items
in the luggage compartment .
• Always secure objects in the luggage compartment using the
tie-down eyelets and suitable straps.
& WARNING
Heavy loads will influence the way your vehicle handles. To help
reduce the risk of a loss of control leading to serious personal
injury:
• Always keep in mind when transporting heavy objects, that a
change in the center of gravity can also cause changes in vehicle
handling:
-Always distribute the load as evenly as possible.
- Place heavy objects as far forward in the luggage compart-
ment as possible.
• Never exceed the Gross Axle Weight Rating or the Gross Vehicle
Weight Rating specified on the safety compliance sticker on the
left door jamb . Exceeding permissible weight standards can cause
the vehicle to slide and handle differently.
• Please observe information on safe driving=>
page 176.
in. WARNING
To help prevent poisonous exhaust gas from being drawn into the
vehicle, always keep the rear lid closed while driving.
• Never transport objects larger than those fitting completely
into the luggage area because the rear lid cannot be fully closed.
& WARNING (continued)
• If you absolutely must drive with the rear lid open , observe the
following notes to reduce the risk of poisoning:
-Close all windows,
- Close the power top,
- Open all air outlets in the instrument panel,
- Switch off the air recirculation,
- Set the fresh air fan to the highest speed.
in. WARNING
Always make sure that the doors, all windows, the power top and
the rear lid are securely closed and locked to reduce the risk of
injury when the vehicle is not being used.
• After closing the rear lid, always make sure that it is properly
closed and locked.
• Never leave your vehicle unattended especially with the rear lid
left open. A child could crawl into the vehicle through the luggage
compartment and close the rear lid becoming trapped and unable
to get out. Being trapped in a vehicle can lead to serious personal
injury.
• Never let children play in or around the vehicle.
• Never let passengers ride in the luggage compartment. Vehicle
occupants must always be properly restrained in one of the
vehicle's seating positions .
(I) Tips
• Air circulation helps to re du ce win dow fogging. Stale air escap es
to the outside th rough vents in the trim panel. Be sure to keep t hese
slots free and open.
• Th e tire pressure must correspond to the load . The tire pressure is
shown on the tir e pressure label. The tire pressure label is located on .,_