instrument cluster AUDI A5 CABRIOLET 2013 User Guide
[x] Cancel search | Manufacturer: AUDI, Model Year: 2013, Model line: A5 CABRIOLET, Model: AUDI A5 CABRIOLET 2013Pages: 290, PDF Size: 72.35 MB
Page 44 of 290
42 Power top
Power top
Automatic power top
General information
The sophisticated design of the fabric power
top allows you to operate it easily and quickly.
You can open and close the power top while
driving as long as the vehicle is traveling be
low 30 mph. When open, the power top is
stored in a special compartment which is
equipped with a cover.
Under normal conditions, the power top is
wind- and waterproof . In rare cases, small
droplets of water may form under extreme
weather conditions such as torrential or pro longed rain. That is normal and no cause for
concern.
F ollow the maintenance instructions to main
tain the attractive appearance of the converti ble and to ensure that it does not leak
<=> page 19 7, Power top care. Also observe
the following:
- Only open and close the power top when it is
clean. Sharp-edged particles of dirt can
scratch the rear window when the power top
is folded and can cause abrasion that result
in damage to the power top over time. You
should also remove ice and snow before
opening the power top.
- Never remove snow and ice with sharp
edged objects. You can remove ice from the
rear window w ith a standard ice scraper .
- You should on ly open the power top when it
is completely dry. Opening the power top
and stowing it in the compartment when it
is wet can cause marks on the top that de
tract from its appearance. Mildew can also
form if the power top is stowed for an ex
tended period of time when it is wet.
- Do not leave the power top open for several
weeks at a time. Always close it between
uses to prevent discoloration and creases
from forming. This is especially important if
it was not completely dry when stowed.
- Opening or closing the power top in temper
atures below 32 °F
(0 °() is not recommend- ed because the flexibility of the fabric
de
creases is sub-zero temperatures .
A WARNING
--When operating the power top, make
sure the function is not affected by wind
or other factors and that it does not in
terfere w ith other dr ivers.
- Never drive when the power top is not
locked correctly. The wind from driving
could cause the power top to open . This
can result in injuries and damage to the
veh icle.
- When opening and closing the power
top, make sure no one will be injured by
the supports and other moving parts.
- Operating the power top reduces the
headroom in the rear of the vehicle.
Make sure there is enough clearance be
tween the rear passenger and the power
top when opening and closing it.
-
-When operat ing the power top, visibility
to the rear is limited . Avo id operat ing the
top while driving in reverse.
(D Note
-Always make sure there is enough clear
ance above the vehicle so the power top
is not damaged when opening and clos
ing it.
- Do not store any objects in the power top
compartment to avoid damage when
opening the top.
@ Tips
- To prevent the battery from discharg ing,
do not open or close the power top re
peated ly when the engine is switched
off.
-A message in the instrument cluster dis
play will a lert you if a protection function
was activated or if there is a malfunction
<=>page 43.
-The power top can also be operated
manually if there is a malfunction
<=> page 47, Power top emergency op
eration.
Have you authorized Audi dealer .,..
Page 45 of 290
correct the cause of the mal function as
soon as possible.
- If park ing the veh icle w ith the power top
open, remember that the ve hicle interior
will not be protected from the weather
or from unauthorized entry. Closing the
power top before leaving the vehicle is
r ecommended. If you leave items in the
vehicle, lock them in the trunk .
"' Power top operation
The indicator light monitors the power top.
The l'JI indicator light illuminates for approxi
mate ly 2 seconds when the ignit ion sw itches
on to check the function and then goes out
again . T he indicator light also:
- illuminates when the power top opens or
closes.
- blinks if the power top switch is operated
but the conditions for opening or closing the
power top are not met. A warning message
also appears in the instrument cluster dis
play
c::> page 43, Error message in the in
strument cluster display .
-if the power top d id not open or close com
pletely.
(D Tips
The indicator light stays on if the power
top was opened manually.
Error message in the instrument cluster
display
An error message appears if the power top
cannot open or close .
Several conditions must be met for the power
top to open or close automat ically .
An error message in the instrument cluster
d isp lay ind icates if one of the condit ions is not
met or there is a malfunct ion.
Power top: please close rear lid
The luggage compartment lid must be closed
when the power top is opening or closing . This
error message appears in the instrument cl us-
Power top 43
ter display if the luggage compa rtment lid is
not closed .
Storage bay not lowered. Please remove
obstruction
The power top sto rage bay must lower when
the power top is opening . This error message
appears in the instrument cluster display if
the storage bay is not lowered. If the storage
bay does not lower automat ically because of
objects in the luggage compartment, remove
the objects that are in the way from the stor
age bay area . Otherwise, you can operate the
power top storage bay manually
c::> page 45.
Power top : cannot be used
This error message appears if the convertible
cannot open or close automatically because of
safety reasons or if there is a malfunct ion . The
follow ing causes are possible:
- Vehicle speed too high: Power top opera
tion is deactivated and an error message ap
pears if the veh icle speed is too high. Re
duce the vehicle speed and ope rate the
sw itch again to open or close the powe r top.
- Battery voltage too low: The power top can
not be ope rated if the battery voltage is too
low. This ens ures the re will be enough bat
t ery vol tage le ft to sta rt the vehicle. The
power top can be operated again after the
eng ine is started .
-Rollover protection active: If the power top
is operated continuously for an extended pe
riod of time, rollover protection will activate
to prevent damage to the hydra ulic unit.
This protective funct ion prevents the power
top from opening or close for approx imately
15 to 30 minutes. It w ill function again af
ter that
c::> & .
-Malfunction: Failure of system components
is one possib le cause for malfunction . If this
happens, you can a lso ope rate the powe r
top by hand
c::> page 47.
Power top not secure
This message appears with a warning tone if
the power top is not
completely closed or
open and the vehicle speed is above 50 km/h.
ll-
Page 55 of 290
@ Tips
-The light sensor * for headl ight control is
l ocated in the rear view m irror mount.
You should therefore not apply any st ick
ers to the windsh ield in this area in order
to prevent malfunctions or failures .
- Some exterior lighting functions can be
ad justed
¢ page 53.
-When yo u remove you r key from the igni
tion w hile the vehicle's lights are turned
on, a buzzer sounds as long as the driv
er's door is open .
- In cool or damp weather, t he ins ide of
the headlights, turn signa ls and tail
li ghts can fog ove r due to the tem pera
ture diffe ren ce betwe en the inside and
outside. They will clear shor tly after
swi tching t hem on. This d oes not aff ect
the service life of the ligh ting.
- In the even t of a ligh t sensor malfunc
tion, the drive r is no tifie d in the inst ru
ment cluster disp lay ~
page 2 2.
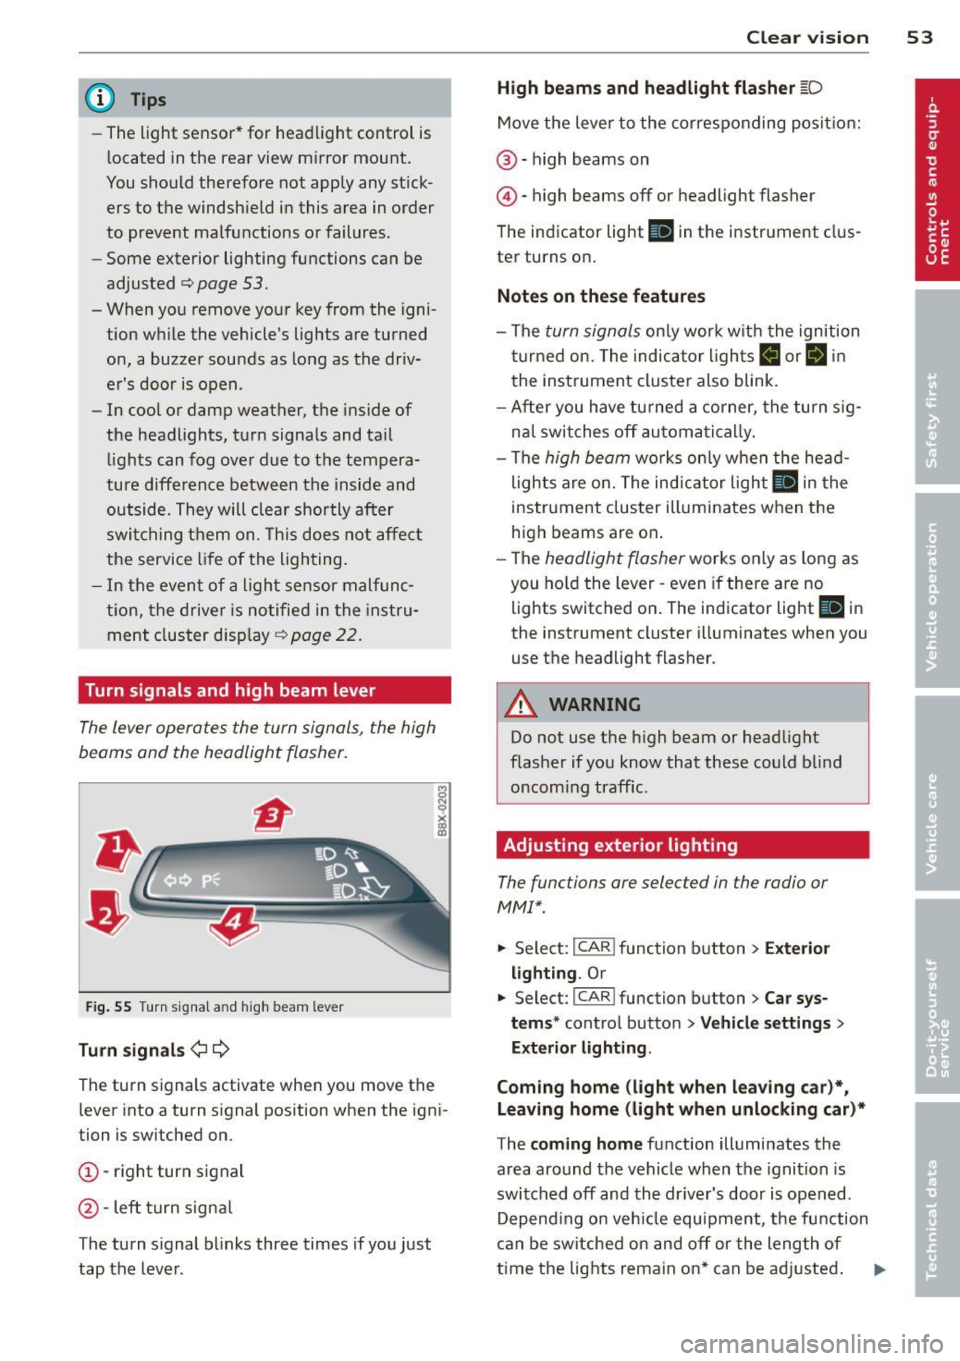
Turn signals and high beam lever
The lever operates the turn signal s, the high
b eams and th e headlight flash er.
F ig. 55 Turn sig na l an d high beam leve r
Turn signals ¢i ¢
Th e turn s ignals activate when you move the
l ever into a turn s ignal position when the ign i
tion i s sw itched on.
(D -right turn signal
@ -Left turn signa l
T he turn s ignal b links three times if you just
tap the lever .
Clear vision 5 3
High beams and headlight flasher @:D
Move the lever to the corresponding posit io n:
@ -high beams on
@-high beams off or headlight flasher
T he ind icator light
II in the instr ument clus
ter turns on .
Notes on these features
-The turn signals on ly wor k w it h t he ignition
t urned on. The indica tor l igh ts
11 or II in
the instrument cluste r also blink .
- Aft er you have tu rned a corner, the turn s ig
na l swi tches off au tom atically .
- The
high beam wo rks only when the head
lights a re on. The indicator Ligh t. in the
i nstrumen t clus ter illuminates when the
high beams are on .
- The
headligh t flasher works on ly as long as
you ho ld the lev er -even if the re are no
lights switched o n. The ind icator light
Ill i n
the inst rument cluster illuminates when you
use the headlight flasher .
&_ WARNING
Do not use the high beam or head light
flasher if you kn ow that these could b lind
oncom ing traffic.
Adjusting exterior lighting
The functions are selec ted in the radio or
MM!* .
.. Select : I CAR! function b utton > Exter io r
light ing . Or
.. Select: I CAR I func tion button > Car sys
tems *
control button > Vehicle settings >
Exterior Lighting .
Coming home (light when leaving car )*,
Leaving home (light when unlocking car)*
T he coming home function illumi nates the
area around the vehicle when the ignition is
switched off and the dr iver's door is open ed.
Depend ing o n ve hicl e equ ipment, t he function
can be switched on and off or the length of
time the lig hts remain on* can be ad justed . .._
Page 56 of 290
54 Clear vis ion
The lea ving home function i lluminates the
area around the vehicle when unlocking it.
This funct ion can be switched on and
off.
The co ming h ome and le av ing h ome func
tions on ly operate when it is dark and the
light switch is in the AUTO position
r=:> fig. 54.
Auto headlight s*
When the light switch is in the AUTO
r=:> page 52 position, the sw itch-on po int of the
lights can be changed in the automatic dr iv ing
light function.
Daytime running lights
US A mo del s: You can switch the dayt ime run
ni ng lights
on and off .
Ca nada mod els :
The function cannot be
turned
off . It is activated automat ically each
time the ignition is switched on.
Tra vel mode*
The headlight beam is asymmetrical. This pro
vides stronger illum ination on the side of the
road on wh ich you are driving . If you are driv
ing in a country that drives on the opposite
side of the road from your own country, t his
will cause glare for oncoming dr ivers. To pre
vent glare:
- Trave l mode must be selected in vehicles
with Xenon head lights *.
- In vehicles with halogen headlights, ce rtain
areas of the head light lenses must be cov
ered w ith waterproof adhesive covers that
prevent light from passing through . Fo r
more information, please see your author
ized Audi dea ler or authorized repair facility .
@ Tips
When travel mode is a ctiv ated, a displ ay in
the dr iver information system indi cates
this each time you switch t he ignition on.
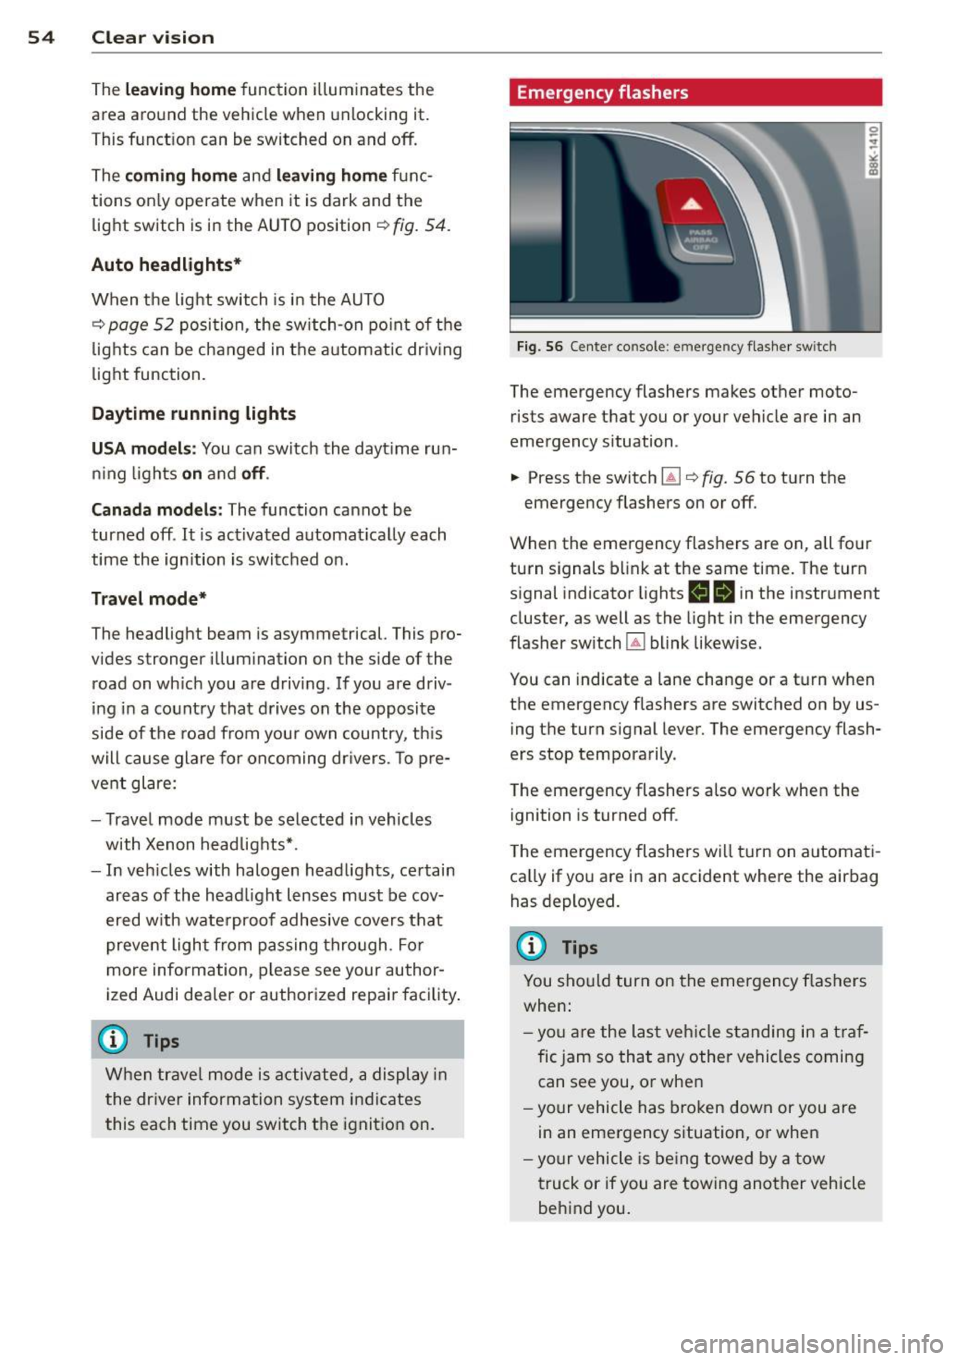
Emergency flashers
F ig. 56 Center console: em erge ncy flashe r switch
The emergency flashers makes other moto
rists aware that you or your vehicle are in an
emergency situation.
... Press the switch ~¢
fig. 56 to turn the
emergency flashers on or
off.
When the emergency flashers are on, all four
turn signals b link at the same time. The turn
s ignal indicator lights
H II in the instrument
cluster, as well as the light in the emergency
flasher switch ~ blink likewise.
You can indicate a lane change or a tu rn when
the emergency flashers are switched on by us
ing th e turn signal lever. The emergency flash
ers stop temporarily .
T he emergency flashers also work when the
ignition is turned
off .
The emergency flashers wi ll tu rn on automat i
ca lly if yo u are in an accident where the air bag
has deployed.
(D Tips
You sho uld turn on the emergency flashers
when:
- yo u are the last veh icle standing in a t ra f
fic jam so that any other vehicles coming can see you, or whe n
- yo ur vehicle has bro ken down or you are
in an emergency situation, or when
- yo ur vehicle is be ing towed by a tow
truck or if you are towing ano ther vehicle
behind you .
Page 82 of 290
80 On the road
This message appears if the master key is re
moved from the vehicle with the engine run
n ing.
If the master key is no longer in the ve
hicle, you cannot switch on the ignition after
stopping the engine and you also cannot start
the eng ine again . Moreover, you can not lock
the veh icle from the outside w ith the key.
Shift to P otherwise vehicle can roll away.
Doors do not lock if lever is not in
P.
This message appears for safety reasons
a long w ith a warning signa l. It appears if the
selector lever for the automat ic transm iss ion
is not in the P position when switch ing off the
ignition . Move the selector lever to the P pos i
tion, othe rwise the ve hicle is not secured
against rolling away . You also cannot lock the
vehi cle using the locking bu tton* on the door
han dle or using the remote key.
Convenience key defective! Use ignition lock
This message appears if the eng ine must be
started or stopped using the ignition key and
not the
I STAR T ENGIN E ST OP ! button .
Electromechanical
parking brake
Operation
The electromechanicol parking brake replaces
the hand brake.
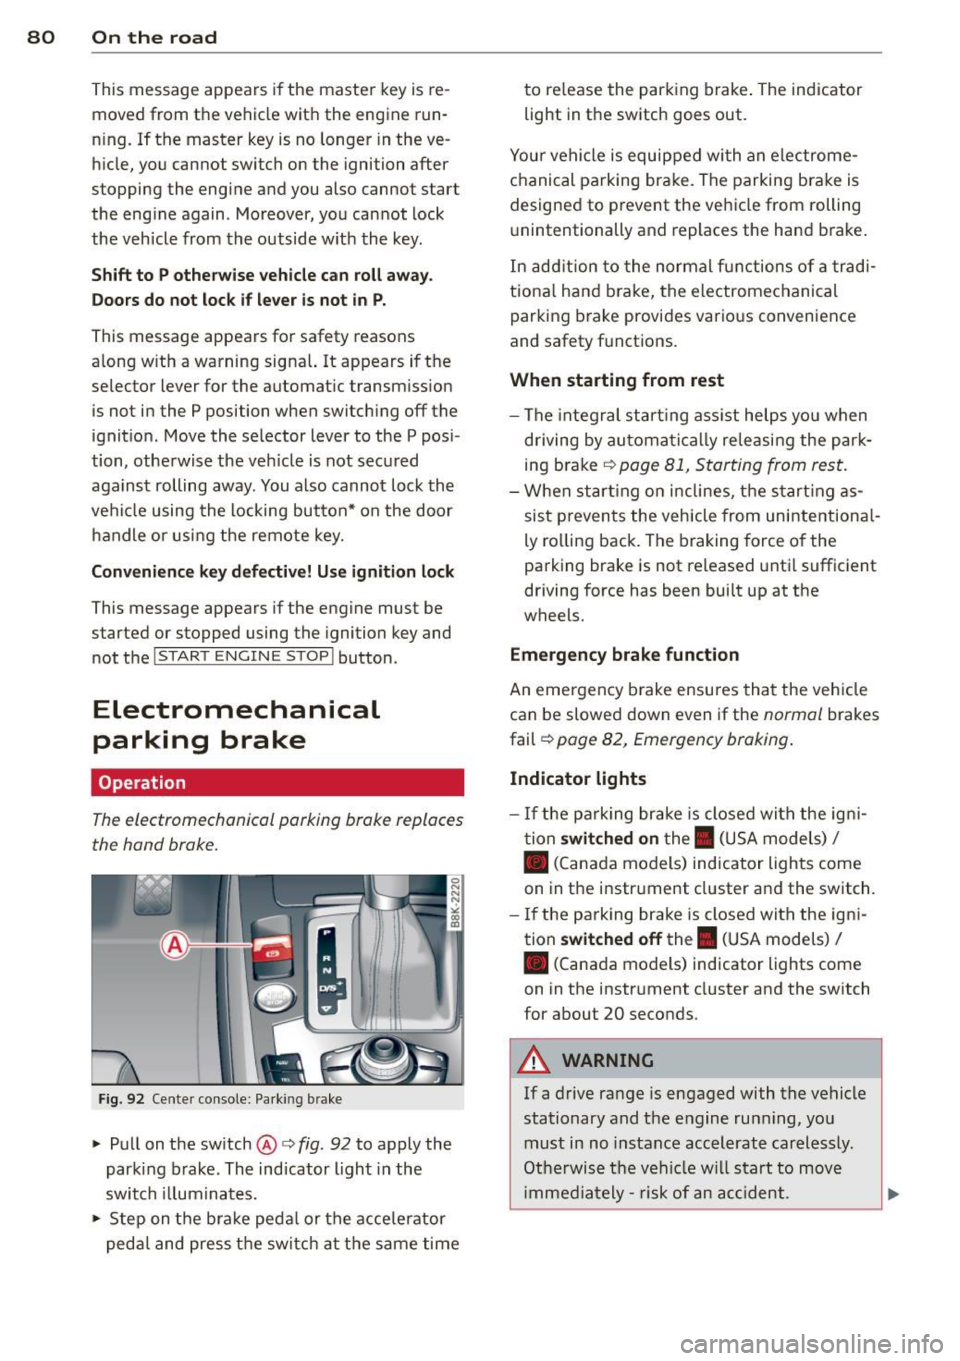
F ig. 92 Cente r console: Parking brake
.., Pull on the switch @c:> fig. 92 to apply the
parking brake. The indicator light in the
switch illum inates .
.., Step on the brake peda l or the accele rator
pedal and press the switch at the same time to re
lease the par king brake . The indicator
light in the switch goes out.
Your vehicle is equipped wi th an electrome
chanical parking brake . The parking brake is
designed to prevent the vehicle from rolling
u nintentionally and replaces the hand brake.
In addition to the normal fun ctions of a tradi
tiona l hand b rake, the electromechanical
parking brake provides various convenience
and safety f unctions .
When starting from rest
-The integral start ing assist helps you when
driving by automatica lly re leasing the par k
ing brake
c:> page 81, Starting from rest.
-When starting on inclines, the starting as
sist prevents the vehicle from unintentiona l
ly ro lling back. The braking force of the
parking brake is not released until sufficient
driving force has been built up at the
wheels.
Emergency brake function
An eme rgency b rake ensures that the vehicle
can be slowed down even if the
normal brakes
fail c:>
page 82, Emergency braking .
Indicator lights
- If the parking brake is closed with the igni
tion
switched on the. (USA models) I
• (Canada models) ind icator lights come
on in the instr ument cluster and the switch .
- If the parking brake is closed with the igni
tion
switched off the . (USA models) I
• (Canada models) indicator lights come
on in the instrument cluster and the switch
for about 20 seconds .
A WARNING
-
If a drive range is engaged with the vehicle
stationary and the engine runn ing , you
must in no instance accelerate carelessly.
Otherwise the vehicle will start to move
i mmed iately- risk of an acc ident.
Page 83 of 290
(D Note
If the . symbol i n the display or the
1111 (USA models) ;II (Canada models)
ind icator lig ht in the instrument cluster
flashes, there is a ma lfu nction in the brake
system. By press ing the
!SETI butto n, you
can br ing up a d river message which ex
plains the malfunction in more detail.
If
the dr iver message Parking brak e! ap
pea rs, there is an operating ma lfunction in
the parking brake which you should have
repaired immediately by an authorized
Audi dea ler or other q ualified workshop
¢page 15.
@ Tips
-You can apply the parking brake at any
time - even with the ignition switched
off . The ignit ion must be t urned on in or
der to release the parking brake.
- Occasiona l noises when the parking
brake is applied and re leased are norma l
and are not a cause for concern.
- When the vehicle is parked, the parking
brake goes through a se lf-test cycle at
regular intervals. Any assoc iated noises
are norma l.
Parking
P ar king
• Press the brake pedal to stop the vehicle .
• Pull the button®¢
fig. 92 to set the park-
ing brake .
• Move the selecto r leve r to P .
• T urn the eng ine off¢ ,&..
In addition on inclines and grad es
• T urn the steer ing wheel so that your vehicle
will roll against the curb in case it should
sta rt to move .
A WARNING
-When you leave your veh icle -eve n if on
ly b rief ly - a lways remove the ign ition
key . This applies part icu larly when chil
dre n remain in the vehicle . Otherw ise the
On th e ro ad 81
children could start the eng ine, release
the park ing brake or operate electrical
equ ipment (e.g. power windows). There
is t he risk of an acc ident .
- When the veh icle is locked, no one -par
ticularly not children should rema in in
the vehicle. Locked doors make it more
difficult for emergency wo rke rs to get in
to the veh icle - putting lives at risk.
Starting from rest
The starting assist function ensures that the
parking brake is released automatically upon
starting .
Stopping and applying parking brake
• Pull the switch®¢ fig. 92 to app ly the
parking brake.
Sta rting and automatically rel easing the
parking brake
• When you start to drive as usual, the park
ing brake is automatically released and your
veh icle beg ins to move .
When stopping at a traffic signal or stopping in city traff ic on vehicles with an automatic
transmission, the parking brake can be ap plied . The vehicle does not have to be he ld
with the footbrake. The pa rking brake elimi
nates the tende ncy to creep w ith a dr ive range
engaged. As soon as yo u drive off as usu al,
t h e parking bra ke is re leased automatic ally
and the vehicle starts to move.
Starting on slopes
When starting on inclines, the sta rting assist
prevents t he vehi cle from u nintent ionally roll
ing back. The bra king force of the par kin g
brake is no t re leased unti l su ff ic ient d riving
f orce has been built up at the wheels.
(D Tips
F o r safety reaso ns, t he pa rking br ake is re
l eased automatic ally o nly when the d riv
e r's safety belt is engaged in the buckle .
Page 85 of 290
Speed warning 2
Storing w arning 2 is recomme nded if you al
ways want to be rem inded of a certa in speed ,
for example when yo u are traveling in a coun
try that has a general ma ximum speed limit,
or if you do not want to exceed a spec ified
speed for winter tires.
The . (U SA mode ls)
I. (Canada mode ls)
speed warn ing 2 symbo l appears in the dis
p lay when you exceed the stored speed lim it.
Unlike warning 1, it will not go out u ntil the
ve hicle speed drops below the stored speed
limit.
Sett ing speed warning 2 ¢page
83.
(D Tips
Even tho ugh you r vehicle is equip ped with
a speed wa rni ng system, you should st ill
watch the speedometer to make sure you are not d riving faster tha n the speed lim it.
Speed warning 1: setting a speed limit
Warning threshold 1 is set by the !SET I but
ton.
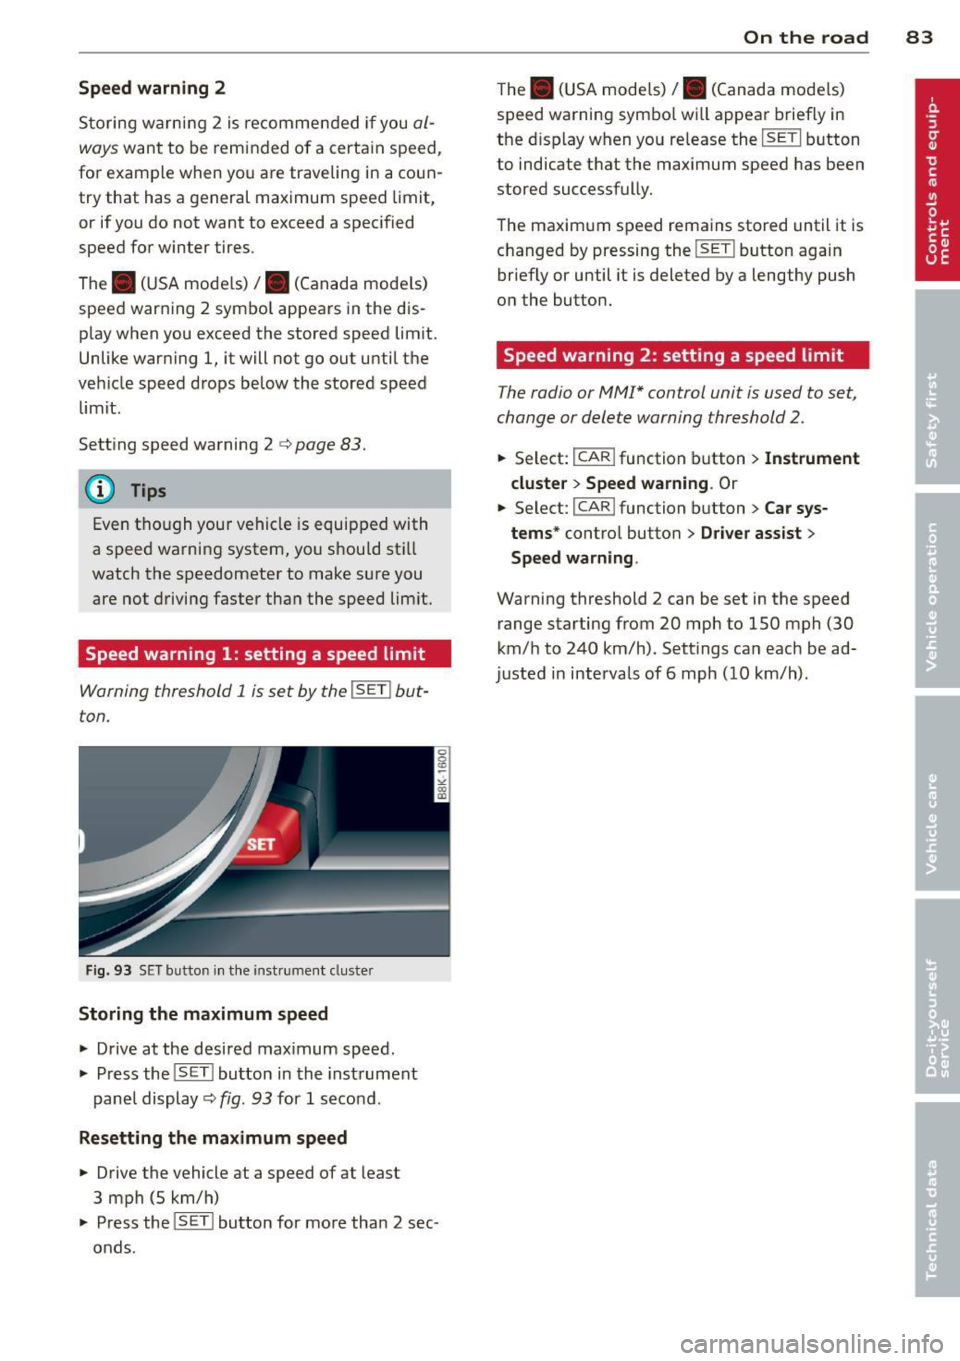
F ig . 93 S ET button in the ins trument cluste r
Storing the maximum speed
.,. Drive at the desired max imum speed .
.,. Press the !SET I button in the instrument
pan el display ¢ fig . 9 3 for
1 secon d.
Resetting the maximum speed
.,. Driv e the vehicle at a speed of at least
3 mph (5 km/h)
.,. Press the !SET I bu tton for mo re tha n 2 sec
onds .
On the road 83
The . (U SA mode ls) /. (Canada mode ls)
s peed warning sym bo l wi ll appea r brief ly in
the d isplay when yo u re lease the
I SETI button
to indicate t hat the maximum speed has been
stored successfully.
The maxim um s peed rema in s stored until it is
c h anged by pressing the !SE TI button aga in
briefly or until it is deleted by a lengthy push
o n the button .
Speed warning 2: setting a speed limit
The radio or MMI* control unit is used to set ,
change or delete warning threshold
2.
.,. Se lect: !CAR ifunction b utton> Instrument
cluster > Speed warning .
Or
.,. Select: I CAR I function butt on > Car sys
tems *
contro l butto n > Driver assist >
Speed warning .
Warning threshold 2 can be set in the speed
range starting from 20 mph to 150 mph (30
km/ h to 240 km/h). Sett ings ca n eac h be ad
justed in interva ls of 6 mph ( 10 km/h) .
Page 89 of 290
N -Neutral
The transmission is in neutra l in this position .
Shift to this posit ion for standing with the
brakes applied
~ &. in Driving the automatic
transmission on page 89.
When the veh icle is stationary or at speeds
below 1 mph (2 km/h) , you must always apply
the footbrake before and while moving the lever out of N.
DIS -Normal position for driving forward
In the D/S position, the transmission can be
operated e ither in the normal mode Dor in
the sport mode S . To select the sport mode S,
pu ll the se lector lever back briefly. Pulling the
lever back again will select the normal mode
D. The instrument cluster display shows the
selected driving mode .
In the
normal mode D, the transmission auto
matica lly selects the suitable gear ratio. It de
pends on engine load, vehicle speed and driv
ing style .
Select the
sport mode S for sporty driving .
The vehicle makes full use of the engine's
power . Shifting may become noticeable when
accelerating.
When the vehicle is stationary or at speeds be low 1 mph (2 km/h), you must always apply
the foot brake before and while moving the lever to D/S out of N .
A WARNING
Read and follow all WARNINGS 9 &. in
Driving the automatic transmission on
page 89.
(D Note
Coasting downhill with the transmission in
N and the engine not running will result in
damage to the automatic transmission
and possibly the catalytic converter .
(D Tips
-On vehicles with drive select*, you can
adjust the sporty shift characteristics in
the
Dynamic driving mode .Swill appear
Transmission 87
in the instrument cluster display instead
ofD.
- If you accidentally select N whi le driving,
take your foot
off the accelerator pedal
immediately and wait for the engine to
slow down to idle before selecting D/S.
- If there is a power failure, the selector
lever will not move out of the P position .
The emergency release can be used if
this happens
9 page 92.
Automatic Shift Lock (ASL)
Applies to vehicles: with multitro nic/S tronic/t iptronic
The Automatic Shift Lock safeguards you
against accidentally shifting into a forward or the reverse gear and causing the vehicle to
move unintentionally.
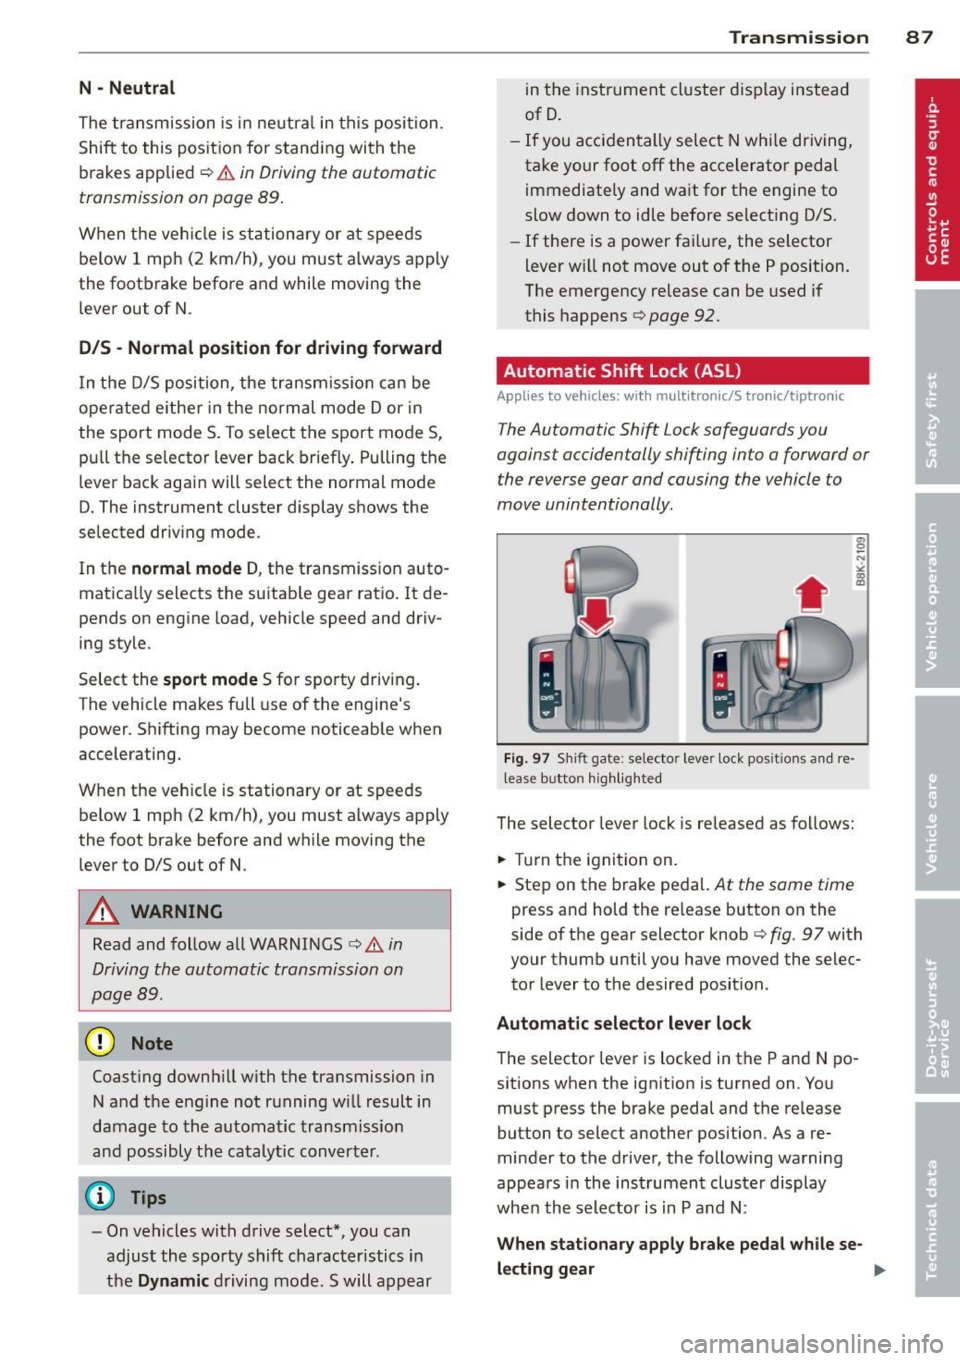
Fig. 97 Shift gate: selecto r lever lock posit ions and re
lease b utto n highlighted
The selector lever lock is released as follows:
.,. Turn the ignition on.
.,. Step on the brake pedal.
At the same time
press and hold the re lease button on the
side of the gear selector knob
9 fig . 97 with
your thumb until you have moved the selec
tor lever to the desired position .
Automatic selector lever lock
The selector lever is locked in the P and N po
sitions when the ignition is turned on. You
must press the brake pedal and the release
button to select another position . As a re
minder to the driver, the following warning
appears in the instrument cluster display
when the selector is in P and N:
When stationary apply brake pedal while se-
lecting gear .,,_
Page 92 of 290
90 Transmi ssion
Hill descent control
App lies to vehicles: with multitronic/5 tronic/t iptronic
The hill descent control system assists th e
driver when driving down declines .
Hill descent control is activated when these
lector lever is in D/S and you press the brake
pedal. The transmission automatically selects
a gea r that is su itab le for the incl ine. Hill de
scent control tries to maintain the spe ed ach
i eved at the t ime of bra king , wi thin physical
a nd techn ica l limita tions. It m ay st il l be nec
essary to adjust the speed with the brakes .
Hill descent control switches off once the de
cline levels out or you press the accelerator pedal.
On vehicles w ith the cruise control system*
c::> page 84, hill descent contro l is also act ivat
ed when the speed is set.
.&, WARNING
H ill descen t control cannot overcome
physical limita tions, so it may not be able
to maintain a constant speed under all
conditions . Always be ready to app ly the
brakes.
Manual shift program
App lies to vehicles: with multitronic/S tronic/tiptron ic
Using the manual shift program you can
manually select gears.
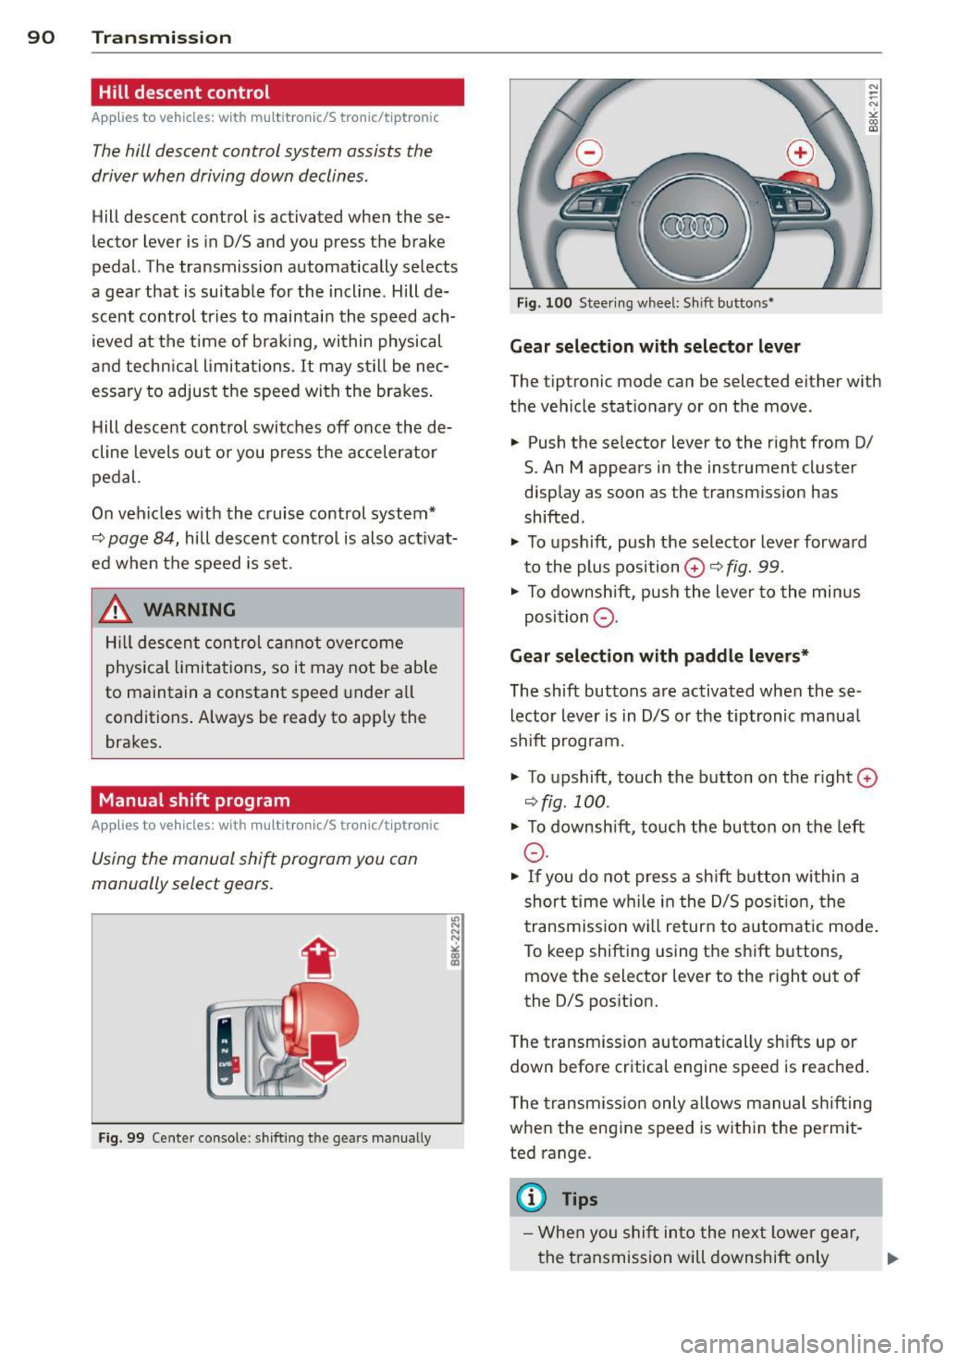
F ig . 99 Ce nte r console: sh ifting t he gea rs man ually
Fig. 10 0 Stee ring w hee l: S hift b uttons*
Gear select ion with selector lever
N
--N
"' gi
The tiptronic mode can be selected ei ther with
the veh icle s tat io nary or on the move .
• Push the se lector lever to the right from D/
S. An M appears in the instrument cluster
display as soon as the transm ission has
shifted .
• To upshift, push t he se lector lever forwa rd
to the plus position
0 c::> fig. 99.
• To downshift, push the lever to the mi nus
posi tion
0 .
Gear selection with paddle levers*
The shift buttons are activated when these
lector lever is in D/S o r the tiptronic manua l
shift program .
• To upshift, touch the button on the r ight
0
c::> fig. 100 .
• To downshift, to uch the but ton on the left
0 .
• If you do not press a sh ift b utton wi thin a
sh ort time w hile in t he D/S posit ion, the
t ransmiss ion w ill retur n to automatic mode .
To kee p shifting using the shift b uttons,
move the selector lever to the r ight out of
the D/S pos it ion.
T he transm iss io n automatically sh ifts up or
down before cr itical engine speed is reached .
T he tran sm iss io n only al lows manual sh ifting
when the eng ine speed is with in the permit
ted range .
(D Tips
-Whe n you s hift into the ne xt l ower ge ar,
t he transmission will downshift only
Page 98 of 290
96 Audi adaptive cruise control and braking guard
Audi adaptive cruise
control
Description
Applies to vehicles: with Audi adap tive cruise control
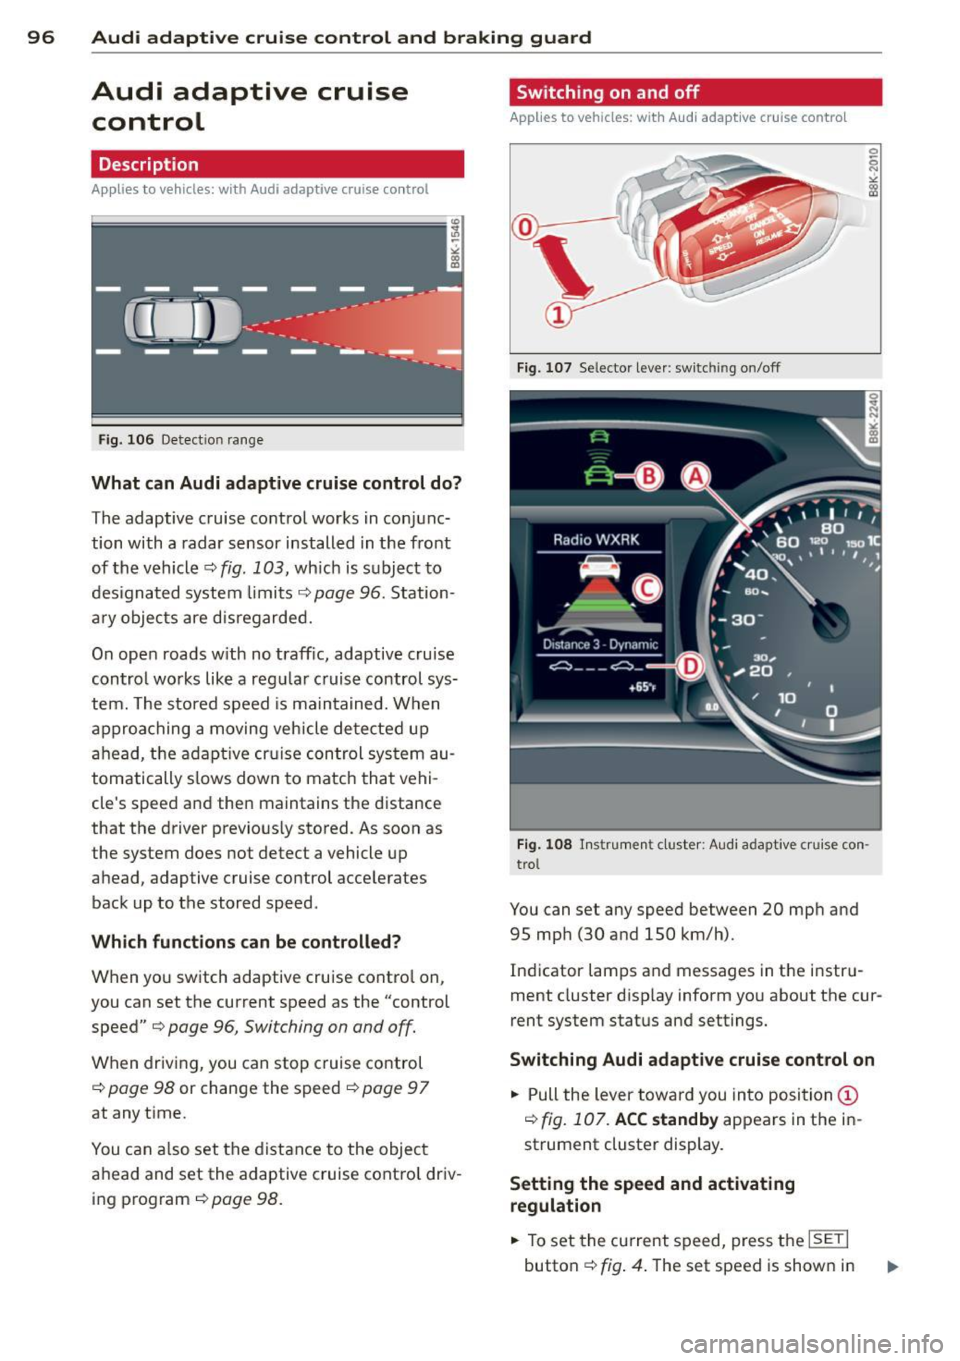
Fig. 106 Detect ion range
What can Audi adaptive cruise control do?
The adaptive cruise control works in conjunc
tion with a radar sensor installed in the front
of the vehicle
c::> fig. 103, which is subject to
des ignated system limits
c::> page 96. Station
a ry objects are disregarded.
On open roads w ith no traff ic, adaptive cruise
control works like a regu lar cruise control sys
tem. The stored speed is main tained. When
approaching a moving vehicle detected up
ahead, the adaptive cruis e control system au
tomatically s lows down to match that vehi
cle's speed and then maintains the distance
that the driver previous ly stored. As soon as
the system does not detect a vehicle up
ahead, adaptive cruise control accelerates
back up to the stored speed .
Which functions can be controlled?
When you switch adaptive cruise contro l on,
you can set the current speed as the "control
speed"
c::> page 96, Switching on and off.
When driving, you can stop cruise control
c::> page 98 or change the speed c::> page 9 7
at any time.
You can a lso set the distance to the object
ahead and set the adaptive cruise control driv
i ng program
c::>page 98.
Switching on and off
Applies to vehicles: with Audi adaptive cruise control
Fig. 107 Selector lever : sw itc hin g on/off
Fig. 108 Instrument cluster: Audi adaptive cruise con
trol
You can set any speed between 20 mph and
95 mph (30 and 150 km/h).
Indicator lamps and messages in the instru
ment cluster disp lay inform you about the cur
rent system status and settings.
Switching Audi adaptive cruise control on
.,. Pull the lever toward you into position (D
c::> fig. 107. ACC standby appears in the in
strument cluster display.
Setting the speed and activating
regulation
.,. To set the current speed, press the ISETI
button c::> fig. 4. The set speed is shown in