key AUDI A5 CABRIOLET 2017 User Guide
[x] Cancel search | Manufacturer: AUDI, Model Year: 2017, Model line: A5 CABRIOLET, Model: AUDI A5 CABRIOLET 2017Pages: 266, PDF Size: 66.64 MB
Page 34 of 266
Opening and closing
using the opening function in the power lock
ing system switch
Iii .
Setting power locking
In the radio/MM!*, you can set which doors the
central locking system will unlock .
.,. Select : I C A RI funct ion button > Central locking .
Or
.,. Se lect : ICAR I functio n button> Car systems*
contro l button > Vehicle settings > (Central
locking)* .
Single door unlocking /Unlock doors* -
you can
specify which doors unlock when yo u open the ve
hicle.
- Selecting
off / All and pressing the~ button on
the remote control key unlocks the entire vehi
cle.
- Se lecting
on /Driver and press ing the ~ button
on the remote control key once unlocks only
the driver 's door. In vehicles w ith a convenienc e
key *, only the door whose hand le you pull will
unlock . If you press the @! button twice, the en
tire veh icle will unlock. If you press the
lm:I but
ton, the ent ire vehicle will a lways lock.
Luggage comp. lock/Lock exterior trunk handle
-If you se lect On , you can no longer open the
luggage compartment using the rear lid handle
<=>
page 33, fig . 24 . In this case , the rear lid can
be opened with the
1£1 button on the master key
¢ page 30, fig. 19 .
Tone when locking -if you select On , a tone will
sound when you lock the vehicle .
Auto Lock/Lock when driving -if you select On ,
the entire veh icle w ill lock automat ically when
the speed reaches 9 mph (15 km/h) .
32
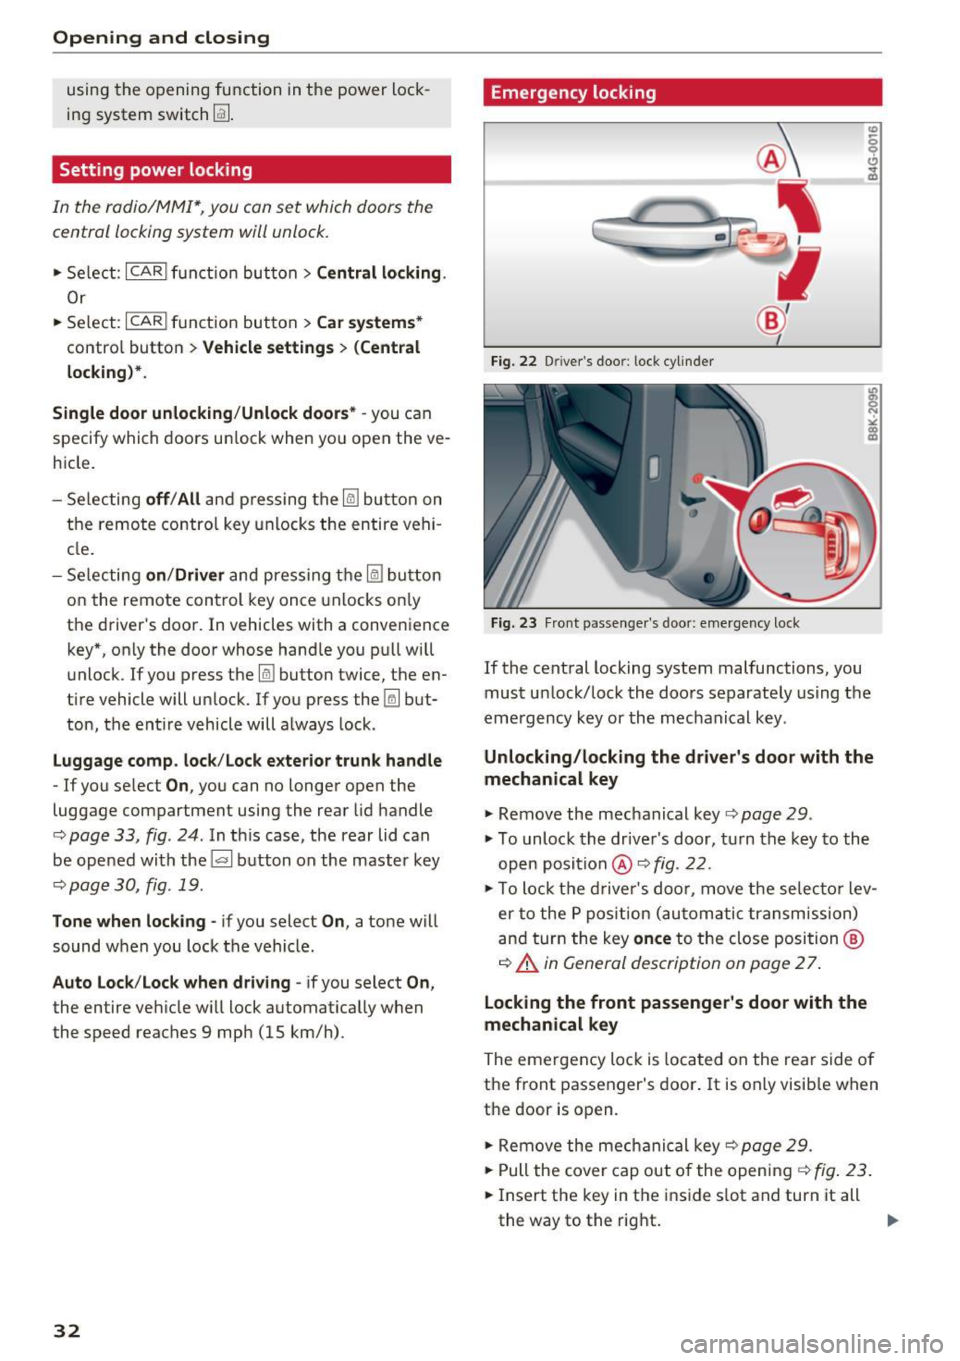
Emergency locking
Fig. 22 Driver 's doo r: lock cylin der
Fig. 23 Fron t passenger's door: emergency lock
If the central locking system malfunctions, you
must unlock/lock the doors separately using the
emergency key or the mechanical key .
Unlocking/locking the driver's door with the
mechanical key
.,. Remove the mechanical key <=> page 29.
.,. To unlock the driver's door, turn the key to the
open position @<=>
fig. 22 .
.,. To lock the driver's door, move the selecto r lev
er to the P position (automatic transmission)
and turn the key
once to the close position @
¢ A in General description on page 2 7.
Locking the front passenger's door with the
mechanical key
The emergency lock is loca ted on the rear side of
the front passenger's door. It is only visible when
the door is op en .
.,. Remove the mechanical key¢
page 29.
""Pull the cover cap out of the opening¢ fig. 23 .
.,. Insert the key in the inside slot and turn it all
th e way to the right.
IJJ,-
Page 35 of 266
a:,
a:,
...... N
" N ...... 0
0
LL co
Once the front passenger's door has been closed,
you cannot open it again from the outside. The
door can be opened from the inside by pulling
the door hand le.
A WARNING
Read and follow all WARNINGS¢&. in Gener
al description on page 2
7 .
@ Tips
After the ignition is switched on, the power
locking system switch is enabled.
Electronic immobilizer
The immobilizer prevents your vehicle from being
started by unauthorized persons .
Inside the key there is a computer chip. This chip
automatically activates/deactivates the electron ic immobilizer.
Applies to vehicles with ignition lock:
The electronic immobilizer deact ivates automati
cally when you insert the remote control key into
the ignition lock . It activates again automatically
when you remove the remote control key from
the ignition lock .
Applies to vehicles with convenience key:
If the remote control key is located inside the ve
hicle and you press the
I START ENGINE STOPI
button , the electronic immobilizer deactivates
automatically. If you switch the ignition off and remove the remote control key from the vehicle,
the electronic immobilizer activates again auto
matically .
A WARNING
Always take the key with you when you leave
the vehicle. The key can disarm the electronic
eng ine immobi lizer and permit an unauthor
ized person to start the engine and enable op
erat ion of the vehicle systems such as power
window or power sunroof leading to serious
personal injury.
Open ing and closing
(D Tips
-The vehicle cannot be started if an unau
thorized key is used. The vehicle may not
start if another radio device such as a key
for another veh icle or a transponder is lo
cated on the key ring.
- For Declaration of Compliance to United
States FCC and Industry Canada regulations
¢ page 249.
Luggage compartment
Lid
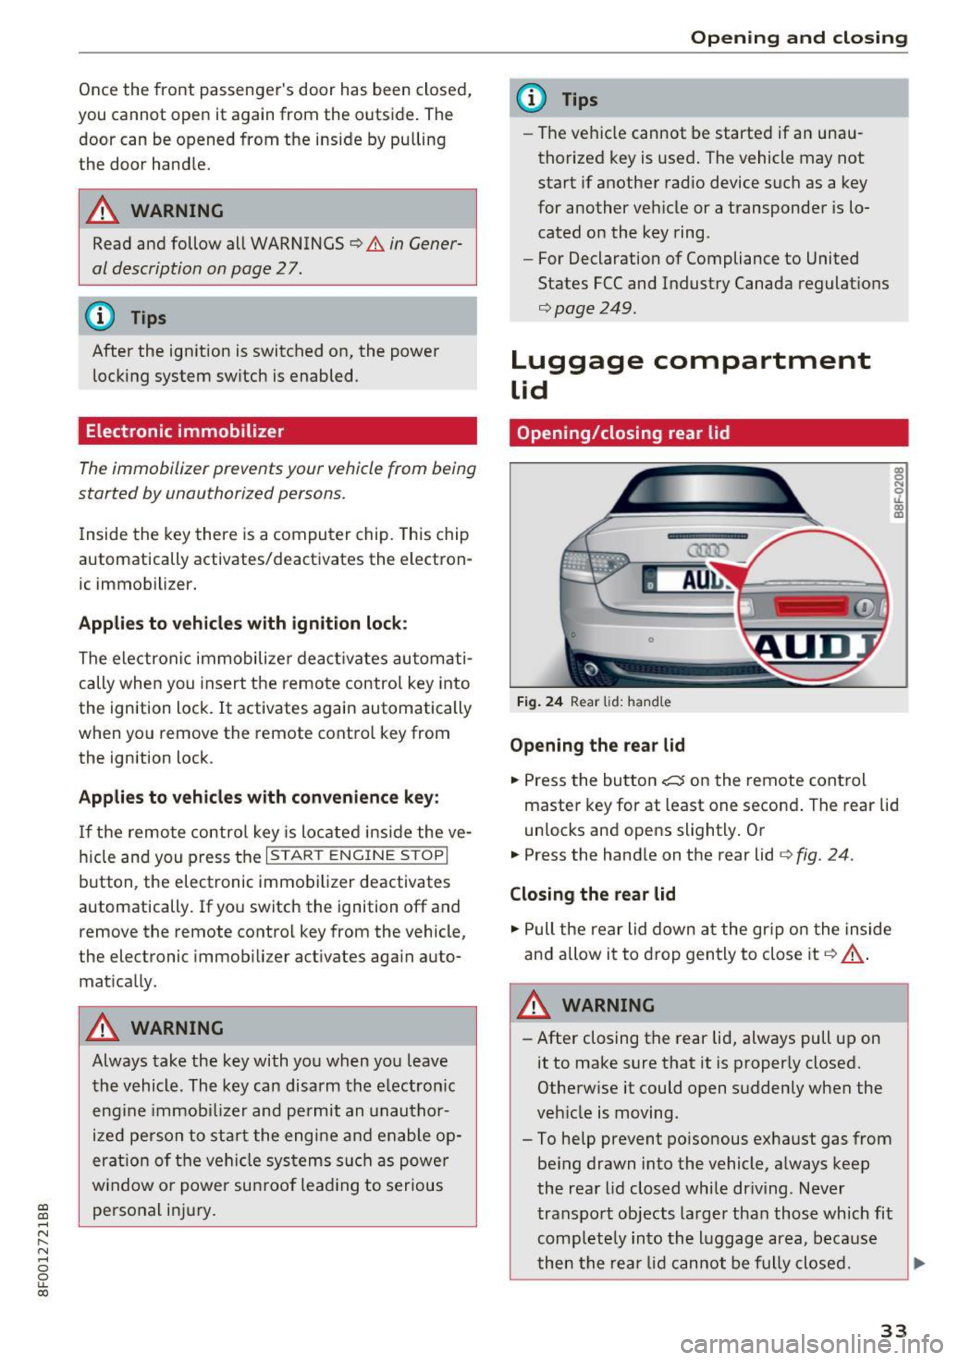
Opening /closing rear lid
Fig. 24 Rear lid: handle
Opening the rear lid
.. Press the button ~ on the remote control
master key for at least one second . The rear lid
unlocks and opens slightly. Or
.. Press the handle on the rear lid ¢
fig. 24.
Closing the rear lid
.. Pull the rear lid down at the gr ip on the inside
and allow it to drop gently to close it
Q &_.
A WARNING
-After closing the rear lid, always pull up on
it to make sure that it is properly closed.
Otherwise it could open suddenly when the
veh icle is moving.
- To help prevent po isonous exhaust gas from
being drawn into the vehicle, always keep
the rear lid closed while driving . Never
transport objects larger than those which fit
comp letely into the lu ggage area, because
then the rear lid cannot be fully closed. .,._
33
Page 36 of 266
Opening and clo sin g
- Never leave your vehicle unattended espe
c ially w ith the rear lid left open. A child
could crawl into the car through the luggage
compartment and pull the lid shut, becom
ing trapped and unable to get out . To re
duce the risk of persona l injury, never let
children p lay in or around your veh icle. Al
ways keep the rear lid as well as the vehicle
doors closed when not in use .
- Always ensure that no one is within range of
the rear lid when it is moving, in particular
close to the hinges -fingers or hands can be
pinched .
© Tips
When the vehicle is locked, the rear lid can be
opened separa tely by p ressing the button
e:5
on the master key . When you close the rear
lid again, it locks automatically .
Emergency unlocking of the luggage
compartment lid
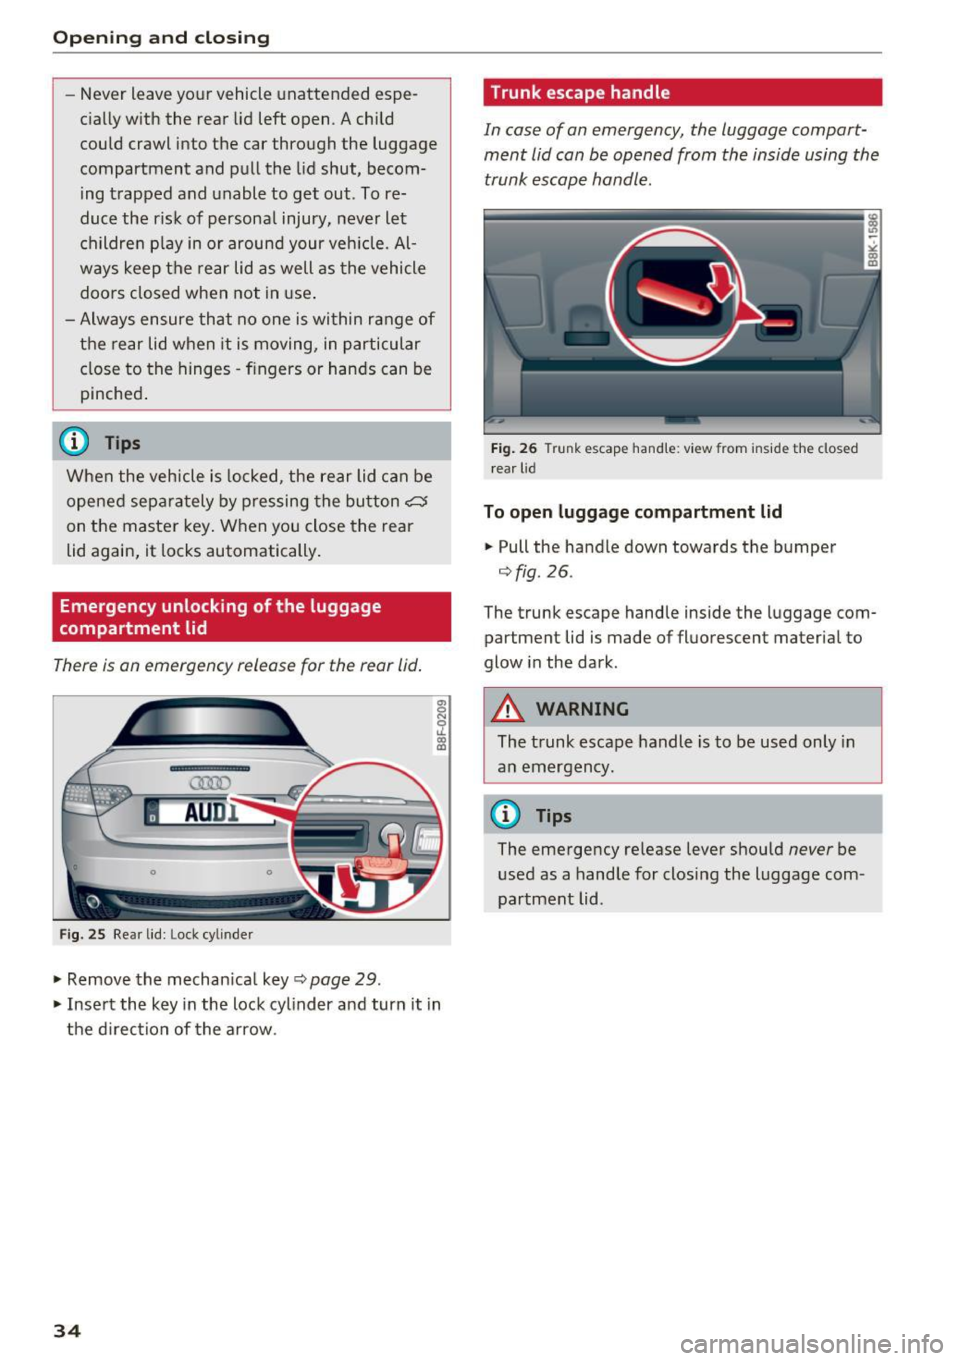
There is an emergency release for the rear lid.
Fig . 25 Rear lid: Lock cylinder
.,. Remove the mechan ica l key c:> page 29 .
.,. Inse rt the key in the lock cylinder and turn it in
the d irec tion of the arrow .
34
Trunk escape handle
In case of an emergency, the luggage compart
ment lid can
be opened from the inside using the
trunk escape handle.
Fig . 26 Trunk escape handle: view from ins ide the closed
r ear lid
To open lugg age compartment lid
.. Pull the handle down towards the bumper
c:>fig . 26.
The trunk escape handle inside the luggage com
partment lid is made of fluorescent material to
glow in the dark .
&_ WARNING
The trunk escape handle is to be used only in
an emergency.
(D Tips
The emergency release lever should never be
used as a handle for closing the luggage com
partment lid.
Page 37 of 266
a:,
a:,
...... N
" N ...... 0
0
LL co
Power windows
Controls
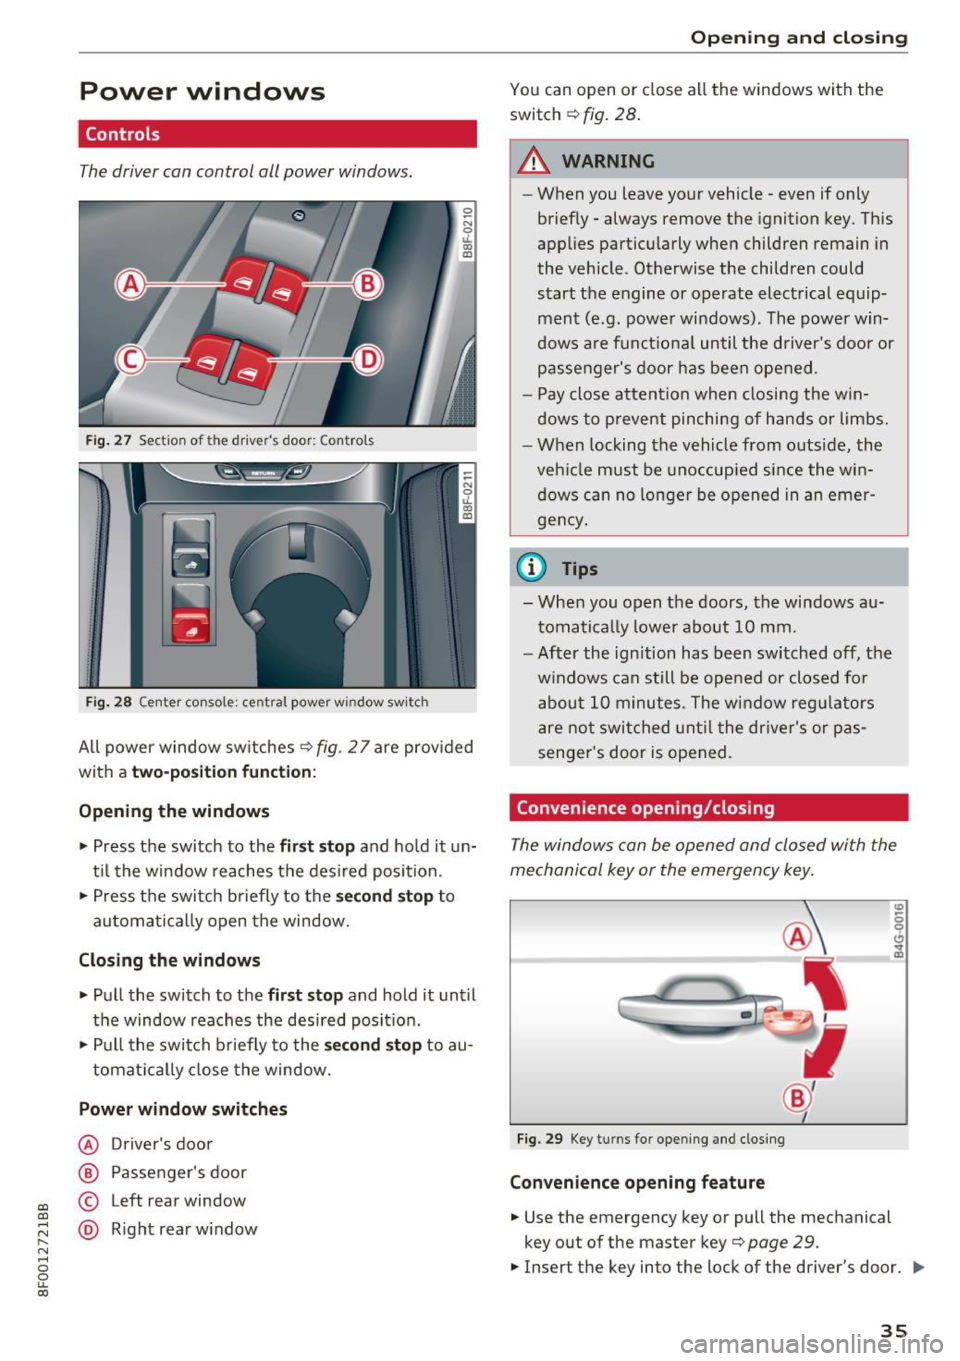
The driver can control all power windows.
Fig. 27 Section of the driver's door: Controls
l
l
f
I
I !
I
Fig. 28 Center console : central power window switch
All power window switches ¢ fig. 2 7 are provided
with a
two-position function:
Opening the windows
"'Press the switch to the first stop and hold it un
til the window reaches the desired position.
"' Press the switch briefly to the
second stop to
automatically open the window.
Closing the windows
"' Pull the switch to the first stop and hold it until
the window reaches the desired position.
"' Pull the switch briefly to the
second stop to au-
tomatically close the window.
Power window switches
@ Driver's door
@ Passenger 's door
© Left rear window
@ Right rear window
Opening and closing
You can open or close all the windows with the
switch ¢
fig. 28.
.&_ WARNING
-
-When you leave your vehicle -even if only
briefly - always remove the ignition key. This
applies particularly when children remain in
the vehicle. Otherwise the children could start the engine or operate electrical equip
ment (e.g. power windows). The power win
dows are functional until the driver's door or
passenger's door has been opened.
- Pay close attention when closing the win
dows to prevent pinching of hands or limbs.
- When locking the vehicle from outside, the
vehicle must be unoccupied since the win
dows can no longer be opened in an emer
gency.
(D Tips
- When you open the doors, the windows au
tomatically lower about 10 mm.
- After the ignition has been switched off, the
windows can still be opened or closed for
about 10 minutes. The window regulators
are not switched until the driver's or pas
senger's door is opened.
Convenience opening/closing
The windows can be opened and closed with the
mechanical key or the emergency key.
Fig. 29 Key turns for opening and closing
Convenience opening feature
"'Use the emergency key or pull the mechanical
key o ut of the master key¢
page 29.
.,. Insert the key into the lock of the driver's door . ..,_
35
Page 38 of 266
Opening and closing
• Turn the key to position c::> fig. 29@ until all
the windows have reached the desired position .
Convenience closing feature
• Use the emergency key or pu ll the mechanical
k ey out of the master key
c::> page 29.
• Turn the key in the lock of the d river 's door to
the lock pos ition @ unt il the windows are
closed
c::> A .
.&_ WARNING
- Never close the windows inattentively and
without checking -there is risk of injury.
- You must always watch when the windows
are being raised so that no one can be trap
ped. If you release the key, the closing ac
t ion is immediately canceled.
- Always read and heed WARN ING
c::> .&. in
General description on page 2
7 .
Correcting window regulator malfunction
-
After disconnect ing the vehicle battery, the one
t ou ch up and down feature mus t be ac tivated
again.
• Pull and hold the pow er window switch until
the window is completely closed.
• Release the switch and pull the sw itch again for
one second .
Valet parking
Applies to: ve hicles with valet parkin g fu nctio n
The valet parking feature protects the luggage
compartment from unauthorized access .
-
Fig. 30 Glove compar tmen t: valet park ing bu tton
36
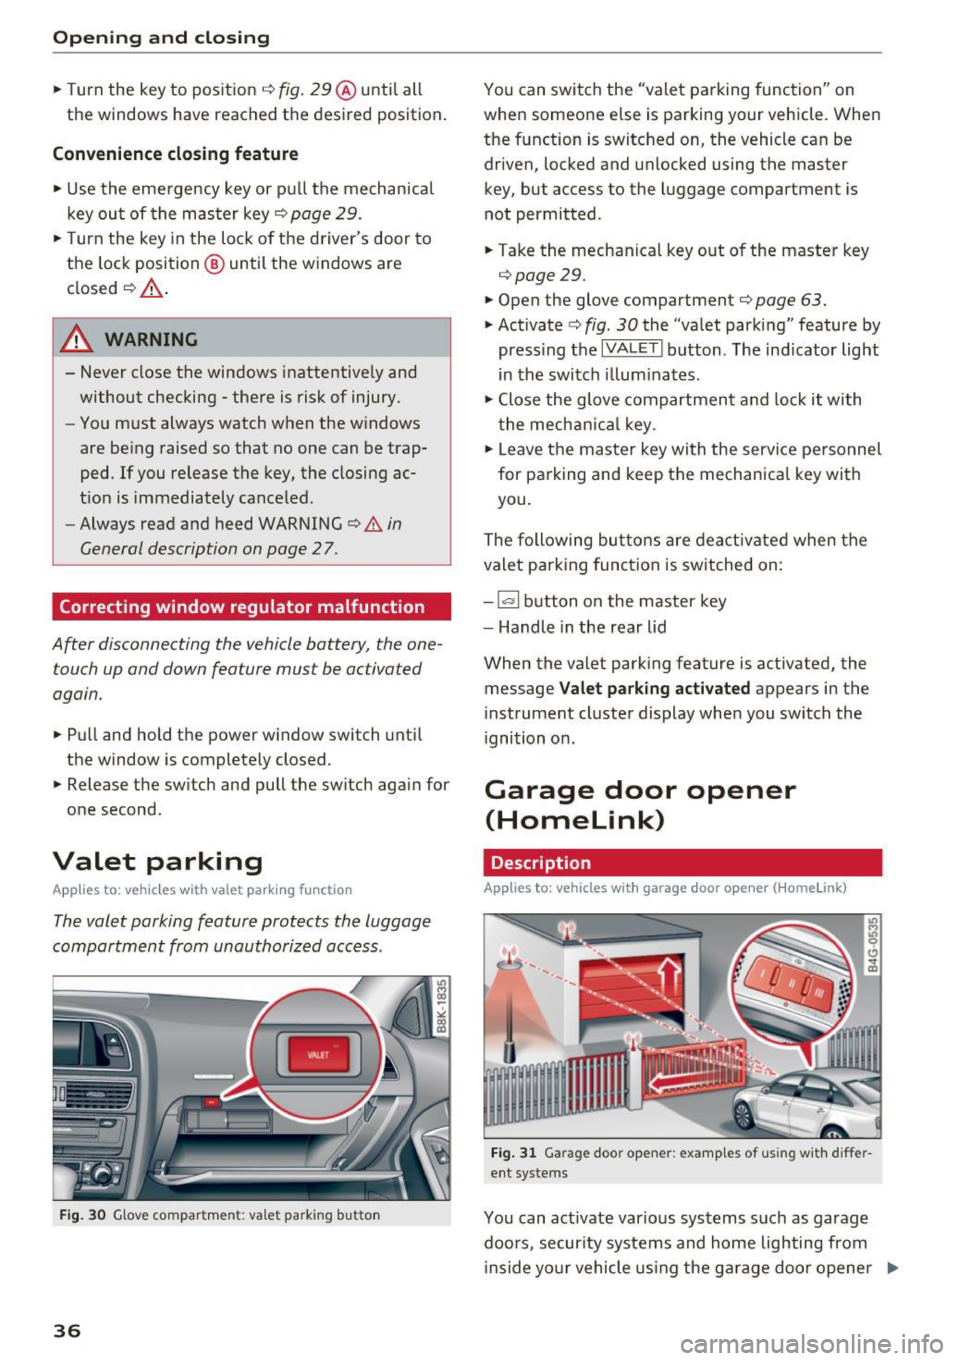
You can switch the "valet parking function" on
when someone else is park ing your vehicle. When
the function is switched on, the vehicle can be
driven , locked and unlocked using the master
key, but access to the luggage compartment is
not permitted .
• Take the mechanical key out of the master key
c::> page 29.
• Open the glove compartment c::> page 63.
• Activate c::> fig . 30 the "valet parking" feature by
press ing the
I VA LET I button. The ind icator light
in the switch illuminates.
• Close the glove compartment and lock it with
the mechan ical key.
• Leave the master key with the service pe rsonnel
for parking and keep the mechanical key with
you.
The following buttons are deactivated when the
valet parking function is switched on :
-
~ button on the master key
- Handle in the rear lid
When the valet parking feature is activated, the message
Valet parking activated appears in the
instrument cluster display when you switch the
i gnition on.
Garage door opener
(Homelink)
Description
Applies to: vehicles with garage door opener (Homelink)
Fig. 31 Garag e doo r op ener: examp le s of using with diffe r
ent systems
You can act ivate various systems such as garage
doors , secur ity systems and home lighting from
i nside yo ur vehicle using the garage door opener .,..
Page 43 of 266
a:,
a:,
...... N
" N ...... 0
0
LL co
(D Note
-To prevent damage to the power top:
- do not store any objects in the power top
compartment .
- make sure there is enough space above
the vehicle when opening or closing the power top.
- To reduce the risk of damage, make sure
there are no fragile objects within the stor
age bay's range of motion.
(D Tips
- To prevent the battery from draining, do not
open or close the power top repeatedly
when the engine is switched off.
- A message will appear in the instrument
cluster display if there is a power top mal
funct ion ¢
page 42.
-The power top can also be operated manual
l y if there is a malfunction
c:> page 44,
Power top emergency operation. The ca use
of the malfunction should be corrected by
an a uthorized Audi dea ler or authorized re
pair facility as soon as possible.
- The vehicle is not prote cted from the weath
er or from unauthorized entry if the vehicle
is left parked with the power top open. Lock
any objects you are leaving in the vehicle in
the luggage compartment. Close the power
top before leav ing the vehicle.
- The side windows lower slightly automati
cally when opening/closing the power top.
Power top convenience opening/closing
Fig . 35 Remote control key: buttons
Powe r top
Fig. 36 Turning the key to open and close
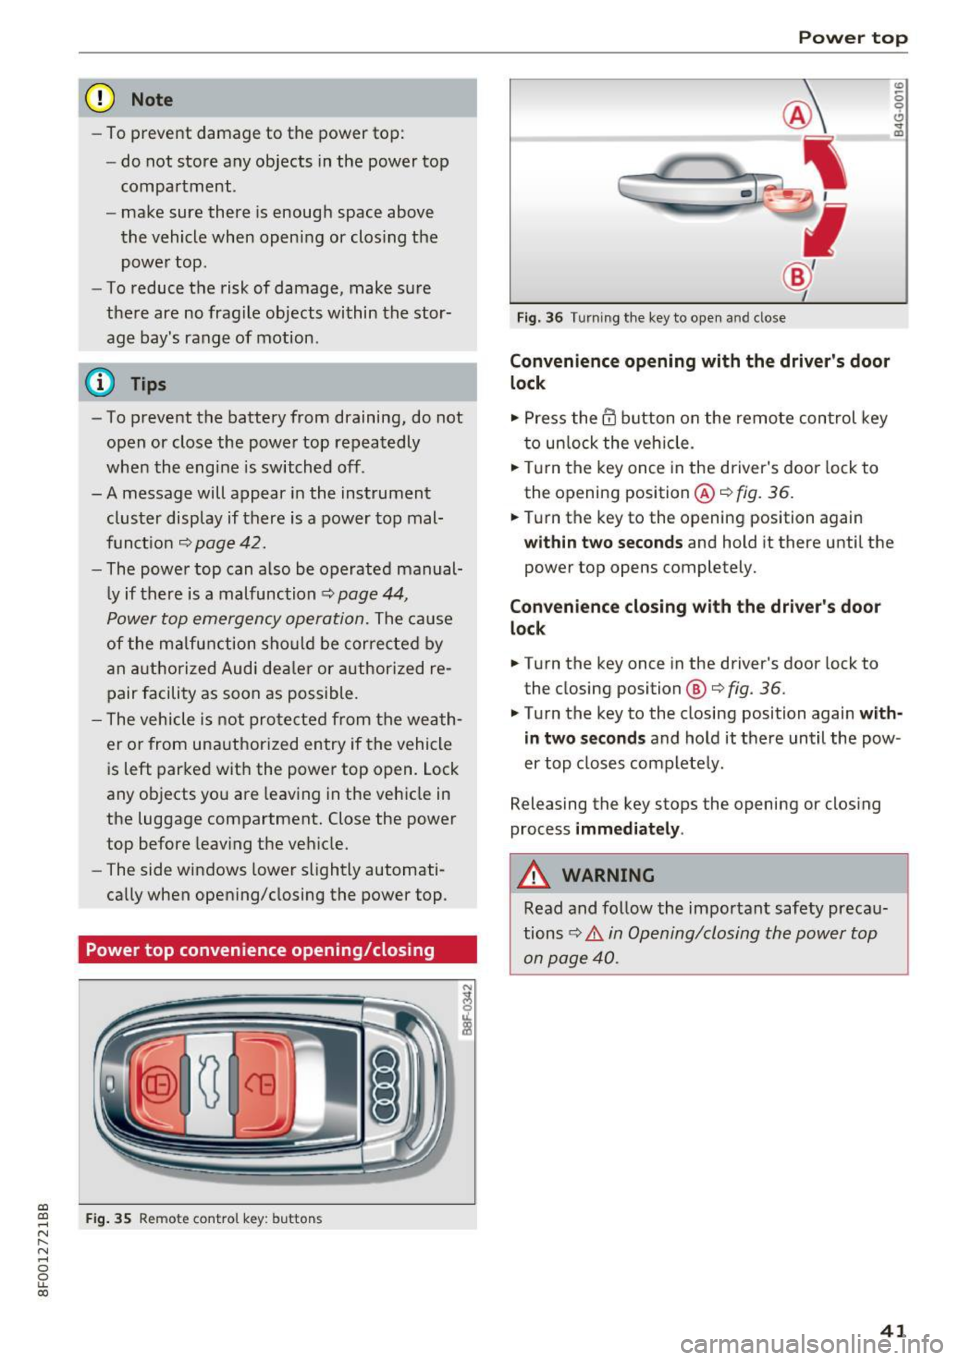
Conven ienc e opening with the driver's door
l o ck
.,. Press the @ button on the remote control key
to unlock the vehicle .
.,. Tu rn the key once in the driver's door lock to
the opening position @¢
fig. 36.
0
0 ... m
.,. Turn the key to the opening position again
within tw o second s and hold it there until the
power top opens completely.
Convenienc e closing with the dri ver's door
lock
.,. Turn the key once in the driver's door lock to
the closing position @¢
fig. 36.
.,. Turn the key to the closing position again with
in tw o second s
and hold it there until the pow
er top closes completely .
Releasing the key stops the opening or clos ing
process
imm edi ate ly .
A WARNING
Read and follow the important safety precau
tions~ .&.
in Opening/closing the power top
on page 40.
41
Page 46 of 266
Power top
Power top emergency
operation
General information
The power top con be closed manually if there is
a malfunction .
• Set the parking brake.
• Open the windows.
• Switch the ignition off .
• To reduce pressure in the power top hydraulics,
pull the~ button for approximate ly 10 to 15
seconds ¢
page 40, fig. 34 .
Only close the power top manually in an emer
gency. Have a second person he lp you. Drive to an
authorized Audi dealer or authorized repair facili
ty immediately to have the malfunction correct
ed.
A WARNING
- There is a risk of pinching your hands or in
juring other people during all steps in the power top emergency operation process.
- Ma ke sure a ll windows a re open dur ing
emergency operation.
- Do not hold the power top supports or
other moving parts.
- Never dr ive when the power top is not
locked correctly . The wind from driving
could cause the power top to open . This can
result in injuries and damage to the vehicle .
(1) Tips
The vehicle headliner is not clipped in and the
power top compartment cover is not locked
after using the power top emergency opera
tion procedure. Drive to an authorized Audi
dea ler or authorized repair facility immediate
ly to have the malfunction corrected.
44
.
Step 1: Releasing the power top storage
bay lid
Fig. 41 L uggage compa rtment : release lever
Fig. 42 Luggage compar tment : s ide trim
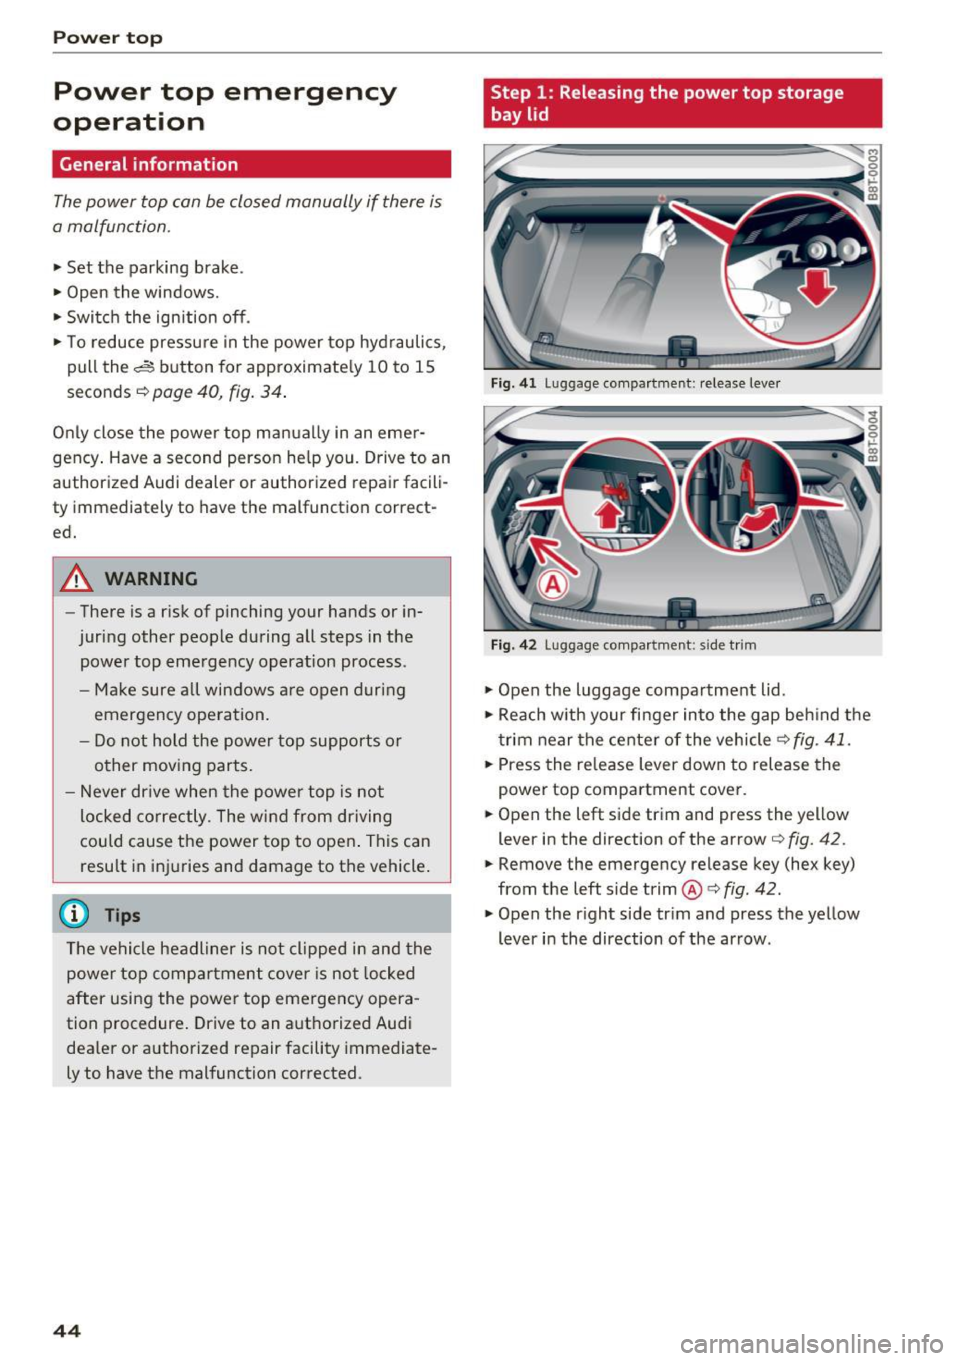
• Open the luggage compartment lid .
• Reach w ith your finger into the gap behind the
trim near the center of the vehicle ¢
fig. 41.
• Press the re lease lever down to release the
power top compartment
cove r.
• Open the left side trim and press the yellow
lever in the direction of the arrow¢
fig. 42.
• Remove the emergency release key (hex key)
from the left side trim®¢
fig. 42.
• Open the r ight side trim and press the yellow
lever in the direction of the arrow .
Page 47 of 266
a:,
a:,
...... N
" N ...... 0
0
LL co
Step 2: Lifting the power top compartment
cover out
Fig. 43 Rea r of veh icle: storage bay cove r pa rt ia ll y ope n
Fig. 44 Rear of veh icle: power top storage compartmen t
cov er comp lete ly open
0
"'
"' 0 ,1. co a,
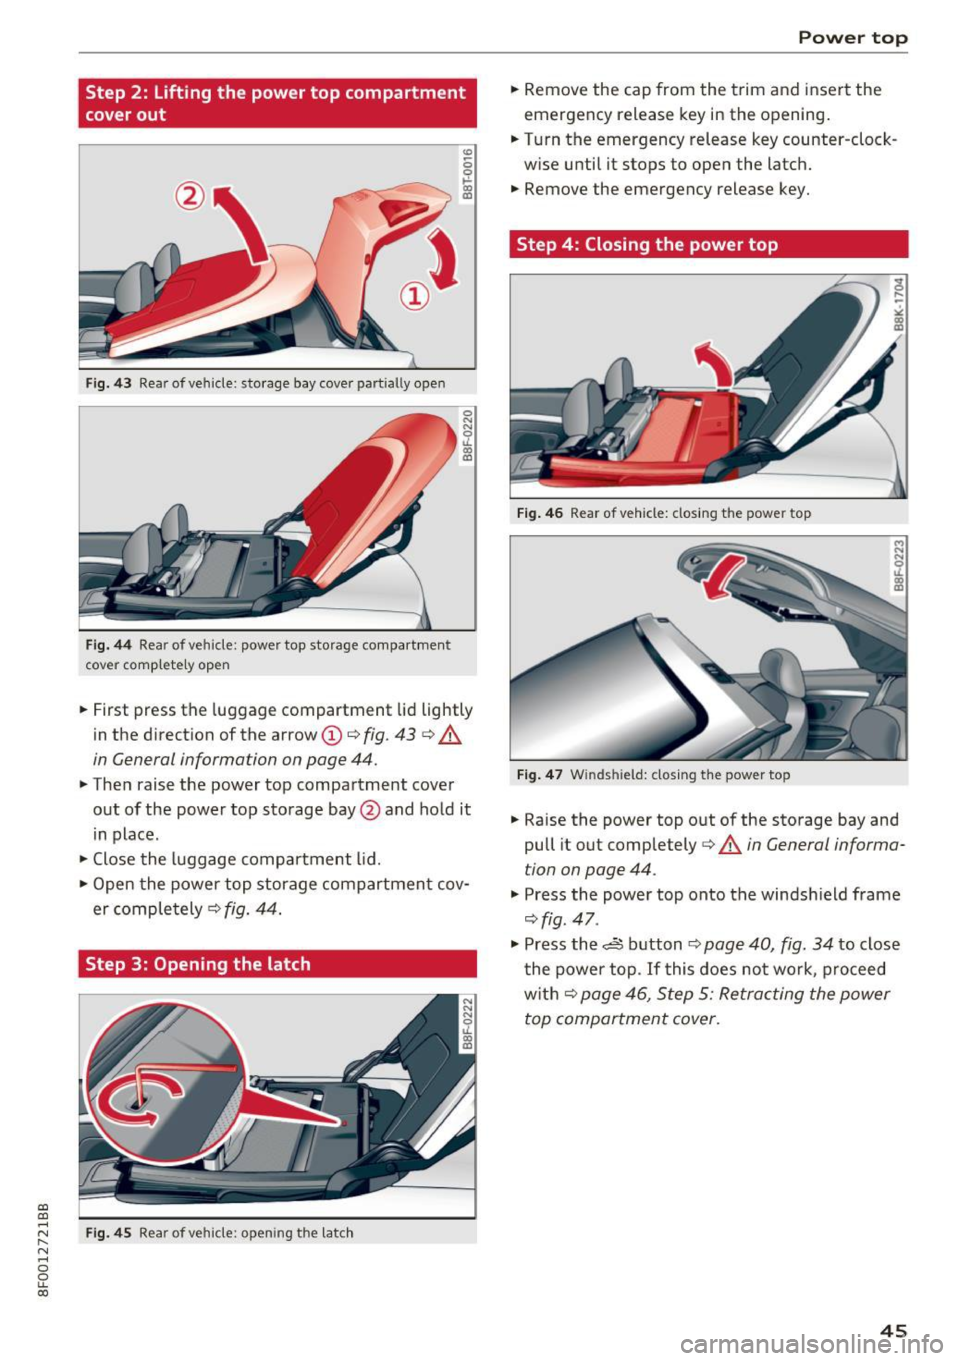
.. First press the luggage compartm ent lid lightly
in the direction of the ar row
(D ¢ fig. 43 ¢ A
in General informa tion on page 44.
.. Then raise the power top compartment cover
out of the power top storage bay @and hold it
in place.
.. Close the luggage compartment lid.
.. Open the power top storage compartment cov
er completely ¢
fig. 44.
Step 3: Opening the latch
Fig. 4S Rear of veh icle: op ening t he latch
Power top
.. Remove the cap from the trim and insert the
emergency release key in the open ing.
.. Turn the emergency release key counter-clock
wise until it stops to open the latch .
.. Remove the emergency release key.
Step 4: Closing the power top
Fig. 46 Rear of vehicle: closing t he powe r top
Fi g. 47 W inds hield : clos ing the power to p
.. Raise the power top out of the storage bay and
pull it out completely ¢
A in General informa
t ion on page 44 .
.,. Press the power top onto the windshield frame
¢ fig. 47 .
.,. Press the .d:, button ¢ page 40, fig. 34 to close
the power top.
If this does not work, proceed
w ith ¢
page 46, Step 5: Retracting the power
top compartment cover .
45
Page 48 of 266
Power top
Step S: Retracting the power top
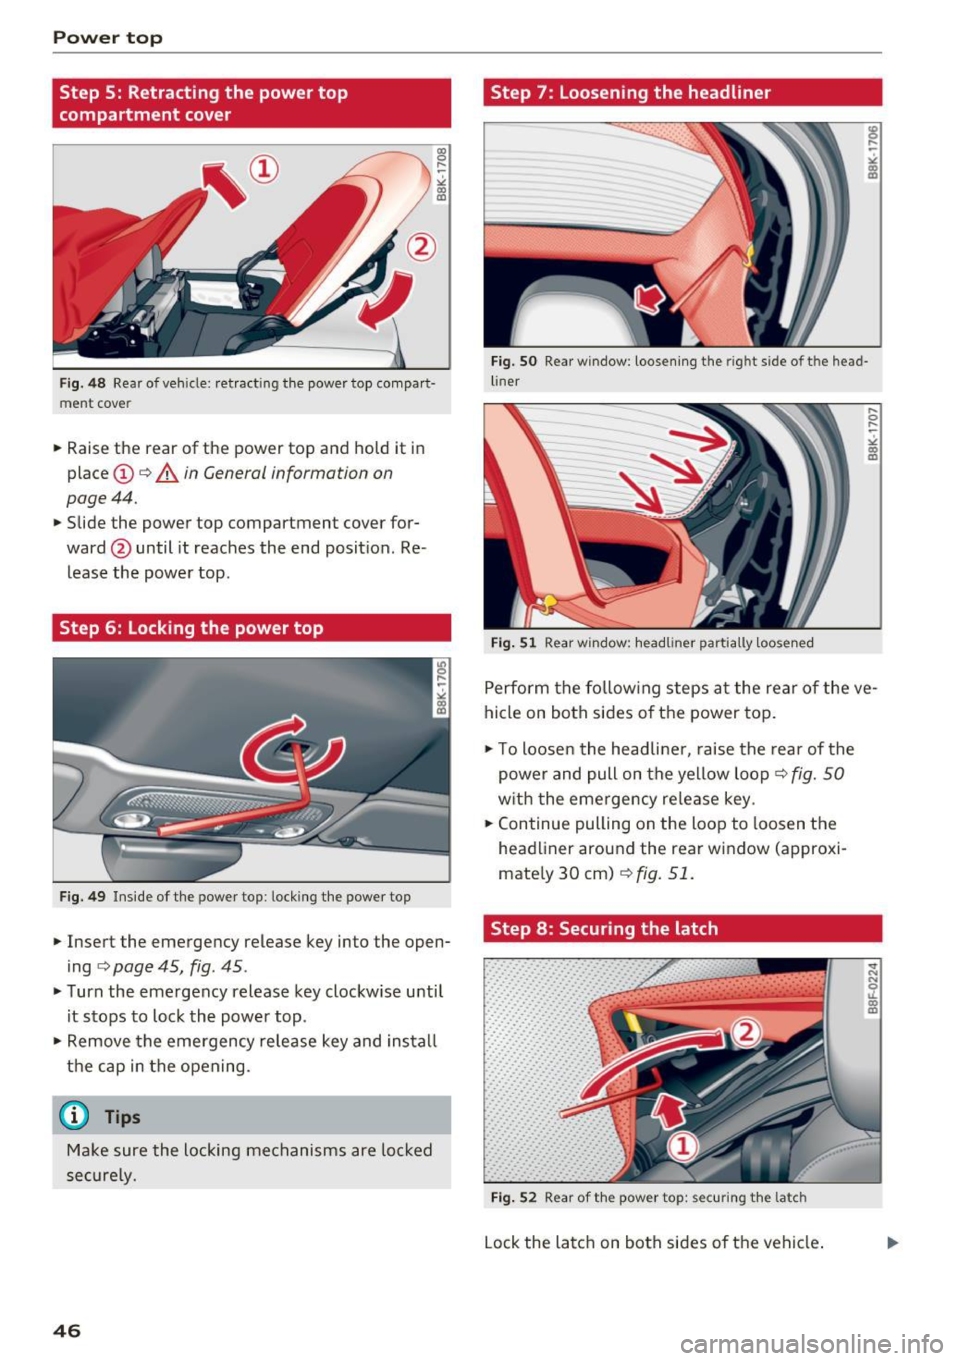
compartment cover
"' 0 ,.... ~
" "' U)
Step 7 : Loosening the headliner
Fig. SO Rear window: loosen ing the right side of the head-
Fig. 48 Rear of vehicle: ret racting the power top com par t· liner
ment cover
.. Raise the rear of the power top and hold it in
place @
¢ A in General information on
page 44 .
.. Slide the power top compartment cover for
ward @ until it reaches the end position. Re
lease the power top .
Step 6: Locking the power top
Fig. 49 Inside of the power top: locking the power top
.. Insert the emergency release key into the open
ing
¢ page 45, fig. 45 .
.. Turn the emergency release key clockwise until
it stops to lock the power top .
.. Remove the emergency release key and install
the cap in the opening.
(D Tips
Make sure the locking mechanisms are locked
securely .
46
Fig. 51 Rear wfndow: headliner partially loosene d
Perform the following steps at the rear of the ve
hicle on both sides of the power top .
.. To loosen the headliner, raise the rear of the
power and pull on the yellow loop ¢
fig. 50
with the emergency release key .
.. Continue pulling on the loop to loosen the
headliner around the rear window (approxi
mately 30 cm)
Q fig. 51 .
Step 8: Securing the latch
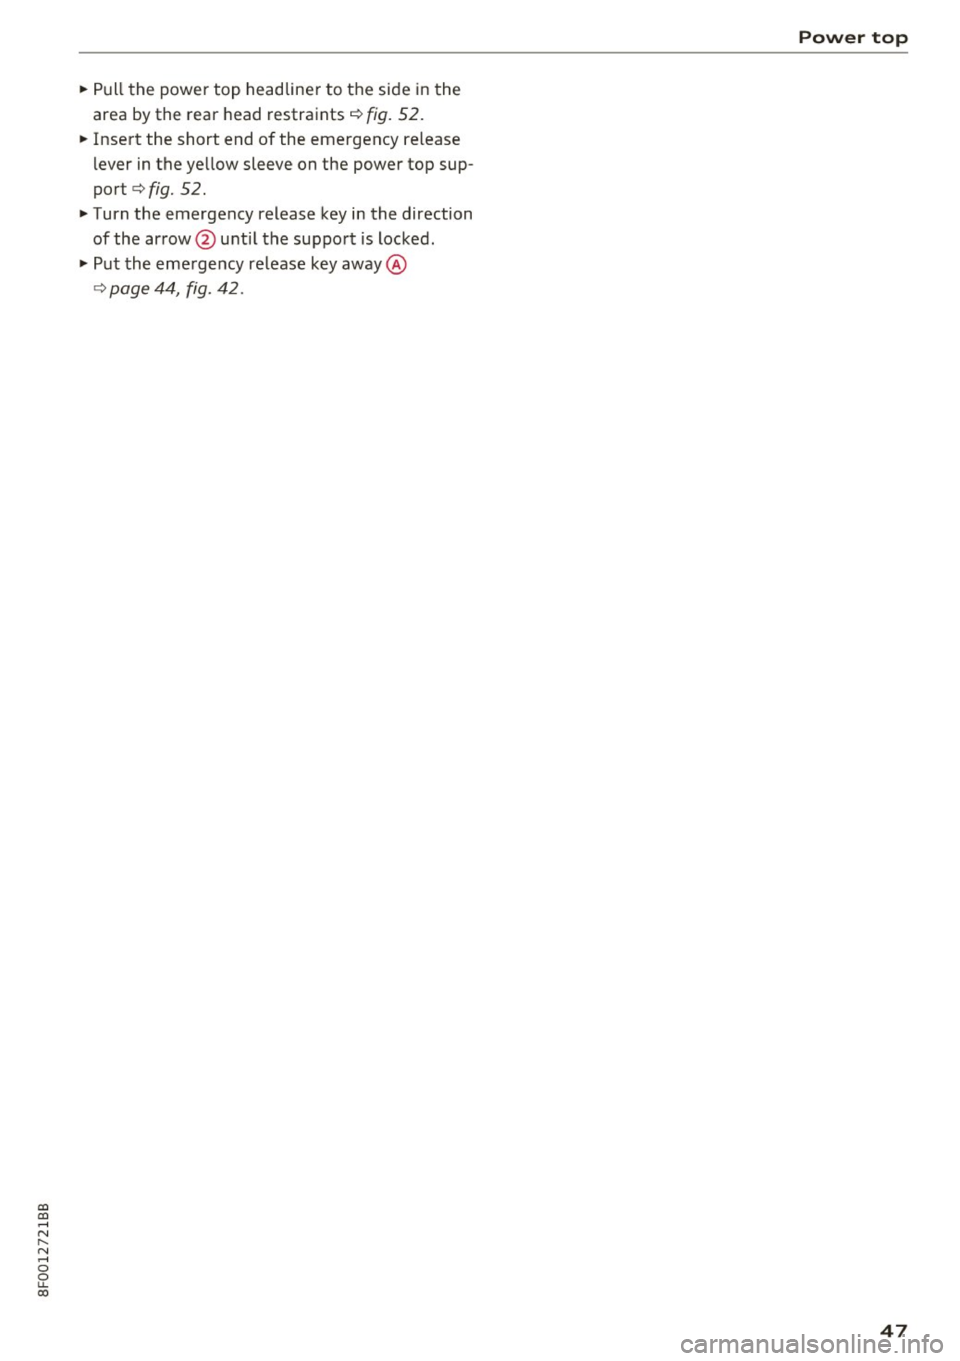
Fig. 52 Rear of the power top: securin g the la tc h
Lock the latch on both sides of the vehicle.
... N N
:r (0 U)
Page 49 of 266
a:,
a:,
...... N r--. N ...... 0
0
LL 00
~ Pull the power top headliner to the side in the
area by the rear head restraints
r:!> fig. 52.
~ Insert the short end of the emergency release
lever in the yellow sleeve on the power top sup
port
r:!> fig. 52.
~ Turn the emergency release key in the direction
of the arrow@ until the support is locked .
~ Put the emergency release key away@
r:!> page 44, fig. 42.
Power top
47