seats AUDI A5 CABRIOLET 2017 Owners Manual
[x] Cancel search | Manufacturer: AUDI, Model Year: 2017, Model line: A5 CABRIOLET, Model: AUDI A5 CABRIOLET 2017Pages: 266, PDF Size: 66.64 MB
Page 4 of 266
Table of contents
About this Owner's Manual. . . . . .
5
Operation . . . . . . . . . . . . . . . . . . . . . . . . 6
Cockpit . . . . . . . . . . . . . . . . . . . . . . . . . . . 6
Gene ral illustration . . . . . . . . . . . . . . . . . . 6
Instruments and indicator lights 8
Inst ruments . . . . . . . . . . . . . . . . . . . . . . . . 8
Indicator lights . . . . . . . . . . . . . . . . . . . . .
1 1
Driver information system . . . . . . 21
Int roduction . . . . . . . . . . . . . . . . . . . . . . . . 2 1
On-boa rd computer . . . . . . . . . . . . . . . . . . 22
Eff iciency program . . . . . . . . . . . . . . . . . . . 24
Service interval display . . . . . . . . . . . . . . . 25
O n Board Diagnostic System (OBD) . . . . . 25
Opening and closing . . . . . . . . . . . . . 27
Central lock ing . . . . . . . . . . . . . . . . . . . . . . 27
L uggage com partment lid . . . . . . . . . . . . . 33
P owe r windows . . . . . . . . . . . . . . . . . . . . . 35
Va let par king . . . . . . . . . . . . . . . . . . . . . . . 36
G arage do or opener (Home link) . . . . . . . . 36
Power top . . . . . . . . . . . . . . . . . . . . . . . . 4 0
Autom atic power top . . . . . . . . . . . . . . . . . 4 0
W ind defle ct or . . . . . . . . . . . . . . . . . . . . . . 43
P ower top emergen cy opera tion ... .. .. .
Lights and Vision ............ .. .. .
Exterio r lighting .... . ...... ... .. .. .. .
I nterior lighting .. .. .. ..... ... .. .. .. .
4 4
48
48
5 1
V1s1on . . . . . . . . . . . . . . . . . . . . . . . . . . . . . 5 1
W indshield w ipers . . . . . . . . . . . . . . . . . . . 53
Dig ita l compass . . . . . . . . . . . . . . . . . . . . . 55
Seats and storage . . . . . . . . . . . . . . . . 57
Gene ral information . . . . . . . . . . . . . . . . . 57
Front seats . . . . . . . . . . . . . . . . . . . . . . . . . 58
H ead restra ints . . . . . . . . . . . . . . . . . . . . .
60
Memory function . . . . . . . . . . . . . . . . . . . . 6 1
Ashtray . . . . . . . . . . . . . . . . . . . . . . . . . . . . 62
Ciga ret te ligh te r . . . . . . . . . . . . . . . . . . . . 6 2
Sto ring . . . . . . . . . . . . . . . . . . . . . . . . . . . . 6 2
Lugg age compa rtment . . . . . . . . . . . . . . . 63
Warm and cold . . . . . . . . . . . . . . . . . . . 66
Climate con trol system . . . . . . . . . . . . . . . 66
2
Driving .... . .. .. .. .. ... . .. .... ... . .
Steering . ... .. .. .. .. .. .. .. .... ... . .
Ign it ion loc k ... .. .. .. .. . ... .... ... . .
Convenience key .. .. .. ............. . .
D river messages .. .. .. ............. . .
E lectromechanical parking brake ...... .
Speed warning system ......... ..... . .
Cru ise cont rol system .............. . .
Automatic transmiss ion
mul tit ronic, S t ronic, tiptron ic
Audi adaptive crui se control and
braking guard ................... .
Introduction ....................... .
Genera l information .. .. ........... . .
Audi ad aptive cruise cont ro l .......... .
A udi br aki ng g uard ... .. . ... .... ... . .
Messages ... .. .. .. ... .. .. ..... ... . .
Audi side assist ... .. .. .. .... .. .. .
S ide ass ist . ... .. .. .. ... .. ..... ... . .
71
71
7 1
73
75
76
78
79
81
81
88
88
88
90
94
95
97
97
Audi drive select . . . . . . . . . . . . . . . . . 101
Drive sett ings . . . . . . . . . . . . . . . . . . . . . . . 101
Parking System . . . . . . . . . . . . . . . . . . 104
Parking sys tem ... .. .. ... . .. .... ... . .
Rear parking system .. .. .. .. .... ... . .
Rear park ing system with rearview
camera
Safety
104
104
105
111
Driving safety . . . . . . . . . . . . . . . . . . . . 111
Bas ics . . . . . . . . . . . . . . . . . . . . . . . . . . . . . 111
Correct passenger seat ing positions... .. 112
D river's and front passenger's footwell . . 115
Pedal area .......................... 116
Stor ing cargo cor rec tly . . . . . . . . . . . . . . . 116
Reporting Safety Defec ts . . . . . . . . . . . . . . 118
A ctive rollover protec tion system 119
Safety belts . . . . . . . . . . . . . . . . . . . . . . 122
Gener al infor mation . . . . . . . . . . . . . . . . . 122
Why use safety be lts? . . . . . . . . . . . . . . . . 123
Safe ty be lts . . . . . . . . . . . . . . . . . . . . . . . . 125
Be lt tensioners . . . . . . . . . . . . . . . . . . . . . . 128
Page 5 of 266
a:,
a:,
...... N r--. N ...... 0
0
LL 00
Airbag system .. .. .... ... .. .. .... . 130
Important information . . . . . . . . . . . . . . . 130
F ront a irbags . . . . . . . . . . . . . . . . . . . . . . . 134
Mon itoring the Advanced Airbag System . 140
K nee airbags . . . . . . . . . . . . . . . . . . . . . . . . 144
Side airbags . . . . . . . . . . . . . . . . . . . . . . . . 146
Ch ild safety . . . . . . . . . . . . . . . . . . . . . . 150
Important information . . . . . . . . . . . . . . . 150
C hi ld seats . . . . . . . . . . . . . . . . . . . . . . . . . 155
Secur ing c hild seats . . . . . . . . . . . . . . . . . . 159
L ATCH system ( lower anchorages a nd
tethers for chi ld ren) . . . . . . . . . . . . . . . . . 163
Addit io nal info rmat ion 166
Driver messages . . . . . . . . . . . . . . . . . 167
In telligent Technology . . . . . . . . . . 167
E lectronic Stabilization Control ( ESC) . . . . 16 7
N otice about data recorded by the Event
Data Recorde r and vehicle control
modules . . . . . . . . . . . . . . . . . . . . . . . . . . . 169
Brak ing . . . . . . . . . . . . . . . . . . . . . . . . . . . . 170
Electro-mechan ica l power assist, dynamic
steer ing . . . . . . . . . . . . . . . . . . . . . . . . . . . 171
D riving w ith your quatt ro . . . . . . . . . . . . . 172
E ne rgy management . . . . . . . . . . . . . . . . . 173
Driving and the environment .... 175
Break ing in . . . . . . . . . . . . . . . . . . . . . . . . . 17 S
Avoi d damagi ng the vehicle . . . . . . . . . . . 175
D riving throug h wate r on roads . . . . . . . . 17 5
Cata lytic conve rte r. .. .... ... .. .. .... . 176
Shutting down veh icle . . . . . . . . . . . . . . . . 176
Economical and environmentally-friendly
driving . . . . . . . . . . . . . . . . . . . . . . . . . . . . 177
Trailer towing . . . . . . . . . . . . . . . . . . . . 179
Driving w ith a t railer . . . . . . . . . . . . . . . . . 179
T rai ler tow ing informat ion . . . . . . . . . . . . 180
Operating instructions . . . . . . . . . . . 182
Care and cleaning . . . . . . . . . . . . . . . . 182
Gene ral information . . . . . . . . . . . . . . . . . 182
Car washes . . . . . . . . . . . . . . . . . . . . . . . . . 182
C lean ing and care information . . . . . . . . . 183
Pl acing your ve hicle out of se rvice . . . . . . 186
Table of contents
Fuel and Refueling . . . . . . . . . . . . . . .
188
Fuel. ... .. .. .. .. .. .... . ..... ... .. .. 188
Refueling . . . . . . . . . . . . . . . . . . . . . . . . . . 190
Checking and Filling . . . . . . . . . . . . . 193
Hood . . . . . . . . . . . . . . . . . . . . . . . . . . . . . . 193
Engine compartment . . . . . . . . . . . . . . . . . 195
Engine oil . . . . . . . . . . . . . . . . . . . . . . . . . . 195
Cooling system . . . . . . . . . . . . . . . . . . . . . . 199
Brake fl uid . . . . . . . . . . . . . . . . . . . . . . . . . 202
Battery . . . . . . . . . . . . . . . . . . . . . . . . . . . . 203
W indsh ield/headlight* washer conta iner. 206
Wheels ........ .. ................. 207
Whee ls and Tires . . . . . . . . . . . . . . . . . . . . 207
T ire p ressure monito ring sys tem 224
Do It Yourself . . . . . . . . . . . . . . . . . . . . 227
Emergency a ssistance . . . . . . . . . . . 227
Vehicle too l ki t . . . . . . . . . . . . . . . . . . . . . . 227
Space -sav ing spare tir e ( compac t spare
t ire) . . . . . . . . . . . . . . . . . . . . . . . . . . . . . . . 227
Replacing w heels . . . . . . . . . . . . . . . . . . . . 228
Fuses and bulbs . . . . . . . . . . . . . . . . . . 234
Fuses ... .. .. .. .. .. .... . ..... ... .. .. 234
B ul bs ... .. .. .. .. .. .... . ..... ... .. .. 237
Emergency situations . . . . . . . . . . . . 238
Genera l . . . . . . . . . . . . . . . . . . . . . . . . . . . . 238
Start ing by pushing or tow ing . . . . . . . . . . 238
Start ing with jumper cables . . . . . . . . . . . 238
Use of jumper cables . . . . . . . . . . . . . . . . . 239
T ow ing with a tow t ruck . . . . . . . . . . . . . . 240
Raising the vehicle . . . . . . . . . . . . . . . . . . . 242
Technical data . . . . . . . . . . . . . . . . . . . . 243
Technical data . . . . . . . . . . . . . . . . . . . . 243
Vehicle iden tification . . . . . . . . . . . . . . . . . 243
Weig hts . . . . . . . . . . . . . . . . . . . . . . . . . . . 243
Di mens ions . . . . . . . . . . . . . . . . . . . . . . . . . 244
Capacities . . . . . . . . . . . . . . . . . . . . . . . . . . 2 44
Gasoline engines . . . . . . . . . . . . . . . . . . . . 245
Consumer informat ion ...... .. .. 246
War ranty coverages . . . . . . . . . . . . . . . . . . 246
Operating your vehicle outside the U.S.A.
or Canada . . . . . . . . . . . . . . . . . . . . . . . . . . 246
3
Page 59 of 266
a:,
a:,
...... N r--. N ...... 0
0
LL 00
Seats and storage
General information
Why is your seat adjustment so important?
The safety belts and the airbag system can only
provide maximum protection if the front seats are corr ectly adjusted .
There are various ways of adjusting the front
seats to provide safe and comfortable support
for the driver and the front passenger . Adjust
your seat properly so that:
- you can easily and quickly reach all the switches
and controls in the instrument panel
- your body is properly supported thus reducing
physical stress and fatigue
- the safety belts and a irbag system can offer
maximum protection
Q page 130.
In the following sections, you will see exact ly
how you can best adjust your seats.
There are spec ial regulations and instr uctions for
installing a child safety seat on the front pas
senger's seat . Always fo llow the information re
garding child safety provided in
¢ page 150,
Child safety.
A WARNING -
Refer to Q page 111, Driving safety for im
portant information, tips, suggestions and
warnings that you should read and follow for
your own safety and the safety of yo ur pas
senge rs.
A WARNING
Incorrect seat ing position of the driver and all
other passengers can result in serious person
al injury .
- Always keep yo ur feet on the floor when the
vehicle is in motion -never pu t your feet on
top of the instrument pane l, out o f the win
dow or on top of the seat cushion. This ap
plies especially to the passengers. If your
seating pos it ion is incorrect, you increase
the risk of injury in the case of sudden brak
ing or an accident. If the airbag inflates and
Seat s and sto rage
the seating position is incorrect, this could
result in persona l injury or even death.
- It is important for both the driver and front
passenger to keep a distance of at least
10 inches (25 cm) between themselves and
the steering wheel and/or instrument pan
el. If you're sitt ing any closer than this, the
airbag system cannot protect you properly .
In addition, the front seats and head re
stra ints must be adjusted to you r body
he ight so that they can g ive you maximum
p rotection.
- Always try to keep as much dis tance as pos
sible between yourself and the steer ing
wheel or instrument pane l.
- Do not adjust the driver's o r front passeng
er 's seat while the veh icle is moving . Your
seat may move unexpectedly, causing sud
den loss of vehicle contro l and personal in
jury. If you ad just your seat while the veh icle
is moving, you are out of pos ition.
Driver's seat
The correct seat position is important for safe
and relaxed driving.
We recommend that you adjust the driver's seat
in the following manner:
.,. Adjust the seat in fo re and aft direction so tha t
you c an ea sil y push the pedals to the floor
while keeping yo ur knees s light ly bent ¢.&.
in
Why is your seat adjustment so important? on
page
57.
.,. Adj ust the seatback so that when you sit with
your back against the seatback, you can still
grasp the top of the steering wheel.
.,. App lies to ve hicles w ith ad justable head re
stra ints: Adjust the head rest raint so the upper
edge is as even as possible w ith the top of your
head. If t hat is not possible , try to adjust the
he ad restraint so that it is as close to this pos i
tion as possible ¢
page 60.
A WARNING ~
Never place any objects in the driver 's foot-
well. An object could get into the pedal area and interfere with pedal function. In case of
57
Page 60 of 266
Sea ts and stor age
sudden braking or an accident, you would not
be able to brake or accelerate.
Front passenger's seat
Always move the front passenger seat into the
rearmost position.
To avoid contact with the a irbag while it is de
p loying, do not sit any closer to the instrument
panel than necessary and a lways wear the three
point safety belt provided adjusted correctly. We
recommend that you adjust the passenger's seat
in the following manner:
.,. Bring the backrest up to an (a lmost) upright
position .
Do not ride with the seat reclined.
.,. Applies to vehicles with adjustable head re
straints: Adjust the head restra int so the upper
edge is as even as poss ible with the top of your
head. If that is not possible, try to adjust the
head restraint so that it is as close to th is posi
tion as poss ible
¢ page 60.
.,. Place your feet on the floor in front of the pas
senger's seat.
Front seats
Power seat adjustment
App lies to: vehicles with power adjustable seats
Fig . 66 Fro nt seats: power seat adjustment
Controls
@ -Adjusting the lumba r support*: press the
button in the corresponding position¢& .
@-Movi ng the seat up/down: p ress the but ton
up/down¢ &.
@ -Moving the seat forward/back: press the but
ton forwa rd/back ¢,& .
58
©-Adjusting the backrest ang le: press the but
ton forward/back ¢
.&..
©-Raising/ lower ing* the head restra ints: press
the button up/down ¢& .
@ -Lengthening/sho rtening the upper th igh
suppo rt*: lift the handle. A spr ing moves the
front seat cushion forward ¢
,&.
& WARNING
-Never ad just the driver's or front passeng
er's seat while the vehicle is moving.
If you
do this while the veh icle is moving, you will
be out of posit ion. Always ad just the driver's
or front passenger's seat when the vehicle is
not moving .
- Be carefu l when adjusting the seat height .
Check to see that no one is in the way, or se
rious injury could result!
- Because the seats can be electrically adjust
ed w ith the ignition off or with the ig nition
key removed, never leave children unattend
ed in the vehicle. Unsupe rvised use of the
electric seat adj ustments may cause ser ious
m Jur y.
- To red uce the r isk of injury in the case of
sudden b raking or acc ident, front passen
ge rs must neve r ride in a moving ve hicle
w it h the backrest reclined. Sa fety belts and
the airbag system on ly offer maximum pro
tect ion when the backrest is upr ight and the
safety belts are properly positioned on the
body. The more the backrest is reclined, the
greater the risk of personal injury from an
incorrect seating position and improper ly
positioned safety belts.
-
Page 61 of 266
a:,
a:,
...... N
" N ...... 0
0
LL co
Power easy entry function
Applies to: vehicles with power adjustable seats
The easy entry function makes it easier for the
rear passengers to enter and leave the vehicle .
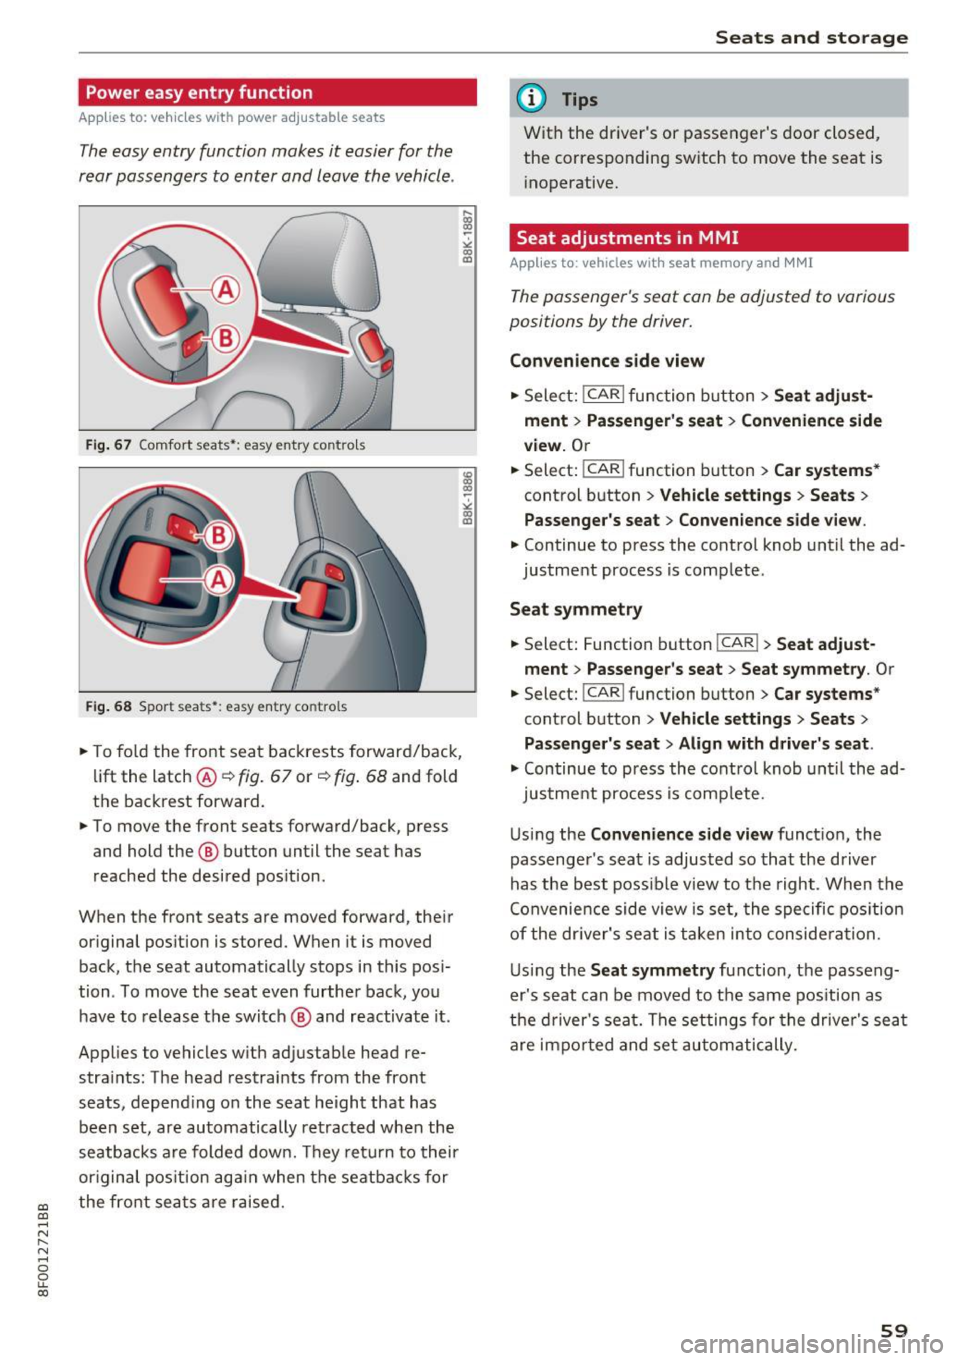
Fig. 67 Comfort seats •: easy e ntry co ntro ls
F ig. 68 Sport sea ts •: easy en try co ntro ls
.. To fo ld the front seat backrests forward/back,
lift the latch @¢ fig. 67 or ¢ fig. 68 and fold
the backrest forward .
.,. To move the front seats forward/back, press
and hold the @ button until the seat has
reached the desired pos ition .
When the front seats are moved forward, their or iginal pos ition is stored. When it is moved
back, the seat automatically stops in this pos i
tion . To move the seat even further back, you
have to release the switch @ and reactivate it .
Applies to vehicles w ith adjustab le head re
stra ints: The head restraints from the fro nt
seats, depend ing on the seat he ight that has
been set, are automatically retracted when the
seatbacks are folded dow n. Th ey retu rn to their
or iginal pos ition aga in when the seatbac ks for
the fro nt sea ts ar e raised.
Seats and storag e
(D Tips
With the dr iver's or passenger's door closed,
the corresponding sw itch to move the seat is
i noperative.
Seat adjustments in MMI
Appl ies to : vehicles with seat memory and MMI
The passenger's seat can be adjusted to various
positions by the driver.
Convenience side view
.,. Select: !CAR ! func tion button> Seat adju st
ment > Passenger' s seat > Convenience side
view.
O r
.. Select: !CAR ! function button > Car systems *
control button > Vehicle settings > Seats >
Passenger's seat > Conven ience side view .
.,. Continue to press the control knob until the ad
justment process
is comp lete .
Seat symmetry
.. Select: Function button !CAR !> Seat adjust ·
ment
> Pa ssenger 's seat > Seat symmetry . Or
.. Select: !CAR ! function button> Car systems *
control button > Vehicle settings > Seats >
Pas senger's seat> Align with driver's seat .
.,. Continue to press the control knob unt il the ad-
justment process is comp lete.
U si ng the
Convenience side view funct ion, the
passenger's sea t is adjusted so that the driver
has the best poss ib le view to the right . When the
Convenience side view is se t, the spe cific pos ition
of the dr iver's seat is taken into conside ra t ion.
U sing the
Seat symmetry function, the passeng
er's seat can be moved to the same pos ition as
the driver 's sea t. The settings for the drive r's seat
are impo rted and set au to ma tically.
59
Page 62 of 266
Sea ts and stor age
Center armrest
The center armrest can be adjusted to several
levels.
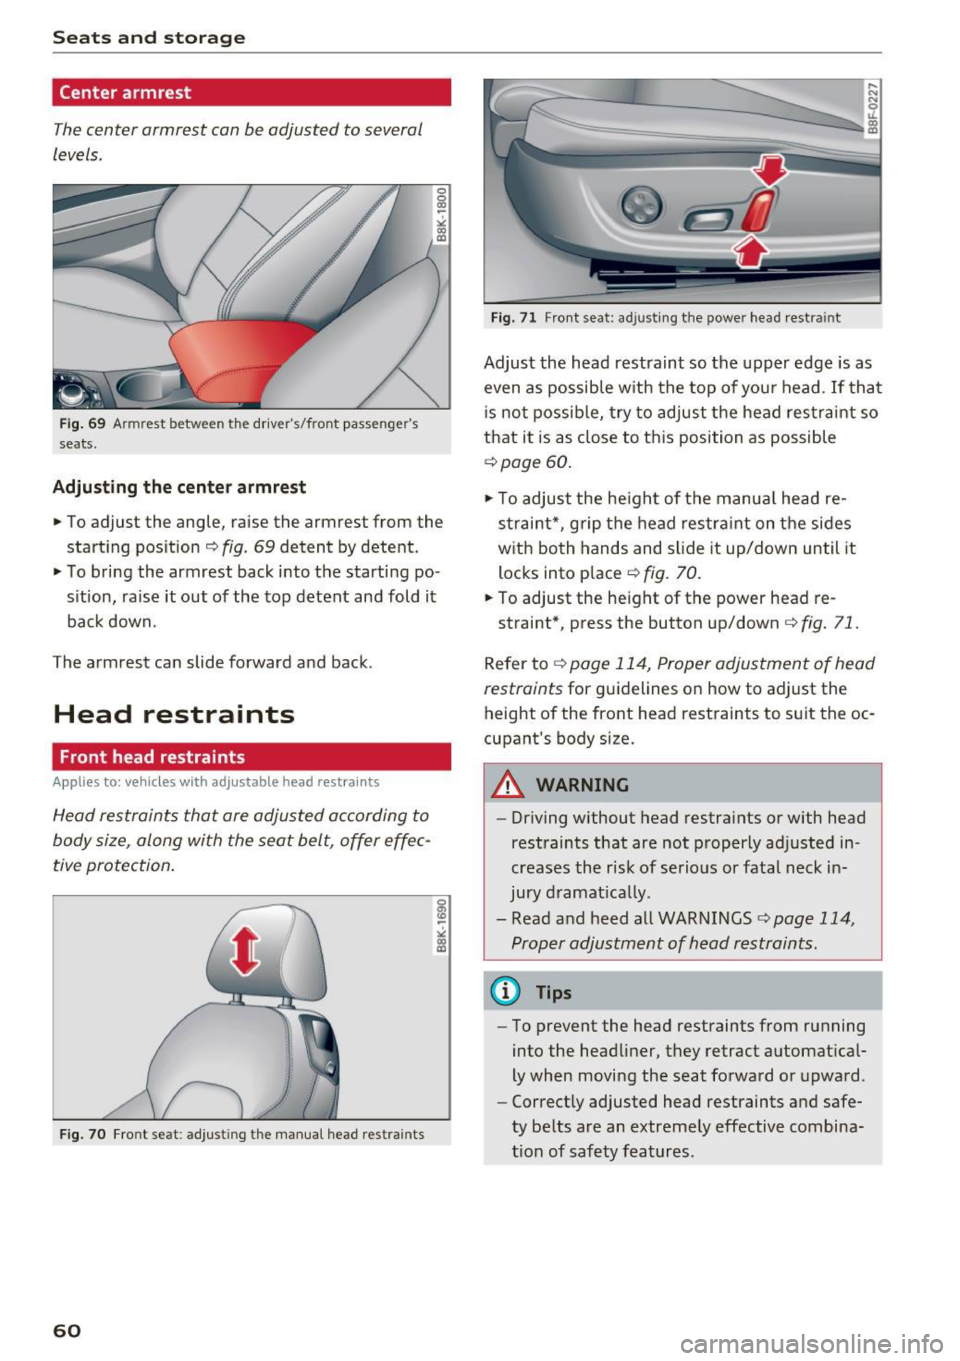
F ig . 6 9 Armrest between the driver's/front passenger's
seats.
Adjust ing th e cente r armre st
.. To adjust the angle, raise the armrest from the
start ing position¢
fig, 69 detent by detent .
.. To bring the armrest back i nto the starti ng po
s ition, raise it out of the top detent and fold it
back down.
The armrest can slide forward and back .
Head restraints
Front head restraints
Applies to: v ehicles with a djustable head res traints
Head restraints that are adjusted according to
body size, along with the seat belt, offer effec
tive protection .
Fig. 70 Fro nt seat: adjust ing the manual head rest rain ts
60
Fig. 71 Fro nt seat: adjusting th e power head restraint
Adjust the head restraint so the upper edge is as
even as possible w ith the top of you r head . If tha t
i s not possib le, try to adjust the head res tra int so
that it is as clo se to th is position as possible
¢ page 60.
.,. To adjust the he igh t of the manua l head re
s t rai nt*, g rip the head restra int on the sides
with both hands and slide it up/down until it
locks into place ¢
fig. 70.
.. To adjust the height of the power head re-
straint*, press the button up/down¢
fig. 71.
Refer to ¢ page 114, Proper adjustment of head
restraints
for guidelines on how to adjust the
height of the front head restraints to suit the oc
cupant's body size.
A WARNING
- Dr iving without head restraints or with head
restraints that are not properly ad justed in
creases the risk of serious or fatal neck in
jury d ramat ically .
- Read and heed all WARNINGS
¢page 114,
Proper adjustment of head restraints.
@ Tips
- To prevent the head restraints from running
into the headliner, they retract automat ica l
ly when moving the seat fo rward or upwa rd .
- Correct ly adjusted head restraints and safe
ty be lts are an extremely effective combina
t ion of safety fea tures.
Page 63 of 266
a:,
a:,
,....,
N
" N ,....,
0
0
LL co
Memory function
Description
Applies to: vehicles with memory function
The memory funct ion allows yo u to qu ickly and
eas ily store and recall personal seat ing profi les
for the driver. The memory function is operated
through the master key and the memory buttons
in the driver 's door.
The drive r's seating profile is stored and assigned
to the maste r key each t ime the vehicle is locked.
When you open the door, the seat profile is auto
matica lly recalled.
If two people use one vehicle,
it is recomm ended that each person a lways uses
"their own" master key .
Up to 2 seat prof iles can be stored in the memory
buttons in the driver 's door . Once they are stor
ed, these s eat profiles can be selected at any
time.
I n addition to the driver 's seat settings, you can
a lso store and access the exterior mirror adjust
ment settings* using the remote control key or
memory button .
Remote control key
Applies to: veh icles with seat memory
To assign the driver 's seat settings to the remote
control key when locking the vehicle, the function
must be act ivated in the rad io or MMI*
.. Select :
I CARI function button > Seat adjust
ment > Driver's seat > Remote con trol ke y
>
on .Or
.,. Select :
- 1 C_ A_ R_ I funct io n button > Car sy stem s*
contro l button > Vehicl e sett ing s > Seat s>
Driv er' s s eat > Remote control key > On .
@ Tips
If you do not wa nt another driver 's settings to
be assigned to the remo te key, switch off the
memory fu nction us ing t he radio o r MMI* or
t he
I ON/OF F I button ¢ page 61.
Seats and storag e
Memory buttons
Applies to: vehicles with seat memory
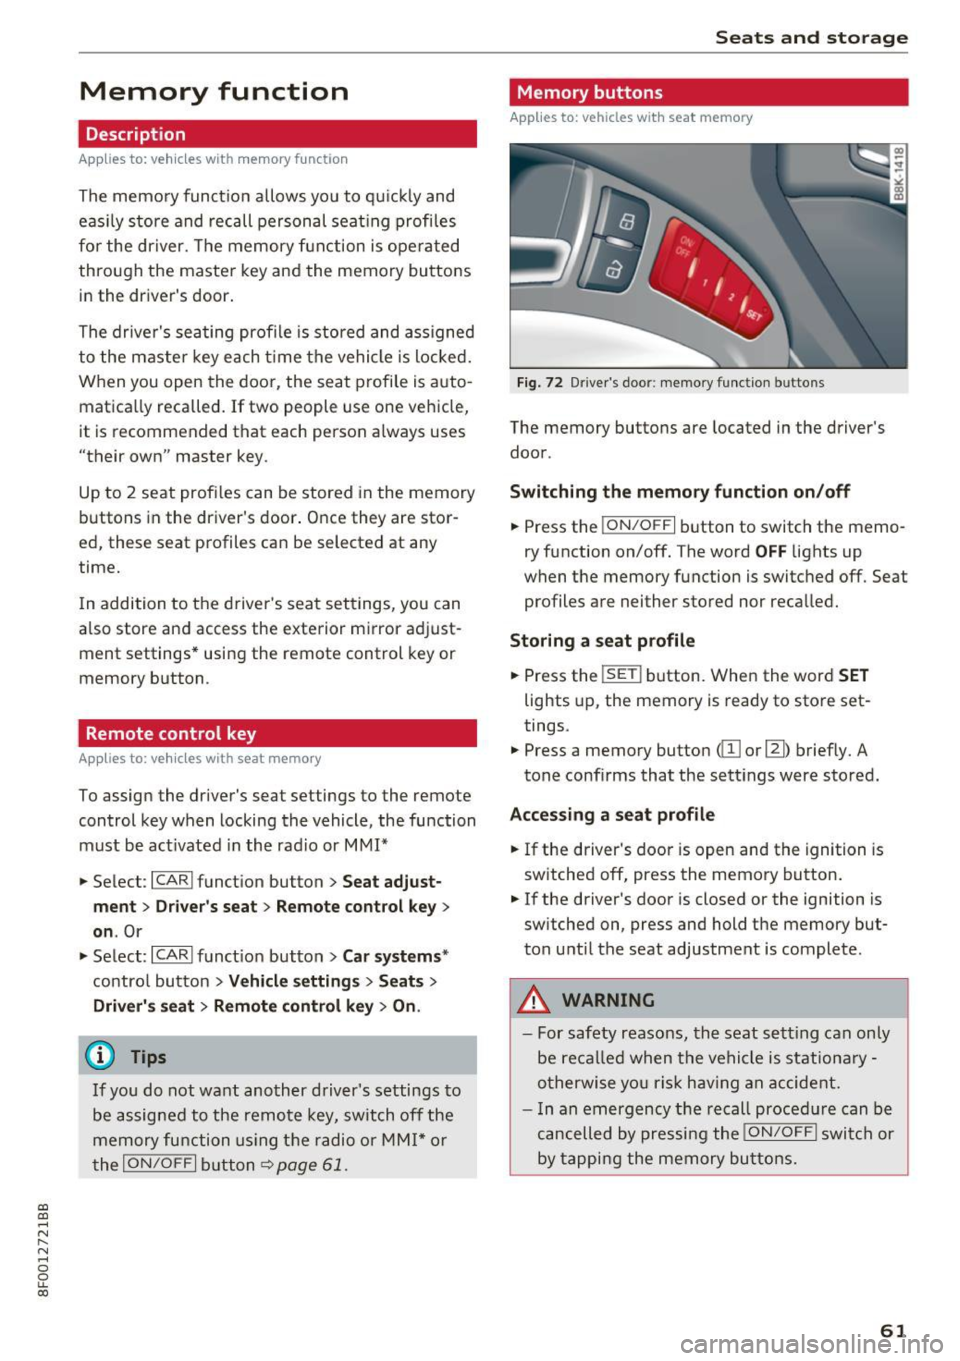
Fig. 72 D river 's doo r: memo ry fu ncti on butto ns
The memory buttons are located in the driver's
door .
Switching th e m emo ry functi on on /off
.. Press the ION/O FF I button to switch the memo
ry function on/off. The word
OFF lights up
when the memory function is swit ched off . Seat
profiles are nei ther stored nor recalled.
Storing a seat p rofil e
.. Press the ISE TI button. When the word S ET
lights up, the memory is ready to store set
tings.
.,. Press a memory button
Accessing a sea t profile
.. If the driver's door is open and the ignition is
switched off, press th e memory button .
.. If the driver's door is closed or the ignition is
sw itched on, press and hold the memory but
ton u ntil the seat adjustment is complete .
.&_ WARNING
-For safety reasons, the seat sett ing can only
be reca lled when the vehicle is st ationa ry -
o therwise yo u ris k hav ing an accident.
- I n an emergency the recall proced ure can be
cancelled by pressi ng the
I ON/OF F I switch or
by tapping the memory bu ttons.
61
Page 65 of 266
a:,
a:,
...... N
" N ...... 0
0
LL co
(upholder
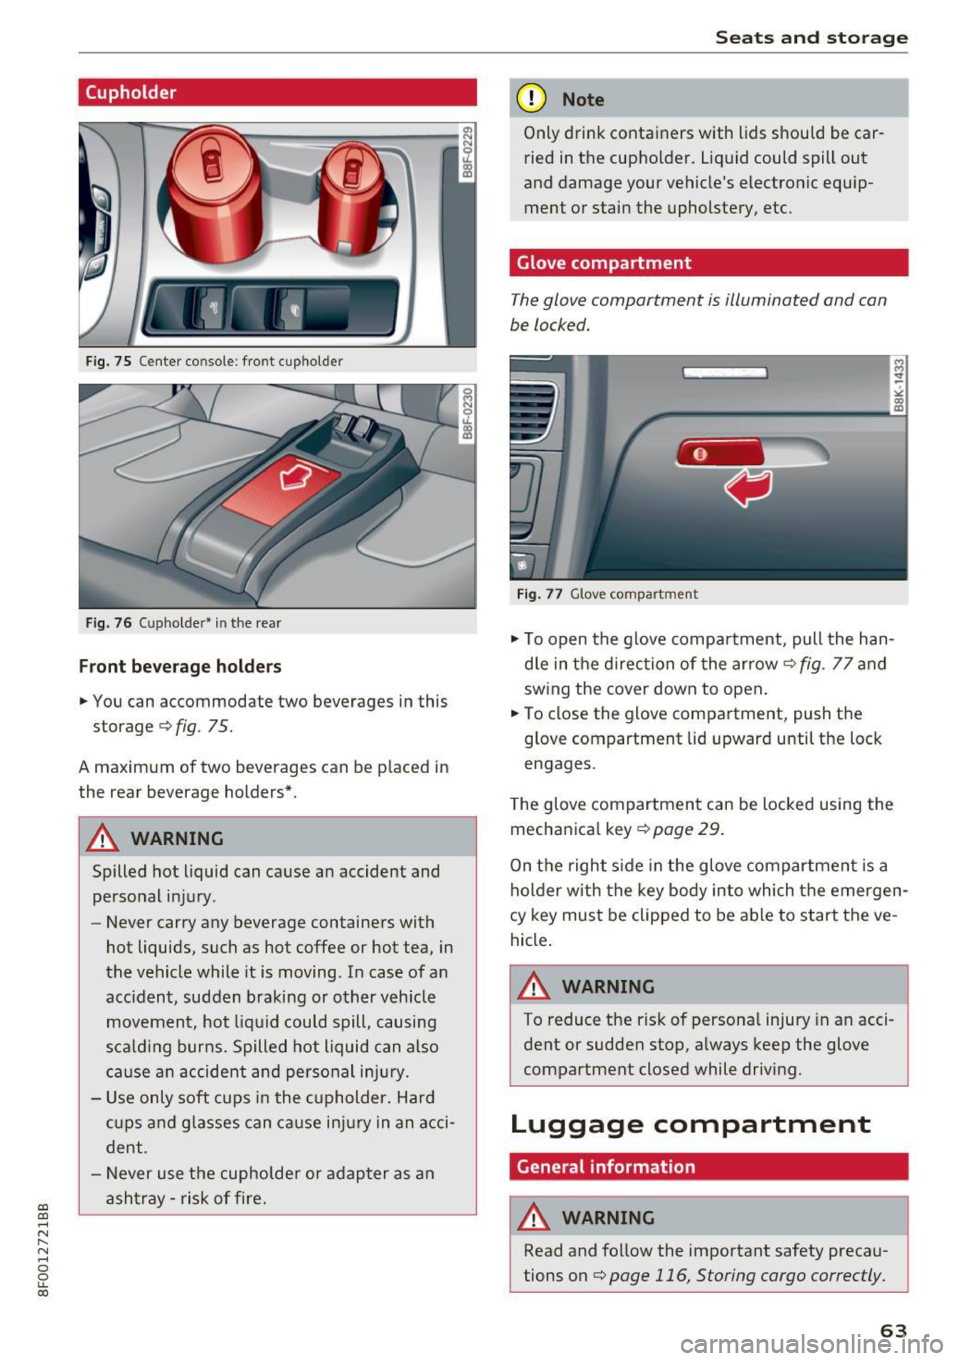
Fig. 75 Center co nsole: fro nt c upho ld er
Fig. 76 ( uph older • i n the rea r
Front be ve rage h olde rs
.. You can ac commodate two beverages in this
storage ¢
fig. 75.
A maxim um of two beverages can be p laced in
the rear beverage holders*.
A WARNING
Spilled hot liquid can cause an accident and
personal injury .
- Never carry any beverage containers with
hot liquids, such as hot coffee or hot tea, in
the vehicle while it is moving . In case of an
acc ident , sudden braking or o ther veh icle
movement, hot liq uid could spill, causing
s ca ld ing burns. Spilled hot liquid can also
c a use a n accident and perso nal i njur y.
- Use o nly soft cups in the c upholder. Hard
cu ps and g lasses can ca use i njur y in an acci
dent.
- Never use the cupholde r or adapter as an
asht ray -ris k of fire.
Seats and storag e
(D Note
Only drink containers with lids should be car
ried in the cupho lder. Liquid could spill out
and damage your vehicle's electronic equ ip
ment or stain the upholstery, etc.
Glove compartment
T he glove compartment is illuminated and can
be locked.
Fig . 77 G love co mpart ment
.. To open the glove compa rtment, pull the han
d le in the d irec tion of the arrow¢
fig. 77 and
sw ing the cover down to open .
.. To close the glove compartment, push t he
glove compartment lid upward until the lock
engages .
T he glove compartmen t can be locked using the
mechan ica l key ¢
page 29 .
On the right s ide in the glove compartmen t is a
holder with the key body into which the emergen
cy key mus t be clipped to be able to s tart the ve
hicle .
A WARNING
To reduce the risk of persona l injury in a n acci
dent or sudden stop, a lways keep the glove
compartment closed while driv ing.
Luggage compartment
General information
A WARNING
-
Read and follow the important safety preca u
tions on
¢ page 116, Storing cargo correctly.
63
Page 67 of 266
a:,
a:,
...... N
l'
N
...... 0
0
LL co
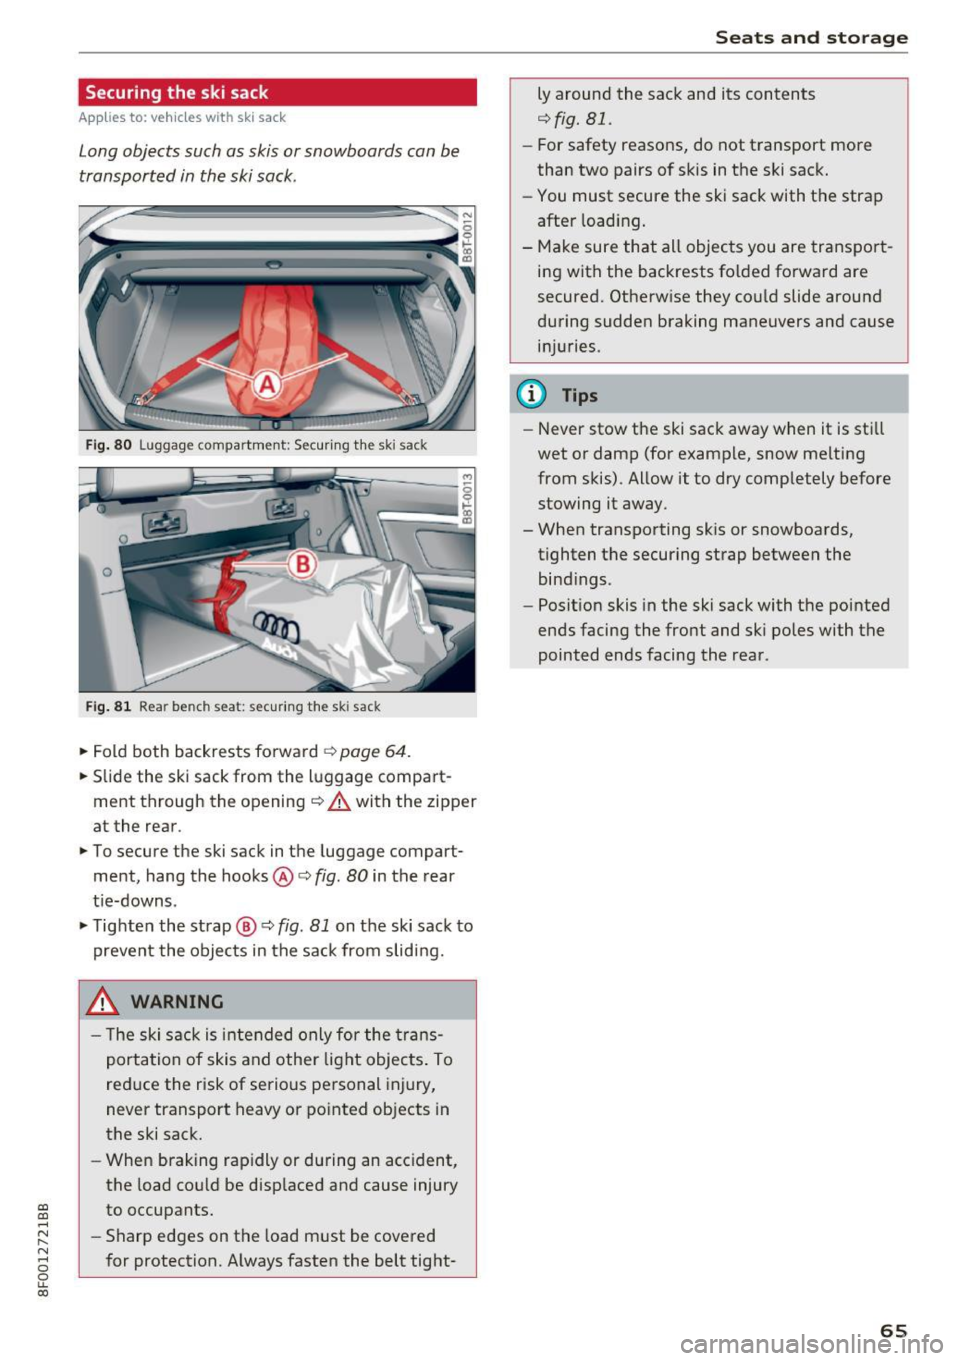
Securing the ski sack
Applies to: vehicles with ski sack
Long objects such as skis or snowboards can be
transported in the ski sack.
Fig. 80 Luggage compartment: Securing the ski sack
Fig. 81 Rear bench seat: securing the ski sack
~ Fold both backrests forward ¢ page 64.
~ Slide the ski sack from the luggage compart
ment through the opening ¢.&. with the zipper
at the rear .
~ To secure the ski sack in the luggage compart
ment, hang the hooks@¢
fig. 80 in the rear
tie-downs.
~ Tighten the strap@¢ fig. 81 on the ski sack to
prevent the objects in the sack from sliding.
_& WARNING
- The ski sack is intended only for the trans
portation of skis and other light objects . To
reduce the risk of serious personal injury,
never transport heavy or pointed objects in
the ski sack.
- When braking rapidly or during an accident,
the load could be displaced and cause injury
to occupants.
- Sharp edges on the load must be covered
for protection. Always fasten the belt tight-
Seats and storage
Ly around the sack and its contents
¢fig. 81.
-For safety reasons, do not transport more
than two pairs of skis in the ski sack.
- You must secure the ski sack with the strap
after loading.
- Make sure that all objects you are transport
ing with the backrests folded forward are
secured. Otherwise they could slide around
during sudden braking maneuvers and cause
injuries.
(D Tips
- Never stow the ski sack away when it is still
wet or damp (for example, snow melting
from skis). Allow it to dry completely before
stowing it away.
- When transporting skis or snowboclrds,
tighten the securing strap between the
bindings.
- Position skis in the ski sack with the pointed
ends facing the front and ski poles with the
pointed ends facing the rear.
65
Page 71 of 266

a:,
a:,
...... N
l'
N
...... 0
0
LL co
the risk of injury, these individuals should
not use seat heating.
(D Note
To avoid damage to the heating elements in
the seats, do not kneel on the seats or place
heavy loads on a small area of the seat.
Setup
The basic climate control settings can be adjust
ed in the radio or MMI*.
.,. Select : I CAR I function button > A/C control but
ton. Or
.,. Select :
ICARI function button> Car systems*
control button > AC.
Automatic recirculation*
When switched on, automatic recirculation con
trols the recirculation mode automatica lly. If the
windows fog up, press the
I@ F RONT I button.
Synchronization*
When synchronization is switched on, the same
settings are applied to both the driver and front
passenger, except for the seat heating/venti la
tion* . Synchronization switches
off when you ad
just the settings on the front passenger's side .
You can also switch synchronization on by press
in g and holding the knob on the driver's side.
Supplementary heater
The supplementary heater warms the interior of
veh icles with flexible fuel engines more quickly .
The supplementary heater is controlled automat ically in the
Auto setting .
Warm and cold
Upper cabin heating
App lies to: vehicles with upper cab in heating
Fig. 84 Driver 's se a t: ve nt for upper c ab in heating
Fig . 85 D rive r's se at: upper cabin heating button
The upper cabin area of the front seats can be
heated at three levels when the engine is run
ning .
.,. Press the ~ button to switch the upper cabin
hea ting on . The LED illum inates.
.,. Press the~ button repeatedly until the LED
goes out to switch the upper cabin heating
off .
A WARNING
-Individuals w ith redu ced sensitivity to pain
or temperature could develop burns when
using the upper cabin heating. To reduce
the risk of injury, these individuals should
not use upper cabin heating.
- The output from the upper cabin heating
system may be very hot temporarily if the
air vents in the seats <=>
fig. 84 are covered
by clothing or other objects when the sys
tem is switched on. This can cause burns on
unprotected skin exposed directly to the
vents.
69