rims AUDI A5 COUPE 2010 Owners Manual
[x] Cancel search | Manufacturer: AUDI, Model Year: 2010, Model line: A5 COUPE, Model: AUDI A5 COUPE 2010Pages: 360, PDF Size: 84.39 MB
Page 260 of 360
___ C_ le_ a _ n_i_n ~g _ a_ n_ d __ p_r _o _t _e _c_ t_ i_o _n ___________________________________________ _
Cast (light) alloy wheels
Cast (light) alloy w heels require special care.
- Wash the wheels with a sponge or hose brush every
o th er week .
- For deep cleaning afte rwards, use only a dedicated
acid
free
cast a lloy wheel c leaner.
- Rub a coat of
liquid wa x onto the rims every t hree month.
Be sure to reac h and treat all parts of the rim.
To preserve the decorative appearance of the cast alloy wheels,
some special care is necessary. In add ition to road dirt and salt,
brake dust is also corrosive . If left on for too long, brake dust can
cause p itting.
Use on ly spec ial
acid -free cleaners formu lated for a lloy rims . Safe
products are available at your authorized Audi dealer. Never leave
t he cleaner on the rims longer than specif ied on the label. If not
rinsed off promptly, the acid contained in some cleaners can attack
t he threads on t he wheel bolts.
Never use abrasive or metal po lishing c leaning agents . If the protec
t ive coating has been chipped, e.g . by kicked up road dirt, touch it
up as soon as possible.
& WARNING
• Moi sture and ice on b rake s ma y affe ct b raking effi cienc y
=> page 23 7, " General information ". Te st the brakes carefully ea ch
t ime you wa sh the vehi cle .
• Always read and heed all WARNINGS and other informat ion
=> page 25 2. •
Body cavity sealing
T he body c avity se aling does n ot need to be c hecked .
All body cavities which could be affected by corrosion have been
th or ough ly pro tected at the factory .
T his sealing does not require any inspection or additional treat
ment . If any wax should seep out of the cavity when the ambient
temperature is high, it can be removed with a p lastic scraper and a
suitable solvent.
& WARNING
Solvent s can be dangerou s.
• Ben zine is flamm able and to xic . If you use benzine for removing
the wax , keep sparks , flame and lighted cigarettes away . Never
dump benz ine on the ground , into open streams or do wn se w age
drains .
• Be sure to observe all safet y and env ironmental regulations .
Follow all in stru ctions on the conta iner .
• Alway s read and heed all WARNINGS and other info rm ation
=> page 2 52 . •
Chassis
Have the underc oating checked for damage from time to
time.
T he lower body shell of your Audi is also thoroughly protected
against corrosion.
Any damage to the undercoating ca used by r oad ha zards shou ld be
repaired promp tly .
& WARNING
Too much undercoating in the wrong pla ces can cause a fire .
Page 289 of 360
________________________________________________ T_ i _r_e _s_ a_n_ d_ w_ h_ e_e _ l_s __ lll
•
Tires and wheels
Tires
General notes
Tires may be the least appreciated and most abused parts
of a motor vehicle.
Tires may be the least appreciated and most abused parts of a
motor vehicle. Tires are, however, one of the most important parts
of a vehicle, particularly considering the comparative ly sma ll patch
of rubber on each tire that assures that all- important contact
between you, your vehicle and the road .
Maintaining the correct tire pressure, making sure that your vehicle
and its tires do not have to carry more weight than they can safely
handle, avoiding damage from road hazards and regu lar ly
inspecting tires for damage inc luding cuts , slashes irregular wear
and overa ll condition are the most important things that you can do
to help avoid sudden tire failure including tread separation and
b lowouts .
Avoiding dama ge
If you have to drive over a curb or similar obstacle, drive very slow ly
and as close as possible at a right angle to the curb.
A lways keep chemica ls includ ing grease, oil, gasoline and brake
f luid off the tires.
I nspec t the tires regularly for damage (cuts, cracks or blis ters, etc.l.
Remove any foreign bodies embedded in the treads.
Storing tires
Mark tires when you remove them to indicate the direction of rota
tion . This ensu res you to be ab le to mount them correctly when you
reinstal l them. When removed, the wheels or tires shou
ld be stored in a coo l, dry
and preferably dark place.
St ore t ires in a vertical posit ion if they a re not mounted on rims, in
a horizontal position if they are mounted on rims.
New tire s
New tires have to be broken in~&.
The tread dep th of new tires may va ry, according to the type and
make of tire and the tread pattern.
Hidden d ama ge
Damage to tires and rims is often not readily visible. If you notice
unusua l vibration or the vehicle pul ls to one side, this may indicate
that one of the tires has been damaged . The tires must be checked
immed iately by an authorized Audi dealer or qualified workshop .
Unidire ction al tir es
A unidirectio nal tire can be iden tif ied by arrows on the s idewa ll, that
point in the direction the tire is designed to rotate. You must follow
the specified direction of ro tation . This is necessary so that these
tires can deve lop their optimum characteristics regarding grip, road
noise, wear and hydroplaning resistance . For more information
~ page 318.
in. WARNING
Ne w tire s or tire s that are old , worn or damaged cann ot pro vide
m aximum cont rol and braking ability.
• New tires tend to b e slippery and mu st also be broken-in . To
redu ce the ri sk of lo sin g control , a colli sion and seriou s per sonal
inj uries , dri ve wi th spe cia l c are for t he first 350 m iles ( 560 km l.
• Driving with worn or damaged t ire s can lead to lo ss of co ntrol ,
s udd en tire failure , in clu ding a blowout a nd sudden deflation , .,,_
Vehicle care
I t •
Page 295 of 360
__________________________________________________ T_ ir_e_ s_ a_ n_d _ w_ h_ e_ e_l_s __ l9III
•
T he correct tire pressure for the spare wheel is located on a label
either on the driver's side B -pi llar or inside the fuel filler flap.
Because technical changes may be made to vehicle equipment
during the mode l year, always compare the tire size designation on
the tire pressure label on your vehicle with the tires on your vehicle. Make sure that the tire size information on the vehicle labe l is the
same as the size of the tires on the vehicle. This is especially impor
tant if the vehicle belongs to someone else or you bought the
vehic le with different rims/tires or you bought the vehicle as a previ
ously owned vehicle.
Remember, your safety and that of your passengers a lso depends
on making sure that load l imits are not exceeded. Vehicle load
includes everybody and everything in and on the vehicle . These load
limits are techn ically referred to as the vehicle's Gross Veh icle
Weight Rating ("GVWR"l. The Gross Axle Weight Rating ("GAWR"l is
the maximum load that can be applied at each of the vehicle's two axles. The Gross Vehicle Weight Rating and the Gross Axle Weight
Rating are l is ted on t he safety compliance sticker labe l located
either on the driver's side B-pillar or on the inside of the fuel fi ller
flap. The ti re pressure labe l on your Audi lists the maximum
combined weight of a ll of the occupants and luggage or other cargo
t hat the vehic le can carry. For the location of the tire pressure label
=>
page 291, fig. 229.
& WARNING
O verl oad ing a vehi cle can c ause lo ss of vehi cle co ntrol , a cras h or
other ac cident , seriou s per sonal injur y, and even death .
• Carry ing m ore w eight t han yo ur vehic le was designed t o carry
will p revent the vehicle from ha ndling properl y and increa se the
ri sk o f a loss of vehi cle co ntrol.
• The br ake s on a ve hicle tha t has been o verloaded may not be
a bl e to st op the veh icle with in a sa fe di stan ce .
• Tires o n a veh icle th at ha s been ov erlo aded ca n fail sudd enl y
ca usin g l oss of co ntrol an d a c rash.
& WARN ING (c ontinued )
• Always m ake sure that the total load being tr ansported -
in cluding the weight of a trailer hitch and the t ongue we ight of a
loaded trailer -do es not m ake the vehicle he avier tha n th e
v ehi cle's Gr oss Vehi cle Weight R ating .
& WARNING
• In corre ct t ire pre ssure s an d/o r underi nfl atio n can lead to a
s eriou s or fatal a ccident.
• In corre ct tire pr essures and/or u nde rin fla tion cau se in cre as ed
tire wear and can affect th e handlin g of the vehicl e.
• Inc orre ct t ir e pre ssu res and /or underinfl ation can a ls o l ead to
s udden tire failure , including a blowout and sudden d eflation ,
ca usi ng loss of vehi cle contr ol. •
Checking tire pressure
The correct tire pressure for the tires originally installed
on your vehicle is listed on the tire pressure label located
either on driver's side B-pillar or inside the fuel filler flap .
The recommended tire pressures are on the ti re pressure label and
in the table=>
page 291, "Cold tire inflation pressure".This means
that the pressure must be checked and adjusted when the tire has
not been driven for more than a couple of mi les (kilometers) at low
speeds during the previous three hours. Air in the tires expands
when the tire heats up as a result of internal friction as i t flexes in
use. The tire pressure is higher when the tire has warmed up than
when it is "cold ."
It is the inflation pressure in a "cold" tire that counts. Therefore, you
should never let air out of a warm tire to match "Co ld tire inf lation
pressure" recommendations=>
page 291. The tires wou ld then be
underinflated and could fail suddenly. .,_
Vehicle care I t •
Page 301 of 360
__________________________________________________ T_ ir_e _ s_ a_ n _ d_ w_ h_ e_ e_ls _ ____. ffllll
New tires and replacing tires and wheels
New tires and wheels have to be broken in.
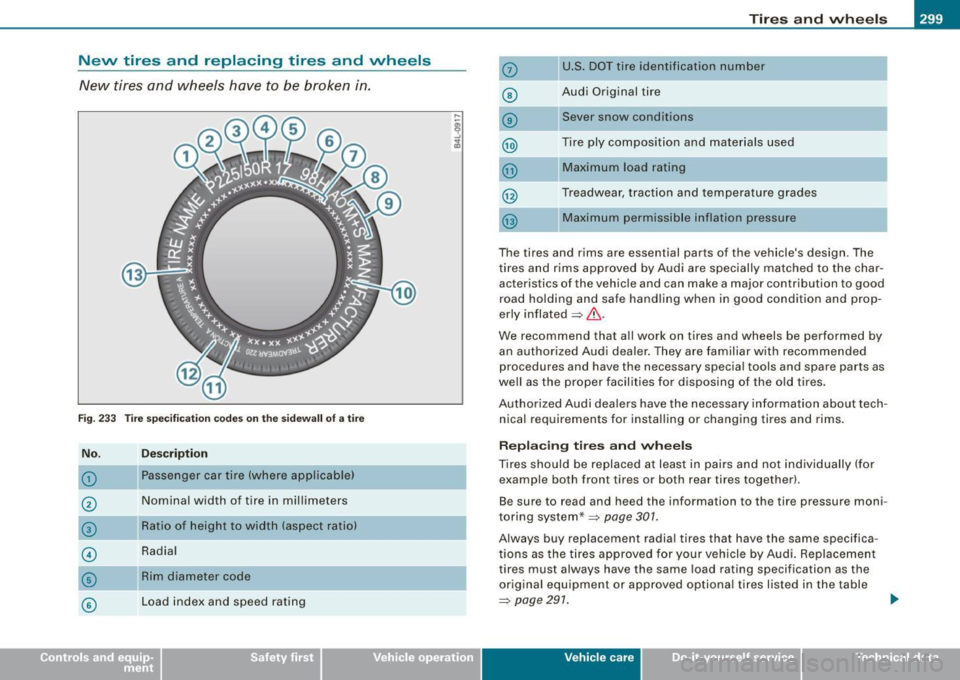
Fig. 233 Tire specification codes on the sidewall of a tire
No.
G)
@
©
©
©
©
Description
Passenger car tire (where applicable)
Nominal width of tire in millimeters
Ratio of height to width (aspect ratio)
Radial
Rim diameter code
Load index and speed rating
0
©
U.S. DOT tire identificat ion number
Audi Original tire
Sever snow condit ions
Tire ply composition and materials used
@ Maximum load rating
@ Treadwear, traction and temperature grades
@ Maximum permissible inflation pressure
The tires and rims are essential parts of the vehicle's design . The
tires and rims approved by Audi are specially matched to the char
acteristics of the vehicle and can make a major contribution to good
road holding and safe handling when in good condition and prop
erly inflated
=> & .
We recommend that all work on tires and wheels be performed by
an authorized Audi dealer. They are familiar with recommended
procedures and have the necessary special tools and spare parts as
well as the proper facilities for disposing of the old tires.
Authorized Audi dealers have the necessary information about tech
nical requirements for installing or changing tires and rims.
Replacing tires and wheels
Tires should be replaced at least in pairs and not individually (for
example both front tires or both rear tires together).
Be sure to read and heed the information to the tire pressure moni
toring system* =>
page 301.
Always buy replacement radial tires that have the same specifica
tions as the tires approved for your vehicle by Audi. Replacement
tires must always have the same load rating specification as the
original equipment or approved optional tires listed in the table
=> page 291. ~
Vehic le care I I irechnical data
Page 303 of 360
__________________________________________________ T_ ir_e_ s_ a_ n_d _ w_ h_ e_ e_l_s __ _
•
prevent your vehicle from going faster than the tire speed rating
=>& .
U.S. DOT Tire Identification Number (TIN ) and tire
manufacture date
T his is the tire's "seria l number". It begins with the letters "DOT"
and indicates that the tire meets all federal standards. The next two
numbers or letters indicate the plant where it was manufactured,
and the last four numbers represent the week and year of manufac
ture. For example, the numbers 2209 mean that the tire was
produced in the 22nd week of 2009. The other numbers are
marketing codes that may or may not be used by the tire manufac
turer. This information is used to contact consumers if a tire defect
requires a recall.
Audi Original tire
Tires with the identification "AO" or "RO" have been specially
matched with your Audi. We recommend using only these tires
because they meet the highest standards regarding safety and
driving characteristics when used correctly. Your authorized Audi
dealer will gladly prov ide you with more information.
Tire ply composition and materials used
The number of plies indicates the number of layers of rubber-coated
fabric in the tire. In general, the greater the number of plies, the
more weight a tire can support . Tire manufacturers also must indi
cate the materia ls in the tire, which include steel, nylon, polyester,
and others.
Maximum Load Rating
This number indicates the maximum load in kilograms and pounds
that can be carried by the tire.
Tire qual ity grading for treadwear , traction, and
temperature resistance
Tread wear, traction and temperature grades=> page 303.
Maximum Permissible Inflation Pressure
This number is the greatest amount of air pressure that should ever
be put in the tire under normal driving conditions.
Replacing tires or rims on vehicles equipped with tire
pressure monitoring system*
The wheels on your vehicle are equipped with a sensor which
constantly monitors the air pressure inside the tire, and then trans
mits this information to the tire pressure monitoring system*. If you
are going to replace the wheel rims on your vehic le, make sure the
new rims also have these sensors. The sensors must be compatible
with the tire pressure monitoring system* on your vehic le.
If you instal l rims, which do not have the sensors, or have sensors
which are not compatible, then the tire pressure monitoring
system* wil l not work properly. In this case, the tire pressure moni
toring system* would not be able to monitor the tire pressure or
warn you if it is necessary .
• The battery inside of the tire pressure sensor has a limited
service life .
• Always drive with the valve stem caps secure ly mounted. We
recommend using factory instal led valve stem caps. Ask your autho
rized Audi dea ler to replace lost valve stem caps.
The installation of replacement tires with steel cord body p lies in
the tire sidewall may cause malfunction of the tire pressure moni
toring system*, and is not recommended (cord material information
in molded on the tire sidewall).
Always check your tire pressure monitoring system* indicator after
replacing one or more tires on your vehic le. If the tire pressure
monitoring system* indicator flashes, or is on, your system is not
working properly. Your replacement tire might be incompatible with
your tire pressure monitoring system*, or some component of the
t ire pressure monitoring system* may be damaged. .._
Vehicle care I t •
Page 304 of 360

___ T_ ir_e_ s _ a_ n_d_ w_ h_ e_e _ l_s _________________________________________________ _
& WARNING
• Using incorrect or unm atched t ires and / or wheels o r improper
tire and wheel combinations can lead to lo ss of control , collision
and se rious per sonal injury .
• Always use tires , rim s and wheel bolts that meet the specifica
t ions of original f actory -installed tire s or other combinations that
have been spe cifically approved by the vehicle manufacturer .
• T ires age even if they are not being used and can fail suddenly ,
especially at high speeds . Tires that are more than 6 years old c an
only be used in an emergen cy and then with spec ial care and at
lower speeds .
• Never mount used tires on your vehi cle if you are not sure of
their "previou s history." Old used tires may have been damaged
e ven though the damage cannot be seen that can lead to sudden
tire failure and loss of vehicle control.
• All four wheels must be fitted w ith radial tires of the same type ,
size (rolling circumference ) and the same tread pattern . Driving
with different tires reduces veh icle handling and can lead to a loss
of control.
• If the spare t ire is not the same as the tires that are mounted
on the vehicle -for example with winter tires -only use the spare
tire for a short period of time and drive with e xtra care . Refit the
normal road wheel as soon as safely possible.
• Never drive faster than the ma ximum speed for which the tires
on your vehicle are rated because tires that are driven faster than
their rated speed can fail suddenly .
• Overloading tires cause heat build -up , sudden tire failure,
in cluding a blowout and sudden deflation and lo ss of control.
• Tempe rature grades apply to tires that are properly inflated and
not over or under inflated .
• For technical reasons it i s not always po ssible to use wheel s
from other veh icles - in some cases not even wheels from the
same vehicle model .
& WARNING (continued )
• If you install wheel trim discs on the vehicle wheels, make sure
that the air flow to the brakes is not blocked . Reduced airflow to
the brakes can them to overheat , increasing stopping distances
and causing a collision .
• Run flat tires may only be used on vehicles that were equipped
with them at the factory . The vehicle must have a cha ssis designed
for run flat tires and a fa ctory-installed tire pressure monitoring
system* that indicates a loss of tire pressure. Incorrect use of run
flat tires can lead to vehicle damage or acc idents . Check with an
authorized Audi dealer or tire specialist to see if your vehicle can
be equ ipped with run f lat tires . If run flat t ires are used , they must
be installed on all four wheels . Mixing tire types is not permitted.
0 Note
• For technical r eas ons, it is not gen erally possible t o us e the
whee l rims from other veh icles . ihis can ho ld true for whee ls of the
same veh ic le type.
• I f the spare tire is different from the tires that you have mounted
o n yo ur vehicl e (f or example wi nter tires or wide p rofile t ires), then
use the spare tire for a short period of time on ly and drive with extra
care . Rep lace the flat tire wi th the ti re m atchi ng t he o thers on you r
vehic le as soon as possib le.
• I f you should put diff ere nt w heels and tires o n your v ehicle (e. g.
winter wheels and tires), you must be certain that the wheels and
t ires are c ompatib le wi th the tire p ressu re monitoring system* .
Otherwise the system will register a malfunction and a fau lt
mes sage will be displayed . For more info rmation, contact your
author ized Aud i dea ler.
0 Note
• When insta lling new t ires, be care fu l not to damage the va lves o r
tire pressure mon itoring system* sensors. .,_
Page 307 of 360
__________________________________________________ T_ ir_e_ s_ a_ n_d _ w_ h_ e_ e_l_s __ _
•
ffi For the sake of the environment
Use summe r tires whe n weather co nditio ns perm it. Th ey are
quieter, do not wear as quic kly and reduce fue l consumption. •
Snow chains
Snow cha ins may be fitted only to the front wheels, and only to
certa in t ire s izes. Ask your author ized Aud i dea ler on wh ic h tir e
s izes snow chains can be used .
The snow c hai ns mu st have low -pro file l inks and must n ot be thicker
than 0.53 inch (13 .5 mm), including the loc k.
R emove wheel cente r covers a nd trim di scs bef ore p utting snow
c h ains on you r ve hicle=:>
0 . For sa fety reasons cove r caps must
then be fitted o ver the wheel bo lts . These a re avai lable fr om autho
r iz ed Au di deale rs.
& WARNING
Using the wrong snow chains for your vehicle or installing them
incorrectly can increase the risk of loss of control leading to
serious per sonal injury.
• Snow chains are available in different sizes. Always make sure
to follow the instructions provided by the snow chain manufac
turer.
• When driving with snow chains never drive faster than the
speed permitted for your specific snow chains.
• Always observe local regulations .
0 Note
• Remove snow chains before driving on roads not covered with
s no w to avoid da mag ing tires a nd wea ring the s now cha ins down
unnecessari ly. •
Snow chains, which come into direct contact with the wheel rim,
can s cratch or damage i t. Therefo re, ma ke s ure t hat the sn ow cha ins
are suitably covered . Check the pos itio n of the snow c hains after
driv ing a few ya rds a nd co rrec t if necessa ry . Fo llow the i nstr uct ions
from the snow chain manufacturer when doing so.
[ i ] Tips
W here snow cha ins are manda tory on certa in roads, t his no rmally
a lso a ppl ies to ve hic les with all wheel d rive. •
Wheel bolts
Wheel bol ts mus t alw ays be ti ght en ed to the corr ec t
t orque .
The de sign of whee l bolts i s matched t o the fac to ry ins tal led rims. I f
d ifferent rims are fitted, the correct wh eel bo lts with the ri ght l ength
and c orrectly s haped bo lt head s mus t be use d. T his ensu res that
w hee ls are fitted securely and that the brake sys tem func tio ns
co rrectly.
I n certa in c ircumsta nces, you may not use w heel bo lts fr om a
different vehicle -even if it is the same model=:>
page 341.
& WARNING
Improperly tightened or mainta ined wheel bolts can become loose
causing loss of control , a collision and serious personal injury .
• Always keep the wheel bolts and the threads in the wheel hubs
clean so the wheel bolts can turn easily and be properly tightened.
• Never grease or oil the wheel bolts and the threads in the wheel
hubs . They can become loose while driving if greased or oiled ,
even if tightened to the specified torque .
• Only use wheel bolts that belong to the rim being installed .
• Never use different wheels bolt s on your vehicle.
Vehicle care
I t •
Page 320 of 360

-L___:W:..:..:. h.:.: a::.. t:...:: d:.:o:::....:. l..: d::. O ::::....: n:..:.:: O:..:W :.:..:. ? ____________________________________________ _
hub. Remove all dirt from these surfaces before remounting the
w he el.
• Do not use the he xagonal socket in the screwdriver hand le to
loo sen or tighten the wh eel bo lts.•
Tires with unidirectional tread design
T ir es with unid irecti onal trea d des ign m ust be moun ted
with th eir tread pattern poin ted in th e right dir ection .
Using a spare tire with a tread pattern intended for use
in a specific direction
When usi ng a s pa re t ire wi th a tre a d patte rn intended for use i n a
s p ecific direc tion, p lease note the following:
• Th e direc tio n of rot ati on is marke d by an
arrow on the side of the
tire .
• I f th e spare tir e has to be insta lled in th e incor rec t di recti on, use
the spare tire only temporar ily since the tir e will not be able to
ac hieve it s optimu m perf ormance cha rac te ris tic s wit h rega rd to
aqua plani ng, no ise and wea r.
• W e recom men d th at you pay pa rticu lar att ent ion to this f act
du ring wet weather and that you adjust your sp eed to match road
c o nditio ns.
• Replace the flat tire with a n ew on e and have i t installe d on your
v eh ic le as so on as possib le to re st ore th e handl ing a dvant ages of a
un idirectional tir e.•
Notes on wheel changing
P lease read the information=> page 299, "New tir es and r ep lacing
tir es a nd wh eels" if yo u are g oing t o use a spare t ire w hich is
differ ent from th e tires on your v ehicle.
A fter yo u change a ti re:
• Check the tire pressure on the spare immediately after installa
tion.
• Have the wheel bolt tightening torque checked with a torque
wrench as soon as possible by your authorized Audi dealer or a qualified workshop.
• With steel and alloy wheel rims , the wheel bolts are correctly
tightened at a torque of 90 ft lbs. 1120 Nm l.
• If you notice that the wheel bolts are corroded and difficult to
turn while changing a tire, they should be replaced before you check
the tightening torque .
• Replace the flat tire with a new one and have it installed on your
vehicle as soon as possible . Remount the wheel cover .
Until then , drive with extra care and at reduced speeds.
& WARNING
• If you are going to equip your vehicle with tires or rims which
differ from those which were factory installed , then be sure to read
the information
=> page 299 , "New tires and replacing tires and
wheels ".
• Always make sure the damaged wheel or even a flat tire and
the jack and tool kit are properly secured in the luggage compart ment and are not loose in the passenger compartment .
• In an accident or sudden maneuver they could fly forward,
injuring anyone in the vehicle .
• Always store damaged wheel , jack and tools securely in the
luggage compartment . Otherwise , in an accident or sudden
maneuver they could fly forward , causing injury to passengers in
the vehicle .
0 Note
Do not use commercia lly available tire sealants. Otherwise, the elec
tr ica l comp onents o f the tire pr essur e mon it o ring syste m * w ill n o .,
Page 354 of 360

-Alphab eti ca l ind ex rm--=-----------------
Parking system (rear , with rear v iew camera)
Park ing mode 1 . . . . . . . . . . . . . . . . . . 160
Parking mode 2 . . . . . . . . . . . . . . . . . . 161
Safety precau tions ..... .. ... ..... 157
Switchi ng on /off .. .... .... .... ... 159
Switc hing rear view camera on /off .. 162
Parts r eplacemen t ......... ........ . 341
PASSENGER AIR BAG OFF light .. ... ... 200
Passive safety system . . . . . . . . . . . . . . . 168
Pedals .. .. .. .... .... .... ... .... ... 174
Phys ical pr inciples of a fronta l collision 180
Polish ing .......................... 255
Pollen filter Deluxe automatic climate contro l 90
Pollutant filter Deluxe automatic climate contro l 90
Powe r locking switch . . . . . . . . . . . . . . . . . 46
Power locking sys tem ..... .. .... .... . 41
Emergency locking .. ...... .. . .... . 47
Locking and unlocking the v ehicle from
ins ide ... .... ... .... .... ..... .. . 46
Rear lid /trunk lid ...... .... .. . .... . 47
Selective un lock feature . ...... .... . 43
Set tings . . . . . . . . . . . . . . . . . . . . . . . . . 43
Un locking and locking vehicle ...... . 43
Power locks Windows open and closed . . . . . . . . . . 49
Power st eer ing . . . . . . . . . . . . . . . 13, 33 , 239
Power window regulators Convenience opening/closing .. ... .. 49
Malf unctions ..... ..... ... .. .. .... 50
Powe r window switches . . . . . . . . . . . . . . 48 Pregnant women
Specia l considerations when wear ing a
safe ty belt . . . . . . . . . . . . . . . . . . . . . 1 85
Programming the Homelink® un iversal re -
mote control . . . . . . . . . . . . . . . . . . . 164
Proper occupant seating positions .. .. 170
Prop er sa fety b elt position . . . . . . . . . . . 184
Proper seating pos ition
Front passenger . . . . . . . . . . . . . . . . . 171
Occupants . . . . . . . . . . . . . . . . . . . . . . 170
Rear passengers 172
a
Quartz clock
. . . . . . . . . . . . . . . . . . . . . . . . . 10
Question
R
What happens to unbelted occupants? 181
Why safety belts? 179
Radiato r fan ..... .... ...... ... .. .... 280
Ra in sensor . . . . . . . . . . . . . . . . . . . . . . . . . 61
Rain sensor defective . .... .... .... .... 34
Read ing lights
F ront .. ... .... .... .... ..... .. .... 59
Rear . . . . . . . . . . . . . . . . . . . . . . . . . . . . . 59
Rear fog lights .... ... .... .... .... .... 54
Rear lid
Escape hand le .. .... .. .... .... ... 310
Opening and c losing ... .... .... .... 47 Rear
light
Defective . . . . . . . . . . . . . . . . . . . . . . . . . 35
Rear view camera Parking mode 2
Parking mode 1
Rea r view mirror 161
160
I nside rear view m irro r .. .... .... ... 64
See also M irrors . ....... ... .... .. .. 63
Rear window defogger .... .... .... 95, 102
Rear window sun shade ... .... .... .... 60
Recirculation mode Deluxe automatic c limate contro l .... 94
Deluxe automatic climate con tro l p lus . ..
101
Red symbols ..... .... .... ....... .. .. 28
Ref ill engine oil .. .... .... .... .... ... . 31
Refue lling ...... .. .... .... ...... .... 267
Release lever for hood .. ...... .... ... 270
Remo te control ga rage doo r opener
( H omelink®) ... .. .... .. .. .... .. 16 4
Remote control key Unlocking and locki ng ..... .... ... . 43
Remo te rear lid r ele ase ... .... .... .... 47
Repa ir m anuals . ...... .... ... .... ... 339
Repairs Airbag system .... .... .... .... ... 202
Replacing Whe el rims .... .... .... .... ...... 301
Replacing a fuse ... .. .... .... .... .. . 320
Replacing bulbs . ...... .... ...... ... 324
Replacing tires and wheels .... .... .. . 299
Reporting Safety De fects ... ... ... 177, 178
Page 355 of 360
Alphabetical index -
-------------=----
Reset button ... ...... .. ... ... . .. .. .. 11
Retractor ................. ......... 183
Rims Cast al loy ..... .. .... .... ..... .. . 258
Replacing ... .... ..... .. .... .... . 301
Roof luggage rack
Mounting points .................. 85
Roof rack ........... ...... .... .... .. 84
Roof load ...... ...... ...... ...... 85
See also Roof luggage rack ... .... .. 84
s
SA FE ... .... .... .... .... ... .... .... . 11
Safe driving hab its .. .... .... ... .... . 168
Safe ty belt position . . . . . . . . . . . . . . . . . . 184
Safety belts worn by p regnant women ..
185
Safety belt pretensioner ... .... .... ... 186
Service and disposal .............. 187
Saf ety b elt warning light .... .... .. 14,179
Safety belts . . . . . . . . . . . . . . . . . . . . . . . . 183
Cleaning ..... .... .... ........... 263
Danger to passengers who do not wear a
safe ty belt . .... .... ..... .. ... .. 181
Fastening ... .... .... .... ... .... . 183
Improperly worn ..... .... ........ 186
Not worn . . . . . . . . . . . . . . . . . . . . . . . . 181
Safety belt position ...... .... ..... 184
Safety instructions . ......... .... . 182
Securing child s afety seats ........ 223
Special considerations for pregnant women ....... .... .... ......... 185
Unfastening ..... ... ..... ...... .. 186
Controls and equip
ment Safety first
Warning
/indicator light .... ........ 179
Why YOU MUSTwearthem ... .... . 179
Worn properly ..... .... .... .... .. 182
Safety compliance sticker . .... ... .... 334
Safety equipment .... .... ..... .. .... 168
Safe ty fea tures for occupant restraint and
protection ... .. ........ .... ... . 168
Safety guidelines Seat adjustment ... ...... ... ... ... . 69
Saf ety instructions
Engin e compartm ent . .... .... ..... 271
for sid e curtain airbags . .......... . 211
for using child safety seats ....... .. 216
for using safety be lts .... .......... 182
Moni toring the Advanced Airbag System
201
Seat adjustment Driver's seat ........ ...... ... .... . 69
Easy entry function ........... ... .. 74
Easy entry manual function .. ..... .. 72
For -and -aft manua lly ..... ..... ... .. 71
Front passenger's seat .. .... ..... .. 70
Front seats ...... .. .. .... .... .... . 69
Head restraints ... ..... ... ..... .. . 173
Manual .. ...... .... ... .. ..... ... . 70
Power ....... .. .... .... .... .... .. 72
Seat back angle manually ........ ... 71
Seat height manually . ........ .... . 71
Seat belt s
See Safety belts
Seat heating 179
Front seats ...... .. .. .... .... .... 105
Seat memory ...... .. ... ... ..... .... . 74 Seating capacity
.... ..... .. . .... .. . . 179
Seating position Driver ......... ....... .. .. .... ... 170
Front passenger . ...... .. . .... .. .. 171
How to adjust the front seats ... .... 171
Incorr ect seat position .... .... .... 173
Occupan ts ... ... .. .... ...... .... . 170
Rear passengers . ...... .. . .... .. .. 172
Seats Number of seats .... .... .. .... .... 179
Se lect ive unlock feature ...... .... ..... 43
S elector le ve r .. .. .... ..... .. .... .... 149
Emergency release ...... .... ..... 154
Service and disposal
Safety belt pretensioner . ...... .... 187
Service interval display ... .... .... ... .. 21
S erv ice pos ition for w indsh ield wipers . .. 62
Servotronic Power steering .. ...... ....... .... 239
SET button . ...... .. .... .... ..... .. ... 9
Shift buttons ..... .. .... .... .... .... 153
Side airbags Description . ...... .... ....... .... 207
How they work .. ...... .... ... .. .. 208
Side assist Activating and deactivating .... .... 135
Description . ..................... 135
Informational and alert stage signals 137
Messages in instrument cluster display .
142
MMI settings ............... ...... 141
Operation .... .... ... ... ... .. .... 137
Vehicle operation Vehicle care Do-it-yourself service Technical data