ESP AUDI A5 COUPE 2011 Owner's Manual
[x] Cancel search | Manufacturer: AUDI, Model Year: 2011, Model line: A5 COUPE, Model: AUDI A5 COUPE 2011Pages: 362, PDF Size: 84.88 MB
Page 78 of 362
Seats and storage
Applies to veh icles : w ith manua lly adj ustable seats
Easy entry function
The easy entry function makes it easier for the rear
passengers to enter and leave the vehicle .
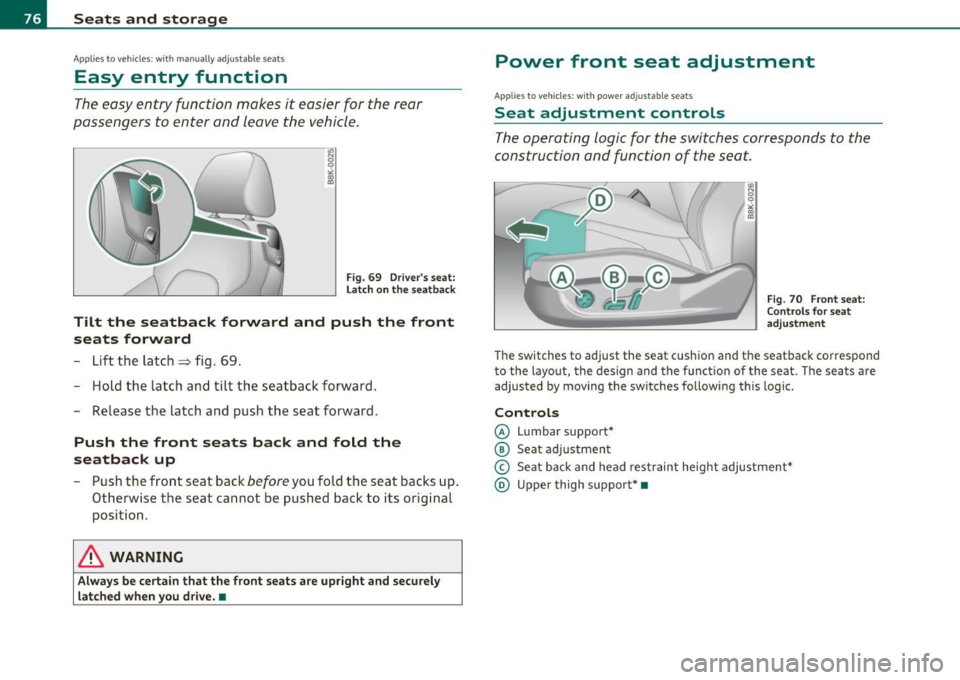
Fig. 69 Driver's seat:
La tch on the seatba ck
Tilt the seatback forward and push the front
seats forward
- Lift the latch=:> fig. 69.
- Hold the latch and tilt the seatback forward.
- Release the latch and push the seat forward.
Push the front seats back and fold the
seatback up
- Push the front seat back before you fold the seat backs up.
Otherwise the seat cannot be pushed back to its original position .
& WARNING
Always be certain that the front seats are upright and securely
latched when you drive.•
Power front seat adjustment
Ap plies to vehicl es: wit h po wer adjusta ble se at s
Seat adjustment controls
The operating logic for the switches corresponds to the
construction and function of the seat .
.,
~ 9
"' "' m
Fig. 70 Front seat:
Controls for seat
adj ustme nt
The switches to adjust the seat cushion and the seatback correspond
to the layout, the design and the funct ion of the seat. The seats are
adjusted by moving the switches following this logi c.
Controls
@ Lumbar support*
@ Seat adjustment
© Seat back and head restraint height adjustment*
@ Upper thigh support* •
Page 80 of 362

Seats and storage
Applie s to veh icles : wi th powe r ad justa ble seats
Easy entry function
The easy entry function makes it easier for the rear
passengers to enter and leave the vehicle.
Fig . 71 Driv er's se at:
C o nt rol s for e asy entry
a ss ist
Folding down the front seat backs
- Liftthel atc h=>fig.71 .
- Tilt the s eatba ck fo rward .
Moving the front seats forward
-Press and hold the switc h@ until t he seat has reached t he
desired position.
Moving front seats back
- Press an d ho ld t he switc h@ unti l the s eat has r eached t he
des ired posi tion . The seat stop s au to matically when it has
reached its starting posit io n again.
To make it eas ier to enter and leave t he rear seat, t he sea tbacks of the
front seats can be folded forward and the head restraints a re a uto
matically lowe red . At the same time, the front seats can be moved
forward and b ack . When the front seats a
re moved forward, their original pos it io n is
sto red. Whe n it i s move d back, t he se at a utoma ticall y sto ps in t his
position . To move the seat eve n further back, you have to release the
switch ® and reactivate it.
T he head res tra ints from the fron t seats , dependi ng on the seat
height that has been set, are automat ically ret racted when the seat
backs are folded down . T hey retu rn to t heir o riginal position again
when the sea tbacks for the fron t sea ts are raised.
[ i ] Tips
Wi th the driver's or passenge r's door closed, the correspond ing
switch to move the seat is inoperative .•
Seat memory
Ap plies to veh icles : w ith sea t mem ory
Memory for driver's seat
The seat adjustment settings for two drivers can be
stored using the memory butt ons in th e driver's door .
Fig. 72 Driver 's door :
Seat m em ory
In addit ion to the setting for the driver's sea t, the exterio r rea r view
m irror set ting can be stored and re called throug h sea t memory if t he
vehicle is p roperly equippe d.
~
Page 81 of 362
Storing and recalling settings
With the help o f the memory buttons 1 and 2 ::::> page 78, fig. 72 the
sett ings fo r two d ifferent d rivers can be stored and recalled
::::>
page 79 .
Th e cur rent settings are a lso a utomat ically stored on the remote
cont rol key being used when the vehicle is locked. W hen the vehicle is
unlo cked , the settings stored on the remo te co ntro l key being used
are automatically reca lled.
Turning seat memory on and off
If the [ ON/OFF ] switch is depressed, the seat memory is inoperative .
Th e wo rd
OFF in the [ ON/OFF ] swi tch illum inates.
All the stored sett ings are retained . We recommend us ing the
I ON/OFF ] switch and deact ivat ing the sea t memory if the vehicle is
only go ing to be used
temporarily by a drive r whose settings are not
going to be stored .•
A ppli es to ve hicl es : wit h seat me mory
Storing and recalling settings
Before you ca n st ore or recall your settings , the [ O N/OF F]
switch o n the seat memory must be engage d (not raise d).
Storing settings
- Adjust the driver's seat.
- Adjust the two exterior mirrors.
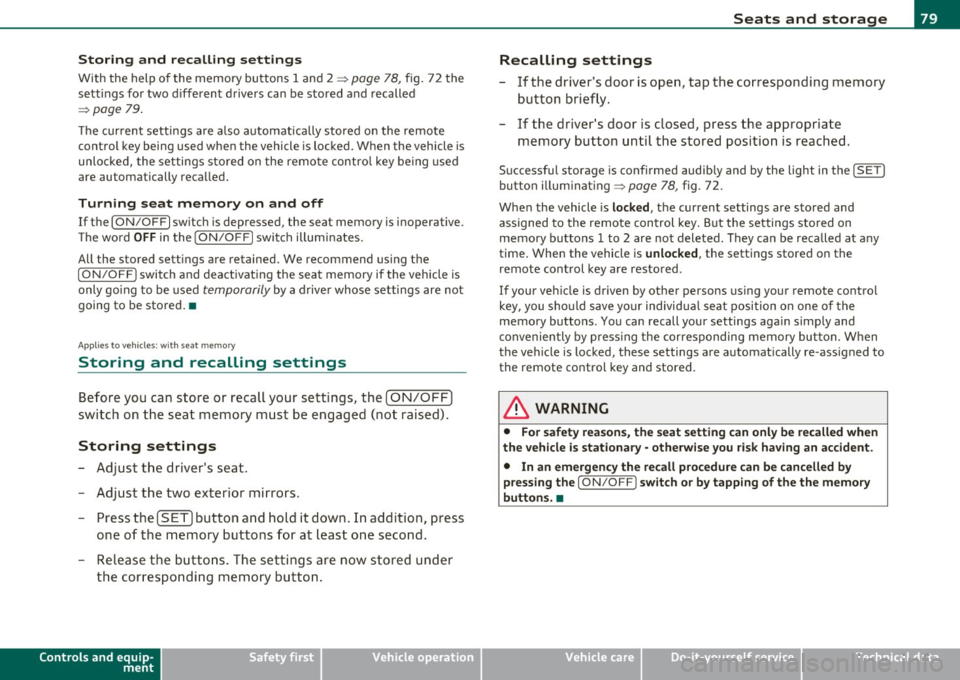
- Press the!SE T] button a nd hold it dow n. In ad dit ion , press
o ne of the memory buttons fo r at least o ne second .
- Release t he b utto ns . The s ett in gs a re now sto red un der
the corres ponding m emo ry bu tt on.
Controls and equip
ment Safety first
Seats and storage
Recalling settings
- If t he driver's doo r is o pen , tap the co rresponding memory
button brie fly.
- If the driver 's door is closed, press the appropriate
me mory button until the stored posi tio n is reached.
Su ccessfu l storage is confirmed audib ly and by the light in the [ SET ]
button illuminat ing::::> page 78, fig. 72.
Wh en the vehicle is
locked , the current settings are stored and
assigned to the remote con trol key . Bu t the settin gs s to red on
memo ry butto ns 1 to 2 are not deleted . They ca n be recalled a t any
time. When the vehicle is
unlocked , the settings stored on the
remote cont rol key are restored .
If your ve hicle is d riven by other persons us ing your remote contro l
key , you sho uld save yo ur individ ual seat p osi tion on one of the
memory butto ns. Yo u can recall your settings aga in simp ly and
c onvenien tly by press ing the corres ponding memory bu tton . Wh en
the ve hicle is locked, these settings a re a utomat ically re -ass ig ned to
the remote control key and stored.
& WARNING
• For safety rea sons, the seat setting can only be recalled when
the vehicle is stationary -otherwise you risk having an accident .
• In an emergency the recall procedure can be cancelled by
pressing the [
ON/OFF] switch or by tapp ing of the the memory
button s. •
Vehicle care Technical data
Page 95 of 362

Storage
General overview
There are numerous places to store items in your vehicle.
Glove compartment
Storage compartment in the roof
Coat hooks
Storage in the tr im panels in the luggage
compartment
ln. WARNING
:::>page 93
::::>page94
=> page 94
• Alway s remove object s from the instrument panel. Any items
not put away could slide around in side the vehicle while dr iving or
when accelerating
or when applying the brake s or when driving
around a corner.
• When you are driving make sure that anything you may have
placed in the center console or other sto rage locat ions cannot fall
out into the footwells. In ca se of sudden braking you would not be
able to brake, depress the clutch or accelerate.
• Any pieces of clothing that you have
hung up must not int er
fere with the driver 's view . The coat hooks a re designed only for
lightweight clothing . Never hang any clothing with hard, pointed
or heavy objects
in the pockets on the coat hooks. During sudden
braking or in an accident -especially if the airbag is deployed -
these objects could injure any passengers inside the vehicle. •
Controls and equip
ment Safety first
Seats and storage
Glove compartment
The glove compartment is illuminated and can be locked.
...
•
To open glove compartment
Fig. 94 Glov e
c om partment
- Pull the ha ndle in th e di rec tion of the arr ow ~ fig. 94 and
swi ng th e cov er d own to o pen .
To close glove compartment
- Push t he g love compartment lid upward u ntil the lock
engages.
T here are holders fo r a pen and a pad of paper in the glove compart
ment lid.
On the righ t side in the glove compartmen t is a holder with the key
body into which t he eme rgency key mus t be clip ped to be able to start
the vehicle.
ln. WARNING
To reduce the risk of personal injury in an accident or sudden stop, always keep the glove compartment closed while driving. •
Vehicle care Technical data
Page 97 of 362
Warm and cold
Deluxe automatic climate control
Applies to vehicles : wit h deluxe automat ic climat e cont ro l
Description
The climate control system can be used to set a comfort
able temperature inside the vehicle.
The climate control system is a combination of a heating and ventila
tion system as well a cooling system responsible for dehumidifying
and cooling the air inside the vehicle.
Th e automatic climate control system automatically maintains a
temperature once it has been set. The temperature of the air from
the vents, fan speed (air volume) and air distribution are a lso auto
matically adjusted. The system also takes into account strong
sunlight so that manual adjustment is not necessary . So in almost all
cases,
automatic mode offers the best conditions for the comfort of
the occupants at all times of the year=>
page 97.
Please note the following :
The cooling mode lowers the humid ity level inside the vehicle. This
prevents fogging up of the windows.
In the case of high outside humidity and temperatures,
condensation
can drip from the air conditioning system evaporator and form a pool
under the vehicle . This is normal and not an indication of leaks!
At low outside temperatures, the fan automatically switches to a
higher speed when the coo lant reaches a sufficient temperature
except in the defroster position .
When starting with fu ll thrott le, the compressor of the automatic
climate control system is temporarily switched off to achieve full
eng ine power .
T o ensure engine cooling when the engine is under an extreme load,
the compressor is switched off at high coolant temperatures.
Controls and equip
ment Safety first
Warm and cold
Pollutant filter
The pollutant fi
lter (particle filter) ensures that impurities in the
outs ide air (e.g. dust, pollen) and odors are significantly reduced or
stopped . The air is also filtered in recirculation mode.
T he pollutant filter e lement must be changed at the intervals speci
fied in the service plan so that the performance of the automatic
climate contro l system is not impaired.
If the effectiveness of the filter dec reases prematurely due to opera
tion of the vehicle in areas with significant pollution, the filter
element must be changed between the specified service dates.
Key recognition
Th e cur rent automatic clima te control settings are automatically
stored and assigned to the master key.
Energy management
To prevent the battery from being discharged and to restore the
balance of energy, components which require large amounts of
energy are temporarily cut back or switched off=>
page 243. Heating
systems in particular require a great deal of energy. If you notice , for
example, that the rear window heater is not heating, then it has been
temporarily reduced or switched off by
energy management . These
systems are available again as soon as the energy balance has been
restored.
& WARNING
Traffic safety requires all window s to be clear of ic e, snow, and
condensation. Only then can good visibility be ensured . Famil
iarize yourself with the correct operation of the automatic climate
control system as well as the proper procedure for defog-
ging/defrosting the windows. _,.
Vehicle care Technical data
Page 104 of 362

1111....__w __ a _r_ m __ a_n_ d_ c_ o _ l_d _______________________________________________ _
your Audi Warranty & Maintenance book let . If in doubt, as k yo ur
a u tho rized Au di Serv ice Advisor for adv ice.
Key recognit ion
T he cur rent climate con trol settings are au tom atically s tored and
assigned to the remote key
Energy management
To prevent the battery from being discharged and to restore the
balance of energy, components wh ic h require large amo unts of
energy are temporarily cut back or sw itched off=>
page 243. Heating
systems in part icu lar req uire a g rea t dea l of energy. If you notice, for
example, that the rear window heater is not heating, then it has been
temporar ily c ut back or switched off by
ene rg y management. These
systems are available again as soon as the energy balance has been
restored .
& WARNING
Reduce d vi sibility is danger ous and can cause a ccident s.
• For safe dri ving it is very important that all windows be free of
ic e, snow and condensation .
• Completely fam iliar ize yourself with the prope r use and func
tion of th e heating and v entilation sy stem and esp eciall y how to
defog and defro st the w indows .
• Never use the wind shield wiper /wa sher system in fr eezing
we ather until you h ave warmed the windshield fir st, u sing the
heating and ventila tion syst em . The wa sher solution ma y free ze
on the win d shield and reduce visi bility.
0 Note
• If you suspect that the cl imate contro l system has been damaged,
switch the system off to avoid further damages, and have i t inspected
by a qua lified dealersh ip. •
Repairs to the Audi a ir conditioner require special techn ica l knowl
edge and special tools . Co ntact an a uth orized Audi dealer fo r assis
tance .
(I] Tips
• To avoid adversely affecting heating and cooling performance and
to prevent condensation on the windows, the air intake in front of the
w indshield must be free of ice, snow and leaves.
• Th e air flowing out of the vents and througho ut the veh icle's
entire inter ior is discharged at the rea r of the vehicle . Make su re that
the o utlet s lots are not covered by clothing, etc.
• Climate control works most effective ly if the windows and the
panoramic sliding/tilt ing sunroof * are closed. However, if the interior
of a parked vehicle is extremely hot from the sun, briefly opening the
windows can speed up the cooling process. •
Page 120 of 362

_____ o_ n_ t_h _e_ r_o _a _ d ________________________________________________ _
When stopping at a traffic signal or stopping in city traffic on vehicles
with an automatic transmission, the parking brake can be applied.
The vehicle does not have to be held with the footbrake . The parking
brake eliminates the tendency to creep with a drive range engaged.
As soon as you drive
off as usual, the parking brake is released auto
matically and the vehicle starts to move.
Starting on slopes
When starting on inclines, the starting assist prevents the vehicle
from unintentionally rolling back. The braking force of the parking
brake is not released until sufficient driving force has been built up at
the wheels .
[I) Tips
For safety reasons, the parking brake is released automatically only
when the driver 's safety belt is engaged in the buckle. •
Starting off with a trailer
To prevent rolling back unintentionally on an incline, do
the following:
- Keep the switch pulled and depress the accelerator. The
parking brake stays applied and prevents the vehicle from
rolling backward.
- You can release the switch once you are sure that you are
developing enough driving force at the wheels by
depressing the accelerator.
Depending on the weight of the rig (vehicle and trailer) and the
severity of the incline, you may roll backwards as you start. You can
prevent rolling backwards by holding the parking brake switch pulled
out and accelerating -just as you would when starting on a hill with a
conventional hand brake. •
Emergency braking
In the event that the conventional brake system fails or
locks.
- In an emergency, pull the switch and continue to pull it to
slow your vehicle down with the parking brake .
- As soon as you release the switch or accelerate, the
braking process stops.
If you pull the switch and hold it above a speed of about 5 mph (8
km/h), the emergency braking function is initiated. The vehicle is
braked at all four wheels by activating the hydraulic brake system.
The brake performance is similar to making an emergency stop:::>& .
In order not to activate the emergency braking by mistake, an audible
warning tone (buzzer) sounds when the switch is pulled. As soon as
the switch is released, or the accelerator pedal is depressed, emer
gency braking stops.
& WARNING
Emergency braking should only be used in an emergency, when
the normal foot brake has failed or the brake pedal is obstructed.
Using the parking brake to perform emergency braking will slow
your vehicle down as if you had made a full brake application. The laws of physics cannot be suspended even with ESP and its associ
ated components (ABS, ASR, EDS). In corners and when road or
weather conditions are bad, a full brake application can cause the
vehicle to skid or the rear end to break away· risking an accident. •
Driver messages in the instrument cluster
Warning Vehicle incline is excessive
This message appears when the parking brake is applied on an incline
that exceeds about 30%. ._
Page 122 of 362
lffl!I.___O_ n_ t_h_ e_ r_ o_ a _ d _________________________________________________ _
may vary, depending on the type of display in your vehicle. The indi
cator ligh t
CRUISE (US model)/ 0" (C anadia n mo del) w ill also light up
in the instrume nt cluster .
The speed is kept constant by modifying engine power or through an
active brake intervention.
& WARNING
• Always pay attention to the traffic around you when the cruise
control is in operation . You are always responsible for your speed
and the distance between your vehicle and other vehicles.
• For reasons of safety, cruise control should not be used in the
city, in stop-and-go traffic, on twisting roads and when road
conditions are poor (such as ice, fog , gravel, heavy rain and hydro
planing) -you could have an accident.
• Switch the cruise control off temporarily when driving in
turning lanes, highway exits or in construction zones.
• Please note that unconsciously "resting" your foot on the
accelerator pedal causes cruise control not to brake. This is due to
the control system being overridden by the driver's acceleration.
(I) Tips
• Vehicles with manual transmission: You can attain the set speed
only if the gear that is currently engaged will allow it, or if it does not
tax the engine and allows it to run smoothly. Therefore shift into a
hig her o r lower gear in a t imely manne r.
• The brake lights illuminate as soon as the brakes apply
automatically .•
Changing speed
- Press the lever in the direction of the 0 => page 119,
fig. 110 or in the dire ction of the Oto increase or
decrease your speed . -
Let go of the lever to save that speed.
Change speed in increments of 1 mph (1 km/h) by lightly pressing the
lever. If you keep the lever pressed down, you will alter your speed in
S mph
(10 km/h) increments.
You can also press the accelerator pedal down to increase your speed,
e.g. if you want to pass someone. The speed you saved earlier will
resume as soon as you let off of the accelerator pedal.
If, however, you exceed your saved speed by 5 mph
(10 km/h) for
longer than 5 minutes, the cruise control will be turned off tempo
rarily. The green symbol in the d isp lay turns white, the saved speed is
reta ined. •
Pre-selecting speed
You can pre -select your desired speed while the vehicle is
not moving.
- Turn on the ign ition .
- Pull lever into position 1
:::> page 119, fig. 110.
- Press the lever in the
0 or O direction to increase or
decrease your speed.
- Let go of the lever to save that speed.
This function makes it possible, for example, to save the speed you
want before dr iv ing on the highway. Once on the highway, activate
the cruise control by pulling the lever toward
(D . •
Switching off
Temporary deactivation
- Step on the brake pedal, or
Page 125 of 362
Adaptive cruise control -____________ __._ __ _
& WARNING (co ntinued )
• Always turn off adaptive crui se control when entering turn
lanes, highway ex it lanes and con struction zones or similar situa
tions because the vehicle will automatically accele rate to the
stored speed .
• Never rest your foot on the accelerator pedal, especially when
the adaptive cruise control is being u sed because doing so will
override the braking function and prevent the brakes from being
applied by the system when it detect s a situation when the brake s
must be applied.
• Alway s remember that the adaptive cruise control has limits -
it does not react when you drive towards an obstacle or something
else on or near the road that is not moving, such as vehicles
stopped in a traffic jam , a stalled or disabled vehicle .
• Always remember that the adaptive cruise control cannot
detect a veh icle th at i s driving towards you in your traffic lane and
that it cannot detect narrow vehicles such as motorcycles and bicy
cles .
[ i] Tips
• For safety reasons, the stored speed is deleted when the ignition
is turned off.
• The Electronic Stabilization Program (ESP) and the Ant i-Slip Regu
la tio n (A SR) c anno t be de activated when the adaptive cruise cont rol
is sw itched on .
If the ESP and the Anti -S lip Regulation (ASR) has been
de activ at ed an d yo u the n switch on the ad apt ive cruise cont rol, the
ESP fu nction w ill also be activated automatically.
• Dam age cau sed by accide nts (e.g. if the vehicle is dam age d whe n
park ing) can affect the rada r sensor settings. This can cause t he
sys tem to malfunc tion or switch off comple tely.
• The radar sensor cover is heated. In w inter conditions, you should
st ill ch eck befor e dr iv in g to make s ure i t is free of ice and s now. If
necessary, clean the area nea r the rada r sensor carefully=>
page 122,
fig. 112 .
Controls and equip
ment Safety first
•
To ensure that the radar sensor is not blocked , fore ign objects
(e .g. st ickers, add -on par ts) m ust no t cover the are a ne ar th e radar
sensor=>
page 122, fig . 112 . The area near t he radar sensor must not
be painted, either .
• For Declaration of Compliance to United States FCC and Industry
C an ada regula tions =>
page 34 3. •
App lies to ve hicle s: with adap tiv e crui se contro l
How does adaptive cruise control work?
Vehicles traveling ahead are de tec ted w ith the aid of a
ra dar sens or.
I;= =;. =============== -.~
~
ll!
Fig. 113 Radar sen sor
mea sureme nt r an ge
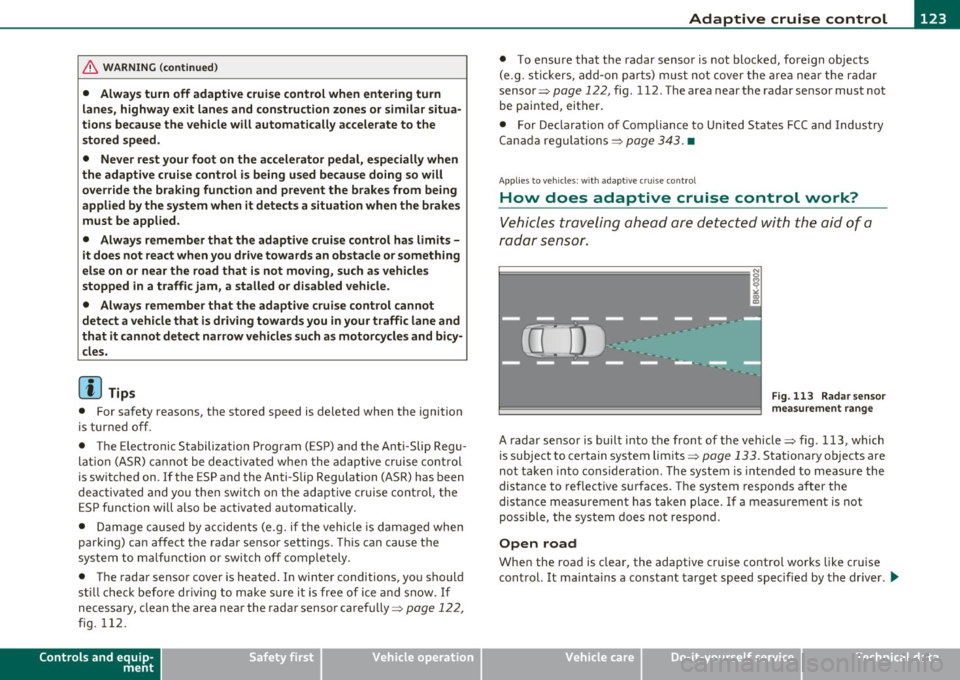
A radar sensor is buil t into the front of the vehicle=> fig. 113, which
is subject to ce rtain system limits =>
page 133 . Stationary o bjects are
not taken into cons iderat ion. The system is intended to measure the
distance to reflective s urfaces. The system responds after the
dis tance measuremen t has taken place. If a meas urement is not
poss ible, the system does not respond.
Open road
When the road is clear, the adaptive c ruise contro l works like cr uise
cont rol. It ma inta ins a constant target speed specified by the drive r.
~
Vehicle care Technical data
Page 130 of 362
IIII..__A_ d_a_ p,__ t_iv _ e_ c_r_ u _i _ s _e _ c_o _n _ t_ r_ o_ l ___________________________________________ _
Driving pro
gram
Dis tance 1
Distance 2
Distance 3
& WARNING
dynamic
1
2
2
3
standard
2
3
3
4
comfort
3
4
4
5
-
When setting the distance, the dri ver is responsible for adhering
to the respect ive national and country -specific regulations .
• Following other vehicles too closely increase s the risk of colli
sions and serious personal injury.
• Setting short distance s to the traffic ahead reduce s the time
and d istanc e av ailable to bring your vehicle to a safe stop and
makes it even more neces sary to pay clo se attention to traffi c.
• Always use good judgment and select a safe following distance
for the traffic , road and weather condition s.
(I] Tips
The d istance setting is reset to the factory default DISTANCE 3 the
next time the ignition is t urned on .•
Driver information
Ap plies to veh icles: w it h ad aptiv e c ru is e co ntro l
Displays in the instrument cluster
Depending on the driving situation, driver information is
displayed in the instrument cluster.
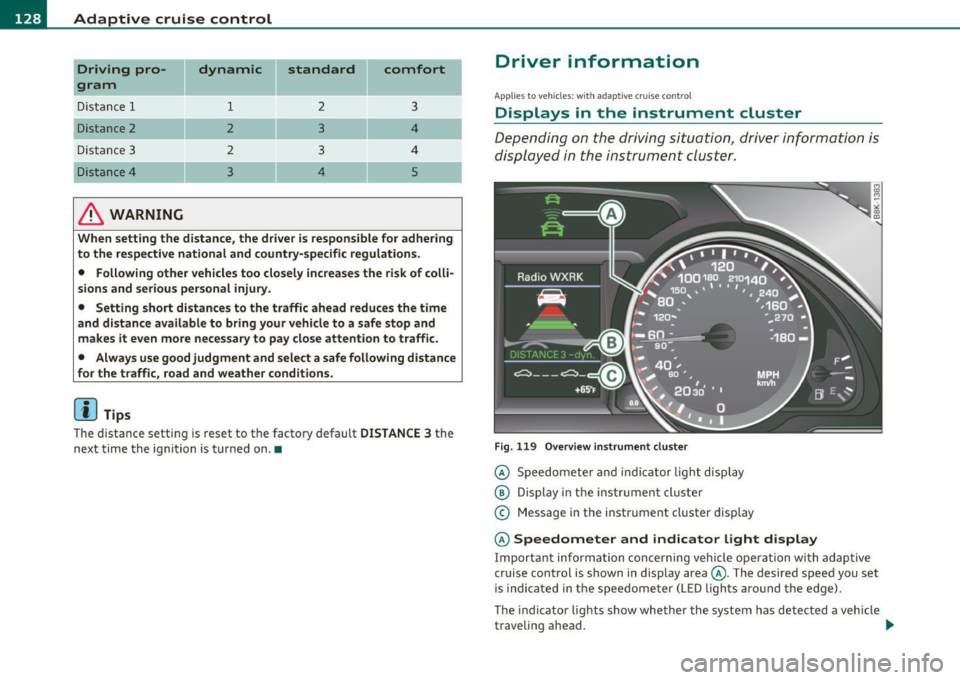
Fig. 11 9 Ove rv iew i nstrum ent clu ste r
© Speedomete r and indicator light disp lay
@ Display in the ins trument cluste r
© Message in the instr ument cluster disp lay
© Speedometer and indicator light d isplay
Important informa tion concerning vehicle ope ration wi th adap tive
cruise control is shown in display area@. The desired speed you set
is indica ted in the speedome ter (L ED ligh ts aro und the edge).
T he indicator lights show whether the system has detected a veh icle
traveling ahead . .,,.