wheel AUDI A5 COUPE 2011 Owners Manual
[x] Cancel search | Manufacturer: AUDI, Model Year: 2011, Model line: A5 COUPE, Model: AUDI A5 COUPE 2011Pages: 362, PDF Size: 84.88 MB
Page 5 of 362
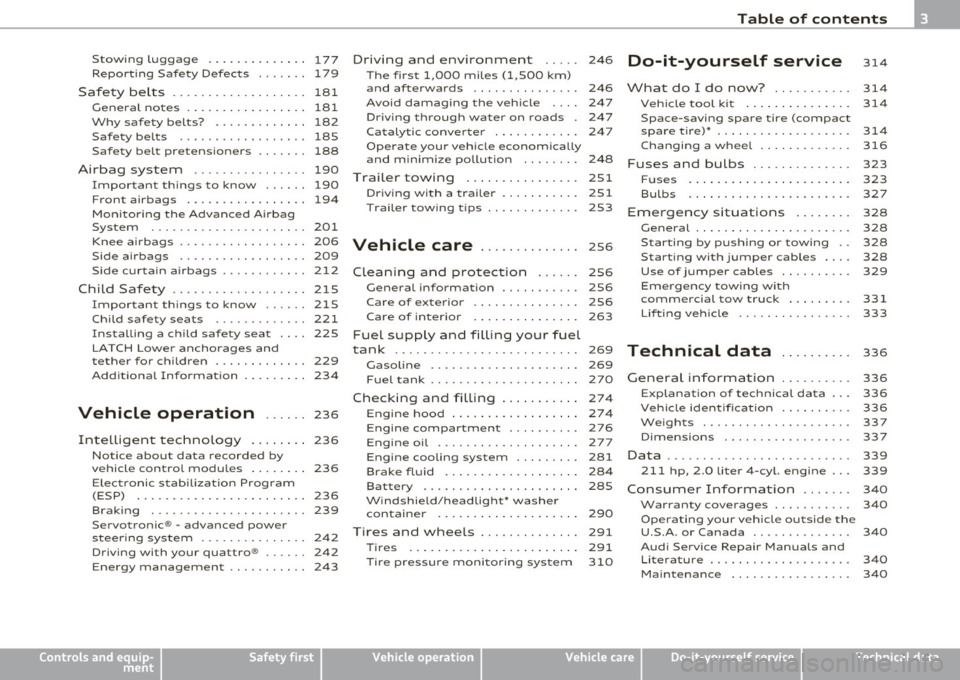
Stowing Luggage ........... ... 177
Repor ting Safe ty Defects . . . . . . . 179
Safety be lts . . . . . . . . . . . . . . . . . . . 181
General no tes ........ ......... 181
Why safety belts? . . . . . . . . . . . . . 182
Safety belts . . . . . . . . . . . . . . . . . . 185
Safety belt pretensioners . . . . . . . 188
Airbag system ................ 190
Important th ings to know ...... 190
Front airbags ................. 194
Mon ito ring the Advanced A irbag
System ...................... 201
Knee ai rbags . . . . . . . . . . . . . . . . . . 206
Side airbags . . . . . . . . . . . . . . . . . . 209
Side curtain airbags ......... ... 212
Chil d Safe ty ................... 215
I mportant things to know ...... 215
Child safety seats ............. 221
Installing a child safety seat . . . . 225
LATCH Lowe r ancho rages and
tether for children . . . . . . . . . . . . . 229
Add it ional Informat ion
234
Vehicle operation ...... 236
Intelligent technology . . . . . . . . 236
Notice abo ut data recorded by
vehicle contro l modu les . . . . . . . . 236
E lect ronic s tab iliza tion Program
(ESP) . . . . . . . . . . . . . . . . . . . . . . . . 236
Braking ...................... 239
Servotronic ® -advanced power
steer ing sys tem . . . . . . . . . . . . . . . 242
Dr iving with your quattro ® . . . . . . 242
Energy management . . . . . . . . . . . 243
Controls and equip
ment Safety first
Driving
and environment ..... 246
The first 1,000 miles (1,500 km)
and afterwards . . . . . . . . . . . . . . . 246
Avoid damaging the vehicle 247
Dr iving through water on roads . 247
Ca talytic conve rter . . . . . . . . . . . . 247
Operate your veh icle economica lly
and m inimize po llution . . . . . . . . 24 8
Trailer towing . . . . . . . . . . . . . . . . 251
Dr iving wi th a trailer . . . . . . . . . . . 251
T railer tow ing tips . . . . . . . . . . . . . 253
Vehicle care .............. 2s6
Clea nin g and protect ion ...... 256
General information . . . . . . . . . . . 256
Care of exterior . . . . . . . . . . . . . . . 256
Care of interior . . . . . . . . . . . . . . . 263
Fuel supply and filling your fuel
tank .......................... 269
Gasol ine . . . . . . . . . . . . . . . . . . . . . 269
F u el tank .................... . 270
Checking and filling . . . . . . . . . . . 274
Eng ine hood . . . . . . . . . . . . . . . . . . 274
Engine compartment . . . . . . . . . . 276
Engine oil . . . . . . . . . . . . . . . . . . . . 277
Engine cooling system . . . . . . . . . 281
Brake fluid . . . . . . . . . . . . . . . . . . . 284
Bat tery . . . . . . . . . . . . . . . . . . . . . . 285
W indshield/headlight* washer
container . . . . . . . . . . . . . . . . . . . . 290
Tires and wheels .............. 291
Tires 291
T ir e pressure monitor ing system 310
Table of contents
Do-it-yourself service
What do I do now? .......... .
Vehic le tool k it ........ ...... .
Space -saving spare tire (compact
spare tire)* ....... ........ ... .
Cha nging a whee l ........... . .
Fuses and bulbs ......... .... .
Fu ses ... ......... .......... .
Bulbs ...................... .
Emergency situations ....... .
General . ........... ......... .
Starti ng by pushing or towi ng ..
Starting with jumper cables ... .
Use of jumper cables ......... .
Emergency towing w ith
commercial tow truck ........ .
Lif ting vehicle ............... .
Technical data
General information
Explana tion of technica l da ta .. .
Vehicle ident ification ......... .
Weights .................... .
Dimensions ................. .
Data ................ ... ...... .
211 hp, 2.0 Liter 4-cyl. engine .. .
Consumer Information ...... .
Warranty coverages .......... .
Operating your vehicle outside the
U.S.A . or Canada ............. .
Audi Service Repair Manuals and
Literature ................... .
Maintenance ............... . . 314
314
314
314
316
323
323
327
328
328
328
328
329
331
333
336
336
336
336
337
337
339
339
340
340
340
340
340
Vehicle operation
Vehicle care Do-it-yourself service Technical data
Page 11 of 362
Instruments and controls
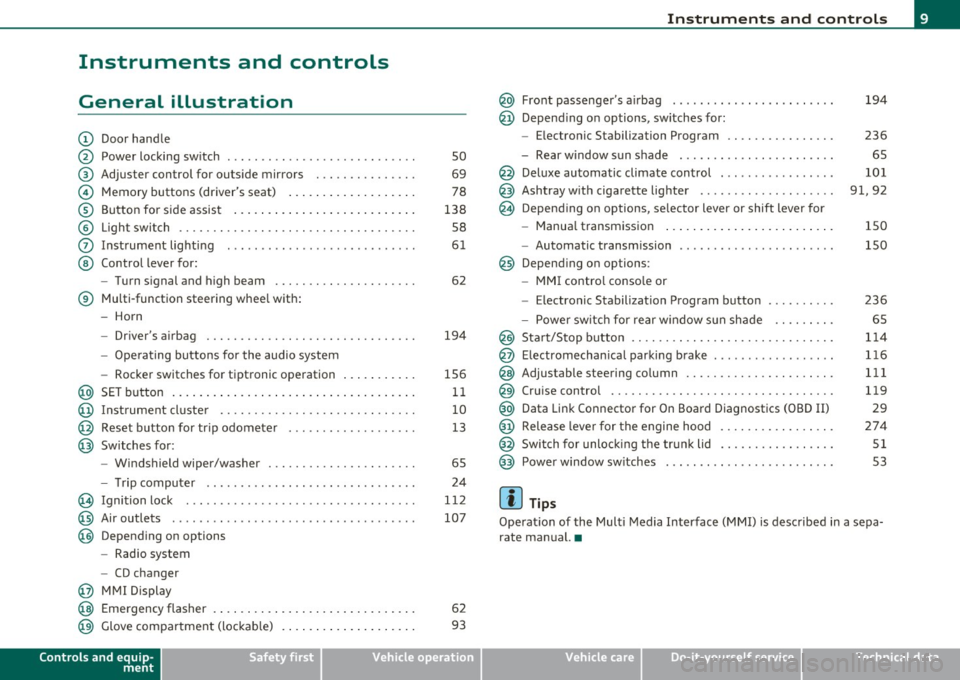
General illustration
(D Door handle
@ Power locking switch ....... .. .......... ... .. .. . .
@ Adjuster control for outside mirrors . .. .. ......... .
© Memory buttons (driver's seat) .... ... ........... .
® Button for side assist ........... ............... .
© Light switch ........... .. .... .. .. .. .. ...... ... .
0 Instrument lighting . ....... ................... .
@ Control lever for:
- Turn signal and high beam ......... .. .. ....... .
® Multi-function steering wheel with:
- Horn
- Driver's airbag ....... .. .... .... .. .. ...... ... .
- Operating buttons for the audio system
- Rocker switches for tiptronic operation ... .. ..... .
@ SET button .............. ..... ..... ........... .
@ Instrument cluster .... ....... .... .. .. .. .. .. .. . .
@ Reset button for trip odometer .................. .
@ Switches for:
- Windshield wiper/washer ................ .. ... .
- Tr ip computer .. .......... . .. .... .. .. .... ... .
@ Ignition lock ..... .. .................. ... .. ... .
@ Air outlets ........... ... .. ..... ... ........... .
@ Depending on options
- Radio system
- CD changer
@ MMI Display
so
69
78
138 SB
61
62
194
1S6 11
10
13
6S 24
112
107
@ Emergency flasher . . . . . . . . . . . . . . . . . . . . . . . . . . . . . . 62
@ Glove compartment (lockab le) . . . . . . . . . . . . . . . . . . . . 93
Controls and equip
ment Safety first
Instruments and controls
@ Front passenger
's airbag ....... .. .. . .. .. .. .. .. . .
@ Depending on options, sw itches for :
- Electronic Stabili zation Program .. .. .. ......... .
- Rear window sun shade . .... .... .. .. .. .. .. .. . .
@ Deluxe automatic climate control . ... ............ .
@ Ashtray w ith cigarette lighter ........ .... .. .. .. . .
@ Depending on options, selector lever or shift lever for
- Manual transmission ..... ................ .. . .
- Automatic transmission
@ Depending on options :
- MMI contro l conso le or
- Electronic Stabilization Program button
- Power switch for rear window sun shade ...... .. .
@ Start/Stop button ........ .. .. .. ...... ......... .
@ E lectromechanica l parking brake ............... .. .
@ Adjustable steering column ............. .. .... .. .
@ Cruise control ......... .. .... .. .. .. .. ......... .
@ Data Link Connector for On Board Diagnostics (OBD II)
@ Release lever for the engine hood ........ .. .... .. .
@ Switch for unlock ing the trunk lid ........... ..... .
@ Power window switches . .... .. .. .. .... .. .. ..... .
(I) Tips
194
236
65
101
91,92
150
lSO
236
65
114
116 1 11
119 29
274
Sl
S3
Operation of the Multi Media Interface (MMI) is described in a sepa
rate manual. •
Vehicle care Technical data
Page 17 of 362

(® ) Canada models: Parking brake
BRAKE USA models: Brake malfu nction
((D ) Canada models : Brake malfunction
& WARNING
~page 18
~page 18
~ page 18
• Failu re to heed wa rning lights and other important vehicle
information may result in serious per sonal injury or vehicle
damage.
• Wh enever stalled or stopped for repair, move th e vehicle a safe
distance off the road, stop the engine, and turn on the emergency
fla sher
~ page 62.
• The engine compartment of any motor vehicle is a potentially
hazardous ar ea . Before you check anything in the engine compart
ment, stop the engine and let it cool down . Always e xercise
extreme caution when working under th e hood ~
page 267,
"Engine compartment ".
(I] Tips
Many funct ions are mon itored by the Auto-Check system~ page 31.
Mal functions o r faults w ill be iden tifi ed eithe r wi th a red sy mbol
(pr iority 1 -Danger!) or with a ye llow symbol (priority 2 -War ning). •
App lies to vehicles : w ith Au di dr ive sele ct
Dynamic steering /
If the indic a tor light ~ illum inate s when swit ching on t he ig nitio n
and goes out when the eng ine starts, dynamic steering is activated.
If the indicator light
Q ill um inates after the eng ine starts, a system
ma lfunct io n has occurred. Yo u can cont inue to driv e carefu lly at a
re du ced speed to a q ualified wor kshop . Steering ca n be more difficult
Controls and equip
ment Safety first
Instruments and warning
/indicator lights
or sensi tive tha n usual. The steering wheel may a lso be at an angle
when driving s traight.
& WARNING
Have the dynamic ste ering system malfunction repaired as soon
as possible by an authorized Audi dealer or any qualified workshop
- risk of ac cident!
(I] Tips
• If the ind ic a tor ligh t ") flashes, dynamic stee ring is being re
initialized. T he driver information system display shows the words
"Dynamic steering: initializa tion" ~
page 3 7.
• The dynamic steering stab il ity systems are not avai lab le in the
event o f a system m alfu nct ion. •
Electronic power control
This warning/indicator light monito rs the el ectr onic
p ower control.
Th e war ning/ indicato r lig ht ( Electro nic Powe r Cont rol) ill umi -
nates when you turn on the ignition as a function chec k.
(I] Tips
If this warning/indicator light i lluminates while you are driving, then
t here is a m alfu nction in the e ng ine e lec tron ic s . H ave the malf u nct io n
corrected as soon as possib le by your authorized Audi dealer or qual
ifie d wo rkshop . •
Electronic stabilization program (ESP) I
If the J in dic ato r lamp b links wh ile dr iv ing, the ESP or ASR (A nti- Slip
Regulation) is act ive ly regulat ing.
~
Vehicle care Technical data
Page 20 of 362
Instruments and warning/indicator lights
Malfunction in the electronic differential lock (EDL)
The ED L works toge ther w ith the ABS. The ABS warn ing lig ht w ill
come on if there is a mal func tion in the EDL system=>
page 238 . See
your authorized A udi dea le r as soon as poss ible .
& WARNING
• If the .. (USA models )/ ...,. (Canada models ) wa rning light
does not go out , or if it comes on while driving, the ABS system is
not working properly. The vehicle can then be stopped only with
the standard brakes (without ABS ). You will not have the p rotec
tion ABS provides. Contact your authorized Audi dealer a s soon as
pos sible.
• USA models : If the BRAKE warning light and the M, warning
light come on together, the rear wheels could lock up fir st under
hard braking. Rea r wheel lock-up can cause loss of vehicle cont rol
and an accident . Have your vehicle repaired immediately by your
autho rized Audi dealer or a qualified work shop. Dri ve slowly and
avoid sudden, hard brake applications.
• Canada models: If the brake warning light 0 and the ABS
warning light come on together, the rear wheels could lock up
first under hard braking. Rear wheel lock -up can cause loss of
vehicle control and an accident . Have your vehicle repaired imme
diately by you r authorized Audi dealer or a qualified wo rkshop.
Drive slowly and avoid sudden , hard brake applications .•
Electromechanical parking brake
~[ (USA models)/ (®) (Canada models)
The warning/indicator light monitors the electromechan
i c al parking brake .
With the parking brake app lied and the ignition turned on, the
wa rning/ind icator light illum ina tes . Afte r th e ign it io n has been
turned off, the wa rning/ind icator light continues to illuminate for
about 30 seconds . If the parking brake is applied with the ignition turned off, the warning/indicator light
illuminates fo r about 30
se cond s.
T he wa rn in g/ind icator light will go out when the parking brake is
re lease d.
If the war ning/ indi cato r l ight flashes cont in uo usly
after applying the
park ing b rake, braking force is not sufficient to prevent the vehicle
fr om rolling unin ten tionally. Please note the following:
• If the slope of the ground is too steep to par k the ve hicle, the addi
tional drive message appears
Caution: Vehicle parked too steep .
• In the event of a pa rking b rake malfunction, the ye llow symbol
appea rs in the instrument cluster display and the driver message
Parking brake malfunction! is displayed . Have the malfunction
repaire d as soon as possible by an authorized A udi dea le r or any other
qualified workshop .•
Brake system BRAKE (USA
models)/ ((D) (Canada models)
Th e warn ing/indica tor li ght flas hes if br ake fluid level is
lo w, if there i s an A BS system malf unctio n or a parki ng
b ra ke malfu nction.
Th e light i lluminates when the ignition is turned on . It goes out after
t he engine has been sta rted . This indicates that t he b rake war ning
light is functioning properly.
If the brake warning light does not light up when the engine is
cranking, there may be a malfunction in the electrical system. In
this case, contact an authorized Aud i dealer.
If t he brake system wa rning/indicator light flashes, the re is a bra ke
system malfunction. By pressing the
[ SET] button, you can bring up a
dr ive r message w hich expla ins the ma lf unc tion in more deta il
=>p~e33. ~
Page 21 of 362
If the ABS fails, the ABS warning/indicator light ~r (USA
mode ls)/ (C anada mode ls) flashes toge ther w ith the br ake system
wa rning/ind icator light=> &.
(USA models): If the warning light
BRAKE and the warning light i llu
m inate together, immed ia te ly co ntac t your author ized A udi deale r or
qualified workshop to have all brake pads inspected=>
page 38.
When the light comes on, an a ud ible w arni ng s ign al is also given.
& WARNING
• USA model s: If the BRAKE warning light and the S warning
light come on togethe r, the rear wheels could lock up first under
hard braking . R ear wheel lock-up can cause lo ss of vehicle control
and an accident. Ha ve your vehicle repa ired immediately by you r
authorized Audi dealer or a qualified work shop. Driv e slowly and
avoid sudden , hard brake applications.
• Canada model s: If the brake warning light(@ and the ABS
warning light ,. come on togethe r, the rear wheels co uld lock up
first under hard braking. Rear wheel lock-up can cau se lo ss of
veh icle cont rol and an accident . Have your vehicle repaired imme
diately by your authorized Audi dealer or a qualified workshop.
Drive slow ly and avoid sudden, hard brake applications .
• If the brake warning/indicator light doe s not go out after a few
seconds and the parking brake released, or lights up while you are
driving , the fluid level in the brake fluid rese rvoir is too low. If you
believe that it is safe to do so, proceed immediately at low speed
to the neare st authorized Audi dealer or qualified repair facility
and have the brake system inspected .
• Always keep in mind that after several brake applications , you
will need greater pressure on th e brake pedal to stop your vehicle .
Do not rely on strained brakes to respond with maximum stopping
power in critical situation s. You must allow for increased braking
distances. The extra distance used up by fading brakes could lead
to an accident . •
Controls and equip
ment Safety first
Instruments and warning
/indicator lights
Vehicle care Technical data
Page 36 of 362
Driver information display
Parking brake Please get to a repair shop
-If this symbol appears when the vehicle is stationary or
after the ignition is turned on, check to see if the parking
brake can be released. Drive to an authorized Audi dealer
or other qualified workshop as soon as possible and have
the malfunction corrected. If the parking brake cannot be
opened, then take it to an expert at an authorized Audi
dealer.
- If the symbol appears while you are driving, it is possible
that the traction control or the emergency brake has malfunctioned. It is possible that the parking brake
cannot be applied. It is also possible that the parking
brake cannot be released after it has been applied. Drive
to an authorized Audi dealer or other qualified workshop
to have the malfunction corrected.
If the ABS system malfunctions, the ABS warning/indicator light illu
minates together with the brake system malfunction warning/indi
cator light~ & .
& WARNING
• Always observe the warnings in~ page 267, "Engine compart
ment", before opening the hood and checking the brake fluid.
• Driving with low brake fluid is a safety hazard. Stop the car and
get professional assistance.
• USA models: If the BRAKE warning light and the ' warning
light come on together, the rear wheels could lock up first under
hard braking. Rear wheel lock-up can cause loss of vehicle control
and an accident. Have your vehicle repaired immediately by your
authorized Audi dealer or a qualified workshop. Drive slowly and
avoid sudden, hard brake applications.
• Canada models: If the brake warning light (Q)} and the ABS
warning light come on together, the rear wheels could lock up
& WARNING (continued)
first under hard braking. Rear wheel lock-up can cause loss of
vehicle control and an accident. Have your vehicle repaired imme
diately by your authorized Audi dealer or a qualified workshop.
Drive slowly and avoid sudden, hard brake applications. •
Engine cooling system malfunction _L
A malfunction in the engine cooling system must be
repaired as soon as possible.
If the _ r_ symbol flashes in the display, either the engine
coolant
temperature is too high or the engine coolant level is
too low. A driver message appears as well to explain the
malfunction in more detail. The driver warning goes out after
about 5 seconds, but it can be brought up at any time by pressing the
(SET) button again .
Switch off engine and check coolant level
- Pull off the road.
- Stop the vehicle.
- Turn off the engine .
- Check coolant level==>
page 282.
-Add coolant if necessary==> page 283.
Continue driving only after the engine coolant
warning/indicator light goes out .
- Contact your authorized Audi dealer for assistance if
necessary .
If the engine coolant leve l is correct, then the radiator fan may be the
cause of the malfunction. ...
Page 40 of 362
Driver information display
difficult or sensitive than usual. The steering wheel can also be at an
angle when driving straight.
Dynamic steering: initialization
If this driver message appears and the indicator light is flashing on
the instrument panel, dynamic steering is being reinitialized. Once
you start the engine after this is finished, the steering wheel will be
easy to move. Re-initialization might be necessary if the steering
wheel was moved hard to the left and right while the vehicle was not
moving. The display goes out as soon as initialization is complete.
& WARNING
Have the dynamic steering system malfunction repaired as soon
as possible by an authorized Audi dealer or any qualified workshop
- risk of accident!
rn Tips
The dynamic steering stability systems are not available in the event
of a system malfunction. •
Applies to vehic les: with con ven ie nce ke y
Key not in vehicle
Key not in vehicle
This reminder appears along with the 7 symbol if the master key is
removed from the vehicle with the engine running. It is intended to
remind you (e.g. when chang ing drive rs) not to continue the journey
without the master key.
If the master key is no longer in the vehicle, you cannot switch off the
ignition after stopping the engine and you also cannot start the
engine again. You also cannot lock the vehicle from the outside. •
App lies to veh icles : with light/ra in senso r
Light/rain sensor defective )
...i-Automatic headlights/automatic wipers defective
If the symbol illuminates, the light sensor has failed . For safety
reasons the low beams are turned on permanently with the switch in
AUTO. However, you can continue to turn the lights on and off using
the light switch. In the case of a defect in the rain sensor, the wind
shield wiper lever functions are still available. Have the light/ rain
sensor checked as soon as possible by an authorized Audi dea ler. •
Worn brake pads J
Brake pads!
If the warning light illum inates, immediately contact your authorized
Audi dealer or qualified workshop to have all brake pads inspected .
On USA models the warning light comes on together with the
warning light
BRAKE . Both sets of brake pads on an axle must always
be replaced at the same time.
& WARNING
Driving with bad brakes can cause a collision and serious personal
injury.
• If the warning light and the warning light
BRAKE1> with the
message Brake pads! comes on in the instrument cluster display,
immediately contact your authorized Audi dealer or qualified
workshop to have all brake pads checked or replaced if
necessary. •
l) BRAK£: USA mode ls only
Page 63 of 362

Instrument lighting
The basic brightness of the illumination for the instru
ments, the center console and the display can be
adjusted.
- Press the knob to release it .
N ~ 0 0
i
"'
Fig. 52 Instrument
lighting
Rotating the knob to the right"+" will increase the basic
brightness when it is dark.
- Rotating the knob to the left"-" will decrease the basic
brightness when it is dark.
- Pressing the knob will prevent unintentional changes.
(I) Tips
The illumination for the instrument cluster lights up whenever you
switch on the ignition with the vehicle headlights off . As the daylight
fades, the instrument cluster illumination likewise dims automati
cally and will go out completely when the outside light is very low .
This feature is meant to remind you to switch on the headlights when
outside light conditions become poor.•
Contro ls a nd e quip
m en t Vehicle
OP-eration
Clear vision
App lies to veh icles : wi th xenon h ead lights
Xenon headlights
After starting the engine, the xenon headlights are automatically
adjusted to the load and angle of the vehicle (for example, during
acceleration and braking) . This prevents oncoming traffic from expe
riencing unnecessary headlight glare from your xenon headlights .
If the system is not operating properly, a warning symbol in the Auto
Check Control is displayed~
page 40. •
Ap plies to vehicles : wit h adap tive light
Adaptive light
When driving around bends, the relevant area of the road
is better illuminated.
Fig. 53 Adaptive light
when driving
The benefit of adaptive light is that the curve and the edge of the road
are better illuminated ~ fig. 53. Dynamic adaptive light is controlled
automatically, depending on vehicle speed and steering wheel angle.
When driving around bends, the headlights are controlled according
to steering wheel angle . So that there is no black hole ahead of the
vehicle, the two main beams pivot at different angles. ..,_
Vehicle care Do-it-yourselt service iTechnical data
Page 65 of 362

High beam l[D ®
-Push the lever forward to switch on the high beam.
- Pull the lever back towards you to switch off the high
beam.
Headlight flasher l[D ©
-Pu ll the lever toward the steering wheel to use the head
light flasher.
Notes on the se fea ture s
• The turn signals only work with the ignition turned on. The indi
cato r lights ¢ or¢ in the instrument cluste r also blink.
• After you have turned a corner, the turn signal switches off auto
matically.
• The
high beam works only when the headlights are on. The indi
cato r light [D in the instrument cluster illuminates when the h igh
beams are on.
• T he
headlight flasher works only as long as you ho ld the lever -
even if there are no lights switched on. The ind icator light [Din the
instrument cluste r illuminates when yo u use the headlight flasher.
0 Note
Do not use the high beam or headlight flasher in if you know that
these could be blinding oncoming traffic. •
Contro ls a nd e quip
m en t Vehicle
OP-eration
Clear vision
Interior lights
Front interior lights
The front interior lights also contain reading lights for
the driver and passenger.
Fig. 56 Headli ner:
Fron t interior lig hts
The rocker switch©==> fig . 56 for operating the inter ior
light ing has the following functions:
Doo r contact switch
- Place the switch© in the middle position.
Interior light switched on
-Place the switch© in position I.
Interior light switched off
-Place the switch© in position 0 .
Front reading lights ~
-Press one of the switches ® to turn the r ight or left
reading light on or off.
Vehicle care Do-it-yourselt service iTechnical data
Page 75 of 362
Seats and storage
General recommendations
Why is your seat adjustment so important?
The safety belts and the airbag system can only provide
maximum protection if the front seats are correctly
adju sted.
Th ere a re various ways of adjusting t he front seats to provide safe and
comfortable support for the driver and the front passenger . Ad just
your seat properly so that :
• you can easily and quickly reach a ll the switc hes and contro ls in the
ins trumen t pa nel
• your body is properly supported thus reducing phys ica l stress and
fatigue
• the safety be lts and airbag system can offer maximum protection
=>
page 190 .
In the following sections, you w ill see exact ly how you can best ad just
your sea ts .
Th ere are special regulations a nd instr uctions for install ing a child
safety seat on the front passenger's sea t. Always follow the informa
tion regarding child safety p rovided in=>
page 215, "Child Safety ".
& WARNING
Incorrect seating posit ion of the dri ver and all other passengers
can result in seriou s personal injury.
• Always keep your feet on the floor when the vehicle is in
motion -never put your feet on top of the instrument panel, out
of the window o r on top of the seat cush ion. This applies especially
to the passengers.
If your seating po sition is incorrect, you
increase the ri sk of injury in the case of sudden braking or an acci-
Controls and equip
ment Safety first
Seats and storage
& WARNING
(con tinu ed)
dent . If the airbag inflates and the seating position is incorrect ,
this could result in per sonal injury or even death .
• It is important for both the dri ver and front passenger to keep
a distan ce of at least 10 inche s (25 cm) between themselves and
the steering wheel and /or instrument panel. If you 're sitting any
closer than this , the airbag system cannot protect you properly. In
addition, the front seats and head restraints must be adjusted to
your body height so that they can give you maximum protection .
• Always try to keep as much distance as possible between your
self and the steering wheel or instrument panel.
• Do not adjust the driver's or front passenger 's seat while the
vehicle is moving. You r seat may move unexpectedly , causing
sudden loss of vehicle control and personal injury . If you adjust
your seat while the vehicle is moving , you are out of position. •
Driver's seat
The correct seat position is important for saf e and
re lax ed driving.
W e recomme nd that you a djust the drive r's sea t in the
f ollowing man ner :
- Ad just the seat in fore and aft direction so that you can
easily pus h the pedals to the floor w hile keeping your
knees slightly bent=>
& in "Why is yo ur seat a djus tme nt
so importa nt?" .
- Adjust the seatback so that when yo u sit with yo ur back
agai nst t he seatback , you can st ill grasp t he top of the
steering w heel. ..,
Vehicle care Technical data