sensor AUDI A5 COUPE 2012 Owner's Manual
[x] Cancel search | Manufacturer: AUDI, Model Year: 2012, Model line: A5 COUPE, Model: AUDI A5 COUPE 2012Pages: 316, PDF Size: 78.59 MB
Page 126 of 316
124 Audi drive select
Audi drive select Driving settings
Introduction
App lies to vehicles: w it h drive se lect
Audi drive select provides the possibility to ex
perience different types of vehicle settings in
one vehicle. For instance, using the three
COMFORT, AUTO and DYNAMIC modes, the
driver can switch from a sporty to a comforta
ble driving mode with the press of a button.
Additionally, in vehicles with MMI*, the vehi
cle setup for INDIVIDUAL* mode can be cus
tomized by you. This makes it possible to
combine settings such as a sporty engine tun ing with light steering.
A WARNING
- Improper use of the Audi drive select can
cause collisions, other accidents and seri
ous personal injury.
- Never drive at speeds that are too high
for traffic, road and weather conditions.
Description
App lies to vehicles: w it h drive se lect
The vehicle setup in each mode depends on
the vehicle's features. However, the engine
and servotronic are always affected. The auto
matic transmission*, dynamic steering* and
adaptive dampers* are also adjustable.
Depending on the mode, the
engine and auto
matic transmission*
respond more quickly or
in a more balanced manner to accelerator
pedal movements.
The
Servotronic (steering servo assistance)
c::> page 209 can also be adapted to driving
situations.
Dynamic steering* changes the steering ratio
as a function of the driving speed in order to
optimize the driver's required steering effort.
This sets the steering to be less sensitive at
higher speeds in order to provide greater con
trol over the vehicle. At reduced speeds, how
ever, steering is more direct in order to keep the steering effort as minimal as possible
when the driver is maneuvering the vehicle. At
low and average speeds, dynamic steering ad
ditionally provides more responsive steering
performance. The driver can set the basic
steering ratio characteristics .
The
adaptive dampers* use sensors to record
information regarding steering movements,
braking and acceleration operations by the
driver, road surface, driving speed, and load.
This makes it possible to adapt damping to
the driving situation virtually in real time. Au
di drive select also makes it possible to satisfy
the desire for sporty suspension (DYNAMIC)
and comfortable suspension (COMFORT) with
out giving up balanced tuning (AUTO).
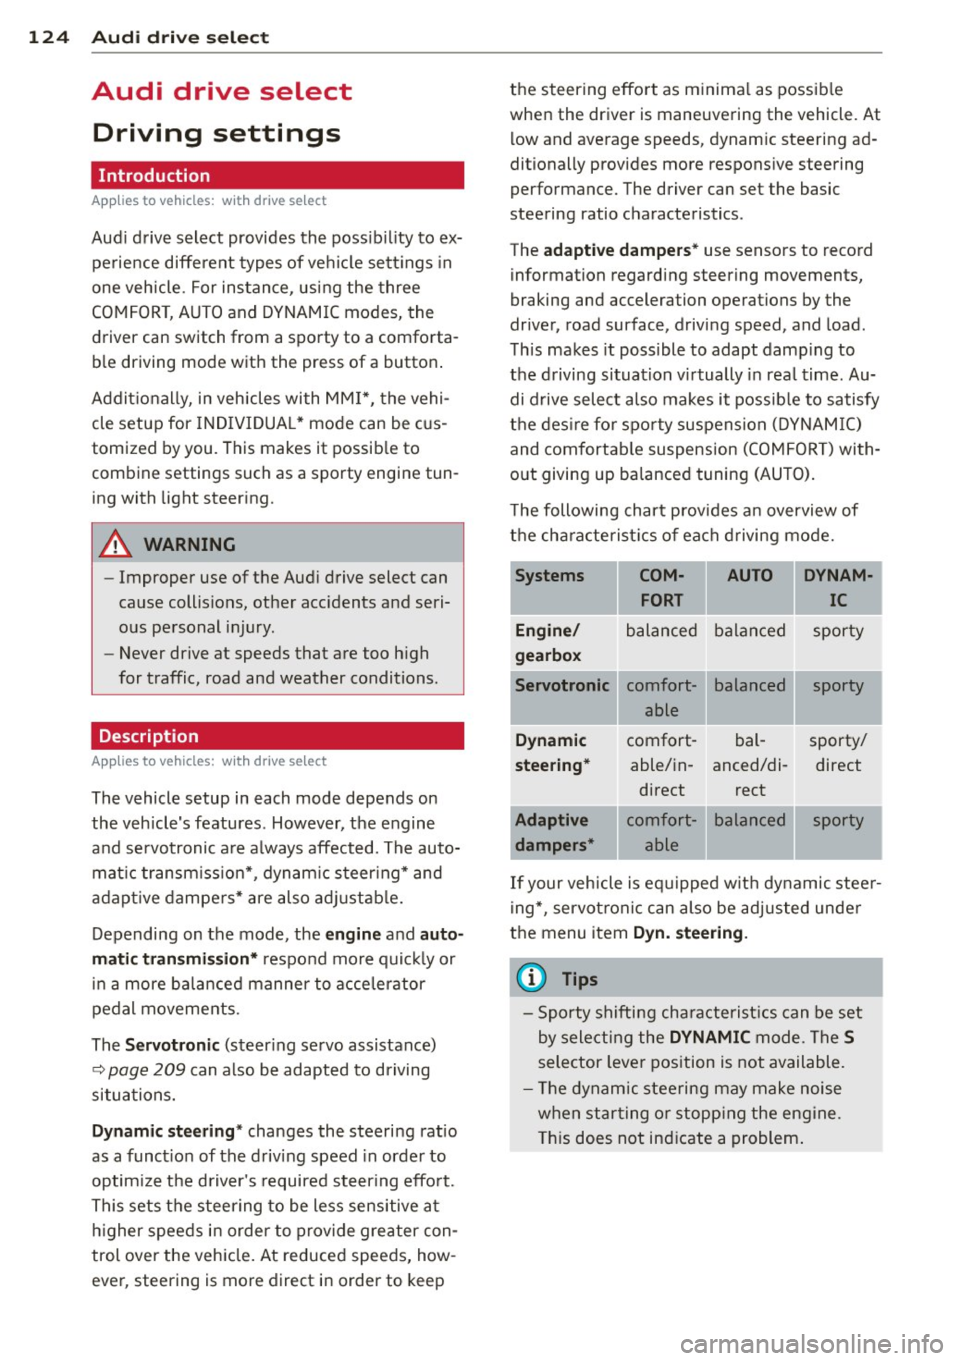
The following chart provides an overview of
the characteristics of each driving mode.
Systems
Engine/
gearbox
Servotronic
Dynamic
steering*
Adaptive dampers* COM-
AUTO DYNAM-
FORT IC
balanced balanced sporty
comfort- able
comfort- able/in-
direct
comfort- able balanced
bal-
anced/di-
rect
balanced sporty
sporty/ direct
sporty
.
.
If your vehicle is equipped with dynamic steer
ing*, servotronic can also be adjusted under
the menu item
Dyn. steering.
(D Tips
-Sporty shifting characteristics can be set
by selecting the
DYNAMIC mode. The S
selector lever position is not available.
- The dynamic steering may make noise
when starting or stopping the engine.
This does not indicate a problem.
Page 135 of 316
Park assist
Parking system
Applies to vehicles: with parking system
Different park assist systems may be used for
parking or maneuvering, depending on the
vehicle's features.
Parking system (rear)*:
For the parking system (rear), the acoustic
park assist system is installed in the rear of
the vehicle
¢ page 133.
The rear parking assist system uses ultrasonic
sensors to determine the distance of the vehi
cle from a detected obstacle. There are a total
of four sensors located on the rear bumper
(two in the middle and two on the sides) .
Parking system (rear, with rear view
camera)*:
For the parking system (rear, with rear view
camera),
the rear acoustic park assist system
is integrated in the rear of the vehicle and the
rear view camera is integrated in the rear lid
¢page 136.
The parking system (rear , with rear view cam
era)
uses ultrasonic sensors to determine the
distance of the vehicle from a detected obsta
cle . There are a total of four sensors located
on the rear bumper (two in the m iddle and
two on the sides).
Parking system (rear)
Rear acoustic park assist
App lies to vehicles: with parking system (rear)
The rear acoustic park assist warns you of ob
stacles or objects behind your car.
Description
The rear acoust ic parking assist system deter
mines the distance of the vehicle from an ob
stacle using ultrasonic sensors. There are 4
sensors in the rear bumper.
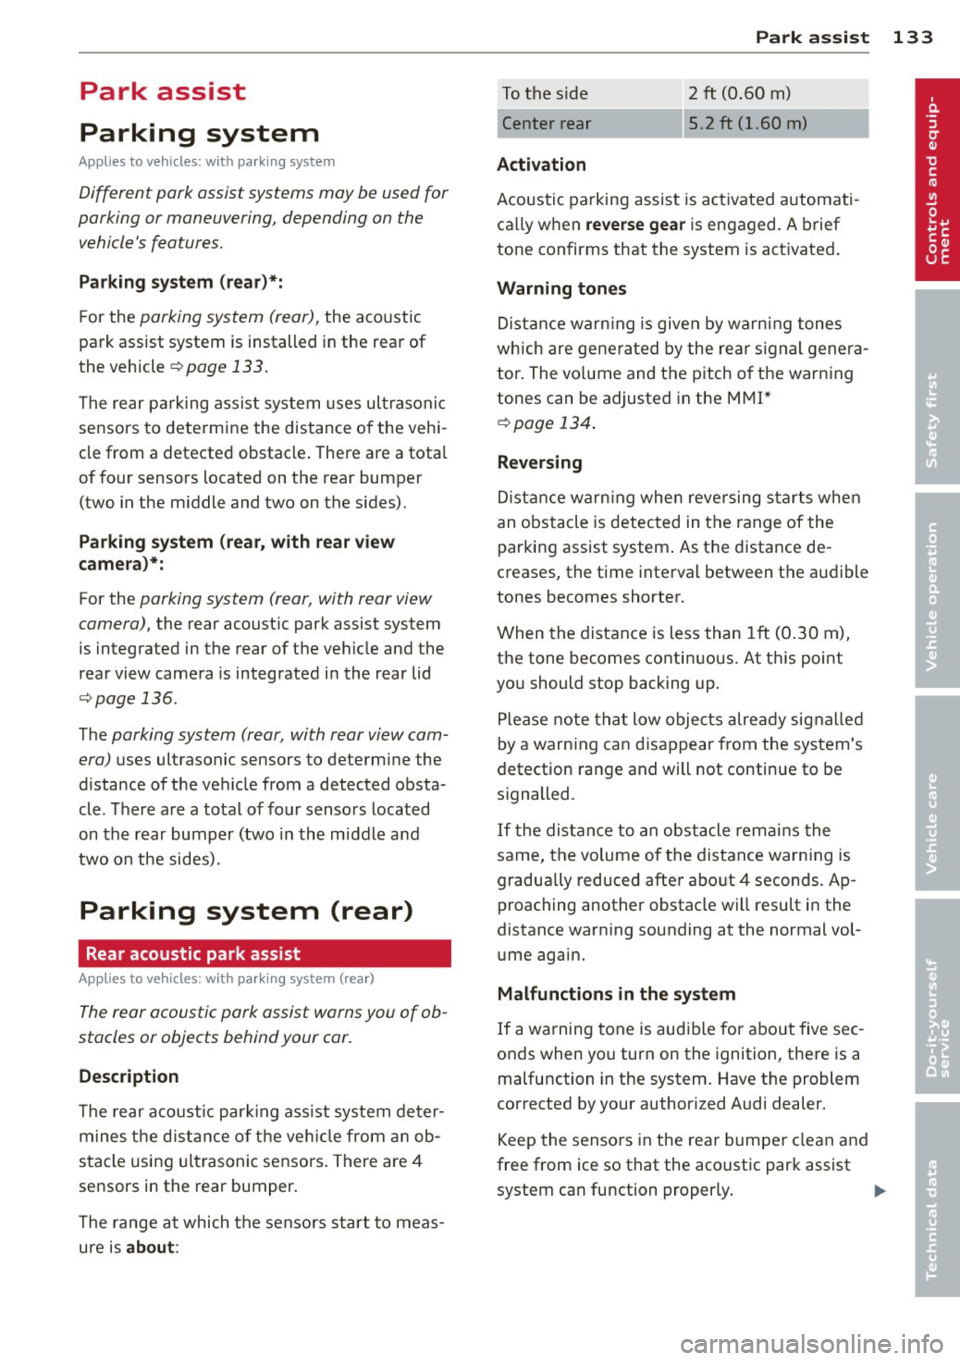
The range at which the sensors start to meas
ure is
about :
Park assist 133
To the side 2 ft (0.60 m)
Center rear 5.2 ft (1.60 m)
Activation
Acoustic parking assist is activated automati
ca lly when
reverse gear is engaged. A brief
tone confirms that the system is activated.
Warning tones
Distance warning is given by warning tones
which are generated by the rear signal genera
tor. The vo lume and the pitch of the warning
tones can be adjusted in the MMI*
¢page 134.
Reversing
Distance warning when reversing starts when
an obstacle is detected in the range of the
parking assist system . As the distance de
creases, the time interval between the aud ible
tones becomes shorter.
When the distance is less than 1 ft (0.30 m),
the tone becomes continuous. At this point
you should stop backing up.
Please note that low objects already signalled
by a warning can disappear from the system's
detection range and will not continue to be
signalled.
If the distance to an obstacle remains the
same, the volume of the distance warning is
gradually reduced after about 4 seconds. Ap
proaching another obstacle will result in the
distance warning sounding at the normal vol
ume again.
Malfunctions in the system
If a warning tone is audible for about five sec
onds when you turn on the ignition, there is a
malfunction in the system. Have the problem
corrected by your authorized Audi dealer.
Keep the sensors in the rear bumper clean and
free from ice so that the acoustic park assist system can function properly. .,..
Page 136 of 316
134 Park ass is t
& WARNING
- Sensors have d ead spaces in which ob
jects cannot be detected. Be espec ially
alert for small children and animals,
since they are not a lways detected by the
senso rs.
- T he acoust ic park ing system is not a sub
st itute fo r the driver's own caut io n and
alertnes s. Ul timate responsib ility always
remains wi th the driver during par king
and similar maneuve rs . Always watch
where you are dr iving.
- You should always adjust the vo lume and
frequency of the warning to nes so that
yo u can easily hear the acoustic distance
warning even if the radio is p laying, the
air-cond it ioner blower is on High or there
is a high leve l of outside noise.
- Check t he settings w henever a nyone
e lse h as dr ive n the vehicle before you.
(D Note
- Remembe r that low obstacles for whic h
a warn ing has a lready be en iss ued may
"dive" below the system's sensing zone if
t h e ve hicle is being b acked up closer. In
t hi s case, the warn ing sound shut ting off
does
not indicate that yo u have cleared
the obstacle . Instead, impact is immi
nent.
- Objects such as trai ler hitches, c hains,
narrow posts or fences covered by a t hin
l ayer of pa int may not a lways be detect
ed by the system . They can still damage
you r vehicle witho ut wa rning .
@ Tips
Keep the sensors in the rear bumper clean
a nd free of snow and ice so that the acous
tic parking assist system can funct io n
prope rly .
Adjusting the warning tones
Applies to vehicles: with parking system (rear)
The warning tones can be adjusted in the
MMI* .
.. Select: !CAR !> Parking system .
- Rear volume -
rear sensor vo lume
- Rear frequency -rear sensor freque ncy
- In-car entertainment fader -when the park-
ing sys tem is swi tc hed o n, the vo lume of the
active audio source is lowered .
T he newly ad justed value is briefly hea rd from
the sig nal gener ator. T he set tings are a uto
m at ic ally s tored and ass igned to the m aster
key with remote cont ro l.
Parking system (rear,
with rear view camera)
Introduction
Applies to vehicles: with parking system (rear, with rear
view camera)
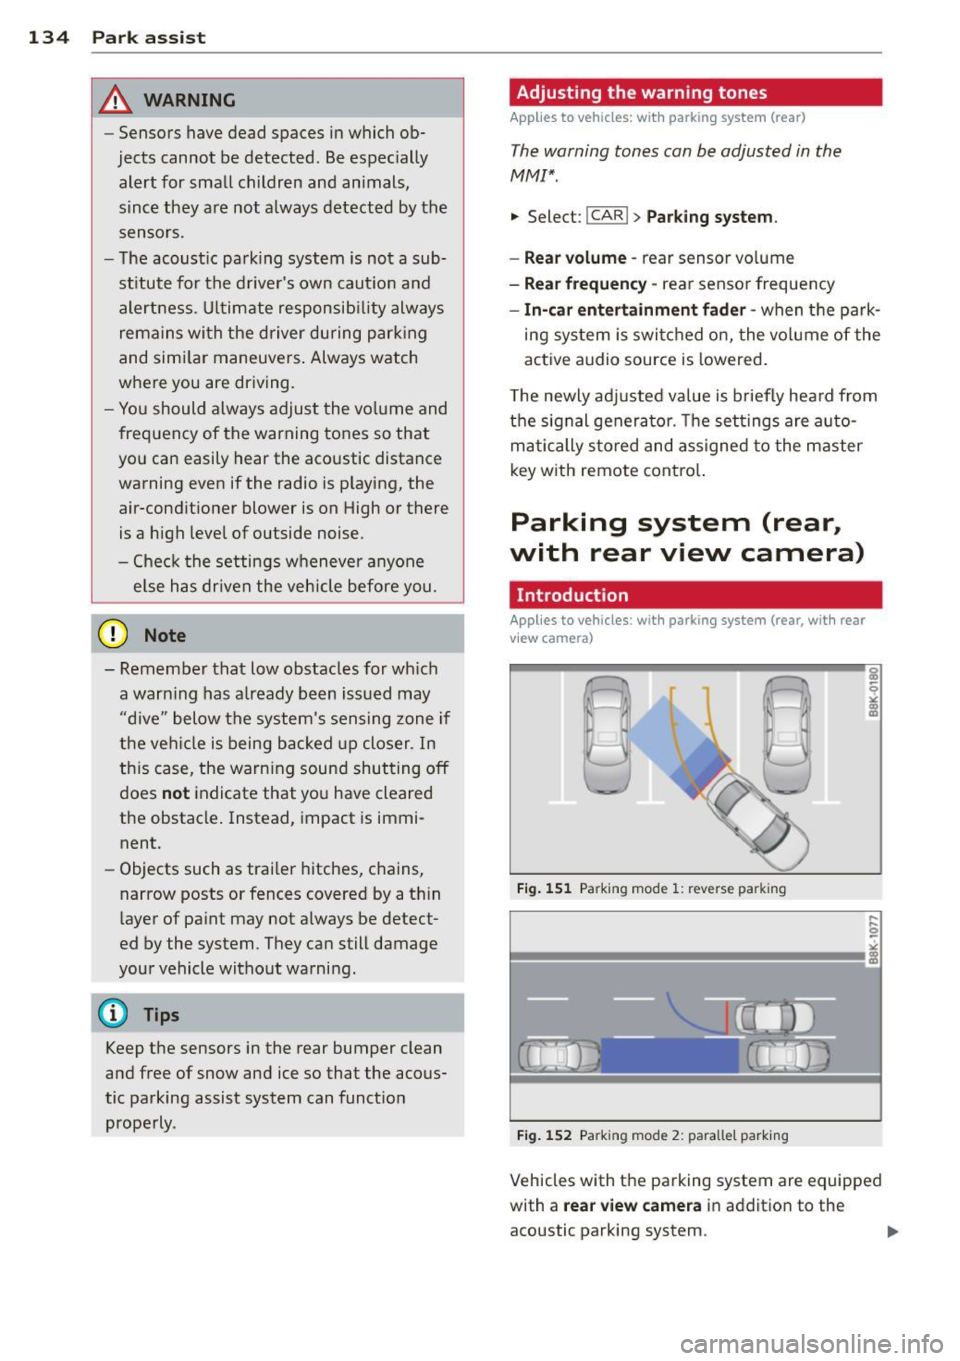
Fig. 1 51 Parking mod e 1: reve rse pa rking
Fig. 1 52 Parking mod e 2: pa ra ll el par king
Vehicles w ith the parking system are equippe d
with a
rear view camera in addition to the
acoustic parking system .
Page 137 of 316
You can choose between two modes to assist
you with parking. For example, you can use
"park ing mode l" when parking in a parking
space or garage
c:> fig. 151. When you want to
park parallel to the edge of the street, select
''parking mode 2"
c:> fig. 152.
The rear acoust ic park assist system is inte
grated in the rear of the vehicle and the rear
view camera is integrated in the rear lid
c:> page 136.
A WARNING
- The rear view camera has blind spots, in
wh ich objects cannot be detected . Be es
pecially careful to check for small chil
dren and animals before backing up.
Small chi ldren and anima ls will not al
ways be detected by the sensors.
General Information
Applies to vehicles: with parking system (rear, with rear
view camera)
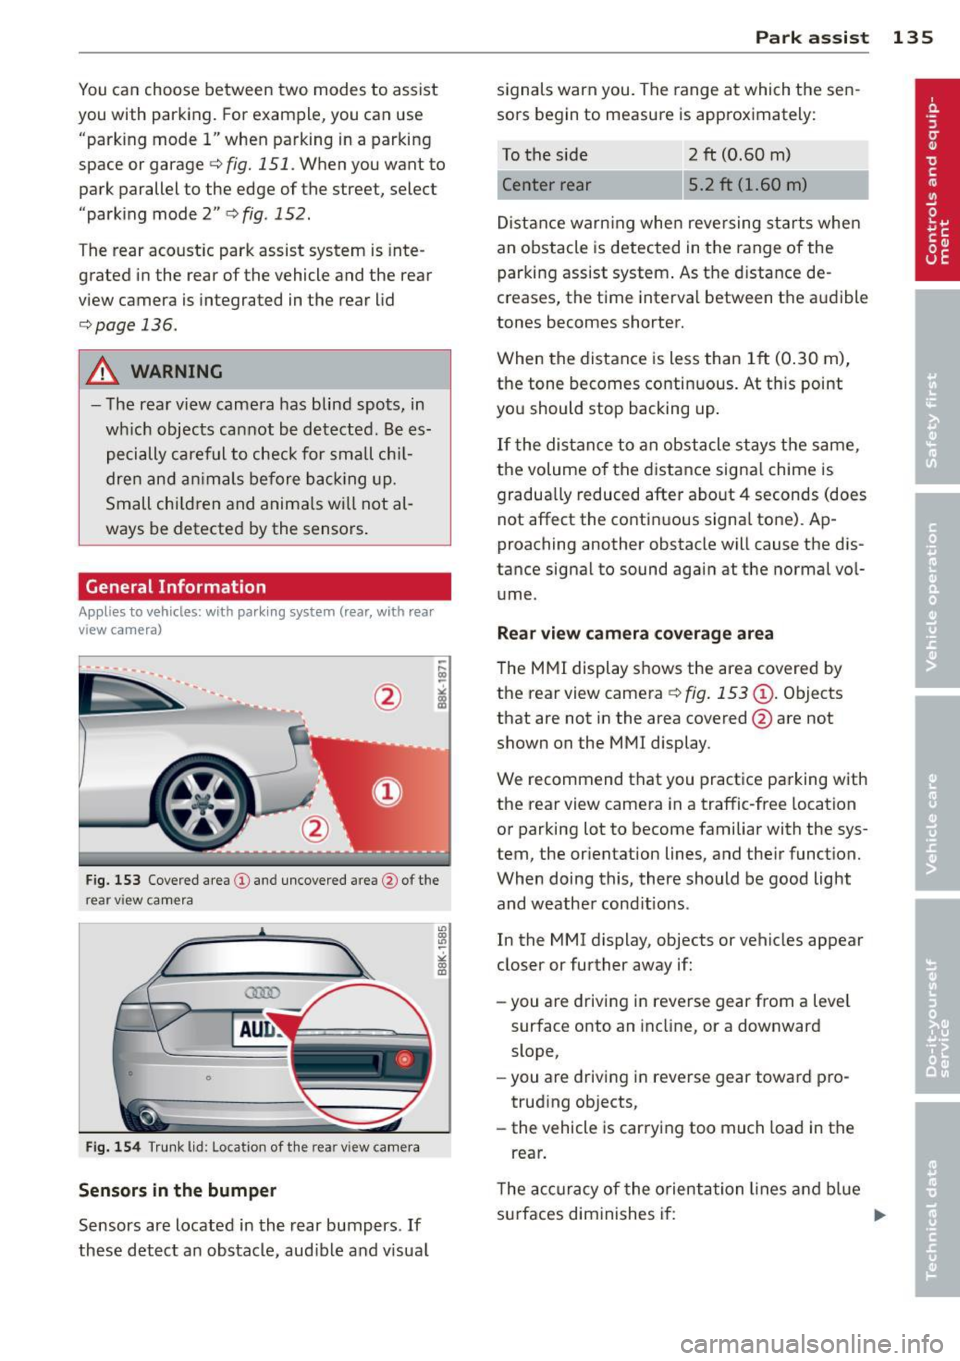
Fig. 153 Covered area(!) and uncovered area@ofthe
rear v iew camera
• 0
Fig. 154 Trunk lid: Location of the rear view ca mera
Sensors in the bumper
Sensors are located in the rear bumpers . If
these detect an obstacle, audible and v isual Park assist 135
signals warn you. The range at which the sen
sors begin to measure is approximately:
To the side
Center rear
2 ft (0.60 m)
5.2 ft (1.60 m)
Distance warning when reversing starts when
an obstacle is detected in the range of the
parking assist system . As the distance de
creases, the time interval between the audible
tones becomes shorter.
When the distance is less than 1ft (0.30 m),
the tone becomes continuous. At th is point
you should stop backing up .
If the distance to an obstacle stays the same,
the volume of the distance signal chime is
gradually reduced after about 4 seconds (does
not affect the continuous signa l tone). Ap
proaching another obstacle will cause the dis
tance signal to sound again at the normal vo l
ume .
Rear view camera coverage area
The MMI display shows the area covered by
the rear view camera
c:> fig. 153 @ . Objects
that are not in the area covered @are not
shown on the MMI display.
We recommend that you practice parking with
the rear view camera in a traffic-free location
or parking lot to become familiar with the sys
tem, the or ientation lines, and their funct ion.
When doing this, there should be good light
and weather cond itions .
In the MMI display, objects or vehicles appear
closer or further away if:
- you are driving in reverse gear from a leve l
surface onto an incline, or a downward
slope,
- you are driving in reverse gear toward pro
trud ing objects,
- the vehicle is carrying too much load in the
rear .
The accuracy of the orientation lines and blue
surfaces diminishes if:
...
Page 139 of 316
switched on, or the start-up phase is
completed.
- Keep the sensors in the rear b umper and
the rear view camera lens clean and free
of snow and ice, so that the parking sys
tem can work properly. Please follow the
additional notes on
c:;, page 139.
Reverse Parking
A ppl ies to vehicles: with parkin g system (rear, with rea r
view ca mera)
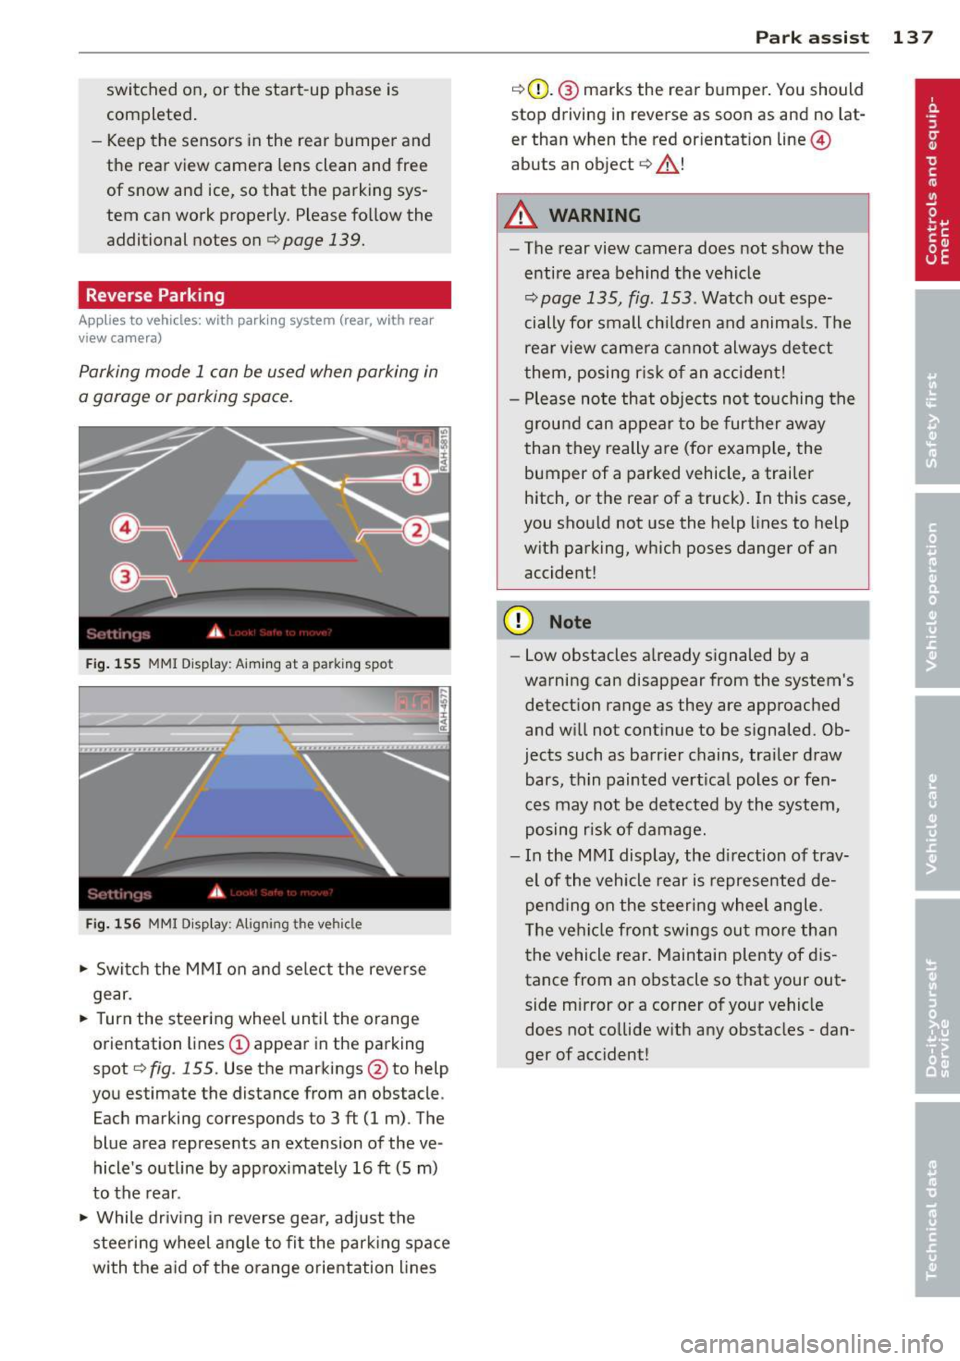
Parking mode 1 can be used when parking in
a garage or parking space.
F ig . 155 MMI Disp lay: Aiming at a parking spot
Fi g. 156 MMI Display: Aligning the vehicle
.,. Switc h the MMI on and se lect the reverse
gear.
.,. Turn the steering wheel until the orange
orientation lines
(D appear in the parking
spot
c:;, fig. 155. Use the markings @to help
you estimate the distance from an obstacle .
Each marking corresponds to 3
ft (1 m). The
blue area represents an extension of the ve
hicle's outline by approx imately 16
ft (5 m)
to the rear.
.,. While driving in reverse gear, adj ust the
steering wheel angle to fi t the park ing space
with the aid of the orange orientation lines
Par k ass ist 137
c:;,G)_ @ marks the rear bumper. You should
stop driving in reverse as soon as and no lat
er than when the red orientat ion line ©
abuts an object
c:;, _&. !
A WARNING
- The rear view camera does not show the
entire area behind the vehicle
c:;, page 135, fig. 153. Watch out espe
cially for small children and anima ls. The
rear view camera ca nnot always detect
them, posing r is k of an accident!
- Please note that objects not touching the
g rou nd can appear to be further away
than they really are (for example, the
bumper of a parked vehicle, a trailer
hitch, or the rear of a truck). In this case,
you shou ld not use the help lines to help
with parking, which poses danger of an accident!
(D Note
- Low obstacles a lready signaled by a
warning can disappear from the system's detection range as they are approached
and w ill not continue to be signaled. Ob
jects such as barrier chains, trailer draw bars, th in painted vert ica l poles or fen
ces may not be detected by the system,
posing risk of damage.
- In the MMI display, the di rection of trav
el of the vehicle rear is represented de
pend ing on the s teering wheel angle.
The vehi cle front swings out mo re than
the vehicle rear. Maintain plenty of dis
tance from an obstacle so that your out
side mirror or a corner of your vehicle
does not co llide w ith any obstacles -dan
ger of accident!
Page 141 of 316
(D Note
In the MMI display, the direction of travel
of the vehicle rear is represented depend
ing on the steering wheel angle. The vehi
cle front sw ings out more than the vehicle
rear. Maintain plenty of distance from an
obstacle so that you r outside m irror or a
corner of your veh icle does not co llide w ith
any obsta cles -danger of acc ident!
(D Tips
The left or r ight orientation li nes and sur
faces will be displayed, depend ing on the
tur n signa l be ing used.
Adjusting the display and warning tones
A ppl ies to vehicles: with pa rk in g system (rear, with rea r
view camera)
The display and warning tones are adjusted in
the radio or MM!*.
~ Select: ICARI > Pa rking system .
Display
-Off -when the pa rking system is switched
off, only aud ib le signals are given.
- On -when the parking system is switched
on, the pict ure from the rear view camera is
displayed.
Warning tones
- Rear volume -rear sensor volume
-Rear frequency -rear sensor frequency
-In -car entertainment fader -when the park-
ing system is sw itched on, the volume of the
active audio source is lowered .
The newly adjusted value is briefly heard from
the signal generator. The settings are auto
mat ically stored and assigned to the remote
control key.
A WARNING
- Always make sure that the volume and
frequency of t he warning tones is adjust
ed so that you can easily hea r th e acous
ti c dis tance s ign al even if the r adio is
playing, the a ir-conditioner b lower is on
-
P ark a ssis t 139
High o r there is a high level of outside
noise.
- Check the settings whenever someone
else has driven the vehicle before you.
(D Tips
- T he war ning tones can also be adjus ted
directly from t he rear view camera im
age. S imply press the
I Sett ings !* contro l
button.
- Changed settings are activated when
parking assist is switched on again .
' Error messages
Applies to vehicles: wit h parking system (rear, wit h rear
v iew camera)
If a warning tone is aud ible for about five sec
onds when yo u turn on the ignition, there is a
malfunction in the system. Have the problem
corrected by your author ized Audi dealer.
Keep the senso rs in the rea r bu mpe r clean and
free from ice so that the acoustic park assist
system can function properly .
Page 171 of 316
-Always move the passenger seat into its
rearmost position in the seat's fore and
aft adjustment range, as far away from
the a irbag as poss ible, before installing
the forward-facing child restraint. The backrest must be adjusted to an upr ight
posit ion.
- Make sure that the
PASSENGER AIR BAG
OFF
light comes on and stays on all the
t ime w henever the ignition is sw itched
on.
Advanced Airbag System components
The fron t passenger seat in your vehicle has a
lot of very important parts of the Advanced
Airbag System in it. These parts include the
weight-sensing mat, sensors, wiring, brack
ets, and more. The function of the system in
the front passenger seat is checked by the
e lectronic control u nit when the ignit ion is on .
The control un it mon itors the Advanced Air
bag System and turns the airbag indicator
l ight on whe n a ma lfunction in t he sys tem
components is de tected. The function of the
airbag indicator light is described in greater
detai l below . Because the front passenger
seat contains important parts of the Ad
vanced A irbag System, you m ust take care to
prevent it from being damaged. Damage to
the seat may prevent the Advanced Airbag for
the front passenger seat from doing its job in
a crash .
The front Advanced Airb ag Sy stem
consists of the following:
- Crash sensors in the front of the veh icle that
measure veh icle acceleration/decele ration
to provide information to the Advanced Air
bag System about the seve rity of the crash.
- An electronic co ntrol unit, with integrated
c rash se nsors for front and side impacts .
T he cont ro l unit " decides " whethe r to fire
the front airbags based on the inform ation
received from the crash senso rs . The contro l
unit a lso "decides" whether the safety belt
pretensioners should be activated .
Airbag system 169
-An Advanced A irbag w ith gas gene rator and
contro l valve fo r the driver ins ide the steer
ing wheel h ub.
- An Advanced Airbag w ith gas gene rator and
contro l valve inside the instrument pane l for
the front passenger.
- A weight-sensing mat under the upholstery
padding of the front passenger seat cushion
that measures the total weight on the seat.
The informat ion reg istered is sent continu
ously to the electronic control unit to regu
late deployment of the front Advanced Air
bag on the passenger side.
- An airbag monitor ing system and ind icator
light in the instrument cluster
q page 173 .
-A sensor in each front seat registers the dis
tance between the respective seat and the
steer ing whee l o r inst rument panel. The in
forma tion registered is sent cont inuo usly to
t he elect ron ic cont ro l uni t to regula te de
ployment o f the front Advance d Airbags .
- The
PASSENGER AIR BAG OFF ligh t comes
on and st ays on in the cen ter o f th e instr u
ment panel
q page 1 73, fig . 178 and tells
you whe n the front Advanced Airbag on the
passenger side has been tu rned
off .
-A sensor below the safety be lt latch fo r the
front seat passenger to measure the tension on the safety be lt . The tension on the safety
be lt and the weight registered by the
weight-sensing mat he lp the control unit
"decide" whether the front a irbag for the
front passenge r seat should be turned
off or
not
~ pag e 163, Child restraints on the
front seat -some important things to
know.
- A senso r in the safety belt latch fo r the d riv
er a nd fo r the fro nt sea t passenger tha t
senses w hethe r that safe ty belt is latched or
no t and transmi ts this informa tion to the
electronic control unit.
_&. WARNING
Damage to the front passenger seat can
prevent the front airbag from work ing
properly.
-
•
•
Page 172 of 316
1 70 Airbag sys tem
-Improper repair or disassembly of the
front passenger and driver seat will pre
vent the Advanced A irbag System from
functioning properly.
- Repairs to the front passenger seat must
be performed by qualified and properly
trained workshop personnel.
- Never remove the front passenger or
dr iver seat from the veh icle .
- Never remove the upholstery from the
front passenger seat.
- Never disassemble or remove parts from the seat or disconnect wires from it.
- Never carry sharp objects in your pockets
or place them on the seat. If the weight
sensing mat in the passenger seat is punctured it cannot work properly.
- Never carry things on your lap or carry
objects on the passenger seat. Such
items can increase the weight registered
by the weight-sens ing mat and send the
wrong info rmation to the airbag control
unit.
- Never store items under the front pas·
senger seat. Parts of the Advanced Ai r
bag System under the passenge r seat
cou ld be damaged, prevent ing them and
the airbag system from wo rking proper
ly .
- Never place seat covers or replacement upholstery that have not been specifical
ly approved by A udi on the front seats.
- Seat covers can prevent the Advanced Airbag System from recognizing child re
straints or occupants on the front pas
senger seat and prevent the side airbag in the seat backrest from deploy ing prop
erly.
- Never use cush ions, pillows, blankets or
similar items on the front passenger
seat. The add itiona l padd ing will prevent
the weight-sensing mat in the seat from
accu rately reg iste ring the c hild restra int
or person on the seat and prevent the
Advanced Airbag System from function ing properly .
-If you must use a child restra int on the
front passenger seat and the ch ild re- straint manufacturer's instructions
re
qu ire the use of a towel, foam cushion or
something e lse to properly pos ition the
child restraint, make certain that the
PASSENGER AIR BAG OFF light comes
on and stays on whenever the ch ild re·
straint is installed on the front passen
ger seat.
- If the PASSENGER AIR BAG OFF light
does not come on and stay on, immed i
a tely insta ll child restrain t in a rear se at
ing position and have the airbag system
inspected by your authorized Audi dealer.
How the Advanced Airbag System
components work together
The front Advanced Airbag System and the
s ide airbags supp lement the protection of
fered by the front three-point safety belts
with pretensioners and load limiters and the
adjustable head restraints to help redu ce the
risk of inju ry in a wide range of accident and
c rash situations. Be s ure to read the impor
tant information about safety and heed the
WARNINGS in this chapter.
Deployment of the Adv a need A irbag System
and the activation of the safety belt preten
sioners depend on the deceleration measured
by the crash sensors and registered by the
electron ic control unit. The amount of infla
tion of the front airbags can a lso be adapted
to the front seat pos ition, depending on the
distance between the respect ive front seat
and the steer ing w heel or instrument panel as
registered by sensors in the seats. Crash se·
verity depends on speed and deceleration as
well as the mass and st iffness of the vehicle
o r object involved in the crash .
On the passenger side, regardless of safety
belt use, the ai rbag w ill be tu rned off if the
we ight on the passenger seat is less than the
amount programmed in the e lectronic control
u nit. The front airbag on the passenger side
will a lso be turned off if one of the child safe -
ty seats that has been certified under Federal Motor Vehicle Safety Standard 208 has been
recogni zed on the seat . The
PAS SENGER AIR .,..
Page 175 of 316
Monitoring the
Advanced Airbag
System
Airbag monitoring indicator light
Two separate indicators monitor the function
of the Advanced Airbag System : the airbag
moni toring indicator light and the
PA SSEN
GER AIR BAG OFF
light.
The Advanced Airbag System (includ ing the
e lectronic control unit, sensor circuits and sys
tem wiring) is monitored continuously to
make sure that it is functioning properly
whenever the ignit io n is on . Each t ime you
turn on the ignition, the
I airbag monitoring
i ndicator light w ill come o n for a few seconds
(self diagnostics) .
The system mu st be inspect ed when the
I indicator light:
- does not come on when the ignit ion is
swi tched on,
- does not go out a few seconds afte r yo u
have switched o n the ignition, o r
- comes on w hile d riving .
If an airbag system malfunction is detected,
the indicator light will first start flashing to catch the driver's attention and then stay on
continuously to serve as a constant reminder
to have the system inspected immediately.
If a malfunction occurs that turns the front
a irbag on the passenger side off, the
PASSEN
GER AIR BAG OFF
li ght w ill come on and stay
on whenever the ignition is on.
_& WARNING
An airbag system that is not funct ioning
properly cannot provide supp lemen tal p ro
tection in a fron tal crash .
-If the airbag indic ator l igh t comes on, it
means that there may be someth ing
wrong with the Advance d Airbag System.
It is possible that the airbag will inflate
when it is not s upposed to, or w ill not in
flate when it should.
-
A irba g sy stem 173
-Have the airbag system inspected imme
diate ly by you r authorized Aud i dea ler.
PASSENGER AIRBAG OFF light
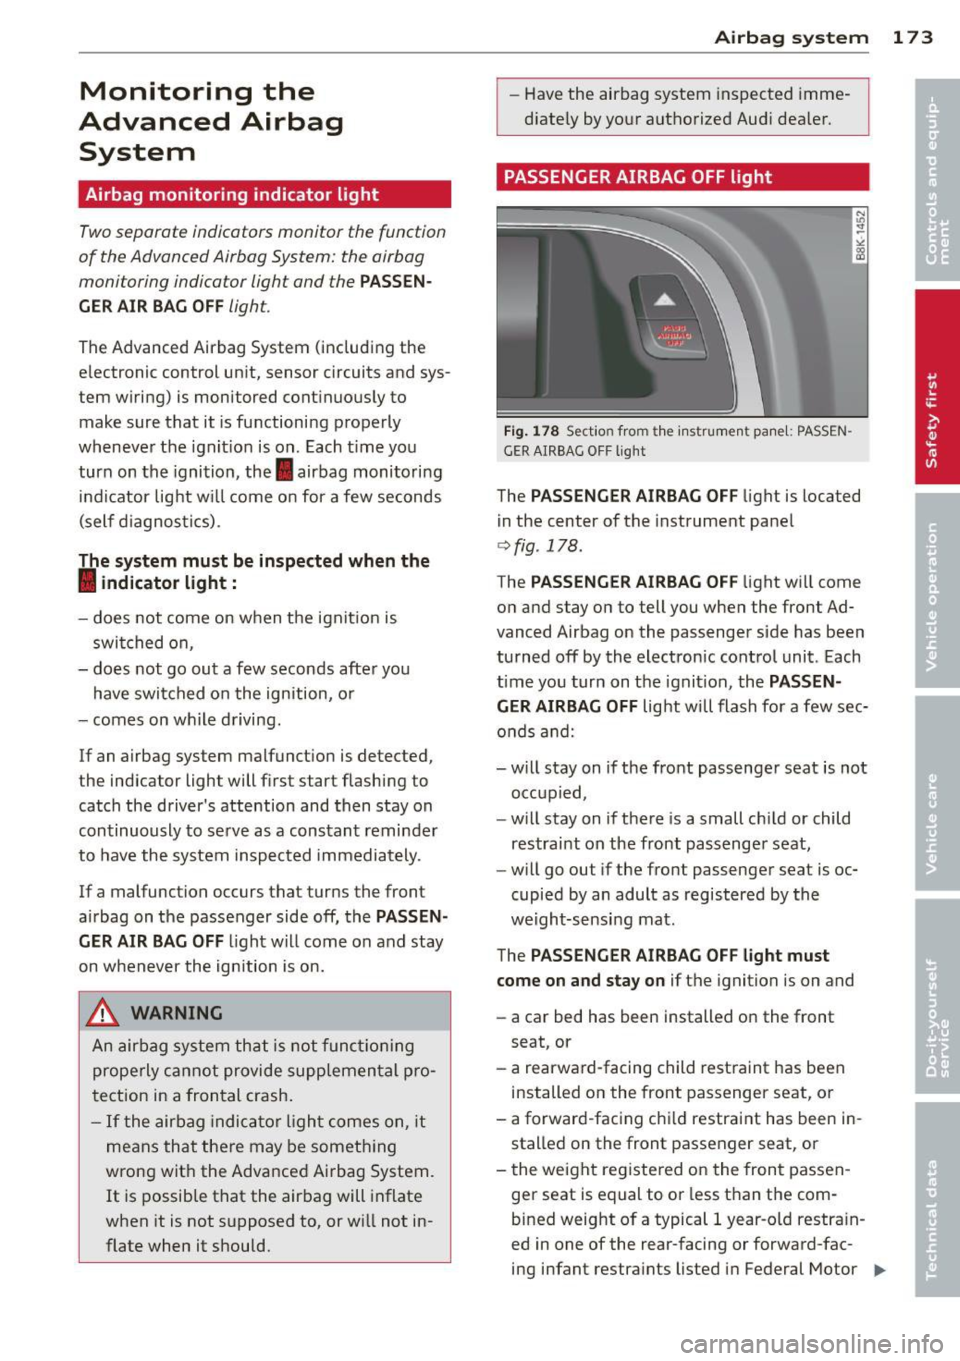
F ig . 1 78 Sect io n fro m t he in strum en t pa ne l: PASSEN
GER AIRBAG OFF lig ht
The PASSENGER AIRBAG OFF light is located
i n the center of the instrument pane l
¢fig . 178.
The PASSENGER AIRBA G OF F light w ill come
o n and stay o n to tell you when the front Ad
vanced Airbag on the passenger side has been
turned off by the electron ic control unit . Each
t ime you turn on the ignit ion, the
PASSEN
GER AIRBAG OFF
lig ht w ill flash fo r a few sec·
o nds and:
- will stay on if the front passenger seat is not
occup ied,
- will stay on if there is a small chi ld or child
restraint on the front passenge r seat,
- will go out if the front passenger seat is oc
cupied by an adult as registered by the
we ight-sensi ng mat .
The
PAS SENGER AIRBAG OFF light must
come on and stay on if the ignition is on and
- a car bed has been installed on the front
seat, or
- a rearward-facing child rest raint has been
installed on the front passenger seat, o r
- a forward -facing chi ld restra int has been in
stalled on the front passenger seat, or
- the weight registered on the front passen
ger seat is equal to or less t han the com
b in ed weight of a typical 1 year-old restra in
ed in one of the rear-facing or forward -fac-
ing infant restra ints listed in Federal Motor ..,.
Page 176 of 316
174 Airbag sys te m
Vehicle Safety Standard 208 with which the
Advanced Airbag System in your vehicle was certified.
I f the front passenger seat is not occupied,
the front airbag will not deploy, and the
PAS
SENGER AIRBAG OFF
light will stay on . Never
install a rearward-facing chi ld restraint on the
front passenger seat, the safest p lace for a
child in any kind of child restraint is at one of
the seating posit ions on the rear seat
c::> page 163, Child restraints on the front seat
- some important things to know
and
c::> page 186, Child Safety .
If the PASSENG ER A IRBAG OFF light com es
on
when one of the conditions l isted above is
met, be sure to check the light regularly to
make certa in that the
PASSENGER AIRBAG
OFF
l igh t stays on cont inuo usly whenever the
ignition is on.
If the PAS SENGER AIRBAG OFF
light does not appear and not stay on all the
time, stop as soon as it is safe to do so and
- react iva te the system by turning the ignition
off and then turning it on again;
- remove and re insta ll the chi ld restraint.
Make su re that the child res traint is properly
insta lled and that the safety be lt for the
front passenger seat has been correct ly
ro uted around the child restraint as descri
bed in the chi ld restraint manufacturer's in
structions;
- make sure that the convertible locking fea
ture on the safety be lt for the front passen
ger seat has been activated and that the
safety belt has been pulled tight. The belt must not be loose or have loops of slack so
t h at the sensor below the safety be lt latch
on the sea t can do its job
c::> page 195.
- make sure that th ings that may increase the
we ight of t he chi ld and child safety seat are
not be ing tra nspo rted on the front passen
ger seat;
- make su re that the safety be lt tension sen
so r is not b locked. Shake t he safety be lt
l atch on the front passenger seat back and
forth;
- If a st rap or te ther is being used to tie the
child safety seat to the front passenger seat, make sure that
it is not so tight that it
causes the weight-sensing mat to measure
more weight than is act ually on the seat.
If the PASSENGER AIRBAG OFF light still
does not come on
and does not stay on con
tin uous ly (when the ignition is switched on),
- t ake the child res train t off the front passen-
ge r seat and ins tall it properly at one of the
rear seat positions. Have the airbag system
inspected by your authorized Audi dea ler
immed iate ly .
- move the child to a rear seat position and
make sure t hat the c hild is properly restra in
ed in a ch ild restra int that is appropriate for
its size and age.
The
PASSENGER AIRBAG OFF light should
NOT come on when the ignit ion is on and an
adult is s itting in a proper seating position on
the front passenger seat. If the
PASSENGER
AIRBAG OFF
lig ht comes on a nd stays on or
flashes fo r about 5 seconds wh ile driving, un
der these c ircumstances, make sure that:
- the adult on the front passenger seat is
properly seated on the center of the seat
cushion with his or her back up aga inst the
backrest and the backrest is not recl ined
c::> page 145, Proper occupant seating posi
tions,
- the adult is not tak ing weight off the seat by
holding on to the passenger assist handle
above the fron t passenger door or s upport
ing their weight on the armres t,
- t he safety belt is be ing properly wo rn and
t hat the re is not a lot o f slack in the safety
be lt webb ing,
- accessory seat covers or cushions or othe r
t hings tha t may cause an incorrec t reading
or impression on the weight-sensing mat
under the upho lstery of the seat have been
removed from the front passenger seat,
- a safety belt extender has not been left in
the safety belt latch for the front passenger
seat.
In add ition to the
PASSENGER AIRBAG OFF
light in the center of the instrument panel,
the message
PASSENGER AIRBAG OFF or