stop start AUDI A5 COUPE 2012 Owner's Manual
[x] Cancel search | Manufacturer: AUDI, Model Year: 2012, Model line: A5 COUPE, Model: AUDI A5 COUPE 2012Pages: 316, PDF Size: 78.59 MB
Page 140 of 316
138 Park ass is t
Parallel Parking
App lies to vehicles: with park ing system (rear, with rear
view camera)
Use parking mode 2 to help you park on the
edge of a street.
..
-...;~ !!!!la-lP.!""" --3.::JI
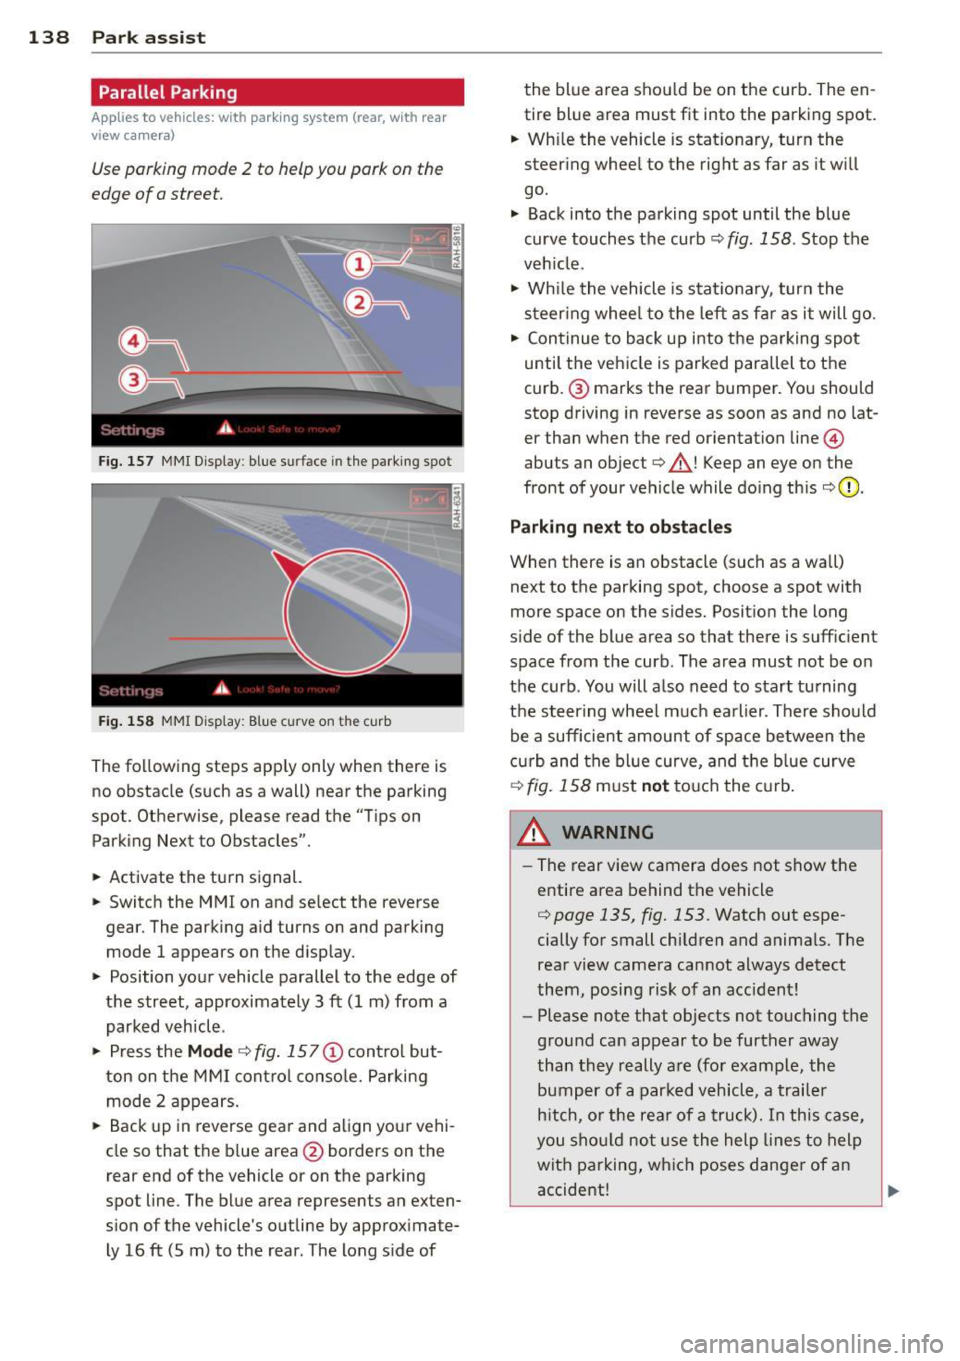
Fig. 157 MMI Display : blue surfa ce in the parking spot
Fi g. 158 MMI Display: Blue curve on the curb
The following steps apply only when there is
no obstacle (such as a wall) near the parking
spot. Otherwise, please read the "Tips on
Parking Next to Obstacles".
.. Activate the turn signal.
.. Switch the MMI on and select the reverse
gear. The parking aid turns on and parking
mode 1 appears on the disp lay.
.. Position your vehicle parallel to the edge of
the street, approximately 3 ft (1 m) from a
parked vehicle .
" Press the
Mod e ¢ fig. 15 7@ control but
ton on the MMI contro l conso le. Parking
mode 2 appears.
.. Back up in reverse gear and align your vehi
cle so that the blue area
@ borders on the
rear end of the vehicle or on the parking
spot line. The blue area represents an exten
sion of the vehicle's outline by approximate
ly 16 ft (5 m) to the rear . The long side of the blue area
should be on the curb. The en
tire blue area must fit into the parking spot.
.. Wh ile the vehicle is stat ionary, turn the
steering whee l to the rig ht as far as it will
go.
" Back into the parking spot until the blue
curve touches the curb~
fig. 158. Stop the
vehicle .
" Wh ile the vehicle is s ta ti onary, tur n the
steer ing whee l to the left as f ar as it will go .
.. Continue to back up into the pa rking spot
until the vehicle is parked parallel to the
curb .@ marks the rear bumper. You should
stop driving in reverse as soon as and no lat
er than when the red orientation line@
abuts an object¢_&. ! Keep an eye on the
front of your vehicle while do ing this
¢ 6) .
Parking ne xt to obstacl es
When there is an obstacle (such as a wa ll)
next to the parking spot, choose a spot with
more space on the sides. Positio n the long
s ide of the blue area so that there is suff ic ient
space from the curb . The area must not be on
the curb . You will a lso need to start tu rning
t h e steer ing wheel much ea rlier . There should
be a sufficient amount of space between the
curb and the bl ue curve, and t he b lue curve
¢ fig. 158 m ust not to uch the c urb.
A WARNING
- The rear view camera does not show the
entire area behind the vehicle
¢ page 135, fig. 153. Watch out espe
cially for small children and anima ls. The
rea r view camera ca nnot always detect
them, posing risk of an accident!
- Please note that objects not touching the
ground can appear to be further away
than th ey really are (for example, the
bumper of a parked vehicl e, a trail er
h itch, o r th e rea r of a truck). In this case,
you s hould not use the help l ines to help
with parking, which poses dange r of an
accident!
'---------------_J ""
Page 142 of 316
140 Homelink®
Homelink®
Universal remote
control
General information
Applies to vehicles: with Home link® universal remote
control
The Homelink ® feature can learn up to three
radio frequency codes for most current trans
mitters used for operating garage doors, es tate gates, home or outdoor lighting sys
tems, and other devices.
You must first program the Homelink ® trans
mitter before you can use the system
~ page 141, Programming the Homelink ®
transmitter.
In order to program the Home link ® transmit
ter for dev ices utilizing rolling code, a second
pe rson on a ladder who ca n safe ly reach the
garage door opener motor is recommended. I t is also necessary to locate the "learn" but
ton on your garage door opener motor . Refer
to the operating instructions for the opener,
as the location and color of this button may
vary by manufacturer.
You can still use the origina l remote contro l
for the device at any time .
.&_ WARNING
-
- Never use the Homelink ® transmitte r
with any garage door opener that does
have not the safety stop and reverse fea
tu re as requ ired by federa l safety stand
ards. Th is includes any garage door open
er mode l manufact ured before April 1,
1982.
- A garage door op ener which cannot de
te ct an object, signa ling the doo r to stop
and reverse does no t mee t current feder
al safety s tandards. Using a garage doo r
opener wi tho ut these features increases
risk of serious in jury or death.
- F or sa fety reasons never release the
par king brake or start the engine w hile
anyone is stand ing in front of the vehicle . -
A garage door or an estate gate may
sometimes be set in mot ion when the
Homelink ® remote control is being pro
grammed. If the device is repeatedly ac
tivated, this can overstrain motor and
damage its e lectr ical components -an
overheated moto r is a fire hazard !
- To avo id possible injuries or property
damage, please always make abso lutely
certain that no persons o r obje cts are lo
ca ted in the range of motion o f any
eq uipment being ope rated .
(D Tips
-If you would li ke more information on
Home link ®, w here to purchase the
Homel ink ® compatib le produc ts, or
would like to purchase the Homelink ®
Home Lighting Package , please ca ll to ll
free: 1-800-355-3515 .
- For Declaration of Compliance to United States FCC and Ind ustry Canada reg ula
tions~
page 296.
Page 221 of 316
Tire pressure
When towing a tra ile r, inflate the t ires of your
vehi cle to the co ld tire pressure listed under
"Full load" on the label located either on the
driver's side B-pillar (visible when the doo r is
open) or inside the f uel f iller flap. Inf late
trailer tires to trailer and tire manufact urers'
specifications .
Lights
The headlight settings should be chec ked w ith
the t railer attached before dr iv ing off. Check
to make sure both vehicle and trai ler lights
are working properly.
Safety chains
Be s ure trai le r sa fety chains are p roperly con
nected from the t railer to the hitch on the ve
h icle. Leave enough s lack in the chains to per
mit turn ing corners . When you install safety
chains, make su re they w ill not drag on the
road when you are driving.
T he chains shou ld cross under the trai ler
tongue to prevent it from droppi ng in case of
separat io n from the hitch .
Driving instructions
Driving with a trailer always requires extra
care and consideration.
To obtain the best poss ible handling of vehicle
and trai ler, p lease note the following:
.,. Do no t tow a loa ded tra iler whe n your car i t
self is no t loaded .
.,. Be especia lly careful when passing other ve
hicles.
.,. Observe speed limits.
.,. Do not drive at the maximum permissible
speed.
.,. Always apply brakes early .
.,. Monito r the t em perature gauge.
Weight distribution
Tow ing a loaded trai ler with an empty car re
sults in a highly unstable distribution of
weight . If this ca nnot be avo ided, drive at very
Trailer towin g 219
low speeds on ly to avo id t he ris k of losing
steering cont ro l.
A "b alanced " rig i s ea sier to op erat e and con
tr ol. T his means t hat t he tow vehi cle should
be loaded to the extent possible and permissi
ble, while keep ing the trai ler as light as possi
ble under the c ircu mstances . Whenever poss i
ble, transfer some ca rgo to the luggage com
partment of the tow vehicle while obse rvi ng
tongue load requirements and vehicle load ing
cons idera tions .
Speed
The higher the speed, the more d iff icu lt it be
comes for the driver to contro l the rig. Do not
drive at the maxim um permissib le speed. Re
duce your speed even more if load, weather o r
wind conditions are unfavo rable -pa rticula rly
whe n going downhill .
Red uce ve hicle speed
immediately if the trail
er shows the slig htest s ign of sway ing .
Do not
try to stop the swaying by accelerating .
Observe speed limits. In some areas, speeds
for vehicles tow ing tra ile rs are lowe r than for
regular ve hicles .
A lways apply brakes early. When driving
down hill, shift into a lowe r gear to use the en
gine braking effect to s low the vehicle. Use of
the b rakes alone ca n cause them to overhea t
and fail.
Coo lant temperature
The coo lant temperat ure ga uge ¢ page 10
must be observed carefu lly. If the need le
m oves cl ose to t he upper end of t he scale, re
duce speed immediately and/or turn off t he
a ir condi tioner .
If the coolant temperature warning light .
in the instrument cluster starts flashing, pull
off the road , stop and let the engine
i dle for
abo ut two minutes to prevent heat build-up .
A WARNING
Anyone no t properly restra ined in a mov
in g ve hicle i s at a much gre ater r isk in an
a cci dent . N ever le t anyone rid e in yo ur car
-
•
•
Page 222 of 316
220 Trailer towing
who is not properly wearing the restraints
provided by Aud i.
Trailer towing tips
Important to know
Your vehicle hand les different ly when towing
a trailer because of the additional weight and
different weight distribution. Safety, perform
ance and economy wi ll greatly depend on how
carefully you load your trailer and operate
your rig.
Before you actually tow your trailer, practice
turning, stopp ing and backing up in an area
away from traffic. Keep practicing until you have become completely familiar with the way
your vehicle-trailer combination behaves and responds.
Backing up is difficult and requires practice.
Backing up with a trai ler genera lly requires
steering action opposite to that when backing up your vehicle without a trailer.
Maintain a greater distance between your ve
hicle and the one in front of you. You will need
more room to stop. To compensate for the
trailer, you will need a larger than normal
turn ing radius .
When passing, remember that you cannot ac
celerate as fast as you normally would be
cause of the added load. Make sure you have
enough room to pass . After passing, allow
plenty of room for your tra iler before chang
ing lanes aga in.
Avoid jerky starts, sharp turns or rapid lane
changes .
(D Tips
-Do not tow a tra iler during the break-in
period of your vehicle.
- If you tow a trailer, your Audi may re
quire more frequent maintenance due to
the extra load
q page 293.
Parking on a slope
Do not park on a slope with a trailer . If it can
not be avoided, do so only after doing the fol lowing:
When parking:
.. App ly the foot brake.
.. Have someone place chocks under both the
vehicle and the trailer wheels .
.,. With chocks in place, slowly release the
brakes until the wheel chocks absorb the
load.
.. Turn the wheels towards the curb.
.. App ly the parking brake.
.. Place an automatic transmission* in
P, re
spectively a manual transmission in first or reverse gear.
When restarting after parking:
.. App ly the foot brake.
.. Start the engine.
.. Move the se lector lever to
D , respectively a
manual transmission in first gear .
.. Release the parking brake and slow ly pu ll
out and away from the wheel chocks.
.. Stop and have someone retr ieve the wheel
chocks .
(D Tips
If you move the selector lever of the auto
matic transmission* to
P before applying
the parking brake and before blocking the
whee ls, you may have to use more force
lat er to move the lever out of the
P posi
tion.
Page 261 of 316
Remember that the vehicle manufacturer, not
the tire manufacturer, determines the correct
tire pressure for the t ires on your vehicle .
It is importan t to check the tire pressu re when
the t ires a re cold .
- Read the requ ired ti re p ressure from the tire
pressure label. On USA veh icles, the t ire
pressure label is located on the drive r's side
B-pi llar . On Canada vehicles, the tire pres
s u re label is located either on the driver's
s ide B-pi llar or inside the fue l filler flap . The
t ire press ure label lists the recommended
cold tire inflation pressures for the veh icle
at its max imum capacity weight and the
t ires that were on your vehicle at the time it
was manufactured . Fo r recommended t ire
pressures fo r normal load condit ions, please
see chapter
9page 256.
- T urn the valve stem cap counter-clockwise
to remove it from the tire valve .
- Place the air pressu re ga uge on the valve .
- The tire pressures should only be checked
and adjusted when the tires a re cold . The
s li ghtly raised p ressures of warm tires must
not be reduced.
- Adjust the tire pressure to the load you a re
c a rrying.
- Re install the valve stem cap o n the valve .
When should I check the ti re pres sure ?
The correct tire pressure is espec ially impor
tant at high speeds. The pressure should
therefore be checked at least once a month
and a lways befo re start ing a journey . Do not
forget to check the tire pressure for the spare
wheel.
When should I ad ju st the tire p re ss ures?
Adjust the tire pressure to the load you are
carry ing . After chang ing a wheel
or replacing
wheels you have to adjust the tire pressures
on all wheels. In addition , you must then in it i
alize the new tire pressures in the tire pres
sure mon itor ing system*
9 page 270.
Tire s an d wheel s 259
_& WARNING
Incorrect tire pressures and/or underinfla
tion can lead sudden tire fa ilure, loss of
control, collision, serio us pe rsonal injury
or even death.
- When the
ti] warn ing symbol appears in
the instrument cluster, stop and inspect
the t ires.
- Inco rrect tire pressure and/or underinfla
tion can cause increased tire wea r and
can affect the handling of the vehicle and
s topping ability.
- I nco rrect tire pressures and/or unde rin
f lation can a lso lead to sudden t ire fail
ure, including a blowou t and sudd en de
f lation, ca using loss of veh icle cont ro l.
- T he drive r is responsi ble for the co rrec t
tire pressures for all tires on the veh icle.
The appli cable pressure values a re locat
ed on a sticke r on the dr iver's side B -pil
lar or on the inside of the fuel filler flap.
- On ly when all tires on the vehicle are fil
led to the correct pressure, the t ire pres
sure mon itor ing system * can work cor
rectly.
- The use of incorrect tire pressu re va lues
can lead to acc idents or other damage.
Therefore it is essential that the driver
observe the spec ified t ire pressure values
for the tires and the correct pressures for
the function of th e ti r e p ress ure monito r
ing system*.
- Always inf late tires to the recommended
a nd correct t ire p ress ure before dr iv ing
off.
- Driving with unde rinflated tir es bend
mo re, lett ing t hem get too hot resulting
in tre ad separation, sudden tir e fa ilure
and loss of cont rol.
- Exces sive speed and/overloading can
cause heat b uild- up, s udden tire failure
an d l oss of cont rol.
- If the tire pressure is too low or too high,
the t ires will wear prema turely and the
vehicle wi ll not handle well.
- I f the tire is not fla t and you do not have
to change a wheel immedia tely, drive a t •
•
Page 272 of 316
2 70 T ire s and wheel s
- Drive carefu lly on roads with potholes, deep
gullies or ridges. The impact from driving
through or over such obstacles can damage
your tires. Impact with a curb may also
cause damage to your tires.
- After any impact, immediately inspect your tires or have them inspected by the neares t
authorized Aud i dealer. Replace a damaged
t ire as soon as possible .
- Inspect your t ires every 2 ,000 miles (3,000
km) for damage and wear . Damage is not al
ways easy to see . Damage can lead to loss of
air and underinflation, wh ich could eventu
ally cause t ire failu re. If you be lieve that a
t ire may have been damaged, replace the
t ire as soon as poss ible.
- T hese tires may wea r more quick ly than oth
ers.
- Please also remember that, whi le these t ires
deliver respons ive handling, they may ride
less comfortably and make mo re no ise than
othe r choices.
Reduced perf ormance in winter /cold
sea son condit ion s
All ti res are des igned for certa in pu rposes.
The low aspect ratio, u ltra high performance
tires originally installed on your vehicle are in
tended for max imum dry and wet road per
formance and handling . They are not suitable
for cold, snowy or icy weather condit ions. If
you dr ive under those circumstances, you
should equip your vehicle with all-season or
winter tires, which offer better traction under
those cond it ions . We suggest you use the rec
ommended snow or all-season tires specified
for your vehicle, or their equ ivalent .
Refe r to ~
page 267 for more deta iled infor
ma tion regarding w inter tires.
Tire pressure
monitoring system
(l) General notes
App lies to vehicles: with tire pressure monitoring system
Each tire , includ ing the spare (if provided),
should be checked month ly when cold and in- flated to the inflation pressure recommended
by the vehicle manufact urer on the vehicle
placard or tire inflation pressure labe l. (If your
vehicle has tires of a different si ze than the
s ize indicated on the vehicle placard or tire in
flat io n pressure labe l, you shou ld determine
the proper t ire inflation pressu re for those
tires) .
As an added safety feature, your veh icle has
been equipped with a tire pressure monitoring
system ( TPMS) that illum inates a low tire
pressure te lltale when one or more of your
t ir es is significantly under-inflated. Acco rding
ly, when the low tire pressure telltale i llumi
nates, yo u shou ld stop and check your tires as
soon as possib le, and inflate them to the
proper pressure . Driving on a significantly un
der- inflated t ire causes the tire to overheat
and can lead to tire fa ilure. Under-inflation al
so reduces fuel effic iency and tire tread life,
and may affect the vehicle's hand ling and
stopp ing ability .
Please note that the TPMS is not a substitute
for proper tire ma intenance, and it is the driv
er 's respons ibility to maintain correct tire
pressure, even if under-inflation has not
reached the level to tr igger illum inat ion of the
T PMS low tire p ressu re tellta le.
Your vehicle has also been equipped with a
T PMS malfunction ind icator to ind icate when
the system is not operating prope rly . T he
T PMS ma lfunction indicator is combined w ith
t h e low tire pressure te lltale . When the sys
tem detects a malfunction , the telltale will
flash for approximately one min ute and then
remain continuously illuminated. This se
quence will continue upon subsequent vehicle
start-ups as long as the malfunct ion exists .
When the malfunction indicator is illuminat ed , the system may not be ab le to detect or
s ignal low tire pressure as intended. TPMS
malfunctions may occur for a var iety of rea
sons, including the installa tion of replace
ment o r alternate tires or wheels on the vehi
cle that p revent the TPMS from functioning
properly. Always check the TPMS malfunction
te lltale a fter rep lacing o ne or more tires o r .,.
Page 302 of 316
300 Index
Car ca re ... ... .. .. ..... ... .. .. .... . 221
Int erior .... ... . ...... ... .. .. .... . 226
Plastic and v inyl ... .... ... .. .. .... . 224
Ca re of exte rior ... .. ... .. .. .. .. .. .. . 22 1
Cargo area
refer to Luggage compartment 44, 68 , 150
Cargo net .... ... . ...... ... .. .. .... .. 69
Cata lytic conve rter ......... .. .. .... . 214
Center armrest
Adjusting .. ................ ... ... .
68
Storage compartment . . . . . . . . . . . . . . . 68
Certification ... .. ...... ... .. .. .... . 296
Changing a fla t tire ......... .. .. .... . 274
Changing a wheel .......... .. .. .... . 274
Changing engine oi l
Chass is 2 4 3
Unde rcoat ing .......... .. .. .. .. .. . 226
Checking
Eng ine coolant leve l ........ ... .. .. .
244
Checking tire pressure . ... .. .. .... .. . 258
C hi ld restra ints
D anger of using c hild restra ints in the
front sea t .... ............. .. .... .
163
Where can I ge t addit iona l info rmation
about child restra ints and their use? ..
203
C hi ld restra int system anchors . .. .. .. . 199
C hi ld safety ............... .. .. .... . 186
Convertible locking retractor .. .. ..... 195
Important safety instructions fo r us ing
ch ild safety seats .. ....... .. .. .. .. .
189
Important things to know wh en dr iving
wi th child ren ............ .. .. .... .
186
Ins tall ing a chi ld res traint using the
L A TC H sys tem .. .. ..... ... .. .. .... .
200
Lowe r ancho rages ..... ... .. .. .... . 200
Mounti ng and releasing the ancho rage
hook .. .. ................. .. .... .
200
Tether anchors ........... .. .. .... . 201
Tethe r straps . ... ..... ... .... .. .. . 201
C hild safety seats ....... ... .. .. .... . 191
Booste r seats .. .. ..... ... .. .. .... . 194
Conve rtible chi ld seats .... .. .. .. .. . 192
Convertible locking retractor .. .. .. .. . 195
Danger of us ing c hild restra ints in the
front seat .. ................ ... .. .
163
H ow do I properly install a child safety
seat in my vehicle? ........ .. .. .. .. .
189
Infant seats ..... ... .. ..... .... . .. 191
Installing ..... .. .. ... ..... ... .. .. 195
LA TCH system . ... ... .. ..... ... .. .. 200
Safety instr uctions ............. .... 189
C igarette ligh ter . . . . . . . . . . . . . . . . . . . . . 76
Cleaning
Alcanta ra ® (synthetic suede) .........
229
Engine co mpartment ......... .. .. .. 2 30
Exhaus t ta il pipes . ............. .... 22 6
Fabr ics and fab ric coverings ... .. .. .. 22 7
Instr ument pane l ... ... ..... ... .. ..
2 27
In terior ... .... .. .. .... .... ... .. .. 226
Leather ... .... .. ... .. ..... .... . .. 229
MMI control console ........... .. .. 226
MMI display ... .. ............. .... 226
Plastic and vinyl .. ..... ........... . 224
Plastic parts . .. .. ..... ........... . 22 7
Safe ty be lts ..... ................ .
230
Trim strips .. .. .. ... .......... .. .. 22 4
Cleaning and protection .......... .. .. 221
Clock . . . . . . . . . . . . . . . . . . . . . . . . . . . . . . 12
Coat hooks ... .. .. .. ... .. ... ..... .. . 77
Co ld tire inflation pressure ........ .. ..
256
Compac t spa re tire . ............. .. .. 2 73
also refer to Spare ti re ............ .. 2 73
Compass mirror . . . . . . . . . . . . . . . . . . . . . 59
Compliance ..... .. .. ... ..... ... .. .. 296
Cons umer Informa tion . . . . . . . . . . 1 52, 293
Contacting NHTSA . ............... .. 152
Co nvenience closed . . . . . . . . . . . . . . . . . . 4 6
Co nvenience key . . . . . . . . . . . . . . . . . . . . . 42
START E NGIN E STOP butto n . . . . . . 94 , 96
Star ting eng ine .. ............. .. .. . 94
Swi tch ing eng ine off ........... .... . 96
Switching on ignition . .. ..... ... .. .. . 94
U nlocking and locking vehicle . ... .. .. . 42
Co nvenience openi ng ............ .... . 46
Convertib le child safety seats ..... .... 192
Co nvertib le locking retractor
Activati ng ..... .. .. ... ..... ... .. ..
197
Deactivating ..... ... .. ..... ... .. .. 198
Using to secure a child sa fety seat l.95, 197
Coolant system .. .. ............. .. .. 2 4 4
Cooling System
Expans ion tank . .. .......... ...... .
244
Cornering light . . . . . . . . . . . . . . . . . . . . . . 52
Page 304 of 316

302 Index
Efficiency program . . . . . . . . . . . . . . . . . . . 24
Fuel economy messages . . . . . . . . . . . . . 26
Memory leve ls . . . . . . . . . . . . . . . . . . . . . 23
Other equipment . . . . . . . . . . . . . . . . . . . 25
Shift indicator . . . . . . . . . . . . . . . . . . . . . 25
Electrical seat adjustment
refer to Seat adjustment ........... . . 63
E lectromechan ical park ing brake
E mergency braking . . . . . . . . . . . . . . . . . 98
Malfunction . . . . . . . . . . . . . . . . . . . . . . . 99
Operation . . . . . . . . . . . . . . . . . . . . . . . . . 96
Parking .... ................ ..... .. 97
Releasing and closing ............. . . 96
Starting assist ........... .. .. .. .. .. 98
Starting from rest .......... .. .... .. 98
Starting off with a trailer . . . . . . . . . . . . . 98
Warning/ indicator lights .... ..... .. .. 17
Electronic differential lock (EDL) How the system works ....... .. .... . 205
Warning/indicator lights ... .. .. .. .. . . 16
Electronic immobilizer . . . . . . . . . . . . . . . . 39
Electronic power control
(EPC) warn ing/ indicator light ... .. .. . . 15
Electronic stabili zation program (ESP)
How the sys tem works ....... .. .. .. . 204
Warning/indicator lights ....... .. .. .. 15
Emergency braking . . . . . . . . . . . . . . . . . . . 98
E mergency flasher . . . . . . . . . . . . . . . . . . . 52
Warn ing/ indicator lights ..... .. .. .. . . 16
Emergency key . . . . . . . . . . . . . . . . . . . . . . 3 7
Start ing engine ........... ... .. ... . 39
Emergency locking of the doors ..... .. .. 44
E mergency release
Selector lever ............ .. .. .... . 132
E mergency starting ......... ... .. .. . 284
Emergency towing .......... ... .... . 286
E mergency unlocking
I gnition key ........... .. .. .. .. .. .. 39
Energy management ..... .. .... .. .. . 211
Battery power ............... .. ... 212
Driver notification . ......... .. .. .. . 212
E ngine
Compartment . ........... .. .. .... . 239
Coolant .. .. ............... .. .... . 244
H ood .. .. .. ................ ... .. . 237
Starting ... ... .... ...... .. .. .. .. .. 92 Starting
with jumper cables ....... .. 284
Stopping . ..... .. .. .............. .. 94
Engine compartment Safety instructions ............. .. .. 23 7
Working the engine compartment .... 237
Engine coolant system ............ ... 244
Adding coolant . .. ................ . 245
Checking coolant level ............ .. 244
Checking the engine coolant level ..... 244
Malfunction . . . . . . . . . . . . . . . . . . . . . . . 31
Radiator fan ..... ................ . 246
Engine coolant temperature
T emperature gauge . ........... .. .. . 10
Engine data . .... .. ............. .... 292
Engine hood
Closing . . . . . . . . . . . . . . . . . . . . . . . . . . 23 7
How to release the hood . . . . . . . . . . . . 23 7
Engine oil ...... .. ............. .... 239
Adding . .. .. .. .. ............. .. .. 242
Additives . ... .. .. .. .............. . 242
Changing ..... .. .. .............. . 243
Check oil level ... ............. .... 242
Consumption .. .. ............. .. .. 242
Oil consumption .. ... .......... .. .. 241
Oil grades . .... ................... 239
Specification and viscosity ........ ... 239
Engine oil level .... ................ .. 36
Engine oil pressure
Malfunction . . . . . . . . . . . . . . . . . . . . . . . 31
Engine oil sensor defective . . . . . . . . . . . . 36
Engine speed limitation . . . . . . . . . . . . . . . 36
Environment Break-in period . .. ............. .... 213
Catalytic converter ............. .... 214
Disposing of your vehicle battery ..... 251
Driving at high speeds .............. 215
Driving to minimize pollution and noise 215
Fuel .. .. .. .. .. .. ............. .. .. 234
Fuel economy .. .. ... .......... .. .. 215
Leaks under your vehicle .......... .. 23 7
Letting the vehicle stand and warm up. 216
Proper d isposal of drained brake fluid . 247
Proper disposal of drained engine cool-
ant .. .. .. .... .. ............. .... 245
Proper disposal of drained engine
oi l . . . . . . . . . . . . . . . . . . . . . . . . . 242, 243
Recycling used engine oil ............ 242
Page 310 of 316

308 Index
Front passenger's seat . . . . . . . . . . . . . . . 62
Front seats ............... ... .... .. 61
Head restraints ................... 147
Manual .. ............... .. .. .... .. 62
Power . .. .... ........... ........ .. 63
Seat back angle manually ...... .. .... 62
Seat height manually . . . . . . . . . . . . . . . . 62
Seat belts
refer to Safety belts . . . . . . . . . . . . . . . . 154
Seat heating
Fr ont seats . . . . . . . . . . . . . . . . . . . . . . . . 91
Seating capacity ............ ... .. .. . 154
Seating position Driver . ...... ........... .. .. .... . 145
Front passenger .......... .. .. .. .. . 146
How to adjust the front seats ... .. ... 146
Incorrect seat position . . . . . . . . . . . . . . 148
Occupants .. ... . ...... ... .. .. .. .. . 145
Rear passengers ............ .. .... . 147
Seat memory . . . . . . . . . . . . . . . . . . . . . . . 65
Seats Number of seats .......... ... .... . 154
Seat symmetry . . . . . . . . . . . . . . . . . . . . . . 66
Selective unlock feature ..... .. .. .. .. . . 41
Selector lever .............. ... .... . 128
Emergency release ................ . 132
Service and disposal Safety belt pretens ioner ... .. .. .. .. . 161
Service interval display ........ .. .. .. .. 21
Service position for windshield wipers ... 56
Servotronic Power steering ......... .. .. .. .. .. . 209
SET button . . . . . . . . . . . . . . . . . . . . . . . . . 11
Shift buttons ............... ... .... . 131
Shift indicator (eff iciency program) .. .. . . 25
Side airbags Description .............. .. .. .. .. . 180
How they work ............. .. .... . 181
Side assist Activating and deactivating .......... 116
Descript ion ............... ... .. .. . 116
Informational and alert stage signals . 118
Messages in instrument cluster display 122
Operation . . . . . . . . . . . . . . . . . . . . . . . . 117
Safety tips . .............. ... .. ... 122
Sensor detection area ......... .. .. .
Settings . .. .. . .......... .. .. .. .. . 117
121 Side curtain airbags .
. . . . . . . . . . . . . . . . 182
Description . ..... ................ . 182
How they work ... ................ . 184
Safety instructions ............. .... 184
S id e marker lights . ............. .... . 49
Ski sack ........ .. .. ... ....... .... .. 72
also refer to Trunk pass-through ...... 73
Snow chains ...... ............. .... 268
Sound system display Driver information display ........ ... . 19
Sources of information about child re-
straints and their use ............. ... 203
Spare tire ... .... .. .. ........... .... 273
Speed control system
refer to Adaptive cruise control ....... 102
Speedometer . . . . . . . . . . . . . . . . . . . . . . . 12
Speed rating letter code ............ .. 264
Speed warning system ........... .. .. . 27
Starting engine Emergency key ... ....... ...... .. .. . 39
Starting from rest . ................. .. 98
Starting off w ith a trailer ......... .. .. . 98
Starting the engine ... .......... .. .. . 92
Steering . . . . . . . . . . . . . . . . . . . . . . . . 14 , 34
Locking the steering ............ ... . 92
Malfunction ... .. ............. .... . 32
Manually adjusting the steering wheel . . 92
Steering wheel column Adjusting manually ................. 92
Steps for determining correct load limit . 261
Stopping the engine ............. .... . 94
Storage
.... .. .. .. .. ........... .... . 76
Glove compartment . . . . . . . . . . . . . . . . . 77
Storage net . . . . . . . . . . . . . . . . . . . . . . . . . 69
Sunroof
refer to Panoramic tilting sunroof .. .. . 48
Sun shade .. .... ................... . 54
Sun visors
Switches 54
Emergency flashers . . . . . . . . . . . . . . . . . 52
Symbols Red ..... ..... .. .. .............. .. 29
Yellow ... ..... .. ............. ..... 33
T
Tachometer . . . . . . . . . . . . . . . . . . . . . . . . . 11