wheel bolts AUDI A5 COUPE 2012 Owners Manual
[x] Cancel search | Manufacturer: AUDI, Model Year: 2012, Model line: A5 COUPE, Model: AUDI A5 COUPE 2012Pages: 316, PDF Size: 78.59 MB
Page 227 of 316
The best way to remove snow from windows
and mirrors is to use a brush. Use a non-abra
sive
plastic ice scraper -better still, a spray
deicer -to remove
ice from windows and mir
rors.
The windows must not be cleaned with insect
remover or wax sin ce these can interfere with
the function of the windshield wiper blades
(chatter).
Oil, grease, or silicone residue can be removed
with
glass cleaner or silicone remover. How
ever, wax residue require s the use of a special
ly formulated solvent. Please contact your au
thor ized Audi dealer for advice on safe prod
ucts for wax removal.
Windows should also be cleaned on the inside
at regular intervals.
Never dry windows with the same chamois
that you use to dry painted surfaces. Wax resi
due on the chamois can impair vision through
the windows.
A WARNING
-Always read and heed all WARNINGS and
other information
r::.> page 221.
- The windshield must not be treated with
water-repellent materials. They can in
crease glare under poor visibility condi
tions such as wetness, darkness, or when
the sun is low on the horizon. In addi
tion, they can cause the windshield wip
ers to chatter.
- Never use warm or hot water to remove
snow and ice from windows and mirrors.
This could cause the glass to crack.
- To prevent damage to the wires of the
rear defogger, do not place any adhesive
stickers on the inside of the rear window
over the wires.
- To help prevent dirt from scratching the
window, always scrape in a forward di
rection -pushing the scraper away from
you -never back and forth.
Cleaning and protection 225
-Water leaking from the inside of the rear
windows may damage sensitive electrical components located either under the
rear parcel shelf or in the rear trunk area.
Always ensure that water never leaks
through the body section of the vehicle.
You can do this by using waterproof pro tection over the vehicle's electrical com
ponents (e.g. when installing window
tinting) .
- Damage or malfunction of electrical
components due to water damage or any
other outside influence is not covered by
the Audi New Vehicle Limited Warranty.
See your Warranty
& Maintenance book
let for additional details about your war
ranty.
Cast (light) alloy wheels
Cast (light) alloy wheels require special care.
.,. Wash the wheels with a sponge or hose
brush every other
week .
.,. For deep cleaning afterwards, use only a
dedicated
acid-free cast alloy wheel cleaner.
.,. Rub a coat of
liquid wax onto the rims every
three month. Be sure to reach and treat all
parts of the rim.
To preserve the decorative appearance of the
cast alloy wheels, some special care is neces
sary. In addition to road dirt and salt, brake
dust is also corrosive . If left on for too long,
brake dust can cause pitting.
Use only special
acid-free cleaners formulated
for alloy rims. Safe products are available at
your authorized Audi dealer. Never leave the
cleaner on the rims longer than specified on
the label. If not rinsed
off promptly, the acid
contained in some cleaners can attack the
threads on the wheel bolts.
Never use abrasive or metal polishing clean
ing agents. If the protective coating has been
chipped, e.g. by kicked up road dirt, touch it up as soon as possible . .,..
•
•
Page 267 of 316
Q up to 99 mph (158 km/h)
R up to 106 mph (170 km/
h)
s up to 1 10 mph (180 km/ h)
T up to 118 mph (190 km/h)
u up to 124 mph (200 km/h)
H up to 130 mph (210 km/h)
V up to 149 mph (240 km/h)1
)
z over 149 mph (240 km/h)ll
w up to 168 mph (270 km/h)1l
y up to 186 mph (298 km/h)1l
Your veh icle is normally factory equipped with
tires, which posse ss excellent driving charac
ter ist ics and give your Audi opt imum dr iving
comfort. An electronic speed limiter
q page 27 w ill normally p revent your vehi cle
from go ing faster than the tire speed ra ting
Q .&. .
U.S. DOT Tire Identification Number (TIN)
and tire manufa ctur e date
This is the t ire's "serial number". It begins
with the lette rs "DO T" and indicates that the
tire meets all federal standards . The next two
numbers or letters indicate the p lant where it
w as manufactured, and the last four numbers
represen t the week and ye ar of manufacture .
For example, the numbers 2209 mean that
the t ire was produced in the 22nd week of
2009 . The othe r numbe rs are marketing co
des that may or may not be used by the t ire
manufacturer. This informa tion is used to con
t act consume rs if a tire defect requires a re
call.
Audi Original tir e
Tires with the ident ificat ion "AO" or "RO " have
been spec ially matched with your Aud i. We
recommend using only t hese tires because
they meet the highest standards regard ing
safety and driving characteristics when used
correctly. Your authorized Audi dealer will
g lad ly p rovide you with mo re info rmation .
ll Fo r tires wit h a m ax im um s pee d ca pabil ity over 149
mph (2 4 0 k m/h) , tire ma nufa cturers some times use
t h e le tters "Z R."
Tire s an d wheel s 265
Tire ply composition and material s used
The number o f plies indicates the number o f
l aye rs of r ubber-coated fabric in the tire. In
genera l, the greater the number of plies, the
more weight a tir e can support . Tire manufac
turers also must indicate the materials in the
tire, which include steel, nylon, po lyester, and
others.
Maximum Load Rating
T his number indicates the maximum load in
ki lograms and po unds that can b e carried by
the tire.
Tire quality grading for treadwear,
tract ion , and temperature resistance
Tread w ear, traction and t emperat ure grades
q page 266.
Ma ximum Permissible Inflat ion Pre ssure
T his number is the greatest amount of a ir
pressure that should ever be put in the tire
u nder normal dr iving conditions.
A WARNING
- Using incorrect or unmatched tires and I
or wheels or improper tire and wheel
comb inat ions can lead to loss of control,
col lis ion and serious personal injury.
- Always use t ires, rims and whee l bolts
that meet the specifications of original
factory- installed tires or other combina
tions that have been specifically ap proved by the vehicle manufacture r.
- Tires age even if they are not being used
and can fail sudden ly, especially at high
speeds. Tires that are more than 6 yea rs
old c an only be used in an emerge ncy
an d then w ith special care and at lower
spee ds.
•
•
Page 270 of 316
268 Tire s and wheel s
speed before driving off . Never drive faster
than the speed permitted for your specific
winter t ires. This will cause damage to the
tires leading to an accident and serious
personal injury to you and your passen
gers .
A WARNING
Driv ing faster than the maximum speed
for which the w inter t ires on your vehicle
were designed can cause tire fa ilu re in
cluding a blowout and sudden deflat ion,
loss of control, crashes and serious per
sonal injuries. Have worn or damaged tires
rep laced immed iate ly.
- Winter tires have maximum speed rating
that may be lower than your vehicle's
maximum speed .
- Never drive faster t han the speed for
which the winter or other tires installed
on your vehicle are rated.
A WARNING
Always adjust your driving to the road and
traffic conditions. Never let the good ac
celeration of the winte r tires and all -wheel
drive tempt you into taking extra r is ks. Al
ways remembe r:
- When brak ing, an all -wheel drive vehicle
handles in the same way as a front drive
vehicle .
- Drive carefu lly and reduce your speed on
icy and slippery roads, even winter tires
canno t he lp under black ice condit io ns.
@ For the sake of the environment
Use summer tires when weather cond i
tions permit . They are quieter, do not wea r
as quickly and reduce fue l consumption .
Snow chains
Snow chains may be fitted on ly to the front
wheels, a nd only to certa in tire sizes. Ask yo ur
author ized Audi dealer on wh ich tire sizes
snow chains can be used. The snow chains must have
low -profile links
and must not be thicker than 0 .53 inch
(13.S mm), includ ing the lock.
Remove whee l cen ter cove rs and t rim discs
before putting snow chains on your vehicle
¢ 0 . For safety reasons cover caps m ust then
be fitted over the wheel bolts. These are avail
a ble from authori zed Aud i dealers.
A WARNING
Using the wrong snow chains for your veh i
cle o r instal ling them incorrectly can in
crease the risk of loss of cont rol leading to
serious pe rsonal injury .
- Snow chains are available in different
sizes . Always make sure to follow the in
structions p rov ided by t he snow cha in
manufac turer.
- When driving with snow cha ins never
d rive faster than the speed permitted for
your specifi c snow chains.
- Always observe local regulations.
@ Note
-Remove snow chains before dr iv ing o n
roads not covered with snow to avoid
damaging tires and wea ring the snow
chains down un necessa rily .
- Snow chains, which come into direc t con
tact with the whee l rim, can scratch or
damage i t. Therefo re , make sure tha t the
snow chains are s uitably covered. Check
t he pos ition of t he snow chains after
driving a few yards and correct if neces
sary. Follow the inst ructions from the
snow chain man ufacturer when do ing so.
(I) Tips
Where snow chains are mandatory on cer
tain roads, th is normally a lso applies to ve
hicles w ith all whee l dr ive .
Page 271 of 316
Wheel bolts
Wheel bolts must always be tightened to the
correct torque .
The design of wheel bolts is matched to the
factory installed r ims. If differen t rims are fit
ted, the correct wheel bolts with the right l ength and correctly shaped bolt heads must
be used. This ensures that wheels are fitted
securely and that the brake system functions
correctly .
In certain circumstances, you may not use
wheel bo lts from a different vehicle -eve n if it
i s the same model
¢ page 295.
_&. WARNING
Improperly tig htened or maintained whee l
bolts can become loose ca using loss of
contro l, a co llision and serious persona l in
jury.
- Always keep the wheel bolts and the threads in the wheel hubs clean so the
whee l bolts can turn easily and be prop
erly t ightened.
- Never grease or oil the wheel bo lts and
the threads in the wheel hubs. They can become loose wh ile driving if greased or
o iled, even if tightened to the specif ied
torque .
- Only use wheel bolts that belong to the
rim being installed.
- Never use different whee ls bolts on your
vehicle .
-Always maintain the correct tighten ing
torque for the wheel bo lts to reduce the
risk of a wheel loss . If the tightening tor
que of the wheel bolts is too low, they
can loosen and come out when the vehi
cl e is moving.
If the tightening torque is
too high, the whee l bolts and threads
can be damaged and the wheel can be
come loose.
Q;) Note
The spec ified torque fo r the wheel bo lts is
90 ft lbs. (120 Nm) with a tolerance of
± 7,4 ft lbs.(± 10 Nm). Torque wheel bo lts
Tire s an d wheel s 269
diagonally. After changing a wheel, the
torque m ust be checked as soon as possi
ble with a torque wrench -preferably by an
a uthori zed Audi dea ler or qualified work
shop.
Low aspect ratio tires
Your Aud i is factory -equ ipped w ith low aspect
ratio tires . These tires have been tho roughly
tested and been se lected specifically fo r your
model for their superb perfo rmance, road fee l
and hand ling under a var iety o f driving cond i
tions. Ask your authorized Audi dealer for
more details .
T he low aspect ratio of these t ires is ind icated
by a numeral of
55 or l ess in the tire's s ize
designation. The numera l rep resents the ra tio
of the tire's sidewa ll height in relation to its
tread width expressed in percentage . Conven
tiona l tires have a he ight/w idth ratio of 60 or
more.
T he performance of low-a spe ct- ra tio tire s is
p ar tic ul ar ly se nsi tiv e to i mprop er i nfl ation
pre ssure. It is the refo re important that low
a spect ratio t ires are inflated to the specified
pr ess ure and that th e inflation pr essur e is
r e gula rly ch ecked and maintain ed. Tir e pre s
s ure s should b e check ed at l east once a
m onth and alwa ys befo re a long trip
¢ page 258, Checking tire pressure.
What you c an do to avo id tire and rim
damage
Low aspect ratio tires can be damaged mo re
easily by impact w ith potholes, curbs, g ull ies
o r ridges on the road, pa rticularly if the tire is
u nderinflated.
In orde r to minimize the occurrence of impact
damage to the tires of your vehicle, we recom
mend that you observe the following p reca u
tions:
- Always ma inta in recommended inflation
pressu res. Check your tire pressure eve ry
2,000 miles (3,000 km) and add air if neces-
sary . .., •
•
Page 275 of 316
What do I do now?
Vehicle tool kit
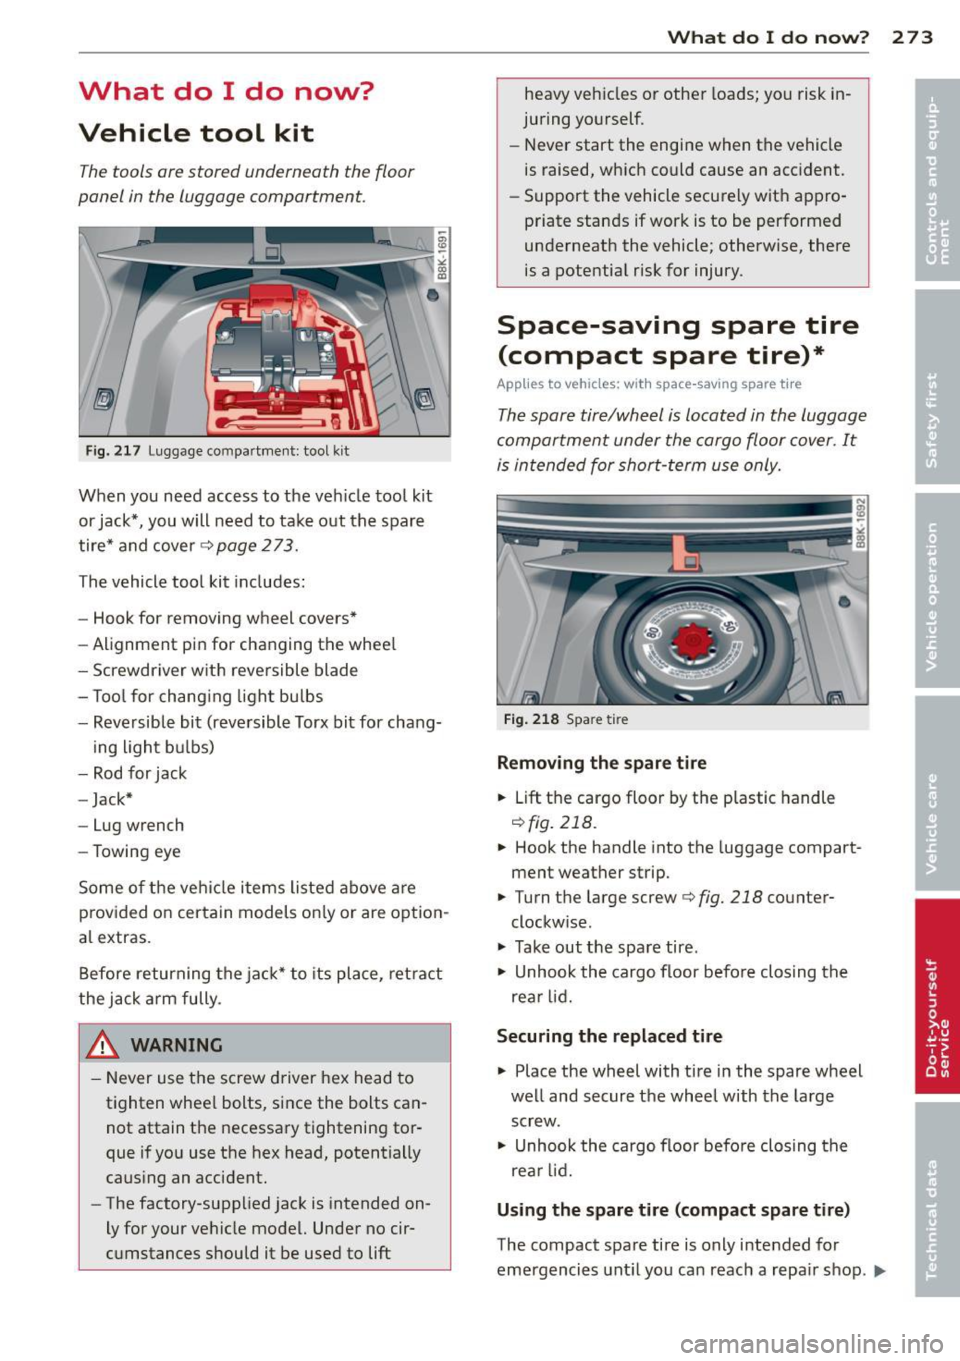
The tools ore stored underneath the floor
panel in the luggage comportment.
F ig . 2 17 Lug gage compar tment: tool kit
When you need access to the veh icle tool kit
or jack*, you will need to take o ut the spare
tire* and cover¢
page 2 73.
The vehicle tool kit includes:
- Hook for removing wheel covers*
- Alignment pin for changing the whee l
- Screwdriver w ith reversible blade
- T ool for chang ing light bulbs
- Reversible bit (reve rsible Torx bit for chang-
ing light b ulbs)
- Rod for jack
- Jack*
- Lug wrench
- Towing eye
Some o f the ve hicle items listed above are
p rov ided o n certain models on ly or are opt ion
a l extras.
Before returning the ja ck* to its place, ret ract
the jack a rm fully.
& WARNING
- Never use t he screw driver hex head to
tighten whee l bolts, since the bolts can
not attain the necessary tightening tor
que if yo u use the hex head, potentially
caus ing an accident.
- The factory-supplied jack is intended on
ly for your ve hicle model. Unde r no cir
c u mstances should it be used to
lift
What do I d o now ? 273
heavy ve hicles o r other loads; yo u risk in
juring yo urself.
- Never start the engi ne when the vehicle
is raised, which could cause an acc ident.
- Support the vehicle secu re ly wit h app ro
priate stands if wor k is to be performed
underneath the vehicle; otherwise, there
is a pote ntia l risk for injury .
Space-saving spare tire
(compact spare tire)*
App lies to vehicles: wit h space-saving spare tire
The spore tire/wheel is located in the luggage
comportment under the cargo floor cover. It
is in tended for short -term use only.
Fi g. 2 18 Spa re tire
Removing the spare ti re
.. Lift
th e cargo floo r by the p lastic handle
r:!) fig. 218.
.. Hook the handle into the luggage compart
ment weather strip.
.. Turn t he large screw¢
fig. 218 counter
clockw ise .
.. Take out the spare tire .
.. Unhook the cargo floor befo re clos ing the
re ar l id.
Securing the repl aced tire
.. Place the wheel with tire in the spare wheel
we ll and secure the wheel with the large
screw.
.. Unhook the cargo floor befo re closing t he
re ar lid .
Using the spare tire (compact spare tire)
The compact spa re tire is only i ntended for
emergencies unt il you ca n reach a repa ir shop .
l)JI,
Page 277 of 316
A WARNING ,~ -
You or your passengers could be injured
while changing a wheel if you do not fol
low these safety precautions:
- If you have a flat tire, move a safe dis
tance off the road. Turn off the engine,
turn the emergency flashers on and use
other warning devices to alert other mo
torists.
- Make sure that passengers wait in a safe
place away from the vehicle and well
away from the road and traffic.
- To help prevent the vehicle from moving
suddenly and possibly slipping off the
jack, always fully set the parking brake
and block the wheel diagonally opposite
the wheel being changed with the fold
ing chocks or other objects. When one
front wheel is lifted off the ground, plac
ing the Automatic Transmission in "P"
(Park) will
not prevent the vehicle from
moving .
- Before you change a wheel, be sure the
ground is level and firm. If necessary,
use a sturdy board under the jack.
- After installing the inflatable spare tire,
make sure that you replace the flat tire/
wheel in its storage area properly and
tighten the knurled retaining screw se
curely.
0 Note
If you are changing the wheel on a steep
incline, use a rock or similar object to
block the opposite wheel to prevent the
vehicle from moving.
(D Tips
Obey all laws.
Changing a wheel
When you change a wheel, follow these
quence described below step-by-step and in
exactly that order .
1. Remove the decorative wheel cover* or
the
wheel bolt caps* . For more details see
What do I do now? 275
also ~ page 2 76, Decorative wheel cov
ers
or ¢ page 2 76, Wheels with wheel
bolt caps.
2. Loosen the wheel bolts ¢ page 276.
3. Locate the proper mounting point for the
jack and align the jack below that point
¢page 277 .
4.
Lift the car with the jack ¢ page 2 77.
5. Remove the
wheel with the flat tire and
then install the
spare tire ¢page 278.
6. Tighten all wheel bolts lightly.
7.
Lower the vehicle with the jack.
8. Use the wheel bolt wrench and
firmly
tighten all wheel bolts in a crisscross pat
tern ¢
page 2 76.
9. Replace the
decorative wheel cover* or
the
wheel bolt caps* .
A WARNING
Always read and follow all WARNINGS and
information ~.&.
in Raising the vehicle on
page
277 and ¢page 279.
After changing a wheel
A wheel change is not complete without the
doing the following.
"' Store and secure the wheel you replaced in
the spare wheel well.
"' Replace the tools and the jack in their prop
er location.
"' Check the
tire pressure of the spare tire as
soon as possible.
"' As soon as possible, have the
tightening
torques
on all wheel bolts checked with a
torque wrench. The correct tightening tor
que is 90 ft lbs. (120 Nm).
"' Have the flat tire
replaced as soon as possi
ble.
(D Tips
- If you notice that the wheel bolts are
corroded and difficult to turn while
changing a tire, they should be replaced
before you check the tightening torque .
- Drive at reduced speed until you have the
tightening torques checked. •
•
Page 278 of 316
276 What do I do now?
Decorative wheel covers
Applies to vehicles: with decorative wheel covers
The decorative wheel covers must be removed
first to access the wheel bolts .
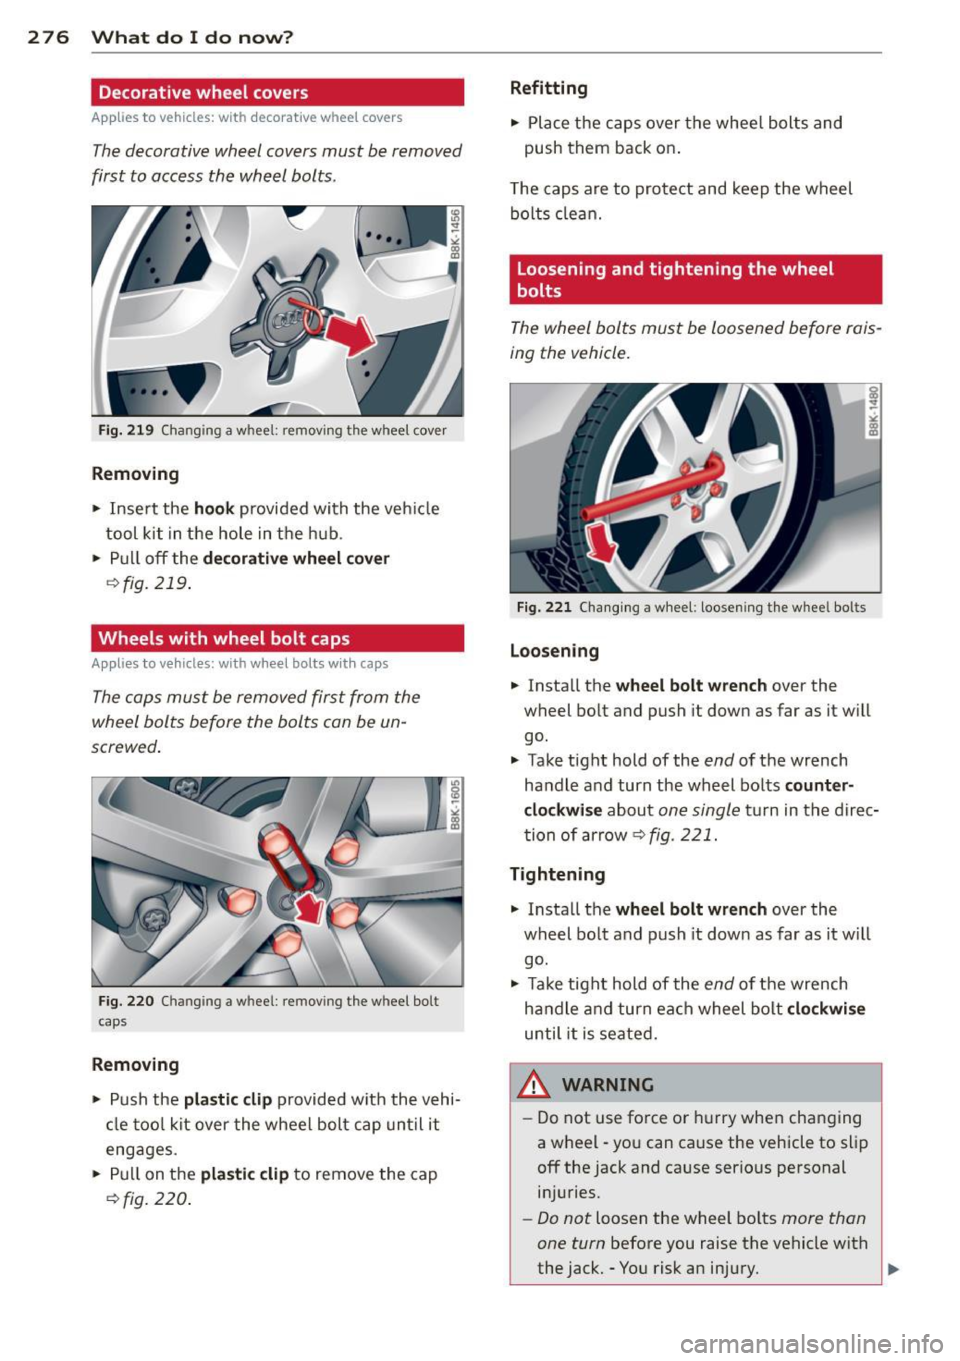
Fig. 219 Changing a w heel: remov ing the wheel cover
Removing
.. Insert the hook provided with the veh icle
tool kit in the hole in the hub .
.. Pull off the
decorative wheel cover
~fig. 219.
Wheels with wheel bolt caps
Applies to vehicles: with wheel bolts w ith caps
The caps must be removed first from the
wheel bolts before the bolts con be un
screwed .
Fig. 220 Chang ing a w hee l: remov ing the w heel bo lt
c aps
Removing
.. Push the plastic clip provided with the vehi
cl e too l kit over the wheel bolt cap until it
engages.
.. Pull on the
plastic clip to remove the cap
9fig . 220.
Refitting
.. Place the caps over the whee l bolts and
push them back on .
T he caps are to protect and keep the wheel
bolts clean.
Loosening and tightening the wheel
bolts
The wheel bolts must be loosened before rais
ing the vehicle.
Fig. 221 Changing a wheel: loosening the w hee l bo lts
Loosening
.. Insta ll the wheel bolt wrench over the
wheel bolt and push it down as far as it w ill
go.
.. Take tight hold of the
end of the wrench
handle and turn the wheel bolts
counter
clockwise
about one single turn in the direc
tion of arrow
c;, fig. 221.
Tightening
.. Install the wheel bolt wrench over the
wheel bolt and push it dow n as far as it will
go .
.. Take tight hold of the
end of the wrench
handle and turn ea ch wheel bolt
clockwise
until it is seated.
,&_ WARNING
-= -
- Do not use force or hurry when changing
a wheel -you can cause the vehicle to slip
off the jack and cause serious personal
injuries.
- Do not loosen the wheel bolts more than
one turn
before you raise the vehicle with
the jack. -You risk an injury. ..,.
Page 279 of 316
@ Tips
-Never use the hexagonal socket in the
handle of the screwdriver to loosen or
tighten the wheel bolts.
- If a whee l bolt is very tight, you may find
it easier to loosen by carefully pushing
down on the end of the wheel bolt
wrench with
one foot only. As you do so,
hold on to the car to keep your balance
and take ca re not to slip.
Raising the vehicle
The vehicle must be li~ed with the jack first
before the wheel can be removed .
*
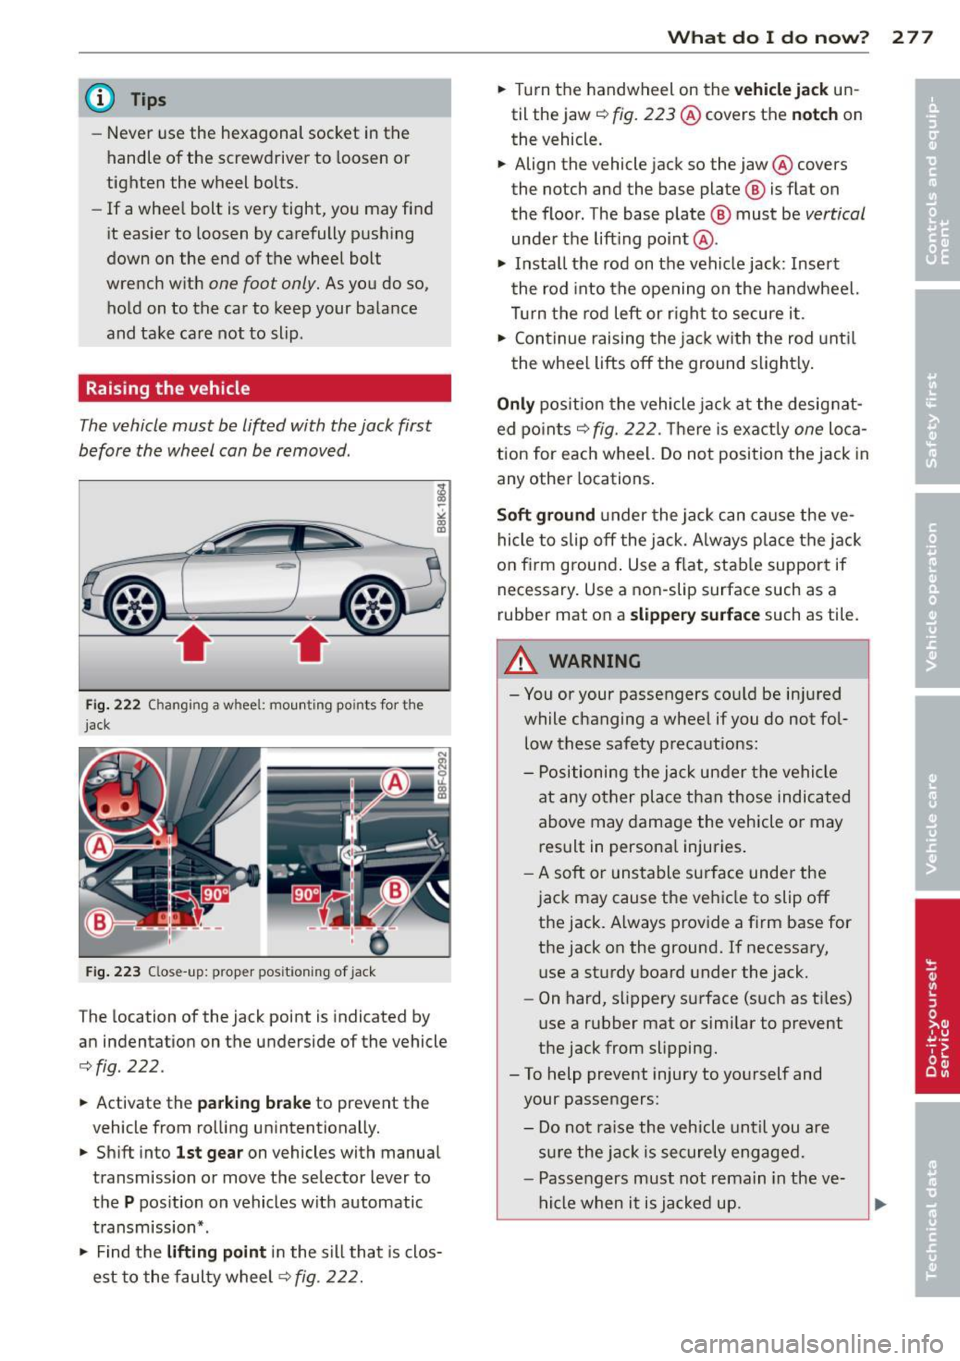
Fig. 2 22 Changing a whee l: moun ting po ints for the
jack
F ig . 223 C lose -up: proper positioning of jack
The location of the jack point is indicated by
an indentation on the underside of the vehicle
¢ fig. 222 .
.. Activate the parking b rake to prevent the
vehicle from rolling unintentionally.
.. Shi ft into
1st gea r on vehicles with manual
transmission or move the selector lever to
the
P pos ition on vehicles with automatic
t ransmission* .
.,. Find the
liftin g point in the sill that is clos
est to the faulty wheel~
fig. 222.
What do I d o now ? 277
.. Turn the handwheel on the ve hicl e jac k un
til the jaw
c::, fig. 223@covers the not ch on
the vehicle.
.. Align the vehicle jack so the jaw @covers
the notch and the base plate ® is flat on
the floor. The base plate
@ must be vertical
under the lift ing po int @ .
.,. Insta ll the rod on the vehicle jack: Inse rt
the rod into the opening on the handwheel.
Turn the rod left or r ight to secure i t.
.. Continue raising the jac k w ith the rod unti l
the wheel lifts off the ground slightly.
O nly pos ition the vehicle jack at the designat
ed po ints
c::, fig. 222. T here is exactly one loca
tion for each wheel. Do not position the jack in
any other locations .
Soft ground under the jack can cause the ve
hicle to slip off the jack. A lways place the jack
on f irm ground . Use a flat, stab le support if
necessary. Use a non-slip surface such as a
rubber mat on a
s lippery surface such as tile.
A WARNING
- You or your passengers cou ld be in jured
while changing a wheel if you do not fol
low these safety precautions:
- Positioning the jack un der the vehicle
at any other place than those indicated
above may damage the vehicle or may result in persona l injuries .
- A soft or unstable surf ace under the
jac k may cause the veh icle to slip off
the jack. Always prov ide a f irm base for
the jack on the ground. If necessary,
use a sturdy board under the jack.
- On hard, slippery surface (such as ti les)
use a rubber mat or similar to prevent
the jack from slipping.
- To help prevent injury to yourself and
your passengers:
- Do not ra ise the vehicle until you are
s u re the jack is securely engaged .
- Passengers must not remain in the ve
h icle when it is ja cked up.
Page 280 of 316

278 What do I do now ?
-Make sure that passengers wait in a
safe p lace away from the vehicle and
well away from the road and t raffic.
- Make sure jack position is correct , ad
just as necessary and then continue to ra ise the jack.
Taking the wheel off/installing the spare
tire
Follow these instructions step-by-step for
changing the wheel.
F ig . 224 Changing a whee l: usi ng the screwdrive r ha n
dle (with th e blade removed} to turn th e bo lts
Fi g. 225 Changing a whee l: a lignm en t pi n insid e t he
top hole
Afte r you have loosened a ll wheel bolts and
r a ised the veh icle off the ground, remove and
r eplace the wheel as follows:
Removing the wheel
" Remove the topmost wheel bo lt completely
with the
hexagonal socket in the screwdr iv
er hand le (vehicle tool kit)
~ fig. 224 and
set it as ide o n a
clean surface.
" Screw t he thre aded end of the
alignment
pin
from the too l ki t hand -tig ht into the
empty bolt hole ~
fig. 225.
" Then remove the other wheel bo lts as de
scribed above. "
Take off the whee l leaving the a lignment
pin in the bolt hole
~CD .
Putting on the inflatable spare tire
" Push the spa re tire over the alignmen t pin.
" Scr ew on t he wheel bolts an d tig hten them
slightly u sing t he hexagona l socket .
" Remove the a lignment pin and insert and
tighten the rema ining wheel bolt slightly
like the rest.
" Turn the jack hand le counter-clockwise to
lower the vehicle until the jack is fully re
leased .
" Use the wheel bo lt wrench to tighten all
wheel bo lts firm ly
~page 276. Tighten
t hem
in a criss cross pattern, from one bolt
to the ( approxim ate ly) opposite one, to keep
t he whee l cen tered .
" Perform the steps required after c hangin g
the whee l~
page 275, After changing a
wheel.
T he hexagonal socket ma kes it easie r to re
move t he whee l bolts from the rim . Care
sho uld be taken when removing the reversible
blade .
(D Note
When removi ng or insta lling the whee l,
the r im cou ld hit the b rake r oto r and dam
age the rotor. Work caref ully and have a
second pe rson to help you.
(@ Tips
- Wh en mount ing tires w ith unidirectional
tread design
make sure the tread pat
tern is po inted the right way
~ page 279.
-The wheel bolts s hou ld be clean and easy
to turn. Check for dirt and corrosion on
the mating surfaces of both the w heel
and the hub. Remove all d irt fro m these
surfaces be fo re remounting th e whee l.
- Do not use the he xagonal socket in the
sc rewd river handl e to loosen or t ight en
t he whee l b olt s.
Page 281 of 316

Tires with unidirectional tread design
Tires with unidirectional tread design must be
mounted with their tread pattern pointed in
the right direction.
Using a spare tire with a tread pattern
intended for use in a specific direction
When using a spare tire w ith a tread pattern
in tended for use in a specific direction, please
note the following:
- The direction of rotation is marked by an
ar
row on the side of the tire .
-If the spare t ire has to be installed in the in
correct direction, use the spare tire only
temporarily since the tire will not be able to
achieve its optimum performance character
istic s with rega rd to aquaplaning, noise and
wear.
- We recommend that you pay particular at
tention to this fact during wet weather and
that you adjust your speed to match road
conditions.
- Replace the flat tire with a new one and
have it installed on your veh icle as soon as
possib le to restore the handling advantages
of a unid irectiona l tire .
Notes on wheel changing
Please read the information c:> page 263, New
tires and replacing tires and wheels
i f you are
going to use a spare t ire which is different
from the tires on your veh icle.
After you change a tire :
-Check the tire pressure on the spare imme
diately after installation .
- Have the wheel bolt tightening torque
checked with a torque wrench as soon as
possible by your authorized Audi dealer or
a qualified workshop.
- With steel and alloy wheel rims, the wheel
bolts are correctly tightened at a torque of
90 ft lbs . (120 Nm).
- If you notice that the wheel bolts are cor
roded and difficult to turn while changing
a tire, they should be replaced before you
check the tightening torque. What do I do now? 2 79
- Replace the flat tire with a new one and
have it installed on your vehicle as soon as
possible. Remount the wheel cover.
Until then , drive with extra care and at re
duced speeds.
A WARNING
-
- If you are going to equ ip your vehicle
with tires or rims which differ from those
which were factory installed, then be
sure to read the information
c:> page 263,
New tires and replacing tires and
wheels.
- Always make sure the damaged wheel or
even a flat tire and the jack and tool kit
are properly secured in the luggage com
pa rtment and are not loose in the pas
senger compartment.
- In an accident or sudden maneuver they
could fly forward, injuring anyone in the
veh icle.
- Always store damaged wheel, jack and
tools securely in the luggage compa rt
ment. Otherwise, in an accident or su d
den maneuver they could fly forward,
causing injury to passengers in the vehi
cle.
([) Note
Do not use commercially available tire
sea lants. Otherwise, the electrica l compo
nents of the tire pressure monitoring sys
tem* wi ll no longer work properly and the
sensor for the tire pressure monitoring
system* will have to be replaced by a
qualified workshop . •
•