Hill AUDI A5 COUPE 2012 Owners Manual
[x] Cancel search | Manufacturer: AUDI, Model Year: 2012, Model line: A5 COUPE, Model: AUDI A5 COUPE 2012Pages: 316, PDF Size: 78.59 MB
Page 27 of 316
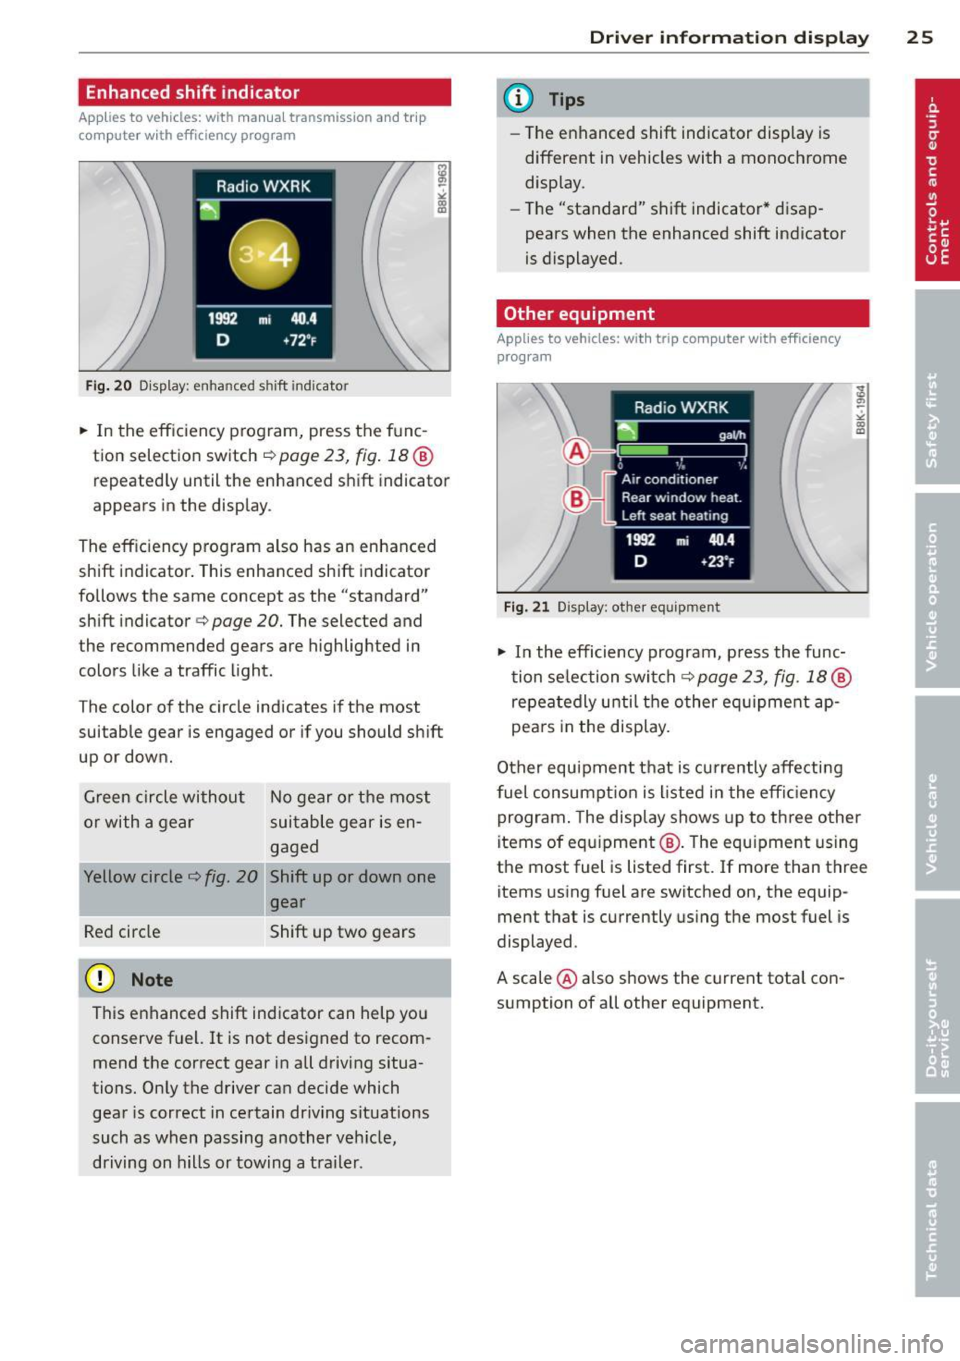
Enhanced shift indicator
Applies to vehicles: with manua l transmission and trip
computer with efficiency program
Fig. 20 Display: e nhan ce d shi ft ind icato r
.,.. In the eff ic iency p rogram, press the f unc
tion selection switch
r:!;> page 2 3, fig . 18 @
repeated ly until the enhanced shift indicator
appears in the display .
The eff ic iency program also has an enhanced
shift indicator . This enhanced shift indicator
follows the same concept as the "standard" shift indicator
c:> page 20. The selected and
t he recommended gears are highligh ted in
colors like a traffic light.
T he color of the circle indicates if the most
suitable gear is engaged or if you should shift
up or down.
Green circle without
or with a gear No gear or t
he most
suitable gear is en
gaged
Yellow circle
c:> fig. 20 Shift up or down one
gear
Red circle Shift up two gears
(D Note
This enhanced shift ind icator can help you
conserve fuel. It is not des igned to recom
mend the correct gear in all driving situa
tions. Only the driver can decide which
gear is correct in certain dr iving situations
such as when passing another veh icle,
driving on hills or towing a trailer .
Driver inform ation di spl ay 25
@ Tips
-The e nhanced shift indicator disp lay is
different in vehicles with a monochrome
display .
- Th e "standard" shift indicator* d isap
pears when the enhanced shift indicator
is displayed.
Other equipment
Applies to vehicles: with trip computer with efficiency
program
F ig. 21 Disp lay : other eq uipment
.,.. In the efficiency program, p ress the func
t ion se lection swi tch
c:> page 23, fig. 18 @
repeatedly until t he other eq uipment ap
pea rs in the display.
Other equipment t hat is cu rrently affecting
fuel consumpt io n is l isted in the effi ciency
program . The display shows up to three other
items of equ ipment @. The equ ipment us ing
the most fuel is listed first. If more than three
items using fuel are switched on, the equip
ment that is currently us ing the most fuel is
displayed .
A scale @also shows the c urrent tota l con
sumpt ion of all other equipment.
Page 100 of 316

98 On the road
-When the vehicle is locked, no one - par
t icu larly not ch ildren should remain in
the vehicle. Locked doors make it more
difficult for emergency workers to get in
to the vehicle - putt ing lives at risk.
Starting from rest
The starting assist function ensures that the
parking brake is released automatically upon
starting .
Stopping and applying parking brake
.. Pu ll the switch to apply the parking brake.
Starting and automatically releasing the
parking brake
.. When you start to drive as usua l, the park
ing brake is automatically re leased and your
vehicle begins to move.
When stopping at a traffic signal or stopping
in city traffic on vehicles with an automatic
transmission, the park ing brake can be ap
plied. The veh icle does not have to be held
with the footbrake. The park ing brake elimi
nates the tendency to creep with a drive range
engaged. As soon as you dr ive off as usual,
the park ing brake is released automatically
and the veh icle sta rts to move.
Starting on slopes
When starting on inclines, the start ing ass ist
prevents the vehicle from unintentionally roll
i ng back . The braking force of the parking
brake is not released until sufficient dr iving
fo rce has been built up at the whee ls.
(D Tips
For safety reasons, the park ing brake is re
leased automatically only when the dr iv
er 's safety belt is engaged in the buck le.
Starting off with a trailer
To prevent rolling back unintentionally on an
incline, do the following:
• Keep the switch pulled and depress the ac
celerator . The parking brake stays applied
and prevents the vehicle from roll ing back
ward .
• You can re lease the switch once you a re sure
that you are developing enough driving
force at the wheels by depressing the accel
erator.
Depending on the weight of the rig (vehicle
and t railer) and the severity of the incline, yo u
may roll backwa rds as you start . You can pre
vent rolling backwards by holding the parking
brake switch pulled out and accelerating -just
as you would when starting on a hill with a
convent ional hand brake.
Emergency braking
In the event that the conventional brake sys
tem fails or locks.
.. In an emergency, pull the switch and con
tinue to pull it to slow your vehicle down
w ith the park ing brake.
• As soon as you release the switch or acceler-
ate, the brak ing process stops.
If you pull the switch and hold it above a
speed of about 5 mph (8 km/h), the emergen cy brak ing funct ion is initiated . The vehicle is
braked at all four wheels by activating the hy
draulic brake system . The brake performance
i s sim ilar to making an emergency stop~& .
In order not to act ivate the emergency brak
i ng by mistake, an audib le warning tone (buz
zer) sounds when the switch is pulled. As soon
as the switch is re leased, or the accelerator
pedal is depressed, emergency braking stops.
A WARNING
Emergency braking should only be used in
an emergency, when the norma l foot brake
has failed or the brake pedal is obstructed. .,..
Page 124 of 316

122 Audi side assist
whether you drive in the center of your lane or
closer to the edge.
If you d rive in narrow lanes, side assist's de
tection area may also incl ude other lanes -es
pecia lly if you tend to drive on the edge of
your lane¢
fig. 139. Under these conditions,
ve hicles can also be detected that are two
lanes away, and side assist then could switch
between the informat ional and warn ing stage
signals .
When dr iv in g in very w ide lanes, vehicles in
the adjacent lane may not be detected be
cause they are not inside the detection area.
Notes
Messages in instrument cluster display
Applies to vehicles: with side assist
If side assist turns off automatically, the indi
cator light on the button wi ll go out and you
will see a message in the instrument cluster
d isplay:
Audi side assist not available : sensors
blocked
The s ide assist sensors are built into the rear
bumper on the left and right (not visible on
the outside)
¢page 116, fig. 130. To ensure
that you do not adversely affect the way side
assist funct ions, foreign objects (such as st ick
e rs or b icycle racks) should not be attached to
the area on the rear bumper where the sen
sors are located. If side assist functions are
adversely affected, you will see this message
in the instrument cluster display. Remove any
thing that may be blocking the sensors .
If no ve hicl e is detected for a longer period of
time while driving , side assist will also switch
off a utomatica lly.
Audi side assist currently not available
If there is a temporary problem (such as the
vehicle's batte ry charge being low), s ide ass ist
cannot be activated temporarily .
Audi side assist: system fault
Have the system checked by an authorized Au
di dealer or qualified workshop.
Safety tips
Applies to vehicles: with side assist
The side assist detection may be limited when
driving aro und narrow street corners, on hilly
streets, and under poor weather conditions.
It is possible that the radar sensors may a lso
detect other objects, such as high or stag
gered guardrails.
Side assist does not measure actual lane
width. The system assumes a fixed lane width.
Detection in the left and right lanes is based
on this assumed lane width. When driving on
narrow roads or when driv ing to the left or
right of the center of a trave l lane, it is poss i
ble that vehicles will be detected that are
not
in the lane next to the lane you are using.
A WARNING
-
- I mproper reliance on the side assist sys-
tem can cause collis ion s and serio us per
sonal injury:
- Never rely on ly on s ide assist when
changing lanes.
- Always check rear view mirrors to make
sure that it is safe to change lanes.
- Side assist cannot detect all vehicles un
der all conditions- danger of accident!
- Side assist cannot detect vehicles in time
to a lert you when they approach from
behind at very high speed, or fall drop
back very qu ickly.
- The radar sensor's
vision can be reduced
or entire ly blocked by rain, snow, and
heavy spray. This can result in side assist
not adequately detecting vehicles or, in
some cases, not detecting them at all.
Always keep an eye on the direction you
are traveling and the relevant area
around the vehicle.
Page 128 of 316
126 Transmission
Transmission Manual transmission
Gearshift lever
Applies to vehicles: with manual transmission
The clutch pedal must be depressed all the
way before you can start the engine.
The manual transmission in your Audi is
equipped with an
interlock-feature.
• Depress the clutch pedal a ll the way.
• Start the engine with the gearshift lever in
Neutral and the clutch pedal depressed.
(D Note
Always depress the clutch pedal fully when
changing gears. Do not hold the vehicle on
a hill with the clutch pedal partially de
pressed. This may cause premature clutch
wear or damage.
@ Tips
- Resting your hand on the gearshift lever
knob while driving will cause premature
wear in the transmission.
- The back-up lights go on when you sh ift
in to Reverse with the ignition on.
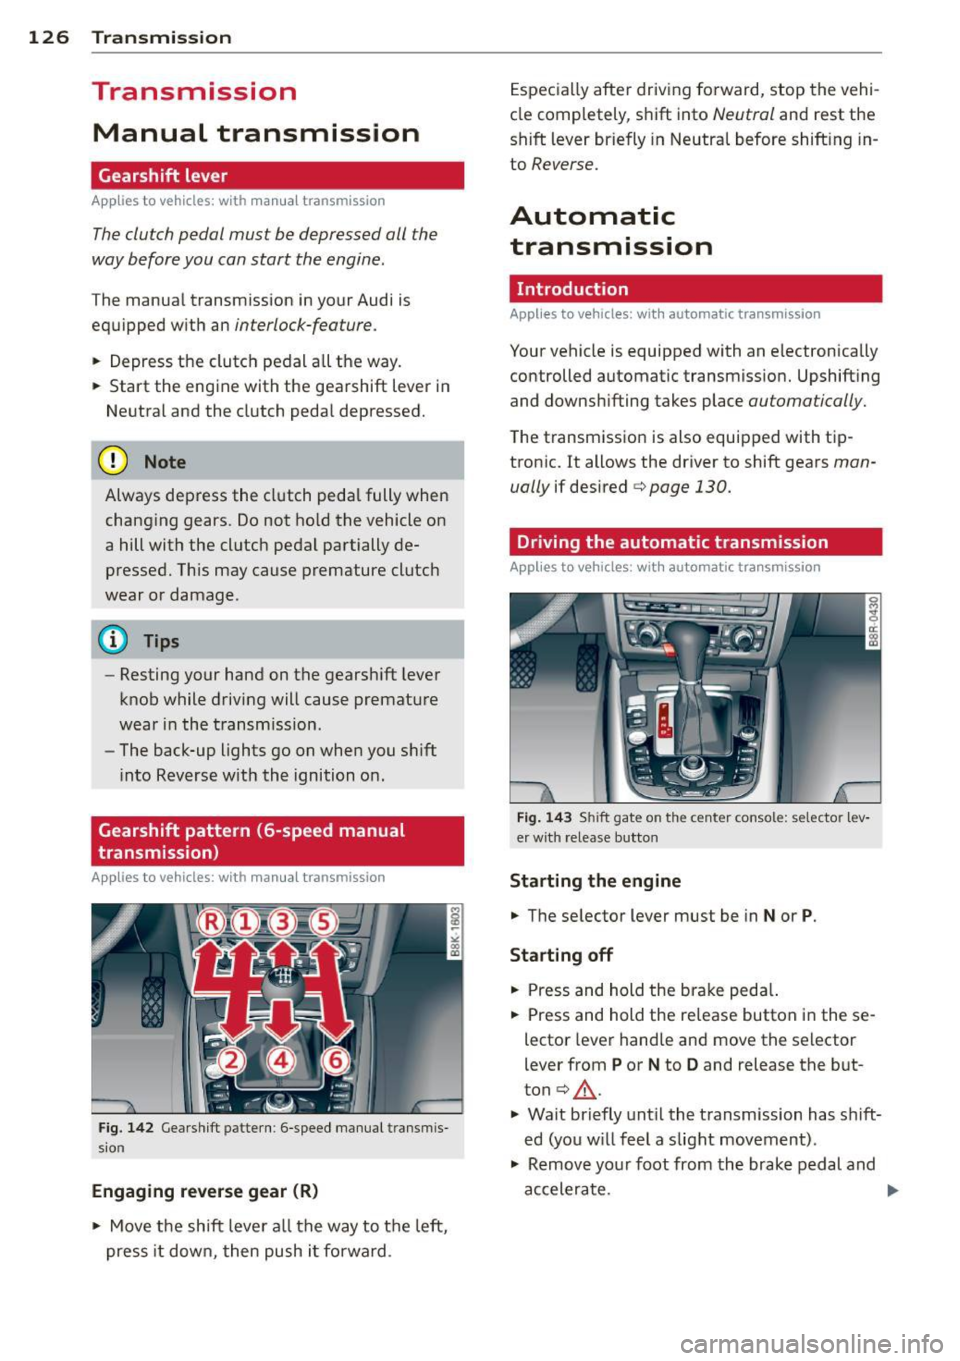
Gearshift pattern (6-speed manual
transmission)
Applies to vehicles: with manual transmission
Fig. 142 Gearshift patte rn: 6 -speed manual transmis
sion
Engaging reverse gear (R)
• Move the shift lever all the way to the left,
press it down, then push i t forward . Especially
after driving forward, stop the vehi
cle comp letely, shift into
Neutral and rest the
shift lever briefly in Neutral before shift ing in
to
Reverse.
Automatic
transmission
Introduction
Applies to vehicles: with automatic transmission
Your vehicle is equipped with an electronically
controlled automatic transmission. Upshift ing
and downshifting takes place
automatically.
The transmission is also equipped with tip
tronic. It allows the driver to shift gears
man
ually
if desired c:> page 130.
Driving the automatic transmission
Applies to vehicles: with automatic transmission
Fig. 143 Shift gate on the center console: selector lev
er with release button
Starting the engine
• The selector lever must be in
Nor P.
Starting off
• Press and hold the brake peda l.
• Press and hold the release button in these
lector lever hand le and move the selector
lever from
P or N to D and release the but
ton
c:> .&_ .
• Wait briefly until the transmission has s hift
ed (you w ill feel a slight movement) .
• Remove your foot from the brake pedal and
accelerate.
Page 130 of 316
128 Transmi ssion
Selector lever positions
Ap plies to vehicles: wit h au to mat ic tra nsmi ssio n
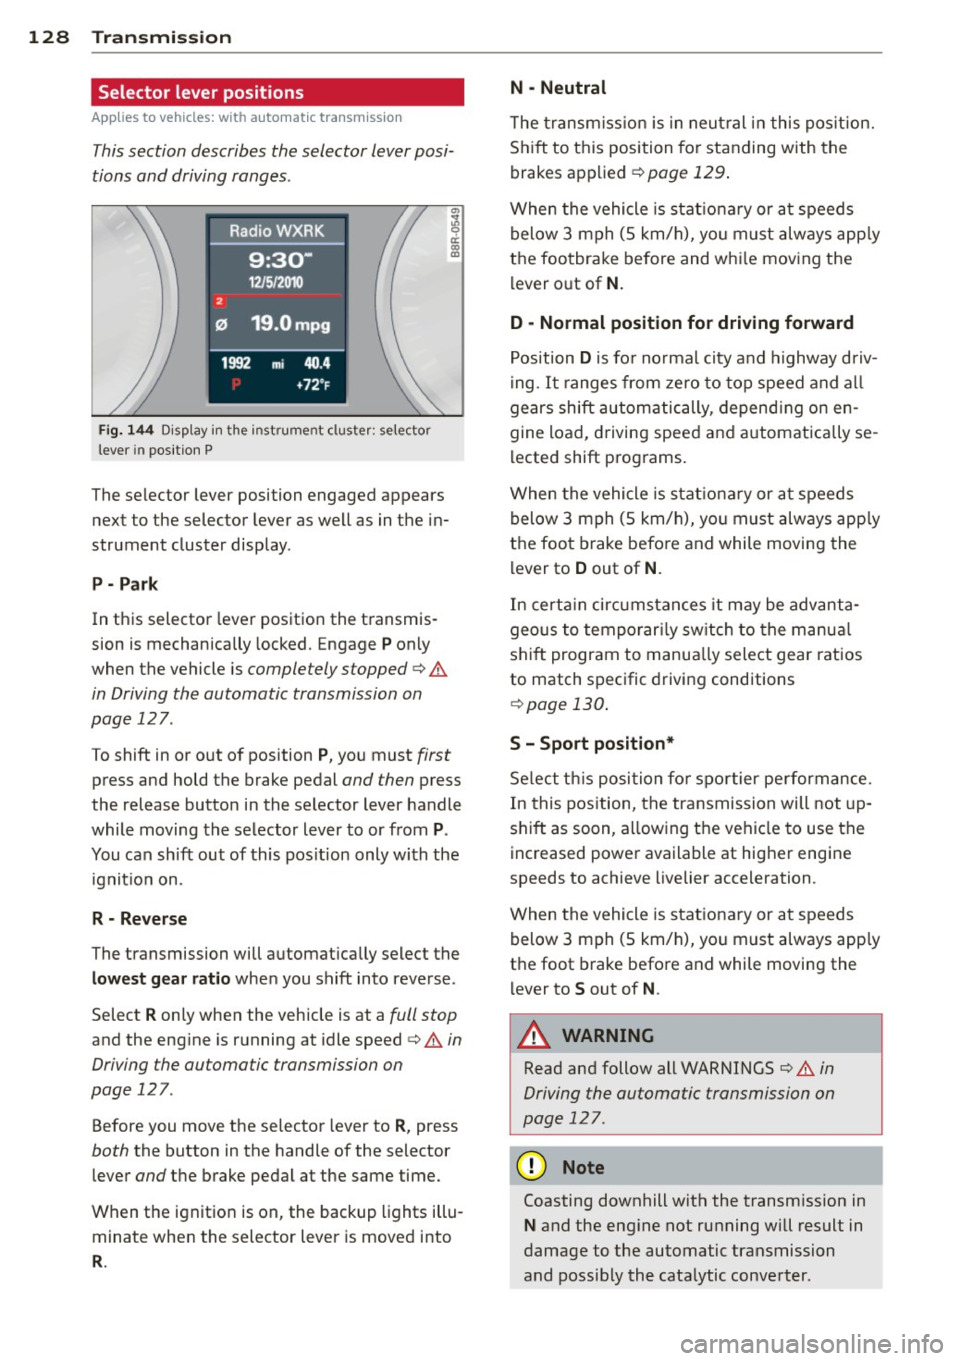
This section describes the selector lever posi
tions and driving ranges .
Fig. 144 D isp lay in the inst rume nt cluster: selector
lever in position P
The selector lever position engaged appears
next to the selector lever as well as in the in
strument cluster display .
P - P ark
In this selector lever position the transmis
sion is mechanically locked. Engage
P only
when the vehicle is
completely stopped q .&
in Driving the automatic transmission on
page 127 .
To shift in or out of position P, you must first
press and hold the brake pedal and then press
the release button in the selector lever handle
while moving the selector lever to or from
P .
You can sh ift out of this pos ition only with the
ignit io n on.
R - Rev ers e
The transmission will automat ically select the
l o west gear ratio when you shift into reverse .
Select
R on ly when the vehicle is at a full stop
and the eng ine is running at idle speed ¢.& in
Driving the automatic transmission on
page 127.
Before you move the selector lever to R , press
both the button in the handle of the selector
lever
and the brake pedal at the same time.
When the ignit ion is on, the backup l ights illu
minate when the selector lever is moved into
R .
N -Neutral
The transm iss ion is in neut ral in this pos ition.
S h ift to this position fo r standing with the
brakes applied
¢ page 129 .
When the vehicle is stat ionary or at speeds
below 3 mph (5 km/h), yo u must always app ly
the foo tbrake be fore and whi le moving the
lever o ut of
N .
D -Normal position fo r driving forward
Position Dis fo r normal city and highway driv
i ng .
It ranges from zero to top speed and a ll
gears shift automatically, depend ing on en
gine load, driving speed and automatically se
lected shift programs.
When the vehicle is stat ionary or at speeds
below 3 mph (5 km/h), yo u must always app ly
the foot brake befo re and while moving the
lever to
D out of N .
In certa in circ umstances it may be advanta
geous to temporar ily sw itch to the manua l
shift program to manua lly select gear ratios
to match specific driving conditions
¢ page 130 .
S - Sport position*
Select t his posi tion fo r spo rtier pe rformance.
In this pos ition, the transmission will not up
shift as soon, a llowing the vehicle to use the
increased power available at higher engine
speeds to achieve livelier acceleration .
When the vehicle is stationary or at speeds
below 3 mph (5 km/h), yo u must always app ly
the foot brake before and while moving the l ever to
S out of N .
A WARNING ,__
Read and follow all WARNINGS ¢ .& in
Driving the automatic transmission on
page 127 .
(D Note
-
Coasting downhill with the transm ission in
N and the eng ine not running wi ll result in
damage to the automatic transmission
and possibly the cata lytic converter.
Page 132 of 316
130 Transmi ssion
fuel efficiency, with ear ly upshifting and
de layed downshifting.
The transmission will a utomat ica lly select the
s port y shift prog rams when you drive at high
e r speeds, or w ith heavy acceleration and fre
quent ly changing speeds. Upshifts are de layed
to make full use of eng ine power. Downsh ift
ing takes p lace at h igher engine speeds than
in the economy programs .
The selection of the most suitab le shift pro
gram is a cont inuous, automatic process. The
driver can also make the transmission switch
to a sporty program by quickly pressing down
the gas pedal.
This causes the transmission to shift down to
a lower gear to achieve rapid acceleration, e.g.
for quickly passing another vehicle. You do not need to press the gas pedal into the kick -down
range . After the transmission has upshifted,
the orig inal program is se lected acco rding to
your d riving s tyle.
A n addit ional shift program allows the auto
mat ic transm iss ion to select the proper gear
for uphill and downhill gradients .
This keeps the transmission from shifting up
a nd down unnecessar ily on hills . The trans
miss ion will shift down to a lowe r gear when
the dr iver presses the brake pedal on a down
hill grad ient. This makes use of t he b raking ef
fe ct of the eng ine wi thout the need to shift
down manua lly. Manual shift program
Applies to
vehicles: with automatic transmission
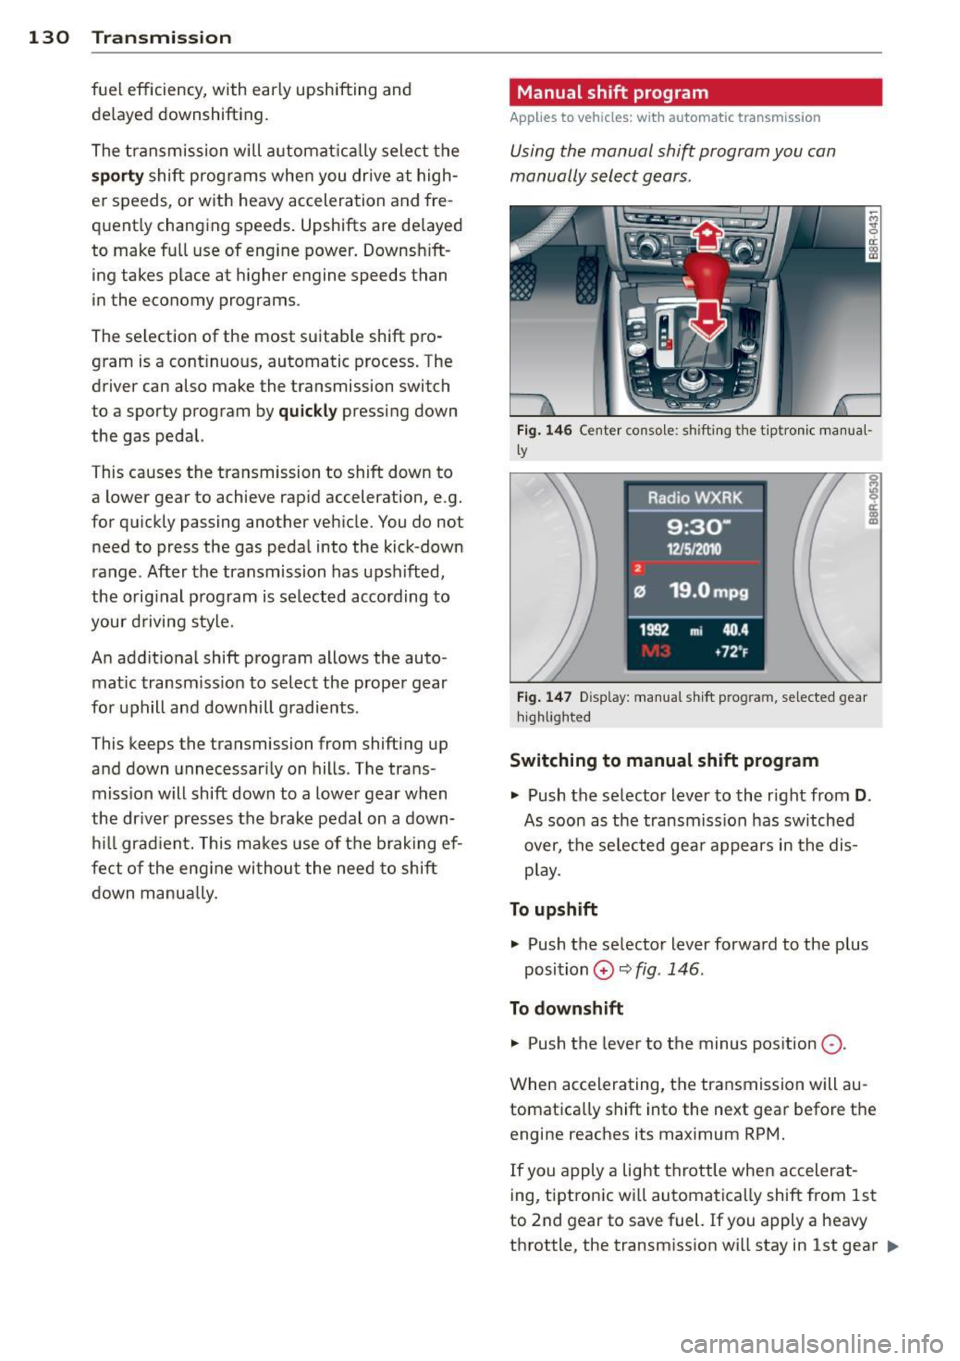
Using the manual shift program you can
manually select gears .
Fig . 14 6 Ce nter conso le: sh ift ing the t iptron ic m an ua l·
l y
F ig. 14 7 Disp lay: manu al shi ft p rog ra m , se lected gear
hi ghlight ed
Switching to manual shift program
.,. Push the selector lever to the right from
D.
As soon as the transmiss ion has sw itched
over, the se lected gea r appears in the dis
p lay .
To upshift .,. Push the selecto r lever forwa rd to the p lus
position
0 ¢ fig . 146 .
To down shift
.,. Push the lever to the minus pos ition
0 -
When accelerating, t he transmission will au
tomatica lly shift into the next gear before the
engine reaches its maximum RPM.
If you apply a light throttle whe n accelerat-
ing, tiptronic wi ll automatica lly shift from 1st
to 2nd gear to save fuel. If you apply a heavy
throttle , the transm iss ion wi ll stay in 1st gear .,.
Page 160 of 316
158 S afet y belt s
To provide maximum protection, sa fety belts
must always be positioned correctly on the
wearer 's body .
.,. Adjust the front seat and head restra int
properly ¢
page 61, General recommenda
t ions .
.,. Make sure the seatback of the rear seat
bench is in an upright pos ition and securely
latched in place before using the belt¢ ,&.
.,. Hold the be lt by the tongue and pull it
evenly across the chest and pelvis ¢ ,& .
.,. Inse rt the tongue into the correct buckle of
your seat until you hea r it latc h securely
¢fig. 171.
.,. Pu ll on the be lt to make sure that it is se-
curely latched in the b uckle.
Automatic safety belt retractors
Every safety belt is equipped w ith an automat
i c belt retracto r on the shoulder be lt. This fea
ture locks the be lt whe n the belt is pulled out
fast, during hard braking and i n an accident.
The belt may also lock when you drive up or
down a steep hill or throug h a sharp curve.
During normal driving the belt lets you move
freely.
Safety belt pretensioner s
The safety belts are equipped with a be lt pre
tensioner that helps to tighten the safety belt
and remove s lack when the pretensioner is ac
tivated. The funct ion of the pretensioner is
monitored by a warning lig ht
Q page 15.
Sw itchable locking feature
Every sa fety belt except the one on the dr iver
seat is eq uipped with a switchable locking fea
ture that
must be used when the safety belt is
used to attach a child safe ty seat. Be sure to
read the important information about this
feature ¢
page 195.
A WARNING
Imprope rly positioned safety belts can
cause se rious injury in an accident
¢ page 1 58, Safety bel t position.
- Saf ety belts offe r optimum pro tection
only when the seatba ck is upright and be
lts are properly posit ioned on the
body.
- Always make sure that the rear seat
backrest to wh ich the center rear safety
be lt is attached is securely latched when
ever the rea r center safety belt is being
used. If the backrest is not secure ly
latched, t he passenger w ill move for
ward with the ba ck rest dur ing sudd en
bra king, in a sudden maneuver and espe
ci ally in a crash.
- Neve r attach the safety belt to t he buck
le for ano ther sea t. At taching the belt to
the wrong buckle will redu ce s afety be lt
effec tiveness and can cause serio us per
sonal injury.
- A passenger who is not properly restrain
ed can be seriously injured by the safety
be lt itself w hen it moves from the stro n
ger parts of the body into cr itical areas
like the abdomen .
- Always loc k the convertible locking re
tractor when you are secu ring a child
safety seat in the vehicle ¢
page 19 7.
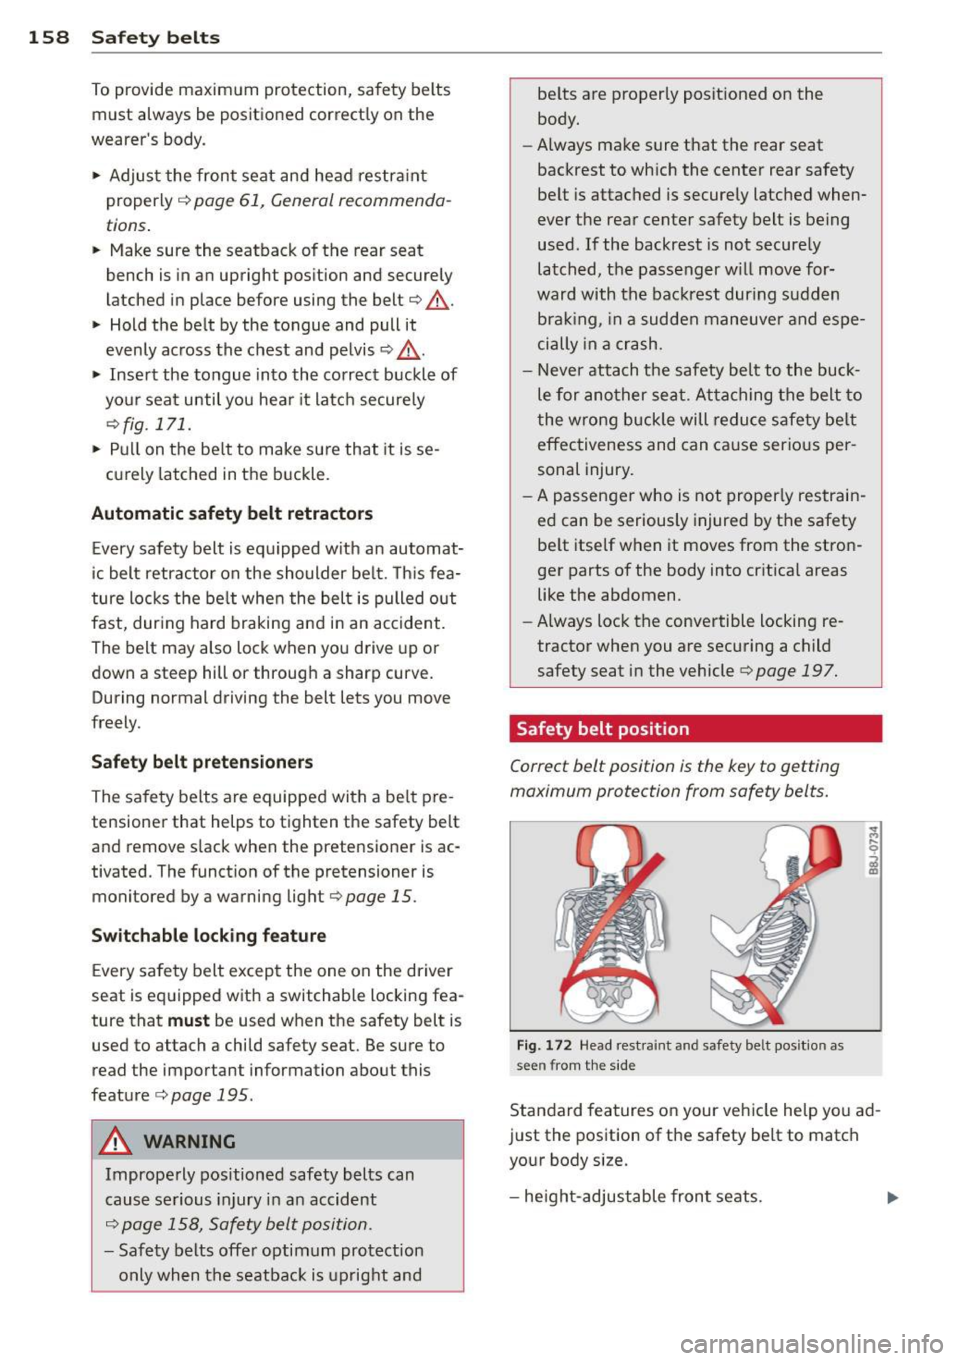
Safety belt position
Correct belt position is the key to getting
maximum protection from safety belts.
Fig . 1 72 Head res tra in t an d safety be lt pos it ion as
see n from t he s ide
Standard features on your vehicle he lp you ad
just the position of the safety be lt to match
yo ur body s ize.
- he ight -adjus table fron t seats.
Page 221 of 316
Tire pressure
When towing a tra ile r, inflate the t ires of your
vehi cle to the co ld tire pressure listed under
"Full load" on the label located either on the
driver's side B-pillar (visible when the doo r is
open) or inside the f uel f iller flap. Inf late
trailer tires to trailer and tire manufact urers'
specifications .
Lights
The headlight settings should be chec ked w ith
the t railer attached before dr iv ing off. Check
to make sure both vehicle and trai ler lights
are working properly.
Safety chains
Be s ure trai le r sa fety chains are p roperly con
nected from the t railer to the hitch on the ve
h icle. Leave enough s lack in the chains to per
mit turn ing corners . When you install safety
chains, make su re they w ill not drag on the
road when you are driving.
T he chains shou ld cross under the trai ler
tongue to prevent it from droppi ng in case of
separat io n from the hitch .
Driving instructions
Driving with a trailer always requires extra
care and consideration.
To obtain the best poss ible handling of vehicle
and trai ler, p lease note the following:
.,. Do no t tow a loa ded tra iler whe n your car i t
self is no t loaded .
.,. Be especia lly careful when passing other ve
hicles.
.,. Observe speed limits.
.,. Do not drive at the maximum permissible
speed.
.,. Always apply brakes early .
.,. Monito r the t em perature gauge.
Weight distribution
Tow ing a loaded trai ler with an empty car re
sults in a highly unstable distribution of
weight . If this ca nnot be avo ided, drive at very
Trailer towin g 219
low speeds on ly to avo id t he ris k of losing
steering cont ro l.
A "b alanced " rig i s ea sier to op erat e and con
tr ol. T his means t hat t he tow vehi cle should
be loaded to the extent possible and permissi
ble, while keep ing the trai ler as light as possi
ble under the c ircu mstances . Whenever poss i
ble, transfer some ca rgo to the luggage com
partment of the tow vehicle while obse rvi ng
tongue load requirements and vehicle load ing
cons idera tions .
Speed
The higher the speed, the more d iff icu lt it be
comes for the driver to contro l the rig. Do not
drive at the maxim um permissib le speed. Re
duce your speed even more if load, weather o r
wind conditions are unfavo rable -pa rticula rly
whe n going downhill .
Red uce ve hicle speed
immediately if the trail
er shows the slig htest s ign of sway ing .
Do not
try to stop the swaying by accelerating .
Observe speed limits. In some areas, speeds
for vehicles tow ing tra ile rs are lowe r than for
regular ve hicles .
A lways apply brakes early. When driving
down hill, shift into a lowe r gear to use the en
gine braking effect to s low the vehicle. Use of
the b rakes alone ca n cause them to overhea t
and fail.
Coo lant temperature
The coo lant temperat ure ga uge ¢ page 10
must be observed carefu lly. If the need le
m oves cl ose to t he upper end of t he scale, re
duce speed immediately and/or turn off t he
a ir condi tioner .
If the coolant temperature warning light .
in the instrument cluster starts flashing, pull
off the road , stop and let the engine
i dle for
abo ut two minutes to prevent heat build-up .
A WARNING
Anyone no t properly restra ined in a mov
in g ve hicle i s at a much gre ater r isk in an
a cci dent . N ever le t anyone rid e in yo ur car
-
•
•