belt AUDI A5 COUPE 2012 Owners Manual
[x] Cancel search | Manufacturer: AUDI, Model Year: 2012, Model line: A5 COUPE, Model: AUDI A5 COUPE 2012Pages: 316, PDF Size: 78.59 MB
Page 5 of 316
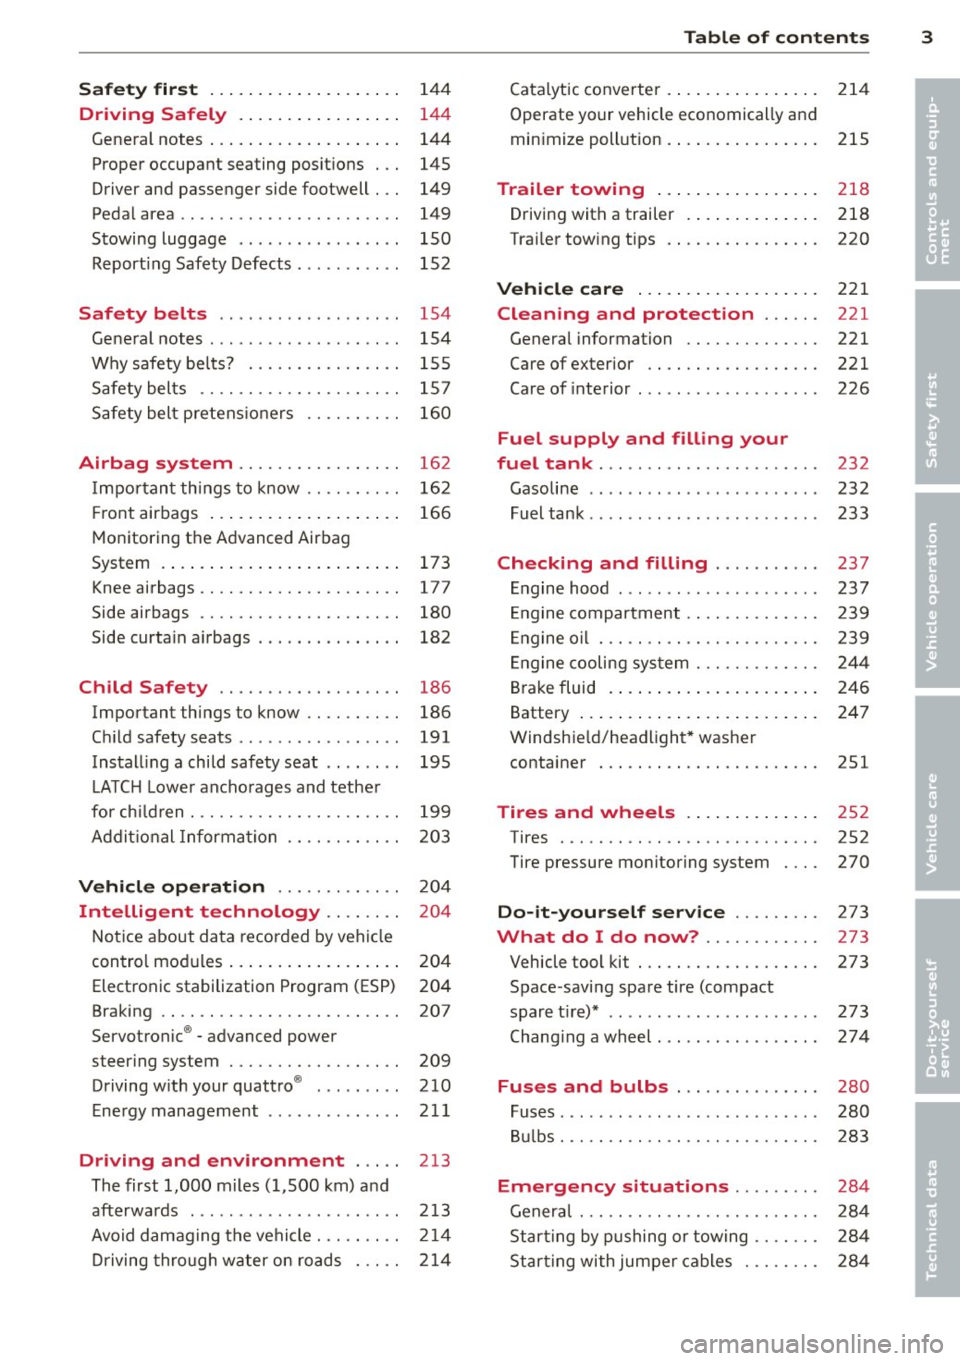
Safet y fir st ..... .... ... .. .. .. . .
Driving Safely .. .... ... .. .. .. . .
General notes ... ...... ... .. .. .. . .
Proper occupant seating posit ions . . .
Driver and passenger side footwell . . .
Pedal area .. .. .............. ... . .
Stowing luggage ... ...... .. .. .. . .
R eport ing Safety Defects . ......... . 1
4 4
144
144
145
149
149 150
152
Safety belts . . . . . . . . . . . . . . . . . . . 154
General notes . . . . . . . . . . . . . . . . . . . . 154
Why safety bel ts? . . . . . . . . . . . . . . . . 1 55
Safety belts . . . . . . . . . . . . . . . . . . . . . 157
Safety belt p re tens ioners . . . . . . . . . . 160
Airbag system . . . . . . . . . . . . . . . . . 16 2
I mpor tant th ings to know . . . . . . . . . . 16 2
Fr ont airbags . . . . . . . . . . . . . . . . . . . . 166
M onitoring the Advanced Airbag
System . . . . . . . . . . . . . . . . . . . . . . . . . 173
Knee airbags . . . . . . . . . . . . . . . . . . . . . 177
Side airbags . . . . . . . . . . . . . . . . . . . . . 180
Side curta in a irbags . . . . . . . . . . . . . . . 182
Ch ild Safety . . . . . . . . . . . . . . . . . . . 186
Important things to know . . . . . . . . . . 186
C hi ld safety seats . . . . . . . . . . . . . . . . . 191
Install ing a chi ld safety seat . . . . . . . . 195
L A TC H L ower ancho rages and tethe r
fo r ch ild ren . ............. .... .. .. 199
Addit io nal Informa tion 20 3
Vehicle operation . . . . . . . . . . . . . 204
Intelligent technology . . . . . . . . 204
N ot ice about da ta recorded by vehi cle
control mod ules . . . . . . . . . . . . . . . . . . 2 04
Electron ic stabilization Program (ESP) 204
Braking . . . . . . . . . . . . . . . . . . . . . . . . . 207
Servot ronic ® - advanced power
steering system . . . . . . . . . . . . . . . . . . 209
Driving w ith your quatt ro ® . . . . . . . . . 210
Ene rgy management . . . . . . . . . . . . . . 21 1
Driving and environment . . . . . 213
The first 1,000 m iles (1,500 km) a nd
afterwards . . . . . . . . . . . . . . . . . . . . . . 2 13
Avoid damaging the vehicle. .. .. .. .. 2 14
Dr iving thro ugh w ater o n roads . . . . . 2 14
Table of contents 3
Cata lyt ic converter . .. .. .. ..... ... .
Operate yo ur vehicle economically and
min imize poll ution . .. .. ... .... ... .
Trailer towing .... .. .. ..... ... .
Driving with a trailer . .. ..... ... .. .
Trai ler tow ing tips 214
215
218
218
220
Vehicle care
. . . . . . . . . . . . . . . . . . . 221
Cleaning and protection . . . . . . 221
General information . . . . . . . . . . . . . . 221
Care of exterior . . . . . . . . . . . . . . . . . . 221
Care of interior . . . . . . . . . . . . . . . . . . . 226
Fuel supply and filling your
fuel tank . . . . . . . . . . . . . . . . . . . . . . .
232
Gasoline . . . . . . . . . . . . . . . . . . . . . . . . 232
Fuel tank . . . . . . . . . . . . . . . . . . . . . . . . 233
Checking and filling . . . . . . . . . . . 237
En gine hood . . . . . . . . . . . . . . . . . . . . . 237
E ngine compartment . . . . . . . . . . . . . . 239
E ngine o il . . . . . . . . . . . . . . . . . . . . . . . 239
E ngine cooling sys tem . . . . . . . . . . . . . 244
Brake fluid . . . . . . . . . . . . . . . . . . . . . . 246
Battery . . . . . . . . . . . . . . . . . . . . . . . . . 247
Windsh ie ld/headligh t* was her
container . . . . . . . . . . . . . . . . . . . . . . . 251
Tires and wheels . . . . . . . . . . . . . . 252
Tires ..... .. .. .. ............... .
Tire pressure monitoring system 252
270
Do-it-yourself service
. . . . . . . . . 273
What do I do now? . . . . . . . . . . . . 273
Vehicle tool kit . . . . . . . . . . . . . . . . . . . 273
Space -saving spare tire (compact
spare t ire)* . . . . . . . . . . . . . . . . . . . . . . 273
Chang ing a wheel. .. . .. .. ..... ... . 274
Fuses and bulbs . . . . . . . . . . . . . . . 280
Fuses ... .. .. .. .. .. . .. .... .... .. . 280
B ulbs. . . . . . . . . . . . . . . . . . . . . . . . . . . 283
Emergency situations . . . . . . . . . 284
Genera l . . . . . . . . . . . . . . . . . . . . . . . . . 28 4
Star ting by p ushing or towing . . . . . . . 28 4
Star ting with jumper cables . . . . . . . . 284
•
•
Page 16 of 316
14 Instrum ent s and w arn ing /indic ato r light s
I
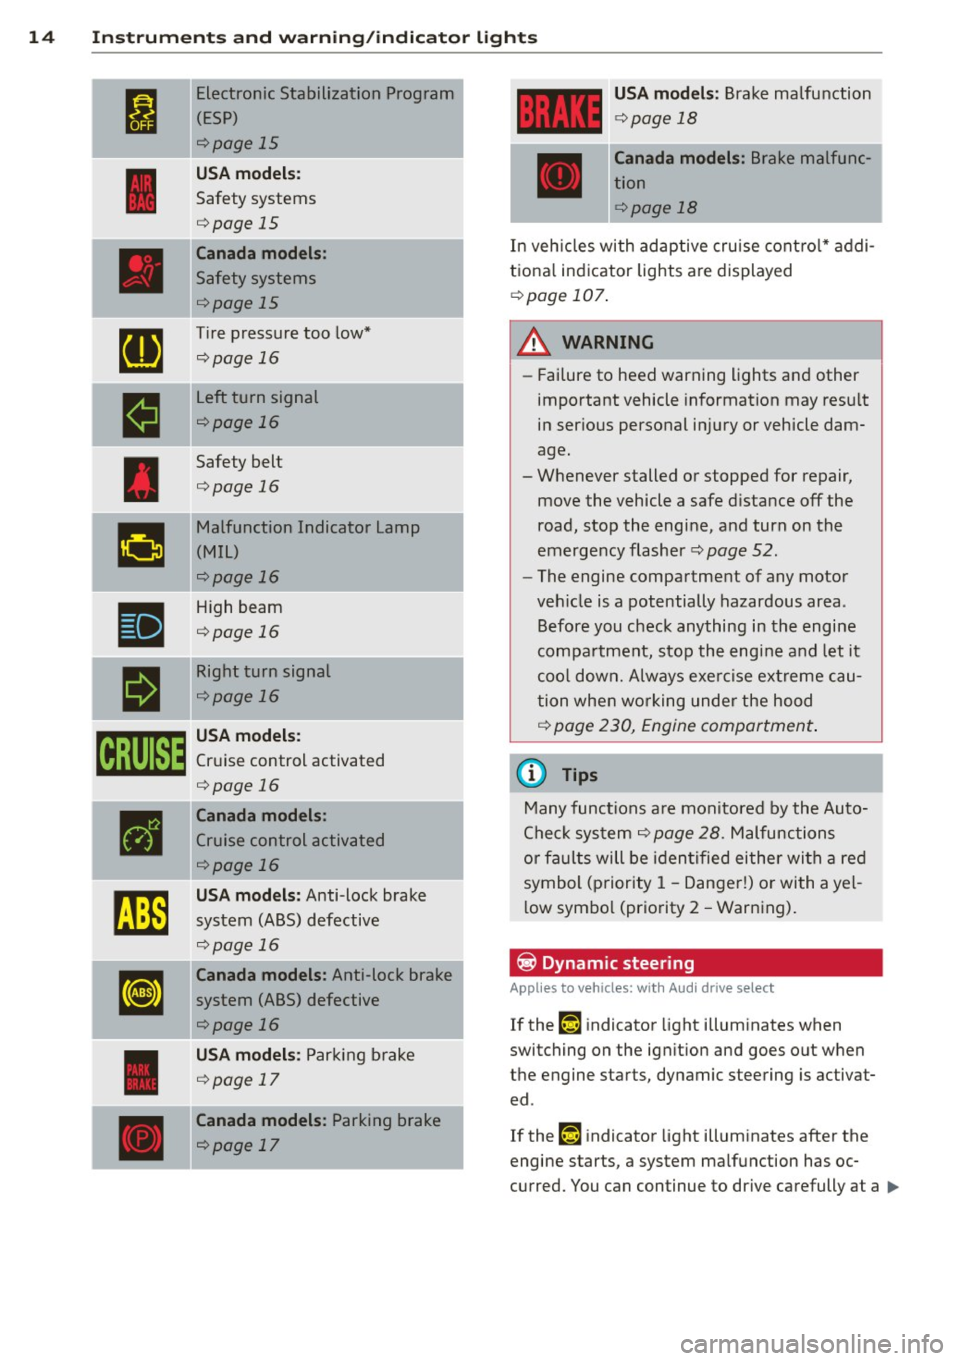
Electronic Stabilization Program
(ESP)
¢page 15
USA model s:
Safety systems
¢page 15
Canada model s:
Safety systems
¢page 15
[a
Tire pressure too low*
¢page 16
-
•
Left turn signal
¢page 16
Safety belt
¢page 16
g
Malfunction Indicator Lamp
(MIL)
¢page 16
•
High beam
¢page 16
a
Right turn signal
¢page 16
om
USA model s:
Cruise control activated
¢page 16
•
Canada models :
Cruise control activated
¢page 16
~
USA mod els: Anti-lock brake
system (ABS) defective
¢page 16
[IJ
Canada models : Anti-lock brake
system (ABS) defective
¢page 16
USA model s: Parking brake
¢page 17
Canada models : Parking brake
¢page 17
USA mod els: Brake malfunction
¢ page 18
Canada models : Brake malfunc
tion
¢page 18
In vehicles with adaptive cru ise cont ro l* addi
t iona l indicator lights are displayed
¢page 107.
A WARNING ~
-Failure to heed warning lights and other
important vehicle information may resu lt
in ser ious personal injury or vehicle dam
age.
- Whenever stalled or stopped for repair, move the vehicle a safe d istance
off the
road, stop the engine, and turn on the
emergency flasher
¢ page 52.
- The engine compartment of any motor
veh icle is a potentially hazardous area.
Before you check anything in the engine
compa rtment, stop the engine and let it
coo l down. Always exe rcise ex treme cau
tion when wo rking under the hood
¢ page 230, Engine compartment .
(D Tips
Many functions are monitored by the Auto
Check system
¢ page 28 . Malfunctions
or faults will be i den tified either wi th a re d
symbol (priority 1 -Danger!) or with a yel
l ow symbo l (priority
2 - Warning).
~ Dynamic steering
Applies to vehicles: with Audi drive select
If the ,-w j indicator light illuminates when
switching on the ign it ion and goes o ut w hen
the engine starts, dynamic steering is activat ed .
If the ,-w j indicator light illuminates after the
engine starts, a system ma lfunction has oc
curred. You can continue to drive carefully at a .,,.
Page 18 of 316
16 Instruments and warning/indicator lights
(l) Tire pressure monitoring system -
telltale indicator lamp
A ppl ies to vehicles: with tire pressure monit oring sys te m
The warning/indicator light appears in the
event of a significant loss of air pressure.
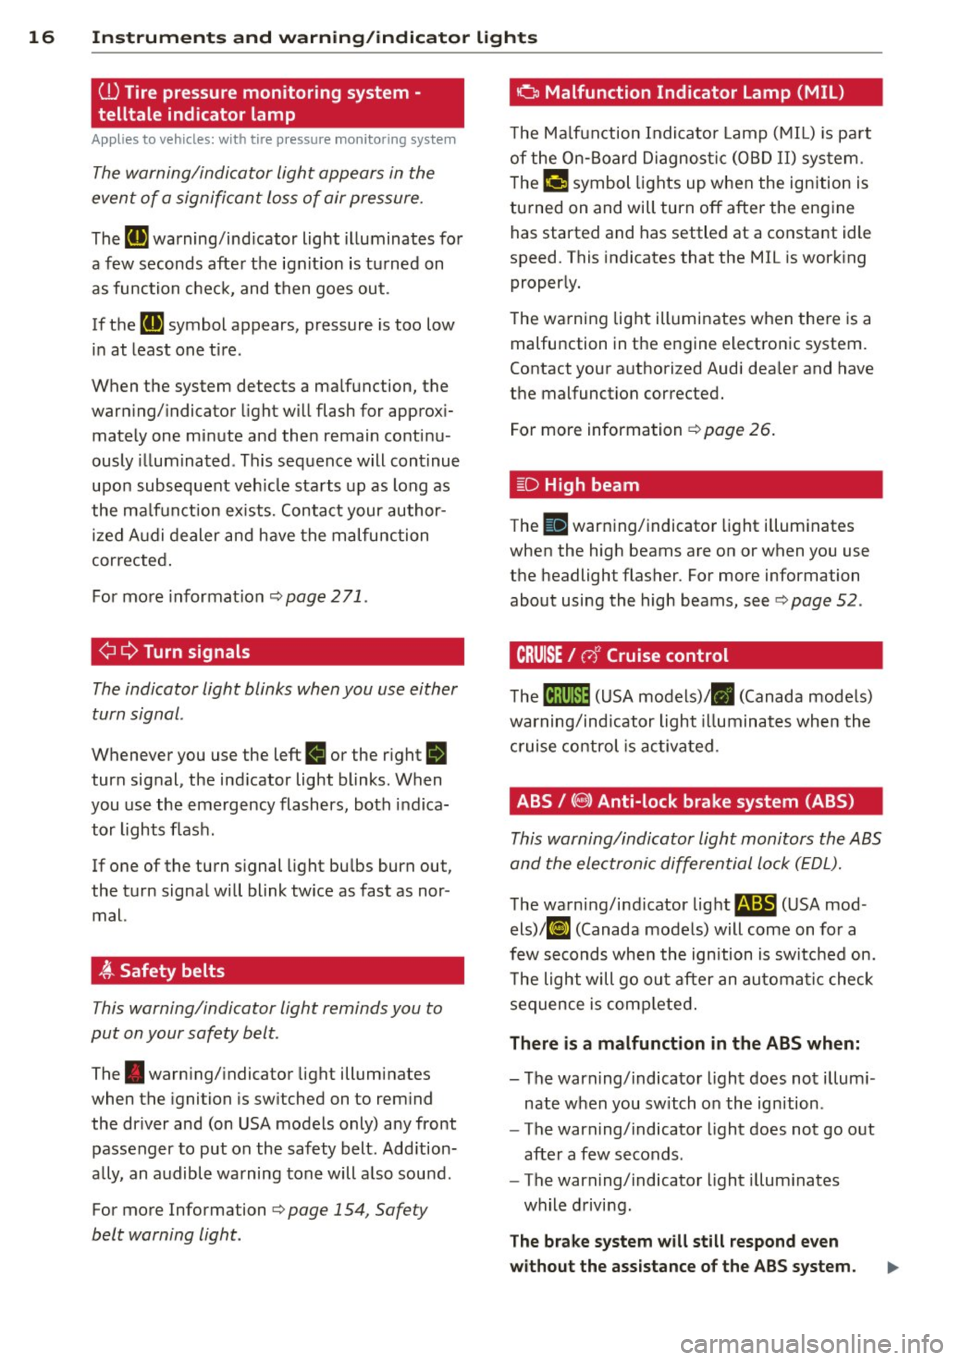
The ti) warning/ind icator light illuminates for
a few seconds after the ignit ion is turned on
as function check, and then goes out.
If the
(g symbol appears, pressure is too low
in at least one tire.
When the system detects a ma lfunction, the
warning/indicator light will flash for approx i
mately one minute and then remain continu
ously illum inated. Th is sequence will continue
upon subsequent vehicle starts up as long as
the ma lfunction ex ists. Contact your author
ized Audi dealer and have the malfunction
corrected .
For more informat ion
c::> page 2 71 .
¢i 9 Turn signals
The indicator light blinks when you use either
turn signal .
Whenever you use the left B or the right II
turn signal, the indicator light blinks. When
you use the emergency flashers , both indica
tor lights flash .
If one of the turn signal light bulbs burn out,
the turn signal will blink tw ice as fast as nor
mal.
~ Safety belts
This warning/indicator light reminds you to
put on your safety belt.
The . warning/ indicator light illum inates
when the ignition is switched on to remind
the dr iver and (on USA models only) any front
passenger to put on the safety belt. Add ition
a lly, an audible warning tone will a lso sound.
For more Information
c::> page 154, Safety
belt warning light.
o Malfunction Indicator Lamp (MIL)
The Ma lfunction Indicator Lamp (MIL) is part
of the On-Board Diagnostic (OBD II) system.
The
fcj symbol lights up when the ign ition is
turned on and will turn off after the engine
has started and has settled at a constant idle
speed. This indicates that the MIL is work ing
proper ly.
The warning light illuminates when there is a
malfunction in the engine electronic system.
Contact your authorized Audi dea ler and have
the malfunction corrected.
For more information
c::> page 26.
~D High beam
The II warning/indicator light illuminates
when the high beams are on or when you use
the headlight flasher. For more information
about using the high beams, see
c::> poge 52.
CRUISE/ (,)" Cruise control
Them! (USA models)/ . (Canada models)
warning/indicator light illuminates when the
cruise control is activated .
ABS/ (9) Anti-lock brake system (ABS)
This warning/indicator light monitors the ABS
and the electronic differential lock (EDL).
The warn ing/indicator light r4iS (USA mod
els)!Ei] (Canada models) will come on for a
few seconds when the ignition is switched on.
T he light will go out after an automatic check
sequence is completed.
There is a malfunction in the ABS when:
-The warning/indicator light does not i llum i
nate when you switch on the ignition .
- The warning/indicator light does not go out
after a few seconds.
- The warning/indicator light illuminates
while driving.
The brake system will still respond even
without the assistance of the ABS system.
Page 63 of 316

Seats and storage
General recommen
dations
Why is your seat adjustment so important?
The safety belts and the airbag system can
only provide maximum protection if the front
seats are correctly adjusted.
There are various ways of adjusting the front
seats to provide safe and comfortable support
for the driver and the front passenger. Adjust
your seat properly so that :
- you can easily and quick ly reach all the
switches and controls in the instrument
panel
- your body is properly supported thus reduc ing physical stress and fatigue
- the safety belts and airbag system can offe r
maximum protection
¢ page 162.
In the following sections, you will see exactly
how you can best adjust your seats .
There are special regulations and instructions
for installing a child safety seat on the front passenger's seat. Always follow the informa
tion regard ing child safety provided in
¢ page 186, Child Safety.
A WARNING
Incorrect seating position of the driver and
all other passengers can result in serious
personal injury.
- Always keep your feet on the f loor when
the vehicle is in motion -never p ut your
feet on top of the instrument panel, out
of the w indow or on top of the seat cush
ion. Th is applies especially to the passen
gers . If your seating position is incorrect,
you increase the r isk of injury in the case
of sudden braking or an acc ident. If the
airbag inflates and the seating position
is incorrect, this could result in persona l
injury or even death.
- It is important for bo th the driver and
front passenger to keep a distance of a t
Seat s an d sto rage 61
least 10 inches (25 cm) between them
selves and the steering wheel and/or in
strument panel. If you're s itting any
closer than th is, the airbag system can
not protect you properly. In addition, the
front seats and head restraints must be
adjusted to your body height so that t hey
can give you maximum protect ion.
- Always try to keep as much distance as
possible between yourself and the s teer
ing wheel o r instrument pane l.
- Do not adjust the driver's or front pas
senger's seat whi le the vehicle is moving.
Your sea t may move unexpected ly, caus
ing sudden loss of vehicle cont rol and
personal injury . If you adjust yo ur seat
while the veh icle is moving, yo u are out
of posit ion.
Driver's seat
The correct seat position is important for safe
and relaxed driving.
We recommend that you adjus t the dr iver's
seat in the fo llowing manner:
.,. Adjust t he seat in fore and aft direction so
that you can easily push the peda ls to the
floor wh ile keeping your knees s lightly bent
i:::> A in Why is your seat adjustment so im
portant? on page 61.
.,. Adjust the seatback so that when you sit
w ith your back against the seatback, you can
still grasp the top of the steering wheel.
.,. Adjust the head restraint so the upper edge
is as even as possible with the top of your head . If that is not poss ible , try to adjust
the head res traint so that it is as close to
this pos ition as possib le
i:::> page 67.
A WARNING
Never place any objects in the dr iver's foot
well. An object could get into the pedal
area and interfere with pedal funct ion . In
case of sudden braking or an acc ident, you
wo uld not be able to brake or accelerate.
Page 64 of 316

62 Seats and storage
Front passenger's seat
Always move the front passenger seat into
the rearmost position.
To avoid contact with the airbag while it is de
ploying, do not sit any closer to the instru
ment panel than necessa ry and always wear
the three-point safety belt provided adjusted
correctly. We recommend that you adjust the
passenger's seat i n the fol low ing ma nner:
"' Bring the backrest up to an (almost) upright
posit ion.
Do not ride w ith the seat reclined .
"' Adjust the head restraint so the upper edge
i s as even a s poss ible with the top of yo ur
head.
If that is not possible, try to adjust
the head rest raint so that it is as close to
this position as possible ¢
page 67.
"' Place your feet on the floor in front of the
passenger's seat .
Adjusting front seats
manually
Seat adjustment controls
Applies to vehicles: with man uaUy adjustable seats
The seat has several adjustmen ts.
Fig . 66 Contro ls on the drive r's seat
Some the controls shown are only installed in
certain model versions or are supplied as an
option.
Controls
CD Fore -and-aft adjustment
@ Upper thigh support*
@ Adjusting seat c ush ion angle*
@ Adjusting lumbar support *
® Adjust ing seat height
@ Adjusting seatback ang le
Adjusting the seat
Appl ies to vehicles: wit h manually adjustable seats
Position and shape of the seat can be adj ust
ed manually to ensure safe and comfortable
seating .
Read and fo llow the warning notices¢ & be
f ore you adjust yo ur seat.
Fore-and-aft adjustment
"' Pull the lever CD¢ page 62, fig . 66 up and
push the seat to the desired position .
"' Release the lever CD and cont in ue to move
t he seat until it loc ks in to pl ace.
Lengthening or shortening upper thigh
support*
"' Lift the b utton @under the seat cush ion.
The fron t seat cush ion moves forw ard under
spri ng force .
"' Push the seat c ushion back when yo u have
fi nished using it .
Adjusting seat cushion angle*
"' Pull or push the lever@¢ page 62, fig. 66
up or down (pumping mo tion).
Ad justing the curvature of the lumbar
support*
"' Push the swi tc h plate @) forward o r bac k
ward to increase o r reduce the curvature.
Ad justing the height of the lumbar
support*
"' Push the switc h plate @) up or dow n to po
sit ion the curva ture h igher or lower.
Raising or lowering seat height
"' Pull or push the lever®¢ page 62, fig . 66
up or down (pumping motion).
Adju sting seatback angle
"' Remove we ight from the seatback (do not
lean against it).
"' Turn th e hand wheel@¢
page 62 , fig . 66
to adjust the angle of the seatback accord -
ing ly.
Iii>
Page 65 of 316

A WARNING
-Adjust the driver's seat only when the ve
hicle is stationary . You risk an accident
otherwise .
- Exercise caution when adjusting the
seats. Adjusting the seat carelessly or
without checking can pinch hands and
fingers.
- While the vehicle is moving, the seat
backs of the front seats must not be in
clined too far to the rear because the ef
fectiveness of the safety belts and the
airbag system is severely compromised -
there is a risk of injury.
Easy entry function
Applies to vehicles: with man ually adjustable seats
The easy entry function makes it easier for
the rear passengers to enter and leave the ve
hicle.
Fig. 67 Driver's seat: Latch on the seatback
Tilt the seatback forward and push the
front seats forward
~ Lift the latch c::> fig. 67.
~ Hold the latch and tilt the seatback for
wa rd.
~ Re lease the latch and push the seat for
ward .
Push the front seats back and fold the
seatback up
~ Push the front seat back before you fold the
seat backs up. Otherwise the seat cannot be
pushed back to its original position.
Seats and storage 63
A WARNING
Always be certain that the front seats are
upright and securely latched when you
drive.
Power front seat
adjustment
Seat adjustment controls
App lies to vehicles: wit h powe r adjustable seats
The operating logic for the switches corre
sponds to the construction and function of
the seat.
Fig. 68 Front seat: Controls for seat ad justment
The switches to adjust the seat cush ion and
the seatback correspond to the layout , the de
sign and the function of the seat. Th e seats
are adjusted by moving the switches following
this logic.
Controls
@ Lumbar support*
@ Seat adjustment
© Seat back and head restraint height ad
justment*
@ Upper thigh support*
Adjusting the seat
Appl ies to vehicles: wi th power adjustable seats
Position, angle and shape of the seat can be
adjusted electrically to ensure safe and com
fortable seating.
Read and fo llow the warning notices c::> .&. be
fore you adjust your seat.
Page 70 of 316

68 Seats and storage
R emoving the h ead re straint s
.,. Fold the backrest forward
Q page 70.
.,. Move the head restraint upward as far as it
can go.
.,. Press the release @
Q fig. 74 with the me
chanical key
Q page 39 and the button @
r:::> fig. 73. Pull the head restraint out of the
backrest at the same timer:::>&_ .
I n st all ing th e head re st ra ints
.,. Slide the posts on the head restra int down
into the guides until you feel the posts click
into place.
.,. Press the button @
Q fig. 73 and slide the
head restraint all the way down. You shou ld
not be able to pull the head restra int out of
the backrest .
So that the driver can have a better view to
the rear, the head restraints should be pushed
down completely when the rear seats are not
occupied.
A WARNING
- Only remove the rear seat head restraints
when necessa ry in order to i nstall a chi ld
seat. Install the head restraint again im
mediately once the child seat is removed.
Driv ing without head restraints or with
head restraints that are not properly ad
justed increases the risk of serious or fa
tal neck injury dramatically .
- Read and heed all WARNINGS
r:::>page 147.
@ Tips
Correctly adjusted head restraints and
safety belts are an extremely effective
comb inat ion of safety features.
Center armrest
The center armrest can be adjusted to several
levels.
0 g ~
"' "' a,
F ig. 75 Arm rest between the driver's/front passenger's
seats.
A dj usting the cent er arm rest
.,. To adjust the ang le, raise the arm rest from
the starting position
r:::> fig . 75 detent by de
tent.
.. To bring the armrest back into the starting
position, raise it out of the top detent and
fold it back down.
The armrest can slide forward and back.
Luggage compartment
Loading luggage compartment
Items of luggage must be stowed securely.
Fig. 76 Place heavy objects as far forward as possib le.
Note the following to preserve the ve hicle's
good handling charac teristics .
.,. Distribute the load as evenly as possible .
.,. Place heavy objects as far forward as poss i-
ble
Q fig . 76. .,.
Page 72 of 316
70 Seats and storage
A WARNING
For reasons of strength, only objects with
a maximum weight of 5 kg should be car
ried in the storage net. Heavier objects are
not adequately secured. There is risk of
personal injury.
Enlarging cargo capacity of the vehicle
interior
Appl ies to vehicles: with folding rear seatback
The seat backs can be folded forward to en
large the cargo capacity.
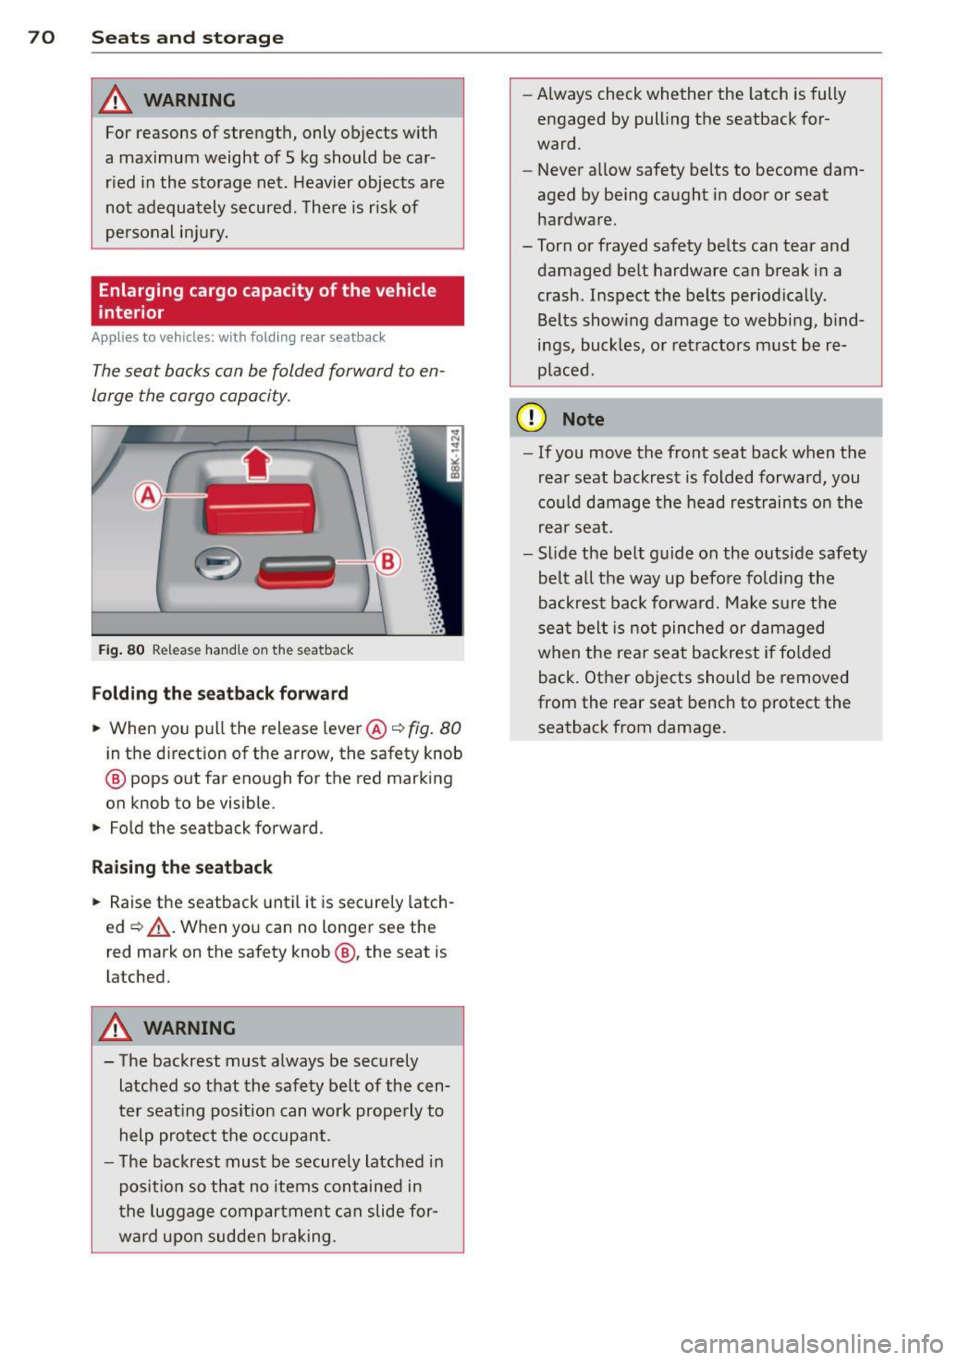
Fig. 80 Release handle on the seatback
Folding the seatback forward
., When you pull the release lever @ c::> fig. 80
in the direction of the arrow, the safety knob
@ pops out far enough for the red marking
on knob to be visible .
., Fold the seatback forward.
Raising the seatback
., Raise the seatback until it is securely latch
ed ~,&.. . When you can no longer see the
red mark on the safety knob@, the seat is
latched.
A WARNING
- The backrest must always be securely
latched so that the safety belt of the cen
ter seating position can work properly to
help protect the occupant.
- The backrest must be securely latched in
position so that no items contained in
the luggage compartment can slide for
ward upon sudden braking . -
Always check whether the latch is fully
engaged by pulling the seatback for
ward.
- Never allow safety belts to become dam
aged by being caught in door or seat hardware.
-Torn or frayed safety belts can tear and
damaged belt hardware can break in a
crash . Inspect the belts periodically.
Belts showing damage to webbing, bind
ings, buckles, or retractors must be re
placed.
(D Note
- If you move the front seat back when the
rear seat backrest is folded forward, you
could damage the head restraints on the
rear seat.
- Slide the belt guide on the outside safety
belt all the way up before folding the
backrest back forward. Make sure the
seat belt is not pinched or damaged
when the rear seat backrest if folded
back. Other objects should be removed
from the rear seat bench to protect the
seatback from damage.
Page 73 of 316
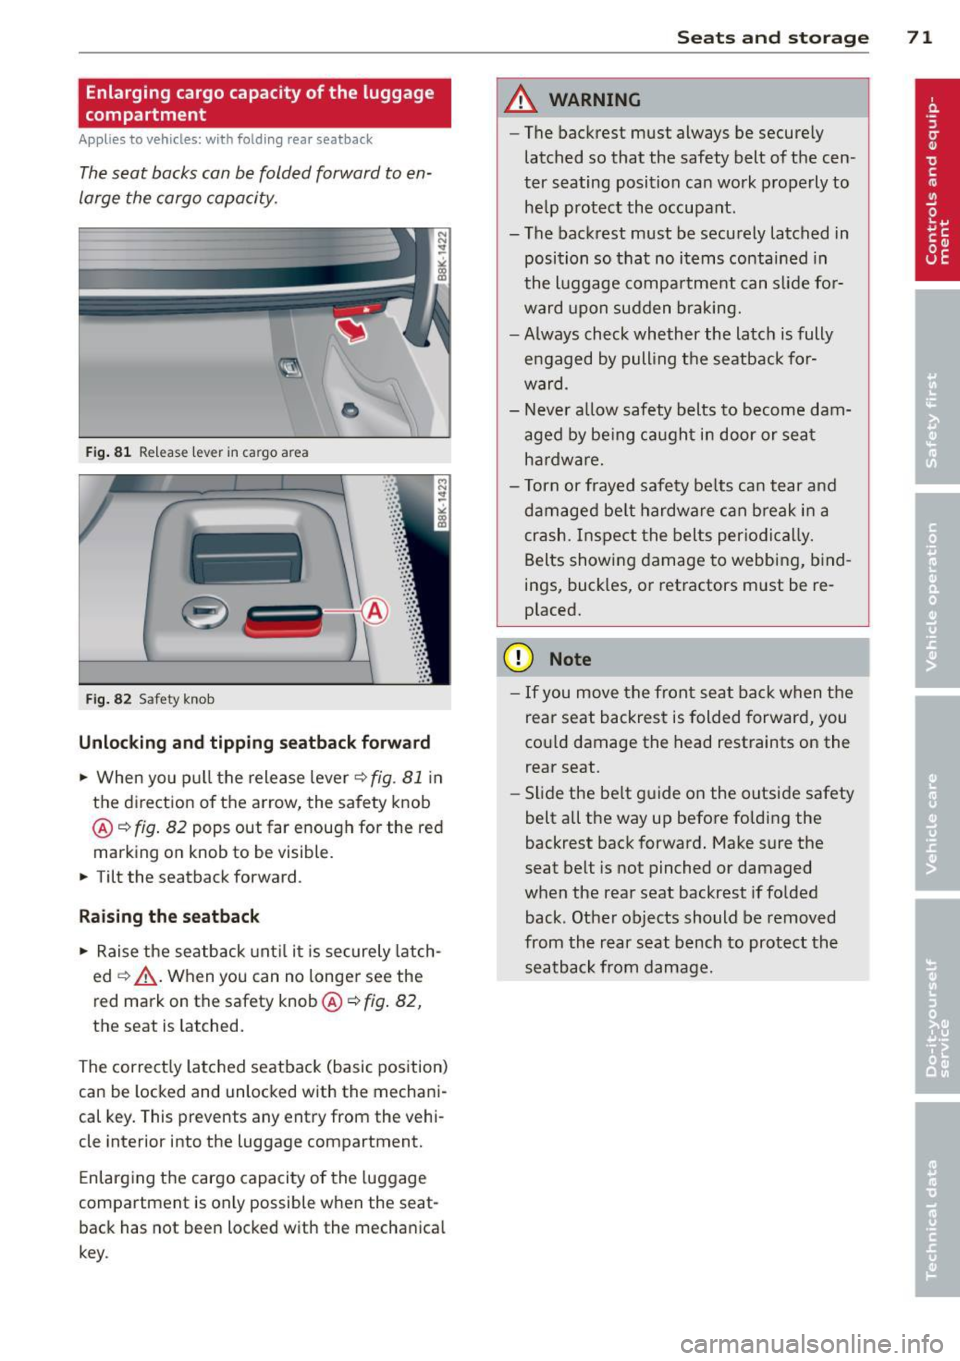
Enlarging cargo capacity of the luggage
compartment
Applies to vehicles: with fold ing rear sea tback
The seat backs can be folded forward to en
large the cargo capacity .
Fig. 81 Release lever in cargo area
'
-
-
. -~ .
Fig. 82 Safety knob
•
·:: ·:: ·:: · : : ·::
· ::
... : :·: ·::
· ::
·:: ·:: · ::
· ::
· :: ·:: ~: :
· ::
· ::
· ::
· :: ... .. ...
Unlocking and tipping seatback forward
.. When you pu ll the release lever c::> fig . 81 in
the direction of the arrow, the safety knob
@ c::>
fig. 82 pops out far enough for the red
marking on knob to be visible.
.. Tilt the seatback forward .
Raising the seatback
.. Raise the seatback until it is securely latch
ed
c::> _& . When you can no longer see the
red mark on the safety knob @c::>
fig. 82,
the seat is Latched.
The correct ly Latched seatback (basic pos ition)
can be Locked and unlocked with the mechani
cal key. This prevents any entry from the vehi
cle inter ior into the Luggage compartment.
Enlarging the cargo capacity of the luggage
compartment is only possible when the seat back has not been locked with the mechanical
key .
Seats and storage 71
A WARNING
-The backrest must always be secure ly
latched so that the safety belt of th e cen
ter seating position can work properly to
he lp protect the occupant.
- The backrest must be securely Latched in
position so that no items contained in
the Luggage compartment can slide fo r
ward upon sudden braking.
- Always check whether the Latch is fully
e ngaged by pull ing the seatback for
ward.
- Never allow safety belts to become dam
aged by being caught in door or seat
hardware.
- Torn or frayed safety be lts can tear and
damaged belt hardware can break in a
crash. Inspect the belts periodically.
Belts showing damage to webbing, bind
ings, buckles, or retractors must be re
placed.
(D Note
- If you move the front seat back when the
rear seat backrest is folded forward, you
co uld damage the head restraints on the
rear seat .
- Slide the be lt guide on the outside safety
belt all the way up before folding the
backrest back forward. Make sure the
seat belt is not pinched or damaged
when the rear seat backrest if folded
back . Other objects should be removed
from the rear seat bench to protect the
seatback from damage.
Page 75 of 316
button down and push the cover for
ward.
- The pass-through can be locked and un
l ocked with the vehicle mechanical key
r=;, fig. 84.
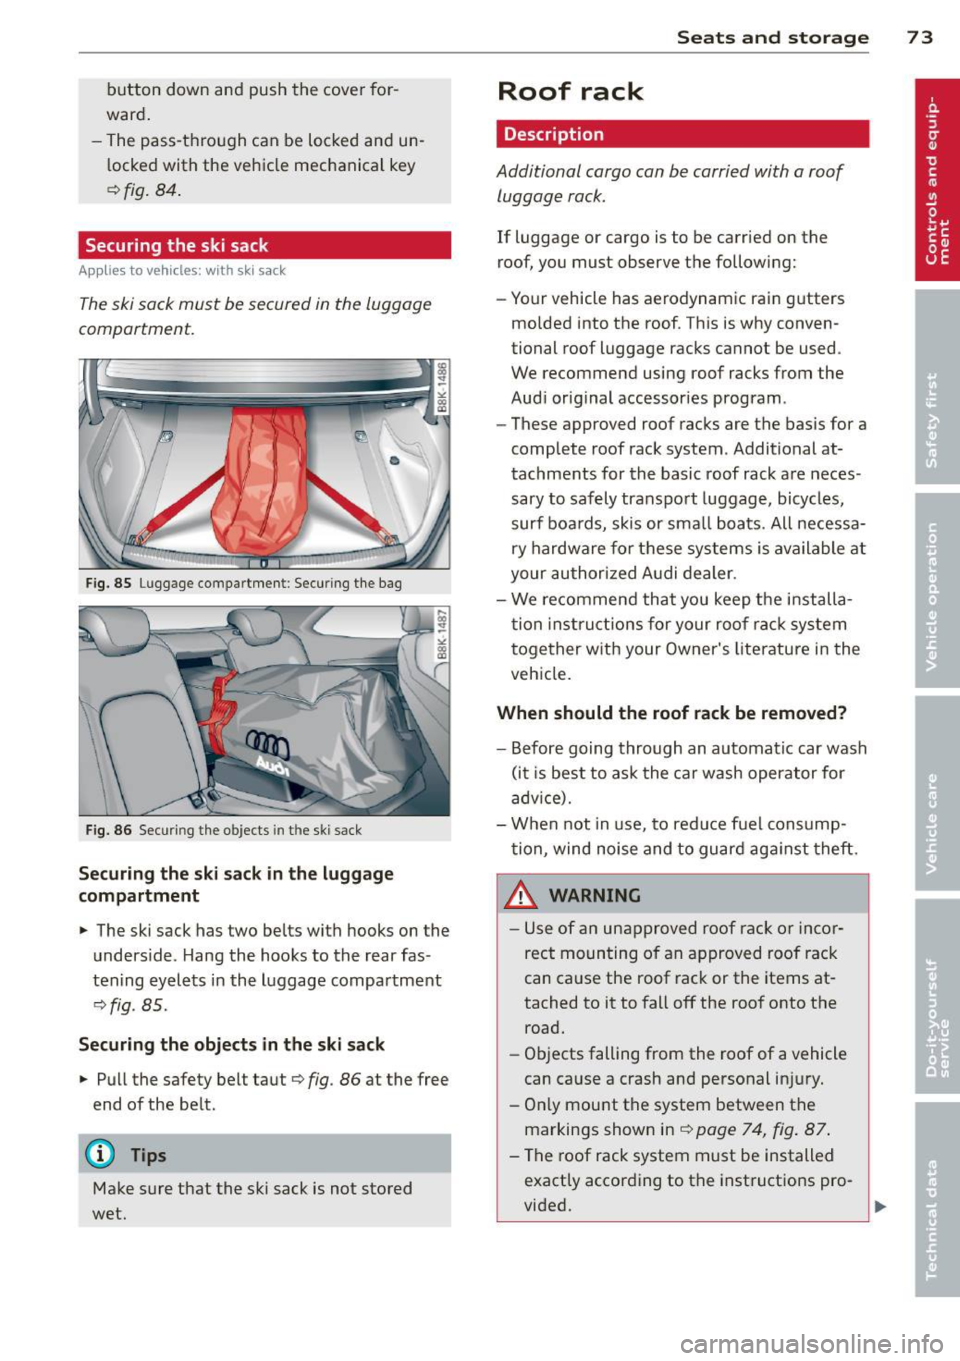
Securing the ski sack
Applies to vehicles: with ski sack
The ski sack must be secured in the luggage
compartment.
F ig. 85 Luggage compartment : Securing the bag
Fig. 86 Securing the objects in t he ski sack
Securing the ski sack in the luggage
compartment
.,. The ski sack has two belts with hooks on the
underside . Hang the hooks to the rear fas
tening eyelets in the luggage compartment
¢ fig . 85.
Securing the objects in the ski sack
.,. Pull the safety belt taut ¢ fig. 86 at the free
end of the be lt.
(D Tips
Make sure that the ski sack is not stored
wet.
Seats and storage 73
Roof rack
Description
Additional cargo can be carried with a roof
luggage rack .
If luggage or cargo is to be carried on the
roof, you must observe the following:
- Your vehicle has aerodynamic rain gutters
molded into the roof . This is why conven
tional roof luggage racks cannot be used .
We recommend using roof racks from the
Aud i original accessories program .
- These approved roof racks are the basis for a
complete roof rack system. Additional at
tachments for the basic roof rack are neces
sary to safely transpo rt luggage, bicycles,
surf boards, skis or sma ll boats. All necessa
ry hardware for these systems is available at
your authorized Audi dealer.
- We recommend that you keep the installa
tion instructions for your roo f rack system
together with your Owner's literature in the
vehicle.
When should the roof rack be removed?
-Before going through an automatic car wash
(it is best to ask the car wash operator for
advice).
- When not in use, to reduce fuel consump
tion, wind noise and to guard aga inst theft.
8_ WARNING
- Use of an unapproved roof rack or incor
rect mounting of an approved roof rack
can cause the roof rack or the items at
tached to it to fall off the roof onto the
road.
- Objects falling from the roof of a vehicle
can cause a crash and personal in jury.
- Only mount the system between the
markings shown in
r=;, page 74, fig. 87 .
- The roof rack system must be installed
exactly according to the instructions pro-
-
vided. .,,.