homelink AUDI A5 COUPE 2012 Owners Manual
[x] Cancel search | Manufacturer: AUDI, Model Year: 2012, Model line: A5 COUPE, Model: AUDI A5 COUPE 2012Pages: 316, PDF Size: 78.59 MB
Page 4 of 316
2 Table of contents Vehicle literature .. .. .. .. .. ... .
About this Owner's Manual ...
Controls and equipment .. ... .
Instruments and controls .. . .
General illus tration .... ... .. .. ... .
Instruments and warning/
indicator lights ........ .. .. .. . .
Ins truments . .. .. ..... ... .. .. ... .
War ning/ indi cator lights ... .. ... .. .
Driver information display .. . .
Introduct ion . .. .. ..... ... .. .. ... .
Trip computer .. .. ..... ... .. .. ... .
Efficiency program ........ .. .. ... .
On-Board Diagnostic system (OBD) . . .
Elect ronic speed limiter .. .. .. .. .. . .
Speed war ning system ...... ..... . .
Auto Check Control ........ ... .. . .
Opening and closing .. .. .. .. . .
Keys .. .. .. ................ ... . .
P owe r locking system . .. .. .. .. .. . .
Opening an d clos ing rear lid/t runk lid
Tr un k esc ape h and le ...... .. .. .. . .
P owe r win dows .. ..... ... .. .. ... .
Va let park ing .. . ...... ... .. .. ... .
Panoramic tilting s unroof . ... .. .. . .
Clear vision .. .. ..... ... .. .. ... .
Lights ..... ... .. ..... ... .. .. ... .
Inter ior lights . ........... .. .. ... .
V1s1on . .. .. .................... .
W iper and washer system .. .... ... .
M irrors .. .. ... .... .... .. .. .. .. . .
Di gita l compass ........... ... .. . .
Seats and storage ...... ..... . .
Ge neral recomme ndat ions ..... .. . .
Ad just ing front seats manually .. .. . .
E asy en try f unction ....... .. .. .. . .
P owe r fron t se at adjus tment . ... .. . .
E asy en try f unction .... ... .. .. ... .
Seat memo ry .. .. ..... ... .. .. ... .
H ead restraints .. ..... ... .. .. ... .
Center a rm rest ........... .. .. .. . .
5
6
8
8
8
10
1 0
13
1 9
1 9
22
24
26
27
27
28
37
37
40
44
45
46
47
4 8
4 9
4 9
53
54
55
57
59
61
6 1
62
63
63
6 4
65
6 7
68
Lugga ge compartment . ..... .... . .
Roof rack ..... .. .. ... ..... ... .. .
Beverage holders .... .. .. ... ... .. .
Ashtray ... .... .. ............. .. .
Cigarette lighter/outlet ......... .. .
Storage ...... ... .. ............. . 68
73
75
75
76
76
Warm and cold . . . . . . . . . . . . . . . . 79
Del uxe a utomat ic cl imate co ntrol . . . . 79
Del uxe a utomat ic cl imat e co ntrol pl us 83
Deluxe a utomat ic c limate co ntrol pl us
- basic setti ngs . . . . . . . . . . . . . . . . . . . 90
Seat heating . . . . . . . . . . . . . . . . . . . . .
91
On the road . . . . . . . . . . . . . . . . . . . 9 2
Stee ring . . . . . . . . . . . . . . . . . . . . . . . . 92
Ig nition loc k an d ign it ion sw itch . . . . . 92
S tar ting and stopping the engine with
convenience key . . . . . . . . . . . . . . . . . . 94
E lectromechanical pa rking bra ke . . . . 96
Cruise cont ro l . . . . . . . . . . . . . . . . . . . . 99
Adaptive cruise control . . . . . . . 102
Speed and distance control system . . 102
Driver informat io n . . . . . . . . . . . . . . . . 107
System limitations ... .......... .. . 112
Audi braking guard . . . . . . . . . . . . . . . 113
Audi side assist
Lane change ass istant ............ .
Not es ..... ... .. .. ... ....... ... .
Audi drive select .. ... .... .. .. .
D riving settings
Transmission
116
116
122
124
124
126
Manua l transm ission . . . . . . . . . . . . . . 126
Automa tic transmiss io n . . . . . . . . . . . 126
Park assist . . . . . . . . . . . . . . . . . . . . . 133
Pa rking sys tem . . . . . . . . . . . . . . . . . . . 133
Pa rking sys tem (rea r) . . . . . . . . . . . . . . 133
Pa rking sys tem ( rea r, wi th rear view
cam era) . . . . . . . . . . . . . . . . . . . . . . . .
13 4
Homelink ® . . . . . . . . . . . . . . . . . . . . 140
U niversa l remote cont rol . . . . . . . . . . . 14 0
Page 142 of 316
140 Homelink®
Homelink®
Universal remote
control
General information
Applies to vehicles: with Home link® universal remote
control
The Homelink ® feature can learn up to three
radio frequency codes for most current trans
mitters used for operating garage doors, es tate gates, home or outdoor lighting sys
tems, and other devices.
You must first program the Homelink ® trans
mitter before you can use the system
~ page 141, Programming the Homelink ®
transmitter.
In order to program the Home link ® transmit
ter for dev ices utilizing rolling code, a second
pe rson on a ladder who ca n safe ly reach the
garage door opener motor is recommended. I t is also necessary to locate the "learn" but
ton on your garage door opener motor . Refer
to the operating instructions for the opener,
as the location and color of this button may
vary by manufacturer.
You can still use the origina l remote contro l
for the device at any time .
.&_ WARNING
-
- Never use the Homelink ® transmitte r
with any garage door opener that does
have not the safety stop and reverse fea
tu re as requ ired by federa l safety stand
ards. Th is includes any garage door open
er mode l manufact ured before April 1,
1982.
- A garage door op ener which cannot de
te ct an object, signa ling the doo r to stop
and reverse does no t mee t current feder
al safety s tandards. Using a garage doo r
opener wi tho ut these features increases
risk of serious in jury or death.
- F or sa fety reasons never release the
par king brake or start the engine w hile
anyone is stand ing in front of the vehicle . -
A garage door or an estate gate may
sometimes be set in mot ion when the
Homelink ® remote control is being pro
grammed. If the device is repeatedly ac
tivated, this can overstrain motor and
damage its e lectr ical components -an
overheated moto r is a fire hazard !
- To avo id possible injuries or property
damage, please always make abso lutely
certain that no persons o r obje cts are lo
ca ted in the range of motion o f any
eq uipment being ope rated .
(D Tips
-If you would li ke more information on
Home link ®, w here to purchase the
Homel ink ® compatib le produc ts, or
would like to purchase the Homelink ®
Home Lighting Package , please ca ll to ll
free: 1-800-355-3515 .
- For Declaration of Compliance to United States FCC and Ind ustry Canada reg ula
tions~
page 296.
Page 143 of 316
Programming the Homelink®
transmitter
Applies to vehicles: with Horne link® universal remote
control
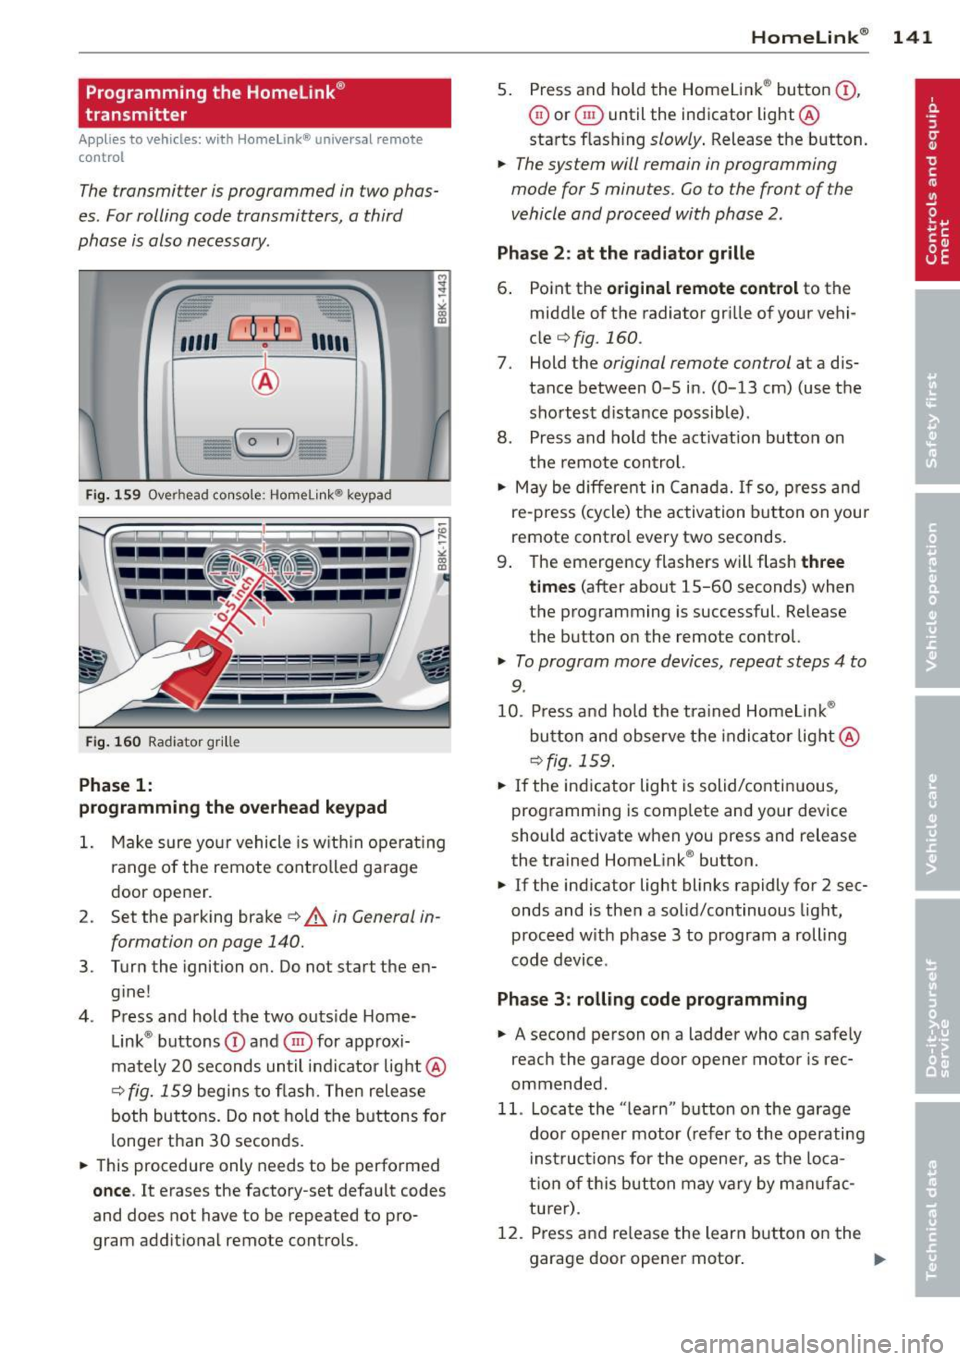
The transmitter is programmed in two phas
es. For rolling code transmitters, a third
phase is also necessary .
/
'/' ~ ..,.-,,,, ~
;,, r ,O :O·,) ,,,, ;
®
)
I~-,- ( o
-
,)- ~ (> ~
Fig. 159 Ove rhead co nsole: Homelink ® keypad
Fig. 160 Radiator gr ille
Phase 1:
programming the overhead keypad
l
~
" CX> !E
;
CX> a,
1. Make sure your vehicle is w ithin operat ing
range of the remote controlled garage
door opener.
2 . Set the parking brake~
A in General in
forma tion on page 140.
3 . Turn the ignition on. Do not start the en
gine!
4. Press and hold the two outs ide Home
Link ® buttons
(D and @for approxi
mately 20 seconds until indicator light@
c:;, fig. 159 begins to flash. Then release
both buttons. Do not hold the buttons for
longer than
30 seconds .
• This procedure only needs to be performed
once. It erases the factory-set default codes
and does not have to be repeated to pro
gram additional remote controls .
Homelink® 141
5. Press and hold the Homelink® button (D ,
@ or @ until the indicator light @
starts flashing
slowly . Release the button.
• The system will remain in programming
mode for 5 minutes. Co to the front of the
vehicle and proceed with phase 2 .
Phase 2: at the radiator grille
6. Point the original remote control to the
middle of the radiator grille of your vehi
cle
¢ fig. 160.
7. Hold the original remote control at a dis
tance between
0 -5 in. (0-13 cm) (use the
shortest distance possible) .
8. Press and hold the activation button on
the remote control.
• May be different in Canada. If so, press and
re-press (cycle) the activation button on your
remote contro l every two seconds.
9. The emergency flashers will flash
three
times
(after about 15-60 seconds) when
the programming is successful. Release
the button on the remote control.
• To program more devices, repeat steps 4 to
9.
10 . Press and hold the trained Homelink ®
button and observe the indicator light@
¢fig. 159.
• If the indicator light is solid/continuous ,
programming is comp lete and your device
should activate when you press and release
the trained Homelink ® button.
• If the indicator light blinks rapidly for 2 sec
onds and is then a solid/continuous light,
proceed w ith phase 3 to program a rolling
code device .
Phase 3: rolling code programming
• A second person on a ladder who can safely
reach the garage door opener motor is rec
ommended.
11. Locate the "learn" button on the garage
door opener motor (refer to the operating
instructions for the opener, as the loca
t ion of this button may vary by man ufac
turer) .
12 . Press and re lease the learn button on the
garage door opener motor .
Page 144 of 316
142 Homelink®
• Note: once the button is pressed, there are
30 second s in which to initiate the next
step.
13. On the Homel ink ® keypad inside the vehi
cle, firmly press and hold the Homelink ®
button previously p rogrammed in phases
1 and 2 for two seconds and release. Re
peat this sequence
twice .
• Some vehicles may req uire the press/hold/
release sequence up to t hree t imes to com
p lete the training p rocess.
• HomeLink ® should now activate your rolling
code equipped device .
If the 5 minute time limit is exceeded, the
emergency flashe rs will fla sh o ne t ime to in
dicate that the process has been terminated .
In th is case, repeat steps 4 throug h 9.
If the emergency flashe rs do not flas h three
times (after about 15 -60 seconds), program
ming was not successful. In this case, repeat
steps 4 through 9.
Remote control uni ts for g arage door openers
in Canada a re set to stop transmitting radio
frequency signals after two seconds . This time
may not be sufficient for the Homelink ® sys
tem to learn the radio frequency signal. Per
form all other steps as described above.
Operating the Homelink ® transmitter
App lies to vehicles: with Home Link® universa l remote
co ntrol
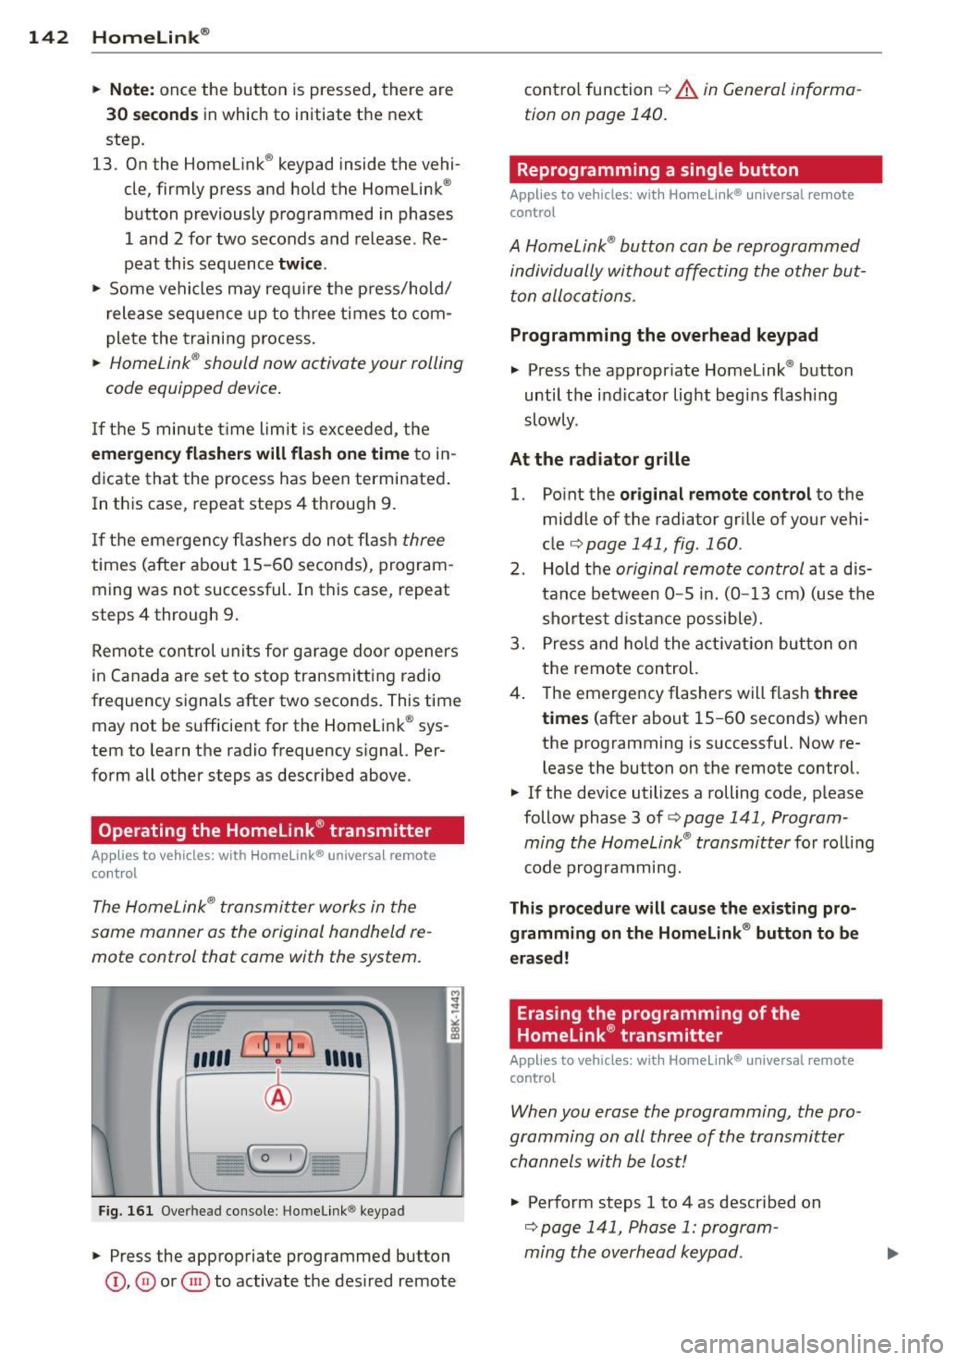
The HomeLink ® transmitter works in the
same manner as the original handheld re
mote control that come with the system.
~.,, r , o : o-) ,,~
®
Fig. 161 Overhead co nsole: Homelink ® keypad
• Press the appropriate programmed button
©, 0 or @ to activate the des ired remote cont
ro l function ¢
& in General informa
tion on page 140.
Reprogramming a single button
Applies to vehicles: wi th Homeli nk® un iversal remote
contro l
A HomeLink ® button can be reprogrammed
individually without affecting the other but
ton allocations.
Programming the overhead keypad
• Press the appropriate Homelink ® button
until the indicator lig ht begins flash ing
slowly.
At the radiator grille
1.
Po int the original remote cont rol to the
middle of the radiator gr ille of your vehi
cle
¢page 141, fig. 160 .
2. Hold t he original remote control at a dis
tance between 0 -5 i n. (0 -13 cm) (use the
shortest d istance possible).
3. Press and ho ld the a ct ivat ion button on
the remote control.
4 . The emerge ncy flashers will flash
th ree
times
(after about 15 -60 seconds) when
the programming is successful. Now re
lease the button on the remote control.
• If the dev ice utilizes a rolling code, p lease
follow phase 3 of¢
page 141, Program
ming the HomeLink ® transmitter
for rol ling
code programming.
Thi s pro cedure will cause the existing pro
g ramming on th e Homelink ® button to b e
era sed !
Erasing the programming of the
Homelink ® transmitter
Applies to vehicles : wi th Homeli nk® uni versal remote
contro l
When you erase the programming, the pro
gramming on all three of the transmitter
channels with be lost!
• Perform steps 1 to 4 as described on
¢page 141, Phase 1: program
ming the overhead keypad.
Page 145 of 316
When completed, the Homelink® system will
be in the programming mode and is then
ready to learn the codes for remote contro lled
devices.
@ Tips
- Programmed buttons cannot be erased
i ndividually.
- For security reasons you are advised to
erase the programming of the Home
Link ® system before you sell your vehicle.
Homelink ® 143
Page 282 of 316
280 Fuses and bulbs
Fuses and bulbs
Fuses
Replacing a fuse
Fuses that have blown will have metal strips
that have burned through.
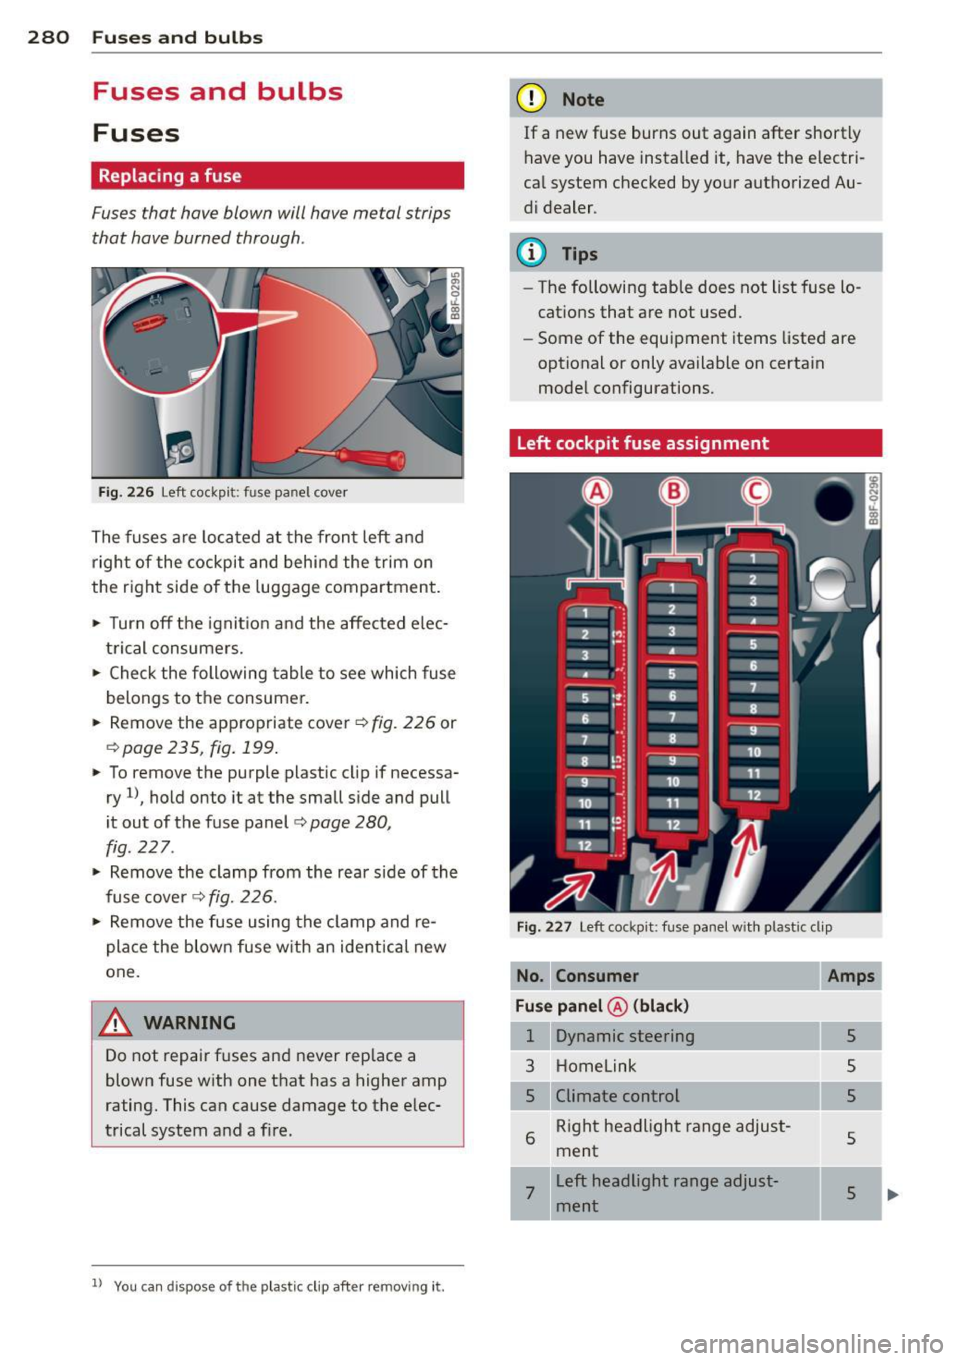
Fig. 226 Left cockpit: fuse panel cover
The fuses are located at the front left and
right of the cockpit and behind the trim on
the right side of the luggage compartment.
• Turn off the ignit ion and the affected elec
trical consumers.
• Check the following table to see which fuse
belongs to the consumer.
• Remov e the appropriate cover¢
fig. 226 or
¢ page 235, fig. 199.
• To remove the purple plastic cl ip if necessa
ry
1l, hold onto it at the small side and pull
it out of the fuse panel
c:> page 280,
fig. 227.
• Remove the clamp from the rear side of the
fuse cover ¢
fig. 226.
• Remove the fuse using the clamp and re
place the blown fuse w ith an ident ical new
one.
A WARNING
Do not repair fuses and never replace a
blown fuse with one that has a higher amp
rating. This can cause damage to the elec
trical system and a fire.
ll You ca n dispose of the p lastic clip afte r remov ing it.
(D Note
If a new fuse burns out again after shortly
have you have installed it, have the electri
cal system checked by your authorized Au
d i dealer .
(D Tips
-The following table does not list fuse lo
cations that are not used.
- Some of the equipment items listed are
optional or only available on certain
model configurations.
Left cockpit fuse assignment
Fig . 227 Left cockpi t: fu se pane l with plastic clip
No. Consumer
Fuse panel @(black)
1 Dynamic steering
3 Homelink
5
6
Climate control Right headlight range adjust
ment
Amps
5
5
5
5
7
Left headlight range adjust
ment
5 ...
•
Page 298 of 316
296 Consumer Information
Technical Modifications
Our guidelines must be complied with when technical modifications are made .
Always consult an authorized Audi dealer be
fore starting work on any modifications.
This will help ensure that vehicle function,
performance and safety are not impaired
¢ &. .
Attempting to work on electronic components
and the software used with them can cause
malfunctions. Because of the way electronic
components are interconnected with each
other, such malfunctions can also have an ad
verse affect on other systems that are not di
rectly involved. This means that you risk both
a substantial reduction in the operational
safety of your vehicle and an increased wear of
ve hicle parts ¢
A:,..
Author ized Audi dealers will perform th is
wo rk in a professiona l and competent manner
or, in special cases, refer you to a professional
company that specializes in such modifica
tions .
A WARNING
-
Improper repairs and modifications can
change the way vehicle systems work and
cause serious personal injury.
(D Note
If emergency repairs must be performed
elsewhere, have the vehicle examined by
an authorized A udi dealer as soon as possi
ble.
Declaration of
Compliance, Telecom
munications and
Electronic Systems
Radio Frequency Devices and Radiocommuni
cation Equipment User Manual Notice.
The manufacturer is not responsib le for any
radio or TV interference caused by unauthor
ized modifications to this equipment.
Devices
T he following devices each comply with FCC
Part 15.19, FCC Part 15.21 and RSS-Gen Iss ue
1:
- Adapt ive cru ise control*
- Conven ience key*
- Aud i side assist*
- Cell phone package*
- Electron ic immobilizer
- Homelink ® universal remote control*
- Remote control key
- Tire pressure monitoring system*
FCC Part 15.19
This device complies with part 15 of the FCC
Rules . Operation is subject to the follow ing
two conditions:
(1) This device may not cause harmful inter
ference, and
(2) this device must accept any interference
received, including interference that may
cause undesired operation.
FCC Part 15.21
CAU TION:
Changes or mod ifications not expressly ap
proved by the party responsible for compli
ance could void the user 's authority to operate
the equipment .
RSS-Gen Issue 1
Operation is subject to the following two con
ditions:
Page 305 of 316

Index 303
-----------------------------------.......
Unleaded fuel ..................... 232
What should I do with an old battery? . 251
Environmental note
Rear window defogger . . . . . . . . . . . 83, 88
Roof rack .. .. ........... .. .. .. .... 74
EPC
refer to Electronic power control .... .. 15
E SP
refer to Electronic stabili zation program
(ESP) .... .. ................. .. .... 15
Event Data Recorder (EDR) ............ 204
Exhaust tail pipes Cleaning . .. ............. .. .. .. .. . 226
Expansion tank ............ .... .. ... 244
Exterior mirrors
Adjusting . ................. ... .... 57
Dimming ... ................ ... .... 58
Heating .. .. ............. .... .. .. .. 57
Eyeglasses compartment .... .. .. .. .. .. 77
F
Fan
Deluxe automatic climate control .. .. .. 81
Deluxe automatic climate control plus . . 87
Radiator ... .. .............. ... ... 246
Fastening Booster seats ............ .. .. .. .. . 194
Convertible child safety seats . .. .. .. . 192
I nfant seats ............. .... .. .. . 191
Flat tire Changing .. .. ........ ... .. .. .. .. . 274
Floor mats . . . . . . . . . . . . . . . . . . . . . . . . . 149
F og lights . . . . . . . . . . . . . . . . . . . . . . . . . . 50
Foot pedals . . . . . . . . . . . . . . . . . . . . . . . . 149
For the sake of the environment
Gasoline fumes and the environment .. 234
Reducing engine noise by early upshift-
ing .. .. .. .. .. .. ........... .. .. .... 11
Refueling .. .. ........ ... .. .. .. .. . 234
Saving fuel by early upshifting .. . ... .. 11
Front airbags
Description . .. ........... .. .. .. ... 166
Howtheywork .................... 171
Fr ontal collisions and the laws of physics 155
Front ashtray ............... ... ... ... 75 Front seats
. . . . . . . . . . . . . . . . . . . . . . . . . 61
Adjusting ..... .... ............... 146
Child restraints in the front seat .... .. 163
Convenience side view . . . . . . . . . . . . . . . 66
Symmetrical seat positions . . . . . . . . . . . 66
Fuel Additives ... ..... .. ............... 232
Blended gasoline ... .............. . 232
Consumption .. .. .... ......... .. .. . 22
Filler neck . .. .. .. .. . .............. 233
Fuel gauge . . . . . . . . . . . . . . . . . . . . . . . . 12
Gasoline .. .. .. .. .. . .. .... ........ 232
Gasoline additives .. .............. . 233
Octane rating .. .. ................. 232
Recommendation . .... ......... .. .. 232
Refuelling ..... .. .. ............... 234
Reserve ....... .... ................ 12
Tank capacity .................... . 292
Unlocking the fuel filler flap by hand .. 235
Fuel economy messages (efficiency pro-
gram) .... .. .. .. .. .. . .............. . 26
Fuel filler flap Unlocking the fuel filler flap by hand .. 235
Fuel supply too low ................. . 35
Fuses Assignment . . . . . . . . . . . . . 280, 281, 282
Replacing ........................ 280
G
Garage door opener (Homelink ®) .. .. .. 140
Gas discharge lamps .. ..... .......... 283
Gauges Engine coolant temperature . . . . . . . . . . 10
Fuel gauge .. .. .. ............... .. . 12
Tachometer . . . . . . . . . . . . . . . . . . . . . . . 11
Gear recommendation .............. .. 25
Gearshift indicator . .. ... ....... ...... 20
Gearshift lever 6-speed manual transmission ...... .. 126
General illustration Instruments and controls .......... ... 8
Glossary of tire and loading terminology 253
Glove compartment . . . . . . . . . . . . . . . . . . 77
Gross Vehicle Weight Rating (GVWR) . .. 290
•
•
Page 308 of 316
306 Index
------------------------------------
On-Board Diagnostic System (OBD) Data Link Connector (DLC) .. .. ... ... .. 26
Electronic speed limiter ...... .. .... .. 27
Malfunction Indicator Lamp (MIL) . . . . . 26
Open doo r or rear lid warning . . . . . . . . . . 21
Operate your vehicle econom ically and
minimize pollution .......... ... .. ... 215
Optiona l equipment
M arked with an asterisk . . . . . . . . . . . . . . . 6
Other equipment (efficiency program) 25
Outside mirrors
refer to Exterior mirrors ....... .. .. .. 57
Outside temperature display . .. .. .. .. . . 20
Owner 's manual
H ow the Owner's Manual is o rganized . . . 6
p
Paint
Touch-up ....... .. ....... .. .. .. .. . 224
Paint No ..... ................ ... .. . 290
Panoramic tilting sunroof ............. 48
Convenience opening/closing ... .. .. .. 46
Emergency clo sing .......... .. .... .. 48
Tilting and closing ........ .. .. .. .. .. 48
Park assist .................. .. .... . 133
Rear .. .... ................ ..... . 133
Rea r, with rear view camera . .. .. .... . 134
Parking ... ........ ....... .. .. .... .. 97
Automatic transmission ............ 126
Valet parking ................ .... .. 47
Parking brake ................ ... ... . 96
also refer to Electromechan ica l park ing
brake .. .. .. ... .......... .. .. .. .. .. 96
Park ing system .. ... .... ..... .. .. .. . 133
Rear .. .. .. ..... ........... ... .. . 133
Rear, w ith rear v iew camera ..... .. .. . 134
Parking system (rear) ......... .. .. .. . 133
Parking System (rear)
Adjusting the warning tones . ..... .. . 134
Parking system (rear, w ith rear view cam-
era)
Parking mode 1 .............. .... . 137
Parking mode 2 .......... .. .. .... . 138
Safety precautions ......... ... .... . 135
Switching on/off .......... ... .... . 136
Switching rear view camera on/off ... . 139 Parts
replacement .............. .... 295
PASSENGER AIR BAG OFF light ........ 173
Passive safety system . . . . . . . . . . . . . . . . 144
Pedals . .... .... .. ............. .... 149
Physical principles of a frontal collision . 155
Polishing ......... ................ . 223
Pollen filter
Deluxe automatic climate control . .. .. . 79
Pollutant filter Deluxe automat ic climate control ..... . 79
Power locking switch ................. 43
Power locking system ............ .... . 40
Emergency locking .. ........... .. .. . 44
Locking and unlocking the vehicle from
inside ........ .. .................. 43
Luggage compartment lid ........ ... . 44
Se lective unlock feature .......... .. . 41
Settings .. .. .. .. ............. .... . 41
Unlocking and locking vehicle .... .. .. . 41
Power locks Windows open and closed ........ ... . 46
Power steering . . . . . . . . . . . . . . 14, 34, 209
Power window regulators Convenience opening/closing ........ . 46
Malfunctions .. .. ..... ........... .. 47
Power window switches ............... 46
Pregnant women
Special considerations when wear ing a
safety belt . . . . . . . . . . . . . . . . . . . . . . . 159
Programming the Homelink ® un iversal re
mote control . . . . . . . . . . . . . . . . . . . . . . . 140
Proper occupant seating posi tions . .. .. 145
Proper safety belt position .......... .. 158
Proper seating position Front passenger . . . . . . . . . . . . . . . . . . . 146
Occupants . .. .. .. ... ... ... .... .... 145
Rear passengers .. ............. .. .. 147
Q
Quartz clock .. .. .. .......... ...... .. 12
Question Wha t happens to unbelted occupant s? 155
Why safety belts? ....... ...... .. .. 154