hood open AUDI A5 COUPE 2012 Owners Manual
[x] Cancel search | Manufacturer: AUDI, Model Year: 2012, Model line: A5 COUPE, Model: AUDI A5 COUPE 2012Pages: 316, PDF Size: 78.59 MB
Page 13 of 316

Instrument s and warning /indicator lights 11
Warning light in the instrument cluster
display
If the. warning light in the instrument clus
ter disp lay flashes, this can mean one of two
things: either the coolant
t empera ture is too
high, or the coolant
level is too low
¢ page 31.
If the needle is well in the upper area of the
gauge, the coolant temperature is too high.
Stop the vehicle, switch the engine off, and
allow it to cool.
If the warni ng light comes on
again after driving a short distance, contact
an author ized Audi dealer or other qualif ied
workshop.
_& WARNING
- Always observe the warning in
¢ page 230, Engine compartment, be
fore opening the hood and checking the engine coolant level.
- Never open the engine hood if you see or hear steam, or if you see engine coolant
dripping from the engine compartment.
You could burn yourself . Let the engine
cool off first so that you cannot hear or
see any steam or e ngine coolant .
CD Note
-Mounting additional lights or accessories
in front of the a ir inlets reduces the cool
ing effect of the rad iator. At high outside
temperatures or high engine load, the
engine could overheat .
- The front spo iler has been designed to
properly distribute the cooling air when
the veh icle is moving. If the spoiler is
damaged, this could reduce the cooling
effect and the engine co uld then over
heat. Ask you r aut horized Aud i dealer for
assistance.
Tachometer (engine rev counter )
The tachometer indicates the engine RPM
(revolutions per minutes).
If engine RPM drops be low 1,500, you should
downshift to the next lower gear . Th e red area at
the end of the scale indicates maximum
perm issible eng ine RPM after the break-in pe
riod. Before reaching this area, move these
lector lever to position
D (Drive) or ease your
foot off the accelerator pedal.
CD Note
The tachometer needle @ ¢ page 10,
fig. 3
should on ly briefly be in the red
zone: you cou ld damage your eng ine! The
beginn ing of the red zone var ies depend-
i ng on the engine.
@) For the sake of the environment
Upshifting early saves fuel and reduces en
gine noise .
~button
You can perform different func tions with this
button.
Fig . 4 SET but ton in t he in strumen t cl uster
T he !S ET ! button performs the following func
tions :
Switching on time, date, temperature
display, and odometer
The display appea rs fo r approximately 30 sec
onds when you press the
! S ET ! button¢ fig . 4
with the ignit ion off.
Starting the Auto -Check sequence
The Auto-Check system ¢ page 28 constant-
ly mon itors certa in individua l functions and
components of the vehicle when the ignition
is turned on and when the vehicle is moving.
With the ign ition turned on, you can start the
"Auto-Check sequence" by pressing the
i S ET i liJJ,,
Page 23 of 316
If there is no gearshift recommendation, then
just drive in the appropriate gear for conserv
ing fuel.
@ Tips
-This indicator can help you conserve fuel.
This indicator is not meant to show you
which gear you should a lways be in in all
driving situations. Sometimes, in s itua
tions such as passing, driving through mountains or when towing a trailer,
there won't be any gearsh ift recommen
dat ion.
- The display does not light up when the
clutch pedal is be ing depressed .
Digital speedometer
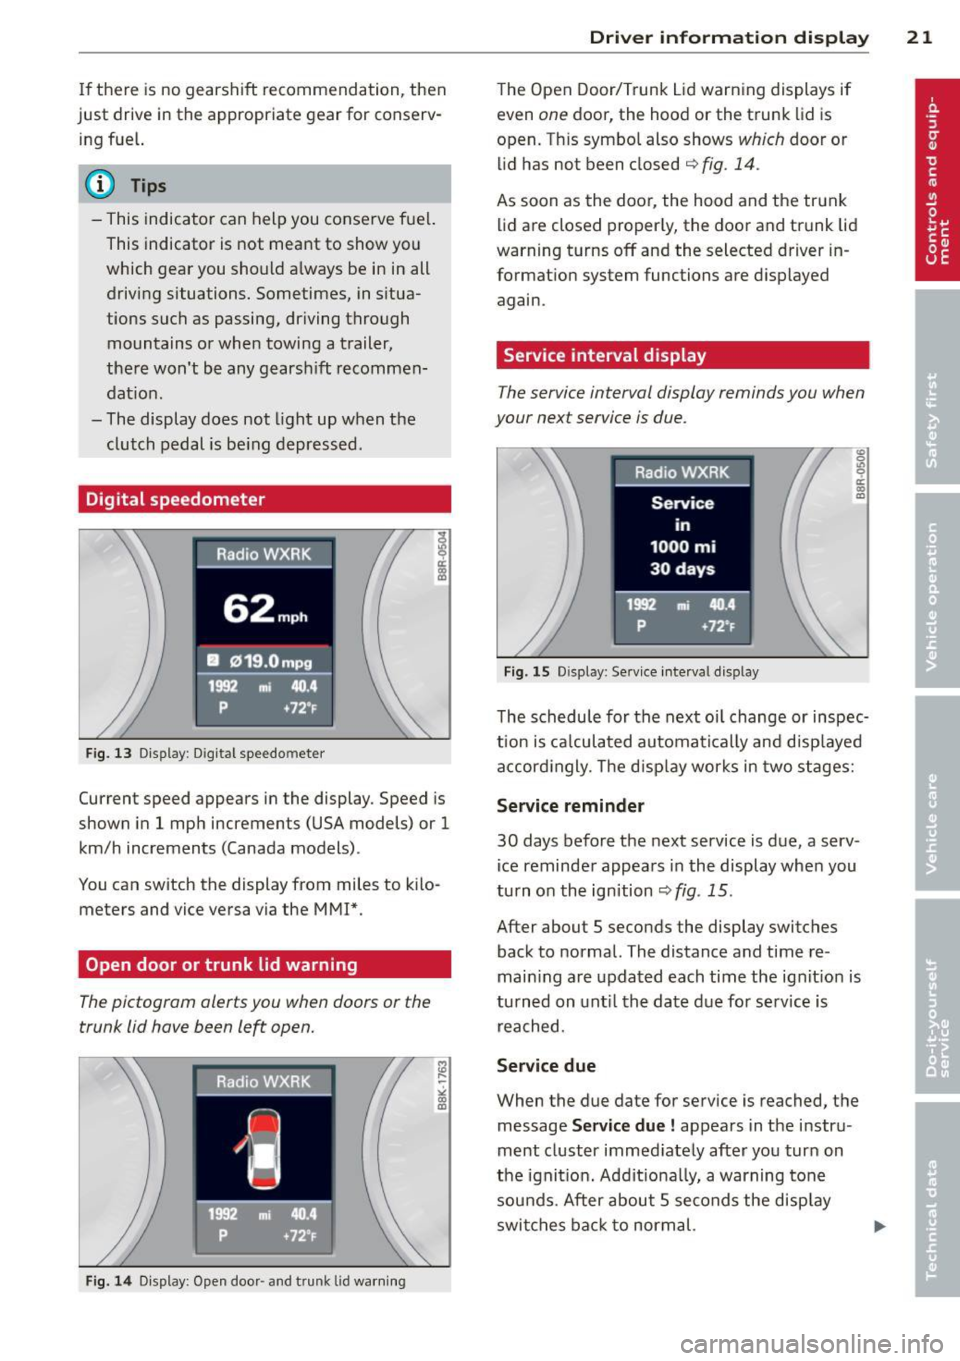
Fig. 13 Display : Dig ital speedo mete r
Current speed appears in the display . Speed is
shown in 1 mph increments (USA models) or 1
km/h increments (Canada models) .
You can switch the display from miles to kilo meters and vice versa via the MMI*.
Open door or trunk lid warning
The pictogram alerts you when doors or the
trunk lid have been le~ open.
Fig. 14 Display: Open doo r- and trunk lid warning
Driver information display 21
The Open Door/Trunk Lid warning displays if
even
one door, the hood or the trunk lid is
open. Th is symbol also shows
which door or
lid has not been closed
q fig. 14 .
As soon as the door, the hood and the trunk
lid are closed properly, the door and trunk lid
warning turns off and the selected driver in
formation system functions are displayed
again.
Service interval display
The service interval display reminds you when
your next service is due .
Fig. 15 Disp lay : Se rv ice interval d isplay
The schedule for the next oil change or inspec
t ion is calculated automatically and d isp layed
accord ingly. The d isp lay works in two stages:
Service reminder
30 days before the next service is due, a serv
i ce reminder appears in the display when you
turn on the ignition
qfig . 15 .
After about 5 seconds the display switches
back to normal. The distance and time re
main ing are updated each time the ignit ion is
turned on until the date due for serv ice is
reached.
Service due
When the due date for service is reached, the
message
Service due! appears in the instru
ment cluster immed iately after you turn on
the ignition. Addit ionally, a warning tone
sounds. After about 5 seconds the disp lay
switches back to normal.
Page 32 of 316

30 Driver in formation d isplay
Canada m odel s:
Bra ke system malfunction
c:>page30
Engine coolant level too low/en
gine coolant temperature too
high
c:>page 31
Engine oi l pressure too low
c:>page 31
Refill engine oil now
c:>page32
Steering malfunction
c:>page 32
Ignition lock malfunction
c:>page32
0 Alternator malfunction
If the . symbol in the instrument panel dis
p lay flashes, the n there is a malfunc tion in the
a lt ernator or the vehicle electron ics. A warn
ing to the driver will appear, too. The driver
warning goes out after about 5 seconds, but it
can be brought up at any time by pressing the
ISETI button again.
Usually, you can still drive to the next dea ler
ship. T urn off all b ut the most necessary elec
tr ica l cons umers, since these dra in the veh i
cle's battery.
(J;) Note
If the . war ning symbol (coolant system
malfunction) also lights up on the instru
ment panel during the trip
c:> page 31,
then you have to stop immediately and
turn off the eng ine. The coolant pump is
not working anymore--danger of damage
to the eng ine!
BRAKE/
A malfunction in the brake system must be
repaired as soon as possible .
If the warn ing /indicator light-(USA
models)/ . (Canada models) in the instru- me
nt cluster flashes, there is a brake system
malfunction. A driver message appears as
we ll to exp la in the ma lfunction in more de
ta il. The dr iver warning goes out after about S
seconds, but it can be brought up at any time by press ing the
ISE TI button again .
Stop the Vehicle and Check the Brake
Fluid
.,. Stop the vehicle .
.,. Check t he brake fluid level
c:> page 246 .
.,. Seek professional assistance if necessary .
Warning ! Fault in br ake system . Contact
workshop
.,. Drive ca refully to the nearest authorized
Aud i dea le r or other q ualified workshop and
have the malfu nction corrected
c:> &_ .
Parking b ra ke Plea se get to a repair shop
.,. If this symbol appears when the vehicle is
stat ionary or after the ignition is t urned on,
check to see if the par king brake can be re
leased. Dr ive to a n author ized Audi dealer or
other qualified workshop as soon as possi
b le and have the malfunc tion cor re ct ed. If
t he par king b rake cannot be opened, t hen
take it to an expe rt at an authorized A udi
dea ler .
.,. If the symbo l appea rs whi le yo u are d riving,
it is possible that the traction contro l or the
emergency brake has malfunctioned. It is
possible that the parking brake cannot be
app lied. It is also possible that the parking
brake cannot be released after it has been
app lied. Drive to an autho rized Aud i deale r
or other qualified workshop to have t he mal
fu nction corrected.
If the ABS system malfu nctions, the ABS
warning/indicator light illuminates togethe r
with the brake system ma lfunction w arning/
i ndica to r li ght
c:> .&..
A WARNING
-A lways observe t he warn ings in
c:> page 230, Engine compartment, be
fore open ing the hood and check ing the
brake fluid.
Page 42 of 316
40 Openin g and clo sing
the ignition lock, the e lectronic immob ilizer is
automatically activated once again.
0) Tips
- The vehicle cannot be s tarted if an unau
thorized key is used. The vehicle may not
start if another radio device such as a key
for another vehicle or a transponder is located on the key ring.
- For Declarat ion of Compliance to United
States FCC and Industry Canada regu la
tions
Q page 296.
Power locking system
General description
The power locking system locks or unlocks all
doors and the rear lid simultaneously.
You can lock and unlock the vehicle centrally.
You have the following choices:
- Remote master key
Q page 41,
-Door handles with convenience key*
c:>page 42,
- Lock cylinder at the driver's door
Q page43, or
- Power locking switc h inside
Q page 43 .
Selective unlocking
When they a re closed, the door and rea r lid
a re locked. When unlocking, you can set in the
radio or MM!* whether
only t he drive r's door
or the entire vehicle shou ld be un locked
Q page 41.
Automatic locking
The automat ic loc king featu re locks all the ve
h icle doors and the rear lid when you drive
faste r than 9 mph ( 15 km/h).
The car is un locked again once the ignition key
is removed. In addition, the veh icle can be un
l ocked if the opening fu nction in the power
l o cki ng system switch or a t one of the door
l evers is act uated . The Auto Lock function can
be turned on and off in the rad io or
MMI*
c:::> page41.
Additionally , in the event of a crash with air
bag dep loyment the doors are automatically
u nlocked to allow access to the vehicle .
Anti-theft alarm warning system
If the an ti- theft alarm warning system de
tects a b reak-in into the vehicle, acoustic and
vis ual warning signals are triggered .
T he anti-theft wa rning system is activated au
tomat ica lly when you lock the vehi cle. It is de
activated when unlocking using the
remot e
k ey,
with the me chanical key , and when you
switch on the ignition.
T he alarm also t urns off when the a larm cy cle
has expired .
Turn signal s
When you unlock the veh icle, the turn s ignals
flash twice, when you lock it once. If they do
not flash, one of the doo rs, the rear lid o r the
hood is not lo cked.
Unintentionally locking yourself out
In the following cases there safeguards to
prevent yo u lock ing your remote master key in
the ve hicle:
- The vehicle does not lock w ith the central
locking switc h
Q page 43 if the driver's
door is open .
- On veh ides w ith convenience key*, if the
most recently used master key is in the lug
gage compa rtment, the rear lid is a utomat i
cally u nlocked again after it is closed.
Do not lock your veh icle w ith the
r e mot e m as
ter key or con ven ienc e ke y*
until all doors
and the rear lid are closed . In this way you
avo id lock ing you rself out a ccidentally.
_& WARNING
-
- W hen you leave the ve hicle, always re
move the ignition key and take it with
you . This will prevent passengers (chil
dren, for example) from acc identally be
ing locked in the vehicle shou ld they acci
dentally press the power locking switch in the front doors.
Page 43 of 316
-Do not leave children inside the vehicle
unsupervised. In an emergency it would
be impossible to open the doors from
the outside without the key.
(D Tips
- In the event of a crash with airbag de
ployment all locked doors will be auto
matically unlocked to give access to the
vehicle occupants from the outside .
- If the power lock ing system should mal
function, you can lock the driver's door
using the mechanical key
q page 44.
- If the power lock ing system should fail,
you can still open the fuel tank flap in an
emergency
c:> page 235 .
-You are well advised not to keep valua
bles inside an unattended vehicle, visible
or not . Even a properly locked vehicle
cannot provide the security of a safe.
- If the LED in the upper edge of the driv
er's door panel comes on for about 30
seconds after the vehicle is locked, there
i s a ma lfunction in the power locking or
the anti-theft warning system. Have the
malfunction corrected by an authorized
Audi dealership or qualified repair facili
ty.
Setting power locking
The driver can determine the functions for
power locking in the radio or MMI*.
In the Central locking menu you can decide
which doors should be unlocked when open
ing the vehicle.
.,. Se lect :
I CAR I funct ion button > Central lock-
ing .
For example, if you switch the item Unlocking
single door On ,
the passenger 's doo r is no
longer included in the power Locking system,
and will not be unlocked by p ress ing the un
l ock button on the master key remote control.
You can continue to unloc k all the doors and
the rear lid as before. Press the open ing but
ton on the master key tw ice.
Opening and closing 41
In addition to this, the Auto locking can be
switched on and off.
When locki ng the vehicle, all doors and the
trunk lid are locked automatically.
If you switch
Trunk lid/tailgate On, then the
handle on the rear lid
c:> page 44 , fig. 42 is
locked . In this case the rear lid can be opened
with the button
cs on the master key
c:> page 41, fig. 36 or with the un locking
button in the dr iver 's door
c:> page 44,
fig .
41 .
When yo u se lect Confirmation tone On, a
confirmation tone sounds when yo u lock the
vehicle.
Unlocking and locking the vehicle with
the remote control
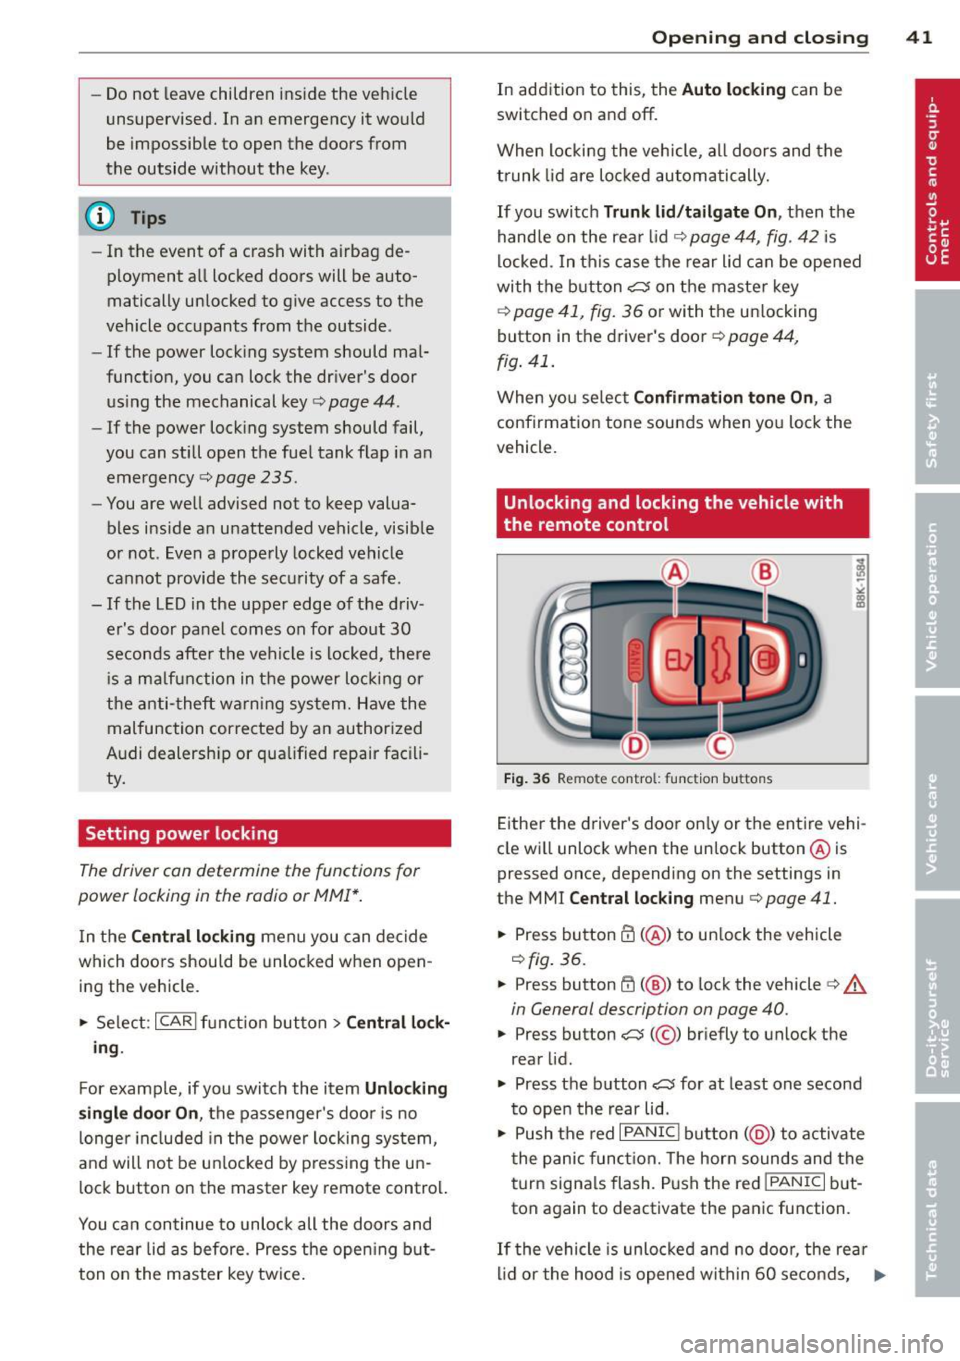
Fig. 36 Remote control: f unc tion buttons
Either the driver's door on ly or the entire vehi
cle wi ll unlock when the unlock button @is
pressed once, depending on the settings in
the MMI
Central locking menu c:> page 41 .
.,. Press button ffi (@ ) to unlock the vehicle
c:> fig. 36.
.,. Press button ffi (@ ) to lock the vehicle ¢ A
in General description on page 40 .
.,. Press button cs( @) briefly to unlock the
rear lid .
.,. Press the button
cs for at least one second
to open the rear lid .
.,. Push the red
I PANIC I button ( @ ) to activate
the panic function. The horn sounds and the
turn signa ls flash . P ush the red
!PANIC I but
ton again to deactivate the panic function.
If th e vehicle is unlocked and no door, the rear
lid or the hood is opened within 60 seconds, .,._
Page 239 of 316

Checking and filling Engine hood
Releasing the engine hood
The engine hood is released from inside the
vehicle .
Fig. 201 Dr iver's s ide footwell: engine hood release
lever
"' Open the driver's door .
"' Pull the release lever on the left under the
instrument panel
i=:> fig. 201 in the d irection
of the arrow.
The hood pops up slight ly under spring pres
sure.
Opening the engine hood
F ig . 202 Re lease lever under the engine hood
Before opening the engine hood, make sure
that the windshie ld wipers are flat against the
windshie ld. Otherwise, they could damage the
paint on the hood.
"' Pull up on the release under the hood
r::!> fig. 202 . This releases the catch.
"' Open the hood all the way
c::> &,.
Checkin g and fillin g 237
A WARNING
Hot engine coolant can burn you.
- To reduce the risk of being burned, never
open the hood if you see or hear steam
or coolant escaping from the eng ine
compartment. Wait unt il no steam or
coolant can be seen or heard before care
fu lly opening the hood.
Closing the engine hood
"' Pull the hood down un til the pressure from
the struts is reduced.
"' Let the hood
drop down and latch in p lace.
Do not try to push it shut; it may fail to en
gage
c;, &, .
A WARNING
--
A hood that is not completely latched
could fly up and b lock your view while dr iv
ing.
- When you close the engine hood, check it
to make sure the safety catch has p roper
ly engaged. The hood should be flush
with the surround ing vehicle body parts.
- If you notice while driv ing that the hood
is not secured prope rly, stop at once and
close it .
Working in the engine compartment
Be especially careful whenever you work in
the engine compartment.
Whene ver y ou must pe rform any wo rk in the
eng ine compartment, for e xample checking
and filling different fluids, th ere is a risk of
injury, burns and accid ent s. To pr event per
s o nal injury always observe the following
WARNINGS . The engine compa rtment of an y
vehicle i s a hazardou s are a
c;, Lh,.
A WARNING ~
To help avoid injury, be fo re yo u check any
thing under the hood:
- Tu rn off the engine.
- Remove the ignition key.
Page 240 of 316
238 Check ing and filling
- Apply the parking brake.
- Move selector lever of automatic trans- mission to "P" (Park); put manual trans
mission in Neutral.
- Always let the engine coo l down . Hot
components will burn skin on contact.
- To reduce the risk o f being burned, never
open the hood if you see or hear steam
or coolant escaping from the engine
compartment. Wait until no steam or
coolant can be seen or heard before care
fully opening the hood.
- Keep children away from the engine com
partment .
- Never spill flu ids on hot engine compo
nents. They can cause a fire.
- Never touch the radiator fan. The auxili
ary electr ic fan is temperature controlled
and can switch on suddenly.
- Never open the coolant reservoir cap when the eng ine is still warm. The cool
ant system is pressur ized and hot coo l
ant could spray out .
-Protect your face, hands and arm from
steam or hot eng ine coolant by placing a
thick rag over the cap when you open the coolant reservoir .
-If work on the fuel system or the electri
cal system is necessary :
- A lways disconnect the battery.
- Never smo ke or work near heaters or
open flames . Fluids in the engine com
partment co uld start a fire.
- Keep an approved fire ext inguisher im
mediately available.
- T o avoid ele ctrical shock and persona l in
jury while the engine is running or being
started, never touch:
- Ignition cables
- Other components of the high voltage
electronic ignition system.
- If you must perform a check or repa ir
with the engine running:
- Fi rst, fully apply the parking bra ke,
move se lec to r l ever o f automat ic trans- mission to
"P" (Park); put manua l
transmission in Neutra l.
- Always use extreme caution to p revent
clothing, jewelry, or long hair from get
ting caught in the radiator fan, V-belts
or other moving parts, or from contact ing hot parts. Tie back hair before
starting, and do not wea r clothing that
will hang o r droop into the engine.
- M inim ize exposure to em iss ion and
chemical hazards
~ &, .
A WARNING
=
Ca lifo rnia Proposition 65 Warning:
- Engine exhaust, some of its const ituents,
and certain vehicle components contain
or emit chemicals known to the State of
California to cause cance r and birt h de
fects and reproductive harm. In addition,
certain fl uids contained in veh icles and
certain products of component wear con
tain or emit chemicals known to the
State of California to cause cancer and
b irth defects or other reproductive harm.
- Battery posts, terminals and related ac
cessories conta in lead and lead com
pounds, chemicals known to the State of
California to cause cancer and reproduc
tive harms. Wash hands after handling.
(D Note
When adding flu ids, always make sure that
they are poured into the proper conta iner
or fil ler opening, otherwise serious dam
age to vehicle systems w ill occur.
@) For the sake of the environment
To detect leaks in time, inspect the vehicle
floor pan from underneath regular ly. If
you see spots from oil or o ther ve hicle flu
i ds, have your vehicle insp ected by a n au
thorized Audi dealer.
Page 244 of 316
242 Checking and filling
Checking the engine oil level
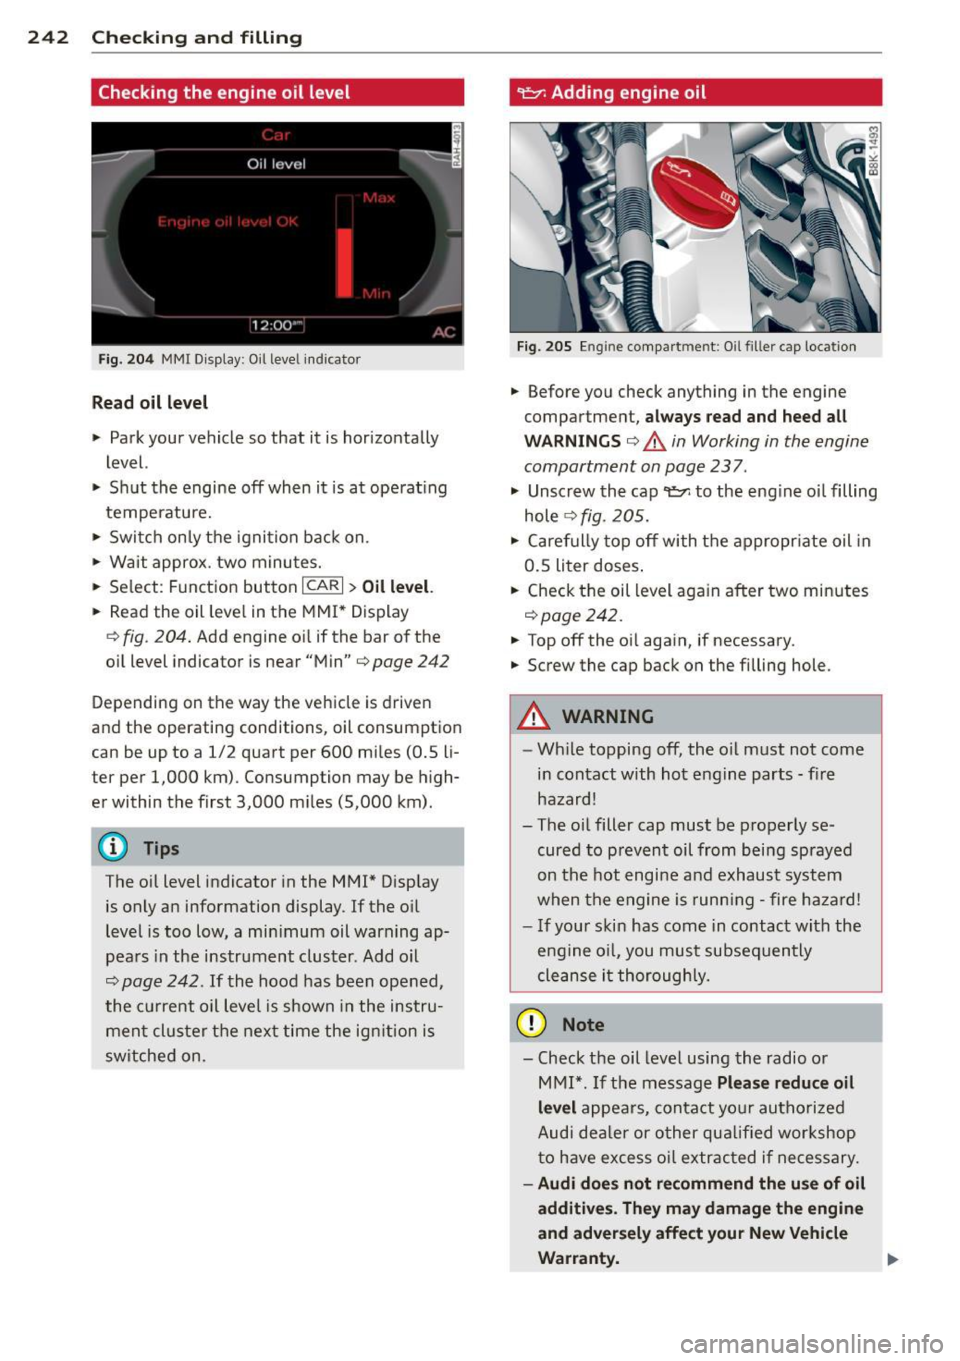
Fig . 204 MMI Display: O il leve l indicator
Read oil level
• Park your vehicle so that it is horizontally
level.
• Shut the engine off when it is at operat ing
temperature.
~ Switch only the ignition back on.
• Wait approx. two minutes.
• Se lect: Function button
,.., IC ,_..,A ,..,R,..., I > Oil level.
• Read the oil leve l in the MMI* Display
¢ fig. 204. Add eng ine oi l if the bar of the
o il level indicator is near "Min" ¢
page 242
Depending on the way the vehicle is driven
and the operating conditions, oil consumption
can be up to a 1/2 quart per 600 mi les (0.5 li
ter per 1,000 km) . Consumption may be high
er within the first 3,000 miles (5,000 km).
@ Tips
The oil level indicator in the MMI* Display
is only an information display. If the oil
level is too low, a min imum oil warning ap
pears in the instrument cluster. Add oil
¢
page 242. If the hood has been opened,
the current oil level is shown in the instru
ment cluster the next time the ignition is
switched on.
~ Adding engine oil
Fig. 205 E ngin e compart ment: O il filler cap locatio n
• Before you check anything in the engine
compartment,
always read and heed all
WARNINGS
¢ &. in Working in the engine
compartment on page
23 7 .
• Unscrew the cap 'l=;r: to the eng ine oi l filling
hole
¢ fig. 205.
• Carefully top off with the appropriate oil in
0.5 liter doses .
• Check the oil level again after two minutes
¢page 242.
• Top off the oil again, if necessary.
• Screw the cap back on the filling hole.
A WARNING ~
-Wh ile topping off, the o il must not come
in contact with hot engine parts -fire
hazard!
- The oil filler cap must be properly se
cured to prevent oil from being sprayed
on the hot engine and exhaust system
when the engine is running -fire hazard!
- If your skin has come in contact with the
engine o il, you must subsequently
cleanse it thoroughly.
(D Note
-Check the oil level using the radio or
MMI*. If the message
Please reduce oil
level
appears, contact your authorized
Audi deale r or other qualified workshop
to have excess oil extrac ted if necessary.
- Audi does not recommend the use of oil
additives. They may damage the engine
and adversely affect your New Vehicle
Warranty.
Page 252 of 316
250 Checking and filling
Battery charging
Starting the engine requires a well charged
battery.
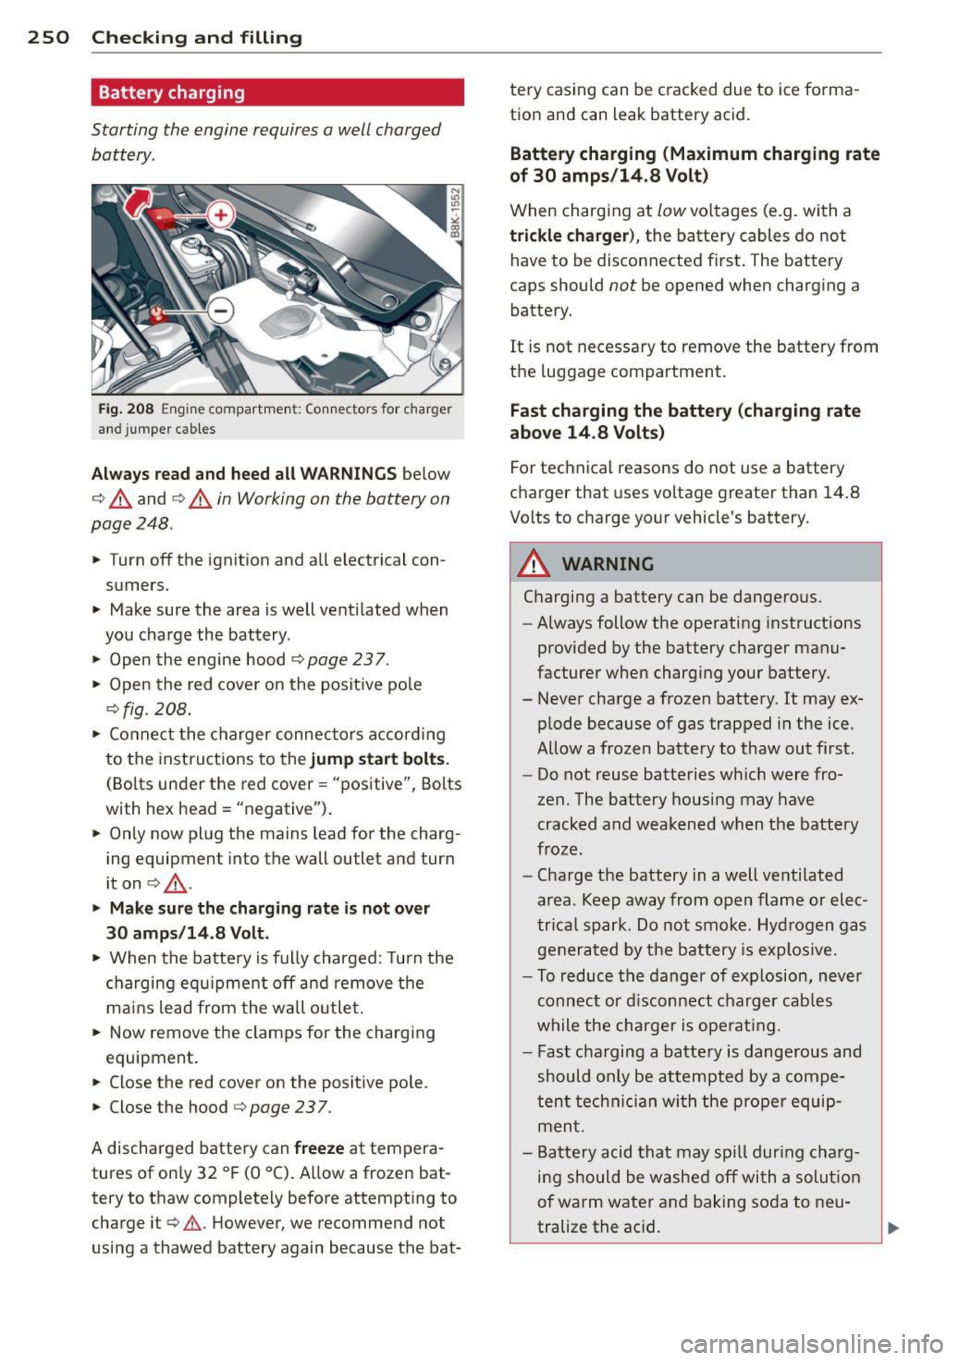
Fig. 208 Engine compartme nt: Connectors for charger
and jumper cables
Always read and heed all WARNINGS below
c:> A and c:> A in Working on the battery on
page 248 .
.,. Turn off the ignition and all electrical con
sumers.
> Make sure the area is well ventilated when
you charge the battery .
> Open the engine hood r:::.> page 237 .
> Open the red cover on the posit ive pole
<::.>fig . 208.
> Connect the charger connectors according
to the instructions to the
jump start bolts.
(Bolts under the red cover= "positive", Bolts
with hex head= "negative") .
> Only now plug the mains lead for the charg
ing equipment into the wall outlet and turn
iton
c:> &_ .
.,. Make sure the charging rate is not over
30 amps/14.8 Volt.
> When the battery is fully charged: Turn the
charging equipm ent off and
remove the
mains lead from the wall outlet.
> Now remove the clamps for the charging
equipment.
.,. Close the red cover on the positive pole.
> Close the hood c:> page 23 7.
A discharged battery can freeze at tempera
tures of on ly 32 °F (0 °C). Allow a frozen bat
tery to thaw completely before attempting to charge it
c:> .&. However, we recommend not
using a thawed battery again because the bat- tery casing can
be cracked due to ice forma
tion and can leak battery acid.
Battery charging (Maximum charging rate
of 30 amps/14.8 Volt)
When charging at low voltages (e.g. with a
trickle charger), the battery cables do not
have to be disconnected first. The battery
caps should
not be opened when charging a
battery.
It i s not necessary to remove the battery from
the luggage compartment.
Fast charging the battery (charging rate
above 14 .8 Volts)
For technical reasons do not use a battery
charger that uses voltage greater than 14.8
Volts to charge your vehicle's battery.
A WARNING
-----=--
Charging a battery can be dangerous.
- Always follow the operating instructions
provided by the battery charger manu
facturer when charging your battery.
- Never charge a frozen battery. It may ex
plode because of gas trapped in the ice.
Allow a frozen battery to thaw out first.
- Do not reuse batteries wh ich were fro
zen. The battery hous ing may have
cracked and weakened when the battery
froze.
- Charge the battery in a well ventilated
area . Keep away from open flame or elec
trica l spark. Do not smoke. Hydrogen gas
generated by the battery is explos ive.
- To reduce the danger of explosion,
never
connect or disconnect charger cables
while the charger is operating.
- Fast charging a battery is dangerous and
should only be attempted by a compe
tent technician with the proper equip
ment.
- Battery acid that may spill during charg
ing should be washed off with a solut ion
of warm water and baking soda to neu-
tralize the acid. ....
L..__ _____________ _J ...
Page 309 of 316

Index 307
-----------------------------------.......
R
Radiator fan ... .... .. .... ... .. .. ... 246
Ra in sensor .. .. ........ ... .. .. .. .. .. 55
Rain sensor defective ....... .... .. .. .. 34
Reading lights
Fr ont .. .. .. ............. .. .. .. .. .. 53
Rear . ..... .. .. ... . .... ... .. .. .... 54
Rear fog lights . . . . . . . . . . . . . . . . . . . . . . SO
Rear lid
refer to Luggage compartment 44, 68, 150
Rear light Defective . . . . . . . . . . . . . . . . . . . . . . . . . 3 5
Rear view camera Park ing mode 1
P ark ing mode 2 137
138
Rear view mirror . . . . . . . . . . . . . . . . . . . . . 58
Rear window defogger . . . . . . . . . . . . 83, 88
Rear window sun shade . . . . . . . . . . . . . . . 54
Recirculation mode De luxe automatic climate control . . . . . . 82
De luxe automatic climate control plus . . 87
Red symbols ... .... .. .... ... .. .. .... 29
Refill engine oil ............ .... .. .. .. 3 2
Refuelling . .. .... ......... .... .. .. . 234
Release lever for hood ... ... .. .. .. .. . 23 7
Remote control garage door opene r
( H ome link ®) . . . . . . . . . . . . . . . . . . . . . . . 140
Remote control key Unlock ing and locking ..... .. .. .. .. .. 41
Remote rear lid release .. ... .. .. .. .. .. 44
R epa ir manua ls ......... ...... .... .. 293
Repairs Airbag system ........... .. .. .. .. . 175
Replacing bulbs . .. ..... ... .. .. .. .. . 283
Replacing t ires and wheels ... .. .. .. .. . 264
Replacing w indshield wiper blades .. .. .. 56
Report ing Safety Defects .... .. .. .. .. . 152
Reset button ... ........ ... .. .. .. .. .. 12
Retractor . . . . . . . . . . . . . . . . . . . . . . . . . . 15 7
R ims
Cast alloy .. .... ......... .. .. .. .. . 22 5
Roof luggage rack
Mounting po ints .......... ... ... ... 74 Roo
f rack . . . . . . . . . . . . . . . . . . . . . . . . . . . 73
Roof load ... .. .... . ... ...... ... .. . 74
also refer to Roof luggage rack . . . . . . . . 73
s
Safe driving habits ... . .. .. ..... ... .. 144
Safety Wa rning/ind icator lights ............ . 15
Safety be lt pos ition . . . . . . . . . . . . . . . . . 158
Safety be lts worn by pregnant women . 159
Safety be lt pretensioner .. ..... ... .. .. 160
Serv ice and disposa l .... .... ... .. .. 161
Safe ty be lts . . . . . . . . . . . . . . . . . . . . . . . . 15 7
Cleaning .. .. .. .. ... .. .......... .. 230
Danger to passengers who do not wear a
safety belt . ....... . .. .. ..... ... .. 155
F astening ....... .. . .. .. ..... ... .. 157
Improper ly worn . ................. 160
Not worn ... .. ...... ............. 155
Safety be lt pos ition . ... ... ... .. .. .. 158
Safety instructions ................. 157
Securing child safety seats ......... . 195
Spec ial considerations for pregnant
women ... .. .. .. .... ............. 159
Unf astening . .. .. ............... .. 159
Warning/ind icator light . ..... ... .. .. 154
Why YOU MUST wear them ... ... .. .. 154
Worn properly ... .. .. ... ..... ... .. 156
Safety be lt warning ligh t . . . . . . . . . 16, 15 4
Safety compliance sticker ............ 290
Safety eq uipment .... . .. .. ..... ... .. 144
Safety featu res for occ upant rest raint and
prote ction . . . . . . . . . . . . . . . . . . . . . . . . . 144
Safety gu idelines
Seat adjustment .. .. . .. .... .... .. .. . 61
Safety instr uctions
Engine compartment . ... .... ... .. .. 237
for side curtain airbags ......... .... 184
for using ch ild safety seats ........ .. 189
for using safety belts .......... .... . 157
Moni to ring the Advanced Airbag Sys -
tem .. .. .. .. .. .. .. . .. .... .... .... 175
Seat adjustment Driver's seat . . . . . . . . . . . . . . . . . . . . . . . 61
Easy entry funct io n . . . . . . . . . . . . . . . . . 64
Easy entry manua l function ......... .. 63
Fo r-and-aft manua lly ... .. .. ... ... .. . 62
•
•