roof AUDI A5 COUPE 2012 Owners Manual
[x] Cancel search | Manufacturer: AUDI, Model Year: 2012, Model line: A5 COUPE, Model: AUDI A5 COUPE 2012Pages: 316, PDF Size: 78.59 MB
Page 4 of 316
2 Table of contents Vehicle literature .. .. .. .. .. ... .
About this Owner's Manual ...
Controls and equipment .. ... .
Instruments and controls .. . .
General illus tration .... ... .. .. ... .
Instruments and warning/
indicator lights ........ .. .. .. . .
Ins truments . .. .. ..... ... .. .. ... .
War ning/ indi cator lights ... .. ... .. .
Driver information display .. . .
Introduct ion . .. .. ..... ... .. .. ... .
Trip computer .. .. ..... ... .. .. ... .
Efficiency program ........ .. .. ... .
On-Board Diagnostic system (OBD) . . .
Elect ronic speed limiter .. .. .. .. .. . .
Speed war ning system ...... ..... . .
Auto Check Control ........ ... .. . .
Opening and closing .. .. .. .. . .
Keys .. .. .. ................ ... . .
P owe r locking system . .. .. .. .. .. . .
Opening an d clos ing rear lid/t runk lid
Tr un k esc ape h and le ...... .. .. .. . .
P owe r win dows .. ..... ... .. .. ... .
Va let park ing .. . ...... ... .. .. ... .
Panoramic tilting s unroof . ... .. .. . .
Clear vision .. .. ..... ... .. .. ... .
Lights ..... ... .. ..... ... .. .. ... .
Inter ior lights . ........... .. .. ... .
V1s1on . .. .. .................... .
W iper and washer system .. .... ... .
M irrors .. .. ... .... .... .. .. .. .. . .
Di gita l compass ........... ... .. . .
Seats and storage ...... ..... . .
Ge neral recomme ndat ions ..... .. . .
Ad just ing front seats manually .. .. . .
E asy en try f unction ....... .. .. .. . .
P owe r fron t se at adjus tment . ... .. . .
E asy en try f unction .... ... .. .. ... .
Seat memo ry .. .. ..... ... .. .. ... .
H ead restraints .. ..... ... .. .. ... .
Center a rm rest ........... .. .. .. . .
5
6
8
8
8
10
1 0
13
1 9
1 9
22
24
26
27
27
28
37
37
40
44
45
46
47
4 8
4 9
4 9
53
54
55
57
59
61
6 1
62
63
63
6 4
65
6 7
68
Lugga ge compartment . ..... .... . .
Roof rack ..... .. .. ... ..... ... .. .
Beverage holders .... .. .. ... ... .. .
Ashtray ... .... .. ............. .. .
Cigarette lighter/outlet ......... .. .
Storage ...... ... .. ............. . 68
73
75
75
76
76
Warm and cold . . . . . . . . . . . . . . . . 79
Del uxe a utomat ic cl imate co ntrol . . . . 79
Del uxe a utomat ic cl imat e co ntrol pl us 83
Deluxe a utomat ic c limate co ntrol pl us
- basic setti ngs . . . . . . . . . . . . . . . . . . . 90
Seat heating . . . . . . . . . . . . . . . . . . . . .
91
On the road . . . . . . . . . . . . . . . . . . . 9 2
Stee ring . . . . . . . . . . . . . . . . . . . . . . . . 92
Ig nition loc k an d ign it ion sw itch . . . . . 92
S tar ting and stopping the engine with
convenience key . . . . . . . . . . . . . . . . . . 94
E lectromechanical pa rking bra ke . . . . 96
Cruise cont ro l . . . . . . . . . . . . . . . . . . . . 99
Adaptive cruise control . . . . . . . 102
Speed and distance control system . . 102
Driver informat io n . . . . . . . . . . . . . . . . 107
System limitations ... .......... .. . 112
Audi braking guard . . . . . . . . . . . . . . . 113
Audi side assist
Lane change ass istant ............ .
Not es ..... ... .. .. ... ....... ... .
Audi drive select .. ... .... .. .. .
D riving settings
Transmission
116
116
122
124
124
126
Manua l transm ission . . . . . . . . . . . . . . 126
Automa tic transmiss io n . . . . . . . . . . . 126
Park assist . . . . . . . . . . . . . . . . . . . . . 133
Pa rking sys tem . . . . . . . . . . . . . . . . . . . 133
Pa rking sys tem (rea r) . . . . . . . . . . . . . . 133
Pa rking sys tem ( rea r, wi th rear view
cam era) . . . . . . . . . . . . . . . . . . . . . . . .
13 4
Homelink ® . . . . . . . . . . . . . . . . . . . . 140
U niversa l remote cont rol . . . . . . . . . . . 14 0
Page 49 of 316
.. Turn the key to position ¢ fig. 45 @until a ll
the windows have reached the desired posi
t ion and the panoramic tilt ing sunroof is t ilt
ed .
Convenience closing feature
.. Use the emergency key or pull the mechani
ca l key out of the master key ¢
page 39 .
.. Turn the key in the lock of the driver's door
to the lock position ® until the windows
and the panoramic tilting sunroof are closed
¢ ,& .
When the panoramic ti lting sunroof is tilted/
closed, the electric sun shade* is also opened/
closed.
A WARNING
- Never close the windows and thepanor
amic tilting sunroof inattentively and
without checking -there is risk of injury .
- You must always watch when the win dows are being raised so that no one can
be trapped. If you release the key, the
closing action is immediate ly canceled .
- Always read and heed WARNING ¢
IJ::,. in
General description on page 40.
Correcting window regulator
malfunction
After disconnecting the vehicle battery, the
one-touch up and down feature must be acti
vated again.
.. Pull and hold the power w indow switch un
til the window is completely closed.
.. Re lease the switch.
.. Pu ll the switch again for one second. The
automatic clos ing/opening is now reactivat
ed .
Opening and closing 47
Valet parking
Through the "valet parking" feature the lug
gage compartment of your vehicle is secured
from unauthorized access during the valet
parking service .
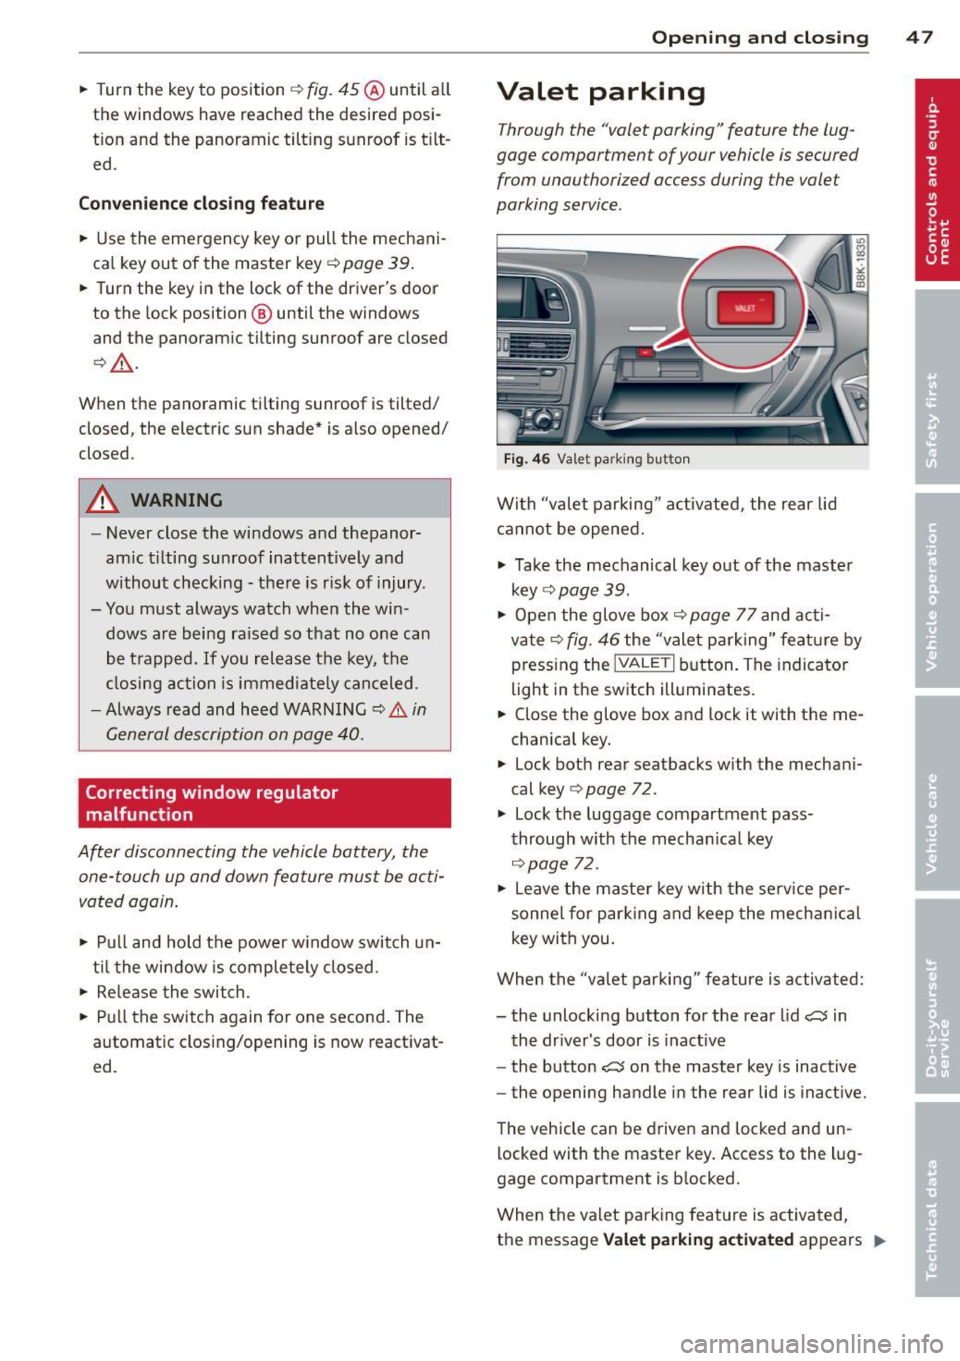
Fig . 46 Vale t parking button
With "valet parking " activated, the rear lid
cannot be opened.
.,. Take the mechanical key out of the master
key
r::!;> page 39.
.. Open the glove box¢ page 77 and acti
vate¢
fig. 46 the "valet parking" feature by
pressing the
! VALET I button. The indicator
light in the switch illuminates.
.. Close the glove box and lock it with the me
chanica l key .
.. Lock both rear seatbacks with the mechani
cal key ¢
page 72.
.,. Lock the luggage compartment pass
through with the mechan ica l key
¢ page 72.
.. Leave the master key with the service per
sonne l for parking and keep the mechanica l
key with you .
When the "va let parking" feature is activated:
- the unlocking button for the rear lid
~ in
the driver's door is inact ive
- the button~ on the master key is inactive
- the opening handle in the rear lid is inactive.
The vehicle can be driven and locked and un
locked with the master key. Access to the lug
gage compartment is b locked.
When the valet parking feature is activated,
the message
Valet parking activated appears II>
Page 50 of 316

48 Openin g and clo sing
in the instrument cluster display when you
switch the ignition on .
Panoramic tilting
sunroof
Tilting and closing
"'
" co 00
F ig. 47 Section of headline r: Sw itch fo r panoram ic t ilt ·
ing sunroof
., To tilt the panoramic tilting sunroof, press
the switch briefly .
., To close the panoramic tilting sunroof, pull
the switch briefly .
., To set an intermediate pos ition, press/pull
the switch until the roof reaches the des ired
pos it ion .
After the ignit ion is swi tched off, you can st ill
operate the Panorama for about 10 minutes .
As soon as the driver's or passenger's door is
opened, the sw itch is inoperative .
Sun blind
The sun blind can be opened and closed man
ually in any position.
A WARNING
Pay careful attention when clos ing the
panoramic tilting sunroof - otherwise seri
ous inju ry could result! For this reason, al
ways remove the ignition key when leaving the vehicle.
- Never leave ch ildren o r persons requ iring
assi stan ce a lone in the vehicle, especi ally
when they c ould access the veh icle keys.
Unsupervised use of the keys can res ult
in t he engine being started or use of ve
hicle systems such as the power win -dows, etc. w
hich could res ult in serious
in jury. The doors could be locked with
the remote key, delaying he lp in an
emergency.
- The panoramic tilting sunroof w ill con
tinue to operate until the ign ition key
has bee n removed and one of the front
doors has been opened.
(D Note
A lways close your panoramic t ilting sun
roof when leav ing your vehicle. Sudden
r ain can cause damage to the inte rior
equipment of yo ur vehicle, particular ly the
electronic equipment .
@ Tips
-Information on convenience opening/
closing
~ page 46 .
Emergency closing of the panoramic
tilting sunroof
If the s unroof detects an object in its path
when it is closing, it wi ll open aga in automati
ca lly. In this case, you can close the roof with
the power emergency closing function .
., Within five seconds after the sunroo f opens
automatically, pu ll the switch until the roof
closes.
Page 75 of 316
button down and push the cover for
ward.
- The pass-through can be locked and un
l ocked with the vehicle mechanical key
r=;, fig. 84.
Securing the ski sack
Applies to vehicles: with ski sack
The ski sack must be secured in the luggage
compartment.
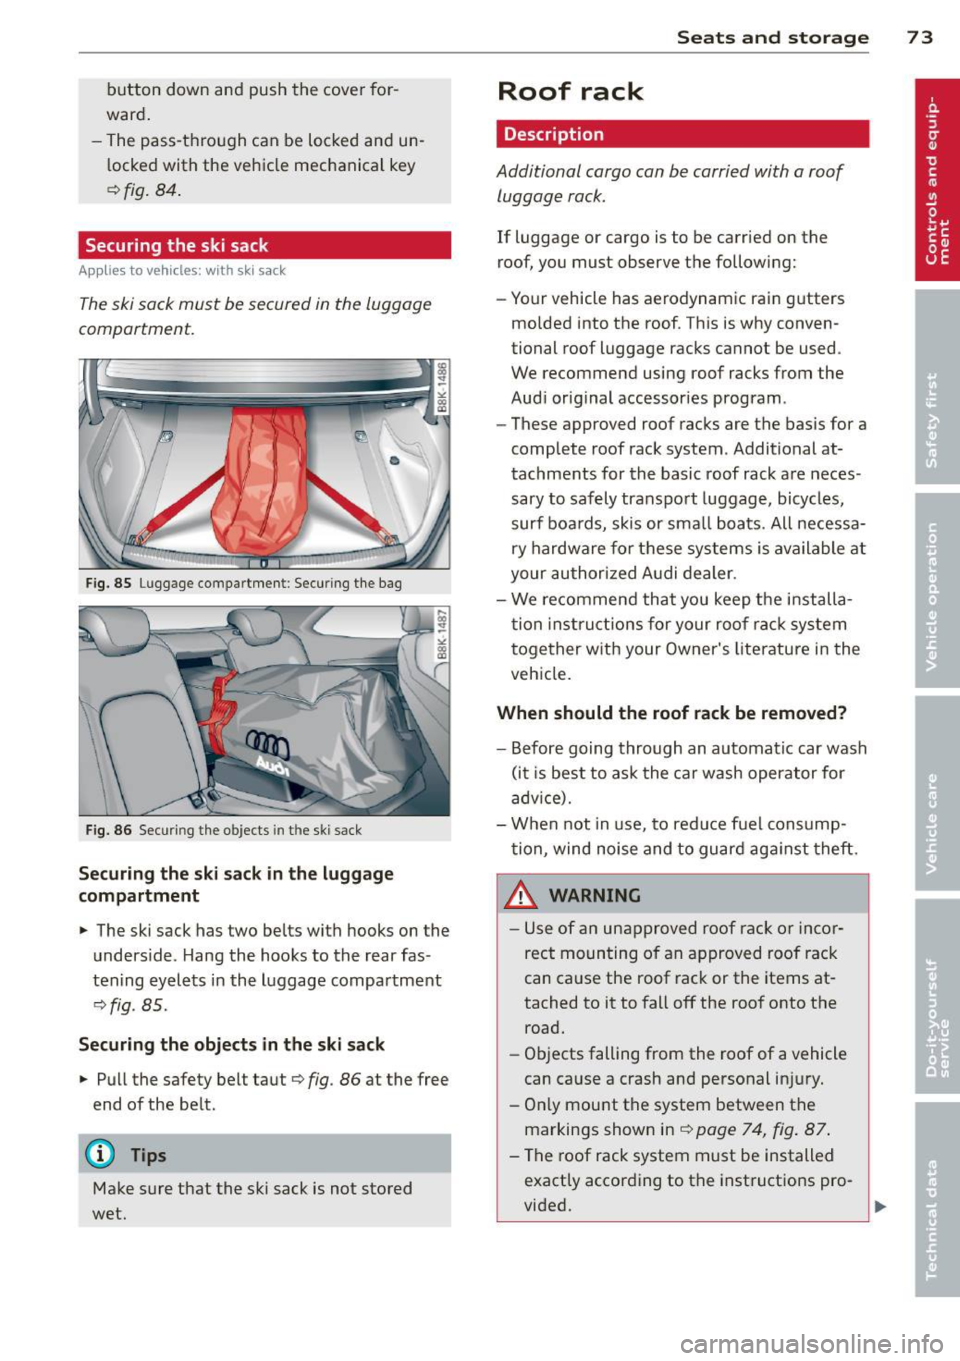
F ig. 85 Luggage compartment : Securing the bag
Fig. 86 Securing the objects in t he ski sack
Securing the ski sack in the luggage
compartment
.,. The ski sack has two belts with hooks on the
underside . Hang the hooks to the rear fas
tening eyelets in the luggage compartment
¢ fig . 85.
Securing the objects in the ski sack
.,. Pull the safety belt taut ¢ fig. 86 at the free
end of the be lt.
(D Tips
Make sure that the ski sack is not stored
wet.
Seats and storage 73
Roof rack
Description
Additional cargo can be carried with a roof
luggage rack .
If luggage or cargo is to be carried on the
roof, you must observe the following:
- Your vehicle has aerodynamic rain gutters
molded into the roof . This is why conven
tional roof luggage racks cannot be used .
We recommend using roof racks from the
Aud i original accessories program .
- These approved roof racks are the basis for a
complete roof rack system. Additional at
tachments for the basic roof rack are neces
sary to safely transpo rt luggage, bicycles,
surf boards, skis or sma ll boats. All necessa
ry hardware for these systems is available at
your authorized Audi dealer.
- We recommend that you keep the installa
tion instructions for your roo f rack system
together with your Owner's literature in the
vehicle.
When should the roof rack be removed?
-Before going through an automatic car wash
(it is best to ask the car wash operator for
advice).
- When not in use, to reduce fuel consump
tion, wind noise and to guard aga inst theft.
8_ WARNING
- Use of an unapproved roof rack or incor
rect mounting of an approved roof rack
can cause the roof rack or the items at
tached to it to fall off the roof onto the
road.
- Objects falling from the roof of a vehicle
can cause a crash and personal in jury.
- Only mount the system between the
markings shown in
r=;, page 74, fig. 87 .
- The roof rack system must be installed
exactly according to the instructions pro-
-
vided. .,,.
Page 76 of 316
7 4 Seats and storage
(D Note
- Your vehicle warranty does not cover any
damages to the vehicle caused by using
roof racks or mounting structures not
approved by Audi for your vehicle . The
same applies to damage resulting from incorrect roof rack installation .
- Always check the roof rack mountings
and hardware before each trip and dur
ing a trip to make sure everything is se
curely tightened. If necessary, retighten
the mountings and check the ent ire sys
tem from time to time.
- After mounting a roof rack system, or
when you transport objects on the roof
of your vehicle, the height of the vehicle
is naturally increased. Be careful when
driving under low bridges or in parking
garages for example. This could cause
damage to the load and even the vehicle itself.
Mounting points
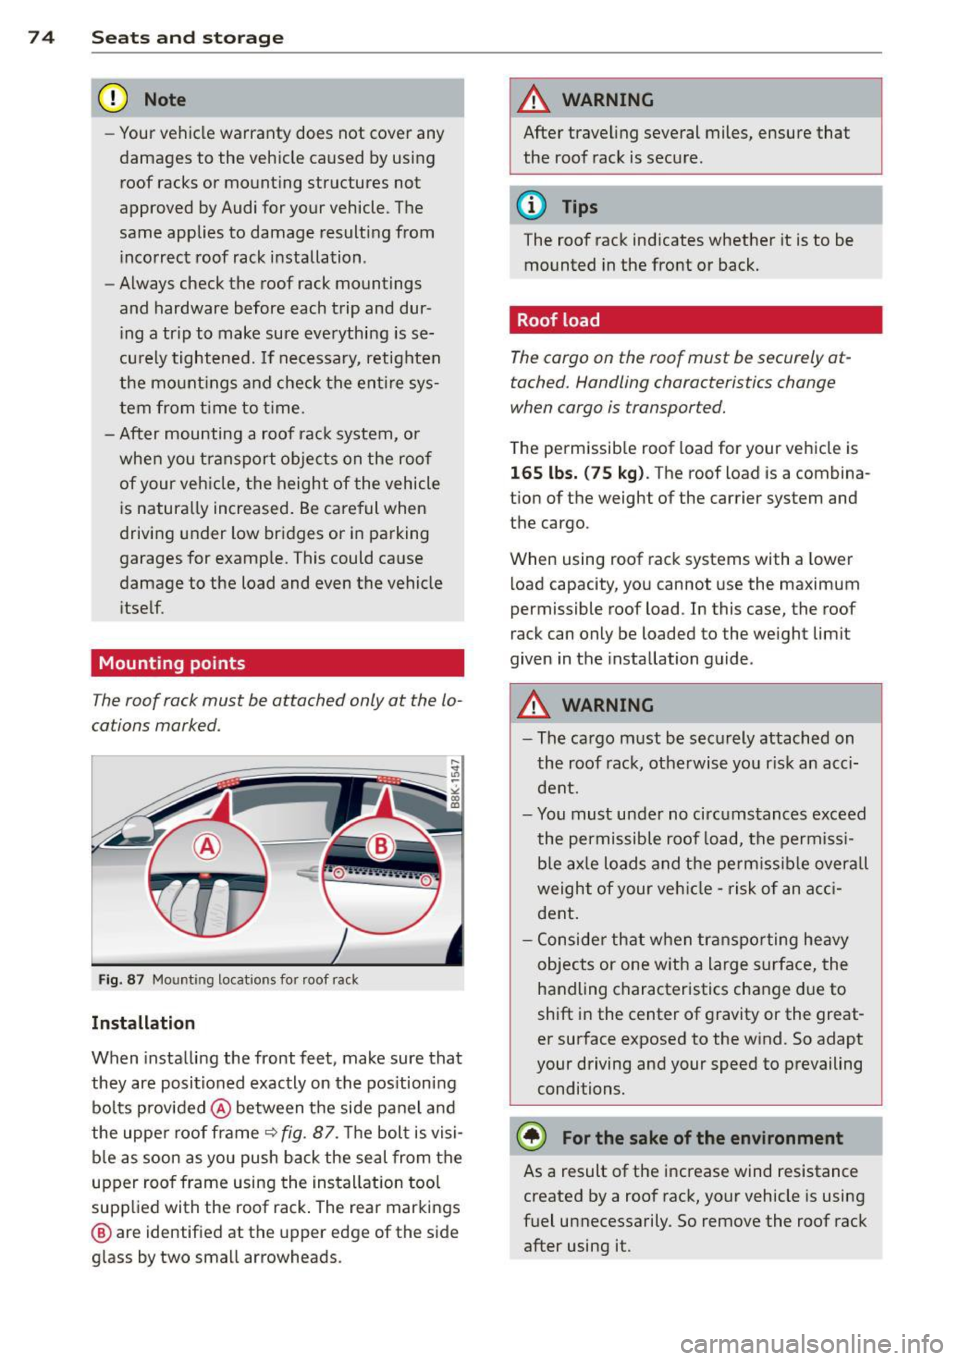
T he roof rack must be attached only at the lo
cations marked .
Fig. 87 Mounting locations for roof rack
Installation
When installing the front feet , make sure that
they are positioned exactly on the positioning
bolts provided @between the side panel and
the uppe r roof frame¢
fig . 87. Th e bolt is visi
ble as soon as you push back the seal from the
upper roof frame using the installation tool
supplied with the roof rack . The rear markings
@ are identified at the upper edge of the side
glass by two small arrowheads.
A WARNING
-After traveling several miles, ensure that
the roof rack is secure.
(D Tips
The roof rack indicates whether it is to be mounted in the front or back.
Roof load
The cargo on the roof must be securely at
tached. Handling characteristics change
when cargo is transported.
The permissible roof load for your vehicle is
165 lbs. (75 kg) . The roof load is a combina
tion of the weight of the carrier system and the cargo.
When using roof rack systems with a lower
load capacity, you cannot use the maximum
permissible roof load . In this case, the roof
rack can only be loaded to the weight limit
given in the installation guide.
A WARNING
- The cargo must be securely attached on
the roof rack, otherwise you risk an acci
dent.
- You must under no circumstances exceed
the permissible roof load, the permissi
ble axle loads and the permissible overall
weight of your vehicle -risk of an acci
dent.
- Consider that when transporting heavy
objects or one with a large surface, the
handling characteristics change due to
shift in the center of gravity or the great
er surface exposed to the wind. So adapt
your driving and your speed to prevailing conditions.
~ For the sake of the environment
As a result of the increase wind resistance
created by a roof rack, your vehicle is using
fuel unnecessarily. So remove the roof rack
after using it.
Page 78 of 316
76 Seats and storage
Reinst alling ashtray insert
> Press the ashtray insert into its holder .
A WARNING
Never put waste paper in the ashtray. Hot
ashes or other hot objects in the ashtray
co uld set waste paper on fire.
Cigarette lighter/outlet
Cigarette lighter
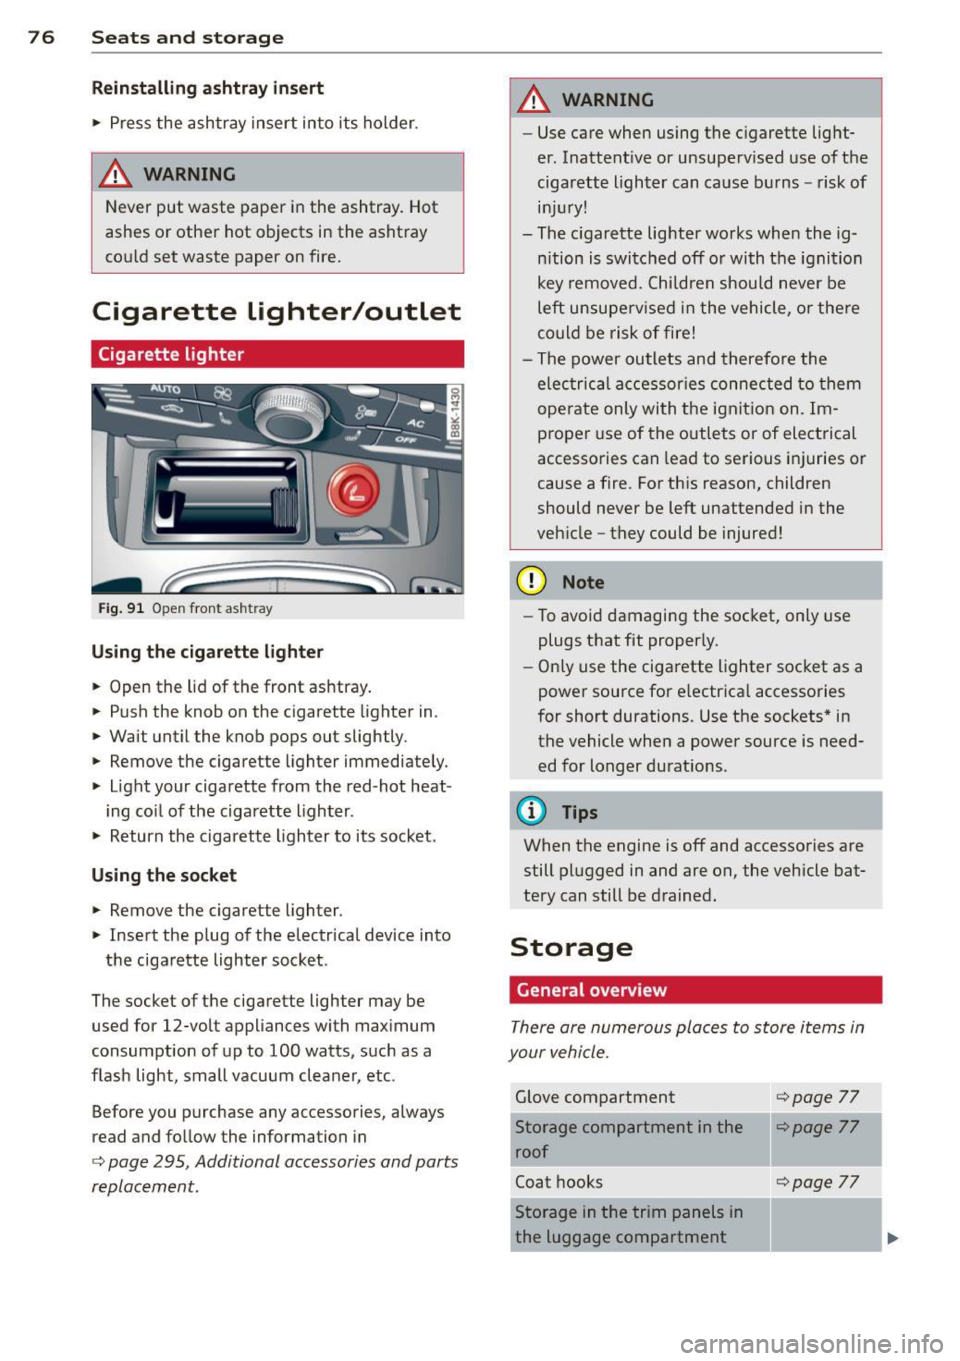
Fig . 9 1 Open front asht ray
Using th e cig arett e light er
> Open the lid of the front ashtray .
> Push the knob on the cigarette lighter in.
> Wait until the knob pops out slightly .
> Remove the cigarette lighter immediately.
> Light your cigarette from the red-hot heat -
ing coil of the cigarette lighter .
> Return the cigarette ligh ter to its socket.
Using the socket
> Remove the cigarette lighter.
> Insert the plug of the electrical device into
t h e ciga rette lighter socket .
The socket of the cigarette lighter may be
used for 12-volt appliances with max imum
consumption of up to 100 watts, such as a
flash light, small vacuum cleane r, etc.
Before you purchase any accessories, always
read and follow the information in
¢ page 295, Additional accessories and parts
replacement.
A WARNING
-
- Use care when using the c igarette light-
er . Inattent ive or unsuperv ised use of the
cigarette lighter can ca use burns -risk of
in jur y!
- The cigarette lighter works when the ig nition is switched off o r with the ignition
key removed. Child ren shou ld never be
left unsuperv ised in the vehicle, or the re
co uld be risk of fire!
- T he power outlets and therefore the
elec tric al accessor ies connec ted to them
operate only with t he ignit ion on. Im
p roper use of the outlets or of elect rical
accessories can lead to serious i nju ries or
cause a fire . For th is reason, children
should never be left unattended in the
veh icle -they could be injured!
(D Note
- To avoid damagi ng the socket, only use
plugs that fit proper ly.
- Only use the cigarette lighter socket as a
power source for e lectr ica l accessories
for short durations. Use the sockets * in
the vehicle when a power source is need
ed for longer du rat io ns.
(!) Tips
When the engine is off and accessories are
still plugged in and are on, the vehicle bat
tery can still be d rained.
Storage
General overview
T here are numerous places to store items in
your vehicle.
Glove compartment
Storage compartment in the roof
Coat hooks
-Storage in the trim panels in
the luggage compartment
i:>page 77
i:>page 7 7
i:>page 77
Page 79 of 316
_& WARNING
-Always remove objects from the instru
ment panel. Any items not put away
could slide around inside the vehicle
whi le driving or when accelerating or
when applying the brakes or when driv
ing around a corner.
- When you are driving make sure that
anything you may have placed in the cen
ter console or other storage locat ions
cannot fa ll out into the footwells. In case
of sudden braking you would not be able
to brake, depress the clutch or acceler
ate.
- Any pieces of clothing that you have
hung up must not interfere with the driv
er's v iew. The coat hooks are designed
only for lightweight clothing. Never hang
any clothing with hard, pointed or heavy
objects in the pockets on the coat hooks.
During sudden braking or in an accident -
especially if the airbag is deployed -
these objects cou ld injure any passen
gers inside the vehicle.
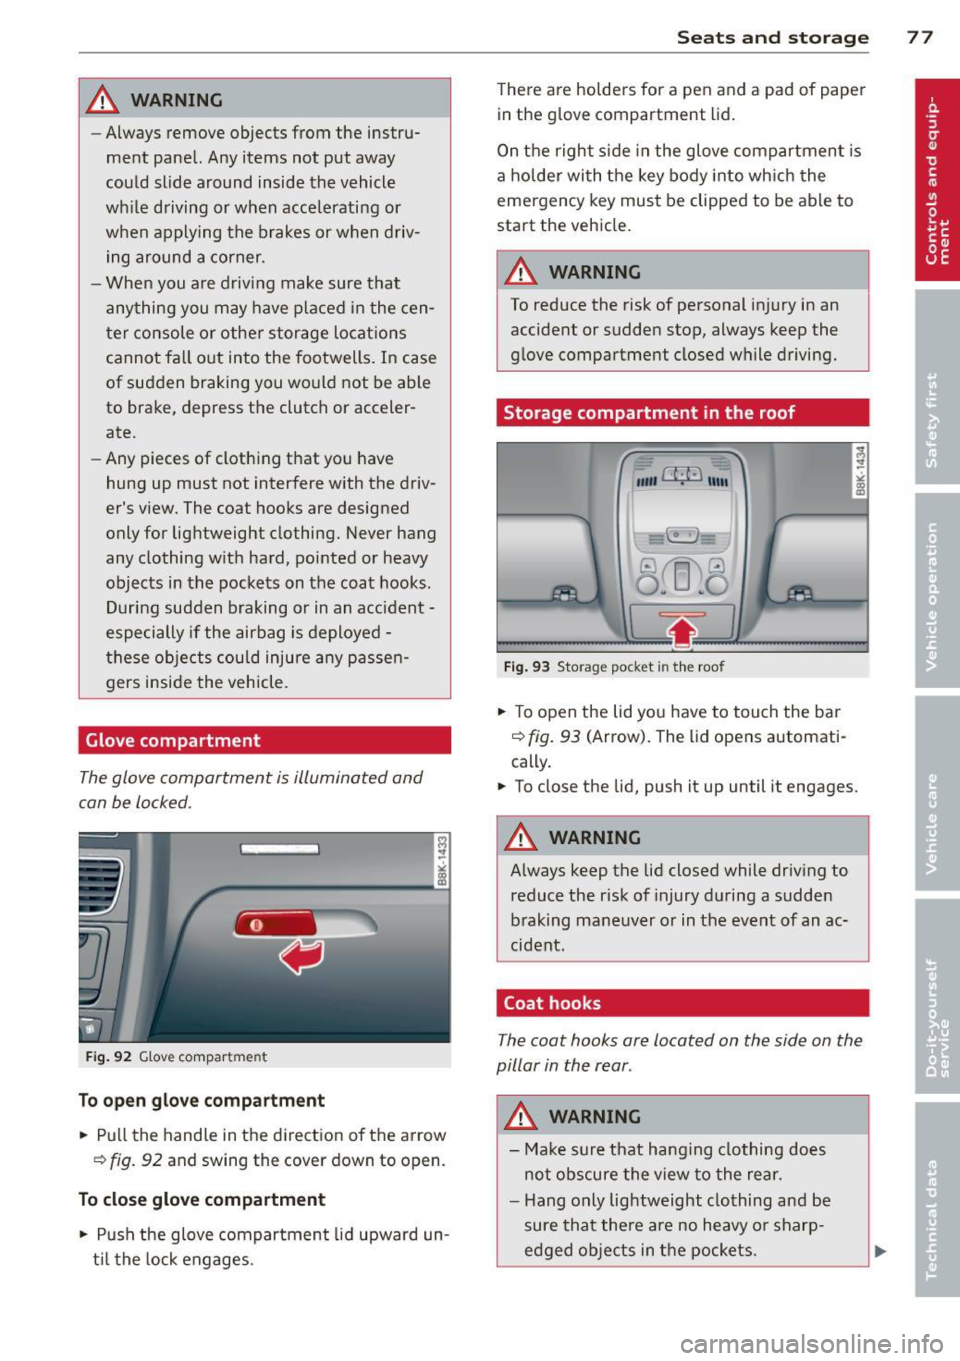
Glove compartment
The glove compartment is illuminated and
can be locked.
F ig . 92 G love compartme nt
To open glove compa rtment
.. Pu ll the hand le in the direction of the a rrow
~ fig . 92 and swing the cover down to open.
T o clos e glo ve compartm ent
.,. Push the glove compartment lid upward un
t il the lock engages .
Sea ts a nd s to rage 77
There are holders for a pen and a pad of paper
in the glove compartment lid.
On the right s ide in the glove compartment is
a holde r with the key body into which the
emergency key must be clipped to be able to
start the vehicle.
A WARNING
To reduce the risk of personal injury in an
accident or sudden stop, always keep the
glove compartment closed while driving.
Storage compartment in the roof
"'" CfJ:' 11111
.8=5: ~I
Fig . 93 Storage pocket in the roof
.,. To open the lid yo u have to touch the bar
~ fig. 93 (Arrow). The lid opens automati
cally.
.. To close the lid, push it up until it engages.
A WARNING
-
Always keep the lid closed while driv ing to
reduce the risk of injury during a sudden
braking mane uver or in the event of an ac
cident.
Coat hooks
The coat hooks are located on the side on the
pillar in the rear .
A WARNING
--Ma ke sure that hanging clothing does
not obscure the view to the rear.
- Hang only lightweight clothing and be
sure that there are no heavy o r sharp
edged objects in t he pockets.
-
Page 82 of 316
80 Warm and cold
damage and have it inspected by a quali
fied dealership.
- Repairs to the Audi automatic climate
control system require specialized knowledge and special tools. Therefore,
contact an authorized dealer in the event
of malfunctions .
@ Tips
-To avoid adversely affecting heating and
cooling performance and to prevent con
densation on the windows, the air intake
in front of the windshield must be free of
ice, snow and leaves .
Controls
Applies to vehicles: with deluxe automatic climate control
-The air flowing out of the vents and
throughout the vehicle's entire interior is
discharged at the rear of the vehicle.
Make sure that the outlet slots are not
covered by clothing, etc.
- The automatic climate control system works most effectively if the windows
and the panorama/tilting sunroof* are
closed . However, if the interior of a
parked vehicle is extremely hot from the
sun, briefly opening the windows can
speed up the cooling process.
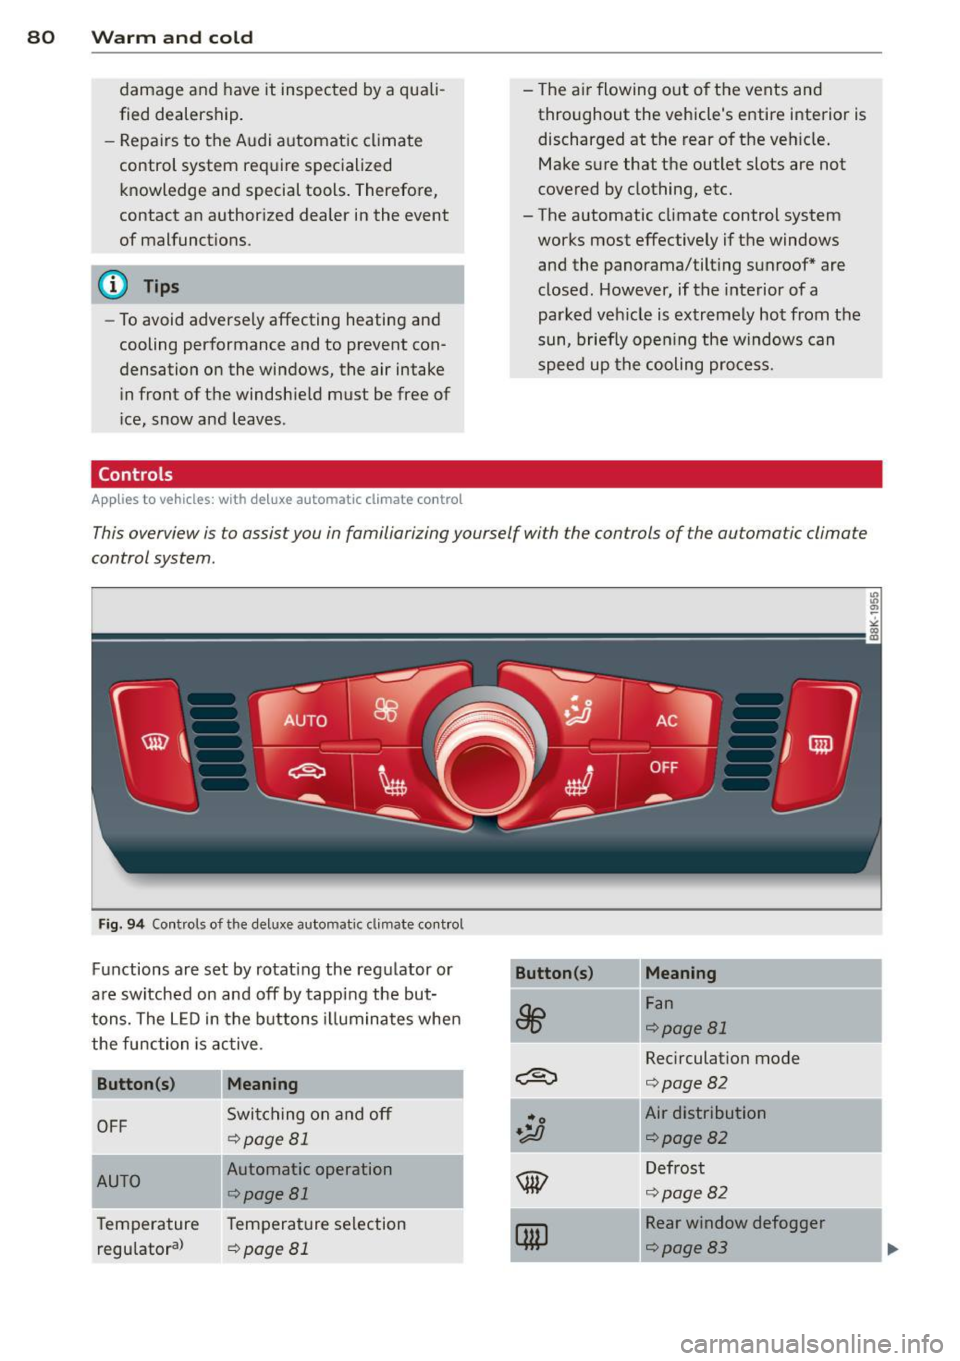
This overview is to assis t you in familiarizing yourself wi th the con trols of the automa tic climate
control system.
Fig. 94 Con tro ls o f th e del uxe a uto matic cl imate contro l
Functions are set by rotating the regulator or Button(s)
Meaning
are switched on and off by tapping the but-
~
Fan
tons. The LED in the buttons illuminates when
¢page81
the function is active. -Recirculation mode
Button(s)
Meaning ~ ¢page82
Switching on and off •o Air distribution
OFF ¢page 81 .;o ¢page82
IAUTO Automatic operation ®
Defrost
¢
page 81 ¢
page82
Temperature Temperature selection
QiP
Rear window defogger
regulatora >
¢page 81 ¢page83
Page 87 of 316
(D Note
-If you suspect that the climate control
system has been damaged, switch the
system off to avoid further damages,
and have it inspected by a qualified deal
ership .
- Repairs to the Audi air conditioner re
quire special technical knowledge and
special tools . Contact an authorized Audi
dealer for assistance .
(D Tips
-To avoid adversely affecting heating and
cooling performance and to prevent con -
Controls
Applies to vehicles: with Deluxe automatic climate control plus
Warm and cold 85
densation on the windows, the air intake
in front of the windshield must be free of
ice, snow and leaves.
- The air flowing out of the vents and
throughout the vehicle's entire interior is
discharged at the rear of the vehicle.
Make sure that the outlet slots are not
covered by clothing, etc.
- Climate control works most effectively if the windows and the panoramic sliding/
tilting sunroof* are closed . However, if
the interior of a parked vehicle is ex
tremely hot from the sun, briefly open
ing the windows can speed up the cool
ing process.
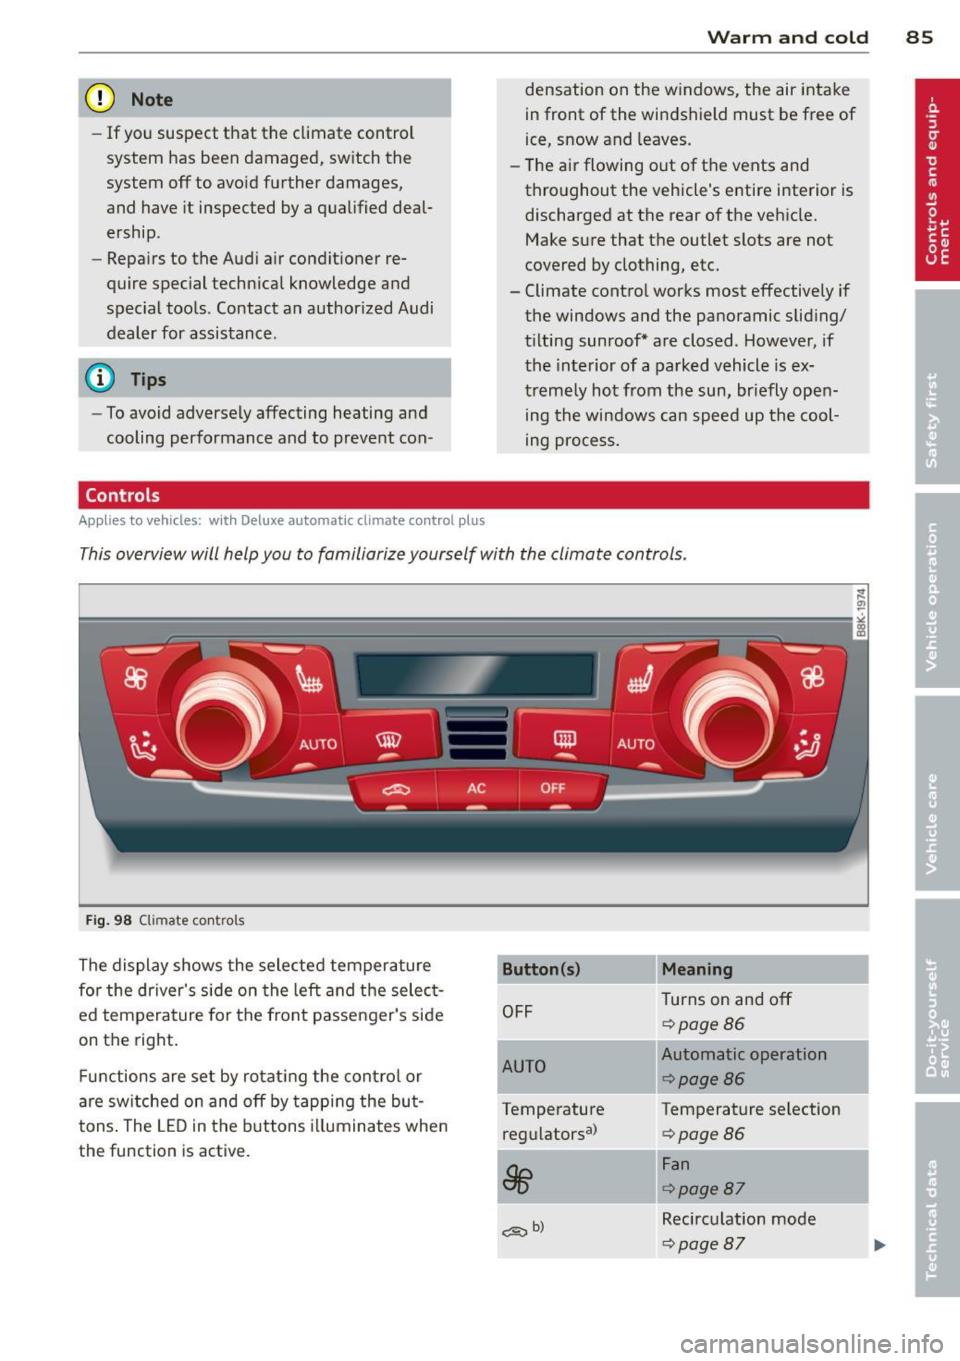
This overview will help you to familiarize yourself with the climate controls .
Fig. 98 Clim ate contro ls
The display shows the selected temperature
for the driver's side on the left and the select
ed temperature for the front passenger 's side
on the right.
Functions are set by rotating the control or
are switched on and off by tapping the but
tons. The LED in the buttons illuminates when
the function is active. OFF
AUTO
Temperature reg u latorsa>
~ b)
Meaning
Turns on and off
9page86
Automatic operation
¢page86
Temperature selection
9page 86
Fan
¢page87
Recirculation mode
¢page 87
Page 92 of 316

90 Warm and cold
If the climate control is operating in cool
ing mode, a ir flows primarily from the
vents in the center console. To achieve ad
equate cooling, you should never close
these vents completely.
Economical use of the climate control
system
A ppl ies to vehicles: w it h Deluxe au toma tic clima te co n
tro l p lus
Economical use of the climate control system
helps save fuel.
When the climate contro l system is working in
coo ling mode, engine performance is reduced
and fuel consumption is affected. To keep the
time the cl imate control system is on as short
as possible, you should do the follow ing:
.. To save fuel, turn off cooling mode by press
ing the AC button (indicator light goes out) .
.. In add ition, if you open the window or the
panoramic sliding/tilt ing sunroof* while
dr iv ing, turn off cooling mode by pressing
the AC button (indicator light goes out) .
.. If the vehicle is extremely hot due to the
heat of the sun, briefly open doors and win
dows.
@ For the sake of the environment
When you save fuel, you reduce em ission s
from the vehicle.
Deluxe automatic
climate control plus -
basic settings
General information
Ap plies to veh icles: w it h Deluxe automat ic climate co n
tro l p lus
The basic climate control settings can be ad
justed in the radio or MM!*.
.. Select: Funct ion button ICARI > Control but
ton
AC .
The follow ing funct ions can be selected: -
Auto reci rculat.
q page 90
- Synchronization
q page 90
Automatic recirculation
App lies to vehicles : with Del uxe a uto mat ic clima te con
tro l pl us
An air quality sensor detects increased con
centrations of pollutants in the outside air
and automatically switches to recirculation
mode.
We recommend that you always keep auto
matic recirculation ON to prevent polluted
outside air from entering the vehicle interior.
If the
air quality sensor located in the climate
control system detects polluted outside air,
the sensor dec ides whether the air pollut io n
can be reduced by the factory-installed pollu
tant filter or w hether it is necessary to switc h
to recirculation. With heavy concentr ations of
po llutants, the climate control system is
switched automatica lly to recirc ulation mode
and the supply of o utside air is blocked . As
soon as the concentration of pollutants in the
outside air drops, fresh air is supplied to the
vehicle interior aga in .
In the event that the windows fog up during
automatic recircu lation, press the~ button
immediately .
Under certain operating conditions, automatic
recirculation is switched off automatically.
When outside temperatures are below about
SO °F (+10 °C), automatic recirculat ion is lim
ited to 30 seconds. When outside tempera
tures are be low about 30 °F (-1 °C), automatic
recirculation is lim ited to 15 seconds .
Synchronization
Applies to veh icles : with Del uxe a uto mat ic climate con
tr ol pl us
One climate control setting for all seats.
After Syn chronization is set to On , all of the
subsequent climate control settings (except
for seat heating *) for the driver are transfer-
red to the front passenger. ..,.