radio AUDI A5 COUPE 2013 Owners Manual
[x] Cancel search | Manufacturer: AUDI, Model Year: 2013, Model line: A5 COUPE, Model: AUDI A5 COUPE 2013Pages: 294, PDF Size: 73.84 MB
Page 14 of 294
12 Instruments and warning/indicator lights
disabled. It is also important to notify your in
surance company about the loss .
Setting the speed warning
By pressing the I SETI button br iefly, you can
set threshold 1 of the speed warning while
you are dr iv ing
~ page 79. By mainta ining
pressure on the ISETI button, you de lete the
warning threshold.
Digital clock with date display and
Odometer
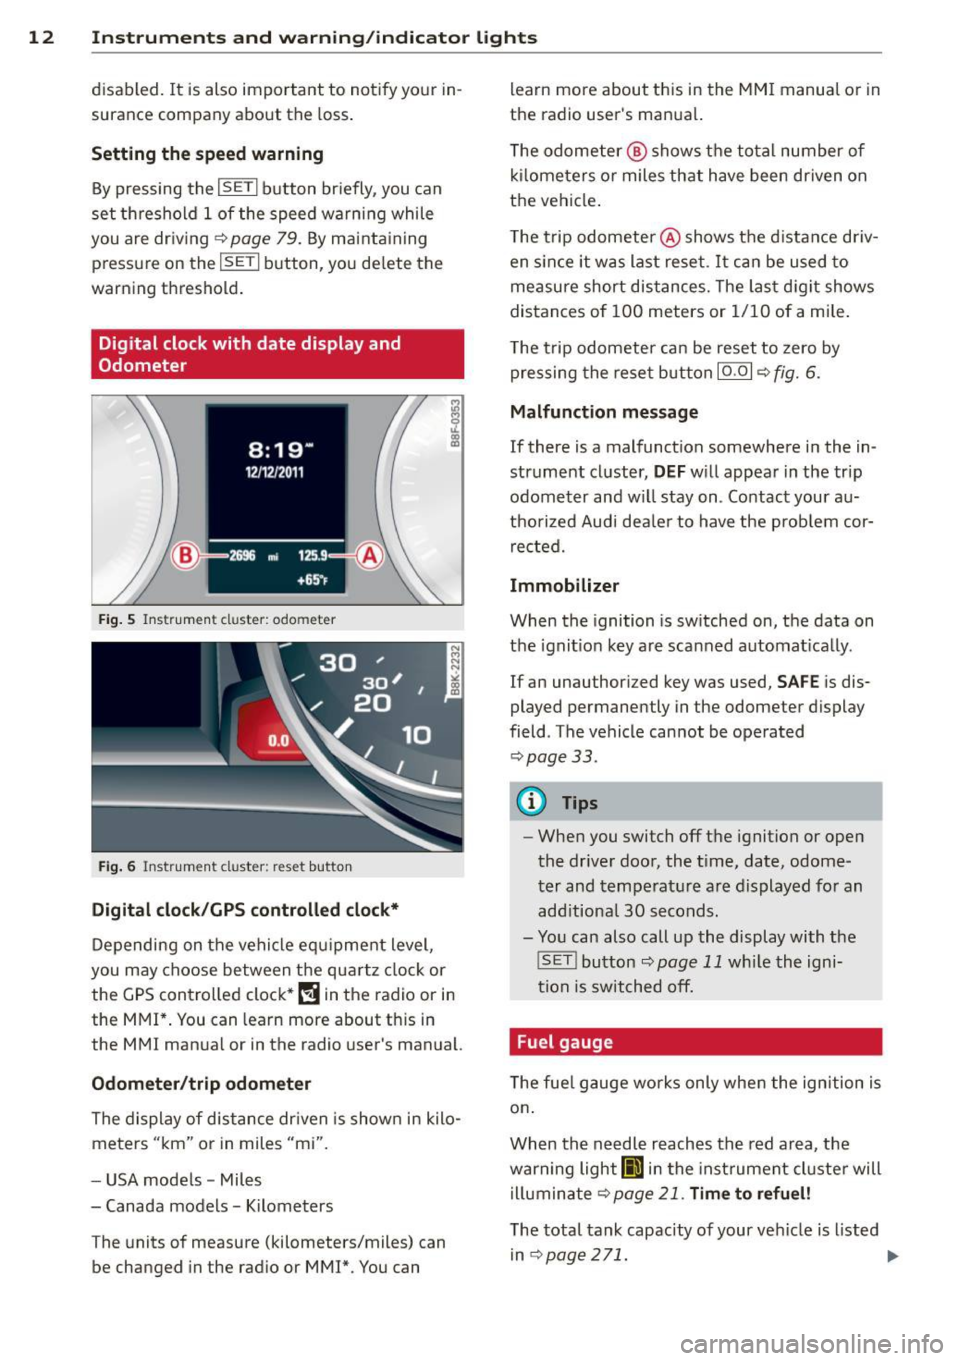
Fig. 5 Instrument cl uster: odo meter
Fig. 6 Instrum ent cl uster : re se t button
Digital clock/GPS controlled clock*
Depending on the vehicle equ ipment level,
you may choose between the quartz clock or
the
GPS controlled clock* (!j in the radio or in
the MMI*. You can learn more about th is in
the MMI manual or in the radio user's manual.
Odometer /trip odometer
The display of distance dr iven is shown in kilo
meters "km" or in miles "mi".
- USA mode ls - Miles
- Canada models - Kilometers
T he units of measure (kilometers/miles) can
be changed in the radio or
MMI*. You can learn more about this in the MM
I manual or in
the radio user's manual.
T he odometer @ shows the total number of
kilometers or miles that have been driven on
the vehicle .
The trip odometer @shows the distance driv
en since it was last reset .
It can be used to
measure short distances. The last digit shows
distances of
100 meters or 1/10 of a mile.
T he trip odometer can be reset to zero by
pressing the reset button IO .OI
~ fig. 6.
Malfunction message
If there is a malfunction somewhere in the in
strument cluster,
DEF will appear in the trip
odometer and w il l stay on . Contact your au
thorized Audi dea le r to have the prob lem cor
rected.
Immobilizer
When the ignition is switched on, the data on
t h e ignition key are scanned automat ically .
If an unauthor iz ed key was used,
SAFE is dis
played permanently in the odometer display
field . The vehicle cannot be operated
~ page 33.
(D Tips
-When you switch off the ignition or open
the-driver door, the t ime, date, odome
ter and temperature are displayed for an
add itiona l
30 seconds.
- You can also call up the display with the
! SET !button
~page 11 wh ile the igni
tion is switched off.
· Fuel gauge
T he fue l gauge works only when the ignition is
on .
When the needle reaches the red area, the
warning light
Ii] in the instr ument cluster will
illuminate
Qpage 21 . Time to refuel!
The total tank capacity of your vehicle is listed
in
~ page 271. .,,.
Page 19 of 294
Instruments and warning/indicator lights 17
malfunction. Drive to your autho rized Audi
dealer or qualified workshop immediately to
have the malfunction corrected.
~ Safety belts
This warning/indicator light reminds you to
put on your safety belt.
The . warning/ind icator light ill uminates
when the ignition is switched on to remind
the driver and any front passenger to put on
the safety belt. Additionally, an acoustic warn
ing (gong) will also sound.
For more Information ¢
page 134, Safety
belt warning light.
0 Battery
T he . warning/indicator light illuminates
when you switch on the ignition and must go
out after the engine has started.
• Alternator fault: Battery is not being
charged
If the indicator light turns on and the mes
sage appears, there is a malfunction in the
generator or vehicle e lectrica l system .
Drive to your autho rized Aud i dealer or quali
fied workshop immediately . Because the vehi
cle battery is discharging, turn
off all unnec
essary electrical equipment such as the radio .
Seek professional assistance if the battery
charge level is too low.
(•) Low battery: Battery will be charged
while driving
If the indicator light turns on and the mes
sage appears , there may be limited starting
ability .
If thi s message turns off after a litt le w hile,
the battery charged eno ugh wh ile driving.
If the message does not turn
off, have your
author ized Audi dealer or qualified workshop
correct the malfunction.
"l::;r: Engine oil pressure
The red engine oil pressure warning symbol
requires immediate service or repair . Driving
with a low-oil-pressure indication is likely to
inflict severe damage to the engine.
• Turn off engine! Oil pressure too low
If the indicator light turns on and the mes
sage appears, the oil pressure is too low.
.,. Pull
off the road .
.,. Stop the vehicle.
.,. Turn
off the engine.
.,. Check the engine oil level ¢ page 221.
.,. If the eng ine oil level is too low, add eng ine
oil
¢ page 221. Make sure that the oil pres
sure warning symbol. appears no longer
in the display before you start dr iv in g again .
.,. If the engine oil level is correct and the ind i
cator light still turns on, turn the engine
off
and do not continue driving. Seek professio
na l assistance .
(D Tips
- The engine oil pressure symbol. is
not an indicator for a low engine oil lev
el. Do not rely on it. Instead, check the
oil level in your engine at regular inter
vals, preferably each time you refuel,
and always before going on a long trip.
- The yellow oil level warning indication
l!I requires oil refill or workshop serv
ice without delay. Do not wait until the
red oil pressure warning. starts to
flash before you respond to the low oil
level warning
1!1-By then, your engine
may already have suffered serious dam
age.
~ .. Engine oil level
• WARNING: Please add oil immediately
If the indicator light and the message appear,
add engine oil immediately
¢ page 221.
Page 26 of 294
24 Driver information d isplay
Driver information
display
Introduction
The Driver information display inside the in
strument cluster provides you, the driver ,
with important information.
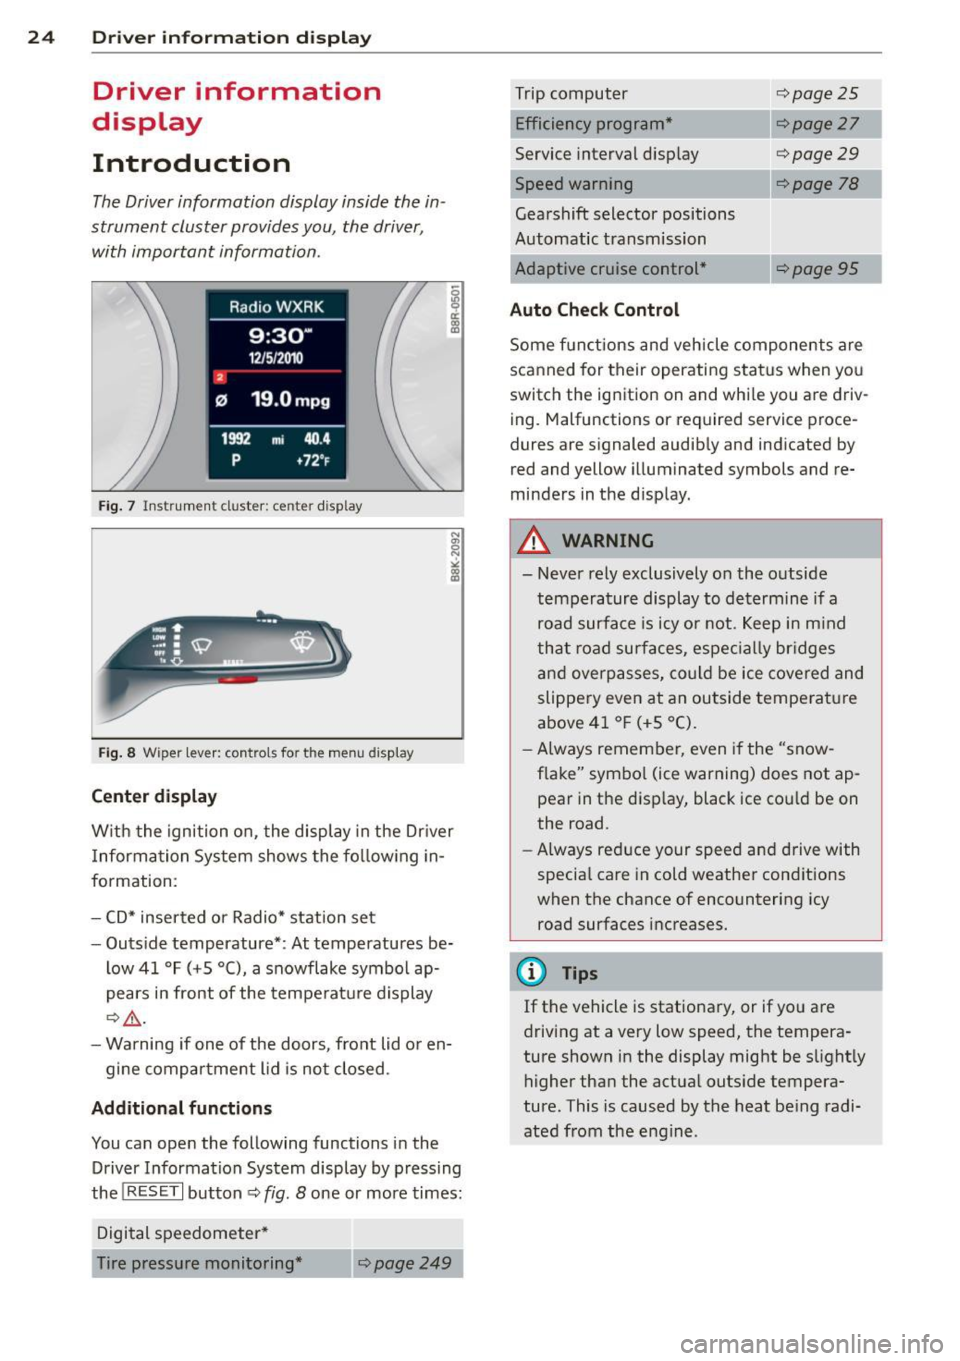
Fig. 7 Ins trum en t cl uster : ce nter display
Fig. 8 W iper lev er: con trols fo r th e menu disp lay
Center display
W ith the ignition on, the display in the Dr iver
I nformation System shows the following in
formation :
- CD* inserted or Radio* station set
- Outside temperature* : At temperatures be-
low 41 °F (+5 °C), a snowflake symbol ap
pears in front of the temperature display
c::> .&_.
-Warning if one of the doors, front lid or en-
gine compartment lid is not closed .
Additional functions
You can open the following functions in the
Driver Information System display by pressing
the
! RESET I button c::> fig. 8 one or more times:
Digital speedometer*
Tire pressure monitoring *
~page249
Trip computer
Efficiency program*
Service interval display
c::>page25
c::> page 27
c::> page 29
--·-
Gearshift selector positions
Automatic transmission
Adaptive cruise control*
Auto Check Control
c::> page 78
Some functions and vehicle components are
scanned for their operating status when you
switch the ignition on and whi le you are driv
ing. Malfunctions or required service proce
dures are signaled audibly and indicated by
red and yellow illuminated symbols and re
minders in the d isplay.
A WARNING
--- Never rely exclusively on the outside
temperature display to determine if a
road surface is icy or not. Keep in mind
that road surfaces, especially br idges
and overpasses, could be ice covered and
slippery even at an outside temperature
above 41 °F (+5 °C).
- Always remember, even if the "snow
flake" symbol (ice warning) does not ap
pear in the disp lay, black ice cou ld be on
the road.
- Always reduce your speed and drive with
specia l care in cold weather cond itions
when the chance of encountering icy
road surfaces increases.
¢j) Tips
If the vehicle is stationary, or if you are
driving at a very low speed, the tempera
ture shown in the display might be s light ly
higher than the actual outs ide tempera
ture. This i.s caused by the heat being radi
ated from the engine .
Page 28 of 294
26 Driver in formation d isplay
¢fig . 10 . The data from the single -trip mem
ory (memory leve l 1) is being displayed if a
D
appears in the display . If a II is shown, then
the data from the total -trip memory is being
d isplayed (memory leve l 2). The fuel pump
nozzle
iii indicates the efficiency program*
¢ page 27.
Single-tr ip m emory (Trip computer 1 )
The single-trip memory stores the trip infor
mat ion from the time the ignition is turned o n
until it is turned off. If the trip is continued
w ithin 2 hours from the t ime the ignition was
turned off, the new data will be included in
the calcu lation of the current trip i nfo rma
tion .
If the t rip is inte rrupted fo r more than 2
hours the memory is reset automati ca lly.
Total -trip memory (Trip computer 2)
Unlike the sing le-trip memory, the tota l- tr ip
memory is not reset automatically . Th is per
mits you to evaluate your d riving data for the
enti re pe riod be tween manual rese ts.
Efficiency program*
The effic iency program can help you to use
less fuel ¢
page 2 7.
Operation
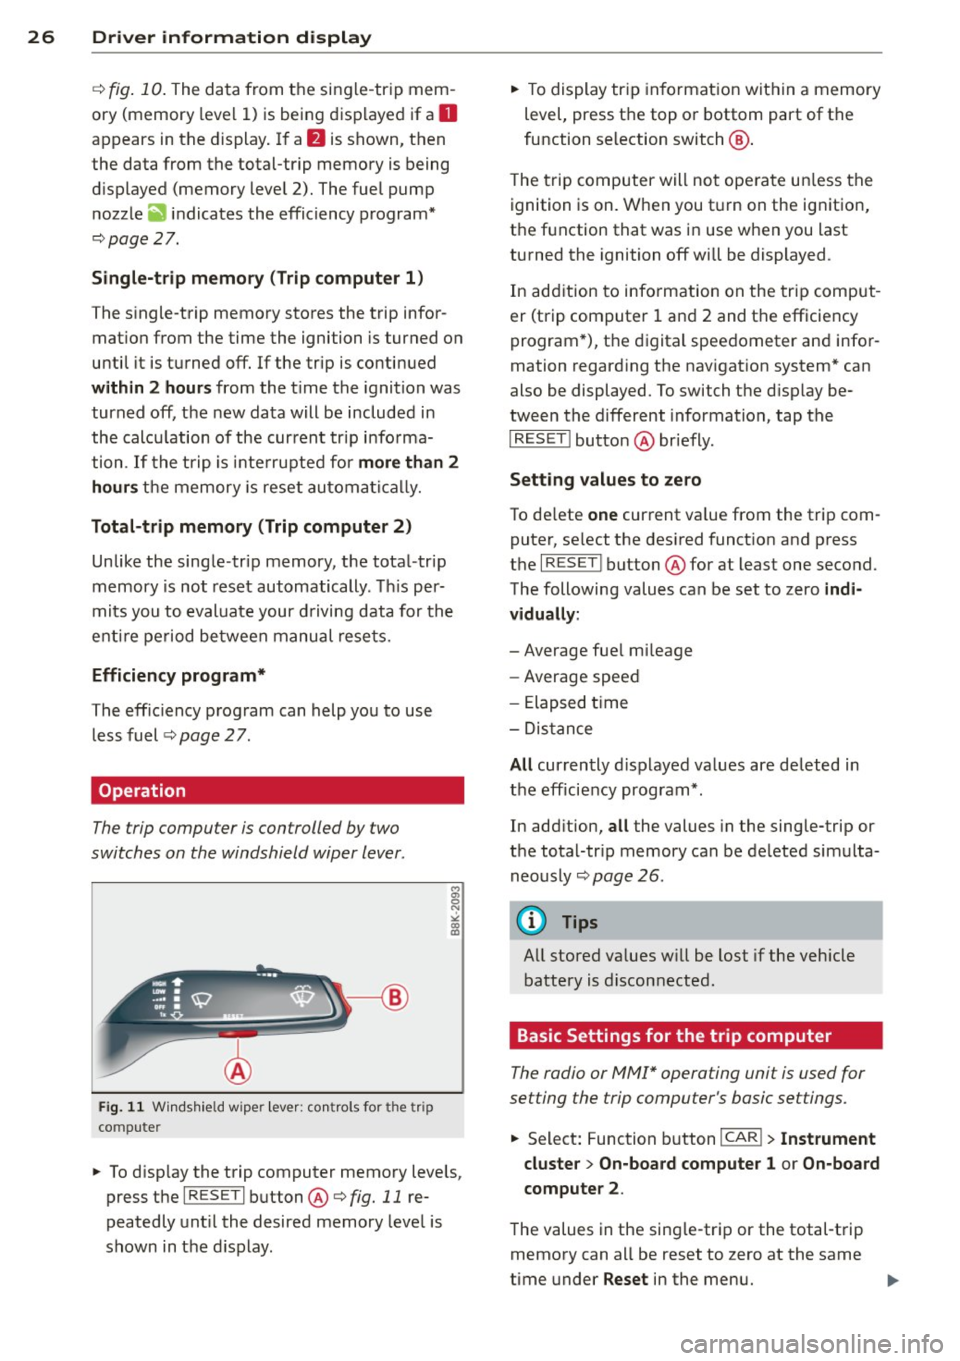
The trip compu ter is controlled by two
switches on the windshield wiper lever.
F ig . 11 W ind sh ie ld wipe r lever: co ntro ls fo r the tri p
co mp ute r
.. To d isp lay the trip computer memory levels,
press t he
I RES ET I button @¢ fig. 11 re
peatedly unt il the desired memory leve l is
shown in the d isplay. ..
To display tr ip in format ion wit hin a memory
level, press the top or bottom part of the
function se lection switch @.
T he trip computer will not ope rate un less the
ignition is on. W hen you t urn on the ignition,
the function that was in use when you last
turned the ignition off will be displayed .
In add ition to info rmation on the trip comput
er (trip computer 1 and 2 and the efficiency
program *), the digital speedometer and infor
mation regard ing the nav igat ion system* can
also be displayed. To switch the d isp lay be
tween the different information, tap the
I RESET ! button@ briefly.
Sett ing values to zero
To de lete one current va lue from the trip com
puter, se lect the des ired funct ion and press
t h e
I RES ET I button @for at least one second.
The following values can be set to zero
indi
vidually :
- Average fue l mi leage
- Average speed
- Elapsed t ime
- Dis tance
All cur rently d isplayed va lues are deleted in
the eff iciency program*.
In add it ion,
all the values in the single-trip or
the total-tr ip memory can be de leted simulta
neously ¢
page 26.
(D Tips
All stored va lues w ill be lost if the veh icle
battery is discon nected .
Basic Settings for the trip computer
The radio or MMI* operating unit is used for
setting the trip computer's basic se ttings.
.. Select: Function b utton ICAR ! > Instrument
cluster > On-board computer 1 or On -board
computer 2 .
The values in the sing le-trip or the total -t rip
memory can all be reset to zero at the same
time under
Reset in the menu. ...
Page 29 of 294
In addition, you can determine what informa
tion from the trip computer should be shown
in the instrument cluster display. If one of the
pieces of driver information is turned
O ff , that
driver information will not be shown in the
d isp lay. The information will continue to be
calculated by the trip computer and can be
turned back
On at any time .
(D Tips
-This function is not availab le on all
vehicles.
- The driving information in the efficiency
program is also reset to zero with t he
s ingle-trip memo ry.
Gearshift Indicator
Applies to vehicles: with manual transmission and gear·
shift indica tor
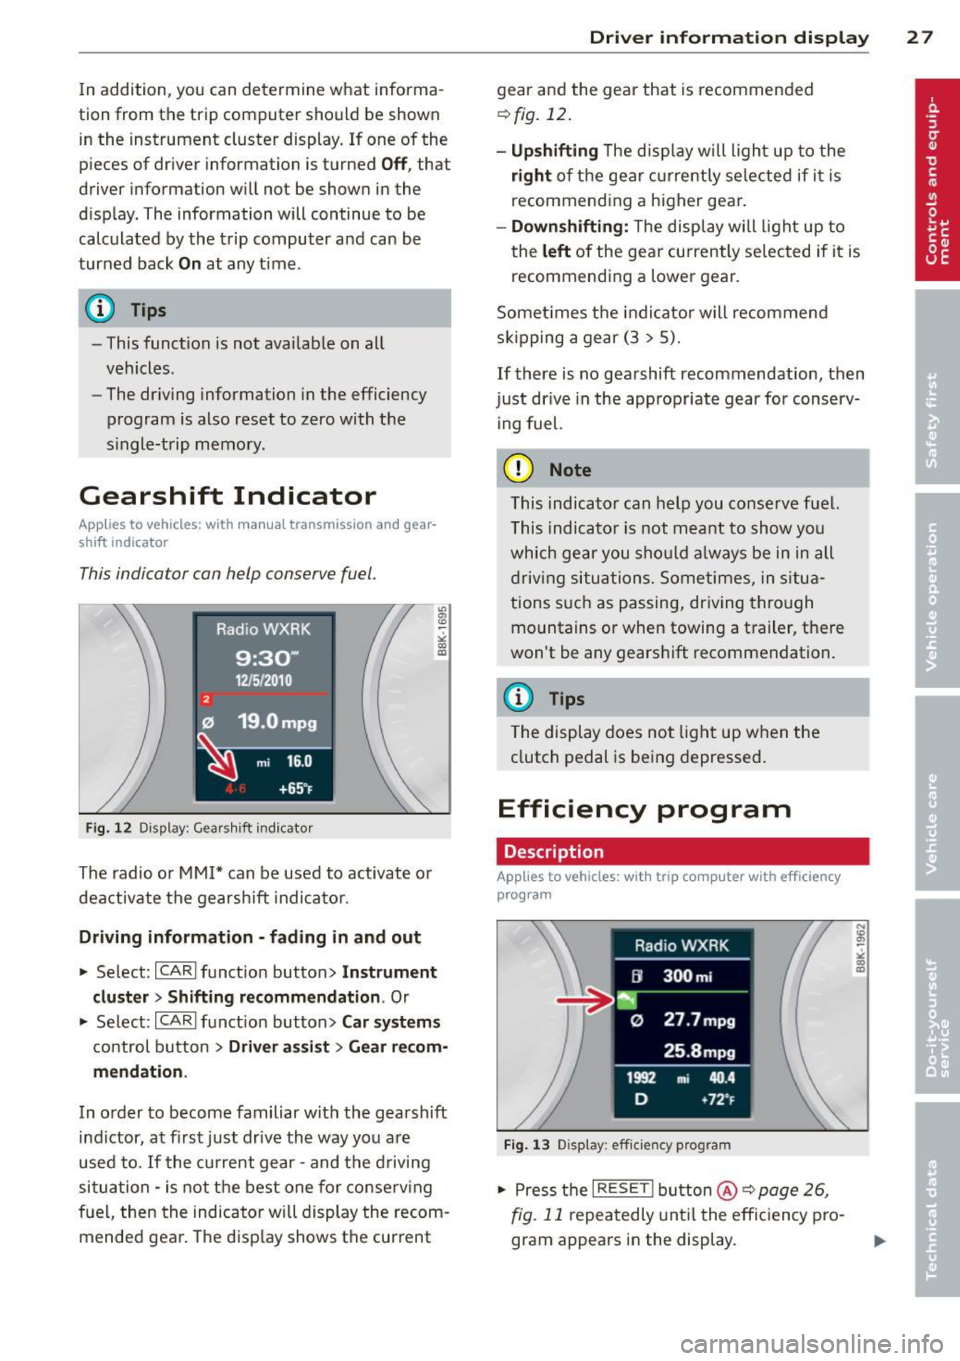
This indicator can help conserve fuel.
Fig. 12 D isplay : Gea rs hi ft indicator
The radio or MMI* can be used to activate or
deactivate the gearshift indicator.
Driving informat ion -fa ding in and out
~ Select: ICARlfunction button> In st rum ent
clu ster
> S hifting r eco mm endati on. Or
~ Se lect: ICARI funct ion button> Car syste m s
control button > Driv er as sist > G ear reco m
m en dation .
In order to become familiar with the gearshift
i ndictor, at first just drive the way you a re
used to.
If the cu rrent gear· and the d riving
situation· is not the best one for conse rv ing
fuel, then the indicator will display the recom
mended gear. The disp lay shows the current
Dri ver inform ation di spl ay 2 7
gear and the gear that is recommended
~ fig. 12.
-Up shifting T he disp lay w ill l igh t up to the
right of the gear c urrently selected if i t is
recommending a higher gear .
-Down shifting : The display will ligh t up to
the
left of the gear currently se lected if it is
recommend ing a lower gear.
Somet imes the indi cator will recommend
skipping a gear (3 > S).
If there is no gearshift recommendation, then
just drive in the appropriate gear for conserv
i ng fuel.
(D Note
This indicator can help you conserve fuel.
This indicator is not meant to show you
which gear you should a lways be in in all
driving situations. Sometimes, in situa
tions s uch as passing, driving through
mountains or when towing a t railer, there
won't be any gears hift recommendation.
a) Tips
The display does not light up when the
clutch pedal is being depressed.
Efficiency program
Description
Applies to vehicles: with trip computer with efficiency
program
Fi g. 1 3 Display: eff iciency program
~ Press the I RESET I button @~ page 26,
fig. 11
r epeatedly unt il the effic iency p ro
gram appears in the display.
Page 36 of 294
34 Openin g and clo sing
keys. Unguarded access to the keys pro
vides children the opportunity to start the engine and/or act ivate vehicle sys
tems such as the power w indows etc . Un
supervised operation of any veh icle sys
tem by ch ildren can res ult in serious in
Jury.
- Do not remove the key from the ignition
lock until the vehicle has come to a com
plete stop. Otherwise the steering col
um n loc k co uld suddenly e ngage -caus
ing the risk of an accident.
@ Tips
- The operation of the remote contro l key
c a n be tempo rarily disrupted by in terfer
ence from tran smi tters in t he v ici nity of
the veh icle work ing in the same frequen
cy ra nge (e.g . a ce ll phone, radio equip
ment).
- Fo r security reasons, replacement keys
are on ly available from Aud i dea le rs .
- Fo r De clarat ion o f Compliance to United
States FCC and Industry Canada regu la
tions ¢
page 2 76.
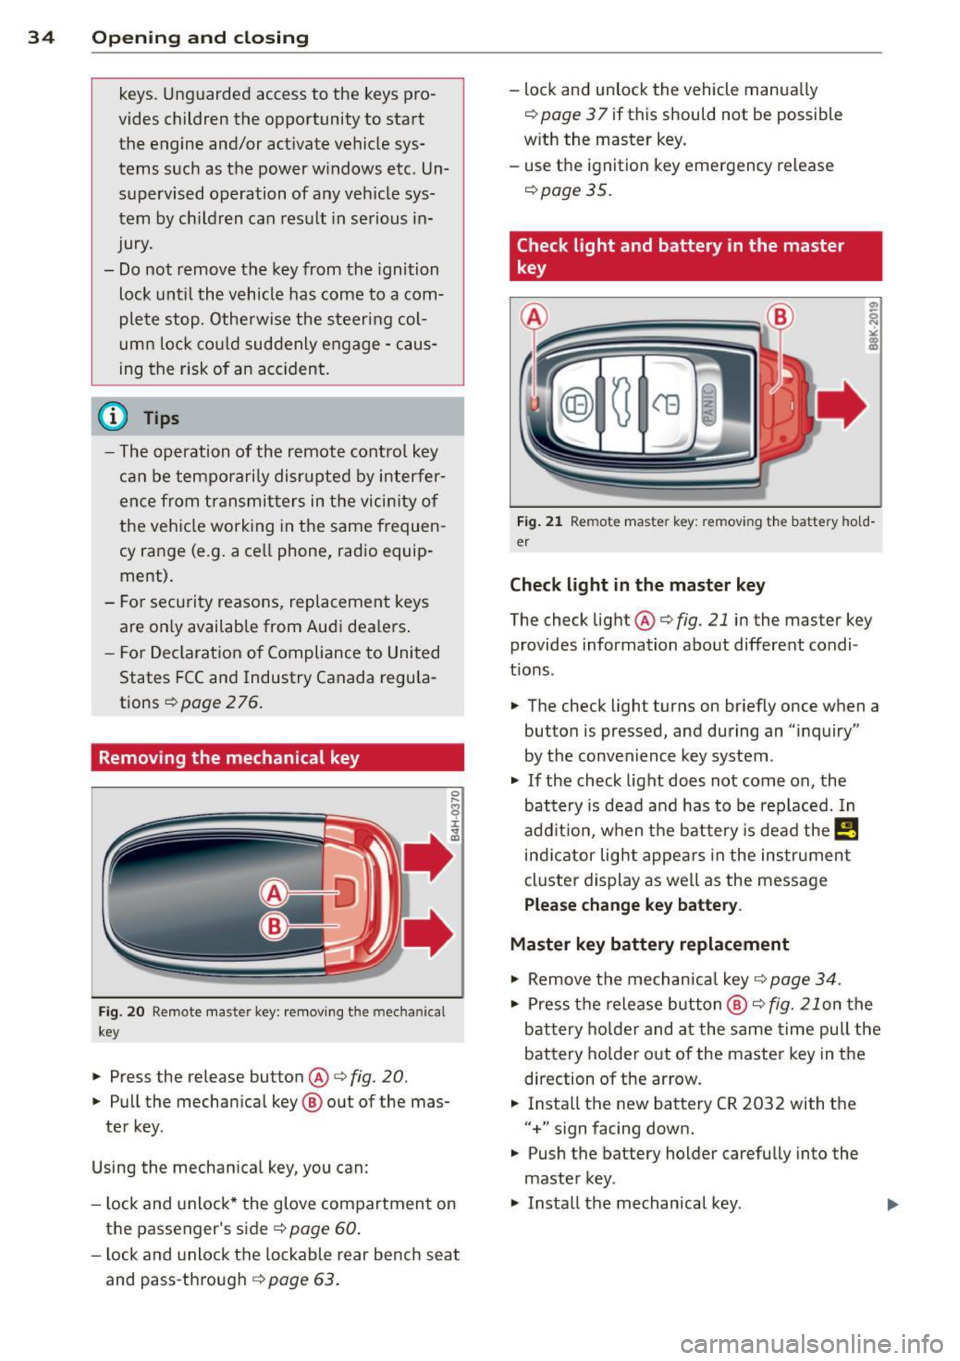
Remov ing the mechanic al key
Fig . 20 Remot e mas ter key: re mov ing the mec hanic al
key
.. Press the release button@¢ fig. 20.
.. Pu ll the mecha nical key @ out of the mas
te r key .
Using the mechan ica l key, you can :
- l ock and unlock* the glove compartmen t on
the passenger's side ¢
page 60.
-lock and unlock t he lockable rear bench seat
and pass -th ro ugh ¢
page 63.
-lock and unlock the vehicle manua lly
¢
page 3 7 if this should not be possible
w ith the master key.
- use the ignition key emergency release
¢ page 35.
Check light and battery in the master
key
•
Fig. 21 Re mote mas ter key: re m ov ing th e bat te ry h old
er
Check light in the master key
The check light@¢ fig. 21 in the mas ter key
provides information about different condi
t ions .
.. The check light turns on br iefly once when a
button is pressed , and during an " inquiry"
by the convenience key system .
.. If the check light does not come on , the
battery is dead and has to be replaced. In
add it ion, when the battery is dead the
!,I
ind icator light appe ars in the instrument
cl uster display as we ll as the message
Plea se change key battery.
Master key battery replacement
.. Remove the mechan ica l key ¢ page 34 .
.. Press t he re lease button @¢ fig. 21on the
bat tery ho lde r and at the same time pu ll the
battery ho lder out of the maste r key in the
d irection of the ar row .
.. Insta ll the new battery CR
2032 with the
"+ " sign facing down .
.. Push the battery holder carefully into the
master key.
.,. Install the mechanical key .
Page 37 of 294
@ For the sake of the environment
Dispose of dead batteries properly so as
not to pollute the environment.
@ Tips
The replacement battery must be the
same specification as the original.
Emergency unlocking of the ignition key
In the event of malfunctions in the electrical
system, it may happen that you cannot re move the ignition key .
• Remove the mechanical key<:? page 34.
• Lock the vehicle using the mechanical key
<:?page 37.
• Have the e lectrica l system inspected by an
authori zed Audi dealership .
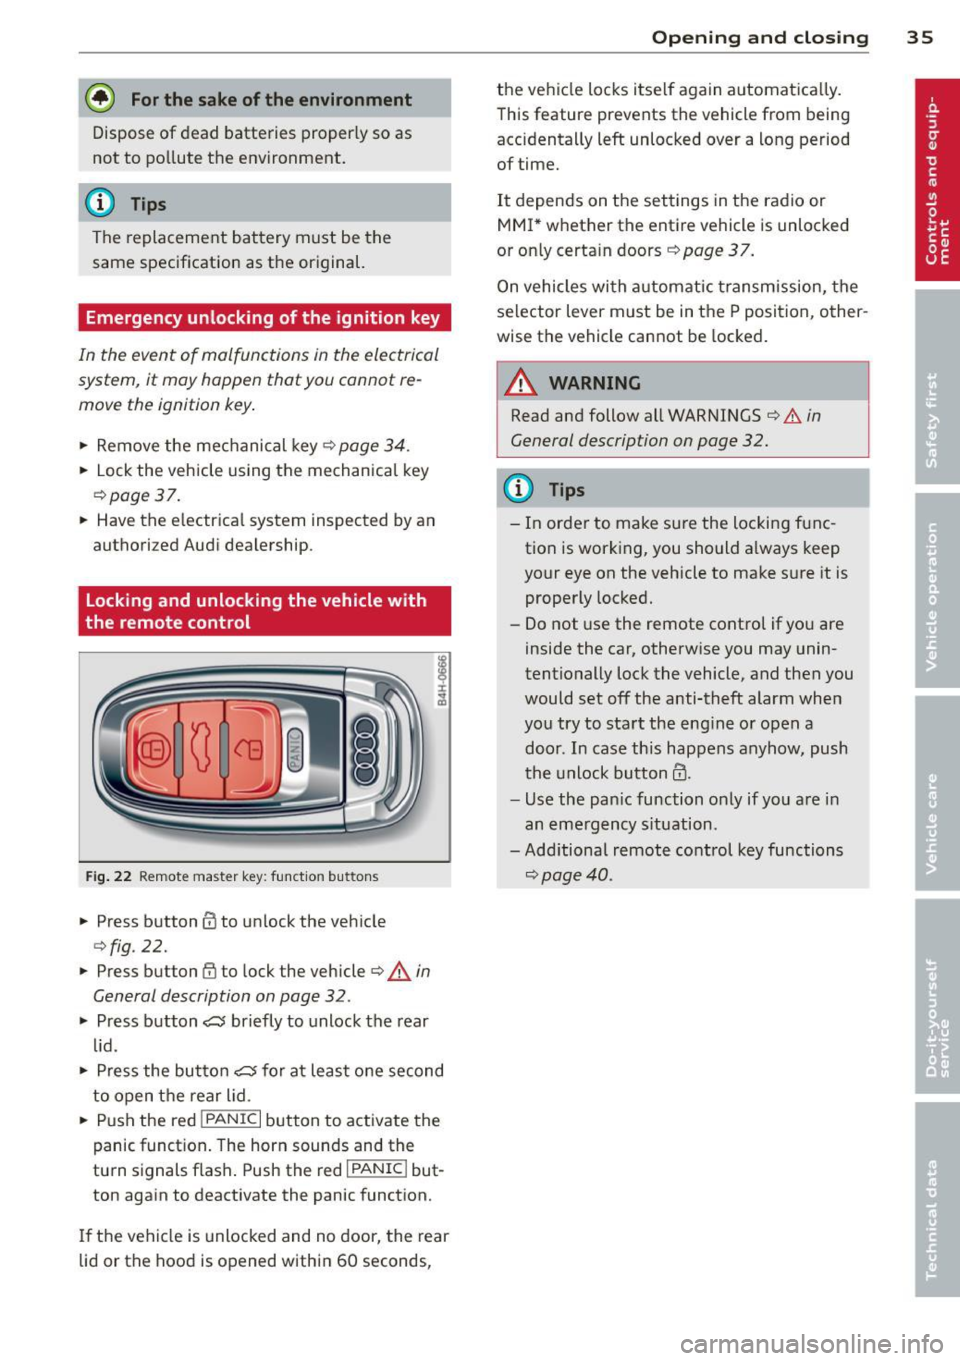
Locking and unlocking the vehicle with
the remote control
Fig. 22 Remote master key: function but tons
• Press button @to unlock the vehicle
Qfig . 22.
• Press button fij to lock the vehicle QA in
General description on page
32 .
• Press button ,c:;5 briefly to unlock the rear
lid .
• Press the button
,c:;5 for at least one second
to open the rear lid .
• Push the red
I PANIC I button to activate the
panic function. The horn sounds and the
turn s ignals flash . Push the red
I PANIC ! but
ton again to deactivate the panic function.
If the vehicle is unlocked and no door, the rear
lid or the hood is opened within 60 seconds,
Opening and closing 35
the vehicle locks itself again automat ica lly.
This feature prevents the vehicle from being
accidentally left unlocked over a long period of time.
It depends on the settings in the radio or
MMI* whether the entire vehicle is unlocked
or only certain doors <:?
page 37.
On vehicles with automatic transmission, the
selector lever must be in the P position, other
wise the vehicle cannot be locked.
A WARNING
Read and follow all WARNINGS ¢.&. in
General description on page
32.
(D Tips
- In order to make sure the locking func
tion is working, you should a lways keep
your eye on the vehicle to make sure it is properly locked.
- Do not use the remote control if you are
inside the car, otherwise you may unin
tentionally lock the vehicle, and then you
would set off the anti-theft alarm when
you try to start the eng ine or open a
door . In case this happens anyhow, push
t he unlock button@.
- Use the pan ic function only if you are in
an emergency s ituation.
-Add itional remote control key functions
¢page 40 .
Page 38 of 294
36 Opening and clo sing
locking and unlocking with convenience
key
Appl ies t o vehicles : wit h convenience key
The doors ond the rear lid can be unlocked
and locked without operating the master key.
Fig . 23 Door hand le: lock ing the v ehi cle
Unlocking vehicl e
.. Take hold of the door hand le . The door is
unlocked automatically .
.. Pull the handle to open th e door .
locking vehicle
.. Move the selecto r lever to the P position
(a ut oma tic transmiss ion *) , othe rwi se the
vehicle cannot be locked.
.. To lock the vehicle , close the door and touch
the sensor in th e door hand le
onc e¢ fig. 23
c:> A in General description on page 32 . Do
not reach inside the door handle .
The vehicle ca n be locked and unlocked at any
door. The remote control key cannot be more
t han 1.5 m away from the door hand le. It
makes no difference whether the m aster key
is in your jacket pocket or i n your brief ca se .
If you grip the door handle while lo cking, th is
can adversely affect the lock ing funct ion.
I t is not possible to re-open the door for a
brief period direct ly after closing it. This al
l ows you to ensure that the doors are properly
locked.
I t depends on the sett ings in the radio or
MMI* whether the e ntire vehicle is unlocked
or one of the doors
c:> page 3 7 .
A WARNING
-
Read and follow all WARNINGS c:> .&. in
General description on page
32 .
(D Tips
If your vehicle has been standing for an ex
tended per iod, please note the following:
- The proximity sensors are deactivated af-
ter a few days to save power. You then
have to pull on the door handle once to
unlock the vehicle and a second t ime to
open the vehicle .
- To prevent the battery from being d is
charged and to preserve yo ur vehicle 's
ability to start for as long as possib le,
the energy managemen t system gra du
ally switches off u nnecessa ry c onven
ience func tions.
It is possib le th at you
w ill not be able to unloc k your veh icle us
ing these convenience func tions.
- F or Declar ation of Comp lian ce to Unite d
States FC C and Ind ustry Canada reg ula
tions
¢ page 276.
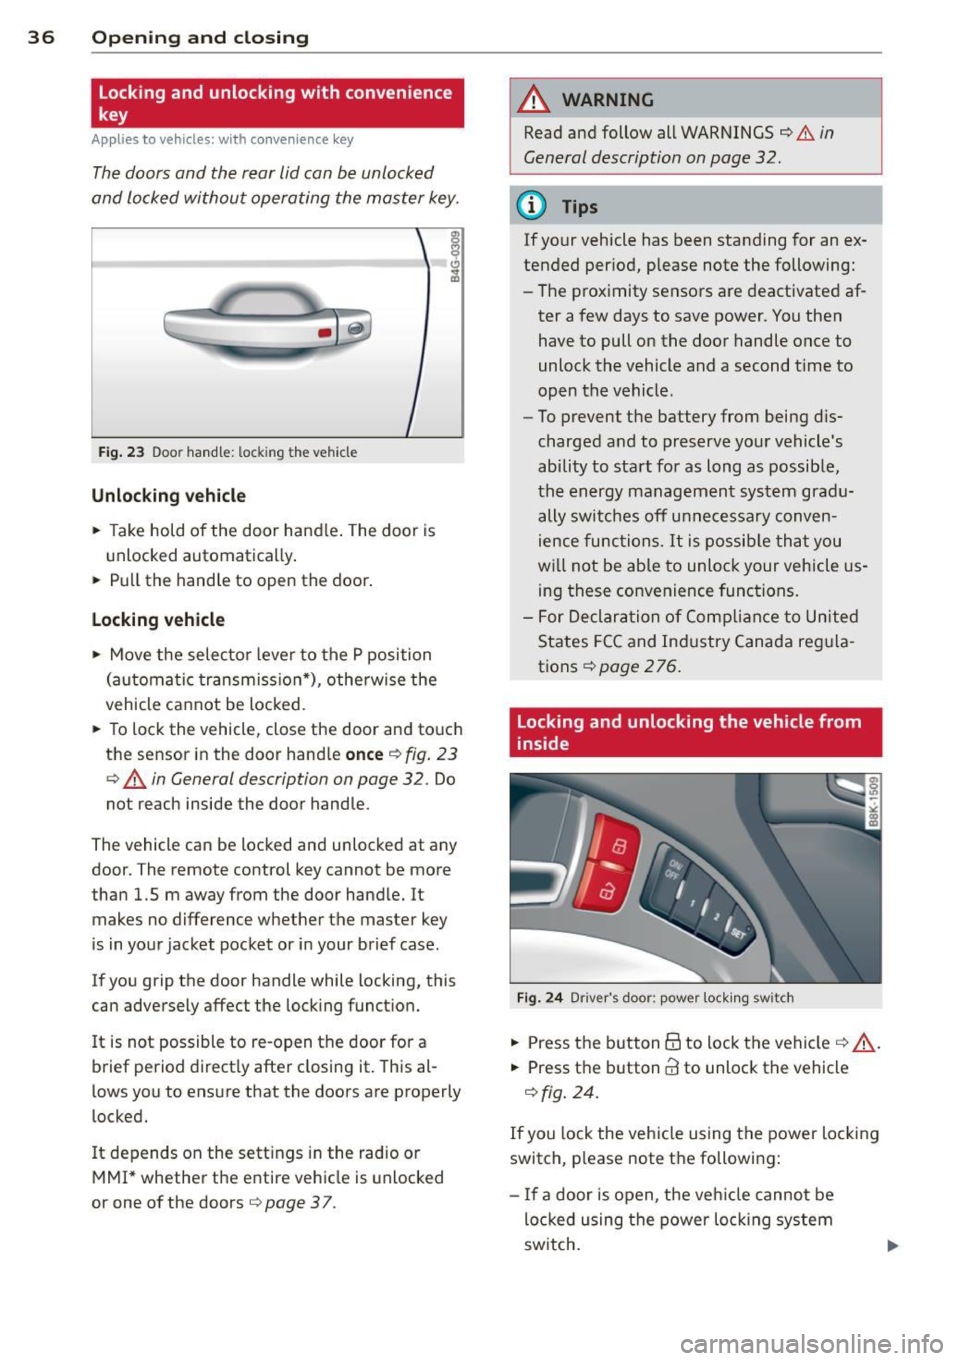
locking and unlocking the vehicle from
inside
Fi g. 24 Drive r's doo r: pow er lock ing sw it c h
.. Press the b utton B to lock the vehicle c::> ,& .
.. Press the button @ to unlock the vehicle
c::> fig. 24.
If you lock the veh icle using the power loc king
switch, p lease note the followi ng:
- I f a door is open, the veh icle canno t be
loc ked u sing the power loc king system
sw itch.
Page 39 of 294
- You cannot open the doors or the rear lid
from the outside (increased security, for ex
amp le when you are stopped at a red light).
- The diodes in the power locking switc h illu
minate when all the doors are closed and
locked.
- You can unlock and open the doors from the
i nside by pul ling on the door hand le .
- If you have a crash and the airbag is activat
ed , the doors automatically un lock .
_& WARNING
- The power locking switch works with the
ignition off and automatically locks the
entire vehicle when it is actuated .
- On a vehicle locked from the outside the
power locking system switch is inopera
t ive.
- locked doors make it more difficult for
emergency workers to get into the vehi
cle, which puts lives at risk . Do not leave
anyone behind in the veh icle, especially
children .
@ Tips
Your vehicle is locked automatically at a
speed of 9 mph (15 km/h) (Auto lock)
Qpage 32. You can un lock the vehicle
aga in using the opening function in the
powe r locking system switch~-
Setting power locking
In the radio/MM!*, you can set which doors
the centrol locking system will unlock .
~ Select : ICARI funct ion button > Central lock
ing .
Or
~ Select: ~ IC_A_R~I funct ion button > Car system s
control button > Vehicle settings > (C entral
locking )* .
Sin gle door unlocki ng /Unl ock door s* -
you
can specify which doors u nlock when you open
the vehicle .
- Se lecting
off / All and pressing the Ii button
on the remote control key unlocks the entire
vehicle.
Opening and clo sin g 3 7
- Select ing o n/Dri ver and pressing the~ but
ton on the remote control key once u nlocks
only the driver's door . In vehicles w ith a con
ven ience key*, only the door whose handle
you pull w ill unlock . If you press the @! but
ton tw ice, the entire vehicle will u nlock . If
you press the [@] button, t he e ntire ve hicle
w ill always lock .
Luggage comp. lock /Lock e xterio r trunk han
dl e -
If you select On , you can no longer open
the luggage compartment us ing the rear lid
hand le
Q page 39, fig. 28 . In this case, the
r ear lid can be opened with the
l""I bu tton on
the maste r key
Q poge 35, fig. 22 or with the
I"" I* button in the driver's door .
Tone when locking -if you select On, a tone
will sound when yo u loc k the vehicle .
Auto Lock /Lock when driv ing -if you select
On, the entire vehicle w ill lock automatically
when the speed reaches 9 mph (15 km/h) .
Emergency locking
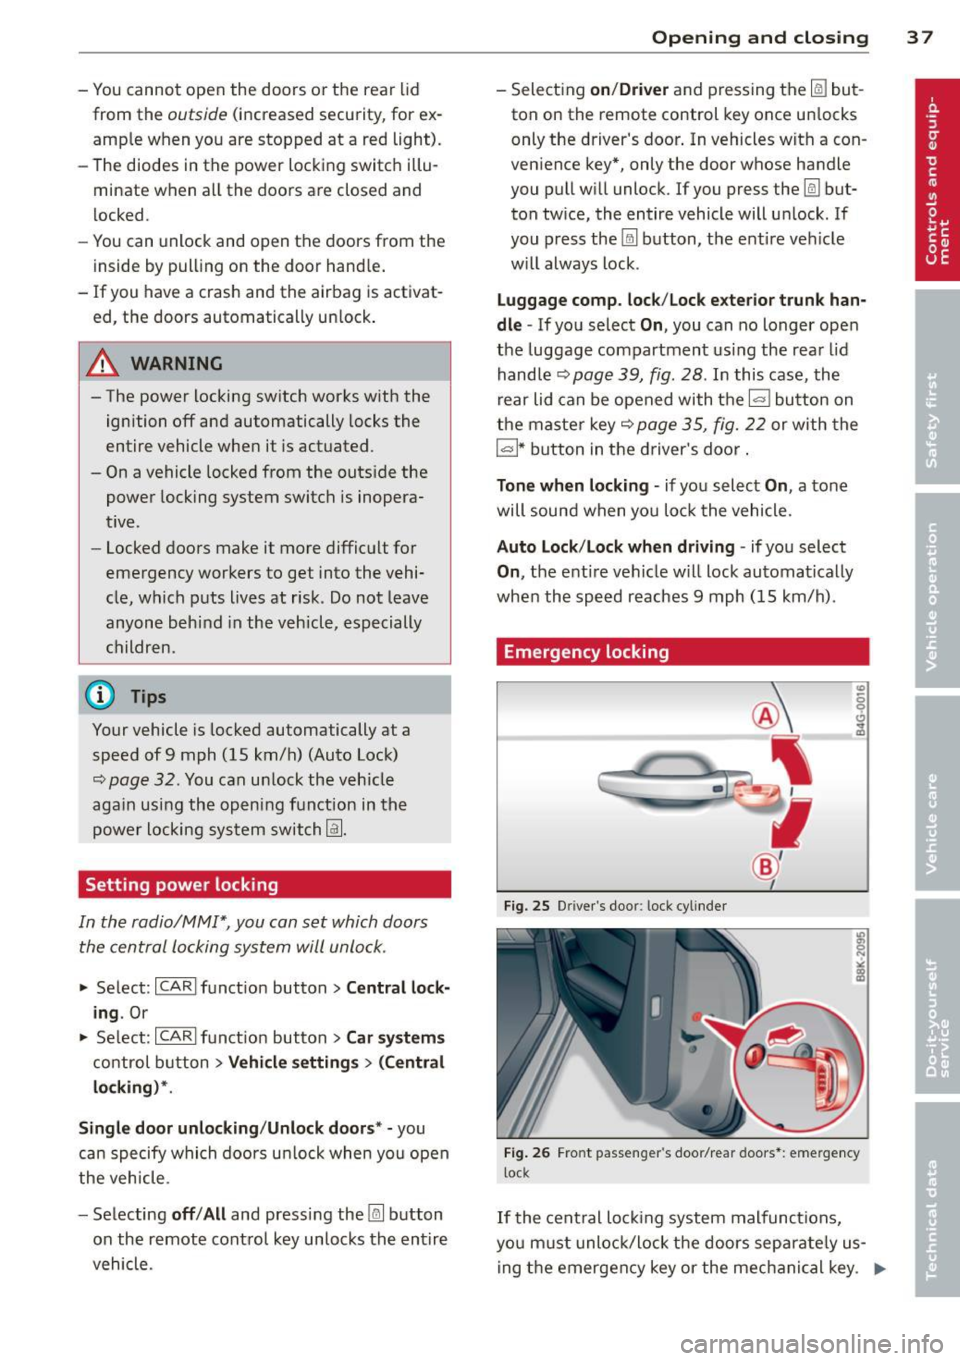
Fig. 25 D rive r's doo r: lock cylinder
Fig . 26 Fro nt p assen ger 's doo r/rear doors*: eme rgency
lock
If the cent ral locking system malfunct ions,
yo u m ust unlock/lock the doors separate ly us
ing the emergency key or the mec hanical key . .,,.
Page 40 of 294
38 Opening and closing
Unlocking/locking the driver's door with
the m echanic al key
.. Remove the mechanical key ¢ page 34.
.. To un lock the dr iver 's door, t urn the key to
the open position@¢
fig. 25.
.. To lock the dr iver's door , move the se lector
lever to the P position (automa tic transmis
s ion*) and t urn the key
once to the close po
s it ion
@ ¢,& in General d escription on
page
32.
Locking the front passenger's door/rear
doors* with the mechanical key
Th e emergency lock is located on the rea r sid e
of the fron t passe nger's door a nd t he rea r
doors.
It i s only vis ible when the doo r is open.
.. Remove the mechanical key¢
page 34 .
.. Pu ll th e cove r cap out of th e opening
¢ fig . 26.
.. Inse rt the key in the inside slot and turn i t
all the way to the right ( right doo r) o r left
(left door) .
On ce the front passenger 's do orrear doo rs *
close, you canno t open them ag ain from t he
outside. The door can be o pened from the in
side by pulling the doo r handle . If the c hild
safety loc k in a rear door* is act ivated, you
must first pull the door hand le on the ins ide.
Then you can open the door from the outside .
A WARNING
Read and follow all WARNINGS¢.&. in
General description on page
3 2 .
(D Tips
-
After the ign ition is switched on, the pow
er l ock ing system switch and the unlocking
button fo r the rea r lid~ in the door are
e na bled.
Electronic immobilizer
The immobilizer prevents your vehicle from
being started by unauthorized persons .
Inside the key there is a computer chip. This
c h ip automat ica lly act ivates/deactiva tes the
electron ic immobilizer .
Applies to vehicles with ignition lock:
The electronic immobilize r deact ivates auto
matically when yo u inse rt the remote contro l
key into the ign ition lock.
It activates again
automa tica lly w hen you remove the remote
control key from th e ignition lock .
Applies to vehicles with convenience key:
If the remote control key is located inside t he
vehicle and you press the
I S TART ENGI NE STOP I button, the electro nic
immob il izer deactivates automat ica lly. If you
swi tch the ign it ion off and remov e the remote
co ntrol key from the vehicle, the el ectronic
immob ili zer ac tiva tes aga in a utoma tically.
_& WARNING
-
Alw ays t ake the key wit h you when you
l eave the vehicle . The key can disa rm the
e lectronic engine immobilize r and permi t
an una uthorized person to start the engine
and enable opera tion of the vehicle sys
tems such as power w indow o r power sun
roof leading to se rious pe rsonal injury.
(D Tips
- The ve hicl e cannot be started if an una u
thorized key is used. The vehicle may not
start i f anot her radio device s uch as a key
for another ve hicle or a transponder is
located on t he key ring .
- Fo r Declaration of Compliance to Unite d
States FCC and Ind ustry Canada reg ula
t ions
c;:, page 2 76 .