belt AUDI A5 COUPE 2016 Owners Manual
[x] Cancel search | Manufacturer: AUDI, Model Year: 2016, Model line: A5 COUPE, Model: AUDI A5 COUPE 2016Pages: 264, PDF Size: 66.92 MB
Page 4 of 264
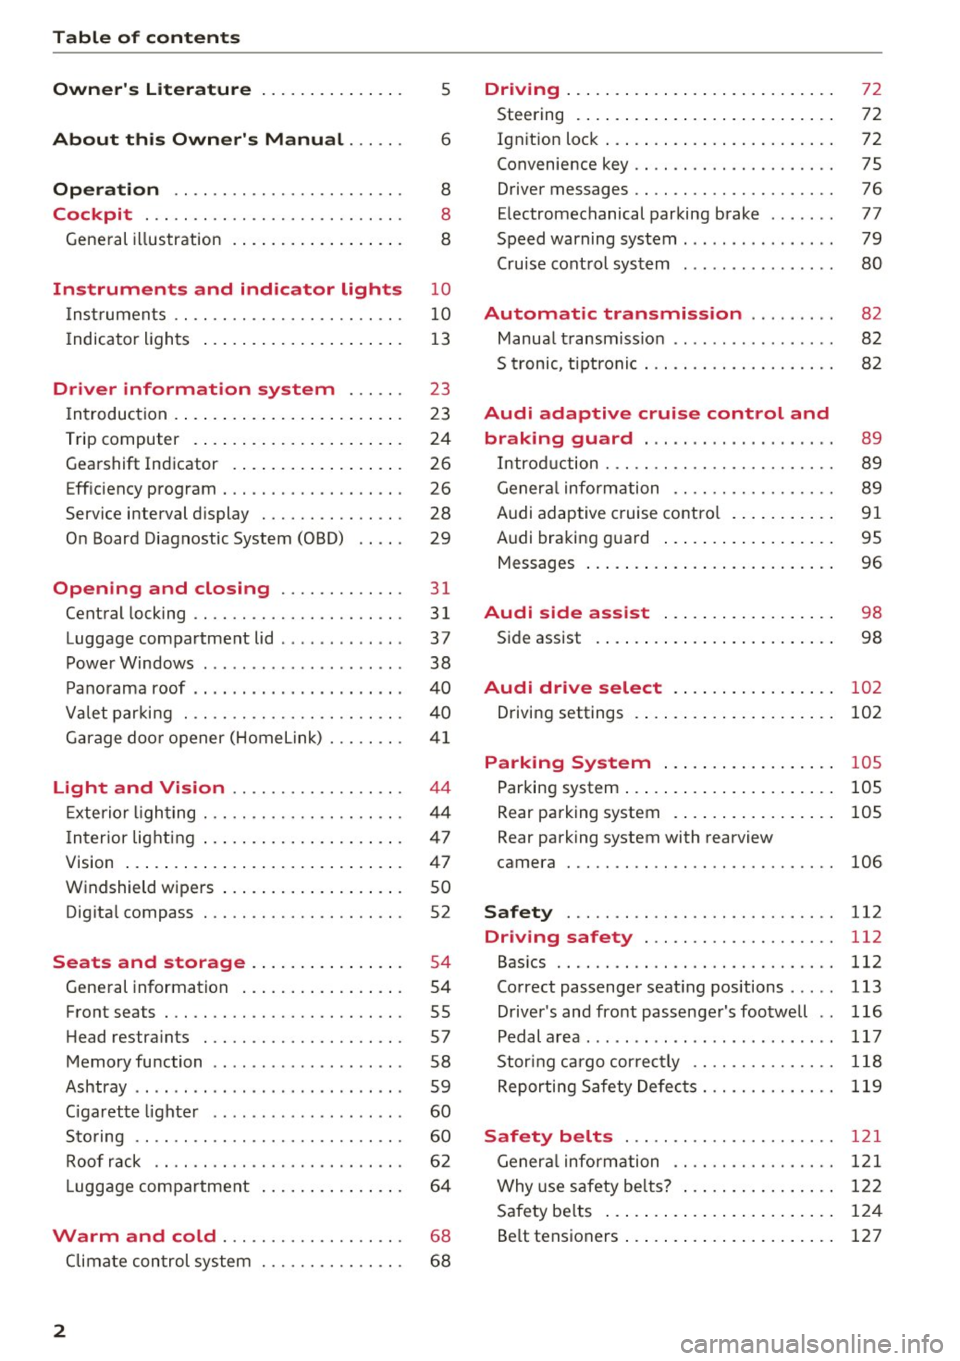
Table of contents
Owner's Literature
About this Owner's Manual ... .. .
Operation .. ................... .. .
Cockpit ..... .. ............. .... .. .
General illustration . .. ..... ..... .. .. .
5
6
8
8
8
Instruments and indicator lights 10
Instruments . . . . . . . . . . . . . . . . . . . . . . . . 10
Indicator ligh ts . . . . . . . . . . . . . . . . . . . . . 13
Driver information system . . . . . . 23
I n tr oduc tion . . . . . . . . . . . . . . . . . . . . . . . . 23
Trip computer . . . . . . . . . . . . . . . . . . . . . .
24
Gearshift Indicator . . . . . . . . . . . . . . . . . . 26
Eff iciency program . . . . . . . . . . . . . . . . . . . 26
Service interval display . . . . . . . . . . . . . . . 28
O n Board Diagnostic System (OBD) . . . . . 29
Open ing and clo sing . . . . . . . . . . . . . 31
Central locking . . . . . . . . . . . . . . . . . . . . . . 31
Luggage compa rtment lid . . . . . . . . . . . . . 37
Power Windows . . . . . . . . . . . . . . . . . . . . . 38
Panorama roof . . . . . . . . . . . . . . . . . . . . . . 40
Valet parking . . . . . . . . . . . . . . . . . . . . . . . 40
Garage door opener (Home link) . . . . . . . .
41
Light and Vision . . . . . . . . . . . . . . . . . . 44
E xte rior lighting . . . . . . . . . . . . . . . . . . . . .
44
Interior lighting . . . . . . . . . . . . . . . . . . . . . 47
V1s1on ... .... ... .. .......... .. .. .. .
Windshield wipers .. .......... .. .. .. .
Dig ita l compass ... . .......... .. .. .. . 47
so
52
Seat
s and storage . . . . . . . . . . . . . . . . 54
Gene ral information . . . . . . . . . . . . . . . . . 54
Front seats . . . . . . . . . . . . . . . . . . . . . . . . . 55
H ead restra ints . . . . . . . . . . . . . . . . . . . . . 57
Memory function . . . . . . . . . . . . . . . . . . . . 58
Ashtray . . . . . . . . . . . . . . . . . . . . . . . . . . . . 59
Ciga rette li ghter . . . . . . . . . . . . . . . . . . . .
60
Storing . . . . . . . . . . . . . . . . . . . . . . . . . . . . 60
Roof rack . . . . . . . . . . . . . . . . . . . . . . . . . . 62
L uggage compartment . . . . . . . . . . . . . . . 64
Warm and cold .. .......... ....... 68
Climate con trol system . . . . . . . . . . . . . . . 68
2
Driving .... . .. .. .. .. ... . .. .... ... . .
Steering . ... .. .. .. .. .. .. .. .... ... . .
72
72
Ign it ion lock . . . . . . . . . . . . . . . . . . . . . . . . 72
Convenience key . . . . . . . . . . . . . . . . . . . . . 75
D river messages . . . . . . . . . . . . . . . . . . . . . 76
E le ctromechanical parking brake . . . . . . .
77
Speed warning system . . . . . . . . . . . . . . . . 79
Cruise control system . . . . . . . . . . . . . . . . 80
Automatic transmiss ion . . . . . . . . . 82
Manual transmission . . . . . . . . . . . . . . . . . 82
5 tronic, tiptronic . . . . . . . . . . . . . . . . . . . . 82
Audi adaptive cruise control and
braking guard . . . . . . . . . . . . . . . . . . . .
89
Introduction . . . . . . . . . . . . . . . . . . . . . . . . 89
General informat ion . . . . . . . . . . . . . . . . . 89
Audi adaptive cruise control . . . . . . . . . . .
91
Audi braking guard . . . . . . . . . . . . . . . . . . 95
Messages . . . . . . . . . . . . . . . . . . . . . . . . . . 96
Audi side a ssi st . . . . . . . . . . . . . . . . . . 98
Side assist . . . . . . . . . . . . . . . . . . . . . . . . . 98
Audi drive select . . . . . . . . . . . . . . . . . 102
Driving settings . . . . . . . . . . . . . . . . . . . . . 102
Parking Sy stem . . . . . . . . . . . . . . . . . . 105
Parking system . . . . . . . . . . . . . . . . . . . . . . 105
Rear parking system . . . . . . . . . . . . . . . . . 105
Rear parking system with rearview
camera
106
Safety 112
Driving safety . . . . . . . . . . . . . . . . . . . . 112
Bas ics . . . . . . . . . . . . . . . . . . . . . . . . . . . . . 112
Correct passenger seat ing positions . . . . . 113
Driver 's and front passenger's footwell . . 116
Pedal area . . . . . . . . . . . . . . . . . . . . . . . . . . 117
Storing cargo correctly . . . . . . . . . . . . . . . 118
Reporting Safety Defec ts . . . . . . . . . . . . . . 119
Safety belts . . . . . . . . . . . . . . . . . . . . . . 121
General information . . . . . . . . . . . . . . . . . 121
Why use safety belts? . . . . . . . . . . . . . . . . 122
Safety belts . . . . . . . . . . . . . . . . . . . . . . . . 124
Be lt tensioners . . . . . . . . . . . . . . . . . . . . . . 127
Page 18 of 264

Instruments and indicator lights
-Always keep in min d that afte r severa l brake
applications, you will need greate r pressure
on the brake pedal t o stop you r vehicle. Do
not re ly on strained brakes to respond w ith
ma ximum stopping power in c rit ical situa
t ions. You must allow for increas ed braki ng
di stan ces. The e xtra dist ance used up by
fa din g brak es c oul d lead to a n accid ent.
:ill.IC®) Electromechanical parking brake
The warning/indicator light monitors th e elec
trome chanical parking brak e.
If the ind icator lig ht . (USA models) ;II (Cana
da models) t urns on , the park ing brake was set .
The warning/indicator light will go o ut when the
pa rking brake is re leased.
• (USA models ) /. (Canada models) Cau
tion: Vehicle parked too steep
If th e ind ic ator lig ht blinks and t he message ap
pea rs, there is not eno ugh bra king power to keep
the vehicle from ro llin g. The bra kes have over
heate d. The vehicle could ro ll away even on a
sma ll incline .
Press brake pedal to release parking brake
To re lease the pa rk ing bra ke, press the bra ke
pe dal and pr ess t he bu tton<®) or start driv ing
w ith s tarti ng assis t at the s ame t ime
¢ page 78 .
Please release parking brake
To re lease the park ing brake ma nually, press the
b rake pedal and press the button<®> at the same
time . The parking brake o nly re leases automati
cally if the dr iver's safety be lt is fastened.
El Parking brake!
If the El indicato r light turns on and this mes
sage appears, there is a pa rking brake mal func
tion. D rive to your authorized Aud i dealer or
qua lified workshop immed iate ly to have the mal
f u nction co rrected .
16
~ Safety belts
This warning/indicator light reminds you to put
on your safety belt.
The . warn ing/ indicator light illum inates when
the ignit io n is switched on to rem ind t he driver
and (o n USA models on ly) any front passenge r to
put on t he safety be lt . Additionally, a n aco ust ic
w arning (gong) w ill also so und.
Fo r more Information
¢ page 121 , Safety belt
warning light .
f::::l Battery
The. war ning/ indica to r li ght illum inates when
yo u s witch on the ig nition an d m ust go out afte r
th e e ngine h as st arte d.
• Alternator fault : Battery is not being charg
ed
If the indicato r light turns on and the message
appears, the re is a ma lfu nction in t he generator
o r vehicle e lectr ica l system .
D rive to your authorized A udi dealer or qualified
workshop immediately . Because the vehicle bat
tery is d ischa rging , tur n off all unnecessa ry elec
trical eq uipme nt such as the rad io . Seek p ro fes
s io na l assis tance if the battery charge leve l is too
l ow.
(•) Low battery: Battery will be charged while
driving
If the indicato r light turns on and the message
appears, there may be limited sta rting ability.
If this message t urns off after a little w hil e, t he
ba tte ry c harge d enough while dr iv ing .
I f the mess age does no t turn off, h ave yo ur au
thorized Audi dea le r or qualified wor ks hop co r
r ect the ma lf u nction .
Page 56 of 264
Seat s and sto rage
Seats and storage
General information
Why is your seat adjustment so important?
The safety belts and the airbag system can only
provide maximum protection if the front seats are correctly adjusted .
There are various ways of adjusting the front
seats to provide safe and comfortable support
for the dr iver and the front passenger . Adjust
your seat properly so that:
- you can easily and quickly reach all the switches
and controls in the instrument panel
- your body is properly supported thus reducing
physical stress and fatigue
- the safety belts and a irbag system can offer
maximum protection
¢ page 129.
In the following sections, you will see exact ly
how you can best adjust your seats.
There are spec ial regulat ions and instr uctions for
installing a c hild safety seat on the front pas
senger 's seat . Always fo llow the information re
garding child safety provided inc::>
page 151,
Child safety.
A WARNING
Refer to ¢ page 112, Driving safety for im
portant information, tips, suggestions and
wa rnings that you should read and follow for
your own safety and the safety of yo ur pas
senge rs.
A WARNING
In correct seating position of the driver and all
other p assenge rs can result in serious person
al injury .
- Always keep you r fee t on the floor when the
vehicle is in motion -never put your feet on
top o f the instr ument pane l, o ut o f the win
dow or on top of the seat cushion. This ap
plies espec ially to the passenge rs. If your
seat ing pos ition is inco rrect, you increase
the risk of injury in the case of sudden brak
ing o r an accident. If the airbag inflates and
54
the seating position is incorrect, this could
result in personal injury or even death.
- It is important for both the driver and front
passenger to keep a distance of at least
10 inches (25 cm) between themselves and
the steering wheel and/or instrument pan
el. If you're sitt ing any closer than this, the
airbag system cannot protect you properly .
In addition , the front seats and head re
straints must be adjusted to your body
he igh t so that they can g ive you maximum
protection.
- Always try to keep as much distance as pos
sible between yourself and the s teer ing
wheel or instrument pane l.
- Do not adjust the driver's or fron t passeng
er 's sea t while the vehicle is moving. Yo ur
seat may move unexpectedly, causing sud
den loss of vehicle contro l and personal in
jury. If you ad just yo ur seat while the veh icle
is moving, you are out of pos ition.
Driver's seat
The correct seat position is important for safe
and relaxed driving.
We recommend that you adjust the dr iver's seat
in the following manner:
.. Adjust the seat in fo re and aft direction so tha t
you c an ea sily push the ped als to the floor
while keeping your knees slight ly bent
c::> A in
Why is your seat adjustment so important? on
page 54.
.. Adjust the seatback so that when you sit with
your back against the seatback, you can still
grasp the top of the steering wheel.
.. App lies to veh icles w ith adjustable head re
straints : Adjust the head restraint so the upper
edge is as even as possible with the top of your
head.
If t h at i s not poss ible , try to a djust the
he ad rest raint so tha t it is as close to this pos i
tion as possible
c::> page 57.
A WARNING
N eve r place any objects in the dr iver's foot
well. An object could get into the pedal area and interfere with pedal function. In case of
-
Page 57 of 264
,-1 N
0 1-CX)
rl I.Cl U"I
,-1 I.Cl ......
sudden braking or an accident, you would not
be able to brake or accelerate.
Front passenger's seat
Always move the front passenger seat into the
r e armos t position .
To avoid contact with t he a irbag while it is de
p loying, do not sit any closer to the inst rument
panel than necessary and a lways wear the three
point saf ety b elt prov id ed adjust ed correctly. W e
r ecommend that you ad just the passenger's seat
in the following manner:
• Bring the backrest up to an (almost) upright
position .
Do not ride with the s eat r eclin ed .
• Applies to vehicles with adjustable head re
strain ts: Adjust the head restraint so the upper
edge is as even as possible with the top of your
head . If that is not possible, try to adjust the
head restraint so that it is as close to th is posi
t ion as poss ible
q poge 57.
• Place your feet on the floor in front of the pas
senger's seat.
Front seats
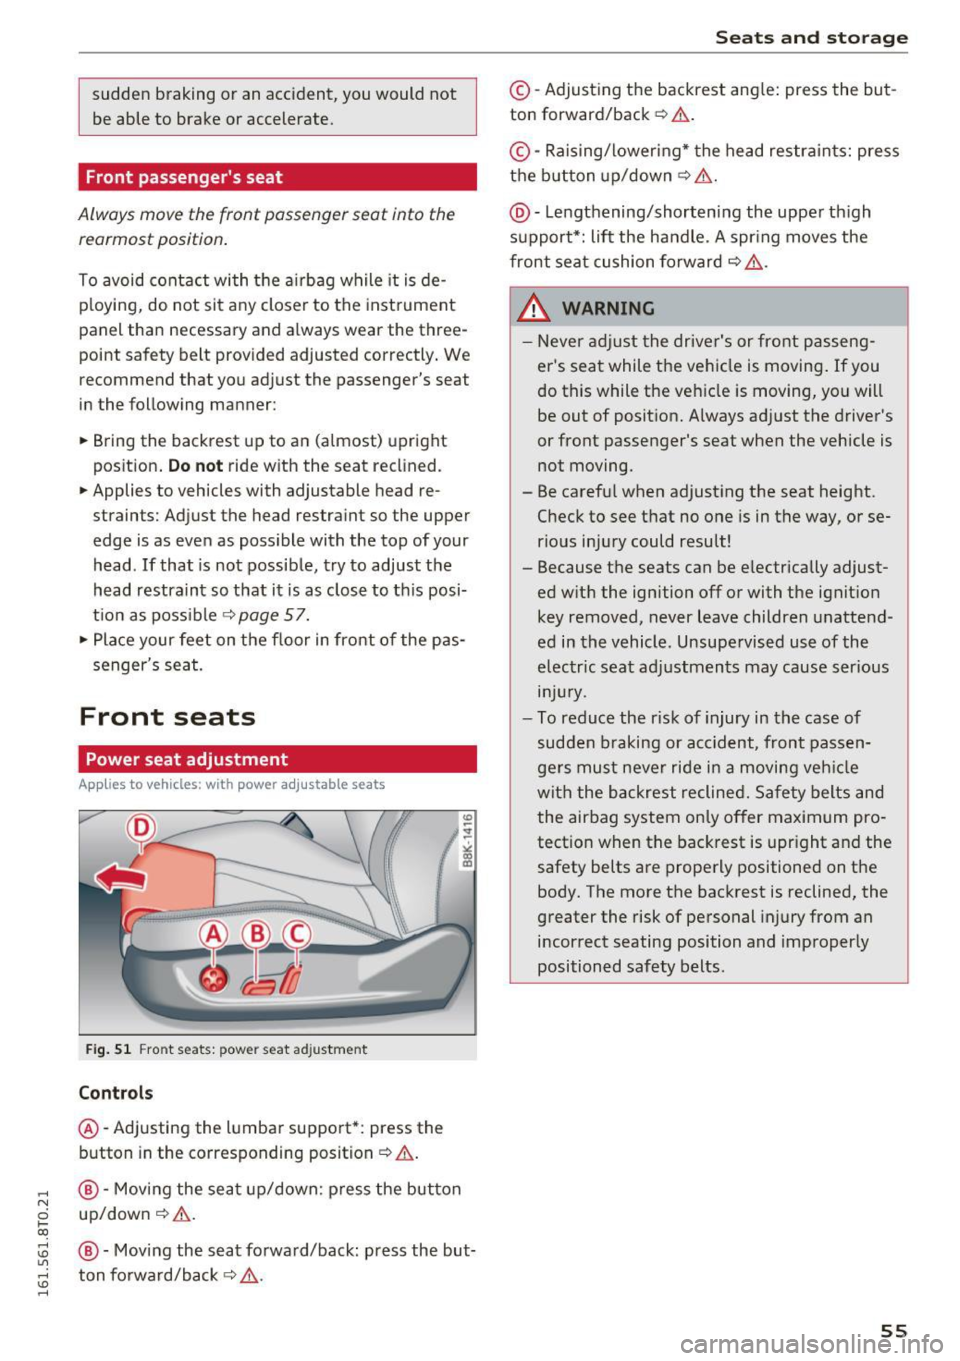
Power seat adjustment
App lies to vehicles : with power adjustable seats
Fig. 51 Fro nt s eats: pow er se at ad just ment
Controls
@ -Adjusting the l umbar support *: press the
b utton in the corresponding position
q .&, .
@-Moving the se at up/down: p ress the but ton
up/dow n
q .&,.
@ -Mov ing the seat fo rwa rd/back: press the but
ton fo rwa rd/back
q .&, .
Seats and storag e
©-Adjust ing the backrest ang le: press the bu t
ton forward/back
~ ,& .
©-Raising/loweri ng* the head restra ints: press
t h e b utton up/down
q .&, .
@-Lengthening/shortening the upper th igh
support*: lift the handle. A spr ing moves the
front sea t cu shion fo rward
q ,.&. .
_& WARNING
-Never adjust the drive r's or front passen g
er's seat while the ve hicle is moving .
If you
do this while the veh icle is moving , you will
be out of position. Always adjust the d river's
or front passenger's seat when the vehicle is not moving.
- Be carefu l when adjust ing the seat height.
C heck to see t hat no one is in the way, or se
rious inju ry could result!
- Because the seats can be e lectrically adjust
ed w it h the ignition off or with the ignit ion
key removed, never leave children unatte nd
ed in the vehicle . Unsupe rvised use of the
electric seat ad justmen ts may cause ser ious
lnJ Ury.
- To reduce the risk of injury in the case of
sudden b raking or acc ident, front passen
ge rs must neve r ride i n a moving veh icle
wit h the backrest reclined. Safety belts and
the airbag system on ly o ffer maximum pro
tect ion when the bac krest is upr ight and the
safety belts a re prope rly positioned on the
body. The more the backrest is reclined, the
greater the risk of pe rsonal injury from an
incorrect seating position and improper ly
positioned safety belts .
55
Page 59 of 264
..... N
0 1-CX)
.....
"' U"I
.....
"' ......
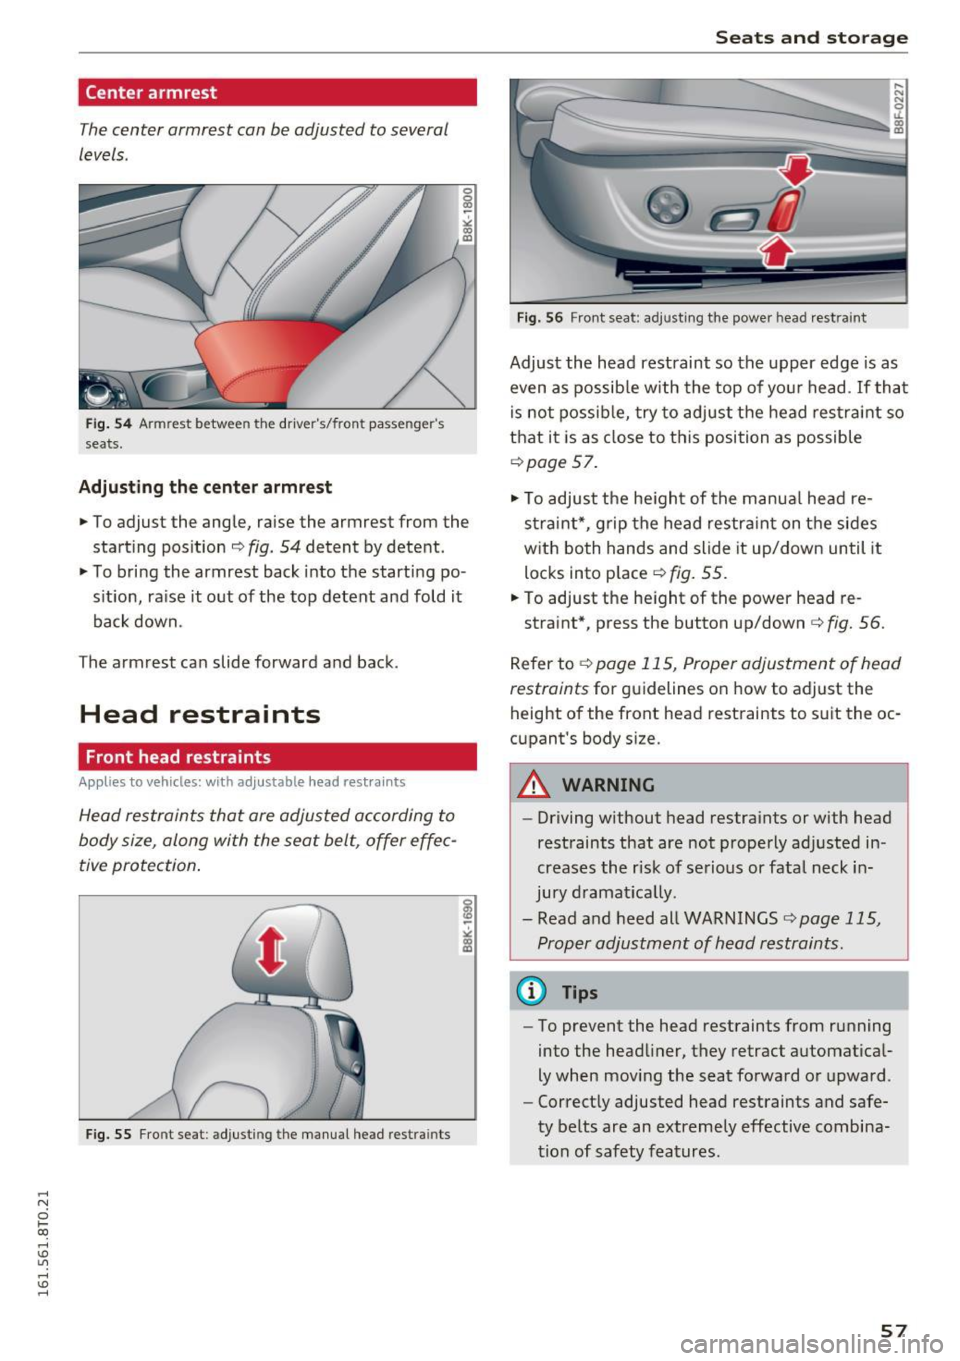
Center armrest
The center armrest can be adjusted to several
levels .
Fig. 54 Armrest betwee n the dr ive r's/ front passenger's
seats.
Adjusting the cent er armr est
.,. To adjust the angle, raise the armrest from the
starting position ¢
fig. 54 detent by detent.
"'T o bri ng the armrest back into the start ing po
s it ion, ra ise it out of the top detent and fold it
back down .
The armrest can slide forward and back .
Head restraints
Front head restraints
Applies to vehicles: with ad justable head restra in ts
Head restraints that are adjusted according to
body size, along with the seat belt, offer effec
tive protection .
Fig. 55 Fr ont sea t: adjusting the manual head restrain ts
Seats and storag e
Fig. 56 Front seat: adjus ting the power head rest rain t
Adjust the head restraint so the upper edge is as
even as possib le w ith the top of yo ur head . If tha t
is not possib le, try to adjust the head res traint so
that it is as close to this position as possible
¢page 57.
.,. To adjust the he igh t of the manua l head re
s trai nt*, grip the head res tra int on t he sides
w ith both hands and slide it up/down until it
locks into place ¢
fig. 55.
"' To adjust the he ight of the power head re -
straint*, press the button up/down
¢ fig. 56.
Refer to ¢ page 115, Proper adjustment of head
restraints
for g uidelines on how to adjust the
height of the front head restraints to s uit the oc
c u pant's body s ize.
A WARNING
-- Driving without head restra ints or with head
restraints that are not properly adj usted in
creases the r isk of se rious or fatal neck in
jury d ramat ica lly .
- Read a nd heed all WARNINGS
¢ page 115,
Proper adjustment of head restraints.
@ Tips
- To prevent the head restraints from r unning
into the head liner, they retract a utomat ica l
ly when mov ing the seat forward or upward .
- Correct ly adjusted head restraints and safe
ty be lts are an extremely effective combina
tion of safety features .
57
Page 60 of 264
Sea ts and stor age
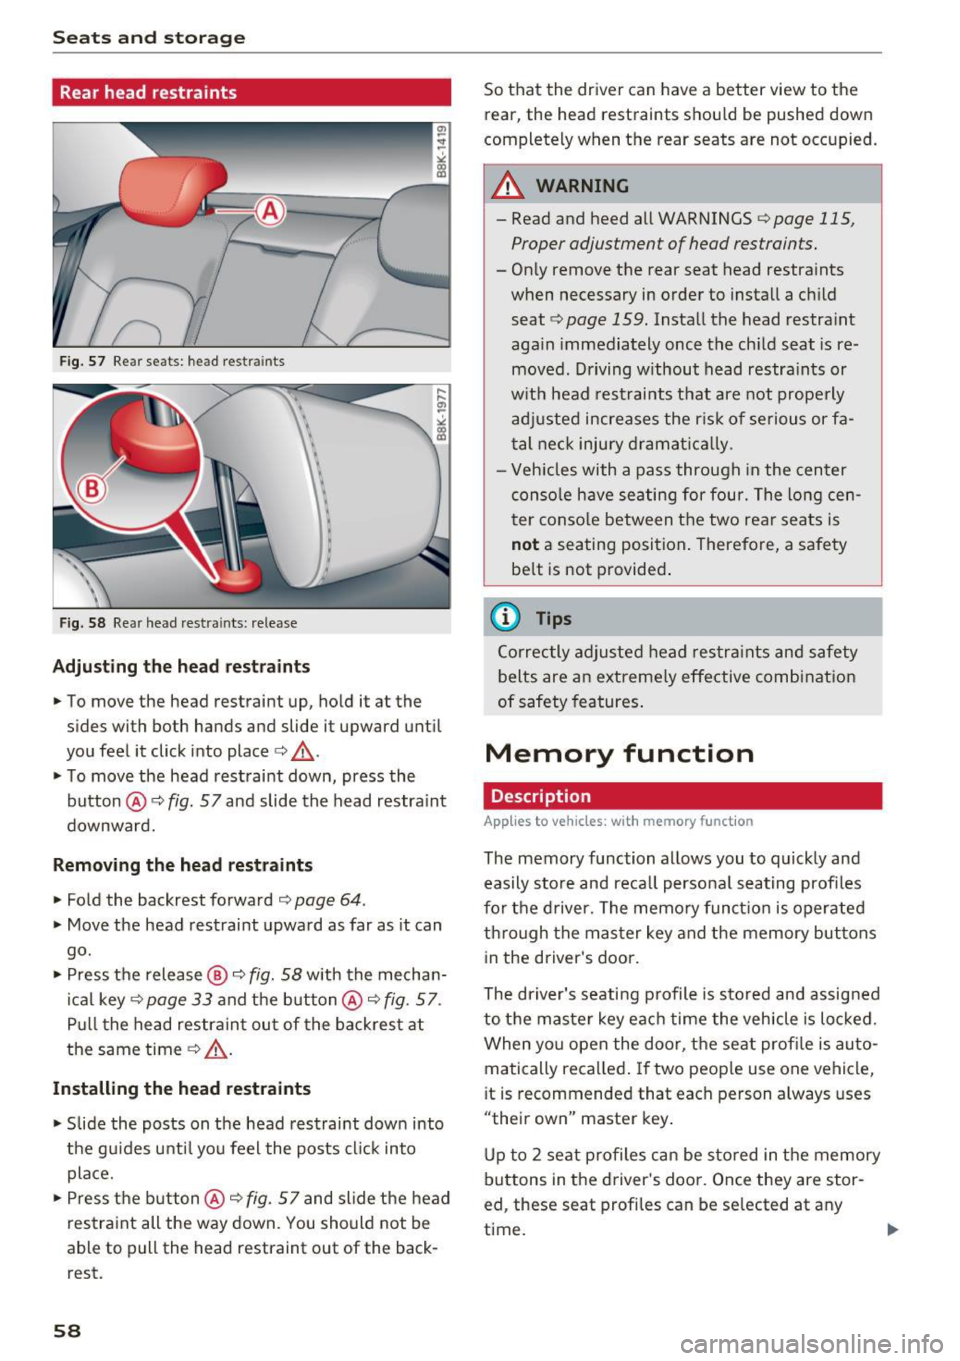
Rear head restraints
Fig. 57 Re ar seats: he ad res traints
Fig. 58 Rea r head restra ints: re lease
Adjust ing th e head re st rai nts
.. To move the head restraint up, hold it at the
sides with both hands and slide it upward until
you feel it click into place<=>& .
.. To move the head restraint down, press the
button @
c::> fig. 57 and slide the head restra int
downward.
Removing th e he ad re straint s
.. Fold the backrest forward <=> page 64.
.. Move the head restraint upward as far as it can
go.
.. Press the release @
i=:> fig. 58 with the mechan
ical key
c::> page 33 and the button @ c::> fig. 57 .
Pull the head restraint out of the backres t at
the same time¢.&_ .
Install ing the head restra ints
.. Slide the posts on the head rest raint down into
the gu ides unti l you feel the posts cl ick into
place.
.. Press the button @
c::> fig. 57 and slide the head
restraint all the way down. You should not be
able to pull the head restraint out of the back
rest.
58
So that the dr iver can have a better view to the
rear, the head restraints shou ld be pushed down
completely when the rear seats are not occupied.
_& WARNING
- Read and heed all WARNINGS <=:>page 115 ,
Proper adjustment of head restraints.
- Only remove the rear seat head restra ints
when necessary in order to install a ch ild
seat
¢ page 159. Install the head restra int
aga in immediately once the child seat is re
moved. Driving w ithout head restraints or
w it h head restraints that are not prope rly
adj usted increases the r isk of se rious or fa
tal nec k injury d rama tica lly .
- Veh icles with a pass through in the center
conso le have seating for four. The long cen
ter conso le between t he two rear seats is
not a seating position . Therefore, a safety
be lt is not provide d.
(0 Tips
Correctly adjusted head restra ints and safety
belts are an e xtreme ly effe ctive combinat ion
of safety features .
Memory function
Description
Applies to vehicles: with memory funct ion
The memory function allows you to quickly and
easily s tore and reca ll persona l seating profiles
for the d river. The memo ry funct io n is operated
through the master key and the memory but tons
in the driver's door .
The driver's seating p rofile is stored and assigned
to the master key eac h time the vehicle is locked .
When yo u open the door, t he seat profi le is auto
matically reca lled. If two peop le use one vehicle,
i t is recommended that each person always uses
"their own" master key .
Up to 2 seat profiles can be sto red in t he memory
buttons in the dr iver 's doo r. Once they are stor
ed , these seat profi les can be se lected at any
time . ..,_
Page 66 of 264
Sea ts and stor age
Luggage compartment
General information
A WARNING
Read and follow the important safety p recau
tions on
~ page 118, Storing cargo correctly.
Enlarging the luggage compartment
A pp lies to veh icles: w ith fol ding rear seatback
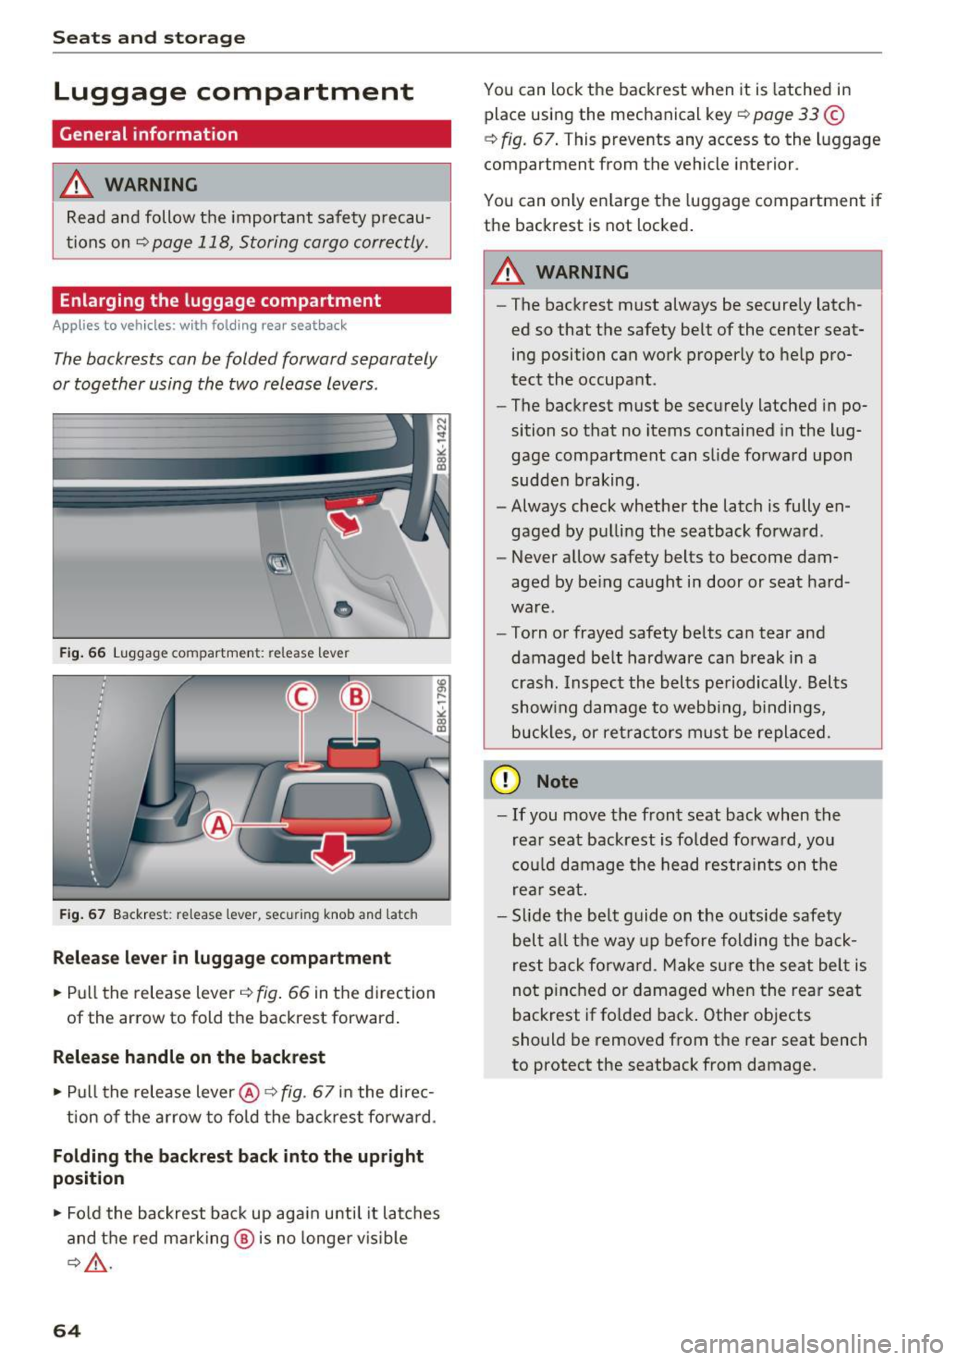
The backrests can be folded forward separately
or together using the two release levers .
•
Fig . 66 Luggage compartment: release lever
Fig . 67 Backrest: re lease lever, secu ring knob and latch
Rel eas e lev er i n lug gage compartment
.. Pull the release lever c:> fig . 66 in the direction
of the arrow to fold the backrest forward .
Release handle on the backrest
.. Pull the release lever@¢ fig. 67 in the direc-
tion of the a rrow to fold the backrest forward.
Folding the backre st back into the upright
posit ion
.. Fo ld the backrest back up again until it latches
and the red marking @ is no longe r vis ible
~ A .
64
You can lock the backrest when it is latched in
place using the mechanical key
i::> page 33 ©
~ fig. 67 . This prevents any access to the luggage
compartment from the vehicle interior.
You can only enla rge the luggage compartment if
the backrest is not locked.
A WARNING
-The backrest must always be securely latch
ed so that the safety belt of the center seat
ing position can work properly to help pro
tect the occupant.
- The backrest must be securely latched in po
sition so that no items contained in the lug
gage compartment can slide fo rward upon
sudden b raking.
- Always check whether the latch is fully en
gaged by pulli ng the seatback forward .
- Never allow safety belts to become dam
aged by be ing caught i n door or seat hard
ware.
- Torn or frayed safety belts can tear and
damaged belt hardware ca n break in a
crash . Inspect the belts pe riodically. Belts
show ing damage to webbing, bindings,
buckles, or ret rac tors must be repla ced.
(D Note
- If you move the front seat back when the
rea r seat backrest is fo lded fo rward, you
cou ld damage the head restra ints on the
rear seat.
- Slide the be lt g uide on the outs ide safety
bel t all the way up be fore folding the back
rest b ack fo rward. Make s ure the seat belt is
not p inched or damaged when the rear seat
backrest if fo lded back . Other objects
should be removed from t he rear seat bench
to protect the seatback from damage .
Page 68 of 264
Seats and storage
@ Tips
-You can open the pass-through from the
luggag e compartment. Push the release
button down and push the cover forward.
- You can lock or unlock the pass-through us
ing the mechanical key. This prevents any
access to the luggage compartment from
the vehicle interior.
Securing the ski sack
Appl ies to veh icles: w ith s ki sac k
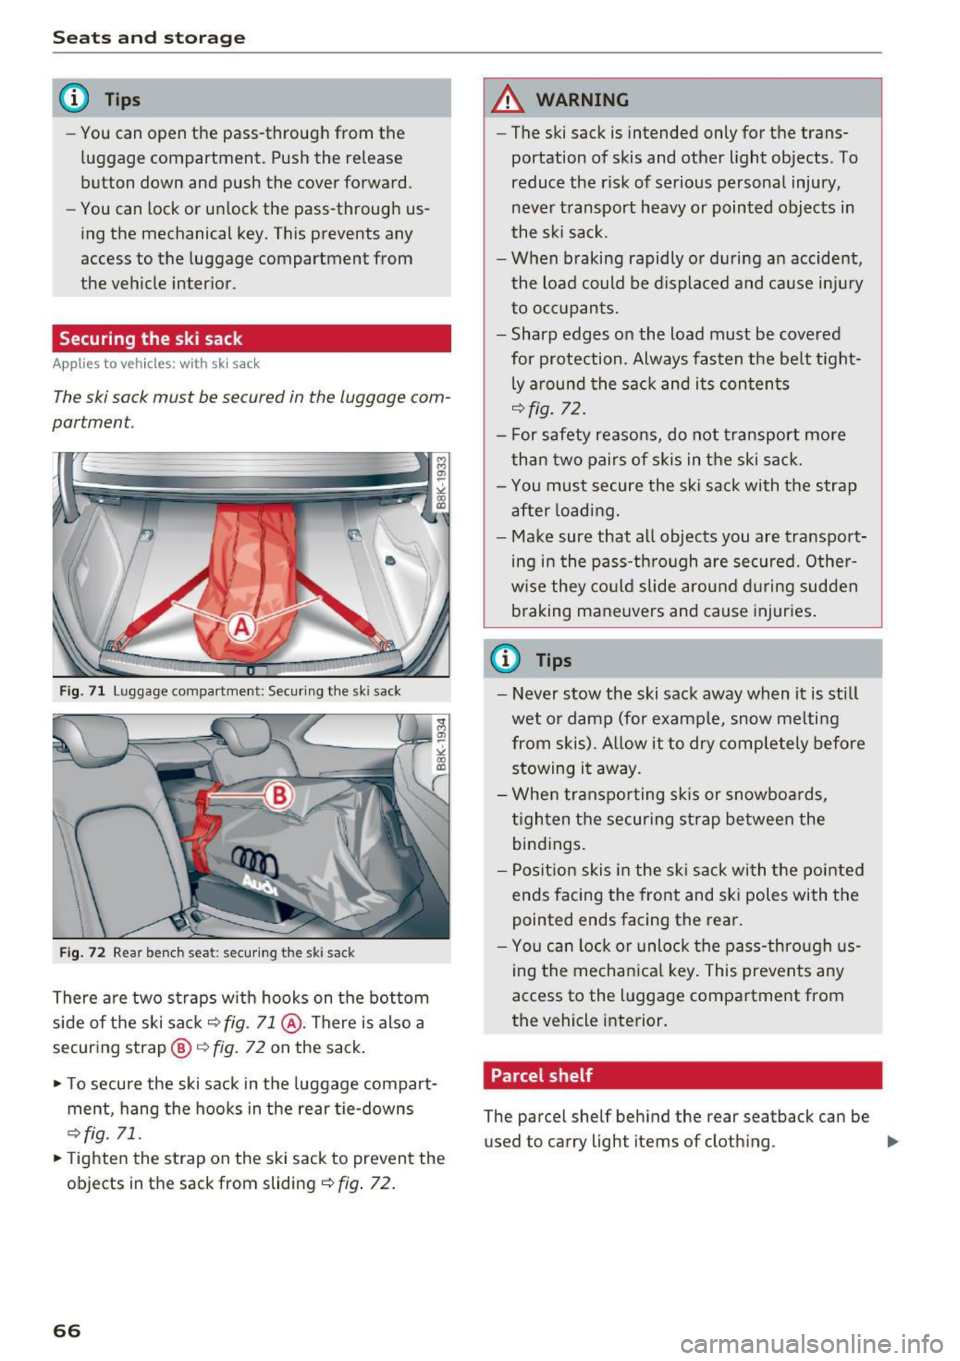
The ski sack must be secured in the luggage com
partment.
Fig. 71 Luggage compartme nt: Secur ing the ski sack
Fig. 72 Rear bench sea t: secu ring the ski sack
There are two straps with hooks on the bottom
side of the ski sack
~ fig. 71 @ . There is also a
securing strap@~
fig. 72 on the sack.
.. To secure the ski sack in the luggage compart
ment, hang the hooks in the rear tie-downs
~fig. 71.
.. Tight en the strap on the ski sack to prevent the
objects in the sack from sliding
~ fig. 72.
66
A WARNING
-The ski sack is intended only for the trans
portation of skis and other light objects . To
reduce the risk of serious personal injury,
never transport heavy or pointed objects in
the ski sack.
- When braking rapidly or during an accident,
the load could be displaced and cause injury to occupants.
- Sharp edges on the load must be covered
for protection . Always fasten the belt tight
ly around the sack and its contents
~fig . 72.
- For safety reasons, do not transport more
than two pairs of skis in the ski sack.
- You must secure the ski sack with the strap
after loading.
- Make sure that all objects you are transport
ing in the pass-through are secured. Other
wise they could slide around during sudden braking maneuvers and cause injuries.
@ Tips
-Never stow the ski sack away when it is still
wet or damp (for example, snow melting
from skis). Allow it to dry completely before stowing it away.
- When transporting skis or snowboards,
tighten the securing strap between the
bindings.
- Position skis in the ski sack with the pointed
ends facing the front and ski poles with the
pointed ends facing the rear.
- You can lock or unlock the pass-through us
ing the mechanical key. This prevents any
access to the luggage compartment from
the vehicle interior.
. Parcel shelf
The parcel shelf behind the rear seatback can be
used to carry light items of cloth ing. ..,.
Page 80 of 264
Driving
- Occasional noises when the parking brake is
applied and released are normal and are not
a cause for concern.
- When the vehicle is parked, the parking
brake goes through a self-test cycle at regu
lar intervals. Any associated noises are nor
mal.
Parking
.,. Press the brake pedal to stop the vehicle .
.,. Pull the switch @¢
page 77, fig. 80 to set the
parking brake .
.,. Automatic transmission: Move the selector lev-
er to P.
.. Turn the engine off¢.&, .
.. Manual transmission: Shift into 1st gear.
.. When on inclines or declines, turn the steering
wheel so that the vehicle will roll into the curb
if it begins to move.
A WARNING
-
-When you leave your vehicle -even if only
briefly -always remove the ignition key. This
applies particularly when children remain in
the vehicle. Otherwise the children could
start the engine, release the parking brake
or operate electrical equipment (e.g. power
windows). There is the risk of an accident.
- When the vehicle is locked, no one -particu
larly not children should remain in the vehi
cle. Locked doors make it more difficult for
emergency workers to get into the vehicle -
putting lives at risk.
Starting from rest
The starting assist function ensures that the
parking broke is released automatically upon
starting .
Stopping and applying parking brake
.. Pull the switch @¢ page 77, fig. 80 to apply
the parking brake.
78
Starting and automatically releasing the parking brake
.. When you start to drive as usual, the parking
brake is automatically released and your vehicle
begins to move.
When stopping at a traffic signal or stopping in city traffic on vehicles with an automatic trans
mission, the parking brake can be applied. The
vehicle does not have to be held with the foot brake. The parking brake eliminates the tendency
to creep with a drive range engaged . As soon as
you drive off as usual, the parking brake is re leased automatically and the vehicle starts to
move .
Starting on slopes
When starting on inclines, the starting assist pre
vents the vehicle from unintentionally rolling back. The braking force of the parking brake is
not released until sufficient driving force has
been built up at the wheels.
(D Tips
For safety reasons, the parking brake is re
leased automatically only when the driver's
safety belt is engaged in the buckle.
Starting off with a trailer
To prevent rolling back unintentionally on an in
cline, do the following:
.. Keep the switch @¢ page 77, fig. 80 pulled
and depress the accelerator. The parking brake
stays applied and prevents the vehicle from
rolling backward.
.,. You can release the switch @once you are sure
that you are developing enough driving force at
the wheels by depressing the accelerator.
Depending on the weight of the rig (vehicle and
trailer) and the severity of the incline, you may
roll backwards as you start. You can prevent roll
ing backwards by holding the parking brake
switch @pulled out and accelerating -just as
you would when starting on a hill with a conven
tional hand brake .
Page 87 of 264
.... N
0 I-co ....
~ Remove your foot from the brake pedal and ac
ce lerate .
Stopp ing tempo raril y
~ Keep the veh icle stat ionary using t he b raking
peda l, for example at traffic lights.
~ Do not press the accelerator pedal when doing
this.
~ To prevent the vehicle from rolling when you
start driving, set the park ing brake when stop
ping on steep inclines¢&, .
~ The parking brake w ill release automatically
and the vehicle w ill start moving once you press
the accelerator pedal.
Stopping /parking
If the selector lever is not in the P position when
you open the driver's door, the vehicle could roll. The message
Tran smission: Car may roll! Shift
to park! appears.
~ Press and hold the brake pedal unt il the vehicle
has come to a complete stop .
~ Apply the parking brake ¢ page 78, Parking .
~ Select the P selector leve r pos ition ¢ ,&.
Stopp ing on an incline
~ Always press the brake pedal to hold the vehi
cle in place and prevent it from "rolling back"
¢ &, . Do
not try to prevent the vehicle from
"ro lling back " when a gear is engaged by in
c reasing the engi ne speed ¢0 .
Starting on an incline
~ Activate the parking brake .
~ With the driving gear selected, press the accel
erator peda l carefully. The parking brake will
re lease automatically if your seat belt is fas
tened .
Unde r certain c ircumstances, such as dr iv ing in
the mountains, it may be useful to switch tempo rari ly to the manua l shift program in orde r to ad
just t he gears to the d rivi ng conditions by hand
¢ page 86.
On slopes, activate the parking brake first and
then move the selector lever to the P pos it ion.
Autom atic tran sm iss ion
This prevents too m uch stress from being placed
on the locking mechanism .
A WARNING ,-
-The vehicle can also ro ll when the eng ine is
stopped.
- Unintended vehicle movement can ca use se
rio us injury .
- Never leave your vehicle with the engine
r u nning while in gear. If you must leave
your veh icle when the engine is running, ac
tivate the pa rking brake and move the selec
tor lever to P .
- Power is still transmitted to the wheels
when the engine is runn ing at idle . To pre
vent the vehicle from "creepi ng", you must
keep your foot on the b rake when the en
g ine is r un ning and the selector lever is in D/
Sor R or "ti ptroni c" mode is selected.
- D o not press the acce le rator peda l when
cha nging t he se lecto r lever position while
t he vehicle is sta tionary and the engine is
r u nning .
- Never s hift into R or P wh ile driving.
- Before d riving down a s teep slope, reduce
your speed a nd s hift into a lowe r gear w it h
" t i pt ronic".
- Do not ride the brakes or press the brake
pedal too often o r too long when dr iv ing
down a hill. Const ant brak ing c auses t he
brakes to overheat and s ubstant ially re
duces bra king performance, increases brak
ing distance or causes comp lete fai lure of
the brake system.
- To prevent the vehicle from rol ling bac k
when stopp ing on inclines, always hold it in
p lace with the brake peda l or park ing brake.
- Never hold the vehicle on an incline with a
slipping clutch. The clutch opens a utomati
cally when it becomes too hot from the
overload. An ind icator lamp@] illuminates
a nd a driver message appears
¢ page 87
when the clu tch is over loaded .
- If the engine must rema in running, never
have any d riving position engaged when
checking unde r the hood . Make s ure these
lecto r lever has se cu rely engage d and is
lo ck ed in P with the par kin g b rake set
85