oil pressure AUDI A5 COUPE 2016 Owners Manual
[x] Cancel search | Manufacturer: AUDI, Model Year: 2016, Model line: A5 COUPE, Model: AUDI A5 COUPE 2016Pages: 264, PDF Size: 66.92 MB
Page 13 of 264
,-1 N
0 1-CX)
,-1 I.Cl U"I
,-1 I.Cl ......
A WARNING
-Always observe the warning in ¢ page 191,
before opening t he hood and checking the
engine coolant level.
- Never open the engine hood if you see or
hear steam, or if you see engine coolant
dr ipping from the engine compartment. You
cou ld burn yourself. Let the engine cool off
firstsothatyoucannothearo rseeany
steam or engine coo lant.
0 Note
- Mounting additional lights or accessories in
front of the air inlets reduces the cooling ef
fect of the radiator. At h igh outside temper
atu res or high engine load, the engine could
overheat.
- The front spoiler has been designed to prop
erly distribute the cooling air when the vehi
cle is moving. If the spoiler is damaged, this
could reduce the cooling effect and the en
gine could then overheat. Ask your author
ized Audi dealer for assistance.
Tachometer (engine rev counter )
The tachometer indicates the engine RPM (revo
lutions per minutes).
If engine RPM drops below 1,500, you should
downshift to the next lower gear. The red area at
the end of the scale indicates maximum permis
sible eng ine RPM after the break-in period. Be
fore reaching this area, move the selector lever
to position D/5 or ease your foot off the accelera
tor pedal.
(D Note
The tachometer needle@¢ page 10, fig. 3
should only briefly be in the red zone: you
could damage your eng ine! The beginning of
the red zone varies depending on the engine.
@ For the sake of the environment
Upshifting early saves fuel and reduces en
gine noise.
Instruments and indicator lights
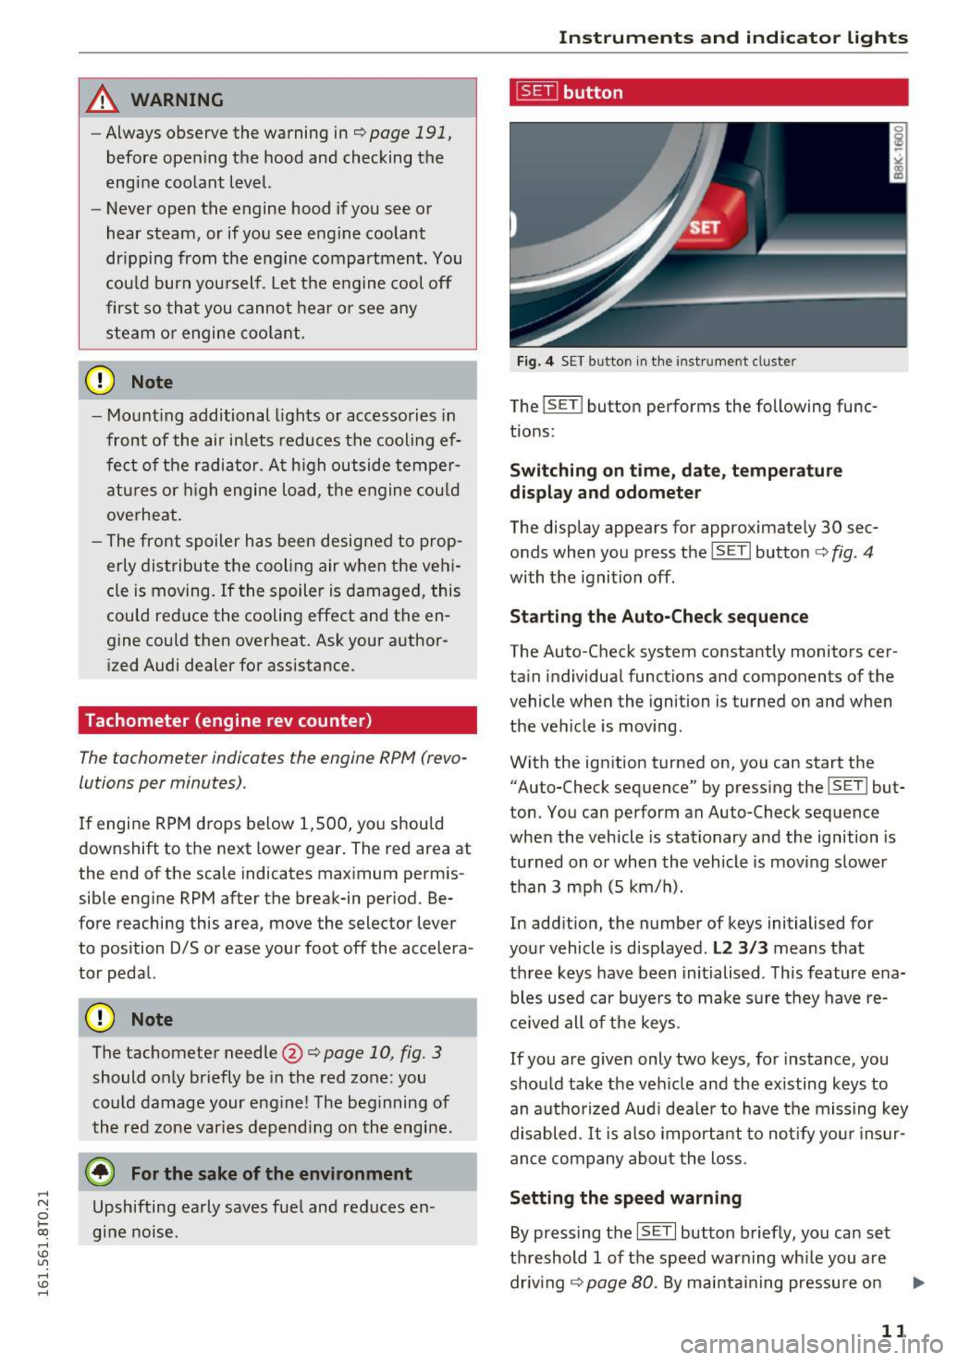
~button
Fig. 4 SET button in the instrument cluster
The !SET I button performs the following func
tions:
Switching on time, date, temperature
display and odometer
The display appears for approximately 30 sec
onds when you press the
ISETI button¢ fig . 4
with the ignition off.
Starting the Auto-Check sequence
The Auto-Check system constantly monitors cer
tain indiv idual functions and components of the
vehicle when the ignition is turned on and when
the vehicle is moving.
With the ignition turned on, you can start the
"Auto-Check sequence" by pressing the
! SETI but
ton. You can perform an Auto-Check sequence
when the vehicle is stat ionary and the ignition is
turned on or when the vehicle is moving slower
than 3 mph (5 km/h).
In addition, the number of keys initialised for
your vehicle is displayed.
L2 3/3 means that
th ree keys have been initialised. This feature e na
bles used car buye rs to make su re they have re
ceived all of the keys.
If you are given only two keys, for instance, you
should take the veh icle and the existing keys to
an authorized Audi dealer to have the missing key
disabled. It is also important to notify your insur
ance company about the loss.
Setting the speed warning
By pressing the ISETI button briefly, you can set
threshold 1 of the speed warning wh ile you are
driv ing
¢page 80. By ma intaining pressure on
11
Page 16 of 264

Instruments and indicator lights
TPMS
-~--
14 USA models
:
Anti-lock brak ing system (ABS) de
fective,/
¢ page 19
Canada mod els :
Anti-lock brak ing system (A BS) de
fective,/
¢ page 19
USA models :
Safety systems ./
¢page 19
Canada models :
Safety systems ./
¢page 19
Worn brake pads
¢page20
Elect romechan ical park ing brake
¢page 16
Tire pressure monitoring
system ,/
¢page 223
Tire pressure monitor ing system
¢page223
Electronic power control ,/
¢page20
Malf unct io n ind icator Lamp (MIL)
,I
c::> page 20
Engi ne speed limitat ion
c::> page20
Engine oil level
c::> page 17
Engine oil sensor
c::>page20
Battery
c::>page 16
Tank system
c::>page20
Wa rm up eng ine *
¢page 187
Windshield washe r fl uid leve l
¢page 21
Windshield wipers
¢page 21
Remote control key
¢ page 75
Battery in remote control key
¢page 33
Defect ive light bulb wa rning
<=> page 21
Fog lights
¢page 21
Rear fog ligh t(s)*
c> page 21
Headlight range control*
c> page 21
Adaptive light*
c>page 21
Light-/rai n sensor*
c> page 21
Adaptive dampers*
c>page22
Sport different ial*
<=> page22
Ig nition loc k
c>page22
Steering co lumn lock
¢ page 18
Elec tromechanical stee ring, dy
nam ic stee ring *,/
c>page 174
Transmission
- tipt ronic
c> page 87
- S tron ic c::> page 87
Transmission
- S tron ic
¢page 87
Other indicator light s
~--==------------Turn signals
<=>page22
USA mode ls: Cruise cont rol
c> page80
Canada model s: Cruise control
c> page 80
Page 19 of 264
9:::1: Engine oil pressure
The red engine oil pressure warning symbol re
quires immediate service or repair . Driving with a
low-oil-pressure indication is likely to inflict se
vere damage to the engine.
• Turn off engine! Oil pressure too low
If the indicator lig ht t urns on and the message
appears, the oi l pressu re is too low.
~ P ull off the road.
~ Stop t he vehicle .
~ Turnoff the engine.
~ Check the engine oil level¢ page 195 .
~ If the engine oil leve l is too low, add engine oi l
¢
page 195. Make sure that t he oil pressure
warning symbol. appears no longe r in the
display before you s ta rt driving ag ain.
~ If the engi ne oil leve l is cor rect and t he i ndic a
tor lig ht still tur ns on, turn t he eng ine
off and
do not continue driving . Seek p ro fessional as
s istance .
(D Tips
- The engine oil pressure symbol. is not
an indicator for a low engine oil level. Do
not rely on it. Instead, check the oil level in
your engine at regular intervals, preferably each time you refuel, and always before
going on a long trip.
- The yellow oil level warning indication
Ill
requires oil refill or workshop service with
out delay . Do not wait until the red oil
pressure warning. starts to flash before
you respond to the low oil level warning
Ill . By then , your engine may already have
suffered serious damage .
~ . Engine oil level
• WARNING: Please add oil immediately
If the indicator lig ht and the message ap pear,
a dd engine o il i mm edi ate ly
¢page 193.
;::; Ill Add oil, max XX XX l. You may cont. driv .
0
~ When the symbol II and driver message appea r, ,....,
~ add the amount of oi l appea ring in the display at
:;;: the next opportunity
¢ page 193. ,....,
Instruments and ind icator lights
-L Eng ine cooling system
A malfunction in the engine cooling system must
be repaired as soon as possible .
• Turn off engine and check coolant level
If the indicator light turns on and the message
appea rs, the coo lant tempe rat ure is too high o r
t h e coo lant leve l is too low.
~ Pull off the ro ad.
~ Stop the vehicle.
~ Tur noff th e engine.
~ Check coolant leve l ¢ page 19 7 .
~ Add coo lant if necessary¢ page 198 .
~ Continue dr iv ing only afte r the e ngine coolant
warni ng/ indicator light goes out .
~ Contact your authorized Audi dealer for assis-
t ance if necessa ry.
If the engi ne coo lant level is correct , then t he ra
dia to r f an may be the cause of t he mal func tion .
• Coolant temperature! Let engine run with
vehicle stationary
If the indicator lig ht tur ns on and the messa ge
appea rs, let the engine run a t idle for a few mi
nutes to c ool down.
A WARNING
-- If yo ur vehicle should break down for me
cha nica l o r ot her reasons, park at a safe dis
t ance from mov ing t raff ic, t urn off t he e n
g in e a nd turn on the haz ard warning lights
¢ p age 46, Em ergency fla she rs.
- N ever open t he hood if you see o r hear
s te am or coo lant esca p in g fr om th e engine
co mpartm ent - you ris k being scald ed . W ait
un til yo u can no longe r see or hear steam or
coo lant escapin g.
- T he engi ne compart ment of an y vehicl e is a
d anger ous are a. B efore y ou perfo rm any
wo rk in the eng ine com partment, t urn of
the eng ine a nd a llow it to cool. Follow t he
warn ing stickers
¢page 191.
(D Note
Do not con tinue dr iv in g if the . symbol i llu-
minates. The re is a malf u nction in the engine
IJi,,,
17
Page 78 of 264
Driving
oil pressure must first build up in the hy
draulic valve adjusters. This is normal and not a cause for concern.
- If you leave the vehicle with the ignition
switched on, the ignition will switch off af
ter a certain period of time. Please note that
electrical equipment such as exterior lights
will switch off as well when that happens .
Switching engine off
Applies to veh icles: w ith conven ience key
" Bring your vehicle to a complete stop .
" Automatic transmission: Move the selector lev
er to the P or N position.
"Press the
I STA RT ENG INE S TOPI button
~ page 75, fig. 79.
Steering lock
The steering locks when you turn the engine off
using the
I START E NGINE STOP ! button and
open the driver's door. The locked steering helps
prevent vehicle theft.
Emergency off
If necessary, the engine can be switched off with
the selector lever in the R or D/S positions . The
engine stops if you press and hold the
I STAR T ENGIN E STOPI button at speeds below
6 mph (10 km/h) and press the brake pedal.
A WARNING
-Never turn off the engine before the vehicle
has come to a complete stop. The full func
tion of the brake booster and the power
steering is not guaranteed. You must use
more force to turn or brake if necessary. Be
cause you cannot steer and brake as you
usually would, this could lead to crashes
and serious injuries.
- For safety reasons, you should always park
your vehicle with the selector lever in P.
Otherwise, the vehicle could inadvertently
roll away .
- The radiator fan can continue to run for up
to 10 minutes even after you have turned
off the engine and removed the ignition key.
The radiator fan can also turn on again if the
76
engine coolant heats up because of intense
sunlight or heat build-up in the engine com
partment.
- Always take the key with you whenever you
leave your vehicle . Otherwise, the engine
could be started or electrical equipment
such as the power windows could be operat
ed. This can lead to serious injury.
(D Note
If the engine has been under heavy load for
an extended period, heat builds up in the en
gine compartment after the engine is switch
ed off - there is a risk of damaging the engine .
Allow the engine to run at idle for about two
minutes before switching it off.
Driver messages
Ignition is on
This message appears and a warning tone sounds
if you open the driver's door when the ignition is
switched on .
No key identified
This message appears when the
I STAR T ENGINE ST OP ! button is pressed if there
is no master key inside the vehicle or if the sys
tem does not recogni ze it. For example, the mas
ter key cannot be recognized if it is covered by an
object (e .g . aluminum brief case) which
screens
the radio signal. Electronic devices such as cell
phones can also interfere with the radio signal.
Press brake pedal to start engine
This message appears if you do not press the
brake pedal to start the engine in a vehicle with
an automatic transmission.
Press clutch pedal to start engine
This message appears if you do not press the
clutch pedal to start the engine in a vehicle with
a manual transmission.
Shift to N or P to start engine
This message appears when attempting to start
the engine if the selector lever for the automatic
transmission is not in the P or N position . The .,_
Page 196 of 264
Check ing and F illing
Using the proper engine oil is impo rtant for the
functionality and service life of the engine. Your engine was facto ry-filled with a h igh-quality oi l
which can usually be used throughout the entire
year.
@) Note
Your Limited New Vehicle War ranty does not
cover damage or malfunctions due to failure
to follow recommended maintenance and use
requirements as set forth in the Audi Owner's
Manual and Warran ty
& Maintenance booklet.
- Use only a high quality eng ine oil t hat ex-
p ressly complies with the Audi oil qua lity
standard specified for your vehicle's engine .
Using a ny o ther oil can cause serious engine
d am age.
- D o not mix any lubricants o r other addit ives
i nto the engine oil. Doing so ca n cause en
g ine damage.
(D Tips
I f you need to add oil and there is none availa
ble t hat meets the Audi o il quality standard
your eng ine requi res , you m ay ad d a tot al of
no more than 0.5 qu art /li ter o f a h igh-quality
"synthe tic"oil that meets t he following speci
fications.
- Vehicles w it h gasoline eng ine: AC EA A3 o r
API SM with a viscosity grade of SAE 0W-30,
SAE SW -30 or SAE SW-40.
- Fo r more information about en gine o il that
has been approve d for your ve hicle, please
contact eithe r you r a uthorized Aud i dea ler
or A udi C ustome r Relat ions at
1 (800) 822-2834 or visit our web site at
www .audiusa .com or www.aud icanada .ca .
Engine oil consumption
The engine in your vehicle depends on an ade
quate amoun t of oil to lubricate and cool all of
its moving parts .
In order to provide effective lubr ication and coo l
ing of in ternal engine components, all internal
combustion eng ines consume a certain amou nt
of oil. Oil co nsumption varies from engine to en
g ine and may change significant ly over the life of
194
th e engine. Typically, engines w ith a specified
break-in period (see
r=:> poge 177) consume more
o il dur ing the b reak-in per iod than they consume
after oil consumption has stabili zed .
U nder normal cond itions, the rate of oil con
sumption depends on the q ua lity and viscosity of
the oil, the RPM (revo lutions per m inute) at
which the engine is operated, the ambient tem perature and road condit ions. Further factors are
the amo unt of o il di lution from water condensa
t ion or fuel residue a nd the oxidation level of the
o il. As any engine is subject to wea r as mileage
builds up, the o il cons umption may increase ove r
t i me unt il repla ce m ent of wo rn components m ay
be come necessary .
With a ll these va riab les coming into p lay, no
sta ndard rate of o il cons umption can be estab
li sh ed or spec ified . T he re is no alte rn ative to reg
ul ar and frequen t checking of the oi l level, see
Note .
If the yellow engine oi l leve l wa rning symbo l Ill
in the instrument clus ter lights up , you sho uld
c h eck t he o il level as soon as possible
r=:> page 195 . Top off the oi l at your ea rliest con
venience
r=:> poge 195.
A WARNING
Before you check anyth ing in the engine com
partment, always read and heed all WARN
INGS
r=:> .&. in Working in the engine compart
ment on page 191.
@ Note
D riving wit h an insuffic ient oil level is like ly to
cause severe damage to the eng ine.
(D Tips
- The oil pressure warning display. is not
an indicator of the oil level. Do not rely on
it . Instead, check the oil level in your en
gine at regular intervals, preferably each
time you refuel, and always before going
on a long trip .
-If you have the impress io n your e ngine con
sumes excessive amou nts of oil, we recom-
mend th at yo u consult an authori zed A udi .,.
Page 200 of 264

Check ing and F illing
blink until you add coolant and the level has been
restored to normal. Even though there is an e lec
tr ic coolant level sensor, we still recommend you
check the coo lant level from time to time.
Coolant los s
Coolant loss may indicate a l e ak in the cooling
system. In the event of coolant loss, the cooling
syst em should be insp ected immediately by your
authorized Audi dealer. It is not enough merely
to add coolant.
I n a
s e aled system, losses can occur only if the
boiling point of the coo lant is exceeded as a re
sult of overheating.
A WARNING
The cooling system is under pressure and can get very hot. Reduce the risk of scalding from
hot coolant by following these steps.
- Turn off the eng ine and allow it to cool
down .
- Protect your face, hands and arms from es
caping fluid and steam by covering the cap
with a large, thick rag.
- Turn the cap slowly and very carefully in a
counter-clockwise direction wh ile apply ing
l ight, downward pressure on the top of the
cap .
- To avo id being burned, do not sp ill anti
freeze or coolant on the exhaust system or
hot eng ine parts . Under certain conditions,
the ethy lene g lycol i n engine coolant can
catch fire.
{Q) Note
Do not add any type of radiator leak seala nt
to your veh icle's engine coolant . Adding radia
to r repa ir fluid may adversely affec t the func
tion and performance of yo ur cooling system
and could result in damage not covered by
your New Vehicle Limited Warranty.
Adding coolant
Be very careful when adding engine coolant.
Before you check anyth ing in the eng ine compart
ment,
a lwa ys re ad an d heed all WARNINGS
198
¢ A in Working in the engine compartment on
page 191.
Requireme nt: The re must be a res idual amount
of coo lant in the expans ion tank
~CD-
.,,. Turn off the engine .
.,,. Let the engine cool down.
.,,. Place a thick rag over the coolan t expa nsion
tank ¢page 197, fig. 163 and
carefull y turn
the cap counter-clockwise ¢.&_ .
.,,. Add coo lant mixed in the correct ratio
~ page 196, Coolant up to the MAX marking.
.,,. Make sure that the fluid level remains stab le.
Add more coolant if necessary .
.,,. Twist the cap on aga in tightly.
Replacement engine coolant must conform to ex
act specifications ¢ page 196, Coolan t.
We recommend using only coo lant additive
G l2 +
+ , Gl3
or in an emergency Gl2+. Do not use a
different additive . In an emergency use plain wa
ter unt il you can get the correct addit ive and can
restore the correct rat io. Th is should be done as
soon as possible.
If you have lost a considerable amount of cool
ant, then you should add cold antifreeze and cold
water only when the engine is cold.
Always use new engine coo lant when refilling .
Do not fi ll coolant above the "MAX " mark. Excess
coolant will be forced out th rough the pressure
relief valve in the cap when the engine becomes
hot.
A WARNING
- The cooling system is under pressure and can get very hot. Reduce the risk of scalding
from hot coolant by following these steps.
- Turn off the engine and a llow it to cool
down.
- Protect your face, hands and arms from
escaping fluid and steam by covering the
cap with a large, thick rag.
- Turn the cap s low ly and very ca refully in a
counter-clo ckwise direction wh ile app ly ing
li ght, downward pressure on the top o f
the cap.
~
Page 210 of 264
Wheels
Bead
means the part of the tire that is
made of steel wires, wrapped or
reinforced by ply cords and that is
shaped to fit the rim .
Bead separation
means a breakdown of the bond
between components in the bead.
Cord
means the strands forming the
plies in the tire.
Cold tire inflation pressure
means the tire pressure recom
mended by the vehic le manufac
turer for a tire of a des ignated
size that has not been driven for more than a couple of miles (kilo
meters) at low speeds in the
three hour period before the tire pressure is measured or adj usted.
Curb weight
means the weight of a motor ve
hicle w ith standard equipment in
cluding the maximum capacity of
fuel, oil, and coolant, air condi
tioning and additiona l weight of
op tional equipment.
E x tra load tire
means a tire des igned to operate
at higher loads and at h igher in -
208
flation pressures than t he corre
spond ing standa rd tire. Extra load
tires may be identified as "XL",
"xl" , "EXTRA LOAD" , or "RF" on
the sidewall.
Gross A xle Weight Rating
("GAWR ")
means the load-carrying capacity
of a single axle system , measured
at the ti re-gro und interfaces.
Gross Vehicle Weight Rating
("GVWR")
means the max imum total loaded
weight of the vehicle .
Groove
means the space between two ad
jacent tread ribs .
Load rating (code)
means the maximum load tha t a
tire is rated to carry for a given in
flation pressure. You may not find
this informat ion on all ti res be
cause it is not required by law .
Maximum load rating
means the load rating for a tire at
the maximum permissible infla
tion p ressure for that ti re .
Maximum loaded vehicle
weight
means the sum of:
Page 219 of 264
.... N
0 Ico ....
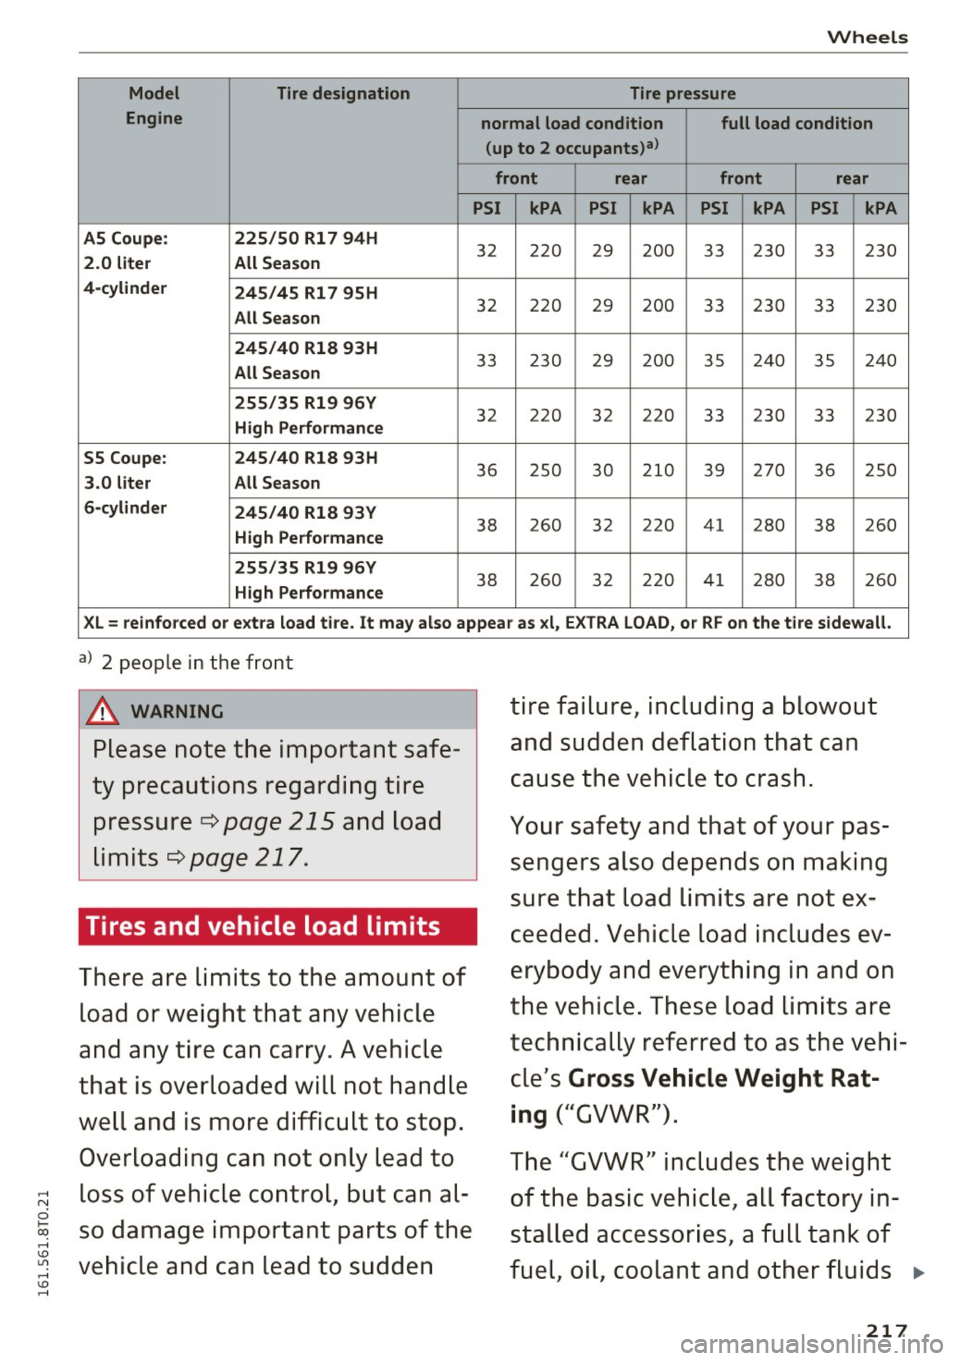
Model Tire designation Tire pressure
Engine normal load condition full load condition
(up to 2 occupants)a)
front rear front rear
PSI kPA PSI kPA PSI kPA PSI kPA
AS Coupe: 225/50 Rl
7 94H
32 220 29 200 33 230 33 230 2.0 liter All Season
4-cylinder 245/45 Rl
7 95H
All Season
32 220 29 200 33 230 33 230
245/40 Rl8 93H 33 230 29 200 35 240 35 240
All Season
255/35 Rl9 96Y
3 2 22 0 32 22 0 33 230 33 230 High Performance
55 Coupe: 245/40 Rl8 93H
36
250 30 210 39 270 36 250 3.0 liter All Season
6-cylinder
245/40 Rl8 93Y
High Performance
38 2
60 3 2 22 0 41 280
38 2
60
255/35 Rl9 96Y
38 260 32 220 41
280 38 260 High Performance
XL= reinforced or extra load tire. It may also appear as xl, EXTRA LOAD, or RF on the tire sidewall.
a) 2 people in the front
_& WARNING
Please note the important safe
ty precautions regarding tire pressure
¢page 215 and load
limits¢
page 217.
Tires and vehicle load limits
There are limits to the amount of
load or weight that any vehicle
and any tire can carry. A vehicle
that is overloaded will not handle
well and is more difficult to stop.
Overloading can not only lead to
loss of vehicle control, but can al
so damage important parts of the
vehicle and can lead to sudden tire failure, including a blowout
and sudden deflation that can
cause the vehicle to crash.
Your safety and that of your pas
sengers also depends on making
sure that load limits are not ex
ceeded. Vehicle load includes ev
erybody and everything in and on
the vehicle. These load limits are
technically referred to as the vehi cle's
Gross Vehicle Weight Rat
ing
("GVWR").
The "GVWR" includes the weight
of the basic vehicle, all factory in
stalled accessories, a full tank of
fuel, oil, coolant and other fluids ..,
217
Page 253 of 264
.... N
0 Ico ....
Dr iving throug h wate r . . . . . . . . . . . . . . . . . 177
Driving time . . . . . . . . . . . . . . . . . . . . . . . . . . 24
D ust filte r
re fer to Po llutant filter (au toma tic A/C sys -
tem) . . . . . . . . . . . . . . . . . . . . . . . . . . . . . . . 68
D ynamic stee ring . .......... .. 102,170 ,174
E
E85 (F ue l) . . . . . . . . . . . . . . . . . . . . . . . . . . . 187
Easy entry function . . . . . . . . . . . . . . . . . . . . . 56
E ff iciency p rogra m . . . . . . . . . . . . . . . . . . . . . 26
Fu el economy mess ages . . . . . . . . . . . . . . . 28
M emory levels . . . . . . . . . . . . . . . . . . . . . . . 24
Othe r equipment . . . . . . . . . . . . . . . . . . . . . 27
Shift indicator . . . . . . . . . . . . . . . . . . . . . . . 27
E lect ro-mechan ica l powe r ass ist . . . . . . . . . 17 4
Electromechanical parking brake
Emergency braking . . . . . . . . . . . . . . . . . . . 79
Indicator light . . . . . . . . . . . . . . . . . . . . . . . 77
Pa rking . . . . . . . . . . . . . . . . . . . . . . . . . . . . . 78
Re leas ing and closing . . . . . . . . . . . . . . . . . 77
St arting assis t . . . . . . . . . . . . . . . . . . . . . . . 78
S tarting from rest . . . . . . . . . . . . . . . . . . . . 78
S tarting off w ith a t railer . . . . . . . . . . . . . . . 78
Warning/indicator lights . . . . . . . . . . . . . . . 16
E lec tronic d ifferential lock
Wa rn in g/i ndic ator lig hts . . . . . . . . . . . . . . . 18
Electronic Differential Lock . . . . . . . . . . . . . 170
Electronic differential lock (EDL)
Wa rning/i ndicator lig hts.. ... .. .. .... .. 1 9
E lec tronic im mob iliz er . . . . . . . . . . . . . . . 12 , 37
Electronic power control (EPC) warning/ind icator light . . . . . . . . . . . 20
Elect ronic speed limiter . . . . . . . . . . . . . . . . . 29
E lect ronic stab iliz at io n cont rol
Sport mode . . . . . . . . . . . . . . . . . . . . . . . . 17 1
Electronic Stabilization Control . . . . . . . . . . 170
Electronic Stabilization Control (ESC) Wa rning/indicator lights . . . . . . . . . . . . . . . 1 8
E me rge ncy ac tuati on
D oors . . . . . . . . . . . . . . . . . . . . . . . . . . . . . . 36
I gnition key . . . . . . . . . . . . . . . . . . . . . . . . . 34
P ano ram ic tilting sunroo f . . . . . . . . . . . . . . 4 0
Sun shade (roof) . . . . . . . . . . . . . . . . . . . . . 4 0
E me rge ncy brak ing . . . . . . . . . . . . . . . . . . . . . 79
Index
E mergency flasher . . . . . . . . . . . . . . . . . . . . . 46
War ning/indicator lights . . . . . . . . . . . . . . . 22
E mergency key . . . . . . . . . . . . . . . . . . . . . . . . 32
Start ing engi ne . . . . . . . . . . . . . . . . . . . . . . 74
Emergency ope ration
Emergency braking function (parking brake) .7.9
Emergency start ing . . . . . . . . . . . . . . . . . . . 236
E nergy manage men t . . . . . . . . . . . . . . . . . . 175
B attery power . . . . . . . . . . . . . . . . . . . . . . . . 16
Drive r notification . . . . . . . . . . . . . . . . . . . . 16
E ngine
Compartment . . . . . . . . . . . . . . . . . . . . . . . 193
Coo la nt . . . . . . . . . . . . . . . . . . . . . . . . . . . . 1 96
Hood . . . . . . . . . . . . . . . . . . . . . . . . . . . . . . 191
Sta rt ing . . . . . . . . . . . . . . . . . . . . . . . . . 72 , 75
Start ing wi th ju mpe r cables . . . . . . . . . . . 236
Stopping . . . . . . . . . . . . . . . . . . . . . . . . . 7 4, 76
En gine compartment . . . . . . . . . . . . . . . . . . 193
Safety i nstr uctions .. ............. .. .. 191
Wo rking the engine compa rtment . . . . . . 191
E ngine coolant
I n dicator light . . . . . . . . . . . . . . . . . . . . . . . 17
Engine coolant system . . . . . . . . . . . . . . . . . 196
Adding coolant . . . . . . . . . . . . . . . . . . . . . . 198
Checking coolant level . . . . . . . . . . . . . . . . 197
Checking the engine coo lant level. . . . . . . 197
Radiator fan . . . . . . . . . . . . . . . . . . . . . . . . 199
Engine coolant temperature
Temperature gauge . . . . . . . . . . . . . . . . . . . 10
E ngine hood
Closing . . . . . . . . . . . . . . . . . . . . . . . . . . . . 191
How to release the hood . . . . . . . . . . . . . . 191
E ngine oil . . . . . . . . . . . . . . . . . . . . . . . . . . . 1 93
Adding . . . . . . . . . . . . . . . . . . . . . . . . . . . . 195
Addi tives. ... .. .. .. ... .. ..... ... .. .. 195
Changing . . . . . . . . . . . . . . . . . . . . . . . . . . 196
Check oil level . . . . . . . . . . . . . . . . . . . . . . 195
Cons umption . . . . . . . . . . . . . . . . . . . . . . . 195
Indicator light . . . . . . . . . . . . . . . . . . . . 17, 20
Oil consumpt io n . . . . . . . . . . . . . . . . . . . . . 194
Pressure malfunct ion . . . . . . . . . . . . . . . . . 17
Senso r defect ive . . . . . . . . . . . . . . . . . . . . . . 20
Spec ificatio n and viscosity . . . . . . . . . . . . . 193
Engine speed limitation . . . . . . . . . . . . . . . . . 20
E nv ironmen t
C atalytic converter . . . . . . . . . . . . . . . . . . . 178
Dispos ing of your veh icle battery . . . . . . . 203
251