change wheel AUDI A5 COUPE 2018 Owners Manual
[x] Cancel search | Manufacturer: AUDI, Model Year: 2018, Model line: A5 COUPE, Model: AUDI A5 COUPE 2018Pages: 409, PDF Size: 67.63 MB
Page 7 of 409
<( a, .... N ,....
N .... 0 \0
3 a,
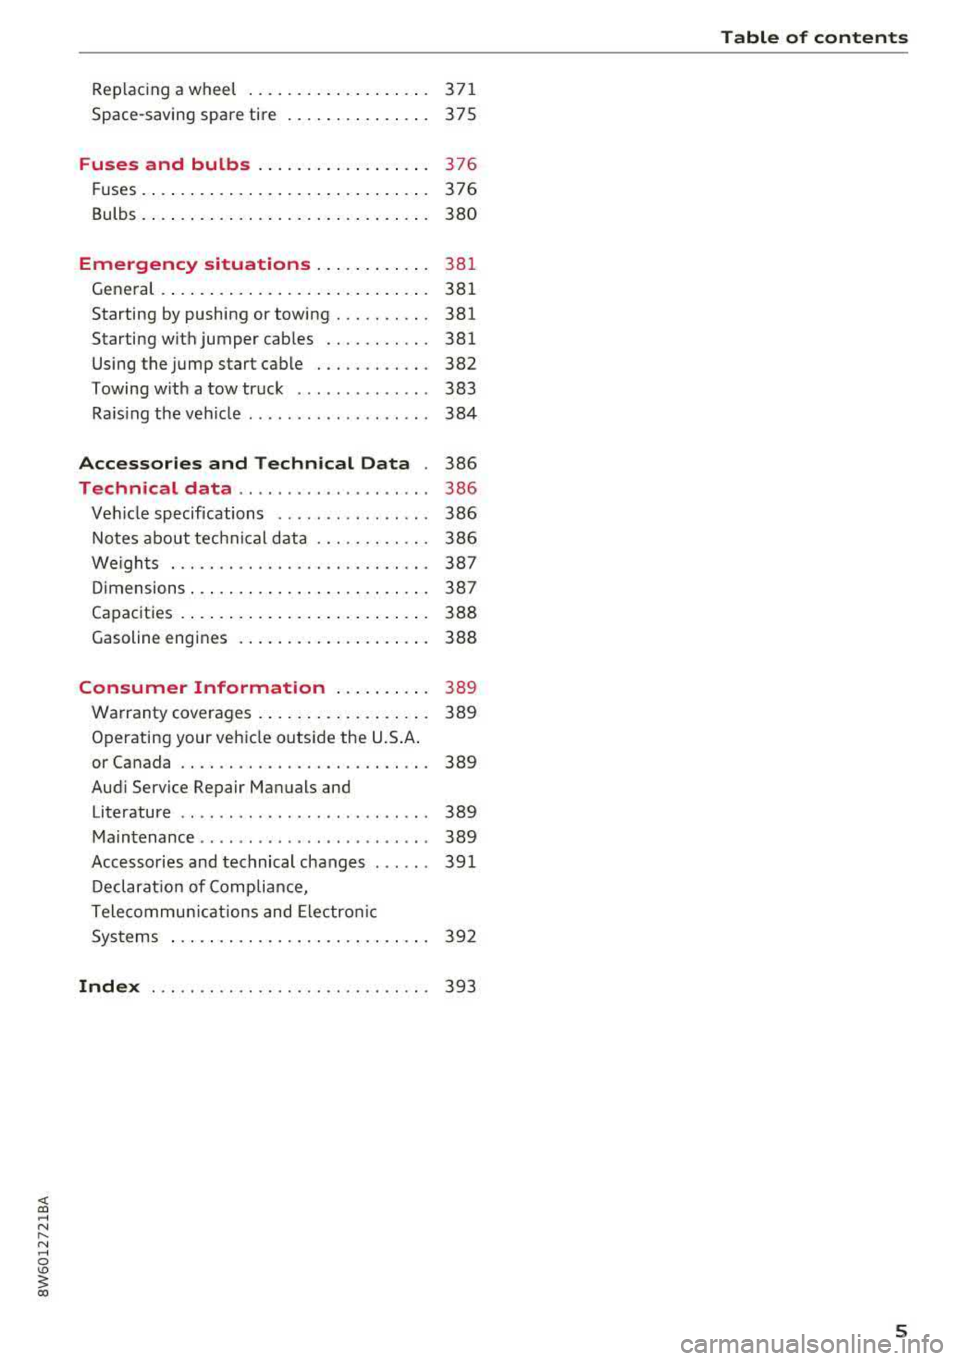
Replac ing a wheel . . . . . . . . . . . . . . . . . . . 3 7 1
Space-saving spare tire . . . . . . . . . . . . . . . 37 5
Fuses and bulbs . . . . . . . . . . . . . . . . . . 376
Fu ses .. .. .. .. .... .. .... ... .. .. .... . 376
Bulbs. ... .. .. ... .. ..... ... .. .. .... . 380
Emergency situations . . . . . . . . . . . . 381
General . . . . . . . . . . . . . . . . . . . . . . . . . . . . 38 1
Starting by pushing or towing . . . . . . . . . . 381
Starting w it h jumper cables . . . . . . . . . . . 381
Using the jump start cable . . . . . . . . . . . . 382
Towing with a tow truck . . . . . . . . . . . . . . 383
Ra is ing t he ve hicle . . . . . . . . . . . . . . . . . . . 384
Accessories and Techn ical Data . 386
Technical data . . . . . . . . . . . . . . . . . . . . 386
Ve hicl e specif ications . . . . . . . . . . . . . . . . 386
N otes about tec hnica l data . . . . . . . . . . . . 386
We igh ts . . . . . . . . . . . . . . . . . . . . . . . . . . . 387
D imensions . . . . . . . . . . . . . . . . . . . . . . . . . 387
Capac ities . . . . . . . . . . . . . . . . . . . . . . . . . . 38 8
Gasoline engines . . . . . . . . . . . . . . . . . . . . 388
Consumer Information . . . . . . . . . . 389
Warranty coverages . . . . . . . . . . . . . . . . . . 389
Operating your veh icle outs ide the U.S .A .
or Canada . . . . . . . . . . . . . . . . . . . . . . . . . . 389
Aud i Service Repair Manuals and
Literature . . . . . . . . . . . . . . . . . . . . . . . . . . 389
M ain tenance . . . . . . . . . . . . . . . . . . . . . . . . 389
Accesso ries and technical changes . . . . . . 39 1
D eclarat io n of Complia nce,
T ele commun ic a tions and Ele ctro nic
Sys tems . . . . . . . . . . . . . . . . . . . . . . . . . . . 39 2
Index ... .. .. ............... .. .. .. . 393
Table of contents
5
Page 16 of 409
Cockpit overview
Control buttons
Applies to: vehicles w ith mu ltifunct ion steering wheel p lus
I rM
' t M' ...
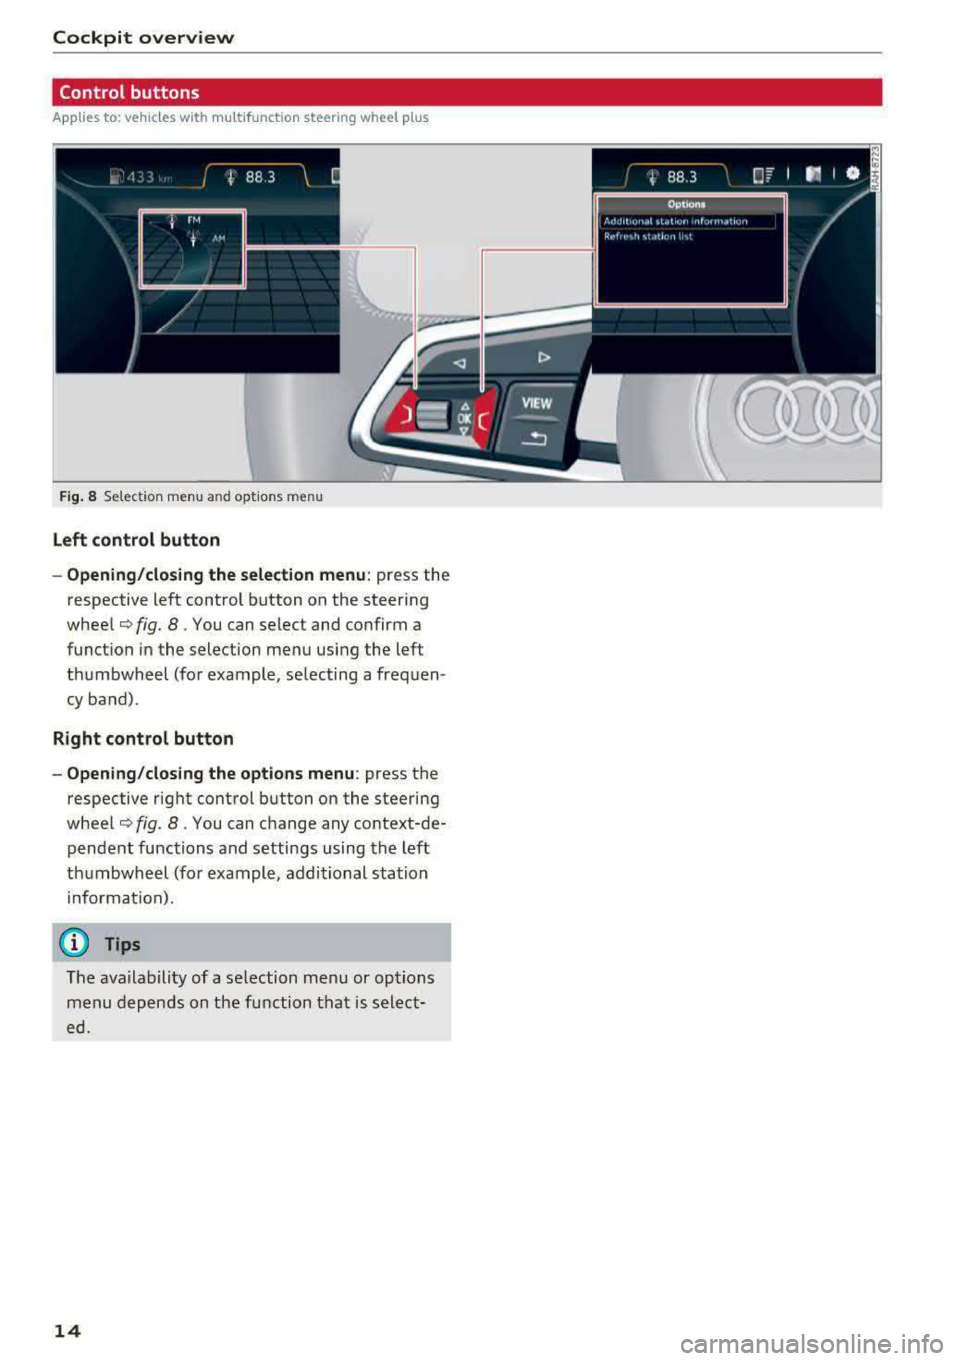
F ig . 8 Select ion menu an d opt io ns m en u
Left control button
- Opening/closing the selection menu :
press the
respective left control button on the steering
wheel¢ fig. 8. You can select and confirm a
function in the selection menu using the left
thumbwheel (for example , selecting a frequen
cy band).
Right control button
- Opening/closing the options menu :
press the
respective right control button on the steering
wheel¢ fig. 8. You can change any context-de
pendent functions and settings using the left
thumbwheel (for example, additional station
in format ion).
(D Tips
The ava ilability of a se lection menu or options
menu depends on the function that is select
ed.
14
Page 20 of 409
Cockpit over view
The short -term memory collects driving informa
tion from the time the ignition is switched on un
til it is switched off . If you cont inue driv ing with
in two hours after switching the ignition off, the
new values are included when calculat ing the cur
rent tr ip informat ion.
Unlike the short-term memory, the long-term
memory is not erased automat ically. You can se
lect the time period for evaluat ing trip informa
tion yourself .
Fuel con sumpti on
The current fue l consumption can be shown us
ing a bar graph
cc> fig. 14. The average cons ump
tion stored in the short-term memory is also dis
played. If the bars are green or the gray tone on
the bars changes (depending on the equipment),
your veh icle is sav ing fuel by the following func
tion:
- Recupe ration : electrical energy can be stored in
the ve hicle battery when the vehicle is coasting
o r driving downhi ll. The bar will move toward
0 /0.
(D Tips
The date, time of day and t ime and date for
mat can be set in the Infotainment system
cc> page 251 .
Energy consumers
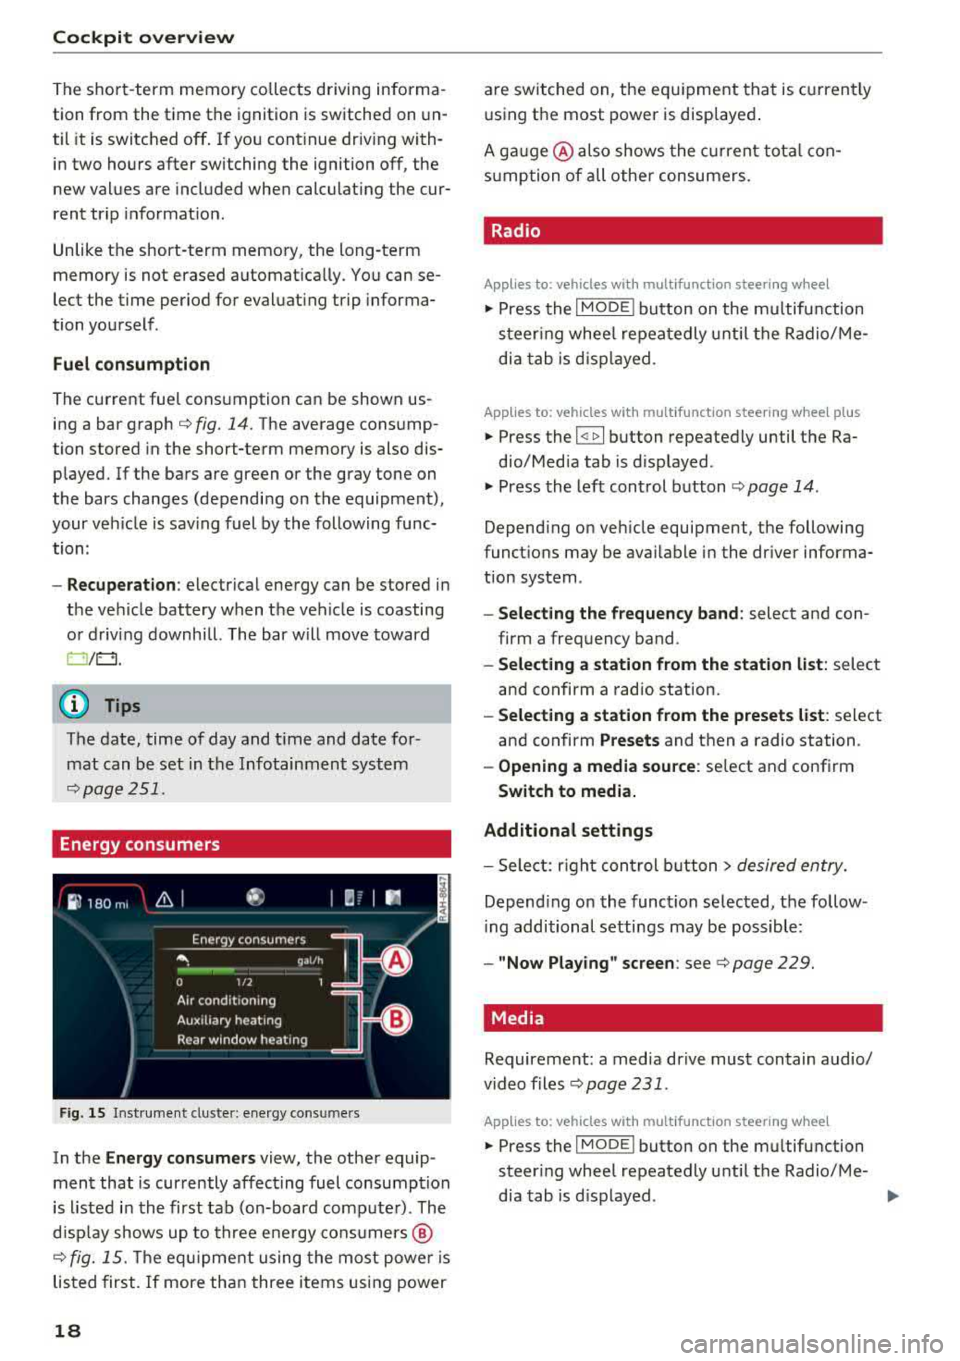
Fig . 15 Inst rume nt cluste r: e nergy cons ume rs
In the En ergy con sumer s view, the othe r equip
ment that is currently affecting fuel consumption
is listed in the first tab (on-board comp ute r) . The
d isp lay shows up to three ene rgy consumers @
cc> fig. 15. The eq uipme nt using the most powe r is
listed first. If more than three items using power
18
are switched on, the eq uipment that is c urren tly
using the most power is disp layed .
A ga uge @ also shows the c urrent tota l con
s u mption of a ll othe r consumers .
. Radio
Applies to: vehicles with multifunction steering wheel
.,. Press the I MODE i button on the m ultif un ction
s teer ing whee l repeatedly u nti l the Radio/ Me
dia tab is d isp layed.
Applies to: vehicles with multifunction steering wheel plus
.,. Press the I <11>I button repeatedly until the Ra-
dio/Med ia tab is d isplayed.
.,. Press the left control b utton cc> page 14 .
Depend ing on veh icle equipment, the following
funct ions may be ava ilable i n the dr iver informa
tion system .
-Select ing the frequen cy band : select and con
firm a freq uency band .
-Selecting a station from the station list : select
and confirm a radio station.
- Select ing a station from the preset s list : select
and confirm
Presets and then a radio station .
-Opening a media sou rce: se lect and confirm
Swit ch to media.
Additional settings
- Sele ct: r ight cont rol b utton> desired entry.
Depend ing on the function se lected, the follow
i ng additional settings may be possible:
- "Now Playing" screen : see cc> page 229.
Media .
Requirement: a media drive must contain audio/
video files
cc> page 231 .
Applies to: vehicles with multifunction steering wheel
.,. Press the I MODE i button on the mu ltifunction
steer ing whee l repeatedly until the Radio/Me-
dia tab is d isplayed .
.,.
Page 24 of 409
Cockpit overv iew
Street view with route guidance started
Applies to: ve hicles w ith navigation system and street view
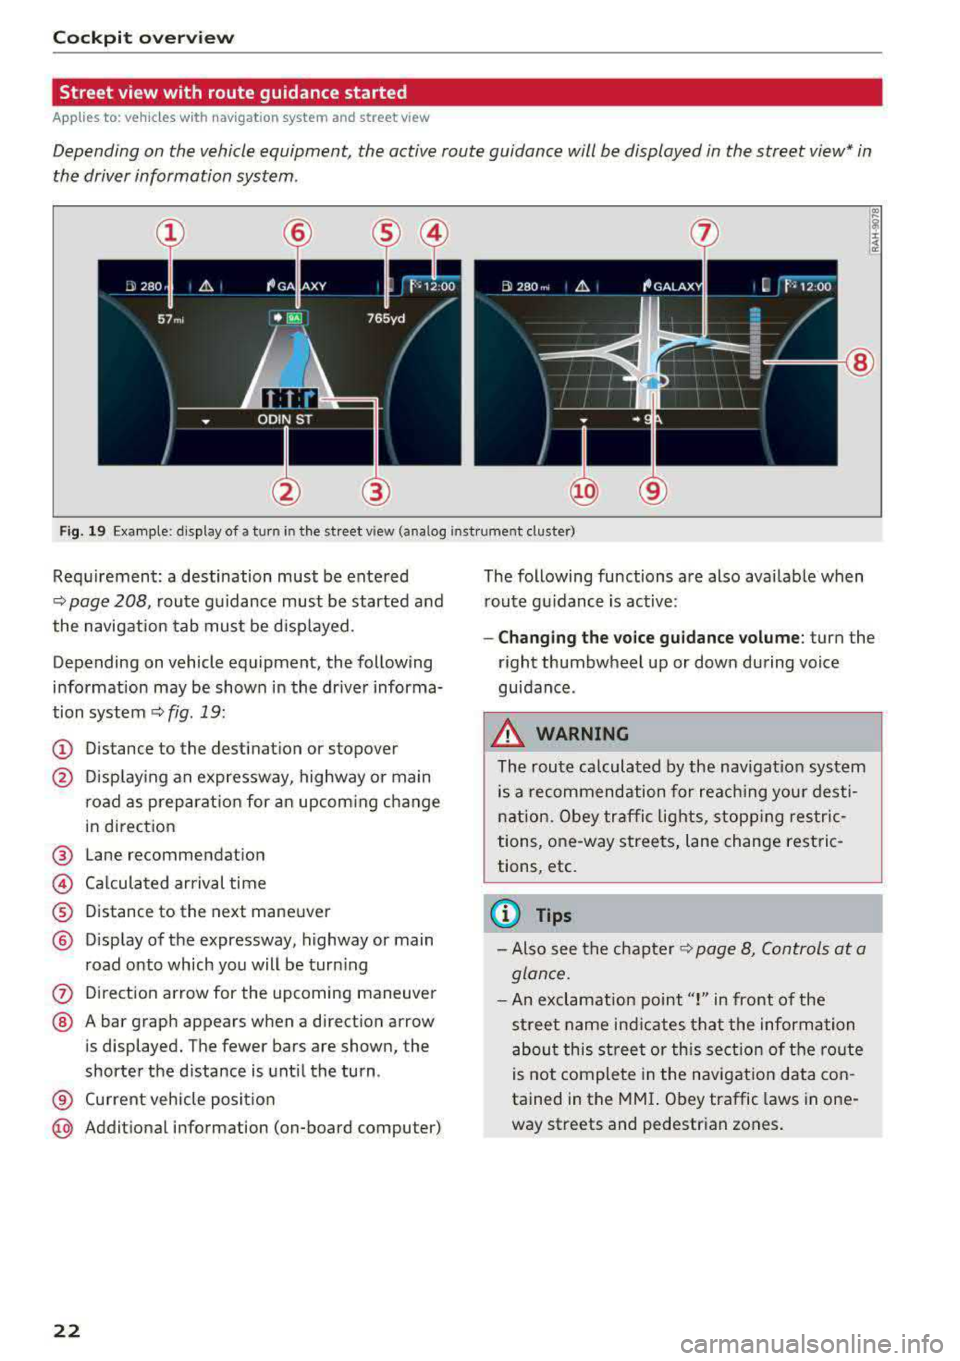
Depending on the vehicle equipment , the active route guidance will be displayed in the street view* in
the driver information system .
®
Fig. 19 Example: display of a turn in the str eet v iew (ana log inst ru ment cluster)
Req uirement: a destination must be entered
¢
page 208, route g uidance must be started and
the navigation tab mus t be disp layed.
Depending on vehicle equipment, the following
information may be shown in the dr iver informa
tion system ¢
fig. 19:
(D Distance to the destinat ion or stopover
@ Disp lay ing an expressway, highway or main
road as preparat ion for an upcom ing change
in direct ion
@ Lane recommendation
© Ca lcula ted ar rival time
® D istance to the next maneuver
@ Disp lay of the expressway, highway or main
road onto which you will be tur ning
(?) Di rect ion arrow for the upcoming maneuver
@ A bar graph appears when a direct ion arrow
is displayed. The fewer bars are shown, the
shorter the d istance is unt il the turn .
® Current veh icle pos ition
@ Addit ional information (on-board computer)
22
The following functions are also avai lab le when
r oute g uidanc e is active :
-Changing the vo ice g uidance volume : turn the
r ight thumbwheel up or dow n during voice
guidance .
_&. WARNING
The route ca lculated by the nav igat ion sy stem
is a recom mendation for reac hing your dest i
n ation. Obey tra ffic lights, stopp ing restric
tions, one-way stree ts, lane change restric
tions, etc.
(D Tips
- Also see the c hapter ¢ page 8, Controls at a
glan ce.
- An exclamation point" !" in front of the
st reet name ind icates t hat the information
abou t this st reet or this sect ion of the ro ute
is not complete in the navigat ion data co n
tained in the
M MI. Obey traffic laws in one
way streets and pedestr ian zones .
Page 86 of 409
Warm and cold
3fx Defr os ting
The windshield and s ide windows are defrosted
or cleared of condensation as quickly as possible.
The maximum amount of air flows mainly from
the vents below the windshield. Recirculation mode switches off. The temperature shou ld be
set at
+72°F (+22°() or higher. The temperature
is controlled automatically.
You can switch the defroster on or off using the
~button.You can switch the function off by
pressing a
knob @.
Applies to vehicles with windshield defogger: the
windshield defogger switches on automatically
when outside temperatures are low. If you would
like to switch the windshield defogger on man
ually, press
the~ button. The LED in the button
blinks.
QID REAR Rear windo w def ogg er
You can switch the rear window defogger on by
pressing
the ~ button . It on ly operates when the
engine is running. It switches off automatically
after 10 to 20 minutes, depending on the outside
temperature.
To prevent the rear w indow defogger from
sw itching off automatically, press and hold the
CliP REAR button for more than three seconds.
This is stored until the ignition is switched off .
SYNC Synchroni zat ion
Use the rocker switch ® to select the function.
When synchronization is switched on, the set
tings for the driver's side are appl ied to the front
passenger's side and the rear (except for seat
heating/vent ilation*). When the sett ings on the
front passenger's side or in the rear are changed,
the synchron izat io n is automatically sw itched off
and
3 -zone appears in the d isplay.
SET REAR function
Use the rocker switch ® to select the funct ion .
When the function is switched on, you can adjust
all settings for the rea r us ing the climate cont rol
sys tem cont rols in the cockpit. The rear climate
con trol system cont rols cannot be operated at
the same time . This function switches off auto-
84
matically after a certain period of time or after
l eaving the menu.
Vents
You can open o r close the center and rear vents in
the cockpit and the vents in the rear center con
so le using the ridged thumbwheels . The levers
adjust the direction o f the airflow from the vents.
The wide vent is opened and closed using the rocker switch ®·
Residual heat
You can act ivate the residual he at function when
the ignition is switched off by pressing the knob
(D . The residual heat from the coolant is used to
heat the vehicle interior . The residual heat func
tion switches off automat ica lly after about 15
minutes.
A WARNING
- You shou ld not use the recirculation mode
for an extended period of time, because no
fresh air is drawn in and the windows can
fog when cooling mode is switched off. This
increases the r is k of an accident.
- I ndividuals w ith reduced sensit iv ity to pa in
or temperature co uld develop bu rns when
using the sea t heating* or neck heat ing*
functions. To reduce the risk of injury, these ind ividuals must not use the seat or neck
heating *.
- If the ai r vents in the seats are covered by
clothing or similar objects when the neck heating * is switched on, the output from
the neck heat ing may become very hot tem
porarily. This can cause burns on unprotect
ed skin exposed direct ly to the vents.
(D Note
To avoid damaging the seat heating* ele
ments, do not knee l on the seats or place
heavy pressure on one area of the seat.
(D Tips
- When the powe r top* is closed, the neck
heating* switches automatically from set
t ing 3 to setting 2 after approx imately six
mi nutes.
Page 98 of 409
Driving
release automatically until the wheels build up
enough driving force .
Starting on hills with hill hold assist
Hill hold ass ist makes it eas ier to start on hills.
Requirement: the driver 's door must be closed
and the eng ine must be running .
.,. To activate hill hold assist, press and hold the
brake pedal for several seconds. The vehicle
must be in an uph ill direction of travel.
After releasing the brake pedal, the braking pow
er is maintained for a brief moment
c;, .&. to pre
vent the vehicle from rolling back when starting. During this time, you can eas ily begin to move
your veh icle .
.&_ WARNING
-If you do not begin driving immediately or
the engine stalls after releas ing the b rake
pedal, your vehicle may begin to roll back
ward. Press the brake pedal or set the park
ing brake immediate ly.
- The intelligent technology of hill hold assist
cannot overcome the limitations imposed by
natural physical laws. The increased comfort
offered by hill hold assist should not cause
you to take safety risks.
-Hill hold assist cannot hold the vehicle in
place on all h ills (for example, if the ground
is slippery or icy).
-To reduce the risk of an accident, always make sure the vehicle is situated safely
wh ile stat ionary.
Automatic transmission
Introduction
Applies to: vehicles with automatic transmissions
.
The aut omat ic transmission is controlled elec
tronica lly. The transmission shifts up or down au
tomatically depending on which drive prog ram is
selected.
When a
moderate driving style is used, the
transmission se lects the most economical driving
mode. The transmission upshifts at a lower RPM
96
and downshifts at a higher RPM to improve fue l
effic iency.
The transmission switches to a sporty mode after
a kick-down or when the driver uses a
sporty
driving style
characterized by quick accelerator
pedal movements, heavy acceleration, frequent
changes in speed and traveling at the maximum
speed .
If desired, the driver can also select the gears
manually (tiptronic mode) c:;, page 99.
S tronic transmission
The S tron ic is a dual-clutch transmission. Power
i s transferred using two clutches that work inde
pendently from one another. They replace the
torque converter used in conventional automatic
transmissions and allow the vehicle to accelerate
without a noticeable interruption in traction .
tiptronic transmission
In the tiptronic transmission, power is transfer
red by a torque converter.
Selecting a selector lever position
Applies to: vehicles with auto matic transmissions
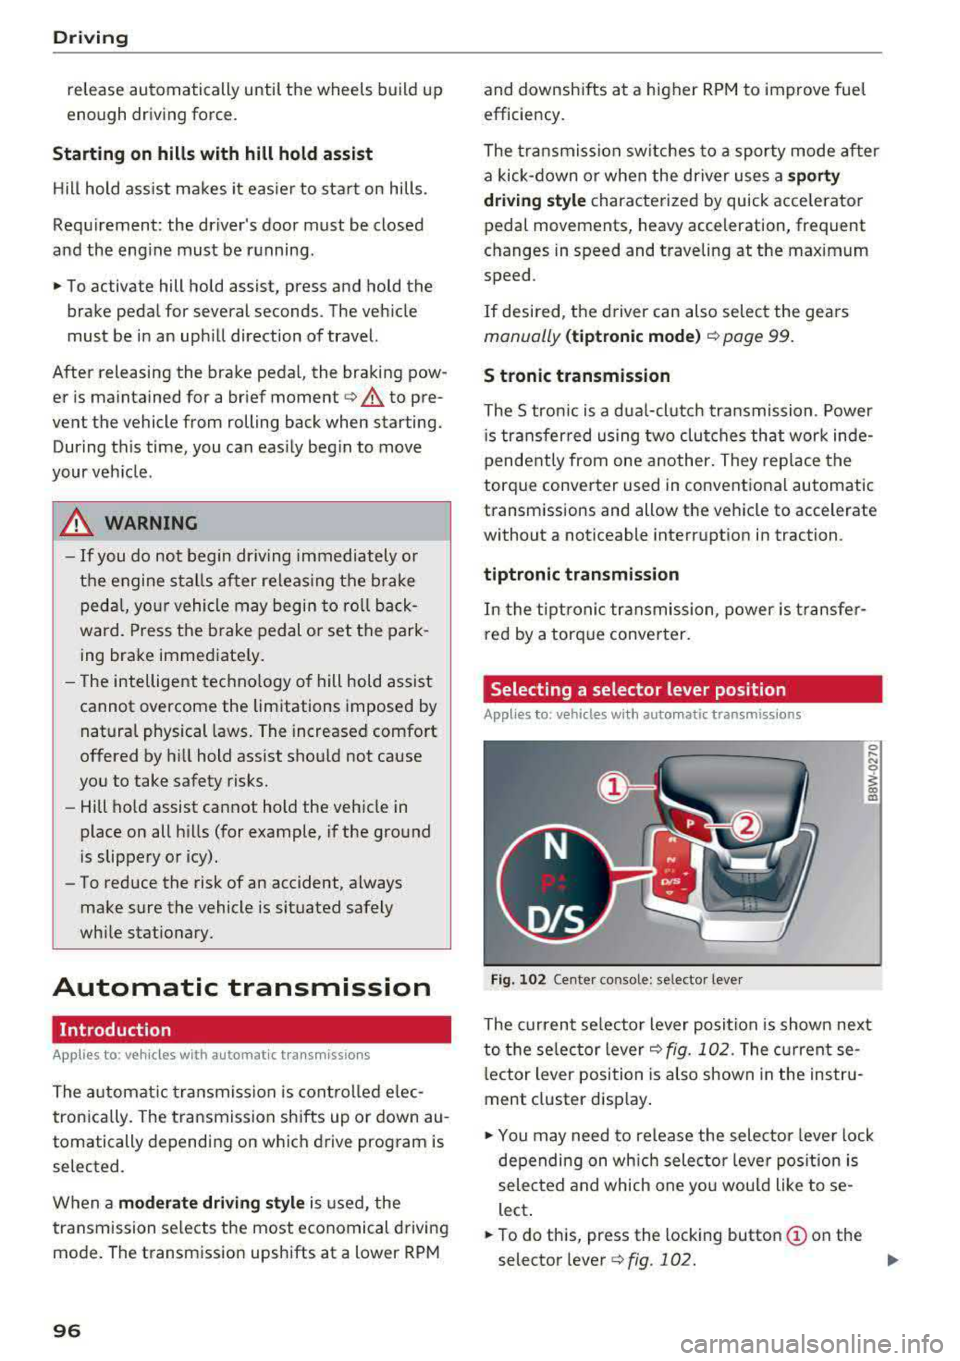
Fig. 102 Cente r console: se lector lever
The current se lecto r lever position is shown next
to the selector lever
c:;, fig. 102 . The current se
l ector lever position is also shown in the instru
ment cluster display .
.,. You may need to release the selector lever lock
depending on wh ich selector lever position is
selected and which one you would like to se
lect .
.,. To do this, press the locking button (!) on the
selector
l ever ¢fig .102. ..,_
Page 108 of 409
Trailer towing
Backing up is difficult and requires practice .
Backing up with a trailer generally requires steer
ing action oppos ite to that when backing up your
veh icle w ithout a trailer.
Maintain a greater distance between your vehicle
and the one in front of you. You w ill need more
room to stop. To compensate for the tra iler, you
will need a larger than normal turn ing radius.
When passing, remember that you cannot accel
erate as fast as you norma lly would because of
the added load. Make sure you have enough room
to pass. After passing, allow plenty of room for
your tra iler before chang ing lanes again.
Avoid jerky starts, sharp turns or rapid lane
changes .
@ Tips
- Do not tow a trailer during the break -in per i
od of your vehicle.
- If you tow a trailer, your Audi may require
more frequent maintenance d ue to the ex
tra load
~ page 389.
Parking on a slope
Do not pork on a slope with a trailer. If it cannot
be avoided, do so only
o~er doing the following:
When parking:
.,. Apply t he foo t brake .
.,. Have someone place chocks under both t he ve
hicle and the tra ile r whee ls .
.. With chocks in p lace, slowly release t he brakes
u ntil the whee l chocks absorb the load .
.. Turn the wheels towards the curb .
.. Apply the parking brake .
.. Move the selector lever to P (automat ic trans
mission) respectively select first gear (manual
transm iss ion).
When restarting after parking:
.. Apply the foot brake .
.. Start the engine .
.. Applies to: vehicles with automatic transmis
sion: Move the selector lever to D/S .
.,. Release the parking brake a nd slowly pull out
and away from the wheel chocks.
106
.. Stop and have someone retrieve the whee l
chocks.
Page 118 of 409
Assistance systems
Indicator lights and messages in the instrument
cluster display inform you about the current sit
uation and setting.
An add itiona l ind icator appears in the head-up
disp lay*.
Switching adaptive cruise control on
.,. Pull the lever toward you into position@
<::;,fig. 115.
Storing the speed and activating regulation
.,. To store the current speed, press the !SET ! but
ton
¢ fig . 115 . The stored speed is shown in the
speedometer in the LED line @and appears
briefly in the status
line @c:;, fig. 116 .
.,. Applies to: vehicles with automatic transmis
sion: To activate the control when stationary,
also press the brake pedal.
Switching adaptive cruise control off
.,. Push the lever away from you into position @
until it clicks into place. The message
ACC: off
appears.
@ Indicator lights
Ill-Adaptive cruise control is switched on . No
veh icles are detected ahead . The stored speed is
maintained.
• -A vehicle driving ahead was detected. The
adapt ive cruise control system regulates the
speed and distance to the vehicle dr iv ing ahead
and accelerates/brakes automatically.
• -Automatic transmission : adaptive cruise
control must be switched on . A vehicle was de
tected ahead . Your vehicle is stat ionary and will
not start driving automatically .
fai-Automatic transmission : adaptive cruise
control must be switched on . No vehicles were
detected ahead. Your vehicle is stationary and
will not start dr iving automatically .
•-The automatic braking is not enough to
maintain a sufficient distance to a vehicle driving
ahead . You must intervene
c:;, page 119, Driver
intervention request.
116
© Instrument cluster display
If the Driver assistance display is not shown in
the instrument cluster display, you can open it
using the multif unction steering wheel buttons
c:;, page 13.
Based on the graphic display, you can determine
if the system is maintaining a distance to the ve
hicle driving ahead and what that distance is .
No vehicle -no veh icle was detected driv ing
ahead .
Silver vehicle -a vehicle was detected driving
ahead.
Red vehicle -request for driver intervention
¢ page 119 .
The five distance bars on the gauge© represent
the set distance (refer to
c:;, page 118 for infor
mation on how to change the distance). If you
fall below the selected d istance, the distance
bars become red from the bottom upwa rd .
A WARNING
Applies to: vehicles with automatic transmis
sion: If you press the
ISET ! button when driv
ing at speeds below 20 mph (30 km/h), the
vehicle accelerates automatically up to 20
mph (30 km/h), which is the minimum speed
that can be set.
(D Tips
- If you switch the ignitio n or the adaptive
cruise control system off, the set speed is
erased for safety reasons .
- T he electronic stabilization control (ESC)
and the anti-slip-regulation (ASR) are auto
matically switched on when the adaptive
cruise control is switched on.
Page 132 of 409
Ass is tan ce sys tems
Ill Audi pre sen se : cu rrent ly rest ricted . See
owner 's manu al
This message appea rs when there is a tempora ry
fa ilure in a subsystem, such as the ESC. If this
message appears repeated ly, drive to an author
ized Audi dealer or authorized Audi Service Facili
ty to have the malfunction corrected.
(II Aud i pre sen se: emergency br aking sy ste m
off
This message appea rs if the pre sense functions
are switched off thro ugh the Info tainmen t sys
tem or if the system is not ready .
Audi active Lane assist
Description
Applies to : vehicles wi th A udi act ive la n e ass ist
Active lane ass ist (lane departure warning) de
tects lane marker lines within the l imits of the
system using a camera in the windshield . If you
are approach ing a detected lane marker l ine and
it appears likely that you will leave the lane, the
system w ill warn you with corrective steering.
You can override this steering at any time. If you pass over a line, the steering whee l will vibrate
lightly . In order for this warn ing v ibration to oc
cur, it must first be sw itched on in the Infotain
ment system. Act ive lane assis t is ready for oper
ation when the lane marker line is detected on at
least one side of the veh icle .
The system is designed for driving on express ways and h ighways and therefore only activates
at speeds above approx imately 40 mph (65 km/
h).
Applies to: vehicles with side assist: if you acti
vate a turn s ignal when active lane assist is ready
and it classifies a lane change as critical because
of vehicles traveling alongside you or approach i n g you, the re w ill be noticeable corrective steer
i n g shortly before you leave the lane. This will at
tempt to keep your veh icle in the lane.
Applies to: vehicles without side assist: the ready
system does not wa rn you if you activate a turn
signal befo re cross ing the lane marker line. In
130
this case, it assumes that you are chang ing lanes
intentionally .
Applies to: vehicles with adaptive cruise control:
there is no corrective steer ing or warnings if the
system recognizes a dist inct passing maneuver .
If the conditions are met, traffic jam assist
switches on at speeds under approximately
40 mph (65
km/h) ¢ page 121.
A WARNING
,-
- The system warns the driver that the vehicle
is leaving the lane using correct ive steering .
The driver is always responsible for keeping
the vehicle within the lane.
- The system can help you keep the vehicle in the lane, but it does not drive by itse lf . Al
ways keep your hands on the steering
wheel.
- Cor rective steering may not occur in certain
situations, such as du ring heavy braking.
- There may be cases where the camera does
not recognize all lane marker lines. Correc
tive stee ring can only take place on the s ide
of the vehicle where lane marker lines are
detected.
- Othe r road structures or objects could poss i
bly be identified un intent ionally as lane
marker lines . As a result, corrective steering
may be unexpected or may not occur.
- The camera view can be restricted, for ex
ample by vehicles driving ahead or by rain,
snow, heavy spray or light shining into the
camera. This can result in active lane ass ist
not detecting the lane marker lines or de
tect ing them incorrectly .
- In certain s ituations where visibility is low,
the vehicle may switch from an "early" to
"late" steering correction .
- Under certain cond it ions such as ruts in the
road, an inclined roadway or crosswinds, the
corrective steer ing alone may not be enough
to keep the vehicle in the m iddle of the lane .
- For safety reasons, act ive la ne assist must
not be used when there are poor road and/
or weather conditions such as slippery roads, fog, gravel, heavy rain, snow and the
Page 135 of 409
There is a temporary malfunction that may pre
vent the active lane assist from switching on. Try
switch ing the active lane assist on again later.
111 Audi active lane assist: Please take over
steering!
This message appears if you are not steering by
yourself. Ac tive lane assist is activated, but is not
ready to give warning
A WARNING
Note that messages may be delayed or not
displayed on vehicles with accessor ies mount
ed on the steering whee l, such as a steering
wheel spinner knob. Always keep your hands
on the steer ing whee l.
Adjusting the steering time and vibration
warning
A pplies to: ve hicles with Audi active lane assist
You can adjust individual active lane assist set
tings in the Infotainment system .
-
.. Select in the Infotainment system: IMENUI but
ton
> Vehicle > left contro l button > Driver as
sistance
> Audi active lane assist.
Steering time
Early :
in this setting, the corrective steering hap
pens continuously to help keep the vehicle in the
center of the lane.
Late: in this setting, the system provides correc
tive steering just before a wheel goes over a de
tected lane marker line.
Vibration warning
You can switch the additional vibration warning
in the steering wheel on or off.
WARNING
With the vibration warning switched off,
there will also be no visual warning in the in
strument clus .ter display when crossing a lane
marker line.
Assistance systems
(D Tips
In certain markets : your sett ings are stored
automat ically and assigned to the remote
control key in use.
Audi side assist
Description
Applies to: vehicles wi th Aud i s ide ass ist
Fig . 131 Sensor detection range
Fig. 132 D isp lay on the exterio r m irror
S ide assist (lane change ass ist) helps you mon itor
your blind spot and traffic behind your vehicle .
Within the limi ts of the system, it warns you
about veh icles that are coming closer or that are
traveling with you wi thin sensor
range ©
¢ fig. 131. If a lane change is classified as criti
cal, the display @in the exterior mirror turns on
¢fig . 132.
The display in the left exterior mirror p rovides as
sistance when making a lane change to the left,
whi le the display in the right exterior mirror pro
vides assistance when making a lane change to
the right.
Information stage
As long as you do not activate the turn signal,
side assist
informs you about vehicles that are
133