homelink AUDI A5 COUPE 2018 Owners Manual
[x] Cancel search | Manufacturer: AUDI, Model Year: 2018, Model line: A5 COUPE, Model: AUDI A5 COUPE 2018Pages: 409, PDF Size: 67.63 MB
Page 53 of 409
Valet parking function
Applies to: vehicles wit h valet parking funct ion
The valet parking function protects the luggage
comportment from unauthorized access.
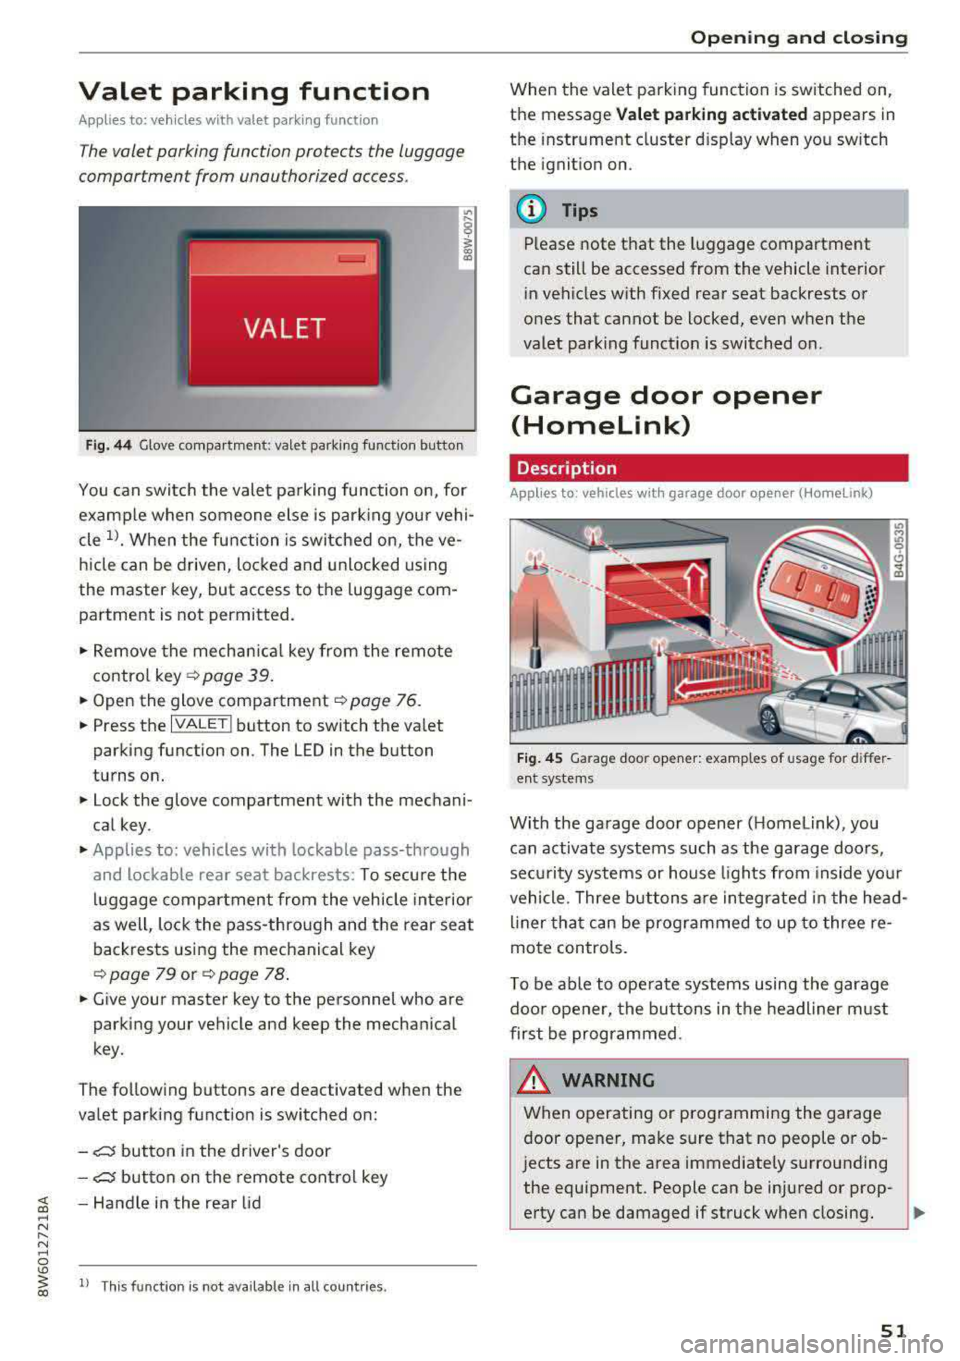
Fig. 44 Glove compartment: valet parking function butto n
You can switch the valet parking function on, for
example when someone else is parking your vehi
cle
l)_ When the function is switched on, the ve
hicle can be driven, locked and unlocked using
the master key, but access to the luggage com
partment is not permitted .
.,. Remove the mechan ical key from the remote
contro l
key~ page 39 .
.,. Open the glove compartment ~ page 76 .
.,. Press the IVALET I button to switch the valet
parking function on . The LED in the button
turns on.
.,. Lock the glove compartment with the mechani
cal key .
.,. Applies to: vehicles with lockable pass-through
and lockable rear seat backrests: To secure the
luggage compartment from the vehicle interior
as well, lock the pass-through and the rear seat
backrests using the mechanical key
~ page 79 or ~ page 78 .
.,. Give your master key to the personnel who are
parking your vehicle and keep the mechanical
key.
The following buttons are deactivated when the
va let parking function is switched on:
-,c:;5 button in the driver's door
-,c:;5 button on the remote control key
~ -Handle in the rear lid ..... N
" N ..... 0
'° ~ ll Th is function is not available in all countr ies . co
Open ing and closing
When the valet parking function is switched on,
the message
Valet parking activated appears in
the instrument cluster disp lay when you sw itch
the ignition on.
@ Tips
Please note that the luggage compartment
can still be accessed from the vehicle interior
in vehicles with fixed rear seat backrests or
ones that cannot be locked, even when the
valet park ing funct ion is switched on.
Garage door opener
(Homelink)
Description
Applies to: vehicles with garage door opener (Home Link)
Fig. 45 Garage door opener: examples of usage for differ
ent system s
With the garage door opener ( Homelink), you
can activate systems such as the garage doors,
sec urity systems or house lights from inside your
vehicle. Three buttons are integrated in the head
liner that can be programmed to up to three re
mote controls.
T o be able to operate systems using the garage
door opener, the buttons in the headliner must
first be programmed .
_& WARNING ~
When operating or programming the garage
door opener, make sure that no people or ob
jects are in the area immediately s urrounding
the equipment. People can be injured or prop-
erty can be damaged if struck when closing.
Ill>
51
Page 54 of 409
Opening and clo sin g
@ Tips
- For security reasons, we recommend that
you clear the programmed buttons before selling the vehicle.
- For additional information about HomeLin k,
vis it www.homelink.com.
- Fo r an explanation on conformity with the
FCC regulations in the United States and the
Industry Canada regu lations, see
¢ page 392.
Operation
Appl ies to: ve hicles w ith ga ra g e doo r opener (Homeli nk)
Requirements: the button in the headliner must
be programmed
c::> page 52 and the vehicle
must be within range of the sys tem, such as the
garage door.
• Press the button to open the garage door . The
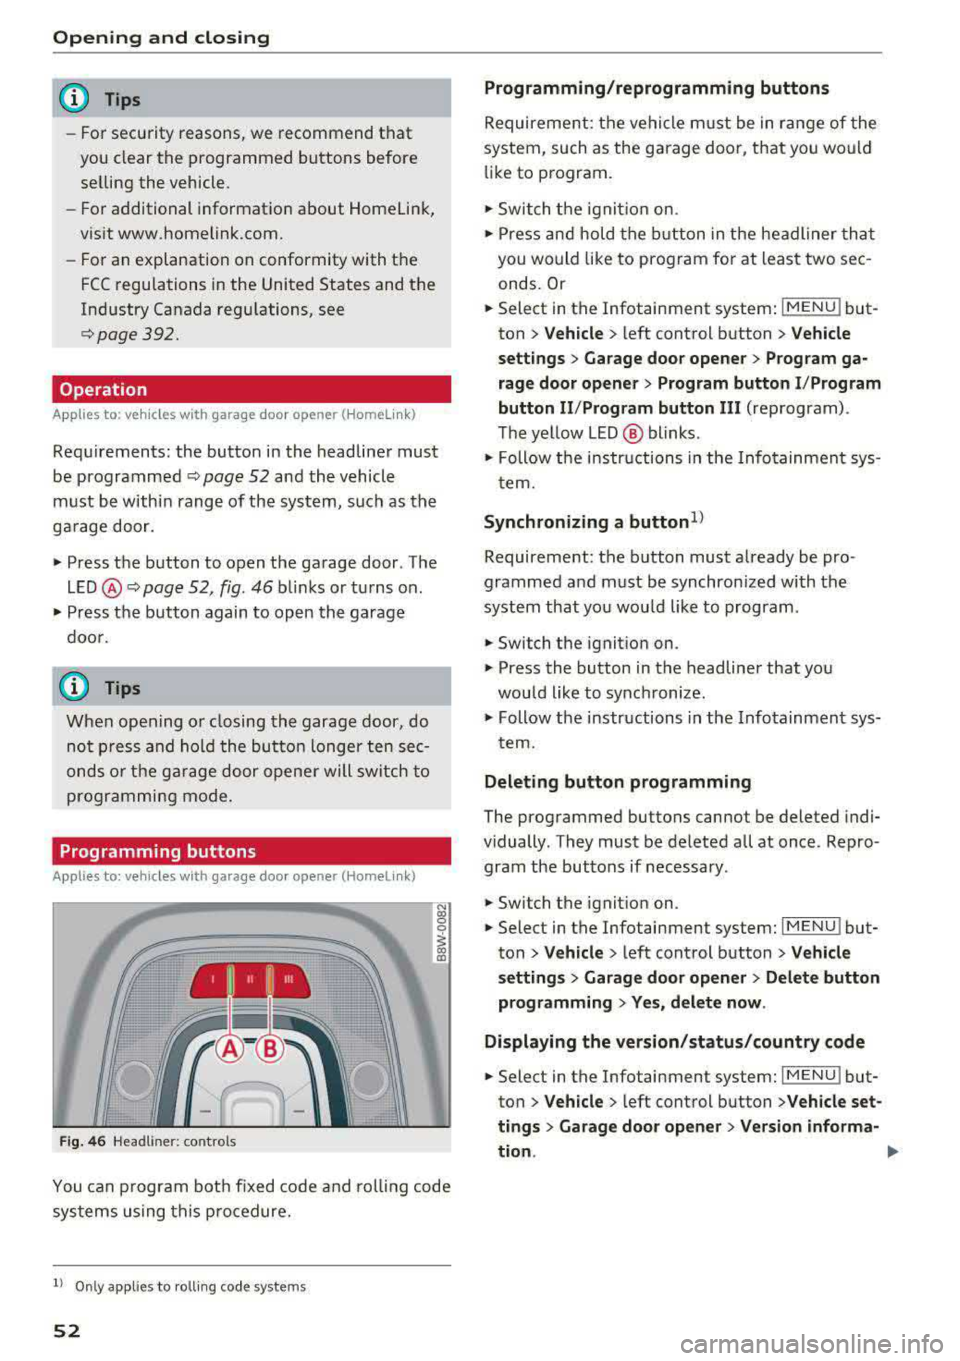
L E D @ c::> page 52, fig . 46 bli nks or turns on .
• Press the button again to open the garage
doo r.
@ Tips
When open ing o r closing the garage door, do
not p ress and hold the butto n longer ten sec
onds o r the ga rage door opene r will sw itch to
programmi ng mode.
Programming button s
App lies to: ve hicles w ith gara g e doo r opener (Homeli nk)
1 1 11~111
Fig . 4 6 Headliner: controls
N
"' 0
0
~ a,
You can p rogram bot h fixed code and roll ing code
sys tems using this procedure.
l) Only appl ie s to ro lli ng code system s
52
Programming /reprogramm ing buttons
Requireme nt: the vehicle m ust be in range of the
system, such as the garage door, that you would
li ke to program.
• Switch t he ignit io n on.
• Press and hold the b utton in the headliner that
you would like to program for at least two sec
onds. Or
• Select in the Infotainment system : IMENUj but
ton
> V ehicle > left control button > Vehicle
s e tting s> Garage door opener > Prog ram ga
rage door opener
> Prog ram bu tton I /P rogram
button II /Prog ram button
II I (reprogram) .
The ye llow LED @ blinks .
• Follow the in structions in the Info tainment sys-
tem.
Synchronizing a button1 )
Requireme nt: the button must already be pro·
grammed and must be synchronized with the
system that you wou ld like to program .
• Switch the ignition on .
• Press the button in the headliner that you
would like to synchronize.
• Follow the instructions in the Infotainment sys·
t ern.
Deleting button programming
The programmed buttons cannot be deleted indi·
vidually . They must be deleted all at once. Repro·
gram the buttons if necessary .
• Switch the ignit ion on.
• Select in the Infotainment system: IMENU j but·
ton
> Ve hicle > left control button > Vehicle
s etting s
> Garage door opener > Del ete button
programming
> Y es, del ete now .
Displa ying the version /status /country code
• Select in the Infotainment system: IMENUj but
ton
>V ehicle > left control button >V ehicle set·
ting s
> Garag e door opener > Version informa-
tion .
.,..
Page 379 of 409
Fuses a nd bul bs
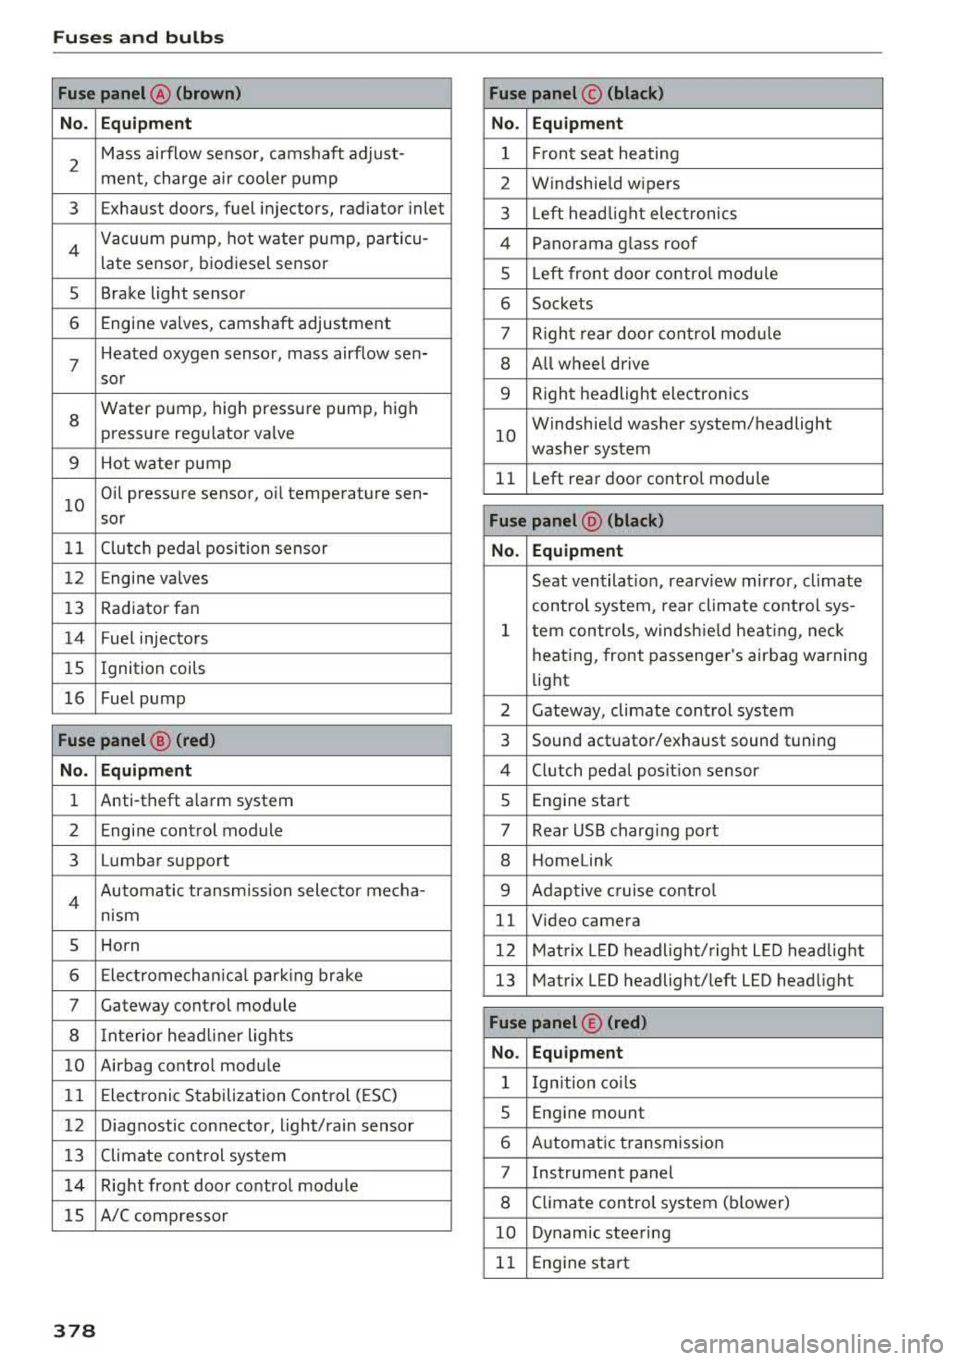
Fuse panel @ (brown) Fuse panel© (blac k)
No. Equip ment No. Equipm ent
2
Mass airflow sensor, camshaft adjust-
ment, charge air cooler pump 1 F ront seat heating
2 Windshield wipers
3 Exhaust doors, fuel injectors, radiator inlet 3 Left head light electronics
4 Vacuum pump , hot water pump, particu-
late sensor, biodiesel sensor 4 Panorama glass roof
s Left front door contro l module
5 Brake light sensor 6 Sockets
6 Engine valves, camshaft adjustment 7 Right rear door control mod ule
7
Heated oxygen sensor, mass airflow sen-8 All wheel drive
sor
8
Water pump, high pressure pump, high
pressure regulator valve
9 Hot water pump
9 Right headlight electronics
10
Windshield washer system/headlight
washer system
11 L eft rear door control module
10
Oil pressure sensor, oil temperature sen-
sor
Fu se panel @ (blac k)
11 Clutch pedal position sensor No. Equipmen t
12 Engine valves
Seat ventilation, rearv iew mirror, climate
13 Rad iator fan control system, rear climate control sys-
14 Fuel injectors
15 Ignition
coils
16 Fuel pump
1 tern controls , windsh ie ld heat ing , neck
heating, front passenger 's airbag warning
light
2 Gateway, climate control system
Fuse panel@ (red ) 3 Sound actuator/exhaust sound tuning
No. Equ ip me nt 4 Clutch pedal posit ion sensor
1 Anti-theft alarm system 5 Engine start
2 Engine control module 7 Rear USB charg ing port
3 Lumbar support 8 Homelink
4 Automatic transmission selector mecha-
nism 9 Adaptive cruise contro l
11 Video camera
5 Horn 12 Matrix LED headlight/right L ED headlight
6 Electromechan ica l park ing brake 13 Matrix LED headlight/left LED headlight
7 Gateway control module
8 Interior headl iner lights
10 Airbag control module
11 Electronic Stabilization Control (ESC)
Fuse panel © (red )
N o. Equ ipmen t
1 Ign ition co ils
12 Diagnostic connector, light/rain sensor
13 Climate control system
14 Right front door control module
lS A/C compressor
5 Engine mount
6 Automatic transmission
7 Instrument panel
8 Climate control system (blower)
10 Dynamic steering
11 Engine start
378
Page 381 of 409
Fuses a nd bul bs
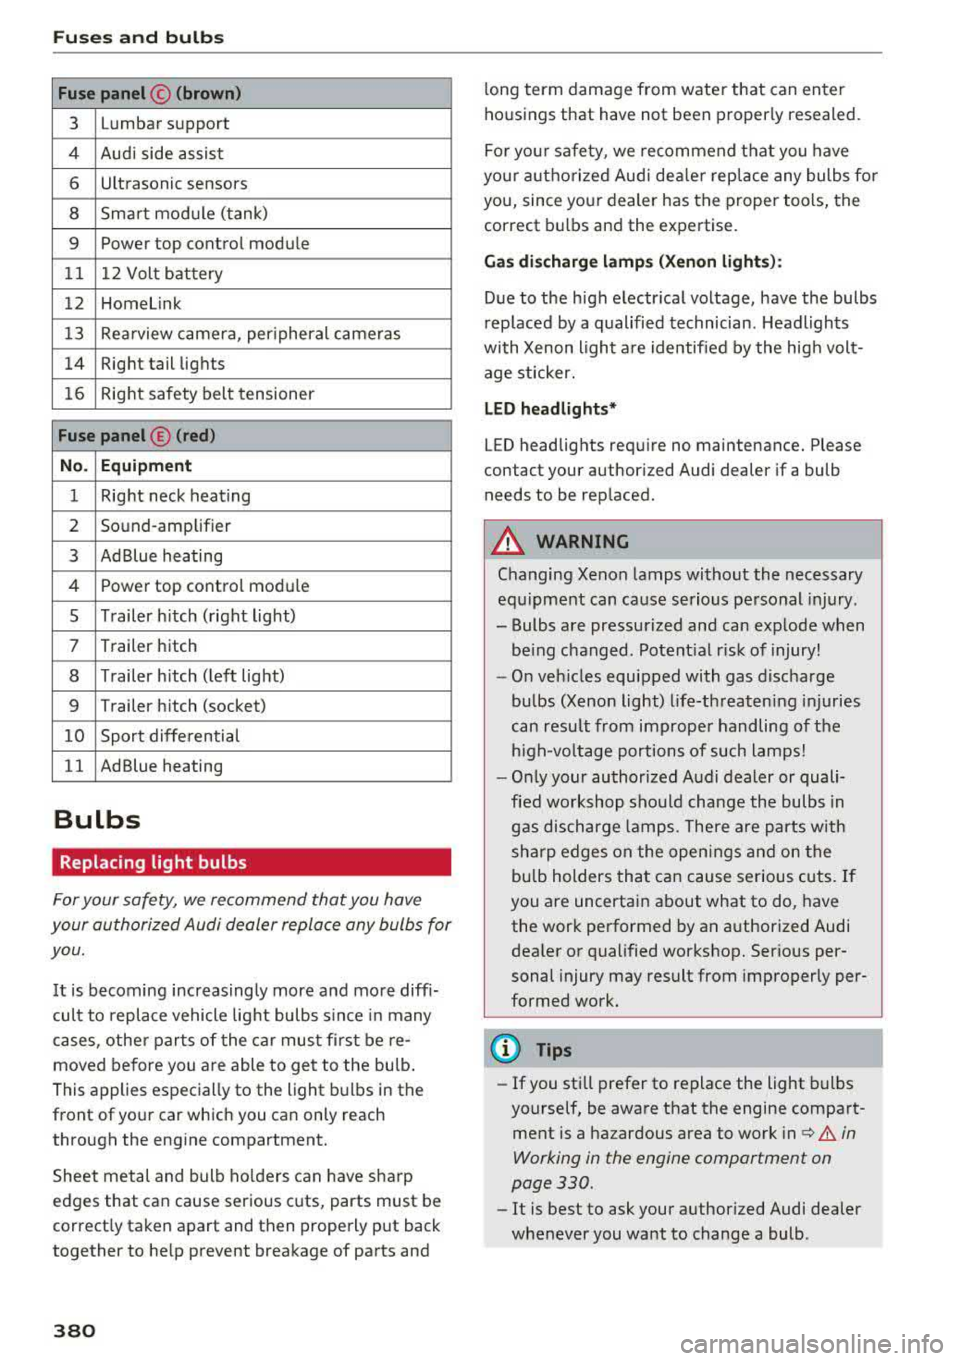
Fuse panel © (brown)
3 Lumbar support
4 Audi side assist 6 Ultrasonic sensors
8 Smart module (tank)
9 Power top control modu
le
11 12 Volt battery
12 Homelink
13 Rea rview camera, per ipheral cameras
14 Right tail lights
16 Right safety belt tensioner
Fu se panel © (red )
N o. Equipm ent
1 Right neck heating
2 Sound-amplifier
3 AdBlue heating
4 Power top control modu
le
5 Trailer h itch (right light)
7 Trailer hitch
8 Trailer h itch (left light)
9 Trailer hitch (socket)
10 Sport differential
11 AdBlue heating
Bulbs
Replacing light bulbs
For your safety, we recommend that you have
your authorized Audi dealer replace any bulbs for
you.
It is becoming increasing ly more and more diff i
cult to replace vehicle light bulbs s ince in many
cases, othe r parts of the car must fi rst be re
moved before you are able to get to the bu lb .
This applies especially to the light bulbs in the
front of your car which you can only reach
through the engine compartment.
Sheet metal and bulb ho lders can have sharp
edges that can cause serious cuts, parts must be
correct ly taken apart and then properly put back
together to he lp prevent breakage of parts and
380
long term damage from water that can enter
housings that have not been properly resealed.
Fo r you r safety, we recommend that you have
you r autho rized Audi dea ler replace any bulbs for
you, since your dealer has the proper tools, the
correct bu lbs and the expertise.
Ga s di sc harg e la mp s (Xe non ligh ts):
Due to the h igh electr ical voltage, have the bulbs
rep laced by a qualified technician . Headlights
with Xenon light a re identified by the high volt
age sticker.
L ED headlight s*
LED headlights require no maintenance. Please
contact your authorized Audi dealer if a bulb
needs to be replaced.
A WARNING
Changing Xenon lamps without the necessary
equipment can cause serious personal injury.
-Bulbs are pressurized and can explode when
be ing changed. Potent ial r isk of injury!
- On veh icles equipped with gas discharge
bulbs (Xenon light) life-threatening injuries
can result from improper handling of the
high-vo ltage portions of such lamps!
-Only your authorized Audi dealer or quali
fied workshop shou ld change the bulbs in
gas discharge lamps . There are parts with
sharp edges on the openings and on the bulb holders that can cause serious cuts. If
you are uncerta in about what to do, have
the work performed by an authorized Audi
dea ler or qualified workshop. Serious per
sonal injury may result from improperly per
formed work.
(D Tips
-If you still prefer to replace the light bulbs
yourself, be aware that the engine compart
ment is a hazardous area to work
i n c:> & in
Working in the engine compartment on
page 330 .
-It is best to ask your authorized Audi dealer
whenever you want to change a bulb .
Page 393 of 409
Consumer Info rmation
Technical Modifications
Our guidelines must be complied with when tech
nical modifications are made .
Always consult an authorized Audi dealer before
starting work on any modificat ions.
This will he lp ensure that vehicle function, per
formance and safety are not impaired
9 & .
Attempting to work on electronic components
and the software used with them can cause mal
functions. Because of the way electronic compo nents are interconnected with each other, such
malfunctions can also have an adverse affect on
other systems that are not directly involved. This
means that you risk both a substantial reduction
in the operational safety of your veh icle and an
i n creased wea r of ve hicle parts
9 ,&. .
Author ized Audi dealers w ill perform this work in
a profess ional and competent manner or, in spe
cial cases, refer you to a professional company
that spec ial izes in such modifications.
_& WARNING
Improper repairs and modifications can
change the way veh icle systems work and
cause damage to the veh icle and ser ious per
sonal injury.
([) Note
I f emergency repa irs mus t be pe rformed else
where, have the vehicle examined by an a u
t horized Audi dealer as soon as possib le .
Declaration of
Compliance, Telecom munications and
Electronic Systems
Radio Frequency Devices and Radiocommunica
tion Equipment User Manual Notice .
The manufacturer is not responsible for any radio
or TV interference caused by unauthorized modi
fications to this equipment .
392
Devices
The following devices each comply wi th FCC Part
15.19, FCC Part 15.21 and RSS-Gen Issue 1:
- Audi adapt ive cru ise cont rol*
- Audi side assist*
- Cell phone package*
- Conven ience key*
- Electronic immobilize r
- Garage door opener (Homelink)*
- Remote cont rol key
FCC Part 15.19
This device complies with part 15 of the FCC
R ules . Ope ration is subject to the follow ing two
cond it ions:
(1) T his dev ice may not cause harmful interfer
ence, and
(2) this device must accept any interference re
ce ived, includ ing interference that may cause un
desired operation.
FCC Part 15.21
CAUTION:
Changes or modificat io ns not express ly approved
by the pa rty responsible fo r compliance cou ld
vo id the user's a uthority to operate the equ ip
ment.
RSS-G en Issue 1
Operat ion is s ubject to the following two cond i
tions:
(1) this device may not cause interference, and
(2) this device must accept any interference, in
clud ing interference that may cause undesired
operation of the device.
Page 399 of 409
Index
Octane rating . . . . . . . . . . . . . . . . . . . . . . . 322
Recommendation.................... 322
Saving fue l . . . . . . . . . . . . . . . . . . . . . . 86, 139
Fueling Fuel gauge . . . . . . . . . . . . . . . . . . . . . . . . . . 12
F uel tank capacity . . . . . . . . . . . . . . . . . . . 388
Opening the fuel filler door . . . . . . . . . . . . 324
Fuses Assignment . . . . . . . . . . . . . . . . . . . . . . . . 377
Replac ing . . . . . . . . . . . . . . . . . . . . . . . . . . 376
G
Garage door opener
refer to Homel ink . . . . . . . . . . . . . . . . . . . . 51
Garment hooks . . . . . . . . . . . . . . . . . . . . . . . . 76
Gas discharge lamps . . . . . . . . . . . . . . . . . . . 380
Glossary of tire and loading terminology . . 343
Glove compartment . . . . . . . . . . . . . . . . . . . . 76
Valet parking function . . . . . . . . . . . . . . . . . 51
Gross Vehicle Weight Rating (GVWR) . . . . . 387
H
Handsfree . . . . . . . . . . . . . . . . . . . . . . . . . . . 178
Head-up display . . . . . . . . . . . . . . . . . . . . . . . 24
Headlight range control system . . . . . . . . . . 61
Headlights . . . . . . . . . . . . . . . . . . . . . . . . . . . 61
Clean ing . . . . . . . . . . . . . . . . . . . . . . . . . . . 363
Headlight range control system . . . . . . . . . 61
Washer system . . . . . . . . . . . . . . . . . . . . . . 67
Head restraints . . . . . . . . . . . . . . . . . . . . 73, 261
Adjusting . . . . . . . . . . . . . . . . . . . . . . . . . . 261
Heating . . . . . . . . . . . . . . . . . . . . . . . . . . . . . . 81
Heavy clothing and safety belts . . . . . . . . . . 271
High beams . . . . . . . . . . . . . . . . . . . . . . . . . . . 62
Assistant . . . . . . . . . . . . . . . . . . . . . . . . . . . . 62
Hill descent control . . . . . . . . . . . . . . . . . . . . 99
Hill hold ass ist . . . . . . . . . . . . . . . . . . . . . . . . 96
also refer to Hill hold assist . . . . . . . . . . . . 95
Home address .... .. ........ ...... 209, 215
Homelink . . . . . . . . . . . . . . . . . . . . . . . . . . . . 51
Horn . . . . . . . . . . . . . . . . . . . . . . . . . . . . . . . . . 8
How are child restraint system anchors relat-
ed to child safety . . . . . . . . . . . . . . . . . . . . . 316
How many airbags does my vehicle have? . . 284
How safety belt pretens ioners work . . . . . . 275
398
I
Imbalance (wheels) . . . . . . . . . . . . . . . . . . . 349
Immobilizer . . . . . . . . . . . . . . . . . . . . . . . . . . 38
Important things to do before driving . . . . 258
Importing and exporting (contacts) . . . . . . 188
Improperly worn safety belts . . . . . . . . . . . 275
Indicator lights . . . . . . . . . . . . . . . . . . . . . . . . 25
Airbag system . . . . . . . . . . . . . . . . . . . . . . 289
PASSENGER AIR BAG . . . . . . . . . . . . . . . . . 289
Infant seats . . . . . . . . . . . . . . . . . . . . . . . . . 308
Input Using the MMI touch . . . . . . . . . . . . . . . . . 161
Using the speller . . . . . . . . . . . . . . . . . . . . 165
Input level (media) . . . . . . . . . . . . . . . . . . . . 242
Inspection interval . . . . . . . . . . . . . . . . . . . . 340
Installing the upper tether strap on the an -
chorage . . . . . . . . . . . . . . . . . . . . . . . . . . . . . 320
Instrument cluster . . . . . . . . . . . . . . . . . . . . . 10
Cleaning . . . . . . . . . . . . . . . . . . . . . . . . . . . 365
Messages . . . . . . . . . . . . . . . . . . . . . . . . . . . 25
Instrument illumination . . . . . . . . . . . . . . . . 65
Interior lighting . . . . . . . . . . . . . . . . . . . . . . . 64
Internet
refer to Audi connect (Infotainment) . . . . 191
Internet radio . . . . . . . . . . . . . . . . . . . . . . . . 235
Interval mode (wipers) . . . . . . . . . . . . . . . . . . 67
iPhone
refer to Audi music interface ....... 236, 237
J
Jukebox 232
Jump-start ing . . . . . . . . . . . . . . . . . . . . . . . . 381
Jump start cable . . . . . . . . . . . . . . . . . . . . . . 382
K
Key.......... .. .. .. .. .. ........... ... 38
Key not recogni zed . . . . . . . . . . . . . . . . . . . 91
Key replacement . . . . . . . . . . . . . . . . . . . . . 38
Mechanical key . . . . . . . . . . . . . . . . . . . . 38, 39
Replacing the battery . . . . . . . . . . . . . . . . . 39
Unlocking/locking . . . . . . . . . . . . . . . . . 40 , 42
Vehicle code . . . . . . . . . . . . . . . . . . . . . . . . . 38
Kick-down (automatic transmission) . . . . . . 100
Page 403 of 409
Index
Refueling . . . . . . . . . . . . . . . . . . . . . . . . . . . . 324
Fuel filler door emergency release . . . . . . 326
Remote control
refer to Remote control key . . . . . . . . . . . . 38
Remote control key . . . . . . . . . . . . . . . . . . . . 38
Remote control operation
Garage door opener (Homelink) . . . . . . . . . 51
Remote lock ing and unlocking
Aud i connect vehicle control . . . . . . . . . . . 202
Removing the caps (wheel bolts) ........ . 371
Repair manuals . . . . . . . . . . . . . . . . . . . . . . . 389
Repairs
A ' b tr ag system . . . . . . . . . . . . . . . . . . . . . . 292
Replacement key . . . . . . . . . . . . . . . . . . . . . . 38
Replacing Light bulbs
380
Replacing wiper blades . . . . . . . . . . . . . . . . . 68
Reporting Safety Defects . . . . . . . . . . . 266, 267
Reset
refer to Restart (MMI) . . . . . . . . . . . . . . . . 256
Reset button (trip odometer) . . . . . . . . . . . . 12
Resetting the trip odometer . . . . . . . . . . . . . 12
Residual heat (automatic climate control) . . 84
Restart (MMI) . . . . . . . . . . . . . . . . . . . . . . . . 256
Retractor . . . . . . . . . . . . . . . . . . . . . . . . . . . . 272
Reverse gear . . . . . . . . . . . . . . . . . . . . . . . . . . 96
Rewinding (audio/video file) . . . . . . . . . . . . 239
Right control button . . . . . . . . . . . . . . . . . . . . 14
Rims ...... ... .. ................ ... . 357
Clean ing . . . . . . . . . . . . . . . . . . . . . . . . . . . 364
Ringtone settings . . . . . . . . . . . . . . . . . . . . . 188
Roaming
refer to Data connection . . . . . . . . . . . . . . 198
Rollbar
refer to Active rollover protection system 265
Roof rack . . . . . . . . . . . . . . . . . . . . . . . . . . . . . 80
Roof load . . . . . . . . . . . . . . . . . . . . . . . . . . . 80
also refer to Roof rack . . . . . . . . . . . . . . . . . 80
Route criteria . . . . . . . . . . . . . . . . . . . . . . . . 216
Route guidance
refer to Navigation . . . . . . . . . . . . . . . . . . . 207
Running direction (tires) . . . . . . . . . . . . . . . 374
s
Safe driving habits . . . . . . . . . . . . . . . . . . . . 258
402
Safety
Airbag system ... .. .. .............. .
Be lts
........ ... .. .. ...............
Cargo
Correct seating position ............ . .
Pedal area ........ ... .............. .
Telephone .... ... .. .. ........ ..... . .
Safety belt h eight adjustment .......... .
Safety belt microphone . .. ........... . .
Safety belt position .. .. ............. . .
Safety belt height adjustment ........ .
Safety belts worn by pregnant women . . .
Safety be lt pretensioner 277
268
263
259
263
178
274
189
273
274
274
Service and disposal. . . . . . . . . . . . . . . . . . 276
Safety be lts . . . . . . . . . . . . . . . . . . . . . . 268, 272
Belt positioners . . . . . . . . . . . . . . . . . . . . . 272
Cleaning . . . . . . . . . . . . . . . . . . . . . . . . . . . 365
Danger to passengers who do not wear a
safety belt . . . . . . . . . . . . . . . . . . . . . . . . . 270
Fastening . . . . . . . . . . . . . . . . . . . . . . . . . . 272
Improperly worn . . . . . . . . . . . . . . . . . . . . 275
Not worn .................. ........ 270
Safety be lt position . . . . . . . . . . . . . . . . . . 273
Safety instructions . . . . . . . . . . . . . . . . . . . 271
Securing child safety seats ............ 313
Special considerations for pregnant wom-
en . . . . . . . . . . . . . . . . . . . . . . . . . . . . . . . . 274
Unfastening . . . . . . . . . . . . . . . . . . . . . . . . 274
Warning/indicator light . . . . . . . . . . . . . . 268
Worn properly . . . . . . . . . . . . . . . . . . . . . . 270
Safety belt warning light . . . . . . . . . . . . . . . 268
Safety instructions for side curtain airbags . . . . . . . . . . . . . . . 300
for us ing child safety seats . . . . . . . . . . . . 306
for using safety belts . . . . . . . . . . . . . . . . . 271
Monitoring the Advanced Airbag System 291
Saving fuel Energy consumers . . . . . . . . . . . . . . . . . . . . 18
R t· ecu per a ton . . . . . . . . . . . . . . . . . . . . . . . . 17
Scan (radio) . . . . . . . . . . . . . . . . . . . . . . . . . . 226
Screen
refer to Display . . . . . . . . . . . . . . . . . . . 13, 16
Screwdriver . . . . . . . . . . . . . . . . . . . . . . . . . . 368
SD card reader (MMI) . . . . . . . . . . . . . . . . . . 231
sos
refer to Voice recognition system . . . . . . . 170
Search area (point of interest) . . . . . . . . . . . 210