length AUDI A5 COUPE 2018 Owners Manual
[x] Cancel search | Manufacturer: AUDI, Model Year: 2018, Model line: A5 COUPE, Model: AUDI A5 COUPE 2018Pages: 409, PDF Size: 67.63 MB
Page 73 of 409
Seats and storage
General information
A WARNING
See ¢ page 258, Driving safety for important
information, tips, suggestions and warnings
that you should read and follow for your own
safety and the safety of your passengers.
Front seats
Power seat adjustment
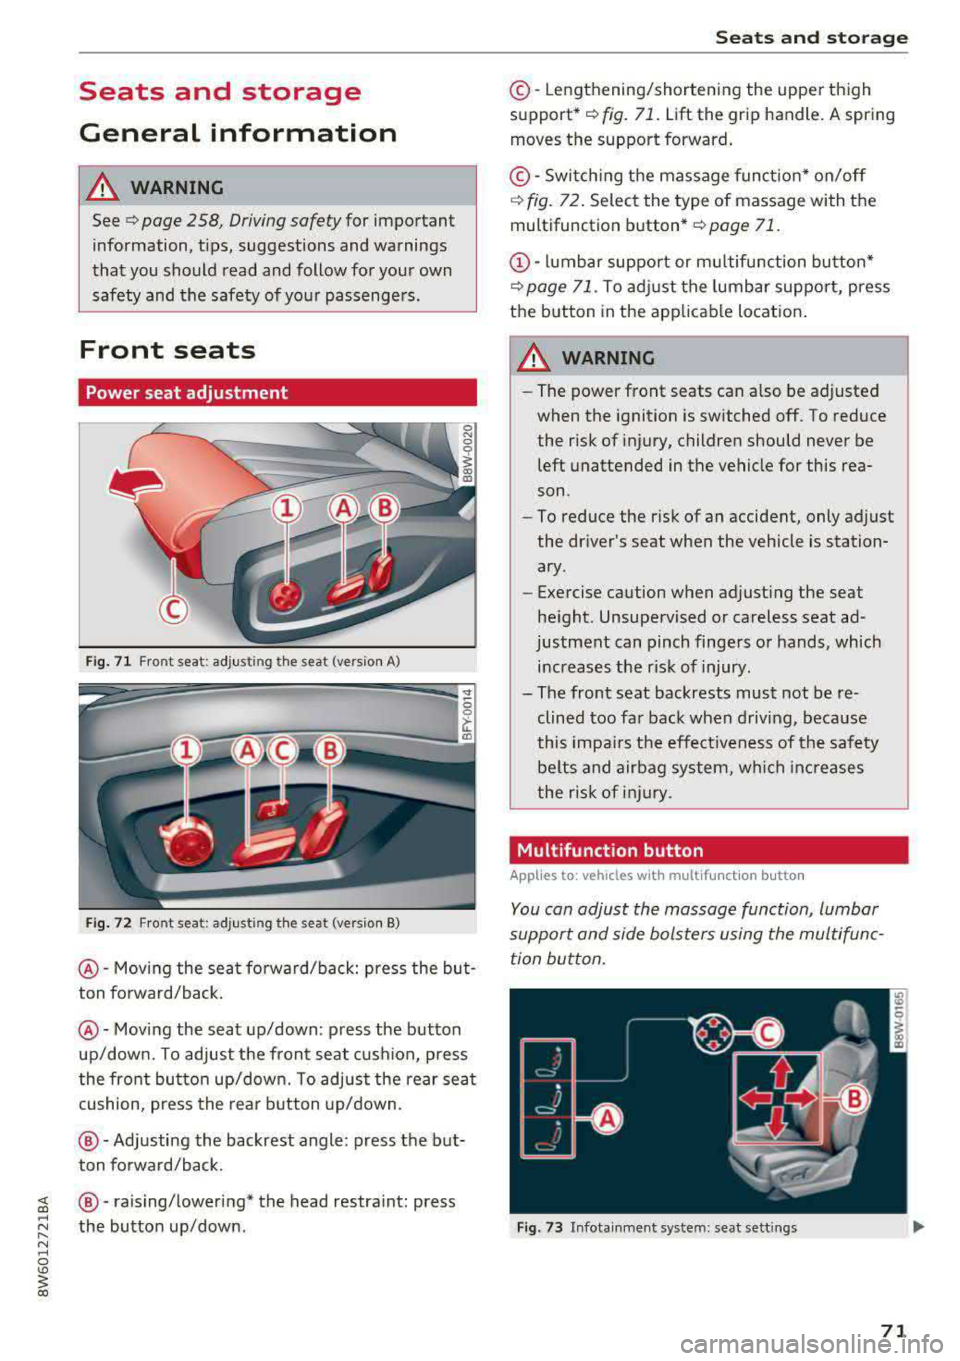
Fig. 71 Fro nt seat: adjus ting the seat (version A)
Fig. 72 Fro nt seat: adjust ing the sea t (version B)
@ -Moving the seat fo rward/back: press the but
ton forward/back.
@ -Moving the seat up/down: press the button
up/down. To adjust the front seat cush ion, press
the front button up/down. To adjust the rear seat
cushion, press the rear button up/down.
@-Adjusting the backrest angle: press the but
ton forward/back.
~ @ -raising/lowering* the head restra int: press
~ ~ the button up/down .
N ~ 0
'° ~ co
Seats and storage
©-Lengthening/shortening the upper thigh
support•¢ fig. 71. Lift the grip handle. A spring
moves the support forward.
© -Switching the massage function* on/off
¢ fig. 72. Select the type of massage with the
multifunction
button* ¢ page 71.
(D-lumbar support or multifunction button*
¢ page 71. To adjust the lumbar support, press
the button in the applicable location.
A WARNING
- The power front seats can also be adjusted
when the ignition is switched off. To reduce
the risk of injury, children should never be left unattended in the vehicle for this rea
son .
- To reduce the risk of an accident, only adjust
the driver 's seat when the vehicle is station
ary .
- Exercise caution when adjusting the seat
height. Unsupervised or careless seat ad
justment can pinch fingers or hands, which increases the risk of injury.
- The front seat backrests must not be re
clined too far back when driving, because
this impairs the effectiveness of the safety
be lts and airbag system, which increases
the risk of injury.
, Multifunction button
Applies to: vehicles with multifunction button
You can adjust the massage function, lumbar
support and side bolsters using the multifunc tion button.
Fig . 73 Infotainment sys te m : s eat sett in gs
71
Page 90 of 409
Driving
unheeded. Extended idling also produces
heat, which could result in overheating or
other damage to the vehicle or other proper
ty.
(D Note
- Have your vehicle maintained properly and
in accordance with the service recommenda
tions in your Warranty
& Maintenance book
let . Lack of proper maintenance as well as
improper use of the vehicle will impair the
function of the emission control system and
could lead to damage.
- Do not alter or remove any component of the Emission Control System unless approved by the manufacturer .
- Do not alter or remove any device, such as
heat shields, switches, ignition wires,
valves, which are designed to protect your
vehicle's Emission Control System and other
important vehicle components.
(D Tips
The consumption estimates as published by
ENVIRONMENTAL PROTECTION AGENCY (EPA) and Transport Canada may not corre
spond to your actual consumption on the
road, which will vary depending upon vehicle
load and speed, road and weather conditions,
trip length, etc.
Steering
Adjusting the steering wheel position
The steering wheel position is adjustable up and
down and forward and back.
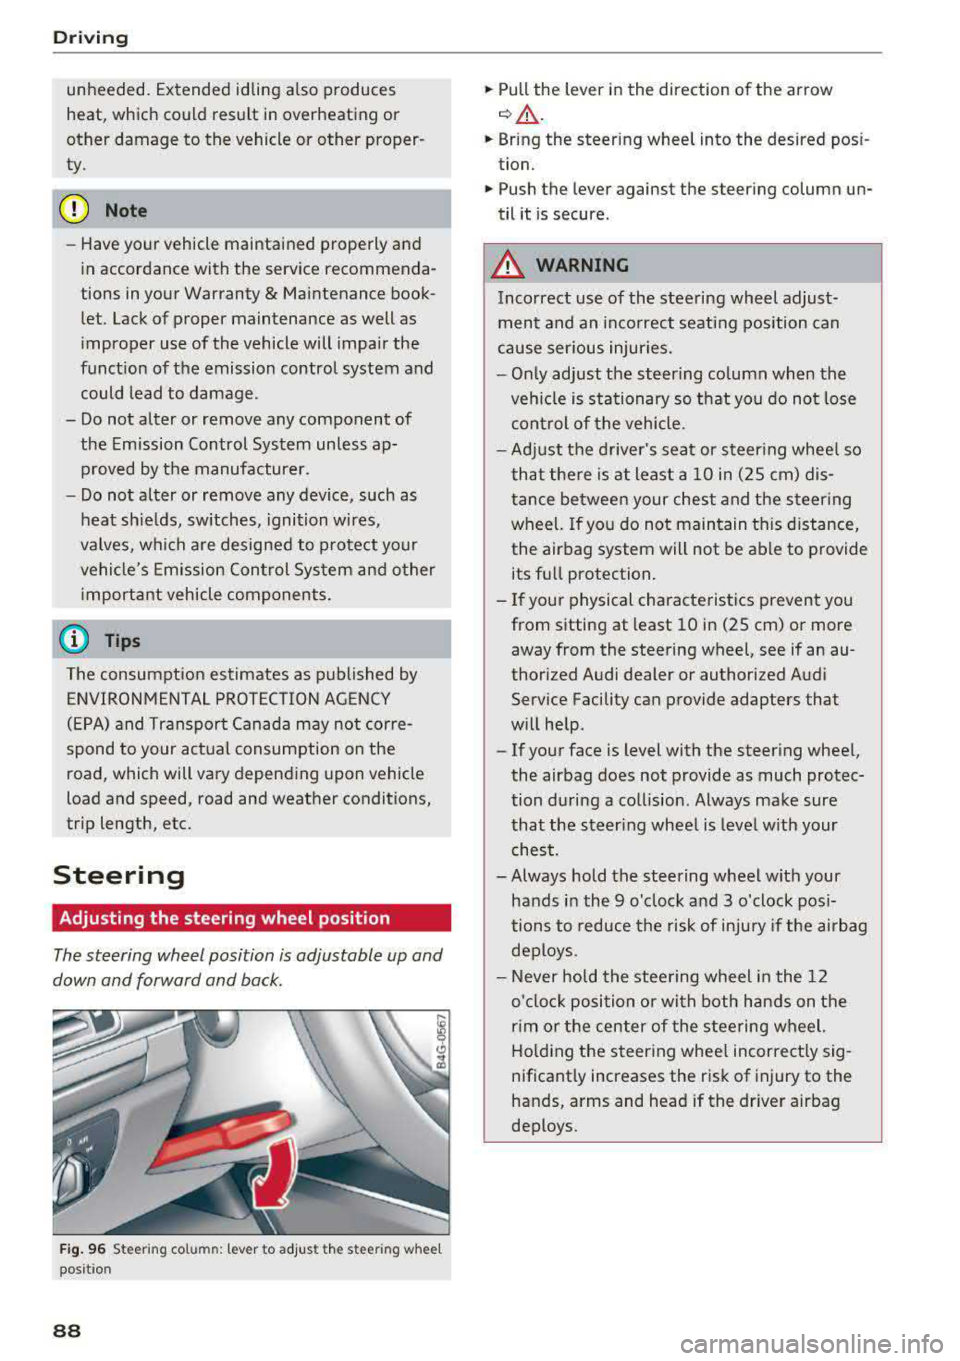
Fig. 96 S tee rin g col umn : le ver to adjus t the stee ring w heel
posit ion
88
.,. Pull the lever in the direction of the arrow
c::, A -
... Bring the steering wheel into the desired posi
tion .
.,. Push the lever against the steering column un
til it is secure .
_&. WARNING
Incorrect use of the steering wheel adjust
ment and an incorrect seating position can
cause serious injuries.
- Only adjust the steering column when the
vehicle is stationary so that you do not lose
control of the vehicle.
-
-Adjust the driver's seat or steering wheel so
that there is at least a 10 in (2S cm) dis
tance between your chest and the steering
wheel. If you do not maintain this distance,
the airbag system will not be able to provide
its full protection.
-If your physical characteristics prevent you
from sitting at least 10 in (2S cm) or more
away from the steering
wheel, see if an au
thorized Audi dealer or authorized Audi
Service Facility can provide adapters that
will help .
- If your face is level with the steering wheel,
the airbag does not provide as much protec
tion during a collision . Always make sure
that the steering wheel is level with your
chest.
- Always hold the steering wheel with your
hands in the 9 o'clock and 3 o'clock posi
tions to reduce the risk of injury if the airbag
deploys.
- Never hold the steering wheel in the 12
o'clock position or with both hands on the
rim or the center of the steering wheel.
Holding the steering wheel incorrectly sig
nificantly increases the risk of injury to the
hands, arms and head if the driver airbag
deploys .
Page 158 of 409
Intelligent Technology
greater than the amount being generated in or
der to maintain an optimal vehicle battery charge
level.
(D Tips
- Energy management cannot overcome the laws of physics. Note that the charge level
and length of the vehicle battery life are
limited.
- When the starting ability is endangered, the
(•j indicator light turns on ¢ page 30.
What you should know
Maintaining the starting ability is the highest
priority.
A lot of stress is placed on the vehicle battery
when driving short distances, during city driving,
and at cold times of the year. A lot of energy is
used but little is generated. It is also critical
when the engine is not running but electrical
equipment is switched on. In this case, energy is used but none is generated .
In situations like this, energy management will
actively regulate the distribution of energy.
Long periods without use
If you do not drive your vehicle for several days or
weeks, electrical equipment is gradually scaled
back or switched off. This reduces energy use and
ensures the vehicle will be able to start after long
periods of time. Some convenience functions,
such as interior lighting or power seat adjust
ment, may not be available under certain circum
stances . These convenience functions will be
available again once you switch the ignition on
and start the engine.
With the engine switched off
The vehicle battery will drain if you use Infotain
ment functions such as listening to the radio
while the engine is switched off .
If the vehicle's ability to start may be impaired by
the energy use, a message will appear in the In
fotainment system display. The message indi
cates that the system will switch off automatical-
156
ly soon. If you would like to continue using the
functions, you must start the engine.
With the engine running
Although electrical energy is generated while
driving , the vehicle battery can drain. This can
happen if little energy is generated but much is
used, and the charge level of the vehicle battery
is not optimal.
To restore the balance of energy, components
that require large amounts of energy are tempo
rarily scaled back or switched off . Heating sys
tems in particular require a great deal of energy. If you notice, for example, that the seat heating*
or rear window defogger is not working, then it
has been temporarily reduced or switched off.
T hese systems are available again as soon as the
energy supply has been restored.
In addition, you may notice that the idle speed has slightly increased. That is normal and no
cause for concern . By increasing the idling speed,
the additional required energy will be generated
and the vehicle battery will be charged.
Notice about data
recorded by the Event
Data Recorder and
vehicle control modules
Event Data Recorder
This vehicle is equipped with an Event Data Re
corder (EDR). The main purpose of an EDR is to
record, in certain crash or near crash-like situa
tions, such as an airbag deployment or hitting a
road obstacle, data that will assist in understand
ing how a vehicle's systems performed. The EDR
is designed to record data related to vehicle dy
namics and safety systems for a short period of
time , typically 30 seconds or less. The EDR in this
vehicle is designed to record such data as:
- How various systems in your vehicle were oper ating;
- Whether or not the driver and passenger safety
belts were buckled/fastened;
- How far (if at all) the driver was depressing the
accelerator and/or brake pedal; and,
.,_
Page 213 of 409
<( a, .... N ,....
N .... 0 \0
3 a,
-Sear ching fo r a po int of interest in a specific
c a tegor y:
select Select category. Select and
confirm a category such as
Restaurant s.
(D Tips
-Distances to points of interest are displayed
as a straight-line distance from your current
l ocation. The actua l distance from your cur
r ent location to the point of interest is up
dated automat ically. The list of found
po ints of interest is not resorted when th is
happens.
-There may be entries in the list that cannot be displayed completely due to their length.
Se lect the corresponding entry from the
li st . Se lect: right contro l butto n
> Show des
ti nation details . De tail ed info rmation for
the selec ted entry in the lis t is then dis
played.
Online point of interest search (on line
search)
A ppl ies to : ve hicl es with a navigatio n system an d Au di con·
nect (I nfotainm en t)
You can search for points of interest on the In
ternet.
Requirement: the requirements fo r Audi connect
( I nfo tainment) m ust be me t
r:;} page 191.
.,. Press the I NAV/MAPI button repeated ly until
the
Ent er destination menu is displayed
r::} page 207, fig . 193 .
.,. Select : left cont rol button > Online search . The
search area last set is displayed in the i nput
f ield .
-Changing the search area : select: right control
bu tton
> Sele ct search area .
-Searching for online d estinations in these
lected search area :
enter a new city/state if
necessary. Enter the sea rch te rm, su ch as hotel.
Press the con trol knob. Sele ct and confirm an
on line dest ination from the list.
-S ear ching for online de stination s in a specific
category:
selec t and confi rm Select category .
Select and confirm a category such as Restau
rants . Na
vigation
Find wh ic h search areas are avai lab le under
r::} page 210, Point of interest search .
You can search for online destinations using the
vo ice recogni tion sys tem
c> table on page 174.
(D Tips
-Always read the chapter c> page 198, Audi
conne ct (Info tainment) general informa
tion.
-For add ition al information, v is it
www .audiusa .com .
Accessing destinations from myAudi
account
App lies to : vehicles wit h a naviga tion sys te m and Audi co n·
nec t (I nfo ta inm ent)
Import individual destinations from your myAudi
account into the
MMI.
Requirement:
The requirements for Audi connect (Infota in
ment) must be met
c> page 191.
You m ust have a registered myAudi acco unt at
www.audiu sa.com /myaudi. You must have ave
hicle assigned to your myAud i account and you
must have stored one or more destinations.
.. Press the ! NAV/MAPI button repeatedly unti l
the
Enter destination men u is disp layed
c> page207, fig.193.
.. Select: left control button > myAudi contacts .
.. If necessary, enter your myA udi use r data or
your myAudi PIN
c;, page 191. The contacts
stored in myAud i a re displayed .
-Select and confirm a contact.
-Select and confirm a private or business dest i-
nation.
-Select and confirm Start route guidance .
{I) Tips
-You only need to enter the myAudi user data
one time.
-You c an rece ive your myAudi PIN if yo u have
set up a myAudi account .
-For add ition al information, v is it
www .audiu sa .com.
211
Page 220 of 409
Navig ation
@ Map contents (points of interest, favorites).
When there are multip le points of interest in
the immediate vicinity, the symbo ls are
shown stacked on the map.
@ Better route re: if a better route is availab le
for the curren t route gu idance , it wi ll be indi
cated on the map includ ing the time that
wou ld be saved . More information can be
found under
c> page 223.
Map functions
A pp lies to: ve hicles w ith navigation system
~ Press the I NAV/MAPI button repeated ly until
the map is d isp layed
c> page 217, fig. 200.
~ Press the left control button.
The fo llowing map functions can be selected:
Sw itch to destination input
The free text search in the Na vig ation menu is
d isp layed
c> page 207, fig. 193.
Traffic mes sages
Curre nt traffic information is displayed in the In
fotainment system disp lay . You can also find ad
d itiona l information under
c> page 222 .
Route list
The route list can only be displayed when route
gu idance is active and contains information re
garding the route, the names of the streets and
the length of the route sections. Whe n trave ling
on hig hways, possib le pa rk ing lots and rest a reas
a re shown, wh ich yo u can select as a stopover.
POis along the route
Requirement: route guidance must be active .
Searching for points of interest along your cur rent route For addit iona l information, see
c> page 210 .
Additional options on the map
Applies to: ve hicles w ith navigation system
~ Press the I N AV/MAPI button repeatedly until
the map is d isp layed
c> page 217, fig . 200 .
~ Press the right contro l button.
218
Depend ing on the function selected, the follow
ing options can also be selected under the
Map
menu:
Cancel route guidance: see c> page 212 .
Map s etting s: see c> page 218.
Rou te cr iteria : see c> page 216.
Voice guidance : see c> page 216.
Navigation settings : see c> page 215.
Show alternative route s: see c> page 214 .
Parking along the route *: parking options near
the ve hicle are d isplayed .
Save current position : you can save your current
vehicle position as a favorite
c> page 215 or save
i t as a contact in the directory
c> page 215.
Audi connect at thi s location* : allows you to
search for
Travel info rmation at the entered lo
cation (events, weather at the destination, etc.).
Online traffic data *: you can switch the online
traffic da ta and, depending on the equipment,
the ha zard information* on or off(~) .
Countr y information : see c> page 212.
Avoid route *: when route guidance is active, the
ca lculated route will avoid the area you have
spec ified (maximum: 12 mi (20 km)), if possib le.
The nav igat ion sys tem calcu lates an alte rna tive
r oute . The route to be avo ided that yo u have en
te red applies only to the cur rent route and must
be set again, if needed. The areas you have se
l ected to avoid w ill appear with red and white
shading on the map .
Move route*: move your finger over the MM I
touch contro l pad* or use the contro l knob to ad
j ust the route on the overview map .
Map settings
Applies to : vehicles wit h navigat ion syste m
~ Press the I NAV/MAP I button repeatedly until
the map is displayed .
~ Select: right cont rol button> Map settings .
Depending on the selected function, the follow-
i ng settings can be selected:
...,
Page 221 of 409
Map colors
Day /Night :
the map is displayed with a light/
dark background.
Automatic : the map display adapts to the light
i ng conditions (fo r example, changing from
Day
to Night when driving thro ugh a tunne l).
Map display
Standard :
see ¢page 217, fig. 201.
Online map view: see¢ page 219, fig. 202.
Map orientation
Destination :
the map indicates the dest ination
and is oriented to the north.
2D heading up map /2D north up map : the cur
rent vehicle position is dis played. The map is o ri·
ented in the direction of travel or to the north.
3D map *: the current vehicle pos ition is shown
on a th ree-dimensional map and is a ligned to the
d irection of travel. At a scale of 62 mi (100 km)
and larger, the map orientation is to the north.
Overview : the entire route from the vehicle posi·
tion to the destination or the next stopover is dis·
played on the map. The map scale depends on
the length of the route and adapts a utomatica lly.
The map is oriented to the north.
Route information
The display of route information, such as the cur·
rent street being driven on or po ints of in terest
along the current route
c;,page 217, fig. 200, can
be switched on/off or can be m inim ized on the
display of upcoming maneuvers .
Automatic zoom
On :
the map scale is adapted automat ically de·
pending on the type of road being traveled (ex·
pressway , hig hway, other roads) so that you
al
ways have an optimal overview of the road ahead.
The sca le is also automatica lly adapted when
there are upcoming maneuvers to provide a bet·
ter detai led view.
Intersection : when route guidance is active, the
map temporarily zooms in to a detailed scale
Navigation
when there are upcoming maneuvers so that you
can see the street or turn better.
Off : the map scale you have chosen is main·
tained .
MMI map contents
Map contents, such as weather, points of inter·
est, traffic information or favorites, can be dis·
played or hidden.
The weather forecast is displayed on a 3 m i (5
km) scale on the map.
Instrument cluster map contents
You can also set which map content disp lays in
the instrument
cluster¢ page 21.
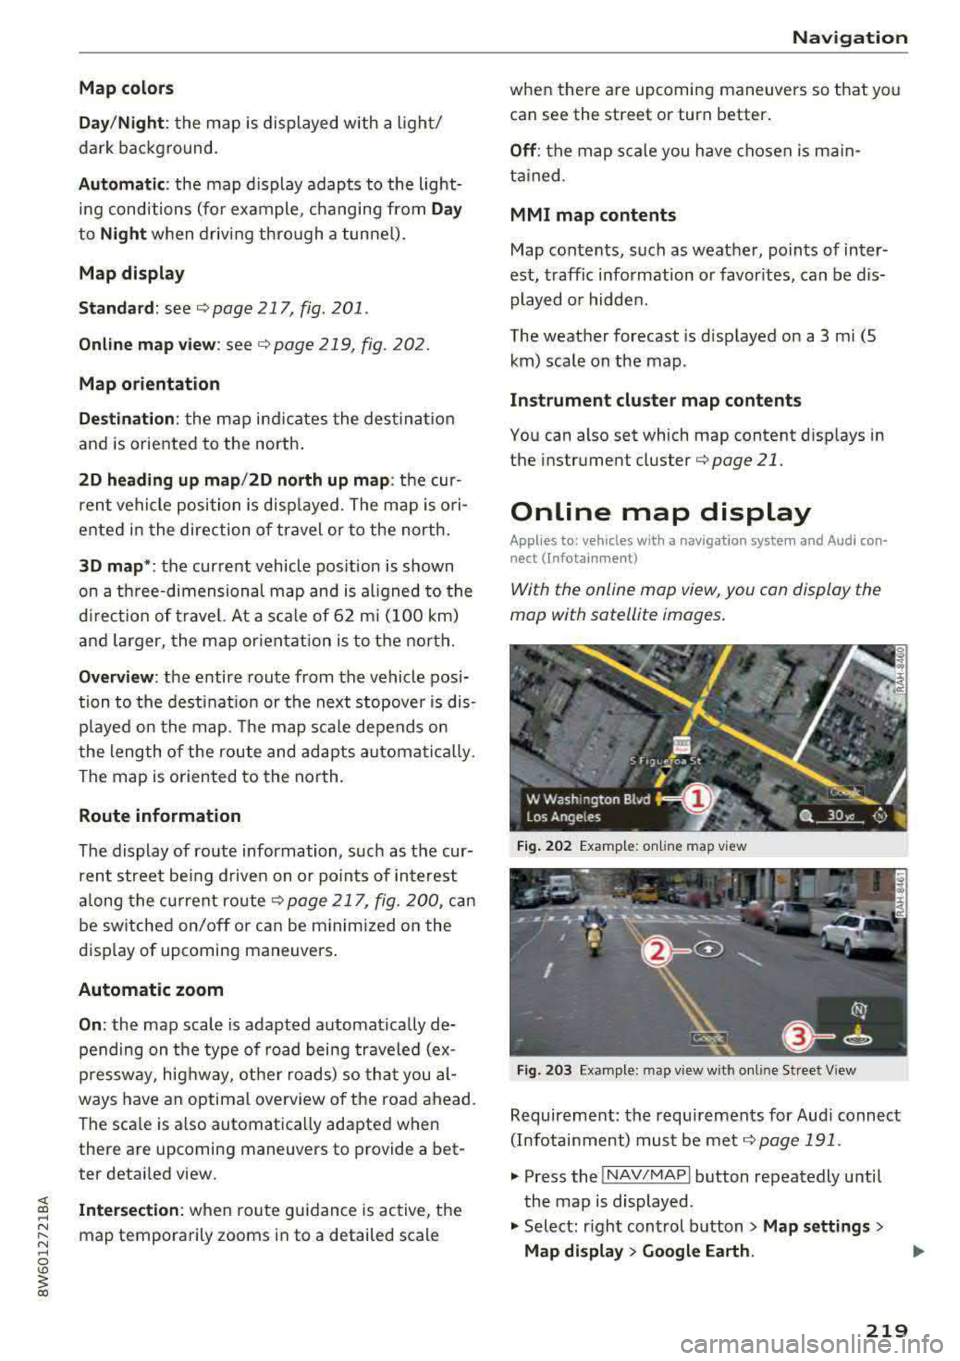
Online map display
Applies to: vehicles with a navigation system and Audi co n·
nect (Infotainment)
W ith the on line map view, you can display the
map with satellite images.
Fig. 202 Example: on line map vie w
Fig . 203 Examp le: map view with onli ne St reet V iew
Requirement: the requirements for Aud i connect
(Infotainment) must be met
¢page 191 .
.,. Press the !NAV/MAPI button repeatedly until
the map is displayed.
.,. Select: r ight control button > Map settings >
Map display > Google Earth.
219
Page 224 of 409
Navigation
Traffic information
Introduction
Applies to: vehicles w ith navigat ion system
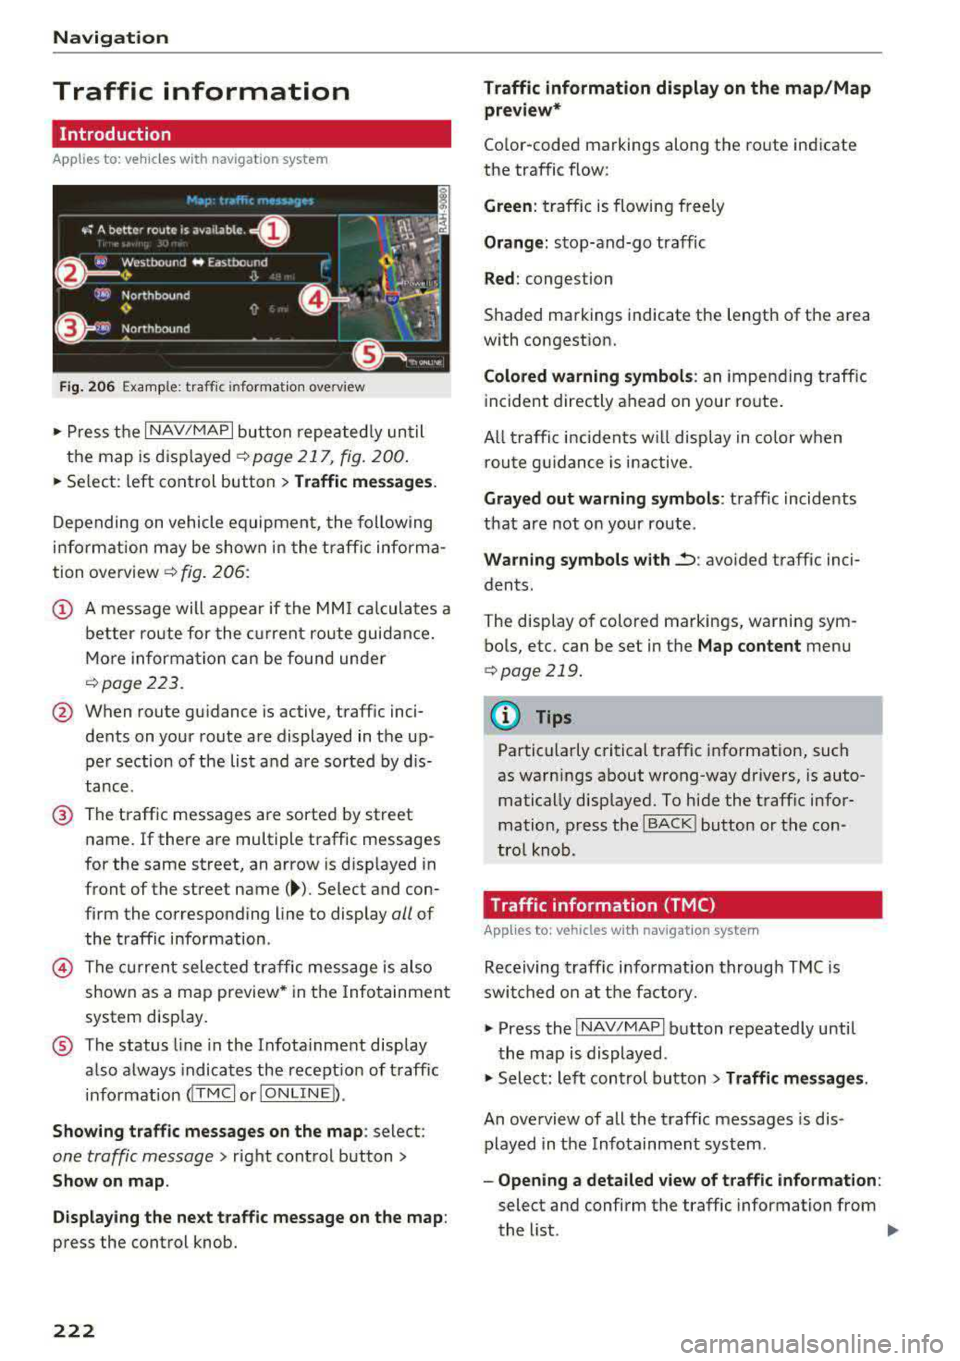
F ig. 206 Exa mple: t raffic info rmatio n overview
,.. Pres s th e I N AV/MAPI butto n repe ated ly un til
the map is d is pla yed
q page 217, fig. 200.
,.. Select: left co ntrol button > Traffic messages .
Dependi ng on vehicle equipment, the following
i n fo rma tion m ay be show n in t he t raff ic info rm a
tion ove rview
q fig . 206:
(!) A message will appear if the MMI calcula tes a
b et ter r oute for the cur rent r oute gui dance.
M ore in for mation can be found u nder
q page 223.
@ When route gu idance is active, traff ic inci
dents on your route a re displayed in the up
pe r section o f the lis t and a re sor ted by di s
t a nce .
@ The traff ic messages are sorted by street
n ame . If there are multiple traffic messages
for the same street, an arrow is d isp layed in
front of the street
name( ~). Select and con
f ir m the corresponding line to display
all of
t h e tr aff ic info rmation .
@ The curren t sele cted tra ffic mess age is also
shown as a m ap preview * in t he Inf ot ainmen t
system displ ay.
® The status line in the In fota inme nt display
a lso always indicates the rece ptio n of traff ic
i nfo rmatio n
dTMC I or IONLI NED.
Showing traffic messages on the map : select:
one traffic message> right cont rol button>
Show on map .
Displaying the ne xt traffic message on the map :
press the control knob.
222
Traffic information display on the map/Map
preview*
Co lor -coded markings along the ro ute ind icate
the traffic flow:
Green : traffic is flowing freely
Orange: stop-and-go tr affic
Red : congestion
S haded markings indicate the length of t he area
with congest ion.
Colored warning symbols : an i mpen ding t raffic
in cident direct ly ahead on you r ro ute .
A ll tr affic in ciden ts w ill displ ay in co lor w hen
ro ute g uidance is inact ive.
Grayed out warning symbols : traffic incidents
that are not o n your rout e.
Warning symbols with..::> : avoided traffic inci
dents.
The disp lay of colore d ma rkings, warning sym
bo ls, etc. can be set in t he
Map content menu
q page 219.
@ Tips
Pa rtic ularl y critica l traffic i nformat io n, such
as wa rni ngs a bout wrong-way drivers, is auto
matically disp layed. To hi de the t raff ic info r
mation, p ress the
I B A CK ! button or the con
tro l knob.
Traffic information (TMC)
Applies to : vehicles wit h navigation system
Receiving tra ffi c info rm ation through TMC is
swi tched on at th e fa ctory.
,.. Press the I NAV/MAPI b utton repeatedly u ntil
th e map is displayed .
,.. Sele ct: le ft control bu tton > Traffic messages .
An overview of all the traffic messages is dis
p layed in the Info tainment system .
-Opening a detailed view of traffic information :
select and confirm the traffic information from
the list.
.,..
Page 255 of 409
System settings
Delete Bluetooth device*
The selected cell phone/mobile device is discon
nected from the MMI and is removed from the
list of all devices that are already paired .
Show Bluetooth profiles*
You can Connect or Disconnect the Handsfree ,
Messages *, Dire ctory/contacts
and Bluetooth
audio player
profiles separately.
Bluetooth settings*
- Bluetooth :
select and confirm a setting for the
B luetooth connection v is ibility. Select
Visible
for the MMI to be visible to other dev ices. Se
lect
Invisible for the MMI to not be vis ible to
other devices. Howeve r, it is still possib le to es
tablish a Bluetooth connection with paired de
vic es when the visibility is switched off. Select
Off to turn visibility off. Then a B luetooth con
nection is not possible .
-Bluetooth audio player: when this function is
switched
on~' the Bluetooth audio player is
available as a source in the
Media menu .
-Bluetooth name : the MMI Bluetooth name (for
example ,,AUDI MM I
2016") is displayed and
can be changed .
Online settings*
- Data usage counter :
the amount of data pack
ets that are sent and received through the MMI
is disp layed. You can reset the data usage infor
mation to zero using the
Reset data counter
option.
-Network status : the mobile network provider
for data service as well as the network status
are displayed .
Wi-Fi settings*
See <=> page 19 7, Wi-Fi hotspot.
Storing as a default telephone
Applies to: veh icles with telephone
Requirement: a cell phone must be connected to
the MMI
<=> page 178.
As soon as the cell phone is in range and the
Bluetooth function on the cell phone and in the
MMI is swit ched on, this cell phone is given pr ior
ity ove r the other Bluetooth devices and is con-
254
nected directly to the MMI. The connected ce ll
phone is displayed first in the device list .
Network settings*
- Login :
you can chose an automatic log in to
your cell phone service provider's network, or
you can choose a
manual login from the list of
avai lab le networks .
-Network selection: available networks in the
present location can be selected under network
selection . This function is on ly availab le for the
Manual l ogin setting.
Apple CarPlay sound settings/ Android Auto
sound settings
Applies to: vehicles with Audi sma rtphone interface
See ~page255.
About Apple CarPlay/ About Android Auto
Applies to: vehicles with Audi smartphone interface
Here you wi ll find legal information regarding
the use of Apple CarPlay or Andro id Auto and in
formation about device-specific data exchange.
Delete CarPlay device/Delete Android Auto
device
Applies to: vehicles with Audi smartphone interface
Requirement: your cell phone must not be con
nected to the Audi music interface with a USB
adapter .
Se lect:
Audi smartphone > a device from the list
> r ight control button.
T o remove your cell phone from the list, select
and confirm
Delete CarPlay device or Delete An
droid Auto device .
System update
"Select: !M ENUI button> Settings > left control
button >
System maintenance .
- System update:
slide the storage device with
the update data into the appropriate drive
<=> page 231 . Select and confirm the dr ive>
Start update . The length of the process de
pends on the size of the update .
-Reset driver installation: the selected media
dr iver package is reset to the settings at the
time of delivery.
Page 351 of 409
Wheels
vehicle components could wear more quickly.
Treadwear indicator
Original equipment tires contain
treadwear indicators in the tread
pattern, which are bars that are
1/16 in (1.6 mm) high and are
spaced evenly around the tire per
pendicular to the running direc
tion
¢ fig. 283. The letters "TWI"
or triangles on the tire sidewall
indicate the location of the tread
wear indicators.
The tires have reached the mini mum tread depth
l) when they
have worn down to the treadwear
indicators . Replace the tires with
new ones
c;, .&..
Tire rotation
Rotating the tires regularly is rec
ommended to ensure the tires
wear evenly. To rotate the tires,
install the tires from the rear axle
on the front axle and vice versa.
This will allow the tires to have approximately the same length of
service life.
For unidirectional tires, make
sure the tires are installed accord-
1> Obey any applicable regulations in your
country.
350
ing to the running direction indi
cated on the tire sidewall
c;, page 374.
Hidden damage
Damage to tires and rims can of
ten occur in locations that are hidden. Unusual vibrations in the
vehicle or pulling to one side may indica te that there is tire damage .
Reduce your speed immediately.
Check the tires for damage. If no
damage is visible from the out
side, drive slowly and carefully to
the nearest authorized Audi deal er or authorized Audi Service Fa
cility to have the vehicle inspect
ed.
&_ WARNING ~
Tread that has worn too low or different tread depths on the
tires can reduce driving safety.
This can increase the risk of an
accident because it has a nega
tive effect on handling, driving
through curves, and braking,
and because it increases the
risk of hydroplaning when driv
ing through deep puddles.
Page 388 of 409
<( a, .... N ,....
N .... 0 \0
3 a,
Weights
Gross Vehi cle We ight Rating
The G ross Veh icle Weight Rating (GVWR), and
the Gross Axle Weight Rating (GAWR) for front
and rear are listed on a sticker on the front end of
the driver's door.
The G ross Veh icle Weight Rating includes the
weight of the basic vehicle p lus full fuel tank, oi l
and coolant, plus maximum load, which includes
passenger weight (150 lbs/68 kg per designated
seating position) and luggage weight
c:> A .
Gross Axle Weight Rating
The Gross Axle We ight Rating is the max imum
l oad that can be applied at each axle of the vehi
cle
c:> A .
Vehicle capacity weight
The vehicle capac ity we ight (max. load) is listed
on the front end of the dr iver's door.
& WARNING
-
- T he act ual Gross Ax le Weight Rating at the
front and rear axles sho uld not exceed the
permissible weights, and their combination
must not exceed the Gross Vehicle We ight
Rating.
- Exceedi ng perm iss ible weight ratings can
result in vehicle damage, acc idents and per
sonal injury.
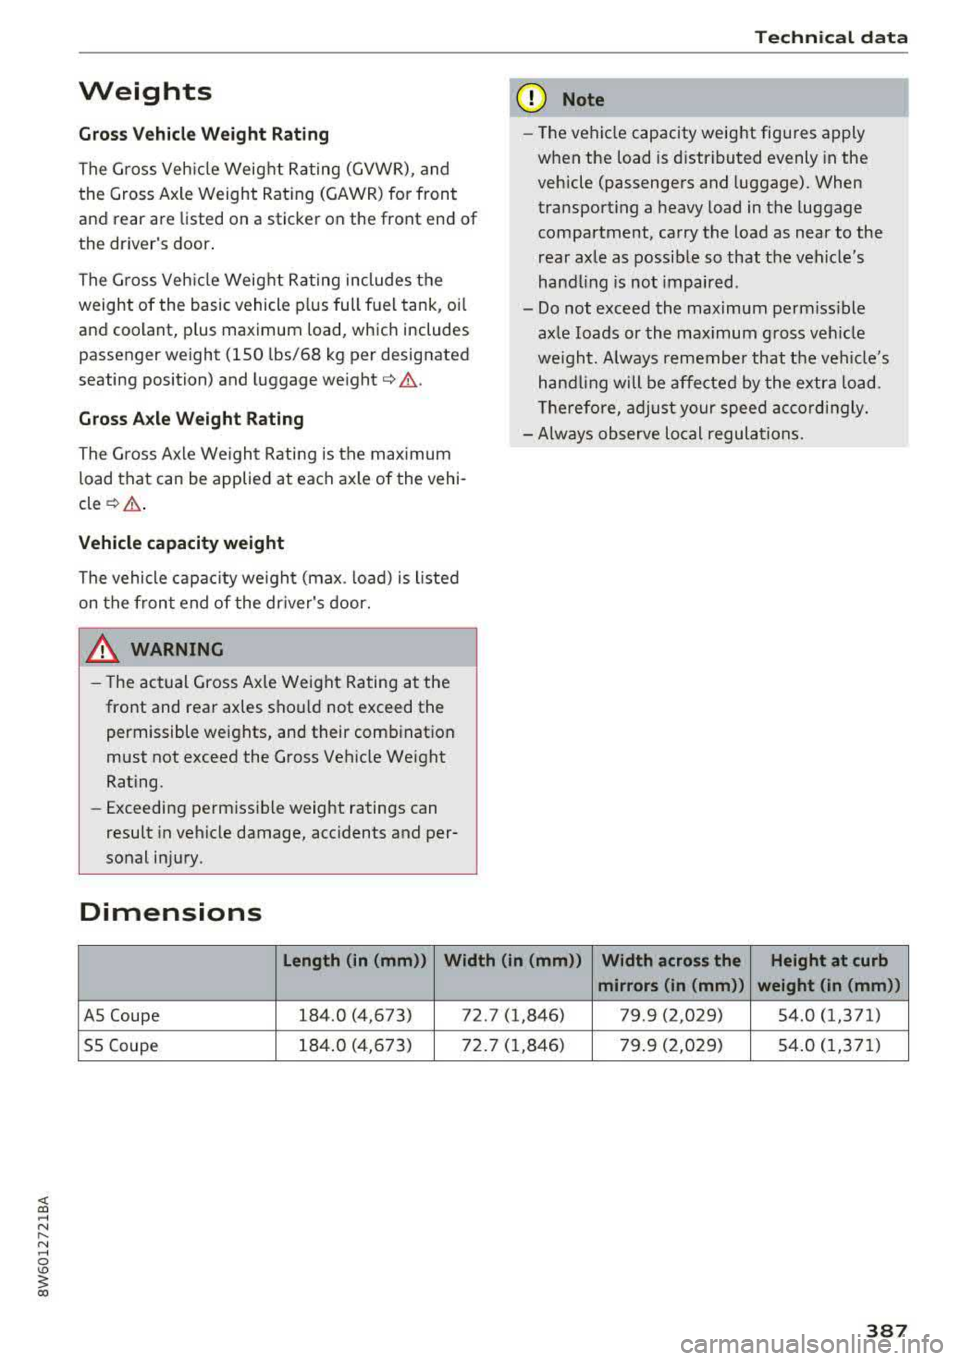
Dimensions
Techn ical data
(D Note
- The vehicle capacity weig ht figures apply
when the load is d istributed evenly in the
vehicle (passengers and luggage). When
transport ing a heavy load in the luggage
compartment, carry the load as near to the
rear axle as possible so that the vehicle's
hand ling is no t impa ired.
- Do not exceed the maximum perm iss ible
ax le loads or the maximum g ross ve hicle
we igh t. A lways remember that the vehi cle's
hand ling will be affected by the extra load.
T he refore, adjust your speed acco rd ingly.
- Always observe lo cal regulations.
Length (in (mm)) Width (in (mm ))
Width across the Height at curb
mirrors (in (mm )) weight (in (mm))
AS Coupe 184.0 (4,673) 72. 7 (1,846) 79.9 (2,029) 54 .0 (1,371)
55 Coupe 184
.0 (4,6 73) 72 .7 ( 1,846) 79 .9 (2,029) 54 .0 (1 ,37 1)
387