rims AUDI A5 COUPE 2018 Owners Manual
[x] Cancel search | Manufacturer: AUDI, Model Year: 2018, Model line: A5 COUPE, Model: AUDI A5 COUPE 2018Pages: 409, PDF Size: 67.63 MB
Page 143 of 409
<( a, ..... N ,....
N ..... 0 \0
3 a,
Parking systems
General information
Applies to: ve hicles with a rea r parking sys te m /pa rking sys
tem plus/rearv iew camera/peripheral cameras
Depending on your vehicle's equipment, various
parking aids will help you when parking and ma
neuvering.
The
rear parking system is an audible parking aid
that warns you of obstacles
behind the vehicle
¢page 142.
T he
parking system plus assists you when park
ing by audibly and visually indicating objects de
tected
in front of and behind the vehicle
¢ page 142.
T he
rearview camera shows the area behind the
vehicle in the Infotainment system display . The
lines in the rearview camera image help you to
park or maneuver ¢
page 143. The parking sys
tem plus functions are also available
¢ page 142.
The
peripheral cameras give various views to
help you when parking or maneuvering
¢
page 145 . The parking system plus functions
are also available
¢ page 142.
A WARNING
-Always look for traffic and check the area
around your vehicle by looking at it directly
as well. The parking system cannot replace
the driver's attention. The driver is always
responsible when entering or leaving a park
ing space and during similar maneuvers .
-
-Please note that some surfaces, such as
clothing, are not detected by the system .
-Sensors and cameras have blind spots in
which people and objects cannot be detect
ed . Be especially cautious of small children
and animals.
-Always keep your eyes on the vehicle's sur
roundings, using the rearview mirror as
well.
-The sensors can be displaced by impacts or
damage to the radiator grille, bumper,
wheel housing and the underbody . The park
ing system may be impaired as a result.
Parking systems
Have an authorized Audi dealer or author
ized Audi Service Facility check their func
tion.
(D Note
-Some objects are not detected or displayed
by the system under certain circumstances:
-objects such as barrier chains, trailer draw bars, vertical poles or fences
-objects above the sensors such as wall ex
tensions
-objects with certain surfaces or structures
such as chain link fences or powder snow
-If you continue driving closer to a low ob
ject, it may disappear from the sensor
range . Note that you will no longer be
warned about this obstacle.
-Keep enough distance from the curb to re
duce the risk of damage to the rims.
(!) Tips
-The system may provide a warning even
though there are no obstacles in the cover
age area in some situations, such as:
-certain road surfaces or when there is tall
grass
-external ultrasonic sources such as from
cleaning vehicles
-in heavy rain, snow, or thick vehicle ex
haust
-We recommend that you practice parking in
a traffic-free location or parking lot to be
come familiar with the system. When doing
this, there should be good light and weath
er conditions .
-You can change the volume of the signals
and the display ¢
page 148.
-Please refer to the instructions for towing a
trailer located in
¢page 149.
-What appears in the infotainment display is
somewhat time-delayed.
-The sensors must be kept clean and free of
snow and ice for the parking aid to operate.
141
Page 342 of 409
Wheels
Wheels and Tires
General information
.,.Check your tires regularly for
damage (punctures, cuts, cracks
and bulges). Remove foreign ob
jects from the tire tread.
.,. If driving over curbs or similar
obstacles, drive slowly and ap
proach the curb at an angle.
.,.Have faulty tires or rims re
placed immediately.
"'Protect your tires from oil,
grease and fuel.
.,.Mark tires before removing
them so that the same running
direction can be maintained if
they are reinstalled.
"'Lay tires flat when storing and
store them in a cool, dry location
with as little exposure to light as
possible.
(D Note
-Please note that summer and
winter tires are designed for
the conditions that are typical in those seasons. Audi recom
mends using winter tires dur
ing the winter months. Low
temperatures significantly de crease the elasticity of summ
er tires, which affects traction
Wheels
and braking ability. If summer
tires are used in very cold
temperatures, cracks can form
on the tread bars, resulting in
permanent tire damage that
can cause loud driving noise
and unbalanced tires.
-Burnished, polished or
chromed rims must not be
used in winter driving condi
tions. The surface of the rims
does not have sufficient corro
sion protection for this and
could be permanently dam aged by road salt or similar
substances.
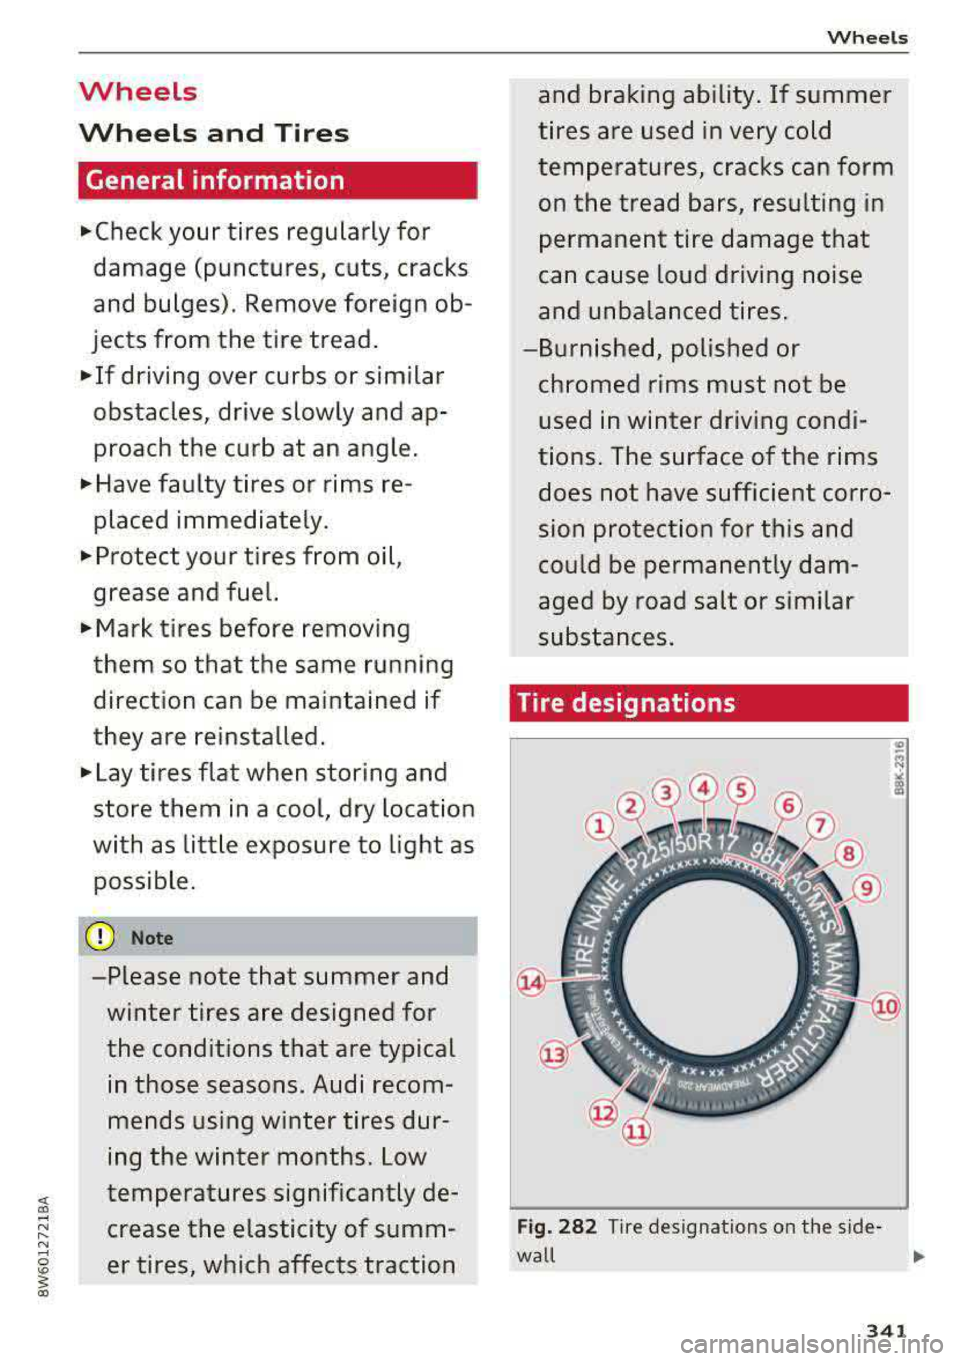
Tire designations
Fig. 282 T ir e designations on the side -
wall Ill>
341
Page 350 of 409
&_ WARNING
"
-Do not use steel rims that are
17 inches or larger. Other
wise, damage to the vehicle
and an accident could result.
-For technical reasons, it is not
possible to use tires from oth
er vehicles - in some cases,
you cannot even use tires from
the same vehicle model.
-Make sure that the tires you
select have enough clearance
to the vehicle. Replacement
tires should not be chosen
simply based on the nominal
size, because tires with a dif
ferent construction can differ
greatly even if they are the
same size. If there is not
enough clearance, the tires or
the vehicle can be damaged and this can reduce driving
safety and increase the risk of
an accident.
-Only use tires that are more
than six years old when abso
lutely necessary and drive
carefully when doing so.
-Do not use run-flat tires on
your vehicle. Using them when
not permitted can lead to ve
hicle damage or accidents.
Wheels
-If you install wheel covers on
the vehicle, make sure they al
low enough air circulation to
cool the brake system. If they
do not, this could increase the
risk of an accident.
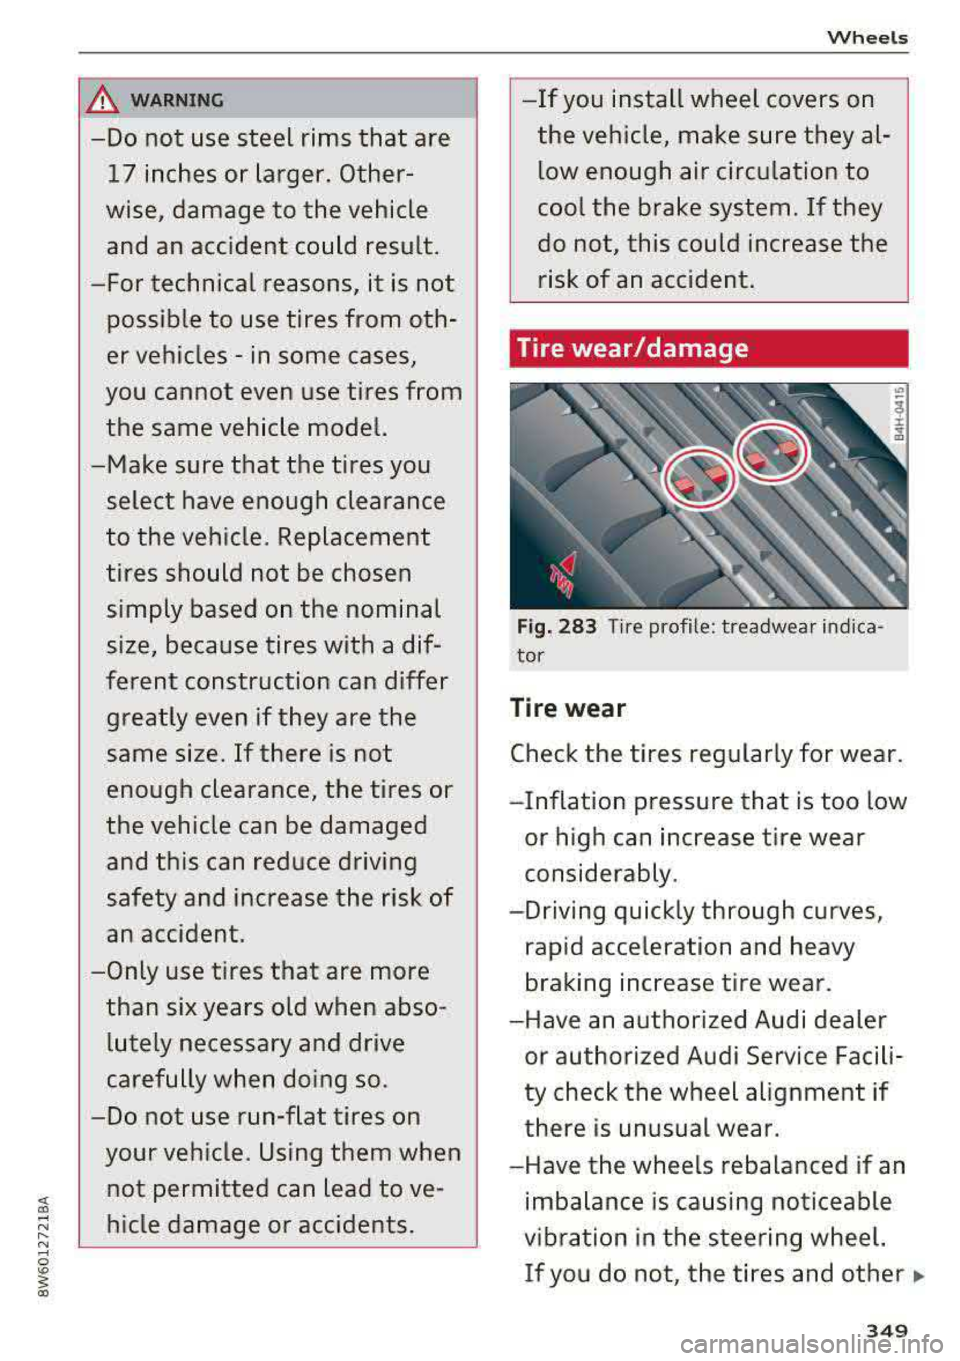
Tire wear/damage
Fig. 283 T ire profile: treadwear indica
tor
Tire wear
Check the tires regularly for wear.
-Inflat ion pressure that is too low
or high can increase tire wear
considerably.
-Driving quickly through curves,
rapid acceleration and heavy
braking increase tire wear.
-Have an authorized Audi dealer
or authorized Audi Service Facili
ty check the wheel alignment if
there is unusual wear.
-Have the wheels rebalanced if an
imbalance is causing noticeable
vibration in the steering wheel. If you do not, the tires and other
..
349
Page 351 of 409
Wheels
vehicle components could wear more quickly.
Treadwear indicator
Original equipment tires contain
treadwear indicators in the tread
pattern, which are bars that are
1/16 in (1.6 mm) high and are
spaced evenly around the tire per
pendicular to the running direc
tion
¢ fig. 283. The letters "TWI"
or triangles on the tire sidewall
indicate the location of the tread
wear indicators.
The tires have reached the mini mum tread depth
l) when they
have worn down to the treadwear
indicators . Replace the tires with
new ones
c;, .&..
Tire rotation
Rotating the tires regularly is rec
ommended to ensure the tires
wear evenly. To rotate the tires,
install the tires from the rear axle
on the front axle and vice versa.
This will allow the tires to have approximately the same length of
service life.
For unidirectional tires, make
sure the tires are installed accord-
1> Obey any applicable regulations in your
country.
350
ing to the running direction indi
cated on the tire sidewall
c;, page 374.
Hidden damage
Damage to tires and rims can of
ten occur in locations that are hidden. Unusual vibrations in the
vehicle or pulling to one side may indica te that there is tire damage .
Reduce your speed immediately.
Check the tires for damage. If no
damage is visible from the out
side, drive slowly and carefully to
the nearest authorized Audi deal er or authorized Audi Service Fa
cility to have the vehicle inspect
ed.
&_ WARNING ~
Tread that has worn too low or different tread depths on the
tires can reduce driving safety.
This can increase the risk of an
accident because it has a nega
tive effect on handling, driving
through curves, and braking,
and because it increases the
risk of hydroplaning when driv
ing through deep puddles.
Page 358 of 409
<( a, .... N ,....
N .... 0 \0
3 a,
(1400-750 (5 X 150) = 650
lbs.)
5 . De termin e the combined
w eig ht of lugg age and carg o
b eing load ed on the vehicle .
Th at w eight ma y not safel y ex
c e e d th e ava ilabl e c argo and
lu ggag e load ca pacit y ca lculat
ed in Step 4 .
6 . I f you r veh ic le will b e tow ing a
tr aile r, load from your tr ailer
will be tran sferred to y our ve
hi cle . Con sult thi s manual to
de te rmin e how this redu ces
th e av ailabl e car go and lug
ga ge load capa cit y o f your vehi
cle.
..,. Chec k the tire s idewall
(¢ page 34 1, fig . 282) to de ter
min e the de sign ated load r ating
for a speci fic tire.
Wheel bolts and rims
Wheel bolts
Wheel bolts must be clean and loosen/t ighten
eas ily.
Rims
Rims with a bolted rim ring " or with bolted wheel
covers* consist of m ultip le pieces . These compo
n ents were bolted together using specia l bolts
a nd a special procedure . You must not repair or
d isassemble
t h em ¢.&. .
_& WARNING
Wheel bolts tha t are t igh tened or re paired in
c orrectly can be come loose and result in loss
Wh eel s
of vehicle contro l, wh ich increases the risk of
an accident. For the cor rect tighten ing spec ifi
cation, see
c:> page 374, Finishing.
- Always keep the wheel bolts and the
threads in the wheel h ub clean and free of
grease.
- Only use wheel bolts that fit the rim.
- Always have damaged rims repaired by an
author ized Audi dealer or author ized Audi
Serv ice Facility. Never repair o r disassemb le
rims yourself, because th is increases the r isk
of an acc ident .
Winter tires
Winter tires significantly imp rove the vehicle 's
handling when dr iv ing in winter conditions . Be
ca use of their const ruct ion (w idth , compou nd,
t read pattern), s ummer tires prov ide less t rac
t ion on i ce and snow.
.,. Use winter tires on all four wheels .
.,. Only use winter tires that are app roved for yo ur
ve hicle.
.,. Please no te that the max imum permi tted
speed may be lowe r with winter tires
c:> .&_ . An
authoriz ed Audi dealer or authorized A udi Serv
ice Facility can inform yo u about the maximum
permitted speed for your tires .
.,. Check the tire pressure after insta lling wheels
c=> page351 .
The effectiveness of winter tires is reduced great
ly when the tread is worn down to a depth of
0.16 in (4 mm). The characteristics of w inter
tires also decrease greatly as the tire ages, re
gardless of the rema ining t read .
_& WARNING
-
- Never d rive fa ster than the max imum pe r
mitted spee d for your tires. This could c ause
the t ires to he at up too mu ch. This inc reases
the risk of an accident because it can cause
the tire to burst.
- Always adapt your driving to the road and
traffic conditions. Drive carefully and reduce
your spee d on icy or slippery roads . Even
winter t ires can lose t ract ion on black ice.
..,..
357
Page 359 of 409
Wheels
@ For the sake of the environment
Reinstall su mmer tires at the appropriate
time, because they pro vide better handling
when roads are free of snow and ice. Summer tires cause less road noise, tire wear and fuel
consumption.
@ Tips
You can also use all season tires instead of
w inter t ires. Please note that in some coun
tries where w inter tires are required, only
w inter t ires with the
& symbol may be per
m itted.
Snow chains
Snow chains not only imp rove the dr iving in w in
ter ro ad conditions, b ut also the brak ing .
.,. Only install snow chains o n the front wheels .
.,. Check and cor rect the seating of the snow
c h ains after dr iv ing a few feet, if ne cessa ry . Fo l
low the ins tructions from the m anufactu rer.
.,. Note the maximum permit ted speed when driv
ing with snow chains. Do not exceed 30 mp h
(SO km/h) .
Use of snow chains is o nly pe rmitted with certain
rim/tire combinations due to technical reasons .
Check with an authorized A udi dealer or author
ized Audi Service Fac ility to see if you may use
snow chains.
Use fine-mesh snow chain s. They must not add
more t han 0.53 in (13 .5 mm) in height, includ ing
the chain lock .
You mus t remove the snow chains on roads w it h
out snow . Otherwise, you could impai r dr iving
abi lity and damage the tires .
A WARNING
Us ing inco rrect snow chains or insta lling snow
chains incorrectly can result in loss of vehicle
control, which increases t he risk of an acc i
dent .
358
(D Note
Snow chains can damage the rims/whee l cov
ers * if the c ha ins come into direct contact
with them . Remove the whee l cove rs* first.
Use coated snow chains.
(D Tips
When using snow chains, it may be usefu l to
switch on sport mode
r=> page 152.
Low-profile tires
App lies to: vehicles with low-profi le tires
Your vehicle is equipped with low-profile t ires* at
the factory. Compared to other tire/r im combina
t ions, low-profi le tires offer a w ider t read surface
and a la rger r im diamete r with shorter tire side
walls. This results in an agile dr iv ing style. How
ever, i t may reduce the leve l of com fort and in
crease road noise whe n driving on roads in poo r
condition .
Low-p rofile ti res ca n become damaged mo re
q uickl y than st andar d tires when dr iv ing ove r
l a rge bumps, potholes, manhole covers, speed
b u mps and curbs . Therefore, it is particularly im
portant to maintain the correct tire pressure
r::> page 3 51.
To reduce the risk of damage to the tires and
rims, drive very caref ully on poor roads.
Check your wheels regu larly eve ry 2,000 m i
( 3 ,00 0 km) for d amage. For ex am ple, c heck for
bulges/crac ks on the tires or deformations/
c racks on the rims.
Af ter a heavy imp act o r damage, have the tires
and rims i nspected or replaced immedia tely by
an a uthorized Audi dea le r or authorized Audi
Service Facility .
Low-p rofile ti res c an wear out f aster than stand
a rd tires.
Summer tires are not suitable fo r cold weather,
snow or black ice. If yo u are d rivi ng in these con
d it ions, use wi nter or a ll season tires
r=> page 357.
Page 364 of 409
<( a, .... N ,....
N .... 0 \0
3 a,
A WARNING ,~
- Only wash the vehicle when the ignition is
off and follow the instructions from the car
wash operator to reduce the risk of acci dents .
- To reduce the risk of cuts, protect yourself from sha rp metal components when wash
ing the underbody or the inside of the wheel
housings .
- After washing the vehicle, the bra king effect
may be de layed due to mo isture on the
bra ke rotors or i ce in the w inte r. This in
cre ases the risk of an ac ciden t. T he bra kes
must be dried first with a few careful brake
applications .
(D Note
-If yo u wash t he ve hicl e in an au tom atic c ar
wash, yo u m ust fold the exterior m irrors in
to reduce the risk of damage to the mirrors .
Power folding exterior mirrors * must on ly
be fo lded in and out using the power folding
funct ion.
- To reduce the risk of damage to the rims
and tires, compare the width between the
whee ls on your vehicle w it h the distance be
tween the g uide rails in the car wash .
- To reduce the risk of damage, compare the
height and width of your vehicle with the
-
Ca re and cleaning
height and w idth of the inside of the ca r
was h.
- T o red uce the risk of pa int damage, do not
was h the vehicle in d irect sun light .
- T o re duce the risk of d am age, do not w ash
t he power top * w ith a pressu re washe r.
- T o re duce the risk of d amage to the surf ace,
do not use insect removing sponges, k itche n
sponges or s imilar items .
- Ma tte finish painted veh icle components :
- To reduce the risk of damage to the sur-
face, do not use polishing agents or hard
wax .
- Never use protective wax. It can destroy
the matte finish effect .
- Do not place any stickers or magnetic
signs on vehicle parts painted with matte
finish paint . The paint could be damaged
when the stickers or magne ts are re
moved .
@ For the sake of the environment
Only wash t he vehicle in facilities spec ially de
s igned for that p urpose. This will reduce the
risk of dirty wate r contamina ted with o il from
ente ring the sewe r sys tem.
Cleaning and care information
When cleaning and caring for individual vehicle
components, refer to the following tables. The information conta ined there is s imply recom
mendations . Fo r quest ions or for components that are not
listed, cons ult an autho riz ed Aud i
dealer or authorized Audi Service Fac ility. Also
follow the information fo und
in <=> ,& .
Exter io r cleaning
Component Situation Solution
Wind shield wiper
Deposits <=> page 68, Cleaning the wiper blades
blades
Headlights /
Deposits Soft sponge with a mild soap so lution a)
Tail lights
Sen sors /
Deposits Sensors: soft cloth wit h a solven t-free cleaning sol ution
camera lenses Camera lenses: soft clot h w ith an alcoho l-free cleaning
solution
Snow/ice Hand brush/solven t-free de-icing spray
363
...
Page 367 of 409
Care and cleaning
-Wheels
-Never use any paint polish or other abra-
sive materials.
- Damage to the protective layer on the
rims such as stone chips or scratches must
be repaired immediately.
- Sensors/camera lenses
- Never use warm or hot water to remove
snow or ice from the camera lens. This
could cause the lens to crack.
- Never use abrasive cleaning materials or
alcohol to clean the camera lens. This
could cause scratches and cracks.
- Power top
- Remove bird droppings immediately.
- Never use gasoline, spot remover, ben-
zene, paint thinner or other solvents to re
move.
- Door windows
- Remove snow and ice on windows and ex-
terior mirrors with a plastic scraper. To avoid scratches, move the scraper only in
one direction and not back and forth.
- Never remove snow or ice from door win
dows and mirrors using warm or hot water
because this could cause cracks to form.
- To avoid damage to the rear window de
fogger, do not apply any stickers on the heating wires on the inside of the window.
- Decorative parts/trim
- Never use chrome care or cleaning prod-
ucts.
- Paint
-To reduce the risk of scratches, the vehicle
must be free of dirt and dust before pol
ishing or waxing.
- To prevent paint damage, do not polish or
wax the vehicle in direct sunlight .
- To reduce the risk of paint damage, do not
polish away rust spots .
- Remove cosmetics and sunscreen immedi
ately- these could damage the paint.
- Displays/instrument cluster
- Make sure that the instrument cluster is
366
switched off and has cooled off before
cleaning it. - Displays, the
instrument cluster and the
trim surrounding it must not be cleaned
with dry cleaning methods because they
could become scratched.
- Make sure no fluids enter the spaces be
tween the instrument cluster and the
trim, because that could cause damage.
- Controls
- Make sure that no fluids enter the con-
trols, because this could cause damage.
- Safety belts
- Do not remove the safety belts to clean
them.
- Never clean safety belts or their compo
nents chemically or with corrosive fluids
or solvents and never allow sharp objects
to come into contact with the safety belts.
This could cause damage to the belt web
bing.
- If there is damage to the webbing, the
connections, the retractors or the buckles, have them replaced by an authorized Audi
dealer or authorized Audi Service Facility .
-Textiles/artificial leather/ Alcantara
- Never treat artificial leather/ Alcantara
with leather care products, solvents, floor
polish, shoe polish, spot remove or similar
products.
- Have a specialist remove stubborn stains
to prevent damage.
- Never use steam cleaners, brushes, hard
sponges, etc. when cleaning.
- Do not turn on the seat heating* to dry the
seat.
- Objects with sharp edges, such as zippers
or rivets on clothing or belts, can cause
damage to the surface.
- Open hook and loop fasteners, for exam
ple on clothing, can damage seat covers.
Make sure hook and loop fasteners are
closed.
- Natural leather
- Never treat leather with solvents, floor
polish, shoe polish, spot remover or simi
lar products.
Page 375 of 409
Emergency assistance
CJ) Note
When removing or installing the whee l, the
r im could hit the brake rotor and damage the
rotor. Work ca ref ull y and have a second pe r
son help you.
@ Tips
- When mounting tires w ith unidirectional
tread design
ma ke s ure the t read pattern is
po inted the r ight way
¢ page 374 .
-The wheel bolts should be clean and easy to
turn. Check for d irt and cor ros ion on the
mating s urfaces of both the wheel and the
h ub. Remove all dirt from t hese surfaces be
fo re re mount ing th e wheel.
Unidirectional tires
A unid irec tional tire p rofile is ident ified by a rrows
th at poin t in the run nin g dir e cti on o n the tire
sidewall. You mus t always a dhere to the speci
fied running d irec tion. This is necessary ens ure
the t ire's optim um perfo rmance in regar d to a d
hes ion, r unning noise, fr iction and hydrop la ning.
T o be nefi t fu lly fro m the adv ant ages of the uni
d irect ional tire des ign, you sho uld replace faulty
tires as soon as possi ble an d restore the correct
r u nning di rect io n on all of the tires.
Finishing
.,. Reinstall the caps on the whee l bolts if neces
sary .
.,. Store the vehicle tool kit in its designated
place .
.,. If the re m oved whee l does not fi t in the spa re
whee l we ll, store it se cur ely in t he luggage
com partmen t¢ page 2 63.
.,. Check the tire press ure on the ins talled whee l
as soon as possible.
.,. Co rrect the tire p ressure and store it in the I n
fota inment system
¢ page 361.
.,. The wheel bo lt tightening specification must be
90 ft lbs (120 Nm) . Check it as soon as poss ible
with a torq ue wrenc h. Dr ive ca refully unt il t hen .
.,. Have th e faulty wheel rep laced as quic kly as
poss ible.
374
(D Tips
-If you not ice that t he w heel bo lts a re cor
rode d and difficult to tur n while changing a
t ir e, t hey s hou ld be replaced befo re yo u
check the t ightening torque.
- Drive at red uce d speed unti l yo u have the
t ightening to rques checked.
· Notes on wheel changing
Please read t he informat ion¢ page 348 if yo u
are going to use a replacemen t tire which is d if
ferent from the tires on yo ur vehicle .
After you change a tire:
- Check the tire pressure on the replacement
tire immediately after installation.
- Have the wheel bolt tightening torque
checked with a torque wrench as soon as pos
sible by your authorized Audi dealer or quali
fied workshop.
- With steel and alloy wheel rims, the wheel
bolts are cor rectly tightened at a torque of
90
ft lbs (120 Nm) .
- If you notice that the wheel bolts are corroded
and difficult to turn while changing a tire,
they should be replaced before you check the
tightening torque .
- Replace the flat tire with a new one and have
it installed on your vehicle as soon as possi
ble. Remount the wheel cover .
Until then, dr ive with e xtra care and at reduced
speeds.
A WARNING
- If you are going to equip yo ur vehicle wi th
t ires or r ims which diffe r from those which
we re fac to ry insta lled , th en be su re to read
t he
informa tion ¢ page 348.
- Always make sure the damage d w heel or
ev en a fla t tire and the jack* an d tool kit are
p ro p erl y se cured in t he lug gage co mpart
me nt an d ar e no t lo o se in the pas senge r
c o mp artme nt.
- I n an ac cident or su dde n man euver they
co uld fl y forw ard , injur ing an yone i n t he ve
hicle.
Page 403 of 409
Index
Refueling . . . . . . . . . . . . . . . . . . . . . . . . . . . . 324
Fuel filler door emergency release . . . . . . 326
Remote control
refer to Remote control key . . . . . . . . . . . . 38
Remote control key . . . . . . . . . . . . . . . . . . . . 38
Remote control operation
Garage door opener (Homelink) . . . . . . . . . 51
Remote lock ing and unlocking
Aud i connect vehicle control . . . . . . . . . . . 202
Removing the caps (wheel bolts) ........ . 371
Repair manuals . . . . . . . . . . . . . . . . . . . . . . . 389
Repairs
A ' b tr ag system . . . . . . . . . . . . . . . . . . . . . . 292
Replacement key . . . . . . . . . . . . . . . . . . . . . . 38
Replacing Light bulbs
380
Replacing wiper blades . . . . . . . . . . . . . . . . . 68
Reporting Safety Defects . . . . . . . . . . . 266, 267
Reset
refer to Restart (MMI) . . . . . . . . . . . . . . . . 256
Reset button (trip odometer) . . . . . . . . . . . . 12
Resetting the trip odometer . . . . . . . . . . . . . 12
Residual heat (automatic climate control) . . 84
Restart (MMI) . . . . . . . . . . . . . . . . . . . . . . . . 256
Retractor . . . . . . . . . . . . . . . . . . . . . . . . . . . . 272
Reverse gear . . . . . . . . . . . . . . . . . . . . . . . . . . 96
Rewinding (audio/video file) . . . . . . . . . . . . 239
Right control button . . . . . . . . . . . . . . . . . . . . 14
Rims ...... ... .. ................ ... . 357
Clean ing . . . . . . . . . . . . . . . . . . . . . . . . . . . 364
Ringtone settings . . . . . . . . . . . . . . . . . . . . . 188
Roaming
refer to Data connection . . . . . . . . . . . . . . 198
Rollbar
refer to Active rollover protection system 265
Roof rack . . . . . . . . . . . . . . . . . . . . . . . . . . . . . 80
Roof load . . . . . . . . . . . . . . . . . . . . . . . . . . . 80
also refer to Roof rack . . . . . . . . . . . . . . . . . 80
Route criteria . . . . . . . . . . . . . . . . . . . . . . . . 216
Route guidance
refer to Navigation . . . . . . . . . . . . . . . . . . . 207
Running direction (tires) . . . . . . . . . . . . . . . 374
s
Safe driving habits . . . . . . . . . . . . . . . . . . . . 258
402
Safety
Airbag system ... .. .. .............. .
Be lts
........ ... .. .. ...............
Cargo
Correct seating position ............ . .
Pedal area ........ ... .............. .
Telephone .... ... .. .. ........ ..... . .
Safety belt h eight adjustment .......... .
Safety belt microphone . .. ........... . .
Safety belt position .. .. ............. . .
Safety belt height adjustment ........ .
Safety belts worn by pregnant women . . .
Safety be lt pretensioner 277
268
263
259
263
178
274
189
273
274
274
Service and disposal. . . . . . . . . . . . . . . . . . 276
Safety be lts . . . . . . . . . . . . . . . . . . . . . . 268, 272
Belt positioners . . . . . . . . . . . . . . . . . . . . . 272
Cleaning . . . . . . . . . . . . . . . . . . . . . . . . . . . 365
Danger to passengers who do not wear a
safety belt . . . . . . . . . . . . . . . . . . . . . . . . . 270
Fastening . . . . . . . . . . . . . . . . . . . . . . . . . . 272
Improperly worn . . . . . . . . . . . . . . . . . . . . 275
Not worn .................. ........ 270
Safety be lt position . . . . . . . . . . . . . . . . . . 273
Safety instructions . . . . . . . . . . . . . . . . . . . 271
Securing child safety seats ............ 313
Special considerations for pregnant wom-
en . . . . . . . . . . . . . . . . . . . . . . . . . . . . . . . . 274
Unfastening . . . . . . . . . . . . . . . . . . . . . . . . 274
Warning/indicator light . . . . . . . . . . . . . . 268
Worn properly . . . . . . . . . . . . . . . . . . . . . . 270
Safety belt warning light . . . . . . . . . . . . . . . 268
Safety instructions for side curtain airbags . . . . . . . . . . . . . . . 300
for us ing child safety seats . . . . . . . . . . . . 306
for using safety belts . . . . . . . . . . . . . . . . . 271
Monitoring the Advanced Airbag System 291
Saving fuel Energy consumers . . . . . . . . . . . . . . . . . . . . 18
R t· ecu per a ton . . . . . . . . . . . . . . . . . . . . . . . . 17
Scan (radio) . . . . . . . . . . . . . . . . . . . . . . . . . . 226
Screen
refer to Display . . . . . . . . . . . . . . . . . . . 13, 16
Screwdriver . . . . . . . . . . . . . . . . . . . . . . . . . . 368
SD card reader (MMI) . . . . . . . . . . . . . . . . . . 231
sos
refer to Voice recognition system . . . . . . . 170
Search area (point of interest) . . . . . . . . . . . 210