transmission AUDI A5 COUPE 2018 Owners Manual
[x] Cancel search | Manufacturer: AUDI, Model Year: 2018, Model line: A5 COUPE, Model: AUDI A5 COUPE 2018Pages: 409, PDF Size: 67.63 MB
Page 28 of 409
Cockpit over view
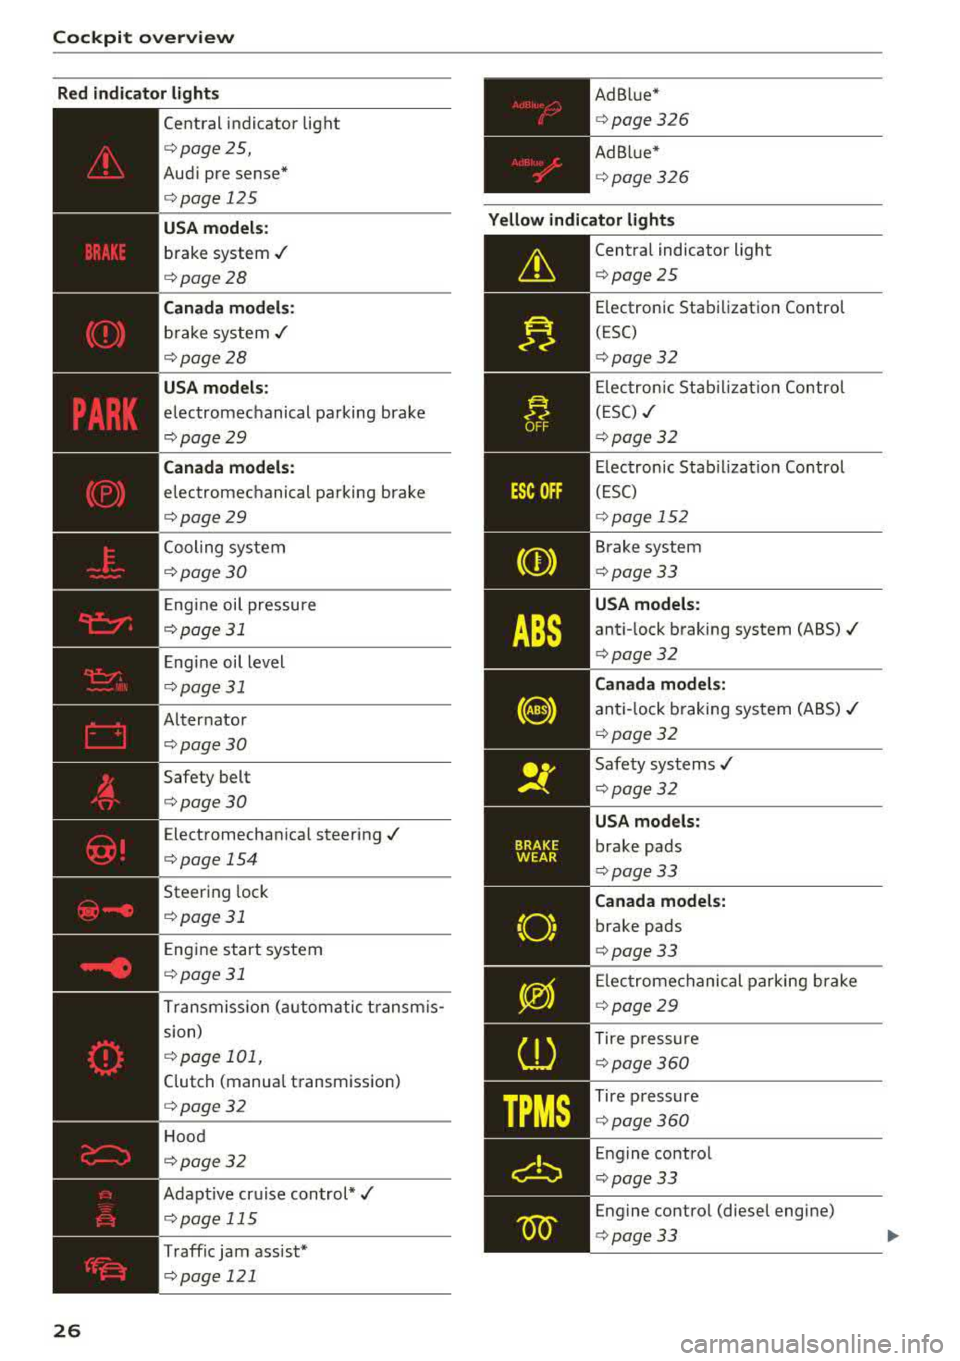
Red indicator ligh ts
26
--------------
Central indicator light
¢page 25,
Aud i pre sense*
¢page 125
USA model s:
brake system ./
¢page28
Cana da m od els:
brake system ./
¢page28
USA models :
electromechanical parking brake
¢page29
Canada models:
electromechanical parking brake
¢page29
Cooling system
¢page30
Engine oil pressure
¢page 31
E ngine oil level
¢page 31
Alter nator
¢page30
Safety belt
¢page30
Electromechan ica l steering ./
¢page 154
Steering lock
¢ page 31
Engine start system
¢page 31
Transmiss ion (automatic t ransm is
sion)
¢ page 101,
Clutch (manual transmission)
¢page32
Hood
¢page32
Adapt ive cr uise control*./
¢page 115
Traffic jam assist*
¢page 121 Ad B
lue*
¢ page326
Ad Bl ue*
¢ page 326
Yellow indi cator lights
--------------
Central indicator light
¢page25
Electronic Stabi lization Control
(ESC)
¢ page32
Elec tronic Stab il izat io n Contro l
(ESC)
./
¢ page32
Electronic Stab ilizat ion Control
(ESC)
¢ page 152
Brake system
¢page 33
USA models:
anti- lock braking system (ABS) ./
¢page32
Canad a model s:
ant i-lock braking system (ABS)./
¢ page32
Safety systems ./
¢page32
USA mode ls:
brake pads
¢ page33
Ca nad a model s:
brake pads
¢ page 33
E lec tromechanical parking brake
¢ page29
Tire p ressure
¢page360
Tire pressure
¢ page 360
Engine contro l
¢page 33
Engine contro l (diesel engine)
¢ page 33
Page 29 of 409
<( a, .... N ,....
N .... 0 \0
3 a,
'
-Yli-, I '
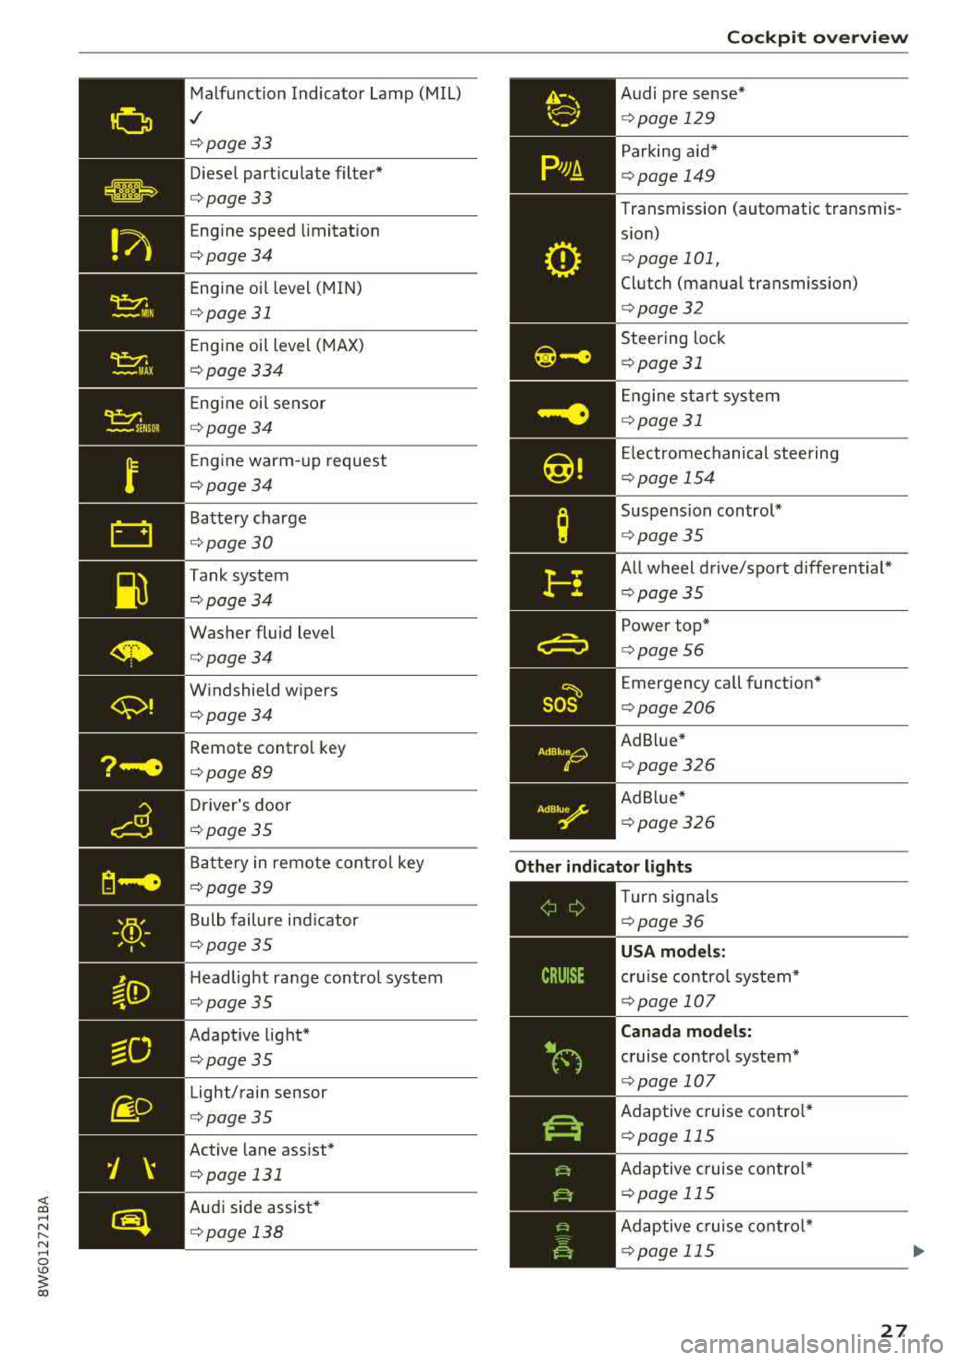
Malfunct ion Indicato r Lamp (MIL)
,/
c:>page 33
Diese l part icu late filter*
c:>page33
Eng ine speed limitat ion
c:> page 34
Eng ine oil level ( MIN)
c:>page 31
Eng ine oil level ( MAX)
c:> page 334
Eng ine oi l sensor
c:> page 34
Eng ine warm- up request
c:>page 34
B attery charge
c:> page 30
Tank system
c:>page34
Washer fluid level
c:> page 34
W indshield w ipers
c:> page 34
Remote control key
c:>page 89
D river's door
c:> page 35
Battery in remote cont rol key
c:>page 39
B ulb failure ind icator
c:>page 35
H eadlight ra nge contro l system
c:> pag e 35
Adapt ive light*
c:> page 35
Light/ rain sensor
c:> page 35
Active lane ass ist *
c:> page 131
Audi side assist*
c:> page 138
so~
Cockpit o verview
Audi pr e se nse *
c:>page 129
Par king aid*
c:> page 149
Transmission (automatic transmis
s ion)
c:> page 101,
Clutch (man ual transmission)
c:> page 32
Steering lock
c:> page 31
En gine st art system
c:> page 31
Electrome chanical stee ring
c:> page 15 4
Suspension control*
c:>page 35
All w heel drive/sport differential*
c:> page 35
Power top*
c:>page 56
Emergency call funct ion "
c:> page 206
Ad B lue*
c:> page 326
Ad Blu e*
c:> page 326
Other indicator lights
--------------
Turn signals
c:> page 36
USA models:
cruise contro l system*
c:> page 107
Canada models:
cruise contro l system*
c:> page 107
Adaptive c ruise contro l*
c:> page 115
Ad aptive cruise contro l*
c:> page 115
Ad aptive cruise cont ro l*
c:> page 115
27
Page 35 of 409

<( a, .... N ,....
N .... 0 \0
3 a,
C© ) Brake system
rm Brakes overheating . Please shift to D
rm Brakes overheating. Please select a gear and
follow gear recommendation
There was a heavy load on the brakes. Engage a
suitable gear (manual transm ission) or place the
selector lever in the D/S position (automat ic
transmission) to use the eng ine braking effect
and reduce the load on the brakes.
~·
:t:J /(0 : Brake pads
II (USA models)/£i1 (Canada models) Brake
pads: wear limit reached. You can continue driv
ing. Please contact Service
The brake pads are worn.
Drive to an authorized Aud i dealer or authorized
Aud i Service Facility as soon as possible to have
the malfunct ion corrected .
c:l:::, Engine control
II Drive system: malfunction! Please contact
Service
There is an engine control malfunction .
Drive slow ly to an author iz ed Audi dealer or au
thor ized Audi Service Facility to have the eng ine
checked .
W Engine control (diesel engine )
Applies to: vehicles with diesel engines
The engine is preheating if the II indicato r light
turns on when the ignition is switched o n.
I f the indicator light does not turn on or b links
while driving , there is an eng ine control malfunc
tion .
Immediately drive slowly to an authori zed Aud i
dealer or authorized Aud i Serv ice Facility to have
the malfunction co rrected .
o Malfunction indicator lamp (MIL)
The malfunction indicato r lamp (MIL) is part of
the On -Board Diagnostic System (OBD II). The Cockpit overview
('4 ,;ymbol turns on when the
ignition is switched
on and turns off again once the engine is started
and running at a steady idle speed. This indicates
that the MIL is function ing correctly.
T he indicator light turns on if there is a malfunc
tion in the engine electronics. See an authorized
Audi dealer or authorized Audi Service Fac ility to
have the malfunction corrected . For additional
information, see
c:::> page 24.
The indicator light can a lso turn on if the fuel fill
er cap is not closed correctly
c:::> page 324.
,m,, Diesel particulate filter
Applies to : vehicles wit h diesel eng ine a nd diesel particulate
filter
II Particulate filter : malfunction! See owner's
manual
T he diese l particulate filter requires regenera
tion . To support the filter 's self-cleaning func
tion:
Drive for approximately 15 minutes at a mini
mum of 37 mph (60 km/h) in 4th or 5th gear
(manua l transmission) or in the S selector lever
position (automatic transmission). Keep the en
gine speed at approximately 2,000 RPM . The
temperature increase that will result from th is
can burn off the soot in the filter . The ind icator
light will turn off when the cleaning has complet
ed successfully .
If the indicator light does not turn off, drive im
med iate ly to an authori zed Audi dealer or author
ized Audi Service Facility to have the malfunct ion
corrected .
A WARNING "---
Always adapt your speed to the current
weather, road and traffic conditions. You
should never disobey traffic laws in order to
follow driving recommendations .
@ Tips
For additional informat ion on the diesel par
ticulate filter, see
c:::> page 329 .
33
Page 38 of 409
Cockpit over view
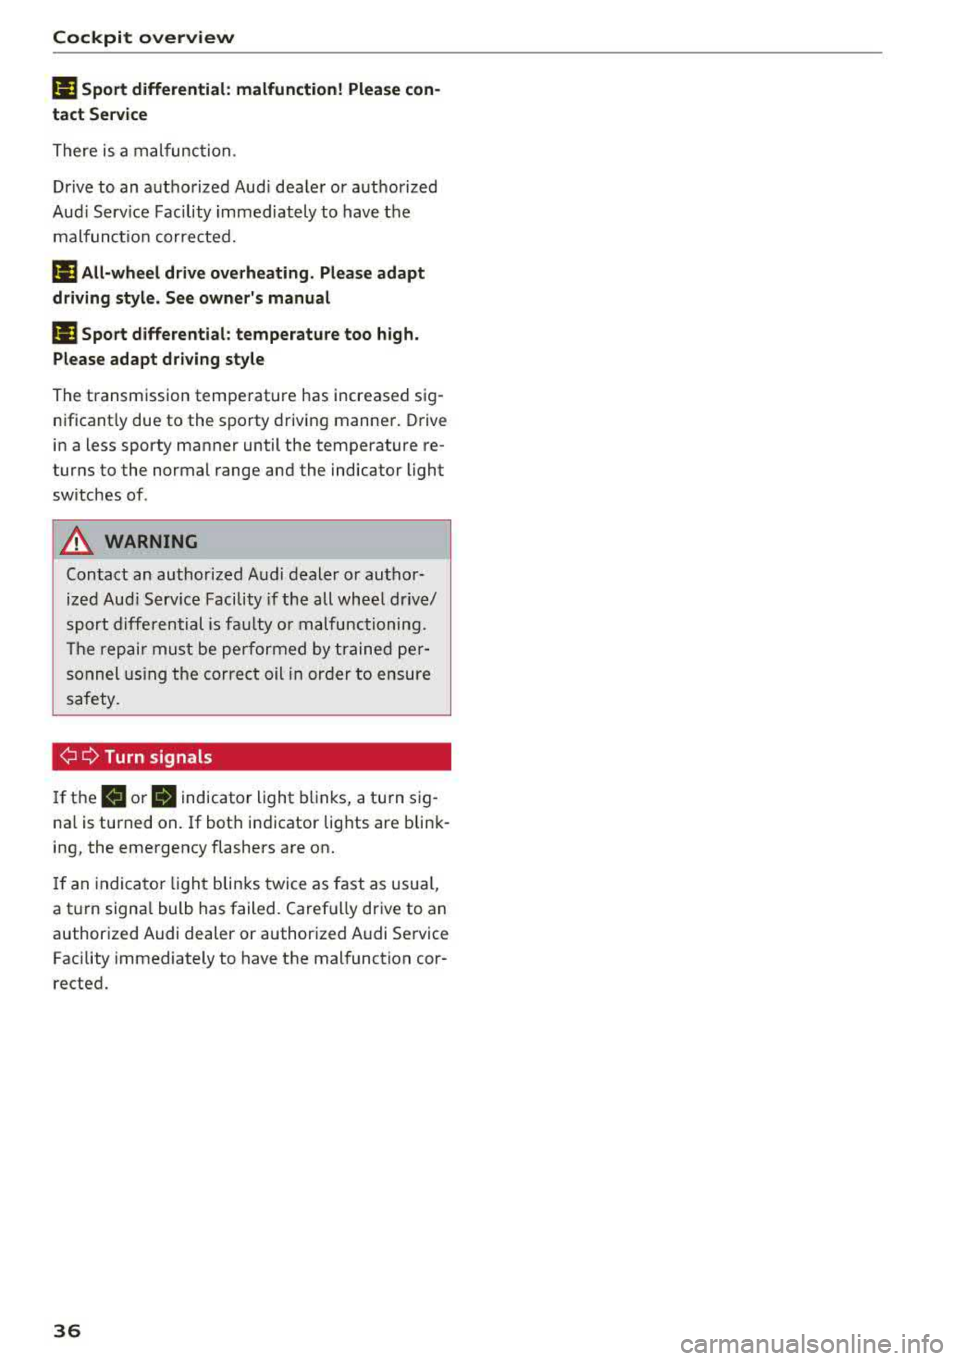
Ill Sport d ifferential : malfunction! Please con
tact Se rvice
There is a malfunction.
Dr ive to an authorized Aud i dealer or authorized
Aud i Serv ice Facility immediately to have the
malfunct io n corrected.
Ill All-whee l dri ve o verhe ating . Ple ase a dapt
driving st yle . See owner' s manual
Ill Sport d ifferential : temper ature too high.
Ple ase adapt drivi ng sty le
The transmission temperature has increased sig
nificant ly due to the sporty driv ing manner. Drive
in a less sporty manner until the temperature re
turns to the normal range and the indicator light
sw itches of .
A WARNING
Contact an authorized Audi dealer or author
ized Aud i Serv ice Facility if the all whee l dr ive/
sport diffe rential is fau lty o r malfunctioning.
The repair must be performed by trained per
sonnel using the correct oil in order to ensure
safety.
¢¢ Turn signals
If the . or .l indicator light b links, a turn s ig
na l is turned on. If bot h indicator lig hts are blink
ing, the emergency flashers are on.
If an indicato r light blinks twice as fast as usua l,
a t urn signa l bulb has failed. Caref ully dr ive to an
authorized Audi dealer or author ized Audi Service
Facility immediately to have the malfunction cor
rected.
36
Page 44 of 409
Opening and closing
luggage compartment lid also unlocks when All
is selected. If you select Driver 's door in a vehicle
with a convenience key*, only the door whose handle you pull will unlock.
If you select
Driver's door , all the doors and lug
gage compartment lid will unlock if you press the
m button on the remote control key twice .
Disable rear lid handle -if you select On , the lug
gage compartment lid hand le is locked. In this
case, the luggage compartment lid can be
opened with the
c::$ button on the remote con
trol key or w ith the
c::$ button in the driver's
door. In vehicles with a convenience key*, you can
still open the luggage compartment lid using the
handle if an author ized remote control key is
near the proximity sensor*.
Fold mirrors * -if you select On , the exterior rear
view mirrors fold in automatica lly when you press
the~ button on the remote control key or touch
the sensor* in the hand le .
Tone when locking1> -if you select On , a tone
will sound when you lock the vehicle.
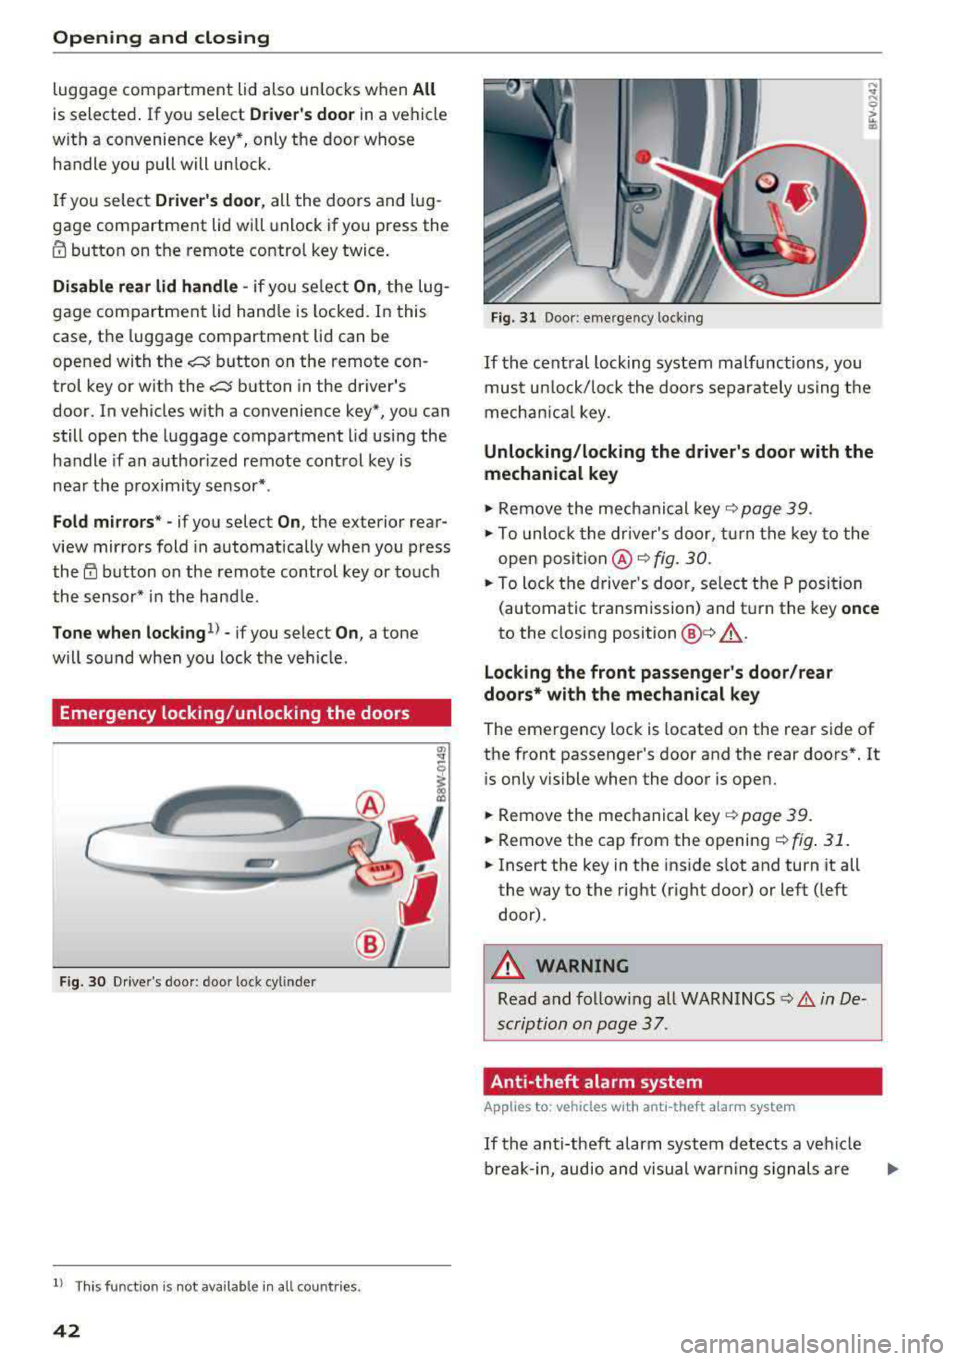
Emergency locking /unlocking the doors
F ig. 30 Drive r's door : door lock cylinder
l) This function is not availab le in all countries.
42
Fig. 31 Door: emergency locking
If the central locking system malfunctions, you
mus t un loc k/lock the doo rs separately using the
mechanical key.
Unlocking/locking the driver's door with the
mechanical key
.,. Remove the mechanical key¢ page 39.
.,. To unlock the driver's door, turn the key to the
open position @¢
fig. 30.
.,. To lock the driver's door, se lect the P position
(automatic transmission) and t urn the key
once
to the closing position @¢&, .
Locking the front passenger's door/rear
doors* with the mechanical key
The emergency lock is located on the rear side of
the front passenger's door and the rear doors*. It
is only visible when the door is open .
.,. Remove the mechanical key ¢ page 39 .
.,. Remove the cap from the opening ¢ fig. 31 .
.,. Insert the key in the inside slot and turn it all
the way to the right (right door) or left (left
door).
A WARNING
Read and following all WARNINGS c:) A in De
scription on page 3
7.
Anti-theft alarm sy stem
Applies to: vehicles wit h anti -theft ala rm system
If the anti-theft alarm system detects a vehicle
break-in, audio and visual warning signals a re
..,.
Page 45 of 409
triggered. The anti-theft alarm system is activat
ed when the vehicle is locked as usua l.
It
switches off when the vehicle is unlocked.
If the a larm is trigge red, it w ill shu t off automat
ically a fter a ce rtain amount of time . Switch the
ignition on or press
the m button on the remote
control key to turn
off the alarm.
Luggage compartment
Lid
Opening /closing the luggage compartment
lid
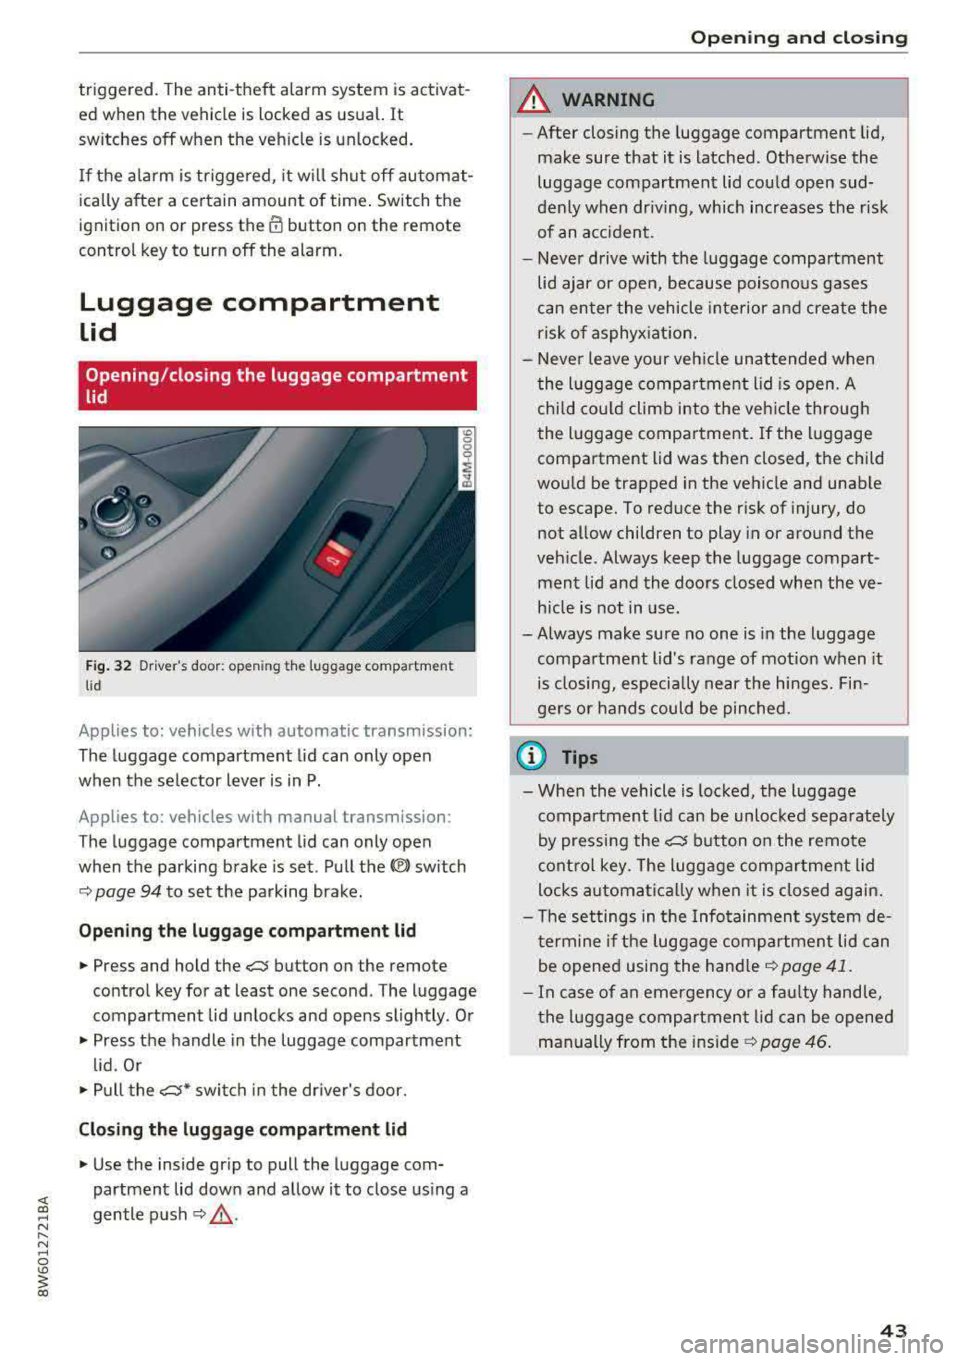
Fig . 32 Driver 's door: opening the luggage compartment
lid
Applies to: vehicles with automatic transmission:
The luggage compartment lid can only open
when the selector lever is in P.
Applies to: vehicles with manual transmission:
The luggage compartment lid can only open
when the parking brake is set. Pull the
«el) sw itch
~ page 94 to set the parking brake.
Opening th e luggage compartment lid
.,. Press and hold the c:;; button on the remote
contro l key for at least one second . The luggage
compartment lid unlocks and opens slightly . Or
.,. Press the handle in the luggage compartment
l id. Or
.,. Pull the c:>* switch in the dr iver's door.
Cl osing the luggage compartment lid
.,. Use the inside gr ip to pull the luggage com
partment lid down and allow it to close using a
gentle p ush
~ ,&. .
Op enin g an d clos ing
A WARNING
--After closing the luggage compartment lid,
make sure that it is latched . Otherw ise the
luggage compartment lid could open sud
denly when dr iving, which increases the r isk
of an a cc ident.
- Never drive with the luggage compartment
lid ajar or open, because poisono us gases
can enter the vehicle interior and create the
risk of asphyx iat ion.
- Never leave your veh icle unattended when
the luggage compartment lid is open. A
child cou ld climb into the veh icle through
the luggage compartment. If the luggage compartment lid was then closed, the child
would be trapped in the vehicle and unable
to escape. To reduce the risk of injury, do
not allow children to play in or around the
veh icle . Always keep the luggage compart
ment lid and the doors closed when the ve h icle is not in use.
-Always make sure no one is in the luggage
compartment lid's range of motion when it
is closing, especially near the hinges. Fin
gers or hands could be pinched.
© Tips
- When the vehicle is locked, the luggage compartment lid can be unlocked separately
by pressing the
c:5 button on the remote
control key. The luggage compartment lid
locks automa tically when it is closed again.
- T he settings in the Infotainment system de
termine if the luggage compartment lid can be opened using the
hand le~ page 41 .
- In case of an emergency or a fau lty handle,
t he luggage compartment lid can be opened
manually from t he
ins ide ~ page 46.
43
Page 46 of 409
Opening and clo sin g
Automatic luggage compartment lid
Applies to: vehicles with automatic luggage compartment lid
The luggage compartment lid can be opened and
closed electrically.
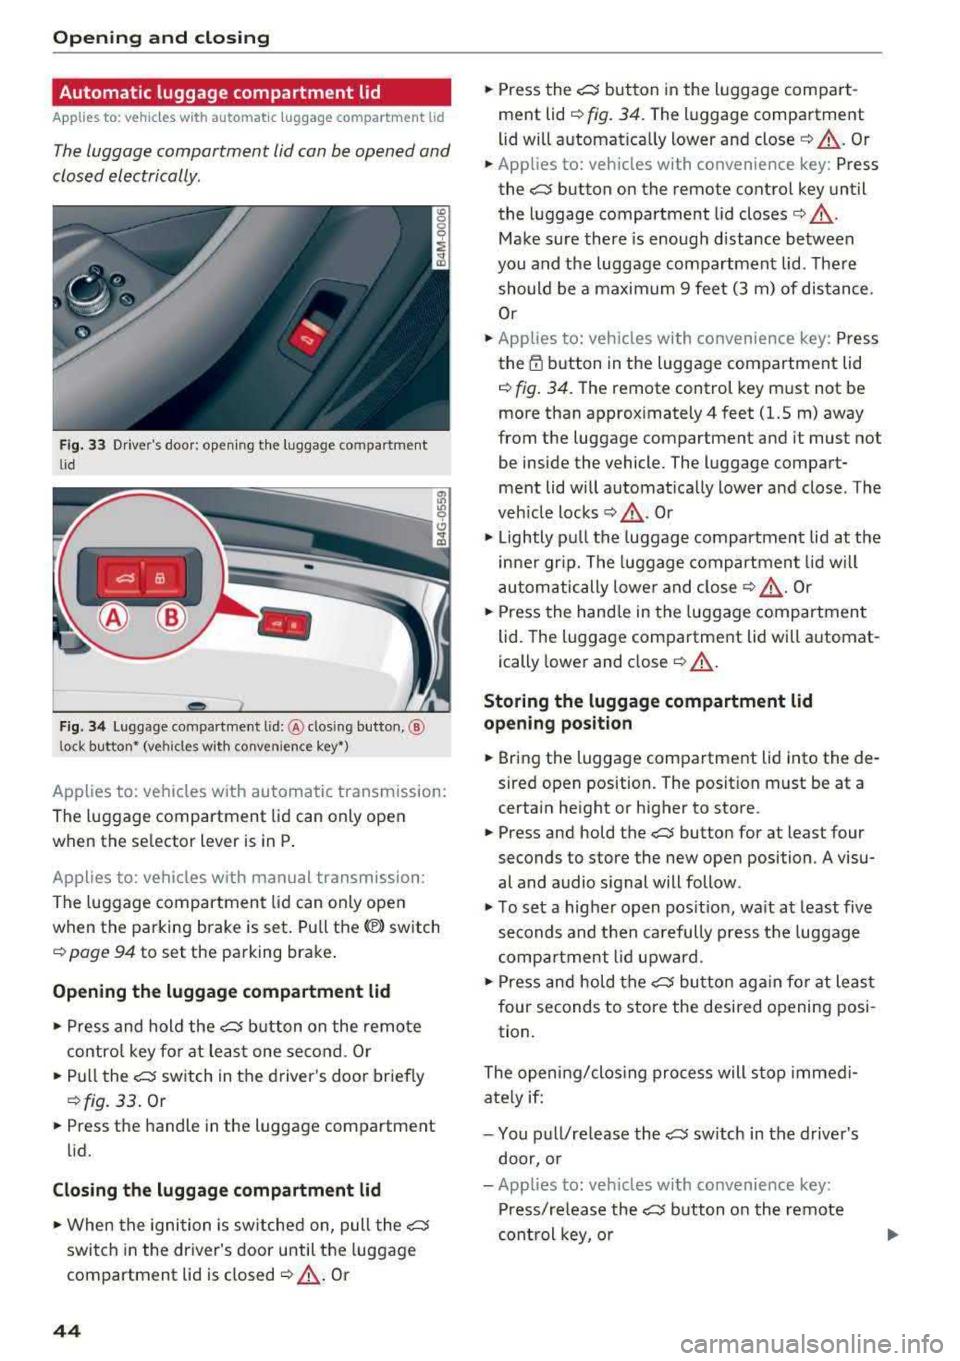
F ig. 33 Driver's doo r: opening the luggage compartment
lid
Fig. 34 Luggage compartment lid: @clos ing button, ®
lock button* (vehicles with convenience key*)
Applies to: vehicles with automatic transmission:
The luggage compartment lid can only open
when the se lector lever is in
P .
Applies to: vehicles with manual transmission:
The luggage compartment lid can only ope n
when the parking brake is set. Pull
the© switch
¢ page 94 to set the parking brake .
Opening the luggage compartment lid
... Press and hold the ~ b utton on the remote
contro l key fo r at leas t one second . Or
... Pu ll the~ switch in the driver 's door briefly
¢ fig. 33 . Or
... Press the handle in the luggage compartment
lid.
Cl osing th e luggage compartment lid
... When the ignition is sw itched on, pull the~
switch in the driver's door until the luggage
compartment lid is closed
¢ ,& . Or
44
... Press the~ button in the luggage compart
ment lid
¢ fig. 34. The luggage compartment
lid wi ll automat ica lly lower and
close¢ ,&. Or
... Applies to: vehicles with convenience key: Press
the~ button on the remote control key until
the luggage compartment l id
closes¢ .&,.
Make sure there is enough distance between
you and the luggage compartment lid . The re
should be a maxim um 9 feet (3 m) of distance.
Or
... Applies to: vehicles with convenience key: Press
the
tf) button in the luggage compartment lid
¢ fig. 34. The remote control key m ust not be
more than approx imately
4 feet (1.5 m) away
from the luggage compartment and it must not
be inside the vehicle. The luggage compart
ment lid will automatically lower and close. The
veh icle
locks ¢.&_ . Or
... Lightly p ull the luggage compartment lid at the
in ner gr ip. The luggage compartment lid wi ll
automatically lowe r and close
¢ .&_ . Or
... Press the hand le in the luggage compartment
lid. The luggage compartment lid will automat
ically lower and close
¢ .&, .
Storing the luggage compartment lid
opening position
... Bring the luggage compartment lid into the de
sired open position. The position must be at a
certain height or higher to store .
... Press and hold the~ button for at least four
seconds to store the new open position . A visu
al and audio s ignal will follow.
... To set a higher open pos it ion, wa it at least five
seconds and then carefully p ress the luggage
compa rtment lid upward .
... Press and hold the~ butto n aga in fo r at least
four seconds to store the desired opening posi
tion.
The opening/clos ing process will stop immedi
ate ly if:
- You pu ll/re lease
the~ sw itch in the drive r's
door, or
- Applies to: vehicles with convenience key:
Press/re lease
the~ b utton o n the remote
con trol key, o r
Page 60 of 409
Power top
Power top emergency
operation
Preparation
Applies to: vehicles with power top
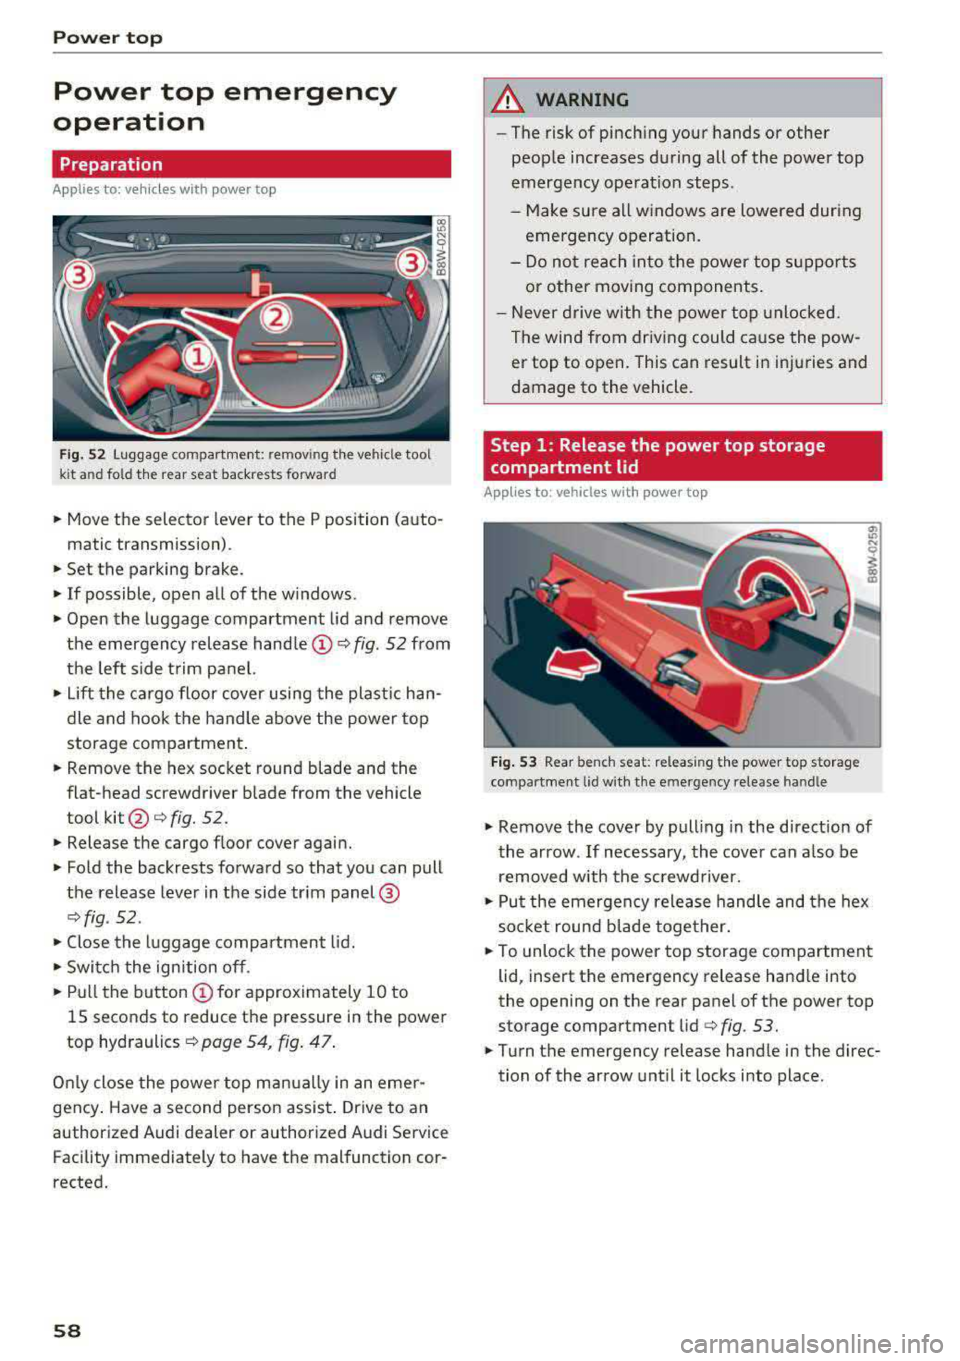
f ig. 52 Luggage compartme nt: remov ing the vehicle tool
k it a nd fo ld the rear seat back rests forward
• Move the selector lever to the P position (auto-
matic transmission) .
• Set the parking brake.
• If possible, open all of the w indows .
• Open the luggage compartment lid and remove
the emergency release
handle@Q fig. 52 from
the left side trim panel.
• Lift the cargo floor cover using the plastic han
dle and hook the handle above the power top
storage compartment .
• Remove the hex socket round blade and the
flat-head screwdriver blade from the vehicle
tool
kit @ c:> fig. 52.
• Release the cargo f loor cover again.
• Fold the backrests forward so that you can pull
the release lever in the side trim panel@
Qfig . 52 .
• Close the luggage compartment lid.
• Switch the ignition off.
• Pull the button @for approximately 10 to
15 seconds to reduce the pressure in the power
top hydraulics
c:> page 54, fig. 47 .
Only close the power top manually in an eme r
gency . Have a second person assist . Drive to an
authorized Audi dealer or authorized Audi Service Facility immediately to have the malfunction cor
rected.
58
A WARNING
- The risk of pinch ing your hands or other
people increases during all of the power top
emergency operation steps .
-Make sure all windows are lowered during
emergency operation.
-Do not reach into the power top supports
or other moving components.
- Never drive with the power top unlocked.
The wind from driving could cause the pow
er top to open. This can result in injuries and
damage to the vehicle.
Step 1 : Release the power top storage
compartment lid
Applies to : vehicles with power top
Fig. 53 Rear bench seat: releas ing the power top storage
compartment lid w ith the e mergency release han dle
"' Ill
I
"' Remove the cover by pulling in the direct ion of
the arrow . If necessary, the cover can a lso be
removed with the screwdriver.
• Put the emergency release handle and the hex
soc ket round b lade together.
• To unlock the power top storage compartment
lid, insert the emergency release handle into
the opening on the rear panel of the power top
storage compartment lid
c:> fig. 53.
• Turn the emergency release handle in the direc
tion of the arrow until it locks in to place.
Page 88 of 409
Driving
Driving
General information
Breaking in
A new vehicle must be broken in for the first 1,000 mi les (1,500 km). Do not drive at speeds
that will exceed 2/3 of the maximum perm itted
engine speed (RPM) for the first 600 miles
(1,000 km), and avoid full acceleration during
this period . You may gradually start increasing
the RPM and the speed between 600 miles (1,000 km) and 1,000 miles (1,500 km) .
During the first hours of use, the engine has a
h igher internal friction than later on when all
moving parts have settled into place with each
other.
How the vehicle is driven during the first 1,000
miles (1,500 km) also affects the engine quality.
Drive at moderate engine speeds after the initial
break-in period, particularly when running a cold
engine. This will reduce engine wear and improve
the mileage .
Do not drive at too low of an engine speed (RPM) .
Shift down if the engine stops running "smooth ly". Extremely high engine speeds are automati
cally reduced .
Reducing the risk of vehicle damage
(D Note
When driving on poor roads, by curbs and on
steep ramps, make su re that low-hang ing
components such as the spoi ler and exhaust
system do not come into contact with these
or they could be damaged. This especially ap
plies to vehicles with low ground clearance
and vehicles that are heavily loaded.
Driving through water on roads
Note the following to reduce the risk of vehicle
damage when driv ing through water, for example
on flooded roads:
-The water must not be any higher than the bot
tom of the vehicle body .
86
-Do not drive faster than walking speed .
A WARNING
After driving through water or mud, the effec
tiveness of the brakes may be reduced due to
moisture on the brake rotors and brake pads.
A few careful brake applications should dry
off the brakes and restore the full braking ef
fect .
{CT) Note
-Vehicle components such as the engine,
transmission, suspension or electrical sys-
tem can be severely damaged by driving
through water .
-Always switch the Start/Stop system* off
when driving through water <=:>page
91.
@ Tips
-Determine the depth before driving through
water.
-Do not stop the vehicle, drive in reverse or
switch the engine off when driving through
water .
'
-Keep in mind that oncoming vehicles may
create waves that raise the water level and
make it too deep for your vehicle to drive
through safe ly .
-Avoid driving through salt water, because
this can cause corrosion .
Economical and environmentally -friendly
dr iving
The amount of fuel consumption, the environ
mental impact and the wear to the engine,
brakes and tires depends mostly on your driving
style. With an anticipatory and economic driving
style, fuel consumption can be reduced by ap proximately 10-15%. The following tips will help
you conserve the environment and your money at the same time .
Anticipatory driving
A vehicle uses the most fuel when accelerating.
When you drive with anticipation, you do not need to brake as often and so you accelerate less.
When possible, let your vehicle coast with a gear
..,.
Page 89 of 409
engaged, for example when you notice that the next traffic light is red . This produces an engine
braking effect, which helps to protect the brakes
and tires and reduces the emissions and fuel con
sumpt ion to zero (fuel shut-off dur ing decelera
tion) .
Shift efficiently
Upshifting earlier is an effective way to save fuel.
Staying in a gear too long uses fuel unnecessari
ly.
Applies to: vehicles with manual transmission
Shift as soon as possible from first to second
gear. S hifting to the next highest gear at approxi
mately 2,000 RPMs if poss ible is recommended.
Applies to: vehicles with automatic transmissions
Press down on the acce le rator peda l slowly and
avoid "kick -down".
Avoid full acceleration
You should rarely travel at the maximum vehicle
speed. High speeds cause a disproportionately
high increase in fuel consumption, emissions and
traffic noise. Driving more slowly saves fuel.
Reduce idling time
The Start/Stop system* he lps to reduce the idling
time automatically. In vehicles without the Start/
Stop system*, it is efficient to switch the engine
off when stopped at railroad cross ings and long
r ed lights. Stopping the engine for 30-40 sec
onds already saves more fuel than the amount of
extra fuel needed to restart the eng ine.
It takes a very long time in idle to warm the en
g ine up to operating temperature. Wear and
emissions are especially h igh in the wa rm-up
phase . Therefore, you should begi n driving im
mediately a fter starting the engine . Avoid high
RPMs while do ing this .
Have maintenance performed regularly
By having maintenance performed regu larly on
your veh icle, yo u ca n he lp to reduce f uel con-
<(
~ sumption before yo u even start to drive. The
N ~ maintenance condition of your vehicle not only
8 affects traffic safety and long-term value but a l
'° 3
so impacts fuel consumption . A poorly main
tained engine can lead to fuel consumption that is 10% higher than norma l.
Avoid short trips
The eng ine and exhaust cleaning system must
reach their optimal operat ing temperatu re to ef
f ectively reduce consumption and emissions.
A cold engine uses a disproportionately high
amount of fue l. The engine reaches operating
temperat ure and consumption normalizes on ly
after approximate ly 2.5 miles (4 km).
Check the tire pressure
To save fuel, make sure the tires are always in
flated to the correct press ure
~page 351. The
fuel consumption can increase by 5% if the pres
s u re is only 0.5 bar too low. Due to the increased
rolling resistance, low tire pressures wi ll also
l ead to greater tire wear and will affect driving
behavior.
Do not drive on winter tires year-round, as this
will consume up to 10% more fuel.
Eliminate unnecessary weight
S in ce eve ry po und of ext ra weight increases f uel
consumption, a quick inspection of the luggage
compartment may be worth it to avoid unneces
sary weight .
When not be ing used, a roof rack should be re
moved to decrease the wind resistance of the ve
hicle. This will save you approximately 12% fuel
at speeds from 62 -75 mph (100 - 120 km/h) .
Save energy
The eng ine drives the generator, which generates
electric ity; the fuel consumpt io n also incr eases
with the demand for electr icity. The refore, switch
electrical eq uipment off when you no longer
need it . Examples of equipment that uses a lo t of
energy are air blowers at a high setting, the rear
window defogger and seat heating* .
@ Note
Do not leave engine idling unattended after
starting. If warning lights shou ld come on to
indicate improper operation, they would go
87