remove AUDI A6 1998 C5 / 2.G 01V Transmission Oil Pan And Oil Strainer Assembly Workshop Manual
[x] Cancel search | Manufacturer: AUDI, Model Year: 1998, Model line: A6, Model: AUDI A6 1998 C5 / 2.GPages: 44, PDF Size: 0.83 MB
Page 1 of 44
38-1
Oil pan, oil strainer and valve
body, removing and installing
WARNING!
Do not run engine with the oil pan removed or
without ATF filling and do not tow vehicle.
Notes:
Always replace a soiled or faulty valve body.
Rules of cleanliness for working on automatic
transmissions page 37
-148
.
General repair notes page 00
-27
.
Coat O-rings and sealing rings with ATF. Other
lubricating substances lead to functional
problems in the hydraulic transmission control.
Pa
ge 1 of 44 Oil
pan, oil strainer and valve bod
y, removin
g and installin
g
11/20/2002 htt
p://127.0.0.1:8080/audi/servlet/Dis
play?action=Goto&t
yp
e=re
pair&id=AUDI.B5.AT01.38.1
Page 2 of 44
38-2
Removed parts, overview
Notes:
There is a distinction made between two types
of transmission. Transmissions with hydraulic
control E17, the sensor for transmission RPM
(inductive sensor) is secured to bottom of valve
body. Transmissions with hydraulic control
E18/2, the sensor for transmission RPM (hall
effect sensor) is secured to transmission
housing behind valve body.
Information regarding which transmission is
installed can be found in tables Page 00
-4
onward.
Overview of the removed parts for
transmission with Park/Neutral Position
(PNP) Switch -E17- page 38
-3
Overview of the removed parts for
transmission with hydraulic control E18/2
page 38
-11
Pa
ge 2 of 44 Oil
pan, oil strainer and valve bod
y, removin
g and installin
g
11/20/2002 htt
p://127.0.0.1:8080/audi/servlet/Dis
play?action=Goto&t
yp
e=re
pair&id=AUDI.B5.AT01.38.1
Page 3 of 44
38-3
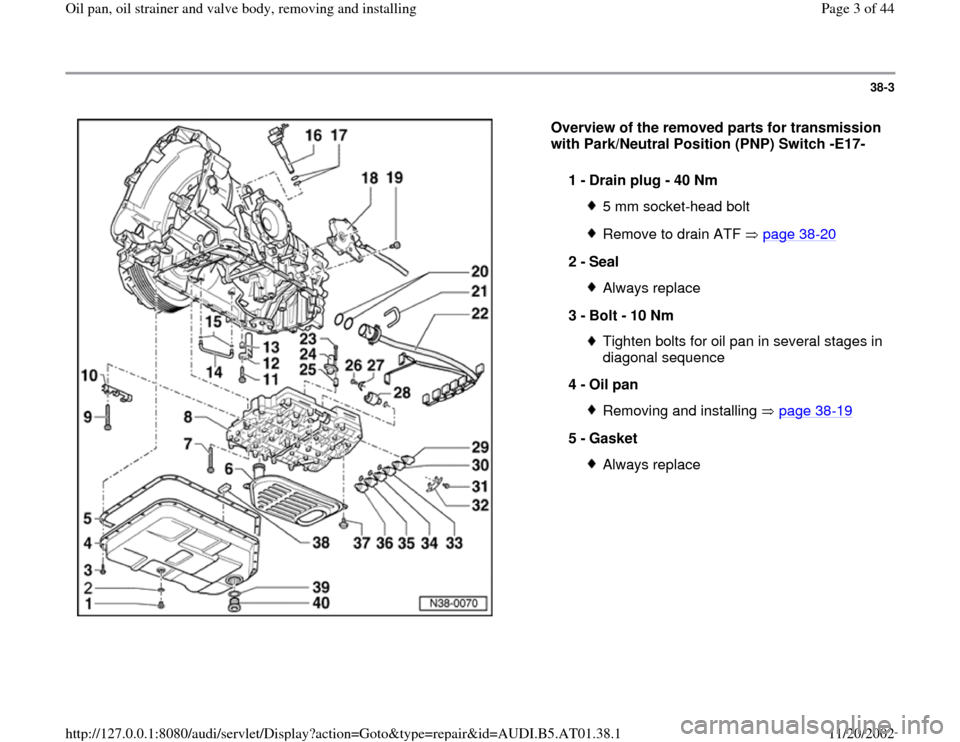
Overview of the removed parts for transmission
with Park/Neutral Position (PNP) Switch -E17-
1 -
Drain plug - 40 Nm
5 mm socket-head boltRemove to drain ATF page 38
-20
2 -
Seal
Always replace
3 -
Bolt - 10 Nm Tighten bolts for oil pan in several stages in
diagonal sequence
4 -
Oil pan Removing and installing page 38
-19
5 -
Gasket
Always replace
Pa
ge 3 of 44 Oil
pan, oil strainer and valve bod
y, removin
g and installin
g
11/20/2002 htt
p://127.0.0.1:8080/audi/servlet/Dis
play?action=Goto&t
yp
e=re
pair&id=AUDI.B5.AT01.38.1
Page 7 of 44
38-7
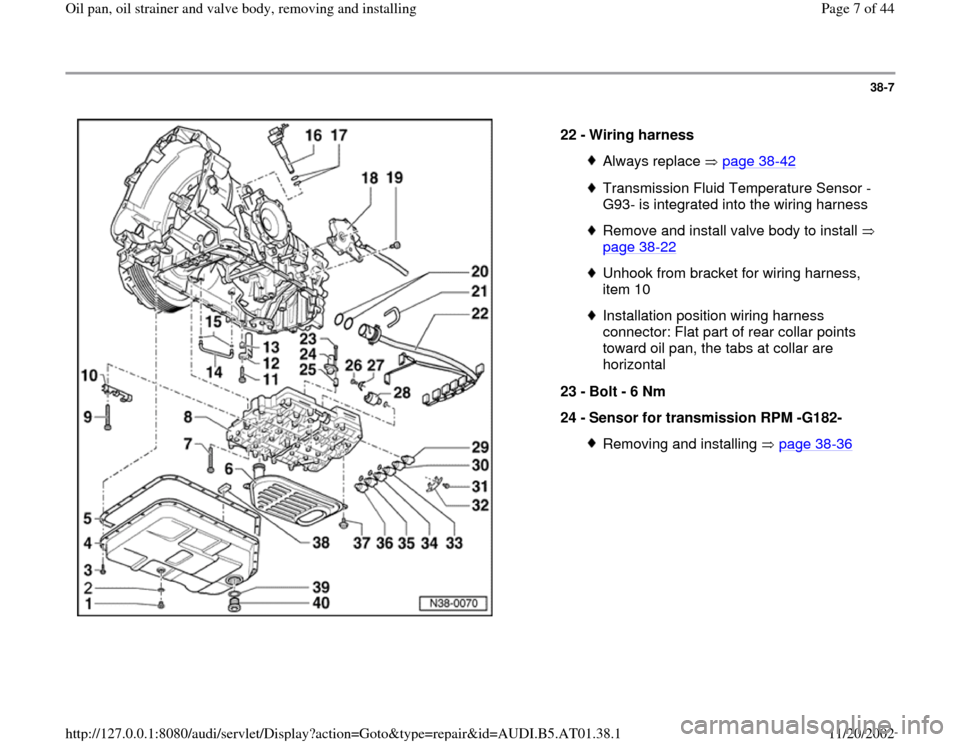
22 -
Wiring harness
Always replace page 38
-42
Transmission Fluid Temperature Sensor -
G93- is integrated into the wiring harness Remove and install valve body to install
page 38
-22
Unhook from bracket for wiring harness,
item 10 Installation position wiring harness
connector: Flat part of rear collar points
toward oil pan, the tabs at collar are
horizontal
23 -
Bolt - 6 Nm
24 -
Sensor for transmission RPM -G182- Removing and installing page 38
-36
Pa
ge 7 of 44 Oil
pan, oil strainer and valve bod
y, removin
g and installin
g
11/20/2002 htt
p://127.0.0.1:8080/audi/servlet/Dis
play?action=Goto&t
yp
e=re
pair&id=AUDI.B5.AT01.38.1
Page 8 of 44
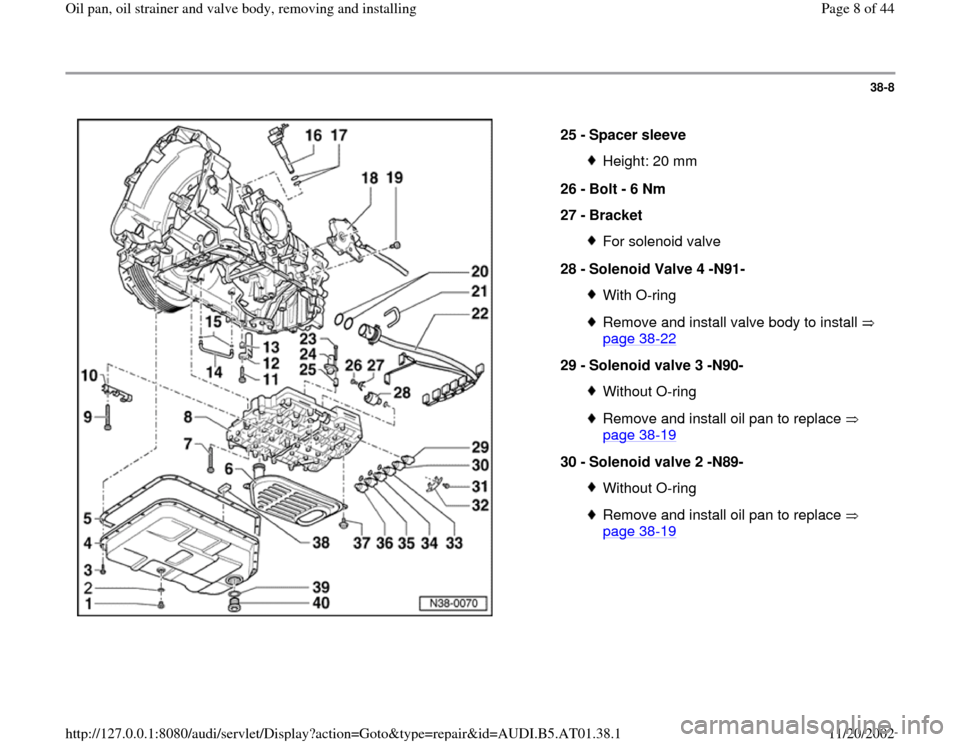
38-8
25 -
Spacer sleeve
Height: 20 mm
26 -
Bolt - 6 Nm
27 -
Bracket For solenoid valve
28 -
Solenoid Valve 4 -N91- With O-ringRemove and install valve body to install
page 38
-22
29 -
Solenoid valve 3 -N90-
Without O-ringRemove and install oil pan to replace
page 38
-19
30 -
Solenoid valve 2 -N89-
Without O-ringRemove and install oil pan to replace
page 38
-19
Pa
ge 8 of 44 Oil
pan, oil strainer and valve bod
y, removin
g and installin
g
11/20/2002 htt
p://127.0.0.1:8080/audi/servlet/Dis
play?action=Goto&t
yp
e=re
pair&id=AUDI.B5.AT01.38.1
Page 9 of 44
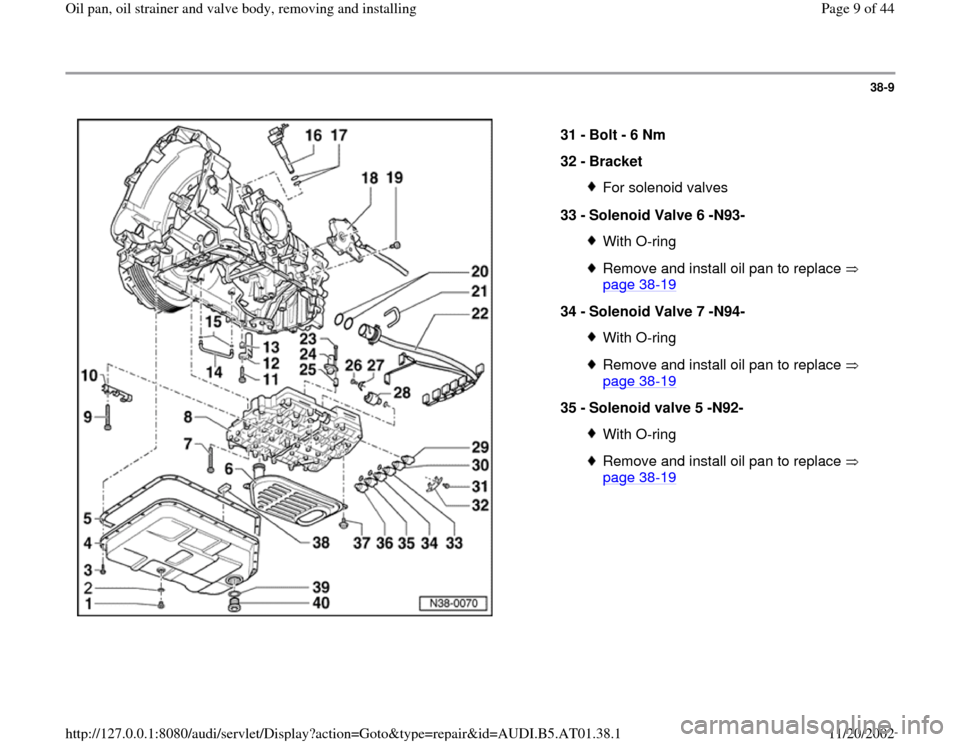
38-9
31 -
Bolt - 6 Nm
32 -
Bracket
For solenoid valves
33 -
Solenoid Valve 6 -N93- With O-ringRemove and install oil pan to replace
page 38
-19
34 -
Solenoid Valve 7 -N94-
With O-ringRemove and install oil pan to replace
page 38
-19
35 -
Solenoid valve 5 -N92-
With O-ringRemove and install oil pan to replace
page 38
-19
Pa
ge 9 of 44 Oil
pan, oil strainer and valve bod
y, removin
g and installin
g
11/20/2002 htt
p://127.0.0.1:8080/audi/servlet/Dis
play?action=Goto&t
yp
e=re
pair&id=AUDI.B5.AT01.38.1
Page 10 of 44
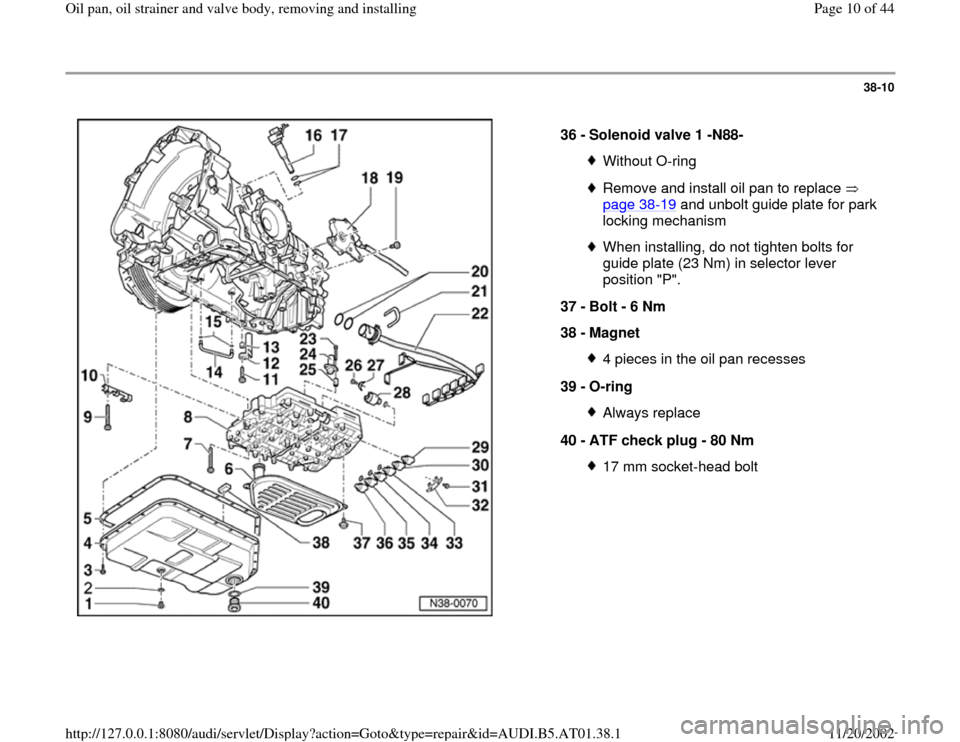
38-10
36 -
Solenoid valve 1 -N88-
Without O-ringRemove and install oil pan to replace
page 38
-19
and unbolt guide plate for park
locking mechanism
When installing, do not tighten bolts for
guide plate (23 Nm) in selector lever
position "P".
37 -
Bolt - 6 Nm
38 -
Magnet 4 pieces in the oil pan recesses
39 -
O-ring Always replace
40 -
ATF check plug - 80 Nm 17 mm socket-head bolt
Pa
ge 10 of 44 Oil
pan, oil strainer and valve bod
y, removin
g and installin
g
11/20/2002 htt
p://127.0.0.1:8080/audi/servlet/Dis
play?action=Goto&t
yp
e=re
pair&id=AUDI.B5.AT01.38.1
Page 11 of 44
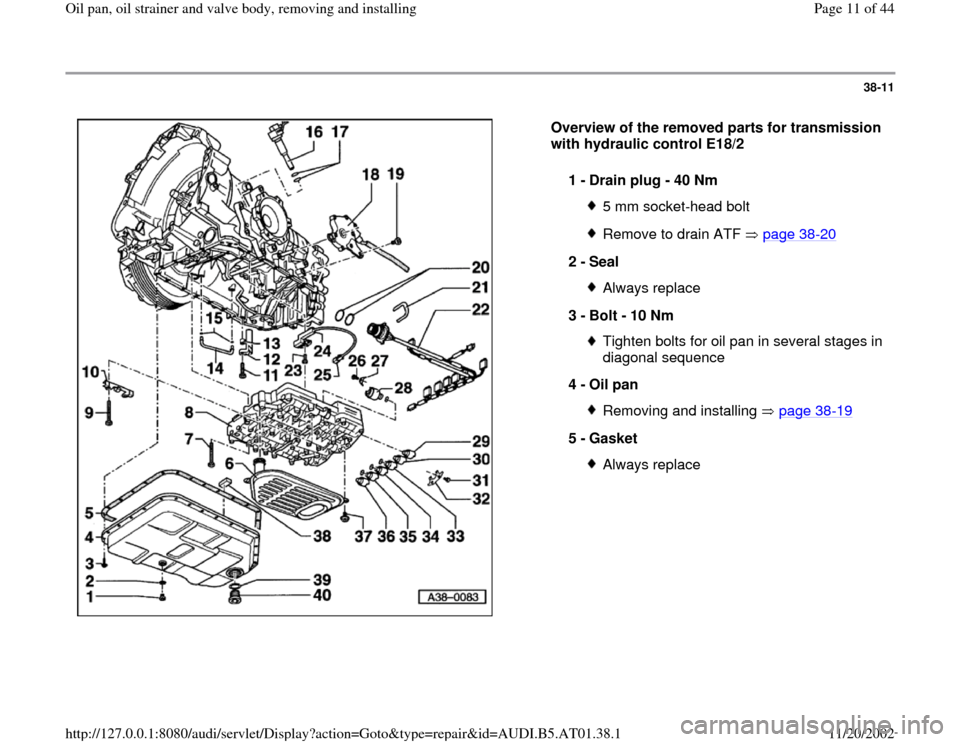
38-11
Overview of the removed parts for transmission
with hydraulic control E18/2
1 -
Drain plug - 40 Nm
5 mm socket-head boltRemove to drain ATF page 38
-20
2 -
Seal
Always replace
3 -
Bolt - 10 Nm Tighten bolts for oil pan in several stages in
diagonal sequence
4 -
Oil pan Removing and installing page 38
-19
5 -
Gasket
Always replace
Pa
ge 11 of 44 Oil
pan, oil strainer and valve bod
y, removin
g and installin
g
11/20/2002 htt
p://127.0.0.1:8080/audi/servlet/Dis
play?action=Goto&t
yp
e=re
pair&id=AUDI.B5.AT01.38.1
Page 15 of 44
38-15
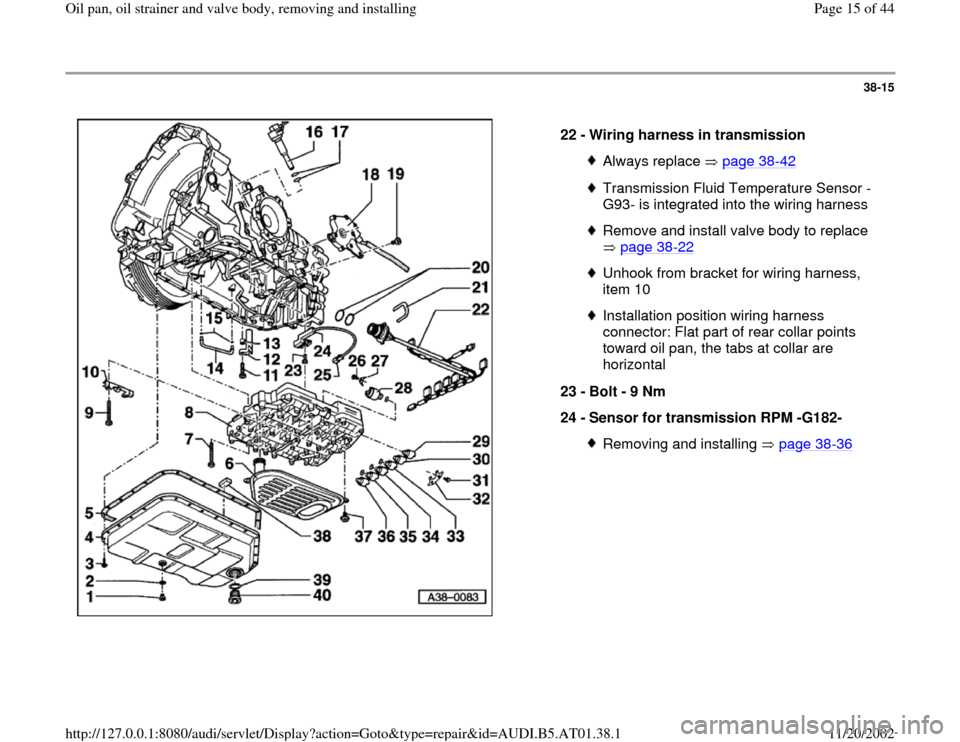
22 -
Wiring harness in transmission
Always replace page 38
-42
Transmission Fluid Temperature Sensor -
G93- is integrated into the wiring harness Remove and install valve body to replace
page 38
-22
Unhook from bracket for wiring harness,
item 10 Installation position wiring harness
connector: Flat part of rear collar points
toward oil pan, the tabs at collar are
horizontal
23 -
Bolt - 9 Nm
24 -
Sensor for transmission RPM -G182- Removing and installing page 38
-36
Pa
ge 15 of 44 Oil
pan, oil strainer and valve bod
y, removin
g and installin
g
11/20/2002 htt
p://127.0.0.1:8080/audi/servlet/Dis
play?action=Goto&t
yp
e=re
pair&id=AUDI.B5.AT01.38.1
Page 16 of 44
38-16
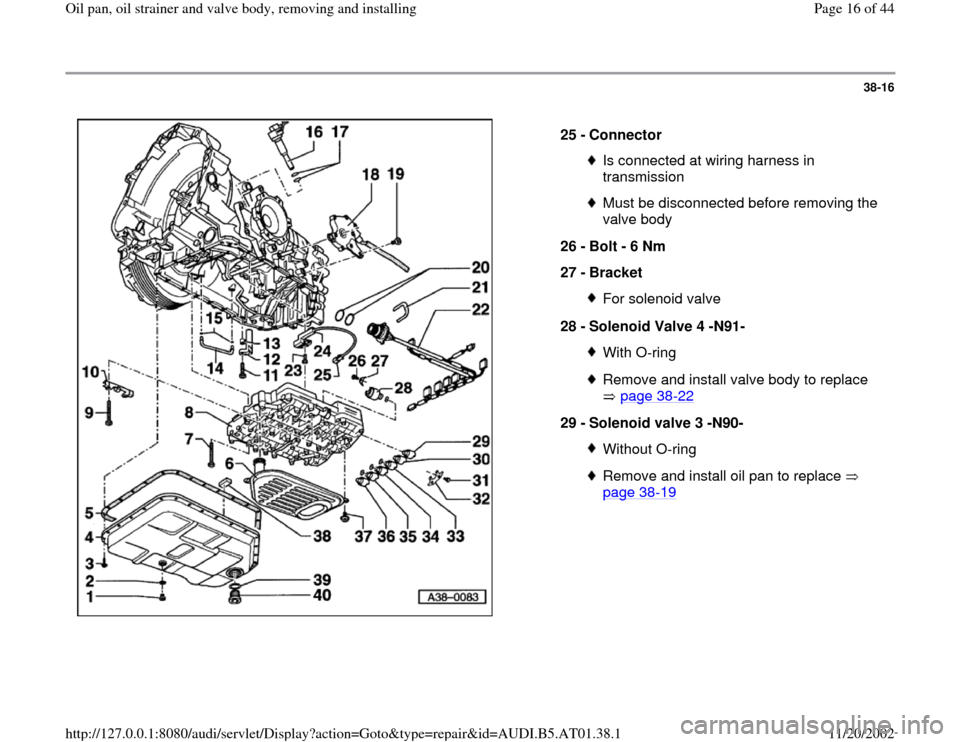
25 -
Connector
Is connected at wiring harness in
transmission Must be disconnected before removing the
valve body
26 -
Bolt - 6 Nm
27 -
Bracket For solenoid valve
28 -
Solenoid Valve 4 -N91- With O-ringRemove and install valve body to replace
page 38
-22
29 -
Solenoid valve 3 -N90-
Without O-ringRemove and install oil pan to replace
page 38
-19
Pa
ge 16 of 44 Oil
pan, oil strainer and valve bod
y, removin
g and installin
g
11/20/2002 htt
p://127.0.0.1:8080/audi/servlet/Dis
play?action=Goto&t
yp
e=re
pair&id=AUDI.B5.AT01.38.1