belt AUDI A6 1999 C5 / 2.G AHA ATQ Engines Valve Gear Service Manual
[x] Cancel search | Manufacturer: AUDI, Model Year: 1999, Model line: A6, Model: AUDI A6 1999 C5 / 2.GPages: 62, PDF Size: 1.17 MB
Page 7 of 62
15-6
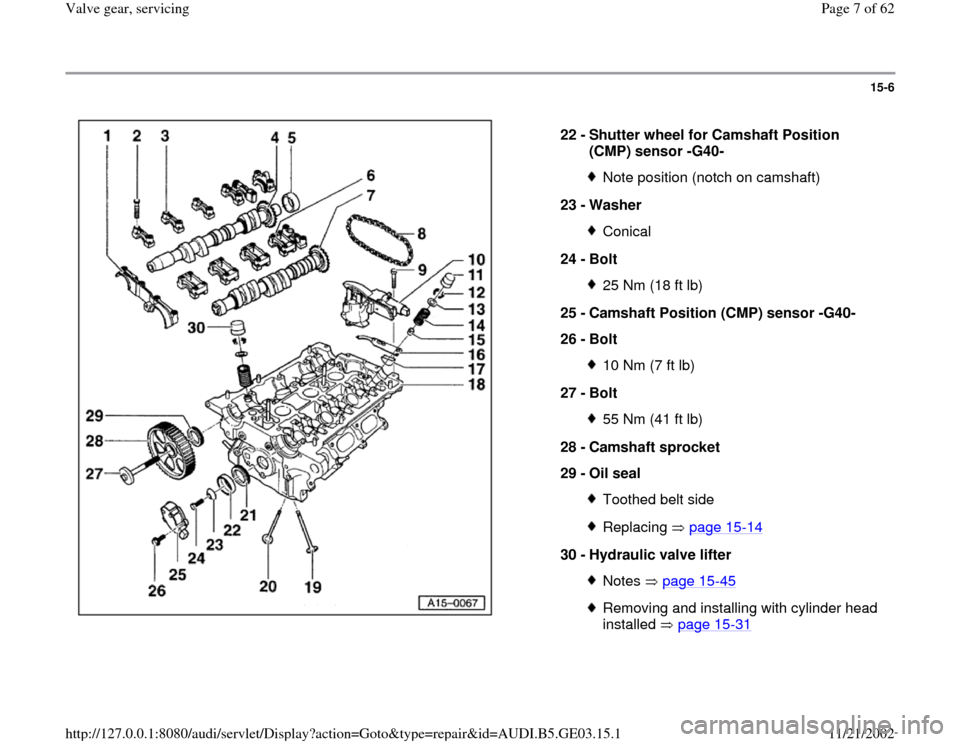
22 -
Shutter wheel for Camshaft Position
(CMP) sensor -G40-
Note position (notch on camshaft)
23 -
Washer Conical
24 -
Bolt 25 Nm (18 ft lb)
25 -
Camshaft Position (CMP) sensor -G40-
26 -
Bolt 10 Nm (7 ft lb)
27 -
Bolt 55 Nm (41 ft lb)
28 -
Camshaft sprocket
29 -
Oil seal Toothed belt sideReplacing page 15
-14
30 -
Hydraulic valve lifter
Notes page 15
-45
Removing and installing with cylinder head
installed page 15
-31
Pa
ge 7 of 62 Valve
gear, servicin
g
11/21/2002 htt
p://127.0.0.1:8080/audi/servlet/Dis
play?action=Goto&t
yp
e=re
pair&id=AUDI.B5.GE03.15.1
Page 15 of 62
15-14
Cylinder head oil seals, replacing
Oil seal for camshaft drive (left and right
cylinder heads)
- Rotate engine to Top Dead Center (TDC).
- Remove toothed belt page 13
-12
.
- Remove rear toothed belt guard.
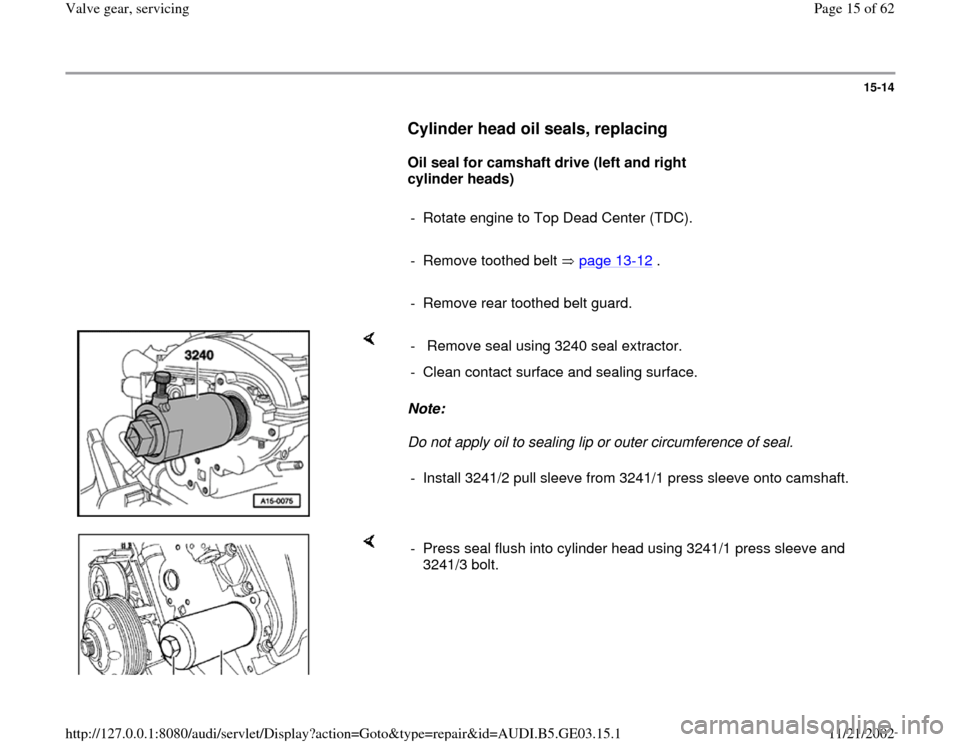
Note:
Do not apply oil to sealing lip or outer circumference of seal. - Remove seal using 3240 seal extractor.
- Clean contact surface and sealing surface.
- Install 3241/2 pull sleeve from 3241/1 press sleeve onto camshaft.
- Press seal flush into cylinder head using 3241/1 press sleeve and
3241/3 bolt.
Pa
ge 15 of 62 Valve
gear, servicin
g
11/21/2002 htt
p://127.0.0.1:8080/audi/servlet/Dis
play?action=Goto&t
yp
e=re
pair&id=AUDI.B5.GE03.15.1
Page 20 of 62
15-18
Cylinder head, removing and installing
Note:
The following instructions apply to the left
cylinder head.
Removing
Lock carrier in service position page 13
-
1 .
- Remove ribbed belt page 13
-8 .
- Remove toothed belt page 13
-12
.
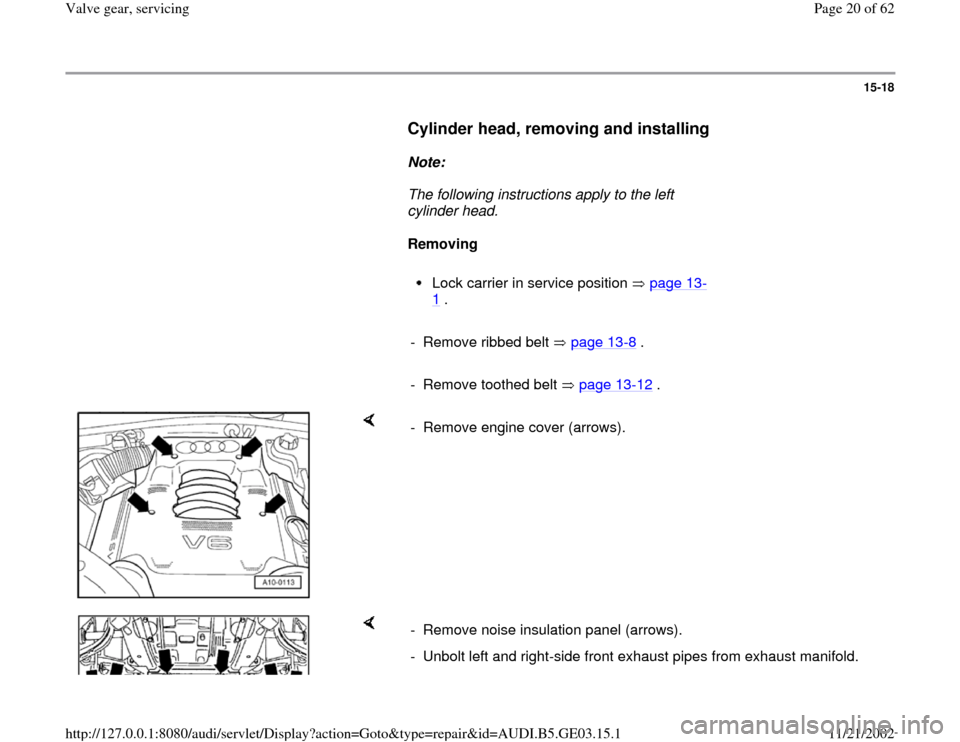
- Remove engine cover (arrows).
- Remove noise insulation panel (arrows).
- Unbolt left and right-side front exhaust pipes from exhaust manifold.
Pa
ge 20 of 62 Valve
gear, servicin
g
11/21/2002 htt
p://127.0.0.1:8080/audi/servlet/Dis
play?action=Goto&t
yp
e=re
pair&id=AUDI.B5.GE03.15.1
Page 26 of 62
15-22
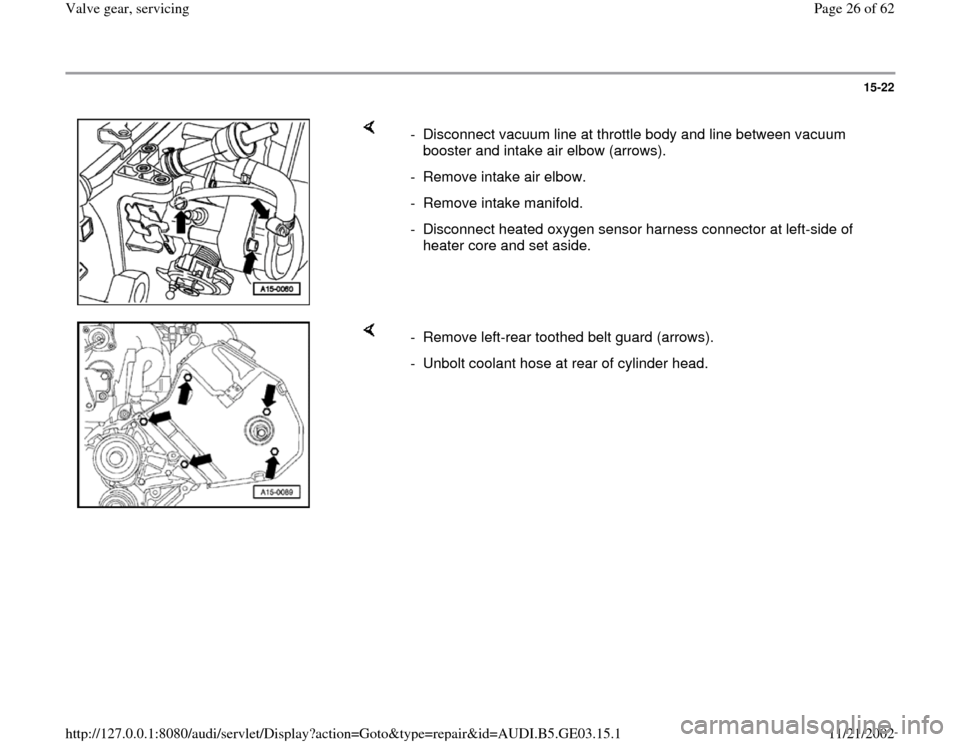
- Disconnect vacuum line at throttle body and line between vacuum
booster and intake air elbow (arrows).
- Remove intake air elbow.
- Remove intake manifold.
- Disconnect heated oxygen sensor harness connector at left-side of
heater core and set aside.
- Remove left-rear toothed belt guard (arrows).
- Unbolt coolant hose at rear of cylinder head.
Pa
ge 26 of 62 Valve
gear, servicin
g
11/21/2002 htt
p://127.0.0.1:8080/audi/servlet/Dis
play?action=Goto&t
yp
e=re
pair&id=AUDI.B5.GE03.15.1
Page 31 of 62
15-26
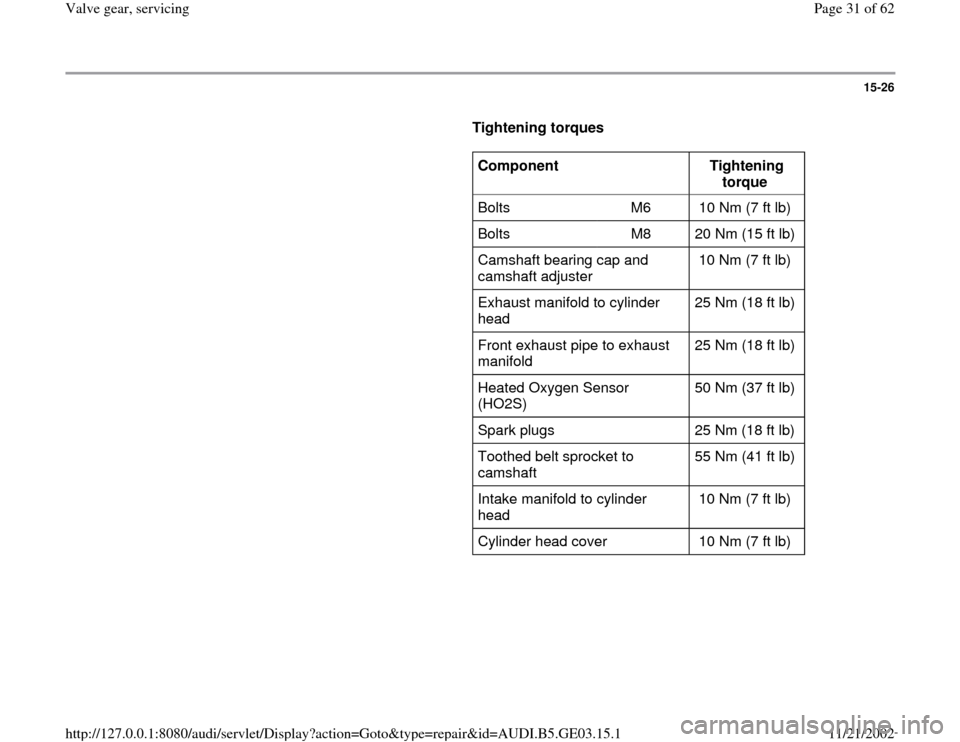
Tightening torques
Component
Tightening
torque
Bolts M6 10 Nm (7 ft lb)
Bolts M8 20 Nm (15 ft lb)
Camshaft bearing cap and
camshaft adjuster 10 Nm (7 ft lb)
Exhaust manifold to cylinder
head 25 Nm (18 ft lb)
Front exhaust pipe to exhaust
manifold 25 Nm (18 ft lb)
Heated Oxygen Sensor
(HO2S) 50 Nm (37 ft lb)
Spark plugs 25 Nm (18 ft lb)
Toothed belt sprocket to
camshaft 55 Nm (41 ft lb)
Intake manifold to cylinder
head 10 Nm (7 ft lb)
Cylinder head cover 10 Nm (7 ft lb)
Pa
ge 31 of 62 Valve
gear, servicin
g
11/21/2002 htt
p://127.0.0.1:8080/audi/servlet/Dis
play?action=Goto&t
yp
e=re
pair&id=AUDI.B5.GE03.15.1
Page 37 of 62
15-31
Camshafts and camshaft adjusters,
removing and installing
Removing
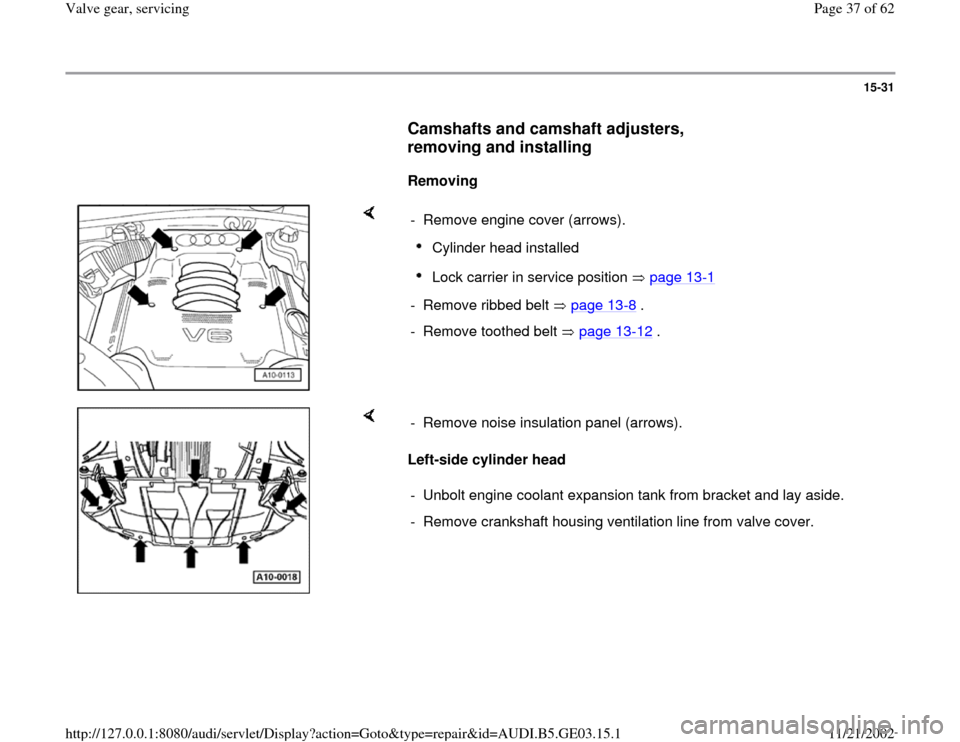
- Remove engine cover (arrows).
Cylinder head installed Lock carrier in service position page 13
-1
- Remove ribbed belt page 13
-8 .
- Remove toothed belt page 13
-12
.
Left-side cylinder head - Remove noise insulation panel (arrows).
- Unbolt engine coolant expansion tank from bracket and lay aside.
- Remove crankshaft housing ventilation line from valve cover.
Pa
ge 37 of 62 Valve
gear, servicin
g
11/21/2002 htt
p://127.0.0.1:8080/audi/servlet/Dis
play?action=Goto&t
yp
e=re
pair&id=AUDI.B5.GE03.15.1
Page 46 of 62
15-40
CAUTION!
After installing new hydraulic lifters, the
engine must not be started for approx. 30
minutes. The hydraulic valve lifters have to
settle (otherwise valves will strike the
pistons).
After installing the valvetrain and lifters,
carefully rotate the crankshaft by hand at
least 2 full revolutions before starting to be
sure that valves do not strike the pistons.
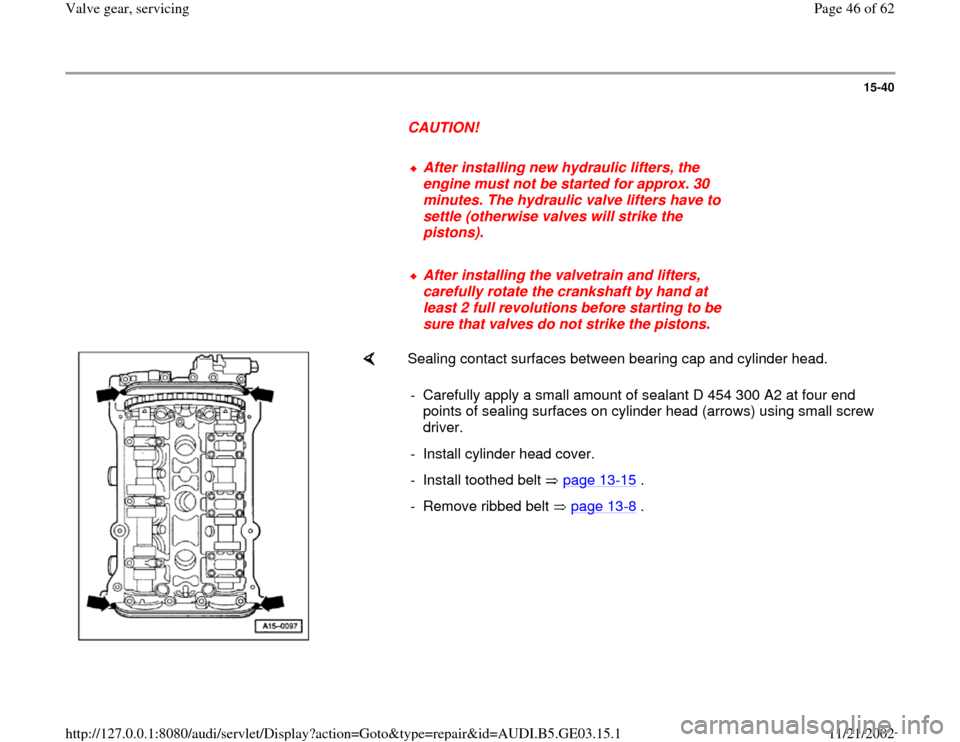
Sealing contact surfaces between bearing cap and cylinder head.
- Carefully apply a small amount of sealant D 454 300 A2 at four end
points of sealing surfaces on cylinder head (arrows) using small screw
driver.
- Install cylinder head cover.
- Install toothed belt page 13
-15
.
- Remove ribbed belt page 13
-8 .
Pa
ge 46 of 62 Valve
gear, servicin
g
11/21/2002 htt
p://127.0.0.1:8080/audi/servlet/Dis
play?action=Goto&t
yp
e=re
pair&id=AUDI.B5.GE03.15.1
Page 52 of 62
- Rotate crankshaft clockwise by turning mounting
bolt for toothed belt sprocket until lobes on
camshaft of hydraulic valve lifters to be checked
are pointing upward.
- Measure clearance between cam and valve
lifter.
Pa
ge 52 of 62 Valve
gear, servicin
g
11/21/2002 htt
p://127.0.0.1:8080/audi/servlet/Dis
play?action=Goto&t
yp
e=re
pair&id=AUDI.B5.GE03.15.1
Page 54 of 62
15-47
Valve stem oil seals, replacing
Cylinder head installed
Lock carrier in service position page 13
-1
- Remove ribbed belt page 13
-8 .
- Remove toothed belt page 13
-12
.
- Remove camshafts page 15
-31
.
- Remove valve lifters (do not interchange) and
lay aside with contact surface facing down.
- Remove spark plugs.
- Move piston for individual cylinder to Bottom
Dead Center (BDC) position.
Note:
Lightly tap valve lever to loosen stuck valve
keepers.
Exhaust side
Note:
Pa
ge 54 of 62 Valve
gear, servicin
g
11/21/2002 htt
p://127.0.0.1:8080/audi/servlet/Dis
play?action=Goto&t
yp
e=re
pair&id=AUDI.B5.GE03.15.1