gearbox lever AUDI A6 2000 C5 / 2.G Changing Clutch 5Speed Manual Gearbox
[x] Cancel search | Manufacturer: AUDI, Model Year: 2000, Model line: A6, Model: AUDI A6 2000 C5 / 2.GPages: 71, PDF Size: 1.82 MB
Page 13 of 71
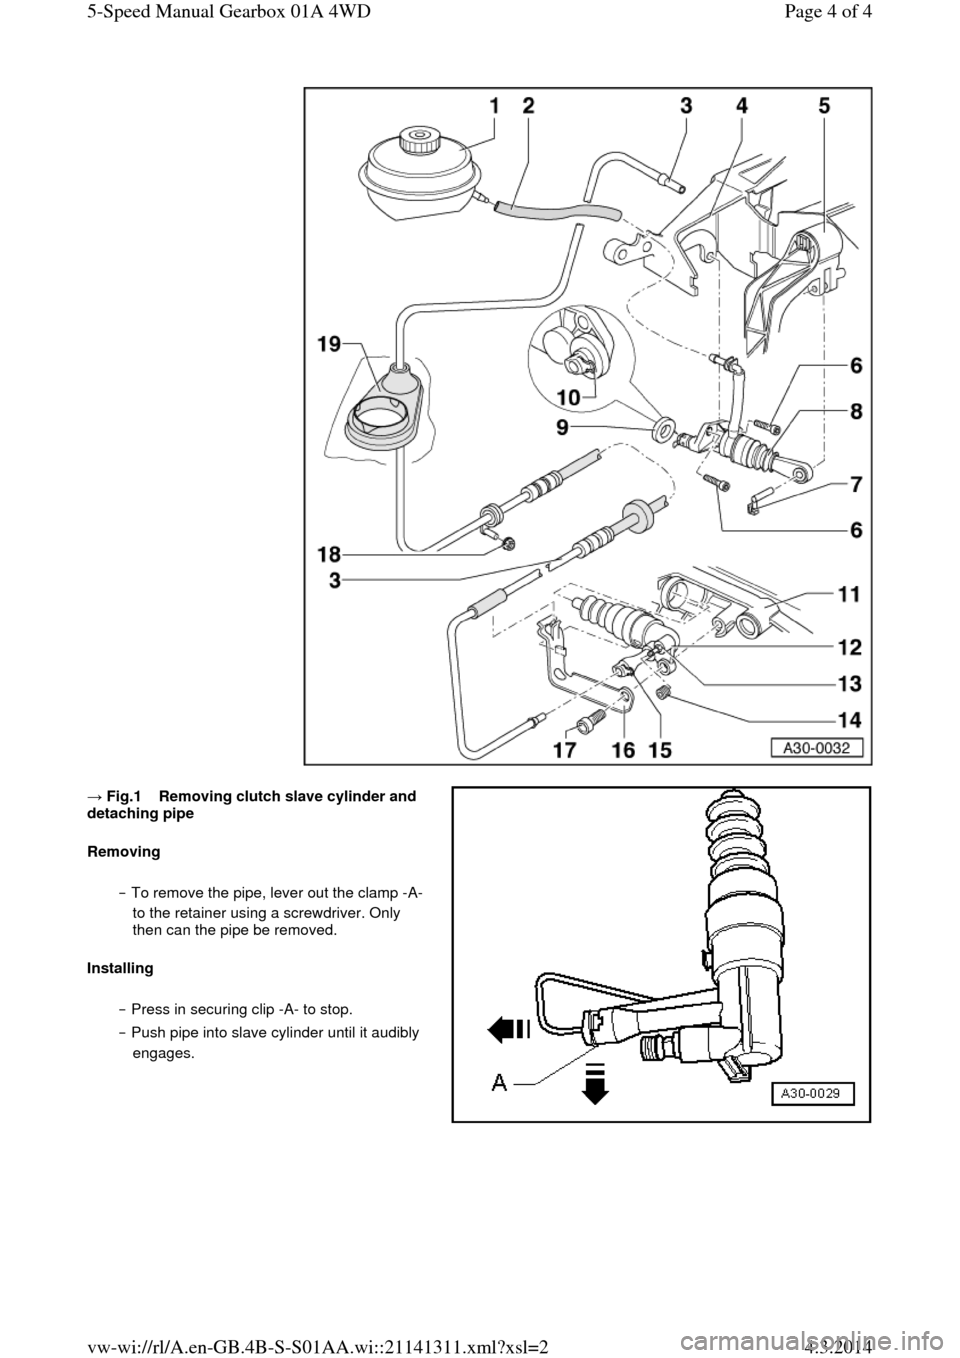
→ Fig.1 Removing clutch slave cylinder and detaching pipe
Removing
‒ To remove the pipe, lever out the clamp -A-
to the retainer using a screwdriver. Only
then can the pipe be removed.
Installing
‒ Press in securing clip -A- to stop.
‒ Push pipe into slave cylinder until it audibly
engages. Page 4 of 45-Speed Manual Gearbox 01A 4WD4.3.2014vw-wi://rl/A.en-GB.4B-S-S01AA.wi::21141311.xml?xsl=2
Page 14 of 71
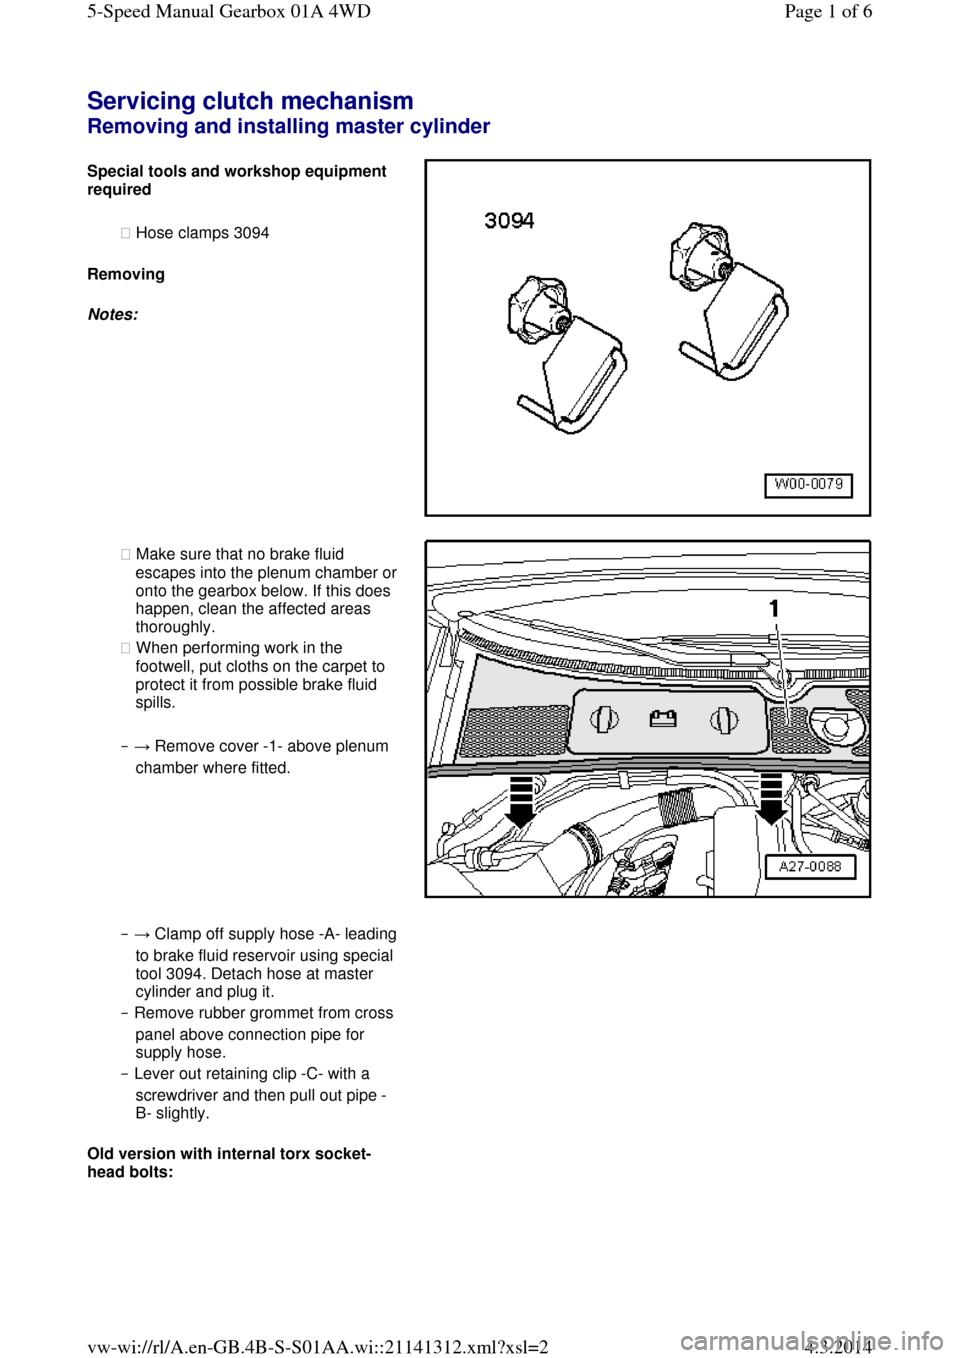
Servicing clutch mechanism Removing and installing master cylinder Special tools and workshop equipment required
◆ Hose clamps 3094
Removing
Notes: ◆ Make sure that no brake fluid escapes into the plenum chamber or onto the gearbox below. If this does
happen, clean the affected areas
thoroughly.
◆ When performing work in the
footwell, put cloths on the carpet to
protect it from possible brake fluid
spills.
‒ → Remove cover -1- above plenum
chamber where fitted. ‒ → Clamp off supply hose -A- leading to brake fluid reservoir using special
tool 3094. Detach hose at master
cylinder and plug it.
‒ Remove rubber grommet from cross
panel above connection pipe for
supply hose.
‒ Lever out retaining clip -C- with a
screwdriver and then pull out pipe -
B- slightly.
Old version with internal torx socket-
head bolts: Page 1 of 65-Speed Manual Gearbox 01A 4WD4.3.2014vw-wi://rl/A.en-GB.4B-S-S01AA.wi::21141312.xml?xsl=2
Page 22 of 71
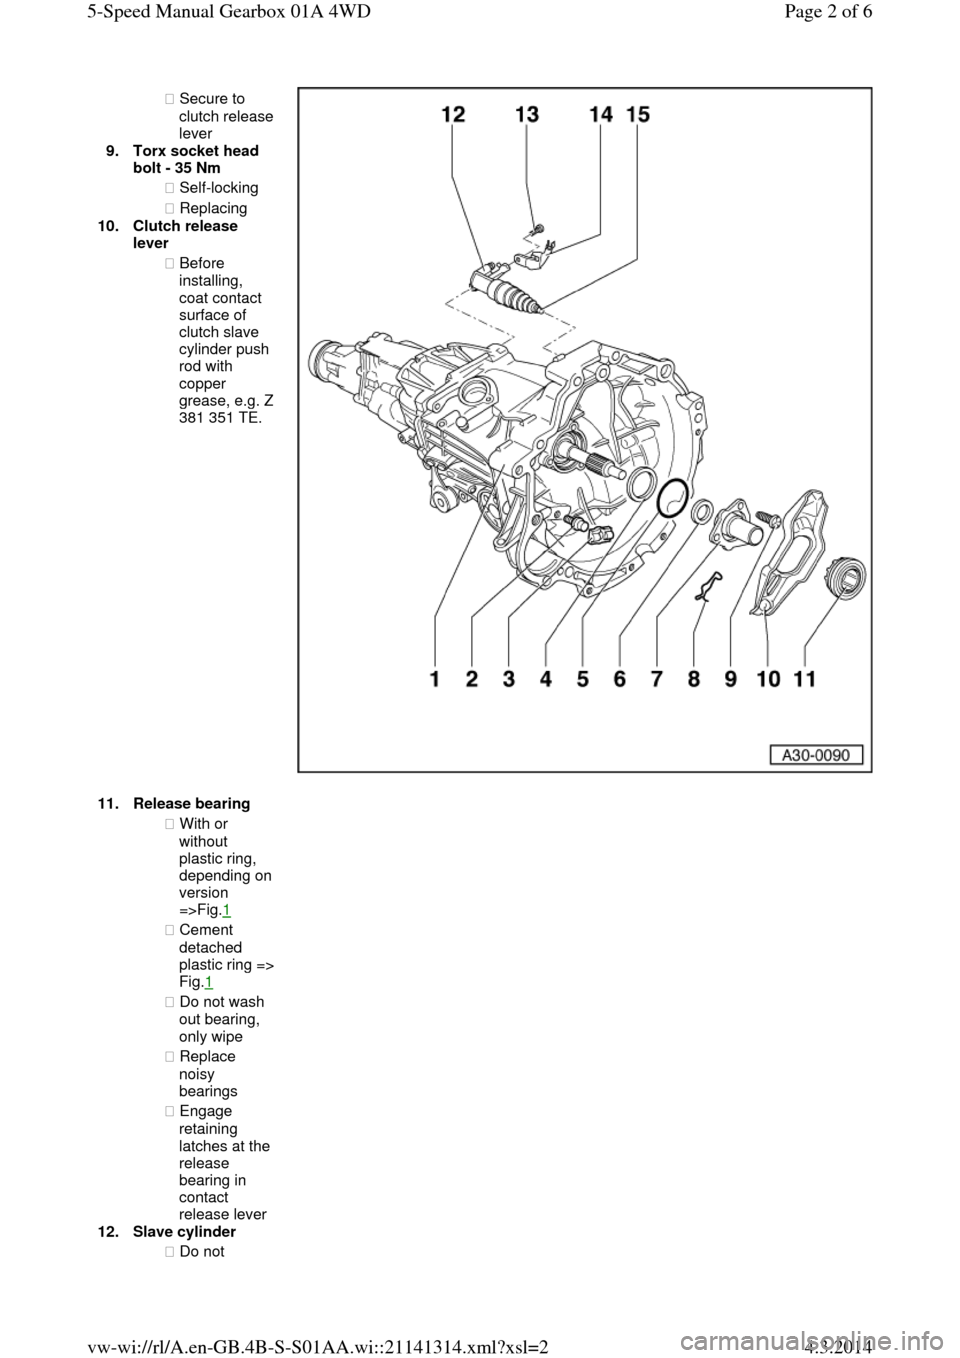
◆ Secure to clutch release lever
9.Torx socket head
bolt - 35 Nm
◆ Self-locking
◆ Replacing
10.Clutch release
lever
◆ Before
installing,
coat contact
surface of
clutch slave
cylinder push
rod with
copper grease, e.g. Z 381 351 TE. 11.Release bearing ◆ With or
without
plastic ring, depending on version
=>Fig.1
◆ Cement
detached plastic ring => Fig.1
◆ Do not wash
out bearing,
only wipe
◆ Replace
noisy
bearings
◆ Engage
retaining
latches at the
release
bearing in
contact
release lever 12.Slave cylinder
◆ Do not Page 2 of 65-Speed Manual Gearbox 01A 4WD4.3.2014vw-wi://rl/A.en-GB.4B-S-S01AA.wi::21141314.xml?xsl=2
Page 25 of 71
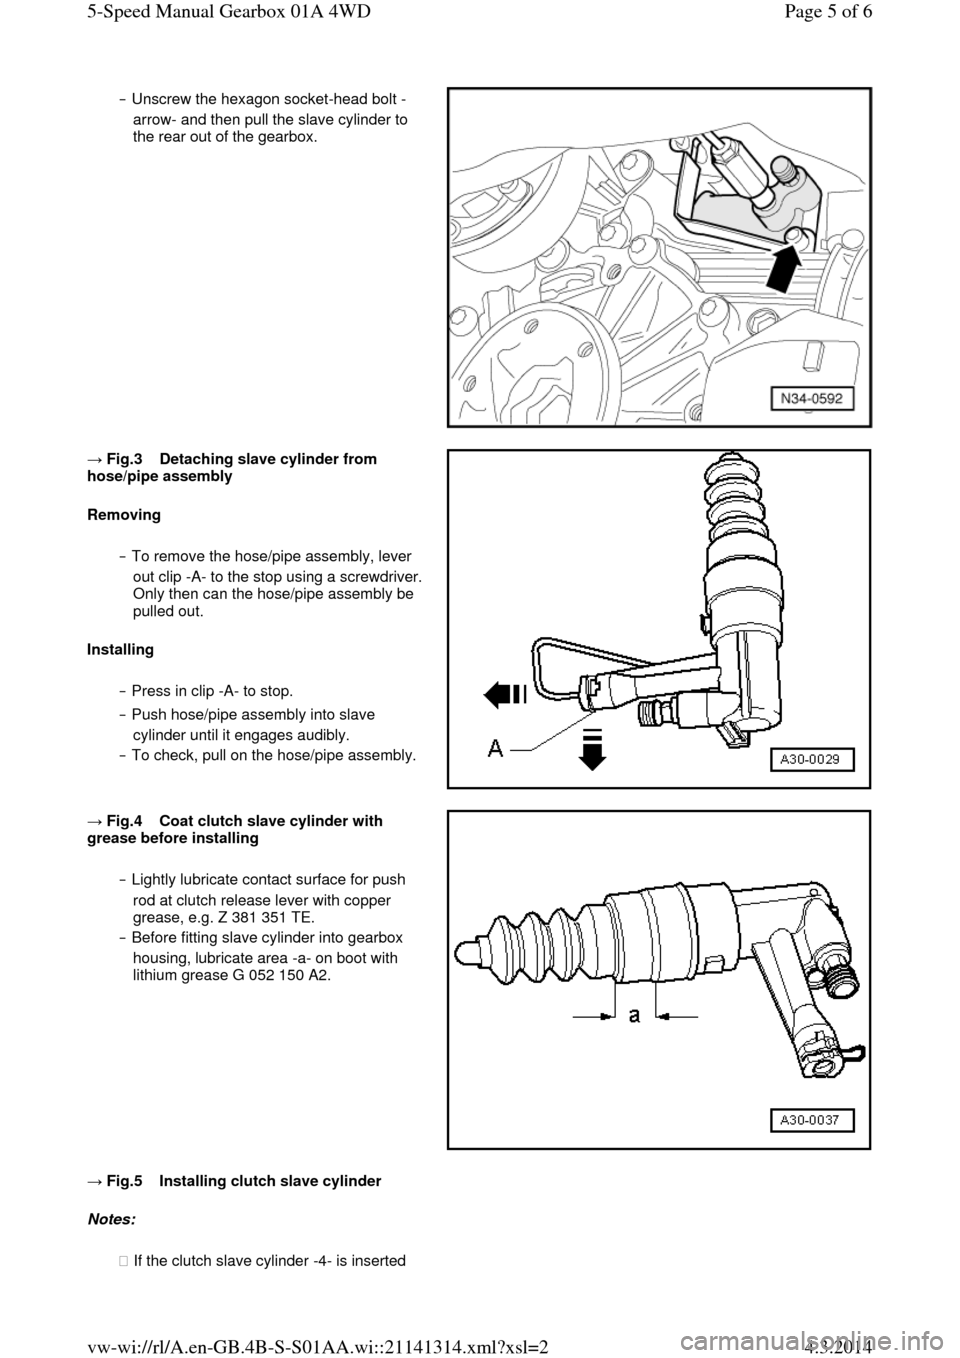
‒ Unscrew the hexagon socket-head bolt -
arrow- and then pull the slave cylinder to
the rear out of the gearbox. → Fig.3 Detaching slave cylinder from hose/pipe assembly
Removing
‒ To remove the hose/pipe assembly, lever
out clip -A- to the stop using a screwdriver. Only then can the hose/pipe assembly be
pulled out.
Installing
‒ Press in clip -A- to stop.
‒ Push hose/pipe assembly into slave
cylinder until it engages audibly.
‒ To check, pull on the hose/pipe assembly. → Fig.4 Coat clutch slave cylinder with grease before installing
‒ Lightly lubricate contact surface for push
rod at clutch release lever with copper
grease, e.g. Z 381 351 TE.
‒ Before fitting slave cylinder into gearbox
housing, lubricate area -a- on boot with
lithium grease G 052 150 A2. → Fig.5 Installing clutch slave cylinder Notes:
◆ If the clutch slave cylinder -4- is inserted Page 5 of 65-Speed Manual Gearbox 01A 4WD4.3.2014vw-wi://rl/A.en-GB.4B-S-S01AA.wi::21141314.xml?xsl=2
Page 26 of 71
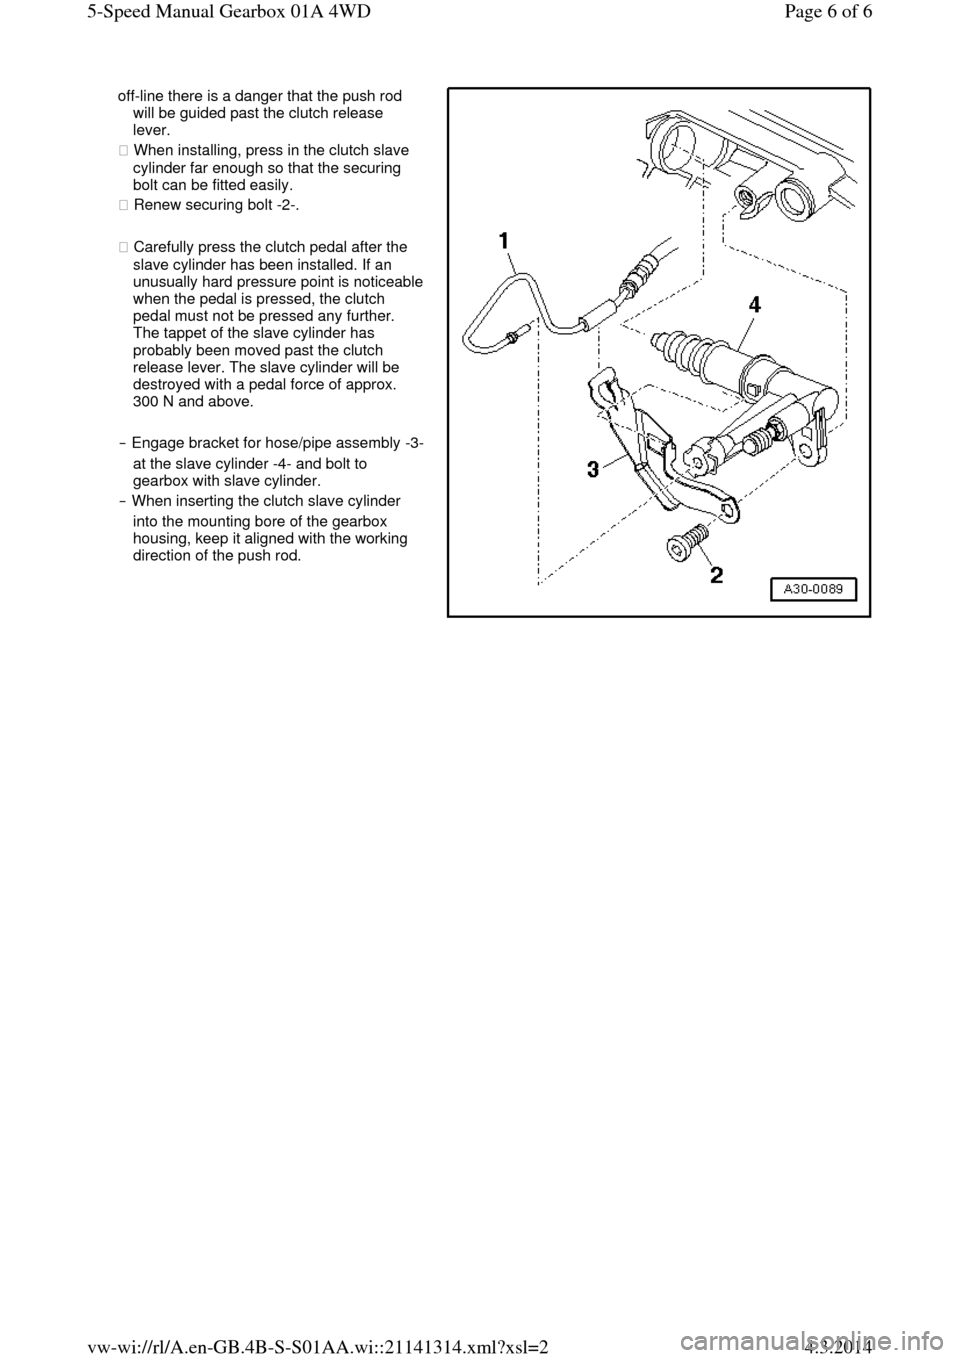
off-line there is a danger that the push rod
will be guided past the clutch release
lever.
◆ When installing, press in the clutch slave
cylinder far enough so that the securing
bolt can be fitted easily.
◆ Renew securing bolt -2-.
◆ Carefully press the clutch pedal after the
slave cylinder has been installed. If an unusually hard pressure point is noticeable when the pedal is pressed, the clutch
pedal must not be pressed any further.
The tappet of the slave cylinder has
probably been moved past the clutch
release lever. The slave cylinder will be
destroyed with a pedal force of approx.
300 N and above.
‒ Engage bracket for hose/pipe assembly -3- at the slave cylinder -4- and bolt to
gearbox with slave cylinder.
‒ When inserting the clutch slave cylinder
into the mounting bore of the gearbox
housing, keep it aligned with the working
direction of the push rod. Page 6 of 65-Speed Manual Gearbox 01A 4WD4.3.2014vw-wi://rl/A.en-GB.4B-S-S01AA.wi::21141314.xml?xsl=2
Page 34 of 71
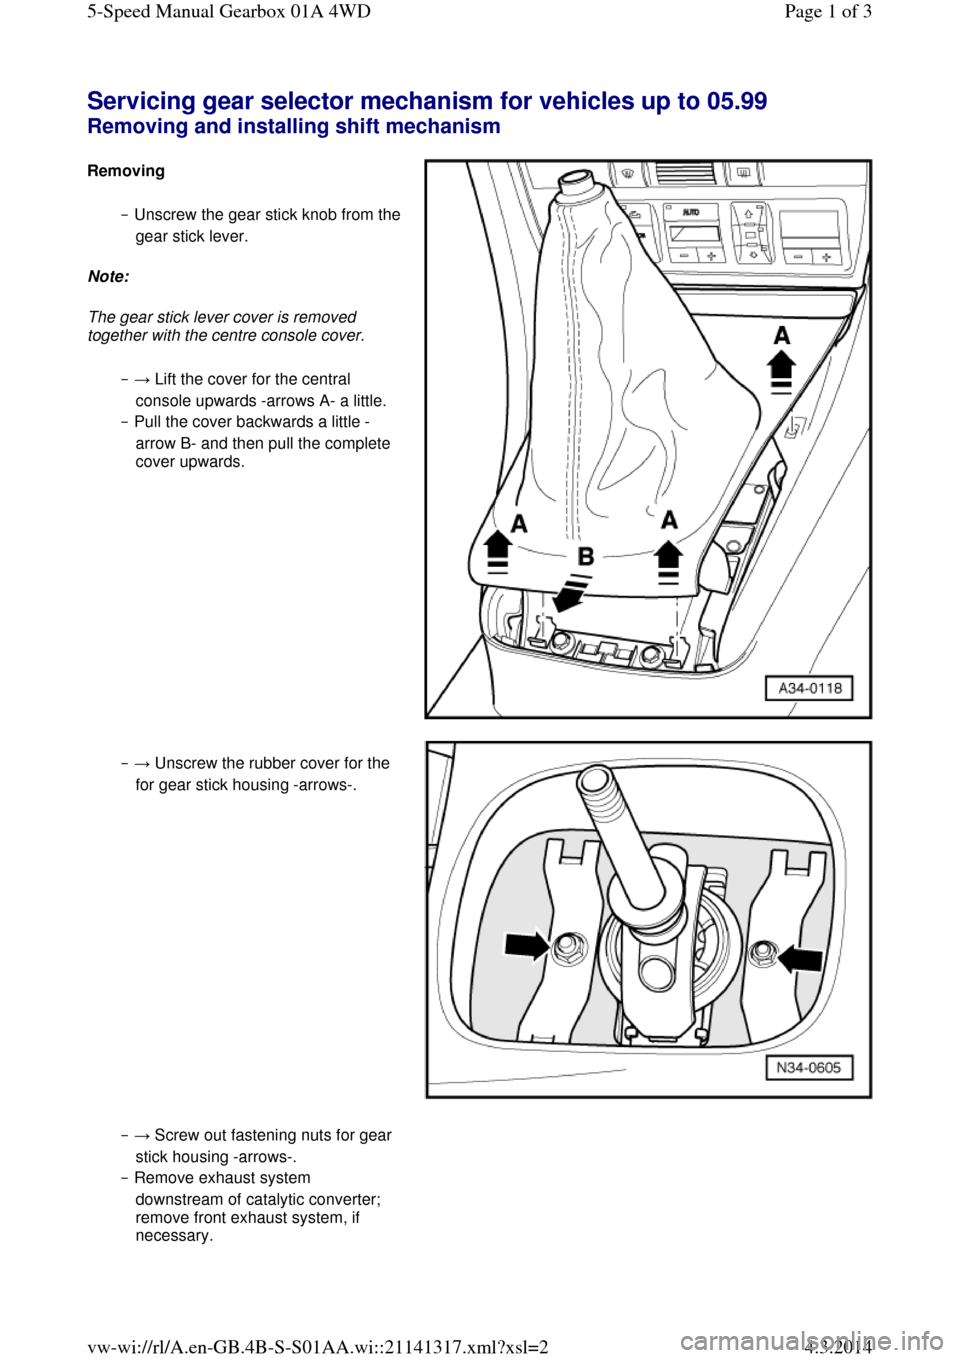
Servicing gear selector mechanism for vehicles up to 05.99 Removing and installing shift mechanism Removing ‒ Unscrew the gear stick knob from the gear stick lever.
Note:
The gear stick lever cover is removed
together with the centre console cover.
‒ → Lift the cover for the central
console upwards -arrows A- a little.
‒ Pull the cover backwards a little -
arrow B- and then pull the complete
cover upwards. ‒ → Unscrew the rubber cover for the
for gear stick housing -arrows-. ‒ → Screw out fastening nuts for gear
stick housing -arrows-.
‒ Remove exhaust system
downstream of catalytic converter;
remove front exhaust system, if
necessary. Page 1 of 35-Speed Manual Gearbox 01A 4WD4.3.2014vw-wi://rl/A.en-GB.4B-S-S01AA.wi::21141317.xml?xsl=2
Page 36 of 71
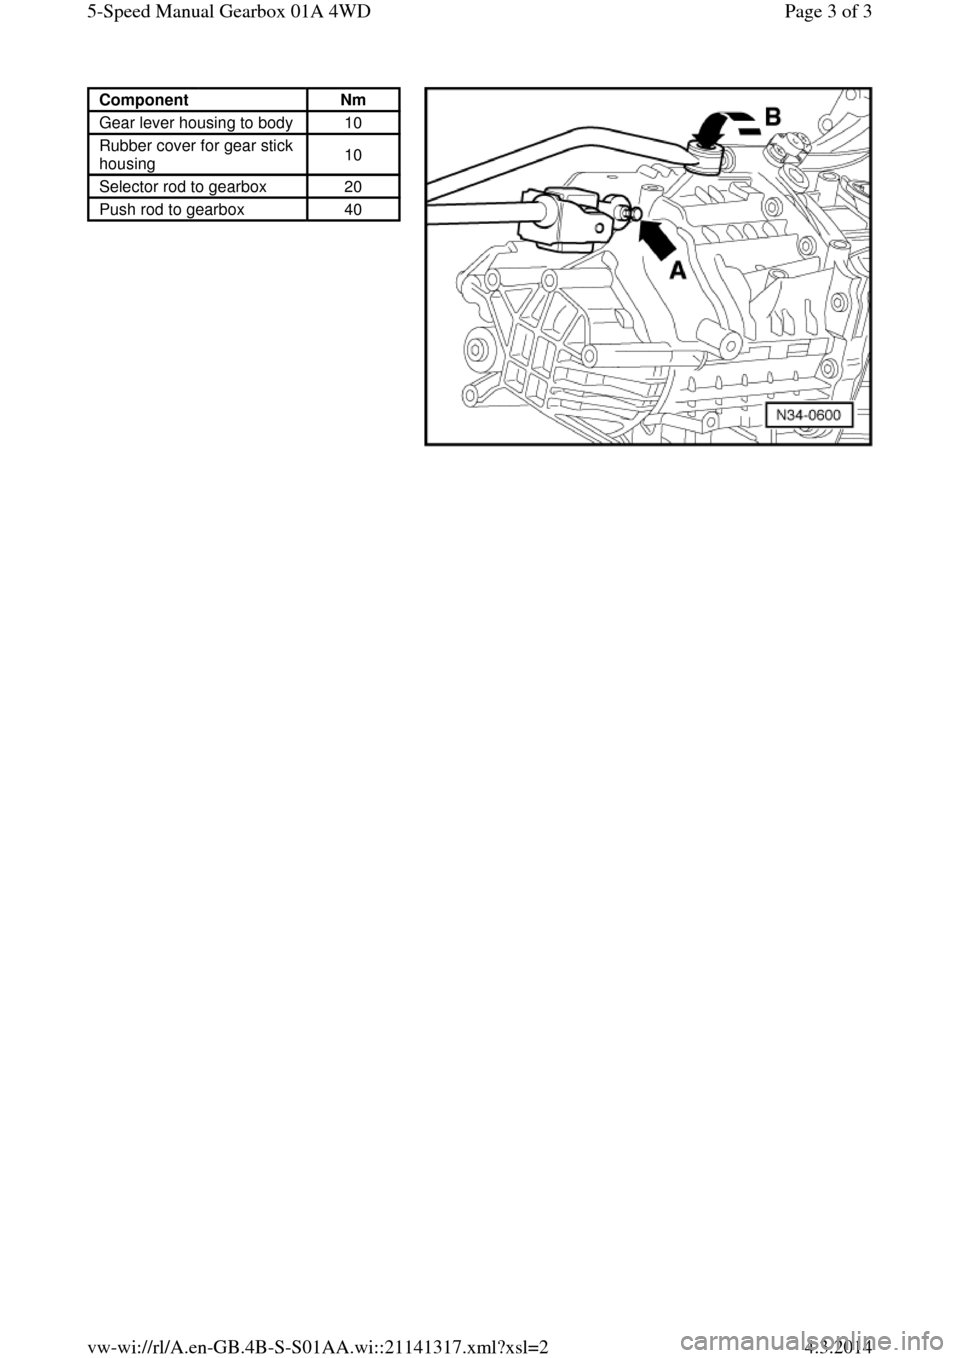
Component Nm
Gear lever housing to body 10
Rubber cover for gear stick
housing 10
Selector rod to gearbox 20
Push rod to gearbox 40 Page 3 of 35-Speed Manual Gearbox 01A 4WD4.3.2014vw-wi://rl/A.en-GB.4B-S-S01AA.wi::21141317.xml?xsl=2
Page 37 of 71
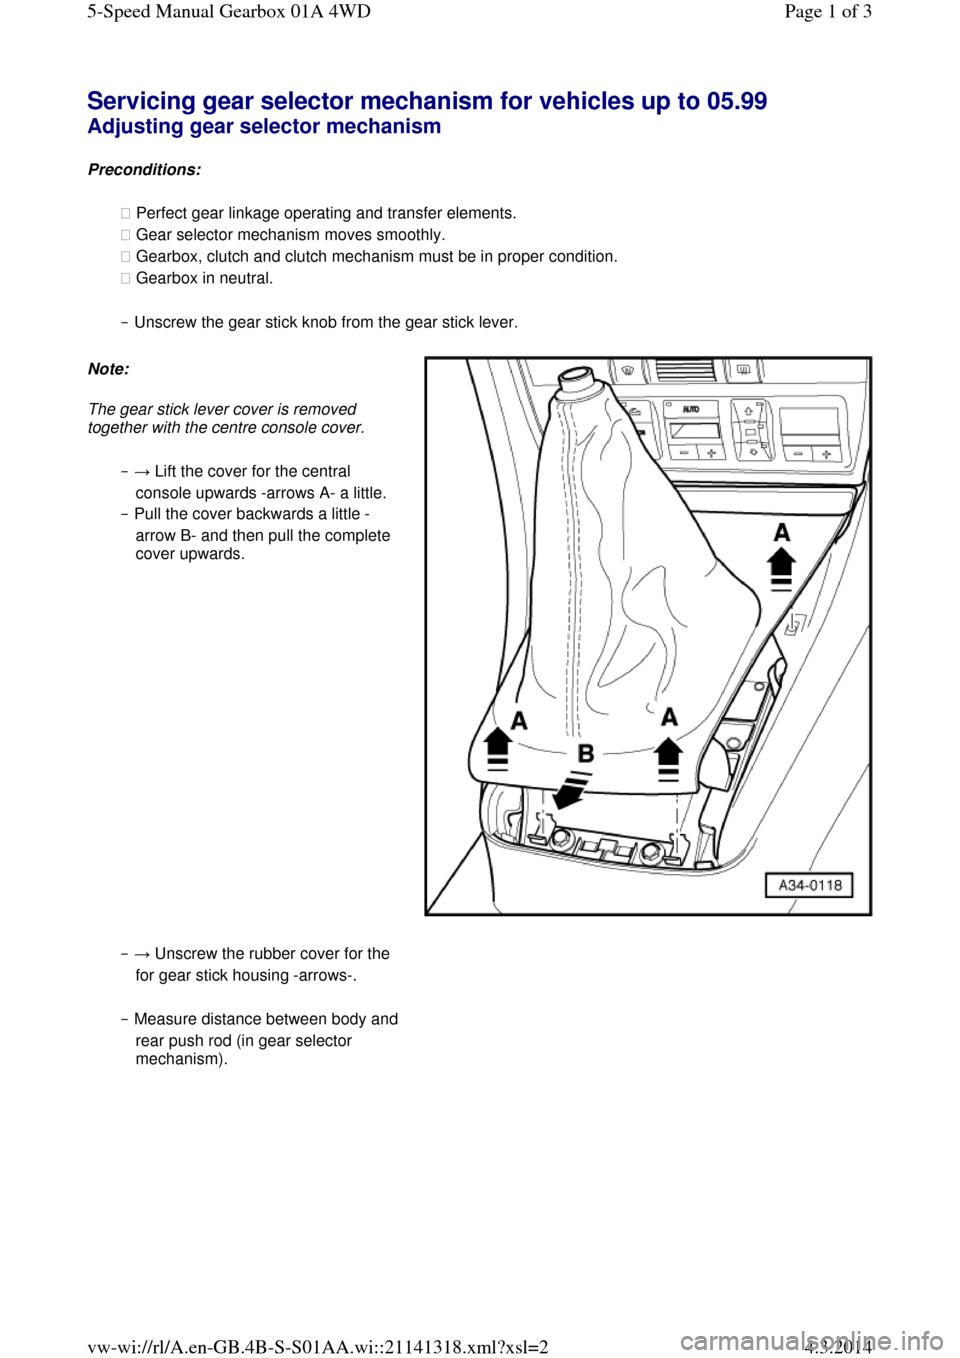
Servicing gear selector mechanism for vehicles up to 05.99 Adjusting gear selector mechanism
Preconditions:
◆ Perfect gear linkage operating and transfer elements.
◆ Gear selector mechanism moves smoothly.
◆ Gearbox, clutch and clutch mechanism must be in proper condition.
◆ Gearbox in neutral.
‒ Unscrew the gear stick knob from the gear stick lever. Note:
The gear stick lever cover is removed
together with the centre console cover.
‒ → Lift the cover for the central
console upwards -arrows A- a little.
‒ Pull the cover backwards a little -
arrow B- and then pull the complete
cover upwards.
‒ → Unscrew the rubber cover for the
for gear stick housing -arrows-.
‒ Measure distance between body and rear push rod (in gear selector
mechanism). Page 1 of 35-Speed Manual Gearbox 01A 4WD4.3.2014vw-wi://rl/A.en-GB.4B-S-S01AA.wi::21141318.xml?xsl=2
Page 41 of 71
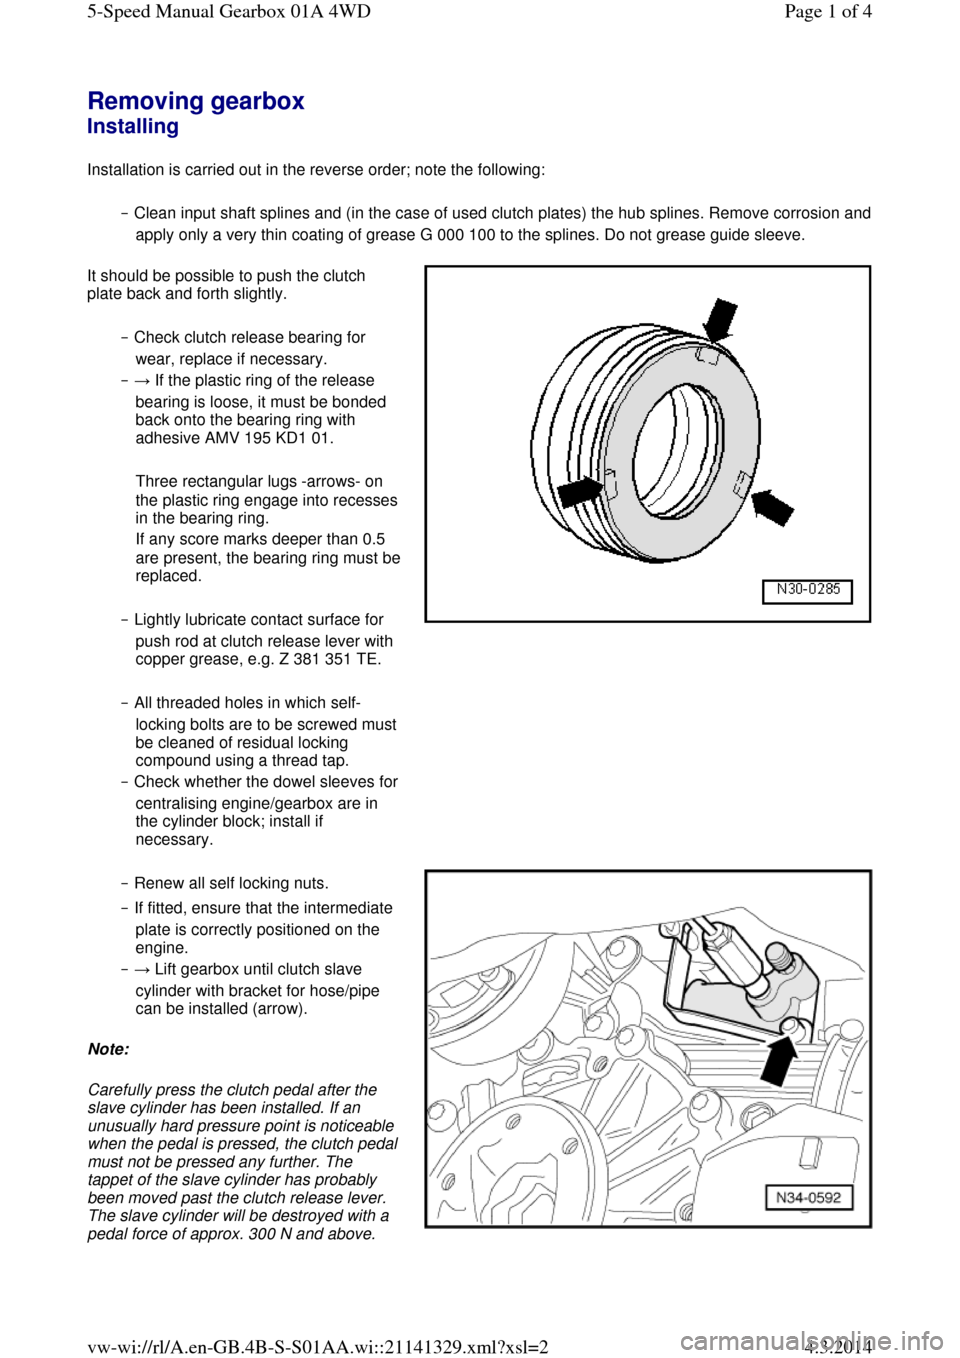
Removing gearbox Installing
Installation is carried out in the reverse order; note the following:
‒ Clean input shaft splines and (in the case of used clutch plates) the hub splines. Remove corrosion and apply only a very thin coating of grease G 000 100 to the splines. Do not grease guide sleeve. It should be possible to push the clutch
plate back and forth slightly.
‒ Check clutch release bearing for
wear, replace if necessary.
‒ → If the plastic ring of the release
bearing is loose, it must be bonded
back onto the bearing ring with
adhesive AMV 195 KD1 01.
Three rectangular lugs -arrows- on the plastic ring engage into recesses in the bearing ring.
If any score marks deeper than 0.5 are present, the bearing ring must be replaced.
‒ Lightly lubricate contact surface for
push rod at clutch release lever with
copper grease, e.g. Z 381 351 TE.
‒ All threaded holes in which self-locking bolts are to be screwed must be cleaned of residual locking
compound using a thread tap.
‒ Check whether the dowel sleeves for centralising engine/gearbox are in
the cylinder block; install if
necessary. ‒ Renew all self locking nuts.
‒ If fitted, ensure that the intermediate
plate is correctly positioned on the
engine.
‒ → Lift gearbox until clutch slave
cylinder with bracket for hose/pipe
can be installed (arrow).
Note:
Carefully press the clutch pedal after the
slave cylinder has been installed. If an
unusually hard pressure point is noticeable when the pedal is pressed, the clutch pedal must not be pressed any further. The
tappet of the slave cylinder has probably
been moved past the clutch release lever.
The slave cylinder will be destroyed with a pedal force of approx. 300 N and above. Page 1 of 45-Speed Manual Gearbox 01A 4WD4.3.2014vw-wi://rl/A.en-GB.4B-S-S01AA.wi::21141329.xml?xsl=2
Page 59 of 71

‒ → Detach clutch release lever -A-
with release bearing.
Notes:
◆ Before pulling off guide sleeve, cover input shaft splines with a shrink-fit
hose to protect oil seal.
◆ Removing oil seal from guide sleeve
=> Page 30-32.
‒ Unscrew guide sleeve -B-.
‒ Remove dished washer -C-.
‒ Remove circlip -D- in front of input
shaft ball bearing. ‒ If the ball bearing, input shaft or
gearbox housing is not to be
replaced, note the thickness of the
circlip.
‒ → Pull the input shaft ball bearing
out of the gearbox housing. Page 3 of 115-Speed Manual Gearbox 01A 4WD4.3.2014vw-wi://rl/A.en-GB.4B-S-S01AA.wi::21141337.xml?xsl=2