ESP AUDI A6 2012 Owners Manual
[x] Cancel search | Manufacturer: AUDI, Model Year: 2012, Model line: A6, Model: AUDI A6 2012Pages: 298, PDF Size: 74.43 MB
Page 266 of 298
264 Fuses and bulbs
Fuses and bulbs
Fuses
Replacing fuses
Fuses that have blown will have metal strips
that have burned through.
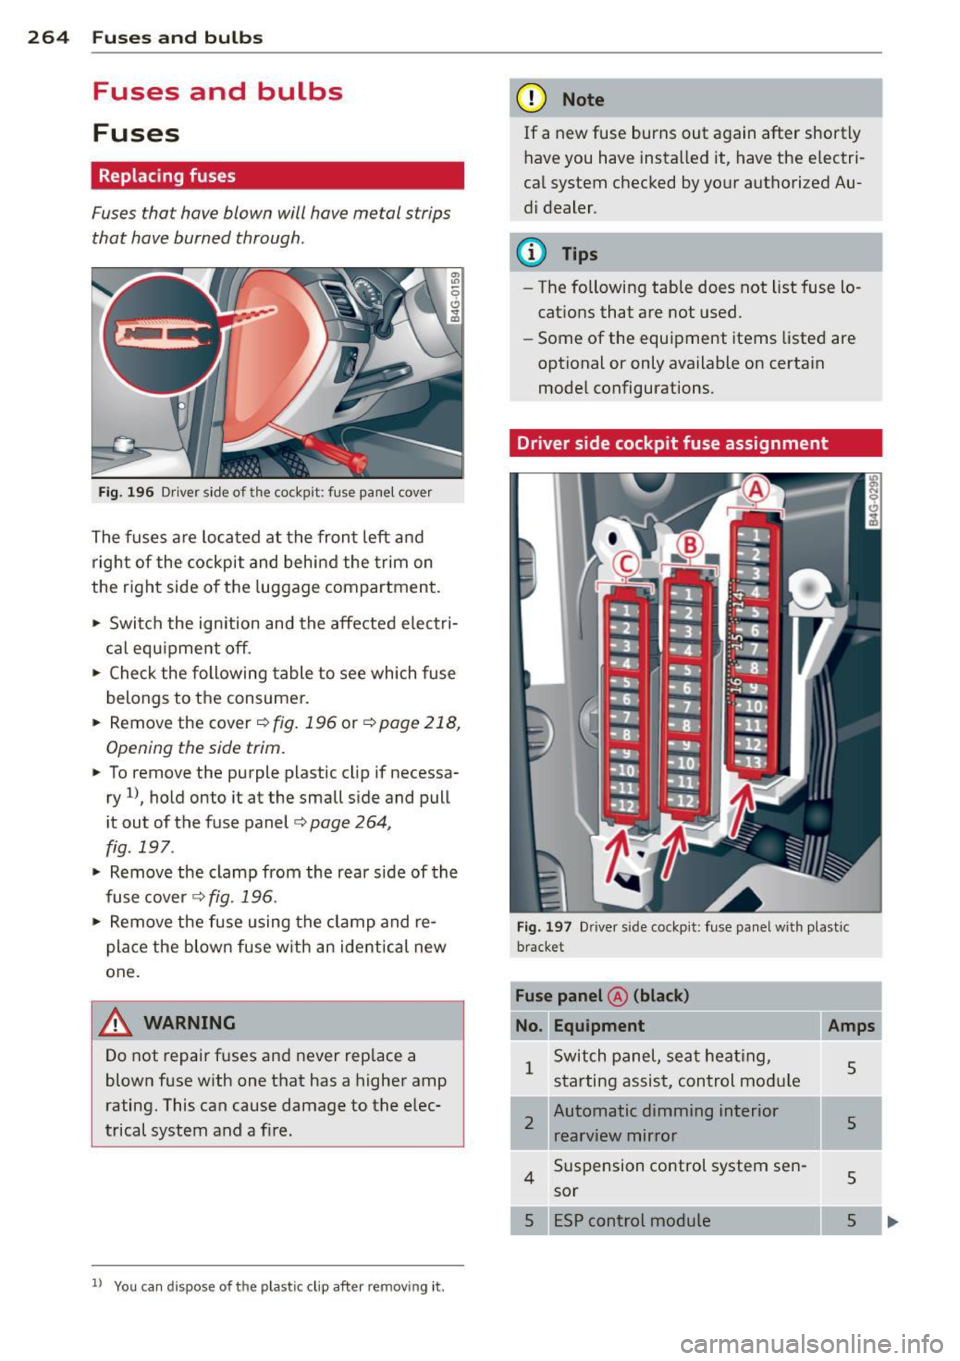
Fig. 196 Driver side of the cockpit: fuse panel cover
The fuses are located at the front left and
right of the cockpit and behind the trim on
the right side of the luggage compartment.
• Switch the ignition and the affected electri
cal equ ipment off.
• Check the following table to see which fuse
belongs to the consumer.
• Remove the cover ¢
fig. 196 or¢ page 218,
Opening the side trim.
• To remove the purple plastic cl ip if necessa
ry
ll, hold onto it at the small side and pull
it out of the fuse panel
c:> page 264,
fig. 197 .
• Remove the clamp from the rear side of the
fuse cover <>
fig. 196 .
• Remove the fuse using the clamp and re
place the blown fuse w ith an ident ical new
one.
A WARNING
Do not repair fuses and never replace a
blown fuse with one that has a higher amp
rating. This can cause damage to the elec
trical system and a fire.
ll You can dis pose of the plastic clip after re moving it.
(D Note
If a new fuse burns out again after shortly
have you have installed it, have the electri
cal system checked by your authorized Au
di dealer .
(D Tips
-The following table does not list fuse lo
cations that are not used.
- Some of the equipment items listed are
optional or only available on certain
model configurations.
Driver side cockpit fuse assignment
Fig. 197 Drive r side cockpit: fuse panel with plastic
bracket
Fuse panel @ (black)
No. Equipment Amps
1
Switch panel, seat heating,
5 starting assist, control module
2
Automatic dimming interior
s rearview mirror
4
Suspension control system sen-
5 sor
ESP control module
5
Page 267 of 298
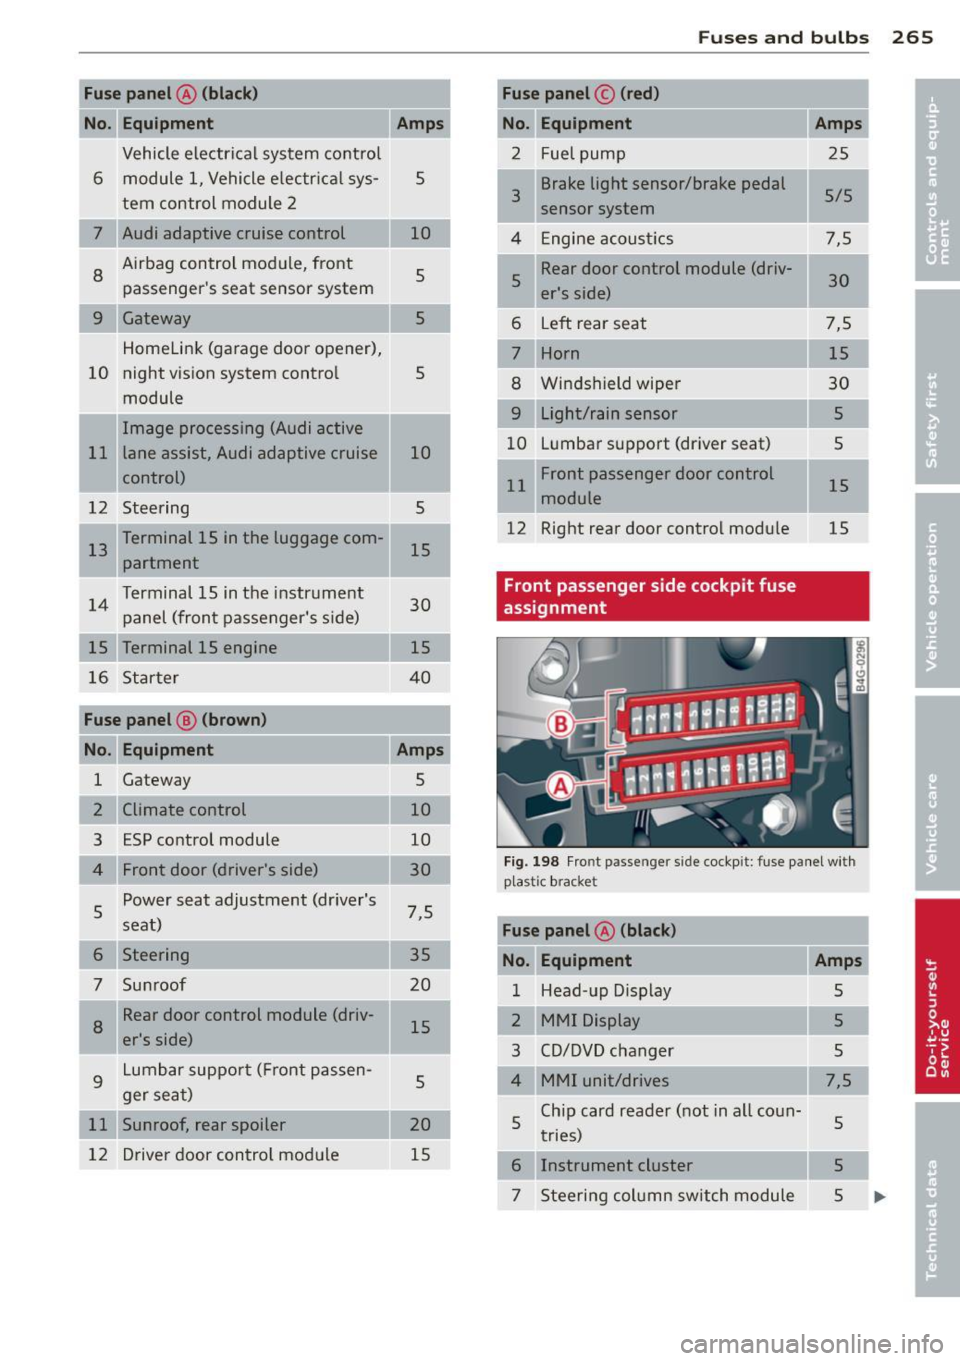
Fuse panel@ (bl ack )
No. Equipment
Vehicle electrical system control
6 module 1, Vehicle e lectr ica l sys-
tern control module 2
7 Audi adaptive cruise control
8
Airbag control module, front
passenger 's seat sensor system
9 Gateway
Homelink (garage door opener),
10 night vision system contro
l
module
Image processing (Audi active
11 lane assist , Audi adaptive cruise
control)
12 Steering
13 Terminal 15 in the luggage com-
partment
14 Terminal 15 in the
instrument
panel (front passenger's s ide)
15 Terminal 15 engine
16 Starter
Fuse panel e (brown)
No . Equipment
1 Gateway
2 Climate control
3 ESP co ntrol module
Front door (driver's side)
5
Power seat adjustment (dr iver's
seat)
6
Steering
7 Sunroof
8
Rear door control module (driv-
er's side)
9
Lumbar suppor t (Fro nt p assen-
ger seat)
11 Sunroof, rear spoiler
12 Driver door control mod ule
Amps
5
10
5
5
5
10
5
15
30 15
4 0
Amps
5
10
10
30
7,5 35
20 1 5
5
20
15
Fu se s and bulb s 265
Fuse panel © (red )
No. Equipment
2 Fue l pump
3 Brake light sensor/brake pedal
sensor system
4 Engine acoust ics
5 Rear door control module (driv-
er's side)
6 Left rear seat
7 Horn
8 Win dsh ield wipe r
9 Light/rain sensor
10 L
u mbar support (dr iver seat)
11 Front passenge
r door control
module
12 Right rear door control mod
ule
Front passenger side cockpit fuse
assignment Amps
2
5
5/5
7,5 30
7,5 15
30
5
5
15 15
Fi g. 198 Fro nt passe nge r side cock pit : fu se pa nel with
p last ic bracket
Fuse panel A (black )
No. Equipment
1 Head-up D isplay
2 MMI Display
3 CD/DVD changer
Chip card reader (not in all coun-
5 tr ies)
6 Instrument cluster
Amps
5
5
5
7,5
5
5
7 Steeri ng col umn switch module 5
Page 269 of 298
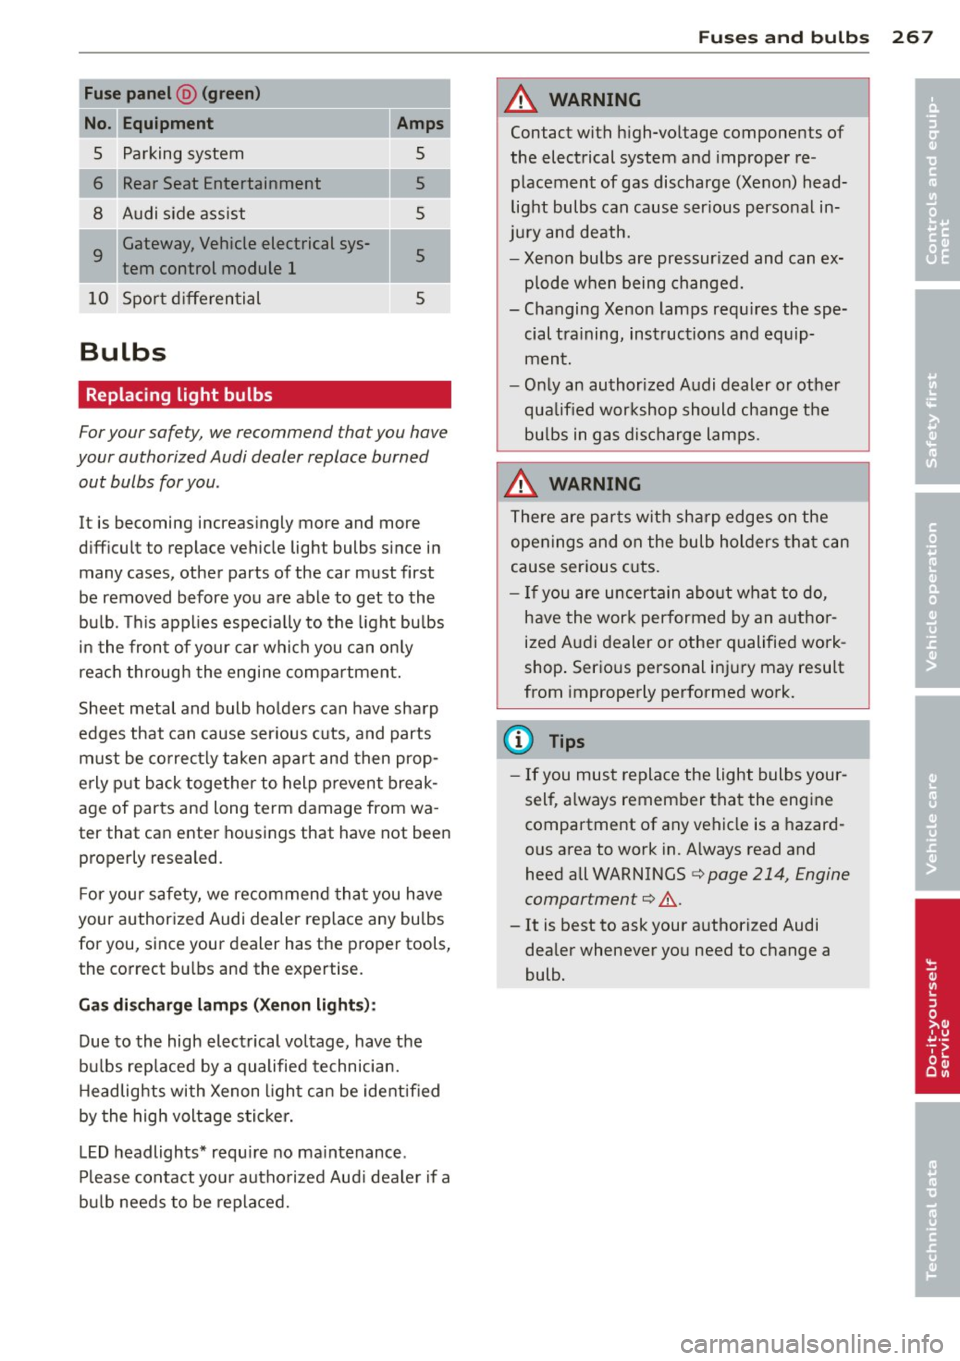
Fuse panel @ (green )
Equipment Amps
Parking system 5
Rear Seat Entertainment s
8 Audi side ass ist 5
9
Gateway, Vehicle electrical sys-
5 tern control module 1
10 Sport d ifferential 5
Bulbs
Replacing light bulbs
For your safety, we recommend that you have
your authorized Audi dealer replace burned
out bulbs for you .
It is becoming increasingly more and more
difficult to replace vehicle light bulbs since in
many cases, other parts of the car must first
be removed before you are able to get to the
bu lb. Th is applies especia lly to the light bu lbs
i n the front of your car which you can only
reach through the engine compartment ,
Sheet metal and bulb holders can have sharp
edges that can cause ser ious cuts, and parts
must be correctly taken apart and then prop
e rly p ut back together to help prevent break
age of parts and long term damage from wa
ter that can enter housings that have not been properly resealed.
F or your safety, we recommend that you have
your authorized Audi dealer replace any bu lbs
for you, since your dealer has the proper tools, the correct b ulbs and the expertise.
Gas disc harge la mp s (X enon li ght s):
Due to the high electrical voltage, have the
bu lbs rep laced by a qualified technician.
H eadlights with Xenon l ight can be identified
by the high voltage stic ke r.
LED headlights* requ ire no ma intenance .
Please contact your autho rized Aud i deale r if a
bu lb needs to be replaced.
Fu ses and bulb s
A WARNING
Contact with h igh-vo ltage components of
the electrical system and improper re
placement of gas discharge (Xenon) head
light bulbs can cause ser ious personal in
jury and death.
- Xenon bulbs are pressur ized and can ex
plode when being changed.
- Changing Xenon lamps requ ires the spe
cial tra ining, instructions and equip
ment.
- On ly an authorized Audi dealer or other
qualified wor kshop should change the
bu lbs in gas discharge lamps .
A WARNING
There are parts with sharp edges on the
openings and on the bulb holders tha t can
cause serious c uts.
- If you are uncertain abo ut what to do,
have the work performed by an author
ized Audi dealer or other qualified work
shop . Ser ious personal inj ury may result
from improperly performed work.
(D Tips
- If you must replace the light bulbs your
sel f, a lways remember that the engine
compartment of any vehicle is a hazard
ous area to work in. A lways read and
heed all WARNINGS
¢ page 214, Engine
compartment¢ ,&..
- It is best to ask your authorized Audi
dealer whenever yo u need to change a
bulb.
-
267
•
•
Page 274 of 298

272 Emergency situations
@ Tips
Check carefully to make sure the hook- up
is sec ure before moving the ca r up the flat
bed truck ramp.
Lifting vehicle
Lifting with workshop hoist and with
floor jack
T he vehi cle may only be li~ed at the lifting
points illustra ted .
Fig. 207 Fr ont lift in g po int
Fi g. 208 Rear lift ing point
• Read and heed WARNING q &_ .
• Locate lifting points q fig. 207 and
qfig. 208.
• Adjust lift ing arms of workshop hoist or
floor jack to match vehicle lifting points.
• Inse rt a r ubber pad betw een the floor jack/
wor kshop hoist and the lifti ng points.
If you must lift your vehicle with a floor jack
to work underneath, be sure the vehicle is
safely supported on stands intended for thi s
purpose .
Front lifting point
The lifting point is located on t he floor pan re
i n forcement about at the same level as the j
ac k mounting po int
~ fig. 20 7. Do not lift
the veh icle at the vertical sill reinforcement .
Rear lifting point
The lifti ng po int is located o n the vert ica l rein
f orcemen t of the lowe r sill for the on- boar d
j a ck
q fig . 208.
Lifting with vehicle jack
Refer to ¢ page 261.
A WARNING
-- To reduce the risk of s erio us injury and
ve hicl e damage.
- Always lift the vehicle only at the spe
c ia l workshop hoist and floor jack lift
po ints illustrated
¢ fig. 207 and
q fig. 208.
-Fail ure to lift the ve hicle at these
po ints could cause the vehicle to tilt or
fall from a lift if there is a change i n ve
h icle weight distribution and balanc e.
T his mig ht happen, fo r example, whe n
h eavy com ponen ts such as the eng ine
b lo ck o r trans mission a re remove d.
- W hen removi ng heavy compone nts like
t hese, anch or vehicle to h oist or ad d cor
resp onding we ig hts t o main tain t he cen
t er of gravity. Oth erwise, t he ve hicle
might tilt or slip off the ho ist , ca using
serio us personal injury.
(D Note
- B e aw are o f the followin g poin ts before
li ft ing t he vehicle:
-The vehicle should never be lifted or
jacked up from underneath the engine oil pan, the transmission housing, the
front or rear axle or the body side
members. This could lead to serious
damage .
- To avoid damage to the underbody or
chas sis frame, a rubber pad must be
inserted between the floor jack and
the lift points.
-
- Before driving over a workshop hoist,
check that the vehicle weight doe s not .,..
Page 280 of 298
2 78 Consumer Information
Consumer Information
Warranty coverages
You r Audi is covered by the following war
ranties:
- New Vehicle Limited Warranty
- Limited Warranty Against Corrosion Perfo-
ration
- Emissions Control System Warranty
- Emissions Performance Warranty
- California Emissions Control Warranty (USA
vehicles only)
- California Emissions Performance Warranty
(USA vehicles only)
Detailed information regarding your warran
ties can be found in your
Warranty & Mainte
nance booklet .
Operating your vehicle
outside the U.S.A. or
Canada
Government regu lations in the United States
and Canada require that automobiles meet
specific emission regulations and safety
standards. Therefore, veh icles built for the
U.S.A . and Canada differ from vehicles sold in
other countries .
If you p lan to take your vehicle outside the
continental limits of the United States or Can
ada, there is the possibility that
- unleaded fuels for vehicles with cata lytic
converter may not be available;
- fuel may have a considerably lowe r octane
rating. Improper fuel may cause engine
damage ;
- service may be inadequate due to lack of
proper service facilities, tools or testing
equipment ;
- replacement pa rts may not be readily availa
ble.
- Navigation systems for vehicles built for the
U.S.A. and Canada will not necessar ily work
in Europe, and may not work in other coun
tries outside North America .
(D Note
Audi cannot be responsible for mechanical
damage that could result from inadequate
fuel, service or parts availability.
Audi Service Repair Manuals and Literature
Audi Official Factory Service Manuals and Lit
erature are published as soon as possible after
model introduction. Service manuals and lit
erature are available to order from the Audi
T echnical Literature Ordering Center at:
www.audi.techliterature.com
Maintenance
General
Your vehicle has been designed to help keep
maintenance requirements to a minimum.
However, a certain amount of regular mainte
nance is still necessary to assure your vehicle's
s afety, economy and rel iability. For detailed
vehicle maintenance consult your Warranty &
Maintenance booklet.
Under difficult operating conditions, for ex
ample at extremely low outside temperatures,
i n very dusty regions , when towing a trailer
very frequently, etc., some service work
should be performed between the intervals
specified. This applies particularly to:
- oil changes, and
- cleaning or replacing the air filter .
(® For the sake of the environment
By regularly maintaining your vehicle, you
help make sure that emission standards
are maintained, thus minimizing adverse
effects on the environment.
Important considerations for you and
your vehicle
The increasing use of electronics, sophisticat
ed fuel injection and emission contro l sys-
tems, and the genera lly increasing technical
liJJ,
Page 283 of 298
Technical Modifications
Our guidelines must be complied with when technical modifications are made .
Always consult an authorized Aud i dealer be
fore starting work on any modifications.
This will he lp ensure that vehicle function,
performance and safety are not impaired
¢ .&. .
Attempting to work on electronic components
and the software used with them can cause
malfunctions. Beca use of the way electronic
components are interconnected with each
other, such malfunctions can also have an ad
verse affect on other systems that are not di
rectly involved . Th is means that you r isk both
a substantial reduction in the operational
safety of you r vehicle and an inc reased wea r of
vehi cle parts¢ _&..
Author ized Audi dealers w ill perform th is
wo rk in a professiona l and competent ma nner
or, in spec ial cases, refer you to a p rofessional
company that specializes in such mod ifica
tions .
_& WARNING t= -
Improper repairs and modifications can
change the way vehicle systems wo rk and
cause damage to the veh icle and ser ious
personal injury.
(D Note
If emergency repairs must be performed
elsewhere, have the veh icle examined by
an authorized A udi dealer as soon as possi
ble.
Con sumer In formation 28 1
Declaration of
Compliance, Telecom
munication and
Electronic Systems
Radio Frequency Devices and Radiocommuni
cation Equipment User Manual Notice.
The manufacturer is not responsib le for any
radio or TV interference caused by unauthor
ized modifications to this equipment.
D evi ces
The following devices each comply with FCC
Part 15 .19, FCC 15.2 1 and RSS -Gen Issue 1:
- Adaptive cru ise control*
- Aud i side assist*
- Cell phone package*
- Convenience key*
- Electron ic immobilizer
- Homelink ® universa l remote contro l
- Remote control key
FCC P art 15.19
This device complies with part 15 of the FCC
Ru les . Operation is subject to the fo llow ing
two conditions :
(1) This device may not cause harmful inter
fere nce, and
(2) this device must accept any interference
received, including interference that may
cause undes ired operation .
FCC Pa rt 15 .21
CAUTION:
Changes or mod ificat ions not expressly ap
proved by the pa rty responsible for compli
ance could void the user's autho rity to ope rate
the equipment .
RSS-Gen Issue 1
Operation is subject to the follow ing two con
ditions:
(1) this device may not cause interference,
and
•
•
Page 288 of 298
286 Index
Homelink ® un iversal remote control .. 281
Remote control key ......... .. .... . 281
DEF
What does this mean when it appea rs in
the trip odometer display? ... .. .... ..
26
Defective light bulb warning ...... ..... 21
Defrosting (windows)
autom atic cl imate control .. .. .. .... ..
6 7
climate control . . . . . . . . . . . . . . . . . . . . . 65
Determining correct load limit ....... . 244
Dimensions .. ... ... ... .... .. .. .. .. .
275
Dimming the rearview mirror . ... .. .. .. 48
Distance . . . . . . . . . . . . . . . . . . . . . . . . . . . 24
Door/re ar lid warning . . . . . . . . . . . . . . . . .
23
Doors
Pow er child safety lock ..... ... .. ... . 37
Driver information system
CD/radio display . . . . . . . . . . . . . . . . . . . .
23
Door/rear lid warning . . . . . . . . . . . . . . . 23
Efficiency program . . . . . . . . . . . . . . . . . . 25
Exterior temperature display ..... .. .. 23
On-board computer ... .... .. .. .... .. 24
Driver seating position .... .. .. .. .. .. .
124
drive select .. .......... ...... ... .. .. 95
Adaptive dampers . . . . . . . . . . . . . . . . . . 95
Cornering light ............... .. ... . 95
Safety belt tensione r ...... .. .. .. .. . . 95
Driving safely . . . . . . . . . . . . . . . . . . . . . . 123
Driving through water ........ .. .... . 198
D .
. t· 24
riving 1me .... ... .... ..... .. .. .. . .
Duplicate key . . . . . . . . . . . . . . . . . . . . . . . 30
Dust filter
refer to Pollutant filter . . . . . . . . . . . . . . 63
E
Easy entry featu re .......... .. .. .. .. .. 70
Efficiency program . . . . . . . . . . . . . . . . . . . 25
Fuel economy messages . . . . . . . . . . . . . 25
Other equipment . . . . . . . . . . . . . . . . . . . 25
Electrical accessories (sockets) . . . . . . . . . 55
Electro-mechanical power assist .. .. ... 193
Elec tromechanical parking brake
Emergency braking ........... .. .. ..
75
Operation . . . . . . . . . . . . . . . . . . . . . . . . . 73
Parking .. .. .... ......... .. .. .. .. ..
74
Releasing and closing ..... .... .... .. 73 Starting
assist . . . . . . . . . . . . . . . . . . . . . 7 4
Starting from rest ..................
74
Starting off w ith a trailer . . . . . . . . . . . . . 7 4
Warning/ind icator lights ........ .... . 16
Electronic differential lock (EDL) ....... 189
Warning/ind icator lights ............. 19
Electronic immob ilizer . . . . . . . . . . . . 26, 31
Electronic power control ( EPC)
warning/indicator ligh t ......... .. .. .
20
Electronic speed limiter .......... ..... 29
Electronic stabilizat ion program (ESP) .. 189
Warning/indicator lights ........... .. 19
Emergency actuation
Doors .... .. .. . .................. .
36
Power sunroof ... .......... ...... .. 40
Emergency braking ................... 75
Emergency flashe r .... ... ... .... .. .. . 42
Warning/indicator lights .......... .. .
22
Emergency release
Selector lever . . . . . . . . . . . . . . . .
106, 112
Emergency starting .......... ..... .. 268
Emergency towing .............. .... 270
Emergency unlock ing
Rear lid .... ... .. .. ... ........... .. 37
Emergency warn ing triangle ..........
256
Energy management . .. ...... ... .. .. 194
Engine
Compar tment .. .. ............. ....
222
Coolant ...... ... .. .............. . 227
Data .... ... .. .. .. ...... ..... .. .. 276
starting . .. .. .. .. .... ... . .. ... .. .. . 70
Starting with jumper cables ....... .. 268
Stopping .... .. .. .. ... .. .. .... .... . 72
Engine compartment ............... . 222
Closing the hood .... ... .... ..... .. 221
Opening the hood ................ . 220
Safety instructions ................. 220
Working in the engine compartment .. 220
Engine coolant .. .. ..... ........... . 22 7
Adding coolant ... ..... ........... .
228
Checking the engine coo lant level ..... 227
Expansion tank ... ... .......... .. .. 227
Malfunction symbol ............ .. .. . 16
Radiator fan ..... .. ........... .. .. 229
Temperature gauge ............. ... . 11
Page 289 of 298
Engine oi l ... .. .... ..... .. .. .. .. ... 222
Adding .... .... .. .... ... .. .. .. ... 225
Addit ives ... .... ...... ... .. .. .. .. . 225
Changing .. ............. .... .. ... 226
Checking the eng ine o il level .. .. .. .. . 225
Indications and cond it ions requ iring ex -
tra check ing ..... .. ...... .. .. .. .. . 225
I ndicator light . . . . . . . . . . . . . . . . . . . . . 18
O il consumption .......... .. .. .. .. . 224
O il gr ad es .. ............. .... .. ... 22 2
O il level symbol ....... ... .. .. .. .... 21
P ressu re mal function ... ... .. .. .. .. .. 17
Recommended oil check intervals .. .. . 225
Sensor defective . . . . . . . . . . . . . . . . . . . . 21
Specification and viscos ity .. .. .. .. .. . 222
E ng ine speed limi tat ion .. ... .. .. .. .. .. 21
E ng ine start system (ind icator l ights) .. .. 18
Environment Break- in period ........... .... .. ... 196
Catalytic converter ........ .. .. .. .. . 197
Disposing of your vehicle batte ry .. .. . 234
Driving at h igh speeds ........ .... .. 199
Driving to m inim ize pollution and no ise 198
F ue l ..... .. ................. .. ... 2 17
Fu el economy ............ .... .. .. . 198
L eaks under your ve hicle ... .. .. .. .. . 220
L ett ing the ve hicle stand and wa rm up. 199
Prope r disposal of drained brake fluid . 230
Prope r disposal of dra ined engine coo l-
ant ..... .. ................. .. ... 228
Proper disposal of drained engine
oil . . . . . . . . . . . . . . . . . . . . . . . . . 225, 226
Recycling used engine o il . ..... .... .. 225
Un leaded f uel ......... ...... .... .. 215
Wha t should I do wi th an old batte ry? . 234
ESP (Electronic s tabilization program)
War ning/ indicator lights ... .. .. .. .. .. 19
Event Data Recorder (EDR) ... .. .. .. .. . 189
E xhaust tail p ipes .... ...... .... .. .. . 210
Expansion tank ............ .... .. .. . 227
E xterior lighting . ... .... ... .. .. .... .. 41
E xterior mirrors
Ad justing ............ .... ... ... ... 48
D imming . .. ............. .... .. .... 48
H eating .. .. .. ........... .. .. .. .... 48
Exterior temperature d isplay ..... ... ... 23
Inde x 287
F
Fastening
Booster seats . . . . . . . . . . . . . . . . . . . . . 177
Convertib le child safety seats . ... .. .. 175
Infant seats . . . . . . . . . . . . . . . . . . . . . . 17 4
Fl oor ma ts .. .. .. .. .. .. ........... .. 1 28
Foot peda ls .... ... .. ..... .......... 128
Fo r th e sake of the environment
Gasoline fumes and the env ironment . . 217
Red ucing engine noise by early upshift -
ing ....... .. .. .. ................. . 11
Refueling . .. .. .... .. ........ ..... 217
Sav ing fuel by early upsh ifting ...... .. 11
Fo ur-zone automatic climate control ... . 66
Fron t air bags
D es cription . . . . . . . . . . . . . . . . . . . . . . . 146
How they wor k . . . . . . . . . . . . . . . . . . . . 152
Frontal coll is io ns and the laws of p hys ics 134
Front seats . . . . . . . . . . . . . . . . . . . . . . . . . 50
Adjusting . .. .. .. .. .. ........... .. 125
Child restraints in the front seat ...... 144
Fuel Additives . ... .... .. . .. .. ..... ... .. 215
B lended gaso line ..... ............. 215
C u rre nt consumption ........... .. .. . 24
Economy messages (effic iency program) 25
Fuel fil le r flap emergency re lease . .... 218
Fuel fi ller nec k ... .. .. .. ...... .... . 216
Fuel gauge . . . . . . . . . . . . . . . . . . . . . . . . 12
Gasoline .. .. .. .. ... ............ .. 215
Gasoline ad di tives .... ........... .. 216
L ow fue l level symbol . . . . . . . . . . . . . . . 21
Octane rat ing . ..... . .. .. ..... ... .. 215
Recommendation ... . .. .. ... ... .. .. 215
Ref uel ling ... .. ...... ............. 217
Reserve ... .. .. .. ... ............ .. . 12
Tank capac ity . . . . . . . . . . . . . . . . . 12, 276
Fuses Ass ignment ..... .. . .. .. ..... ... .. 264
Rep lacing . .. .. .. ................. 264
G
Ga rage door opener (Homelink ®) . ... .. 120
Ga rment hooks . . . . . . . . . . . . . . . . . . . . . . 56
Gas discharge lamps ............. .... 267
•
•
Page 295 of 298
Tire pressure monitoring system .... .. . 253
Loss of air pressure .......... ... .. . 254
Malfunct ion ..... ....... .... ... .. . 254
Resetting tire pressures .... .. .. .. .. . 255
Tires .. .... .. .. ............. .. .. ... 235
Service life . . . . . . . . . . . . . . . . . . . . . . . 245
Speed rating letter code ............ 247
T ire manufacturing date ............ 247
Tire specifications ........ .. .. .. .. . 247
Tread depth ............. .... .. ... 245
Uniform tire quality grading .. .. ... .. 249
W inter t ires ..... .. ...... .. .. .. .. . 250
T ires and vehicle load limits ... ... .. .. . 243
Tires and wheels Checking tire pressure ..... .. .. .. .. . 241
Cold tire inflation pressure ....... .. . 239
Dimensions ................. ... ... 246
General notes .................. ... 23S
Glossary of tire and loading terminolo-
gy .. .. ... . .... ............. .. .. . 236
Low aspect ratio tires ...... .. .. .. .. . 252
New tires and wheels ......... .... .. 246
Replacing ............ ...... .... .. 247
Snow chains ............. .... .. ... 251
Tires and vehicle load lim its .. .. .. .. . 243
Wheel bolts ............. .. .. .. .. . 252
Winter tires ................ ... ... 250
Tire serv ice life ............. ... ... .. 245
T ools . .... .. .. ............. .. .. ... 257
Torn or frayed safety belts ..... .. .. .. . 136
T ouch-up paint ............. ... ... .. 208
Towing Tow truck procedures ......... ..... . 270
TPMS Tire pressure monitoring system .. .. . 254
Trailer towing ................ ... ... 201
Operating instructions ..... .. .. .. .. . 201
Technical requirements . . . . . . . . 201, 202
Trailer towing tips ........ .. .. .. .. . 202
Transmission multitronic ........... ...... .... .. 101
tiptronic . . . . . . . . . . . . . . . . . . . . . . . . . 106
T ransmission ma lfunction (indicator
light) . . . . . . . . . . . . . . . . . . . . . . . . 106, 111
Transport Canada .................. . 131
Tread Wear Indicator (TWI) ...... . ... . 245
Inde x 293
Trip odometer ..... .................. 26
What does it mean when DEF appears in
the tr ip odometer display? ........ .. . 26
T runk
refer to Luggage compartment ... .. .. . 59
Trunk escape handle ..... ....... .... . 256
Trunk lid
refer to Rear lid . . . . . . . . . . . . . . . . . . . . 36
T urn signals . .. .. .. .... ........... .. . 43
Warning/indicator lights ............. 22
u
Undercoating ... .. ................. 209
Unfastening safety belts ............. 138
Unidirectional tires ... ............... 235
Uniform tire quality grading .......... 249
Unlocking Power locking switch ........... .... . 35
Remote control . . . . . . . . . . . . . . . . . . . . 34
Using the key .. ... ...... ........... 35
V
Valet parking . . . . . . . . . . . . . . . . . . . . . . . . 38
Vanity mirrors ..... .................. 45
Vehicle-care products .. .. .... ........ 204
Vehicle electrical system . . . . . . . . . . . . . . 17
Vehicle identification label .......... .. 274
Vehicle Identification Number (VIN) .. .. 274
Vehicle jack .......... ......... 257,261
Vehicle literature ...... ......... .. .. .. 5
Ventilation . . . . . . . . . . . . . . . . . . . . . . . . . 63
w
Warning/indicator lights . . . . . . . . . . . . . . 12
Airbag system . .. .. ............... . 18
Anti-lock braking system (ABS) ... .. .. . 19
Brake system . . . . . . . . . . . . . . . . . . . . . . 14
Cruise control . . . . . . . . . . . . . . . . . . . . . . 22
Electromechanical parking brake ... .. . 16
Electronic power control . . . . . . . . . . . . . 20
Electronic stabilization program (ESP) . . 19
Generator . . . . . . . . . . . . . . . . . . . . . . . . . 17
Instrument cluster . . . . . . . . . . . . . . . . . . 11
Malfunction Indicator Lamp (MIL) ... .. 20
•
•