key AUDI A6 2012 User Guide
[x] Cancel search | Manufacturer: AUDI, Model Year: 2012, Model line: A6, Model: AUDI A6 2012Pages: 298, PDF Size: 74.43 MB
Page 39 of 298
Clos ing th e re ar lid
• Pull the rear lid down at the grip on the in
s ide and allow it to drop gently to close it
¢ A .
The settings in the MM I determ ine if the rear
lid can be opened using the handle ¢
page 33.
& WARNING
-After closing the rear lid, always pull up
on it to make s ure that it is properly
closed. Otherwise it could open sudden ly
when the veh icle is moving .
- To help prevent poisonous exhaust gas
from being drawn into the vehicle, al
ways keep the rear lid closed while driv
ing. Never transport objects larger than
those which fit completely into the lug gage area, because then the rear lid can
not be fully closed .
- Never leave you r vehicle u natte nded es
pecially with the rea r lid left open. A
child could crawl into the car through the
l u ggage comp art ment and pull the lid
shut, becoming trapped and unab le to
get out. To reduce the risk of personal in
jury, never let children p lay in or around
yo ur vehicle. A lways keep the rear lid as
well as the vehicle doors closed when not
in use.
-Always ensure that no one is w ith in
range of the rear lid when it is mov ing, in
part icu lar close to the hinges - fingers o r
hands can be pinched .
(D Tips
When the vehicle is locked, the rear lid can
be opened separately by pressing the but
ton
l a! on the master key. When you close
the rear lid again, it locks automatically.
Op enin g an d clos ing 3 7
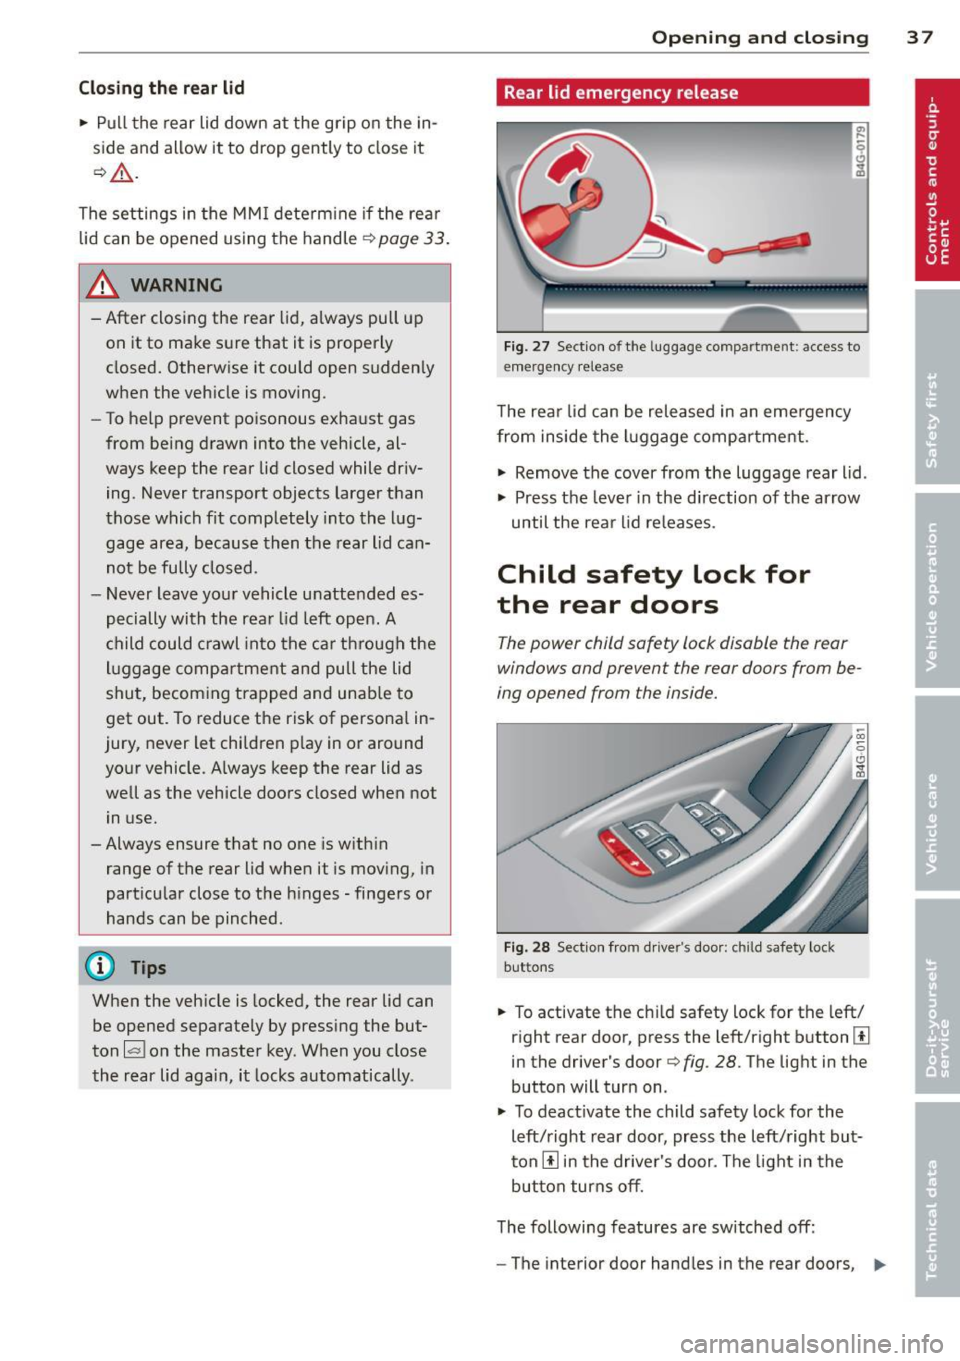
Rear lid emergency release
Fig. 2 7 Section o f th e luggage compart ment : access to
emergency release
T he rea r lid can be released in an eme rgency
from inside the luggage compartment.
• Remove the cover from the luggage rear lid .
• Press the lever in the d irection of the arrow
until the rea r lid re leases.
Child safety Lock for
the rear doors
The power child safety lock disable the rear
windows and prevent the rear doors from be
ing opened from the inside.
F ig. 28 Sect ion from d rive r's doo r: chil d safety lock
but tons
• To activate the ch ild safety lock for the left/
r ight rear door, press the left/right button
[ii
in the driver's door¢ fig. 28. The light in the
button will turn on .
• To deact ivate the child safety lock for the
left/right rear door, press the left/ right but
ton
[ii in the drive r's door . The light in the
button turns off.
T he following features are switched off:
- The interior door hand les in the rear doors,
1111-
Page 40 of 298
38 Openin g and clo sing
- The power windows in the rear doors,
- The interior l ighting buttons.
In order to activate the child safety lock on
the left and the right side, press the two safe
ty buttons [!l in succession.
Power windows
Controls
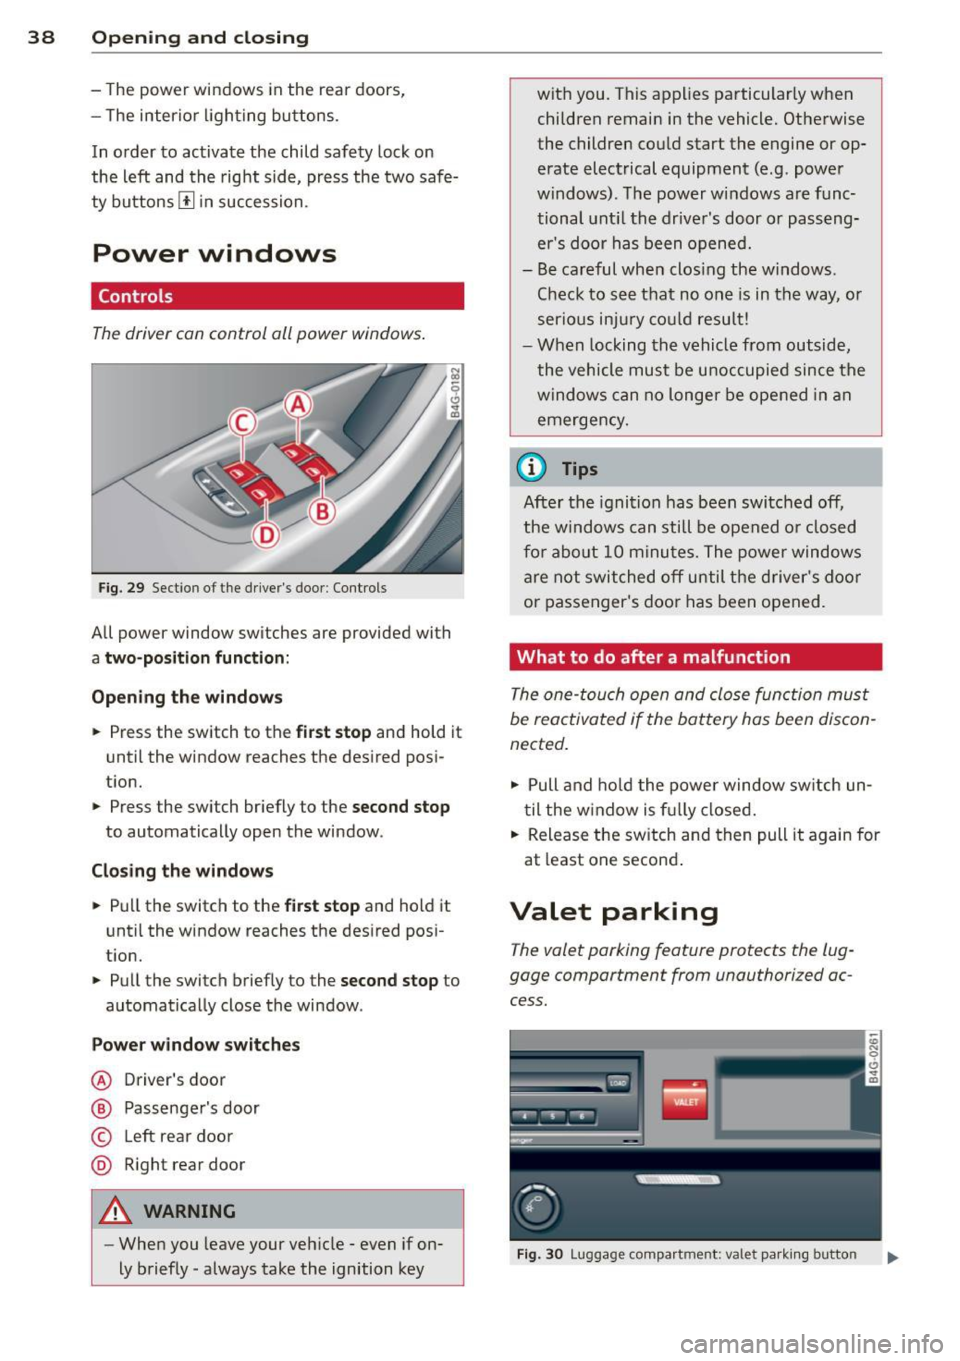
The driver can control all power windows .
Fig. 29 Section of the driver's door: Controls
All power window switches are provided with
a tw o-p osition fun ction :
Opening th e window s
• Press the switch to the
firs t stop and hold it
until the window reaches the desired posi
tion.
• Press the switch br iefly to the
se cond stop
to automatically open the window .
Cl os in g th e window s
• Pull the switch to the
firs t s top and hold it
until the window reaches the des ired pos i
tion.
• Pull the switch briefly to the
sec on d sto p to
automatically close the window .
P ow er wi ndow switche s
@ Driver's door
® Passenger's door
© Left rear door
® R ight rear door
A WARNING
- When you leave your veh icle -even if on
ly briefly -always take the ignition key with you. This applies particularly when
children remain in the vehicle. Otherwise
the children could start the engine or op
erate electrical equipment (e.g. power
windows). The power windows are func
tional unt il the driver's door or passeng
er's door has been opened.
- Be careful when clos ing the windows .
Check to see that no one is in the way, or
serio us inju ry cou ld result!
- When locking the vehicle from outside,
the vehicle must be unoccupied since the windows can no longer be opened in an
emergency.
(0 Tips
Afte r the ignition has been switched off,
the w indows can still be opened o r closed
fo r abo ut 10 minutes. The power windows
are not switched off until the driver's door
or passenger's door has been opened.
What to do after a malfunction
The one-touch open and close function must
be reactivated if the battery has been discon
nected.
• Pull and ho ld the power window sw itch un
til the w indow is f ully closed.
• Release the sw itch and then pull it again for
at least one second .
Valet parking
The valet parking feature protects the lug
gage compartment from unauthorized ac
cess.
F ig. 30 Luggage compartment: valet park ing button
Page 41 of 298
With "valet parking" activated, the rear lid
cannot be opened.
~ Remove the mechanical key¢ page 31.
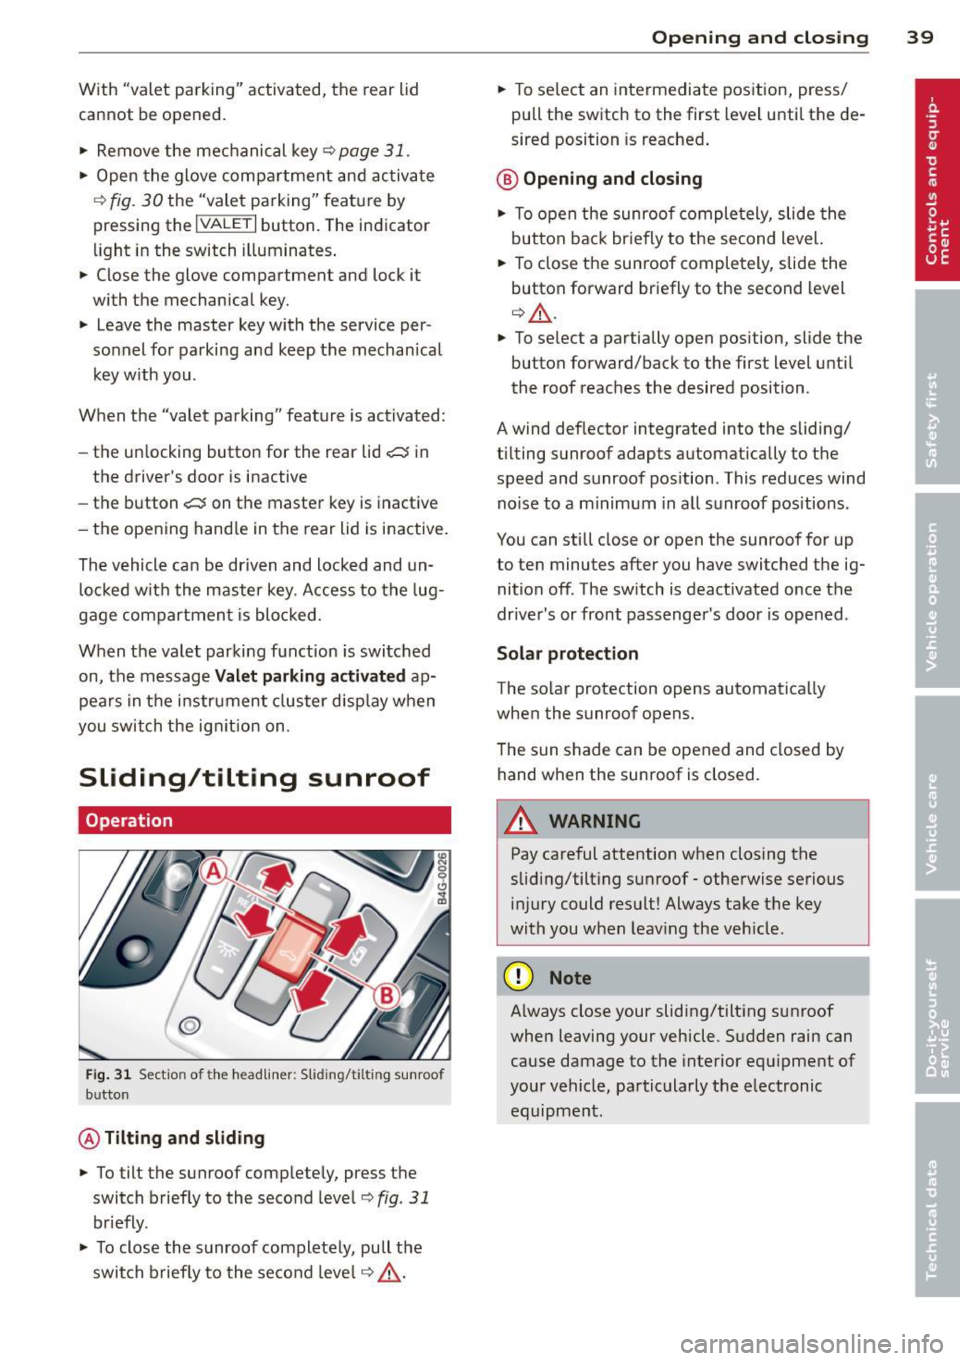
~ Open the glove compartment and activa te
¢
fig. 30 the "valet parking" feature by
pressing the
I VALE T I button. The indicator
light in the switch illuminates.
~ Close the glove compartment and lock it
with the mechanical key.
~ L eave the master key with the service per
sonnel for parking and keep the mechan ical
key w ith you .
When the "valet parking" feature is activated:
- the un locking button for the rear lid
e::5 in
the dr iver's door is inactive
- the button
C::5 on the master key is inactive
- the opening hand le in the rear lid is inactive.
The vehicle can be driven and locked and un
locked w ith the master key. Access to the lug
gage compartment is blocked.
When the valet parking function is switched on, the message
Valet parking activated ap
pears in the instrument cluster display when
you switch the ig nition on.
Sliding/tilting sunroof
Operation
Fig . 31 Sect io n of t he he adlin er: S lidin g/tiltin g sunroo f
b u tto n
@ Tilting and sliding
~ To tilt the sunroof completely, press the
switch briefly to the second leve l¢
fig . 31
briefly.
~ To close the sunroof completely, pull the
switch briefly to the second level ¢
.&_.
Opening and closing 39
~ To se lect an intermediate position, press/
pull the switch to the first level until the de
sired position is reached .
@ Opening and closing
~ To open the sunroof completely , slide the
button back br iefly to the second level.
~ To close the sunroof completely, slide the
button forward briefly to the second level
¢ .&_.
~ To select a partially open position, slide the
button forward/back to the first level until
the roof reaches the desired position .
A wind deflector integrated into the sliding/
tilting sunroof adapts automatically to the
speed and sunroof pos ition . This reduces wind
noise to a minimum in all sunroof positions .
You can still close or open the sunroof for up
to ten minutes after you have switched the ig nition off . The switch is deactivated once the
driver's or front passenger's door is opened .
Solar protection
The solar protection opens automat ically
when the sunroof opens.
The sun shade can be opened and closed by
hand when the sunroof is closed.
A WARNING
-Pay careful attention when closing the
sliding/tilting sunroof -otherwise serious
injury could result! Always take the key
with you when leaving the vehicle .
(D Note
-
Always close your sliding/tilting sunroof
when leaving your vehicle. Sudden rain can
cause damage to the interior equipment of
your vehicle, particularly the electronic equipment .
Page 46 of 298
44 Clear vis ion
Interior lights
Front and rear interior lighting
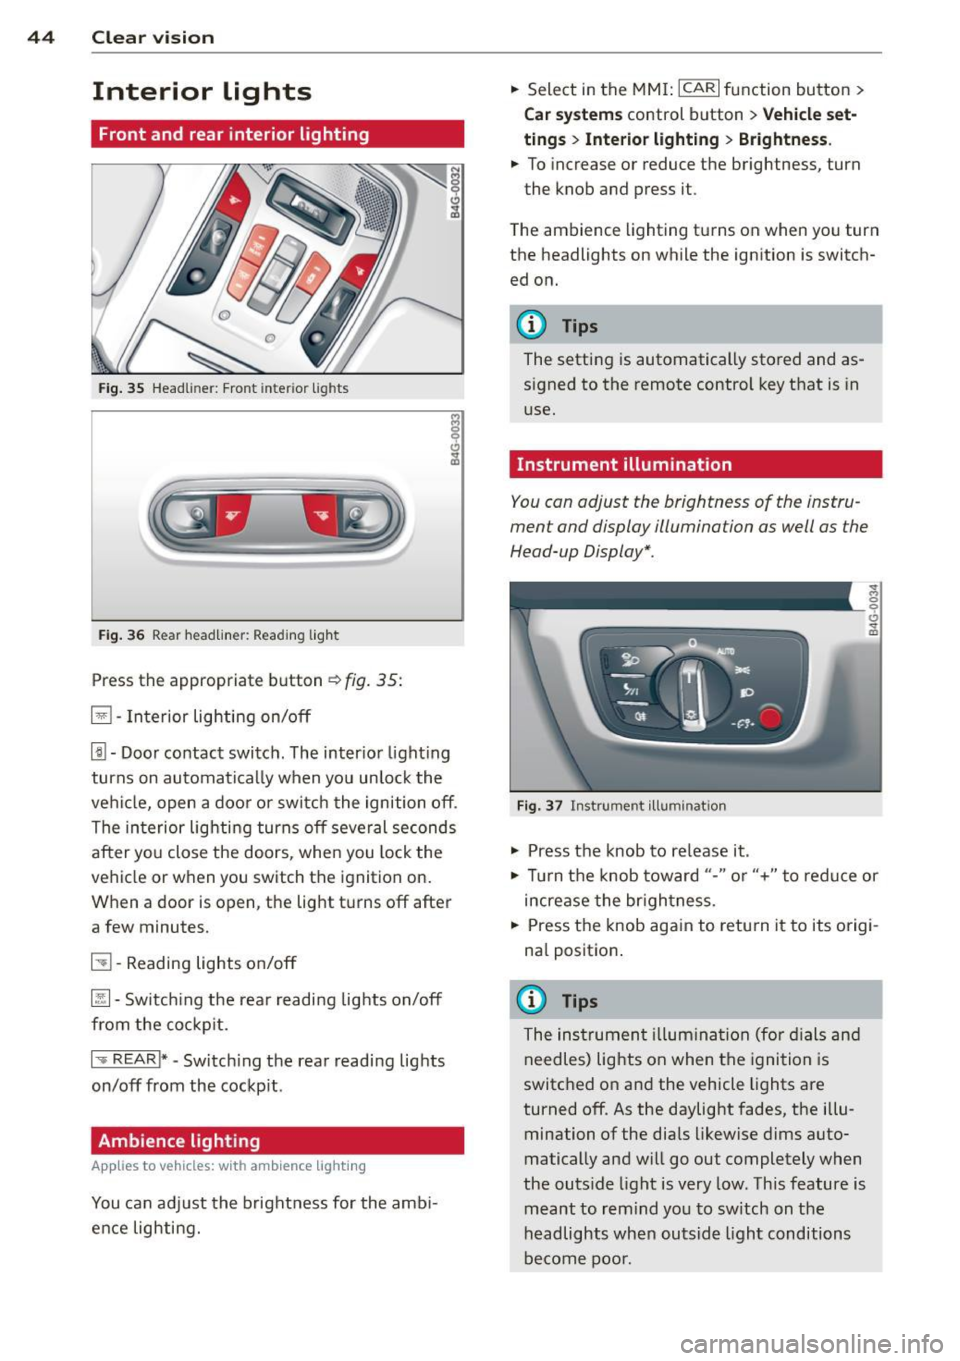
Fig. 35 Head liner: Fron t int eri or ligh ts
Fig. 36 Rear headlin er: R ead in g light
Press the appropriate b utton ~ fig. 35:
El -Interior lighting on/off
[j) -Door contact switch . The inter io r l ight ing
turns on automatically when you unlock the
vehi cle, open a doo r or switch the ignition off .
The interior lighting turns off several seconds
after you close the doors , when you lock the
vehicle or when you switch the ignition on.
When a door is open, the light t urns off after
a few minutes.
51 -Reading lights o n/off
~ -Sw itch ing the rear readi ng lights on/off
from the co ckpit.
I .,.. REAR !* -Switch ing the rear reading lights
on/off from the cockp it .
Ambience lighting
Appl ies to vehicles: wit h ambience lighting
You can adj ust the brightness for the amb i
ence lighting. .,.
Select in the MM I: ICARlfunction button>
C ar sys tem s control button > Vehicle set
ting s
> Interio r light ing > Brightne ss .
.,. To increase or reduce the brightness, turn
the knob and press it .
T he ambience lighting turns on when you turn
the headlights on while the ignition is switch ed on.
@ Tips
The setting is automatically stored and as
signed to the remote control key that is in
use.
Instrument illumination
You can adjust the brightness of the instru
ment and display illumination as well as the
Head-up Display *.
F ig. 37 In strume nt ill umin ation
.,. Press the knob to re lease it .
~ 0
"'
.,. Tur n the knob toward "-" or"+" to redu ce or
increase the br ightness.
.,. Press the knob aga in to retu rn it to its origi
na l position .
(I} Tips
The instrumen t illum ina tion (for dials and
needles) lights on when the ignition is
switc hed o n and the vehicle lights are
turned off . As the daylight fades, the illu
mination of the dia ls likewise d ims auto
matically and will g o out completely when
the outs ide light is very low. This feature is
meant to rem ind yo u to sw itch on the
headlights when outsid e light conditions
be come poo r.
Page 47 of 298
Vision
Sun visors
( J
Fig. 38 Sun v isor
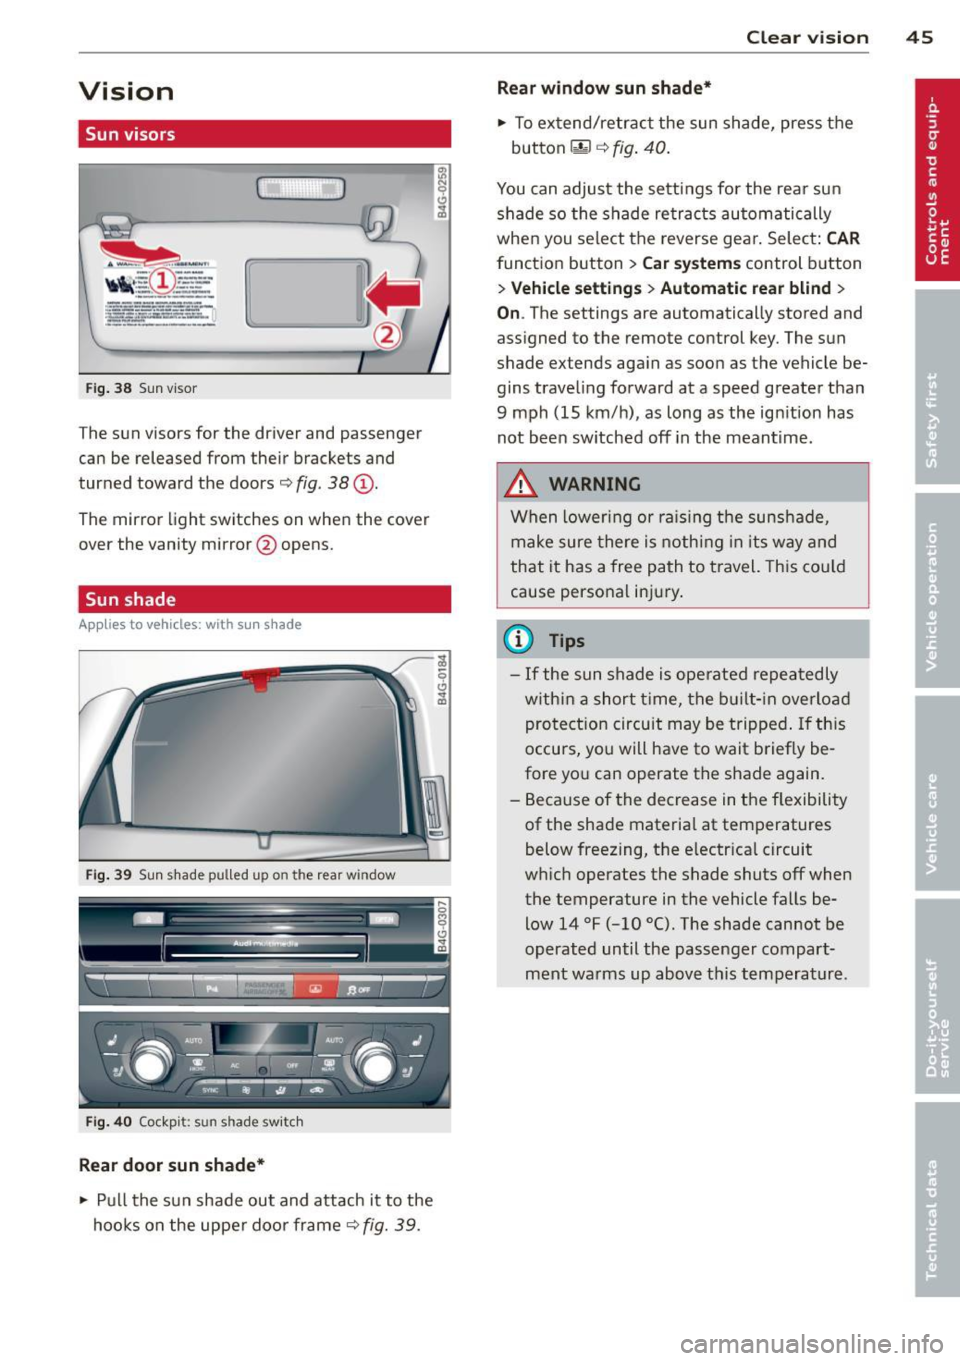
The sun visors for the driver and passenger
can be released from their brackets and
turned toward the doors
c::> fig. 38 @.
The mirror light switches on when the cover
over the vanity mirror @opens.
Sun shad e
Applies to vehicles: with s un shade
Fig . 39 Sun s hade pulled up on th e rear w indow
Fig. 40 Cockp it: sun shade sw itc h
Rear door sunshade*
.,. Pu ll the sun shade out and attach it to the
hoo ks on the upper doo r frame
c::> fig. 39.
Clear vi sion 45
Rea r window sun shad e*
.,. To extend/retract the sun shade, press the
button~
c::> fig . 40 .
You can adjust the settings for the rea r sun
shade so the shade re tracts automatically
when you select the reverse gea r. Select:
CAR
function button > Car system s control b utton
> V ehicle settings > Automatic re ar blind >
O n. The settings are automatically stored and
ass igned to the remote control key. The sun
shade extends again as soon as the vehicle be
gins traveling forward at a speed greater than
9 mph (15 km/h), as long as the ig nition has
not been sw itched off in the meantime.
,&. WARNING
When lowering or ra is ing the sunshade,
make sure there is nothing in its way and
that it has a free path to travel. This co uld
cause persona l inj ury .
(j} Tips
- If the sun shade is ope rated repeatedly
w ithin a short t ime, the built- in overlo ad
pro te ct io n circuit may be tripped . If th is
occurs, you will have to wait briefly be
fore yo u can operate the shade again.
- Because of the decrease in the f lexibility
of the shade materia l at temperatures
below freezing, t he e lectr ica l circuit
w hich operates the shade shuts off when
the temperature in the vehicle falls be
low
14 °F (-10 °C). The shade cannot be
operated until the passenger compart
ment warms up above t his temperature .
Page 50 of 298
48 Clear vis ion
@ Tips
- Commercial hot waxes applied by auto
matic car washes affect the cleanability
of the windshield.
- You can also use the service position, for
example, if you want to protect the
winds hield from icing by using a cover.
- You cannot activate the service position
when the hood is open.
Mirrors
Adjusting the exterior mirrors
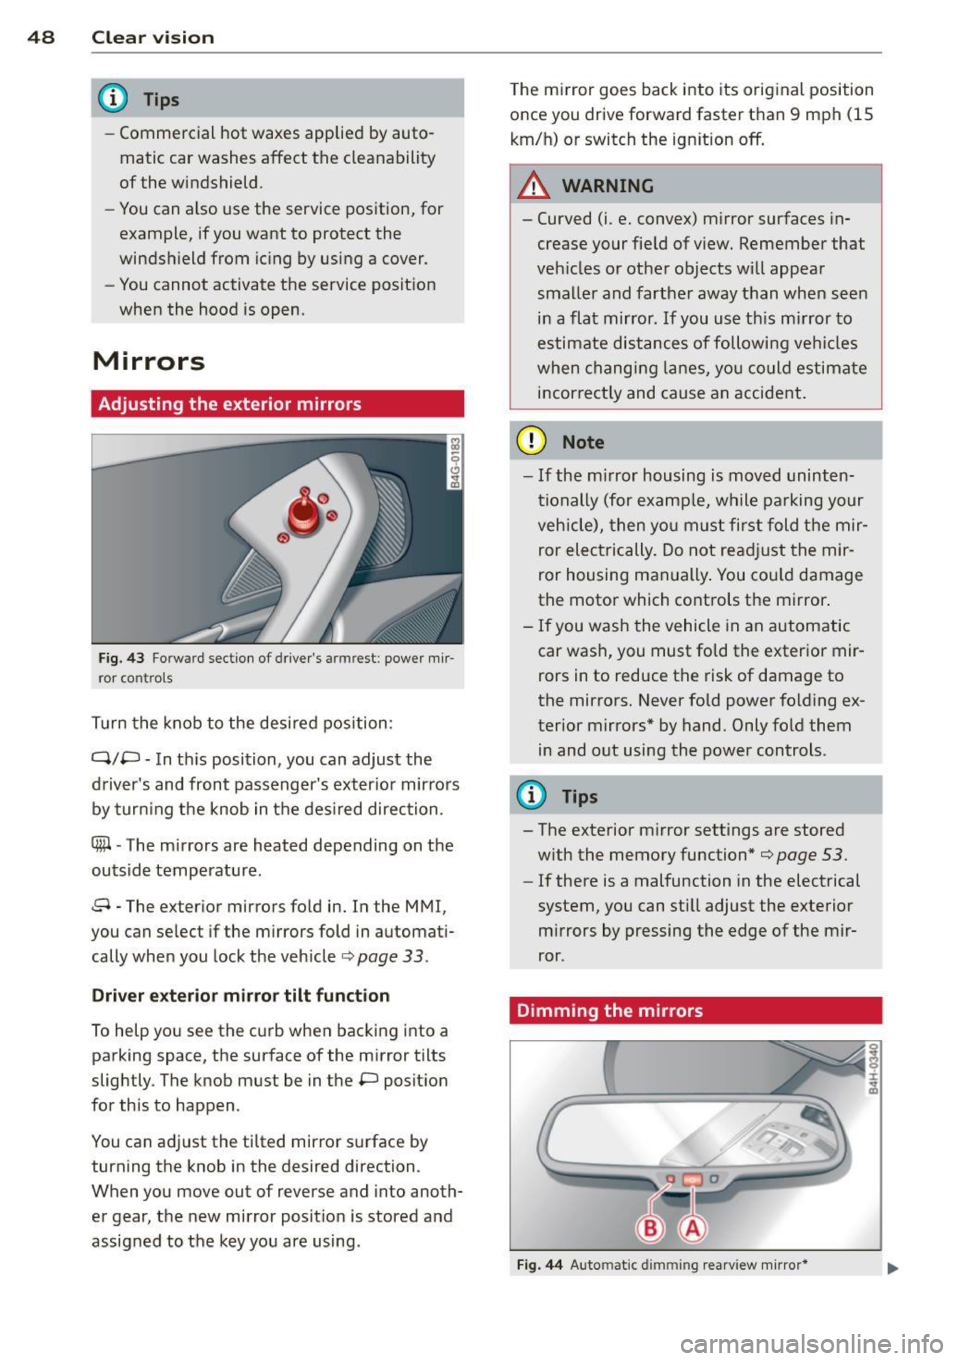
Fig. 43 F orwa rd section of drive r's arm rest: power m ir
ro r cont ro ls
T urn the knob to the desired position :
Q/P -In th is position, you can adjust the
d river's and front passenger's exter io r mirrors
by tur ning the knob in t he des ired direction.
® -The m irrors are heated depending on t he
outside temperature .
8 -The exterior mirrors fo ld in. In the MMI,
you can se lect if the m irrors fold in automat i
cally when you lock the vehicle ¢ page
33 .
Driv er exter io r mirro r tilt function
To help yo u see the c urb when bac king into a
parking space, the surface of the mirror tilts
slightly . The knob must be in the P posit ion
for this to happen .
You can ad just the ti lted mirror s urface by
turning the knob in the desired direction.
When you move out of reverse and into anoth
er gear, the new mirror posit ion is stored and
assigned to the key yo u are using . T
he mi rror goes back into its orig inal position
o nce you drive forward faster than 9 mph (15
km/h) or switch the ign ition off .
A WARNING
--
- Curved (i.e. conve x) m irror surfaces in
crease your fie ld of view. Remember that
veh icles o r ot her objects w ill appea r
smalle r and farther away t han when seen
in a flat mir ror. If you use th is m irror to
estimate distances of followi ng ve hicles
when c hanging lanes, yo u cou ld estimate
incorrect ly and cause an accide nt.
(D Note
- If the m irror housing is moved uninten
ti onally (for examp le, w hile pa rking your
veh icle), then yo u must first fold t he mir
ror electrically. Do not re adj ust the mir
ror housing man ually . You co uld damage
the motor which controls the mirror .
-If you wash the vehicle in an automatic
car was h, you must fo ld the exter ior mir
rors in to reduce the risk of damage to
the mirro rs. Never fold power folding ex
terior mirrors* by hand. Only fo ld them
in and out using the power controls.
{I) Tips
- The exterior m irror settings are stored
w ith the memory function*
¢ page 53.
- If there is a malfunction in the electrical
system, you can sti ll adjust the exterior
m irrors by pressing the edge of the mir
ror.
Dimming the mirrors
Fi g. 44 Auto matic d immin g rearv iew mirro r*
Page 55 of 298

.. To move the head restraint down, press the
button -arrow- ¢
fig. 48 and slide the head
restraint downward.
Removing the head restraints
.. Move the head restraint upward as far as it
can go .
.. Press the re lease ¢
fig. 49 with the me
chanical key¢
page 31 and the button
-ar row- ¢
fig. 48. Pull the head restraint out
of the backrest a t the same time¢,&. .
Installing the head rest raints
.. Slide the posts on the head restra int down
into the guides until you feel the posts lock
into place .
.. Press the button -arrow- ¢
fig. 48 and slide
the head restraint all the way down . You
s hould not be able to pull the head restrain t
out of the backrest .
So that the driver can have a better view to
t he rear, the head restraints should be pushed
down completely when the rear seats are not
occupied .
A WARNING
-Only remove the rear seat head restraints
when necessary in order to install a child
seat. Install the head restraint again im
med iately once the chi ld seat is removed.
Driving without head restraints or with
head restraints that are not properly ad
justed increases the risk of serious or fa
tal neck injury dramatically .
- Read and heed all WARNINGS
c:::>page 127.
Seat memory
Description
App lies to vehicles: wit h memory function
The memory function al lows you to quickly
and easily store and reca ll personal seating
profiles for the driver. The memory function is
operated through the master key and the memory buttons in the driver's door.
Seats and storage 53
The driver's seating profile is stored and as
signed to the master key each t ime the vehicle
is locked. The seating profile is reca lled auto
matically when the vehicle is unlocked . If two
people use one vehicle, it is recommended
that each person always uses "their own"
master key.
Two seating profiles can be stored in each of
the driver's door. Once s tored , these seating
profiles can be recalled at any time .
The following settings are stored:
- Dr iver's seat
- Steer ing wheel*
- Both exterior rearview mirrors*
Remote control key
Applies to veh icles: w ith memory function
To assign the driver's seat settings to the re
mote control key when locking the veh icle, the
function must be switched on.
.. Select:
I CAR ! function button > Car systems
control button > Vehicle settings > Seats >
Driver seat> Remote control key> On .
(D Tips
If you do not wan t another driver's set
tings to be assigned to the remote control
key, switch off the memory function using
the MMI or the
!O FF I button r::::> page 53 .
Memory buttons
Applies to veh icles: w ith memory functio n
Fig. SO Driver 's door : memo ry fun ction b utto ns
The memory buttons are located in the driv
er's door.
Page 57 of 298
should never be left unattended in the ve
hicle because this increases the risk of in
jury.
12-volt sockets
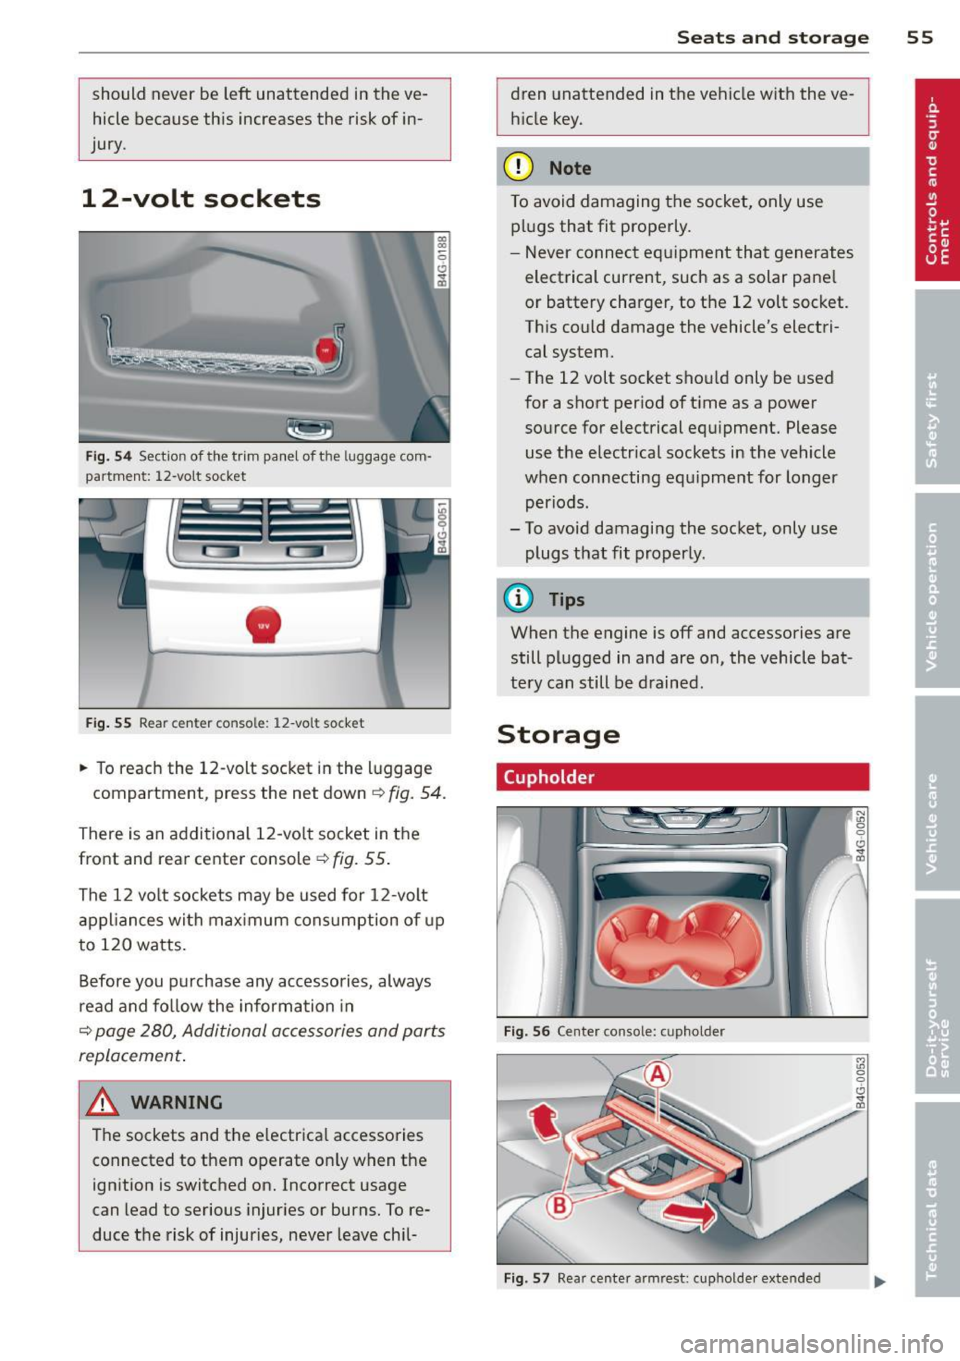
Fig. 5 4 Section of the trim panel of the luggage com·
partment: 12-volt socket
•
Fig . 55 Rear center console: 12-volt socket
~ To reach the 12-volt socket in the luggage
compartment, press the net down
¢ fig. 54.
There is an additional 12-vo lt socket in the
front and rear center console
~fig. 55.
The 12 vo lt sockets may be used for 12-volt
appliances with max imum consumption of up
to 120 watts.
Before you purchase any accessories, always
r ead and fo llow the information in
~ page 280, Additional accessories and parts
replacement .
A WARNING
The sockets and the electrica l accessories
connected to them operate on ly when the
ignition is switched on. Incorrect usage
can lead to serious injuries or burns. To re
duce the risk of injuries, never leave chil-
S ea ts a nd s to rage 55
dren unattended in the vehicle with the ve
h icle key.
(D Note
To avoid damaging the socket, only use plugs that fit properly.
- Never connect equipment that generates
electrical current, such as a solar pane l
or battery charger, to the 12 volt socket.
This could damage the vehicle's electri
cal system.
- The 12 volt socket should only be used
for a short period of t i me as a power
source for electrical equipment. Please
use the electrical sockets in the vehicle
when connecting equ ipment for longer
periods.
- To avoid damaging the socket, only use
plugs that fit properly.
(D Tips
When the engine is off and accessories are
still plugged in and are on, the vehicle bat
tery can still be drained.
Storage
(upholder
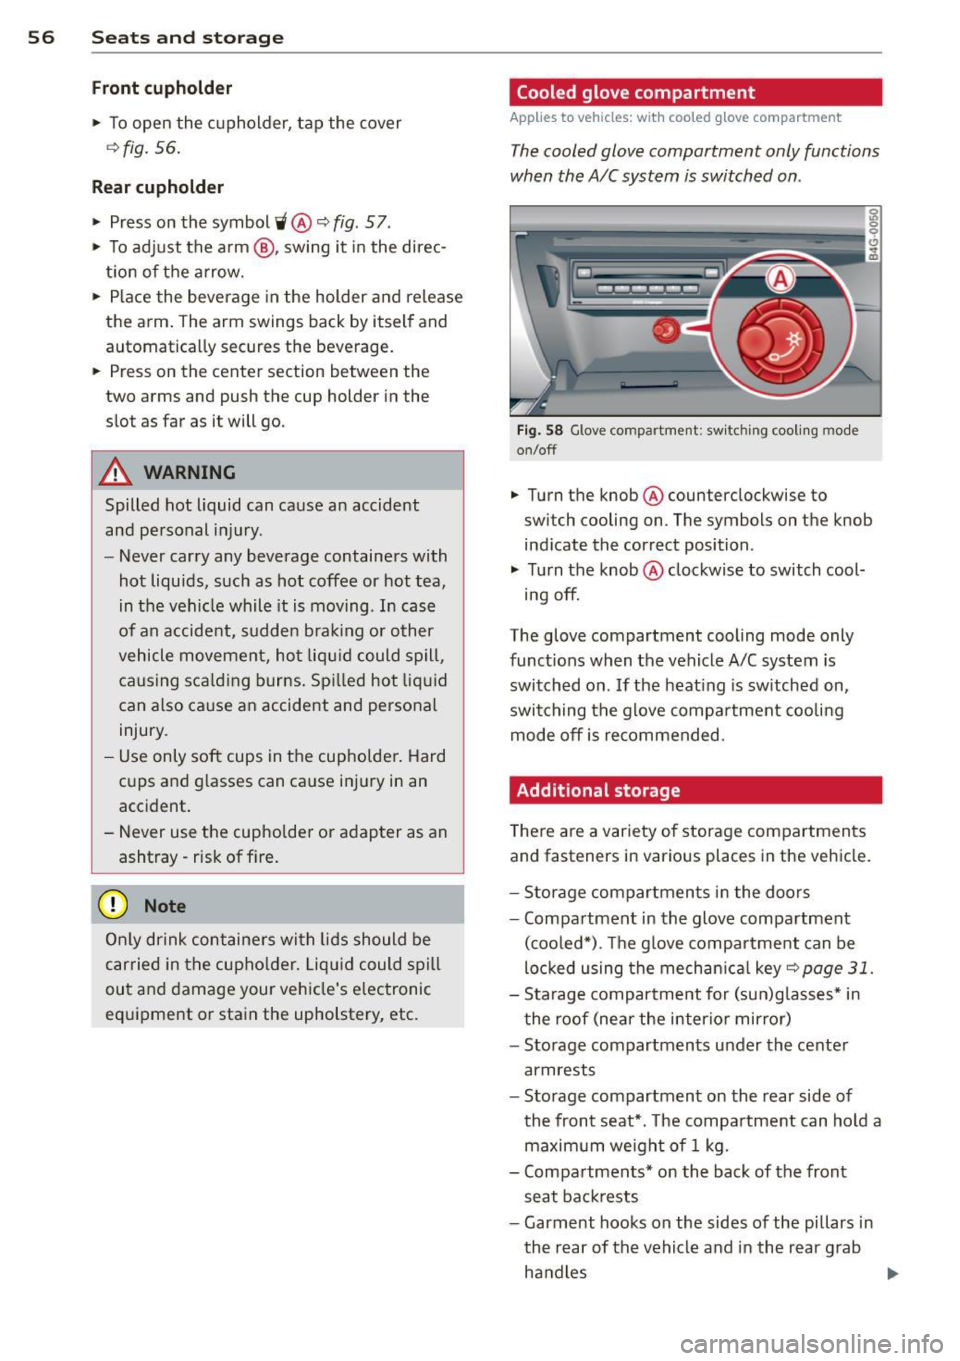
Fig. 56 Center console: cupholder
Fig. 57 Rear center armrest: cupholder extended
Page 58 of 298
56 Seats and storage
Front cuphold er
.,. To open the c upholder, tap the cover
~ fig. 56.
Rear cuphold er
.,. Press on the symbol 'i@ ~ fig. 57 .
.,. To adjust the a rm @ , swing it in the direc
t ion of the a rrow .
.,. Place the beverage in the holder and release
the arm . The arm swings back by itself and
automatically secures the beverage .
.,. Press on the center section between the
two arms and push the cup holder in the
slot as far as it will go.
_& WARNING
Spilled hot liquid can cause an accident
and personal inj ury .
-
- Never carry any beverage containe rs with
hot liquids, such as hot coffee or hot tea,
in the vehicle while it is mov ing . In case
of an accident, sudden b ra ki ng o r other
vehicle movement, hot liq uid c ould spill,
causing sca ld ing burns. Sp illed hot liq ui d
can also ca use an accident and personal
injury.
- Use only soft cups in the cupholde r. Hard
cups and g lasses can ca use inj ury in an
accident.
- Never use the cupho lder or adapter as an
ashtray- r isk of f ire.
(D Note
On ly drink containers wi th lids should be
carried in the cupho lder. Liqu id could spi ll
ou t and damage your vehicle's e lectronic
equ ipment or stain the upholstery, etc.
Cooled glove compartment
Applies to vehicles: wit h coo led g love compartment
The cooled glove compartment only functions
when the A/C system is switched on .
Fig . 58 G love compartme nt: sw it c hin g cooli ng m ode
on/off
.,. Turn the knob @counterclockwise to
sw itch cooling on . The symbols on the knob
ind icate the correct position .
.,. Turn the knob @clockwise to switch cool-
ing off.
The glove compartment cooling mode only
funct ions when the vehicle A/C system is
switched on . If the heat ing is sw itched on,
switching the g love compa rtment coo lin g
mode off is recommended.
Additional storage
T here a re a var iety of storage compartments
and fasteners in various places in the vehicle.
- S torage compartments in the doors
- Compartment in the glove compartment
(coo led*) . T he g love compar tment can be
loc ked using the mechan ica l
key ~ page 31.
-Sta rage compartment for (su n)g lasses* in
t he roof (near the interio r mirror)
- Storage compartments under the center
armrests
- Storage compartment on the rear side of
the front seat *. T he compa rtment can hold a
maximum weigh t of 1 kg.
- Compa rtments* on the back of the front
seat ba ckrests
- Garment hooks on the sides of the pi llars in
th e rear of the vehicle a nd in the rear g rab
ha ndles
lllJ,,
Page 62 of 298
60 Seats and st o rage
Enlarging cargo capacity of the vehicle
interior
The seat backs can be folded forward to en
large the cargo capacity .
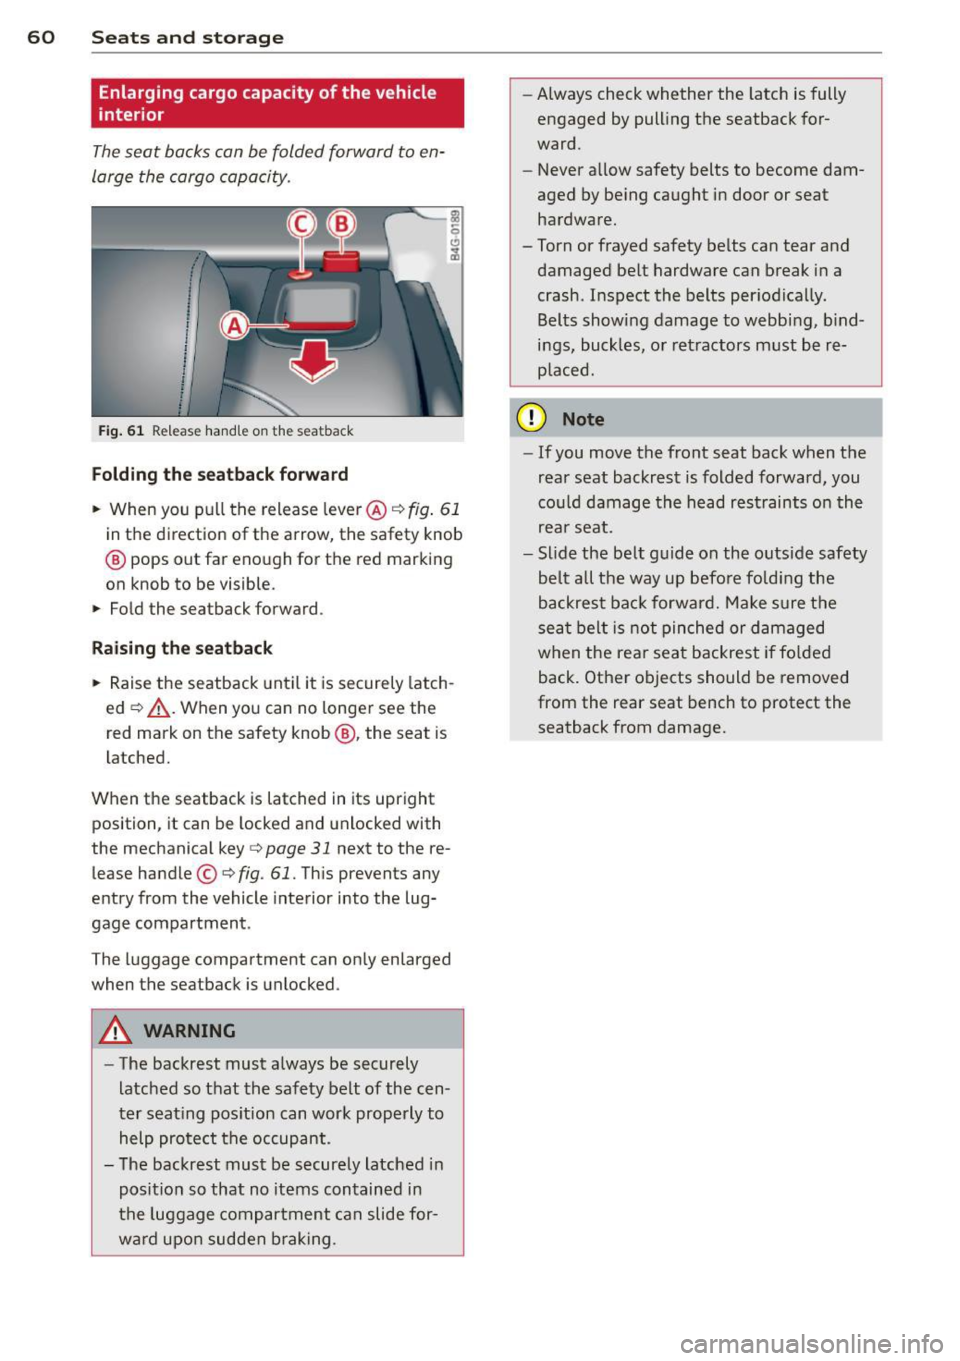
Fig. 61 Re lease handle on the seatback
Folding th e se atback forward
.. When you pu ll the release leve r@ ¢ fig. 61
in the direction of the arrow, the safety knob
@ pops out far enough for the red marking
on knob to be visible.
.. Fold the seatback forward .
Raising th e se atback
.. Raise the seatback until it is securely latch
ed ¢&_ . When you can no longer see the
red mark on the safety knob@, the seat is
l atched.
When the seatback is latched in its upright
position, it can be locked and unlocked with
the mechanical key
c> page 31 next to the re
lease handle ©
c>fig. 61. This prevents any
entry from the vehicle interior into the lug
gage compartment .
The luggage compartment can only enlarged
when the seatback is unlocked.
A WARNING
-
-The backrest must a lways be securely
latched so that the safety belt of the cen
ter seating pos ition can work properly to
help protect the occupant .
- The backrest must be securely latched in
posit ion so that no items contained in
the luggage compar tment can slide for
wa rd upo n sudden b raking . -
Always check whether the latch is fully
engaged by pull ing the seatback for
ward.
- Never allow safety belts to become dam
aged by be ing caught in door or seat
hardware.
-Torn or frayed safety belts can tear and
damaged be lt hardware can break in a
crash . Inspect the belts periodica lly.
Belts show ing damage to webb ing, b ind
ings, buckles, or retractors must be re
p laced.
(D Note
- If you move the front seat back when the
rear seat backrest is folded forward, you
cou ld damage the head r estraints on th e
rea r seat.
- Slide the belt guide on the outside safety
be lt a ll the way up befo re fold ing the
backrest back forward. Make sure the
sea t belt is not pinched or damaged
when the rear seat backrest if fo lded
back. Other objects should be removed
from the rear seat bench to protect the
seatback from damage.