mirror AUDI A6 2012 Owners Manual
[x] Cancel search | Manufacturer: AUDI, Model Year: 2012, Model line: A6, Model: AUDI A6 2012Pages: 298, PDF Size: 74.43 MB
Page 4 of 298
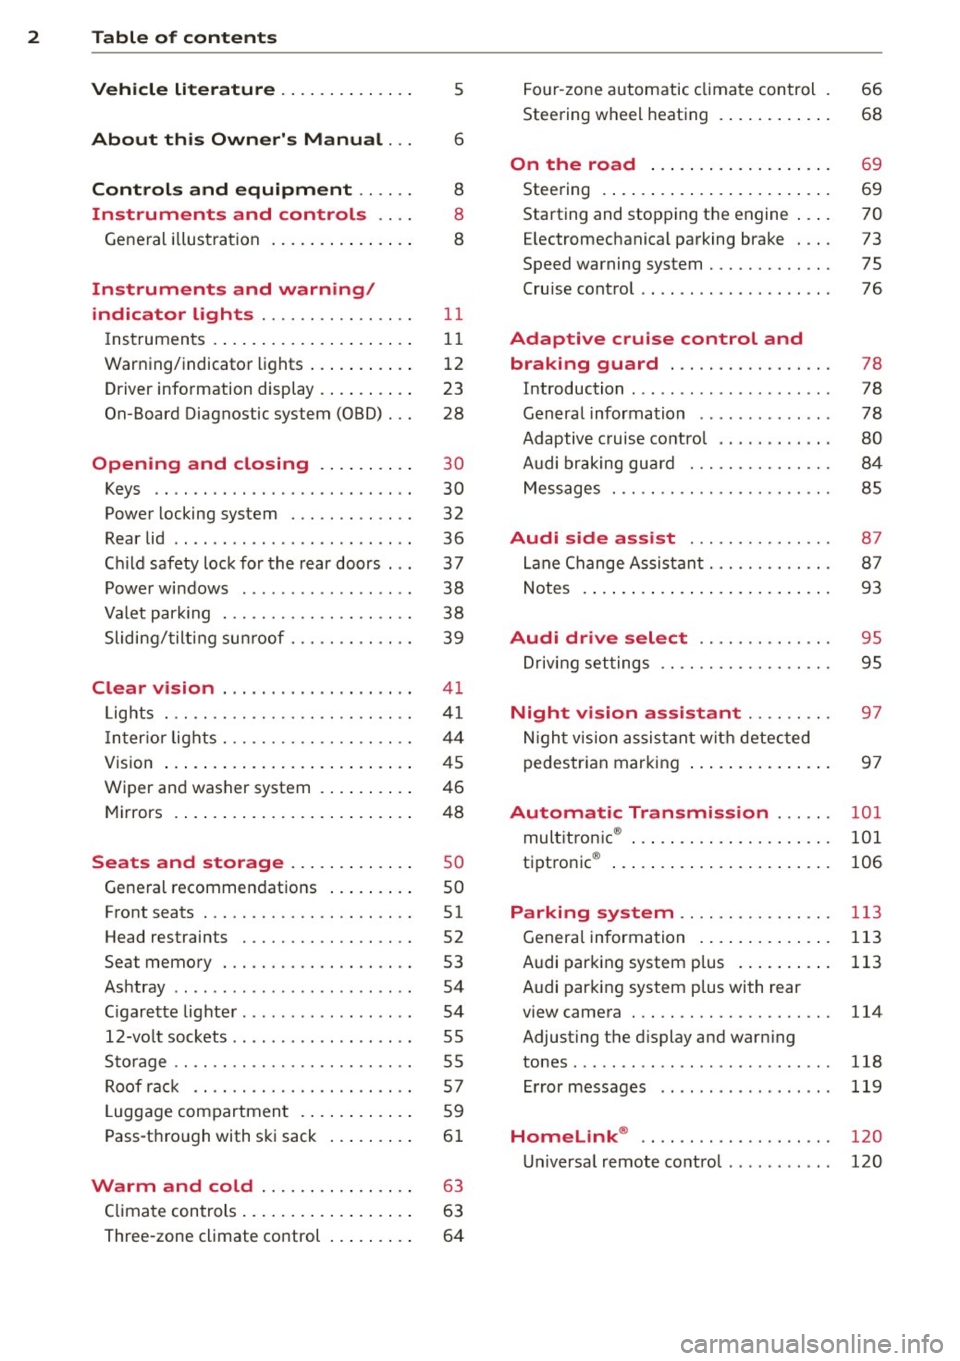
2 Table of content s
Vehicle lite ratu re .. .. .. .. .. ... .
5
About thi s Owner' s Manual . . . 6
C ontr ols and equi pm ent .. ... .
Ins truments and controls .. . .
General illustration ...... ... .. ... .
Instruments and warning /
indicator lights ........ .. .. .. . .
Instruments ............ ... .. ... .
Warning/indicator lights .. ... ... .. .
Driver information display .... .. ... .
On-Board Diagnostic system (OBD) . . .
Opening and closing .. .. .... . .
Keys .. ...... ........... .. .. ... .
Power locking system ..... .. .. .. . .
Rear lid .. .. ........ ........ .... .
Child safety lock for the rear doors .. .
Power windows ............... .. .
Valet park ing . ........... .. .. ... .
Sliding/tilting sun roof ... .. .. .. .. . .
Clear vi sion ................... .
Lights . .. .. .. . .......... .. .. .. . .
I nter ior lights ............ .. .. .. . .
V1s 1on .......... ......... ... ... .
Wiper and washer system ... .... .. .
Mirrors .... .............. ... ... .
Seats and storage ...... ... ... .
General recommendations ... .... . .
Front seats ... ........... .. .. ... .
Head restraints .............. ... .
Seat memory . ........... .... ... .
Ashtray .. .. ... .... ...... .. .. .. . .
C igarette lighter .............. .. . .
12-vo lt sockets ............ ... .. . .
Sto rage ................. .. .. ... .
Roof rack ............... .. .. .. . .
L uggage compartment ... ... ... .. .
Pass-through with ski sack ... .. ... . 8
8
8
11
11
1 2
23
28
30
30
32
36
37
38
38
39
41
41
44
45
46
48
so
so
51
52
53
54
54
55
55
57
59
61
Warm and cold . . . . . . . . . . . . . . . . 63
C limate controls . . . . . . . . . . . . . . . . . . 63
Three-zone climate control . . . . . . . . . 64 Four
-zone automatic climate control .
Steering wheel heating ...... ... .. .
On the road ... ... ....... ... .. .
Steering . ..... .. ... ....... ..... .
Starting and stopping the engine .. . .
E lectromechanical parking brake . .. .
66
68
69
69
70
73
Speed warning system . . . . . . . . . . . . . 75
Cru ise control .... .......... ..... .
Adaptive crui se control and
braking guard .............. .. .
Introduction ... ....... .......... .
General information ............. .
Adaptive cruise control ........... .
Audi braking gua rd ............ .. .
Messages . .. .. . .............. .. .
Audi side assist ............ .. .
Lane Change Assistant .......... .. .
Notes . ... .. .. .. .. ............ . .
Audi drive select ......... .. .. .
Driv ing set tings ................. .
Night vision assistant ........ .
Night vision assistant with detec ted
pedestrian marking .. .. ..... .... . .
Automatic Transmission ..... .
multit ronic ® ... .. ... .. ..... ... .. .
t.
t . ® 1p ronic ..... .. ... .. ..... ... .. .
Parking system ... .......... .. .
Genera l information . ... .... ... .. .
Audi parking system plus .... .... . .
A udi parking system plus with rear
view camera ... .. ............... .
Adjusting the display and warn ing
tones ........ .... .... .......... .
Error messages
Homelink ® .. .... ............. .
76
78
78
78
80
84
85
87
87
93
95
95
97
97
101
101
106
113
113
113
114
118
119
120
Universal remote control . . . . . . . . . . . 120
Page 35 of 298
-When you leave the vehicle, always take
the ignition key with you. This will pre
vent passengers (children, for example)
from accidentally being locked in the ve hicle should they accidentally press the
power locking switch in the doors .
- Do not leave children inside the vehicle
unsupervised. In an emergency it would
be impossible to open the doors from
the outside without the key.
- Applies to vehicles with power side door
closer*:
- When closing a door, make sure noth
ing can interfere with the door. This
could cause serious personal injury.
- You can stop the door from closing at
any time by pulling on the inside or
outside door handle .
@ Tips
-In the event of a crash with airbag de
ployment all locked doors will be auto
matically unlocked to give access to the
vehicle occupants from the outside.
- If the power locking system should mal
function, you can lock the driver's door
using the mechanical key¢
page 36 .
-If the power locking system should fail,
you can still open the fuel tank flap in an
emergency ¢
page 218.
-You are well advised not to keep valua
bles inside an unattended vehicle, visible
or not . Even a properly locked vehicle
cannot provide the security of a safe .
- If the LED in the upper edge of the driv
er's door panel comes on for about 30
seconds after the vehicle is locked, there
is a malfunction in the power locking or
the anti-theft warning system. Have the
malfunction corrected by an authorized
Audi dealership or qualified repair facili
ty.
Opening and closing 33
Setting power locking
T he driver can determine the functions for
power locking in the MMI .
.,. Select: !CAR !function button> Car systems
control bu tton > Vehicle settings > Central
lo cking .
Unlock doors -
You can decide if All doors or
only the
Dri ver should unlock. The rear lid al
so unlocks when
All is selected . If you select
Driver in a vehicle with a convenience key* ,
only the door whose handle you pull will un
lock.
If you select
Driver , all the doors and rear lid
will unlock if you press the
ffi button on the re
mote control master key twice .
Lock exterior trunk handle -If you selec t On,
the rear lid handle is locked . In this case the
rear lid can be opened with the button
a on
the master key or with the
a button in the
driver's door . In vehicles with a convenience
key* , you can still open the rear lid using the
handle if an authorized master key is near the
proximity sensor .
Fold mirrors* -If you select On, the exterior
rearview mirrors fold in automatically when
you press the
(TI button on the remote contro l
master key or touch the sensor* in the handle .
Lock when driving -If you select On, the vehi
cle locks automatically when driving. All of
the doors and rear lid lock.
Tone when locking -When you select On, a
confirmation tone sounds when you lock the
vehicle.
Page 47 of 298
Vision
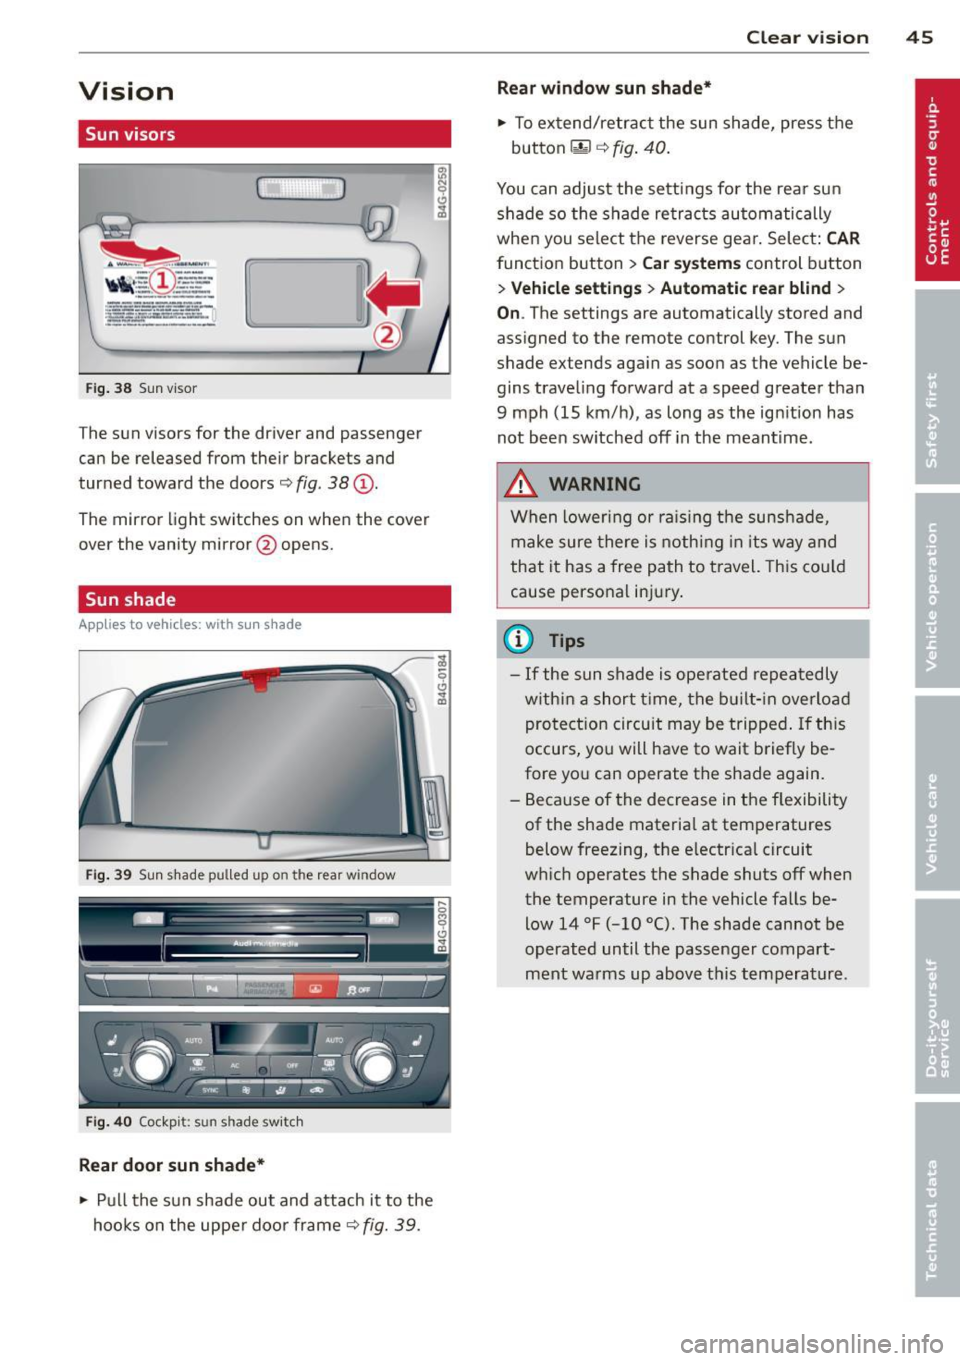
Sun visors
( J
Fig. 38 Sun v isor
The sun visors for the driver and passenger
can be released from their brackets and
turned toward the doors
c::> fig. 38 @.
The mirror light switches on when the cover
over the vanity mirror @opens.
Sun shad e
Applies to vehicles: with s un shade
Fig . 39 Sun s hade pulled up on th e rear w indow
Fig. 40 Cockp it: sun shade sw itc h
Rear door sunshade*
.,. Pu ll the sun shade out and attach it to the
hoo ks on the upper doo r frame
c::> fig. 39.
Clear vi sion 45
Rea r window sun shad e*
.,. To extend/retract the sun shade, press the
button~
c::> fig . 40 .
You can adjust the settings for the rea r sun
shade so the shade re tracts automatically
when you select the reverse gea r. Select:
CAR
function button > Car system s control b utton
> V ehicle settings > Automatic re ar blind >
O n. The settings are automatically stored and
ass igned to the remote control key. The sun
shade extends again as soon as the vehicle be
gins traveling forward at a speed greater than
9 mph (15 km/h), as long as the ig nition has
not been sw itched off in the meantime.
,&. WARNING
When lowering or ra is ing the sunshade,
make sure there is nothing in its way and
that it has a free path to travel. This co uld
cause persona l inj ury .
(j} Tips
- If the sun shade is ope rated repeatedly
w ithin a short t ime, the built- in overlo ad
pro te ct io n circuit may be tripped . If th is
occurs, you will have to wait briefly be
fore yo u can operate the shade again.
- Because of the decrease in the f lexibility
of the shade materia l at temperatures
below freezing, t he e lectr ica l circuit
w hich operates the shade shuts off when
the temperature in the vehicle falls be
low
14 °F (-10 °C). The shade cannot be
operated until the passenger compart
ment warms up above t his temperature .
Page 50 of 298
48 Clear vis ion
@ Tips
- Commercial hot waxes applied by auto
matic car washes affect the cleanability
of the windshield.
- You can also use the service position, for
example, if you want to protect the
winds hield from icing by using a cover.
- You cannot activate the service position
when the hood is open.
Mirrors
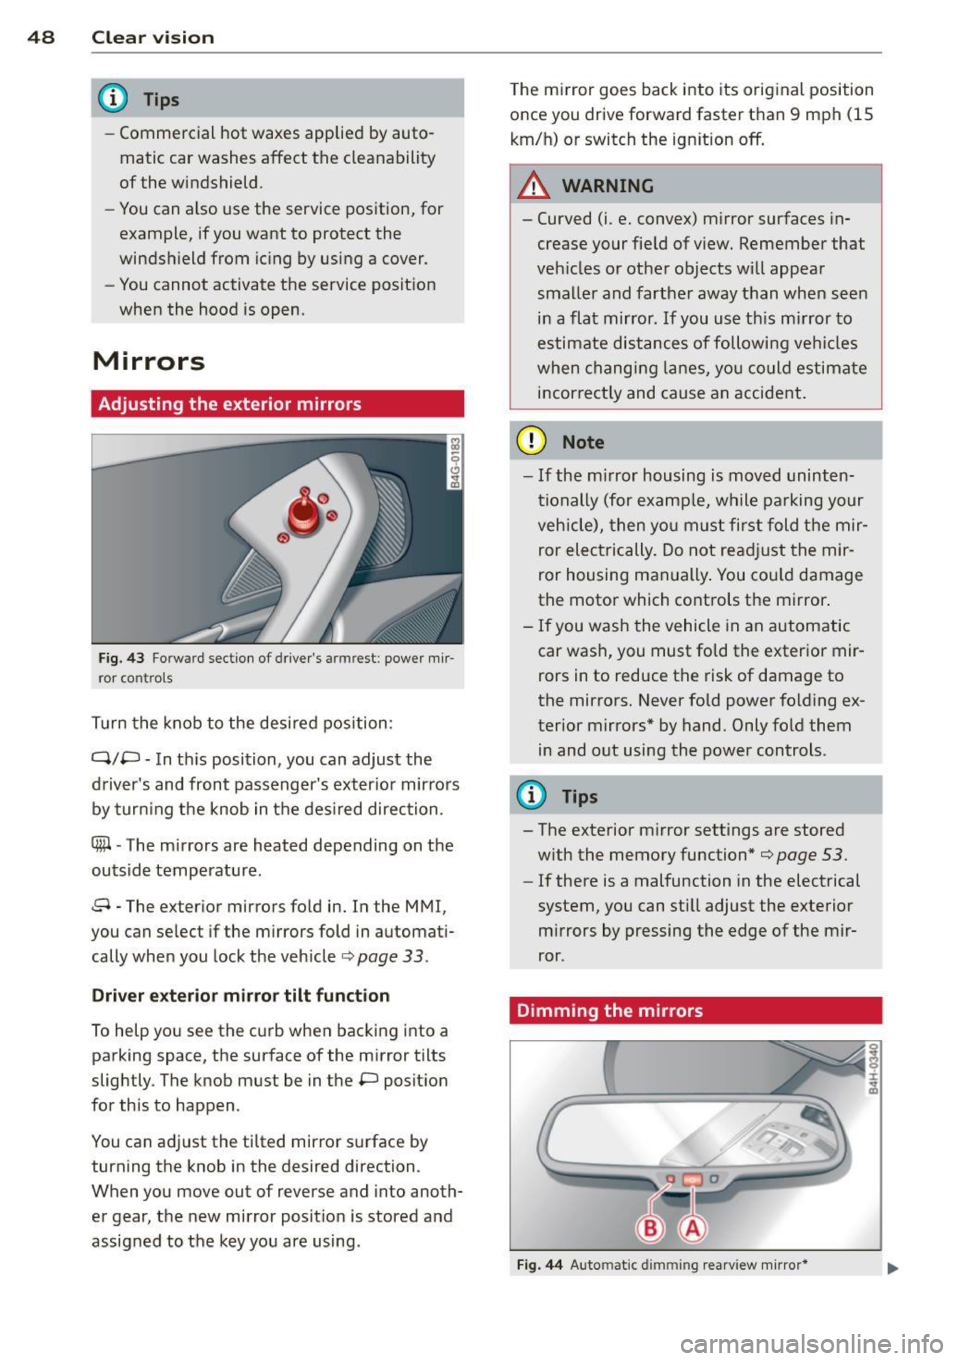
Adjusting the exterior mirrors
Fig. 43 F orwa rd section of drive r's arm rest: power m ir
ro r cont ro ls
T urn the knob to the desired position :
Q/P -In th is position, you can adjust the
d river's and front passenger's exter io r mirrors
by tur ning the knob in t he des ired direction.
® -The m irrors are heated depending on t he
outside temperature .
8 -The exterior mirrors fo ld in. In the MMI,
you can se lect if the m irrors fold in automat i
cally when you lock the vehicle ¢ page
33 .
Driv er exter io r mirro r tilt function
To help yo u see the c urb when bac king into a
parking space, the surface of the mirror tilts
slightly . The knob must be in the P posit ion
for this to happen .
You can ad just the ti lted mirror s urface by
turning the knob in the desired direction.
When you move out of reverse and into anoth
er gear, the new mirror posit ion is stored and
assigned to the key yo u are using . T
he mi rror goes back into its orig inal position
o nce you drive forward faster than 9 mph (15
km/h) or switch the ign ition off .
A WARNING
--
- Curved (i.e. conve x) m irror surfaces in
crease your fie ld of view. Remember that
veh icles o r ot her objects w ill appea r
smalle r and farther away t han when seen
in a flat mir ror. If you use th is m irror to
estimate distances of followi ng ve hicles
when c hanging lanes, yo u cou ld estimate
incorrect ly and cause an accide nt.
(D Note
- If the m irror housing is moved uninten
ti onally (for examp le, w hile pa rking your
veh icle), then yo u must first fold t he mir
ror electrically. Do not re adj ust the mir
ror housing man ually . You co uld damage
the motor which controls the mirror .
-If you wash the vehicle in an automatic
car was h, you must fo ld the exter ior mir
rors in to reduce the risk of damage to
the mirro rs. Never fold power folding ex
terior mirrors* by hand. Only fo ld them
in and out using the power controls.
{I) Tips
- The exterior m irror settings are stored
w ith the memory function*
¢ page 53.
- If there is a malfunction in the electrical
system, you can sti ll adjust the exterior
m irrors by pressing the edge of the mir
ror.
Dimming the mirrors
Fi g. 44 Auto matic d immin g rearv iew mirro r*
Page 51 of 298

Manual anti-glare adju stment
"' Move the small lever (located on the bot
tom edge of the mirror) to the r ear.
Automaticall y dimming mirror s*
"' To dim the rearv iew mirror and both exteri
or mirrors, press the@ button. The diode
@ turns on . The rearview and exte rior mi r
rors dim automatically when l ight sh ines on
them, for example from h eadlights on ave
hicle to the rear.
A WARNING
E lectrolyte flu id can leak from automatic
dimming mirrors if the glass is broken.
Electrolyte flu id can irritate skin, eyes and
resp iratory system .
- Repeated or prolonged exposure to elec
tro lyte can cause irritation to the resp ira
tory system, espec ially among people
with asthma or other respiratory cond i
tio ns. Get fresh ai r immediately by leav
ing the vehicle or, if that is not possible,
open windows and doors all the way.
- If electrolyte gets into the eyes, flush
them tho ro ughly wi th la rge amoun ts of
clean water for at least 15 m in utes;
medica l attention is recommended .
-If elec trolyte contacts s kin, f lush affec t
ed area with clean water for at least 15
minutes and then wash affected area
with soap and water; medical attention
is recommended . Thoroughly wash af
fected clothing and shoes before reuse.
- If swa llowed and person is conscious,
rinse mouth w ith water for at least 15
minutes . Do not induce vom iting un less
instructed to do so by medical professio
nal. Get medical attention immedia tely .
(D Note
Liquid electrolyte leaking from broken mir
ror glass will damage any p lastic surfaces
it comes in contact with . Clean up spilled
electrolyte immediately with clean water
and a sponge.
Clear vis ion 49
(D Tips
- Switching
off the dimming function of
the inside rear view mirror also deacti
vates the automatic dimming function of the exter ior mirrors.
- The automatic dimming mirrors do not dim when the interior lighting is turned
on or the reverse gear is selected.
-Automatic d imming for the mirror only
operates properly if the light striking the
inside m irror is not hindered in any way .
Page 55 of 298

.. To move the head restraint down, press the
button -arrow- ¢
fig. 48 and slide the head
restraint downward.
Removing the head restraints
.. Move the head restraint upward as far as it
can go .
.. Press the re lease ¢
fig. 49 with the me
chanical key¢
page 31 and the button
-ar row- ¢
fig. 48. Pull the head restraint out
of the backrest a t the same time¢,&. .
Installing the head rest raints
.. Slide the posts on the head restra int down
into the guides until you feel the posts lock
into place .
.. Press the button -arrow- ¢
fig. 48 and slide
the head restraint all the way down . You
s hould not be able to pull the head restrain t
out of the backrest .
So that the driver can have a better view to
t he rear, the head restraints should be pushed
down completely when the rear seats are not
occupied .
A WARNING
-Only remove the rear seat head restraints
when necessary in order to install a child
seat. Install the head restraint again im
med iately once the chi ld seat is removed.
Driving without head restraints or with
head restraints that are not properly ad
justed increases the risk of serious or fa
tal neck injury dramatically .
- Read and heed all WARNINGS
c:::>page 127.
Seat memory
Description
App lies to vehicles: wit h memory function
The memory function al lows you to quickly
and easily store and reca ll personal seating
profiles for the driver. The memory function is
operated through the master key and the memory buttons in the driver's door.
Seats and storage 53
The driver's seating profile is stored and as
signed to the master key each t ime the vehicle
is locked. The seating profile is reca lled auto
matically when the vehicle is unlocked . If two
people use one vehicle, it is recommended
that each person always uses "their own"
master key.
Two seating profiles can be stored in each of
the driver's door. Once s tored , these seating
profiles can be recalled at any time .
The following settings are stored:
- Dr iver's seat
- Steer ing wheel*
- Both exterior rearview mirrors*
Remote control key
Applies to veh icles: w ith memory function
To assign the driver's seat settings to the re
mote control key when locking the veh icle, the
function must be switched on.
.. Select:
I CAR ! function button > Car systems
control button > Vehicle settings > Seats >
Driver seat> Remote control key> On .
(D Tips
If you do not wan t another driver's set
tings to be assigned to the remote control
key, switch off the memory function using
the MMI or the
!O FF I button r::::> page 53 .
Memory buttons
Applies to veh icles: w ith memory functio n
Fig. SO Driver 's door : memo ry fun ction b utto ns
The memory buttons are located in the driv
er's door.
Page 58 of 298
56 Seats and storage
Front cuphold er
.,. To open the c upholder, tap the cover
~ fig. 56.
Rear cuphold er
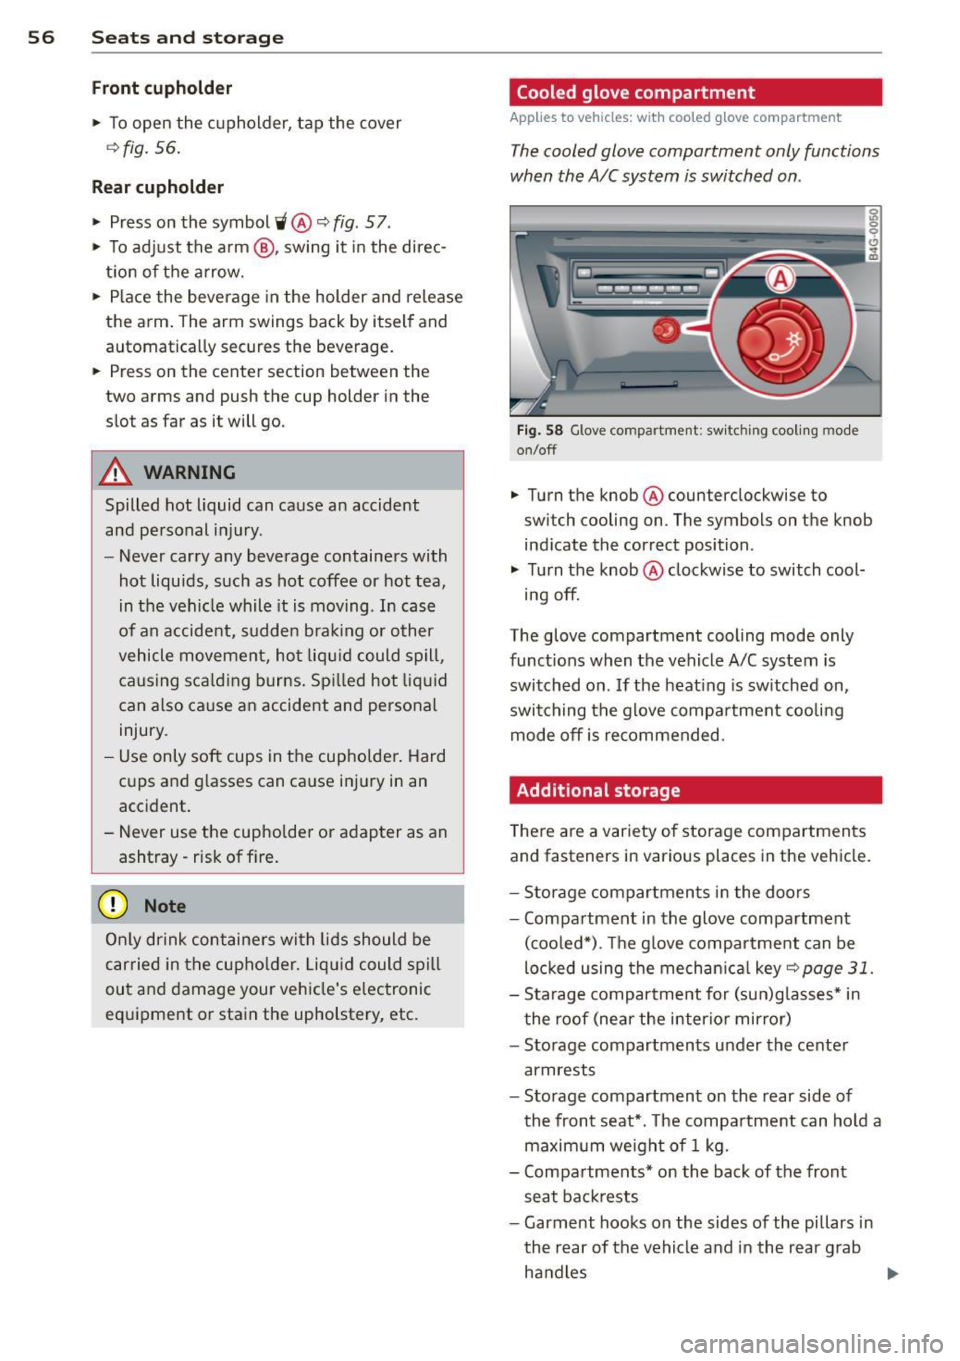
.,. Press on the symbol 'i@ ~ fig. 57 .
.,. To adjust the a rm @ , swing it in the direc
t ion of the a rrow .
.,. Place the beverage in the holder and release
the arm . The arm swings back by itself and
automatically secures the beverage .
.,. Press on the center section between the
two arms and push the cup holder in the
slot as far as it will go.
_& WARNING
Spilled hot liquid can cause an accident
and personal inj ury .
-
- Never carry any beverage containe rs with
hot liquids, such as hot coffee or hot tea,
in the vehicle while it is mov ing . In case
of an accident, sudden b ra ki ng o r other
vehicle movement, hot liq uid c ould spill,
causing sca ld ing burns. Sp illed hot liq ui d
can also ca use an accident and personal
injury.
- Use only soft cups in the cupholde r. Hard
cups and g lasses can ca use inj ury in an
accident.
- Never use the cupho lder or adapter as an
ashtray- r isk of f ire.
(D Note
On ly drink containers wi th lids should be
carried in the cupho lder. Liqu id could spi ll
ou t and damage your vehicle's e lectronic
equ ipment or stain the upholstery, etc.
Cooled glove compartment
Applies to vehicles: wit h coo led g love compartment
The cooled glove compartment only functions
when the A/C system is switched on .
Fig . 58 G love compartme nt: sw it c hin g cooli ng m ode
on/off
.,. Turn the knob @counterclockwise to
sw itch cooling on . The symbols on the knob
ind icate the correct position .
.,. Turn the knob @clockwise to switch cool-
ing off.
The glove compartment cooling mode only
funct ions when the vehicle A/C system is
switched on . If the heat ing is sw itched on,
switching the g love compa rtment coo lin g
mode off is recommended.
Additional storage
T here a re a var iety of storage compartments
and fasteners in various places in the vehicle.
- S torage compartments in the doors
- Compartment in the glove compartment
(coo led*) . T he g love compar tment can be
loc ked using the mechan ica l
key ~ page 31.
-Sta rage compartment for (su n)g lasses* in
t he roof (near the interio r mirror)
- Storage compartments under the center
armrests
- Storage compartment on the rear side of
the front seat *. T he compa rtment can hold a
maximum weigh t of 1 kg.
- Compa rtments* on the back of the front
seat ba ckrests
- Garment hooks on the sides of the pi llars in
th e rear of the vehicle a nd in the rear g rab
ha ndles
lllJ,,
Page 89 of 298
Audi side assist Lane Change Assistant
Description
App lies to vehicles: with si de assist
The side assist helps you when changing
lanes .
H AUDI I
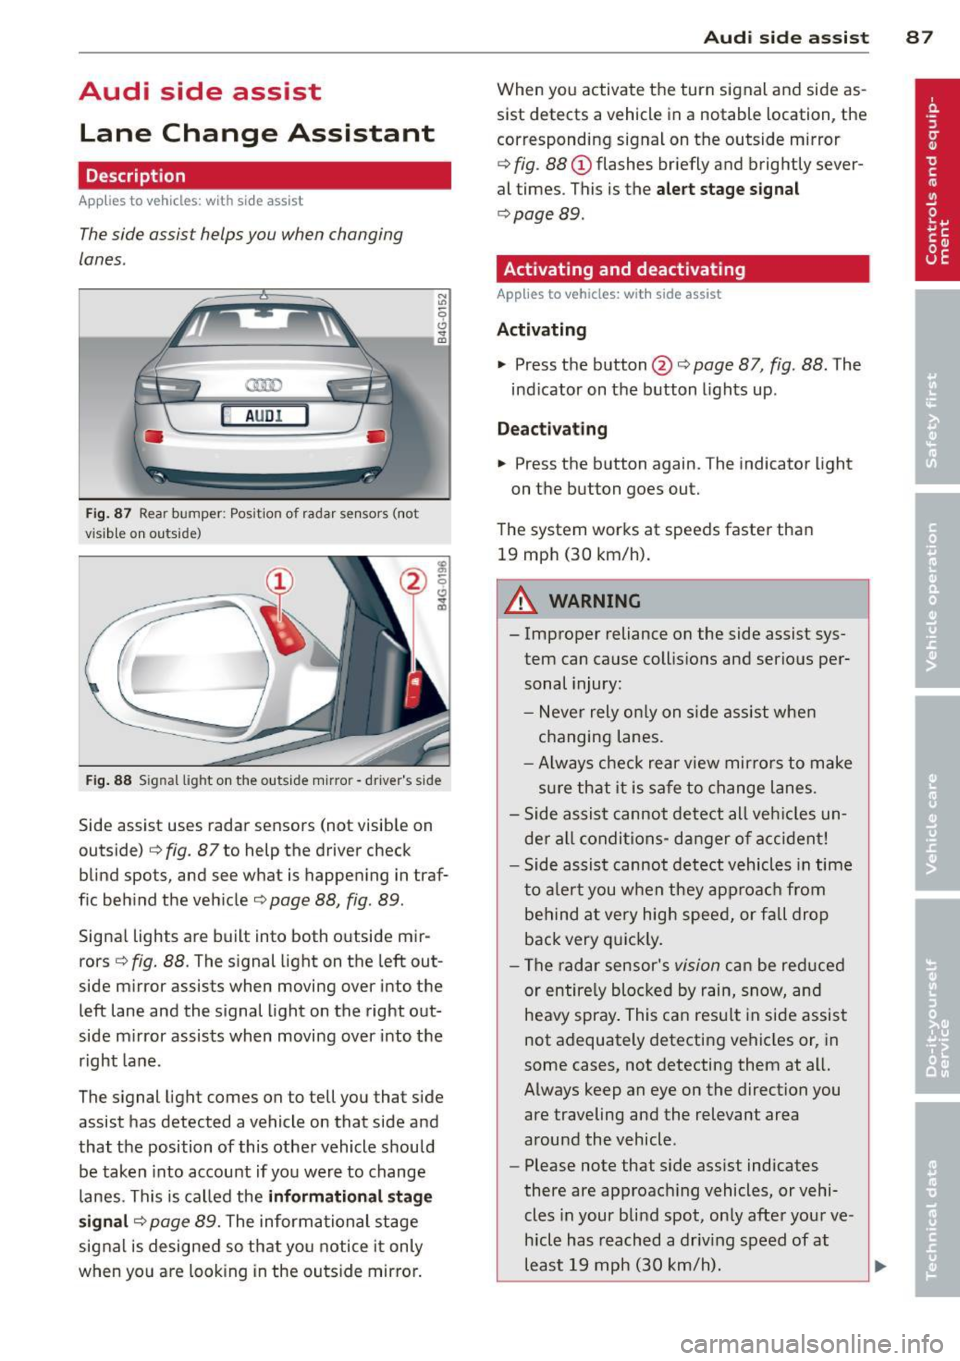
Fig. 87 Rear bumper : Pos ition of rada r sen sors (not
v isib le on outs ide)
Fig . 88 S ig n al l ight on the outside m irro r - drive r's side
Side assist uses radar sensors (not visib le on
outside)
c::> fig. 87 to help the driver check
blind spots, and see what is happening in traf
f ic beh ind the veh icle
c::> page 88, fig. 89 .
Signal lights are built into both outside mir
rors <=>
fig. 88. The signal light on the left out
side mirror assists when moving over into the left lane and the signal light on the right out
side m irror assists when moving over into the
right lane .
The signal light comes on to tell you that side
assist has detected a vehicle on that side and
that the position of this other vehicle should be taken into account if yo u were to change
lanes. This is called the
informati onal stag e
s ignal
c::> page 89. The informational stage
signal is designed so that you notice it only
when yo u are look ing in the outside mirro r.
Aud i side assist 8 7
When you activate the turn signal and side as
sist detects a vehicle in a notable location, the
corresponding signal on the outside mirror
c::> fig . 88 (D flashes br iefly and brightly sever
al times . This is the
aler t stage signal
c::> page 89 .
Activating and deactivating
Applies to vehicles: wit h side assist
Activating
.., Press the button @c::> page 87, fig. 88 . The
ind icator on the button lights up .
Dea ctivating
.., Press the button again. The indicator light
on the button goes out.
The system works at speeds faster than 19 mph (30 km/h).
A WARNING
-
- Improper reliance on the side assist sys-
tem can cause collisio ns and serious per
sonal injury:
- Never rely on ly on s ide assist whe n
changing lanes.
- Always check rear view mir rors to make
sure that it is safe to change lanes.
- Side assist cannot detect all veh icles un
de r al l conditions- danger of accident!
- Side assist cannot detect vehicles in time
to a le rt you when they approa ch from
behind a t very high speed, or fall drop
back very q uickly.
- The radar sensor's
vision can be red uced
or entire ly blocked by rain, snow, and
heavy spray . This can resu lt in side assis t
not adequately detecting vehicles or, in
some cases, not detecting them at all.
Always keep an eye on the direction you are traveling and the relevant area
around the vehicle .
- Please note that s ide assist indicates
there are approac hing vehicles, or vehi
cles in your blind spot, on ly afte r you r ve
hicle has reach ed a driv ing speed of at
least 19 mph (30 km/h).
~
Page 90 of 298
88 Audi side a ssis t
- Side assist signal does not work around
t ight corners (turning radius less than
328 feet or 100 m).
- Side assist is no rep lacement for the driv
er's full attent ion. The dr iver alone is re
sponsible for lane changes and similar dr iv ing maneuvers . Always keep an eye
on the di rection yo u are traveling and the
relevant area around the vehicle.
(D Note
- To ensure that you do not adversely af
fect side assist, do not block the area on
the rear bumper whe re the radar sensors
are located with foreign objects (such as
stickers o r bicy cle racks).
- Make sure that the signa l light on the
outside m irror is not blo cked by st ickers
or other items.
@ Tips
- Side assist a utomat ica lly deactivates if it
detects that the radar sensors a re
blocked E} page 93. The ind icator light
on the bu tton goes out.
- The area on the bumper where the radar
sensors are located must consis tently re
main free of snow, ice, and heavy soiling
so that side assist can function properly .
Fo llow the additional notes on
c> page 93.
-Additional tinting on the front side win
dows can make it harder to see and cor
rectly understand the signa l light on the
outside mirror.
- For Declarat ion of Compliance to United
States FCC and Industry Canada regula
tions
c> page 281.
Sensor detection area
Applies to veh icles: w ith side assist
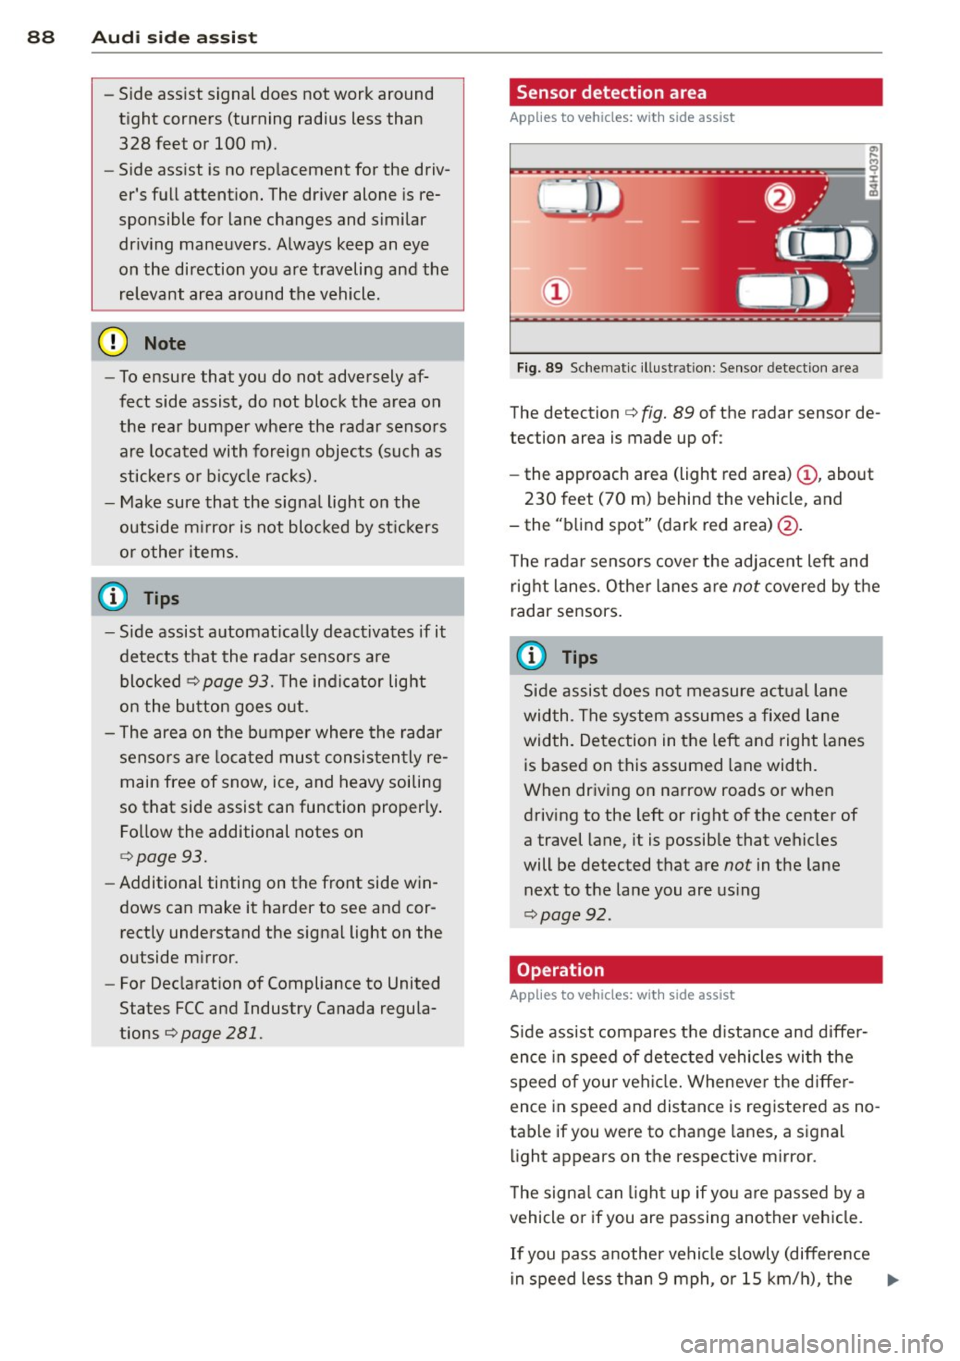
F ig. 89 Schemat ic ill ust rat ion : Sensor detect ion a rea
The detection c> fig. 89 of the radar sensor de
tection area is made up of:
- the approach area (light red area)
(D , about
230 feet (70 m) behind the vehicle, and
- the "b lind spot" (dark red area)@.
T he rada r sensors cover the adjace nt left and
right lanes. Other lanes a re
not covered by the
radar sensors.
(0 Tips
Side assist does not measure a ctual lane
wid th. The system assumes a fixe d lane
width. Detection in the left and right lanes
is based on this assumed lane width .
When driv ing on narrow roads or when
driving to the left or right of the center of
a travel lane, it is possible that vehicles
will be detected that are
not in the lane
next to the lane you are us ing
c> page 92.
Operation
Applies to veh icles: w ith s ide assist
S ide assist compares t he d istance and diffe r
ence in speed of detected vehicles wi th the
speed of your vehi cle. Wheneve r the d iffe r
ence in speed and distance is registered as no
tab le if you were to change lanes, a signal
li ght appears on the respective mirror.
T he signa l can ligh t up if yo u are passed by a
vehicle or if you are passing another vehicle.
If you pass another vehi cle slowly (difference
in speed less than 9 mph, o r 15 km/h), the ..,.
Page 91 of 298
signal light will come on as soon as the other
vehicle is in your blind spot and is detected by
side assist. When the difference in speed is
greater, the signa l light will not come on.
Informational and alert stage signals
App lies to vehicles: with side assist
Side assis t has two s ignal stages:
- the informationa l stage signal, and
- the a le rt stage signa l.
Side assist he lps you by usi ng the approp riate
signal s tage, depending on whether or not
you have activ ated the tu rn signal, and thus
have indicated that you are or are not chang
ing lanes .
Informational stage signal
As long as you have not a ctivated the tu rn sig
n al , side a ssis t inf orms you of detec ted vehi
cles th at are registered as being in a notable
l ocation if you were to change lanes. Whenev
er the detected vehicle's difference i n speed
and d istance is registered by side assist as no
table, the signal lig ht on the respective m irror
prod uces muted illuminat ion.
The brightness of the informat io na l stage sig
na l is designed not to be as intense, so that it
does not interfere wit h your view of the road
when you are driving and have no intention of
changing lanes. When you look in the o utside
mirror, you can clear ly see the info rmat iona l
stage signal.
Alert stage signal
When you activate the turn signa l, and side
assist has detec ted a vehicle i n a notable loca
tion o n that particular side, the s ignal l ight on
this sid e mirro r flashes b right ly . The repeated
b rie f and bright flashing of the alert stage
signal re minds yo u to carefully check tr aff ic to
the rear in the o utside mirror and ove r your
shoulder, so that yo u can safe ly complete the
l ane change
c:> & in Safety tips on page 93.
Aud i side assist 89
@ Tips
The br ightness of the s ignal li ght on the
outside m irr ors can be adjusted with the
MMI c:> page 92.
Driving situation: Fast approaching
vehicles
Applies to vehicles: with side assist
@
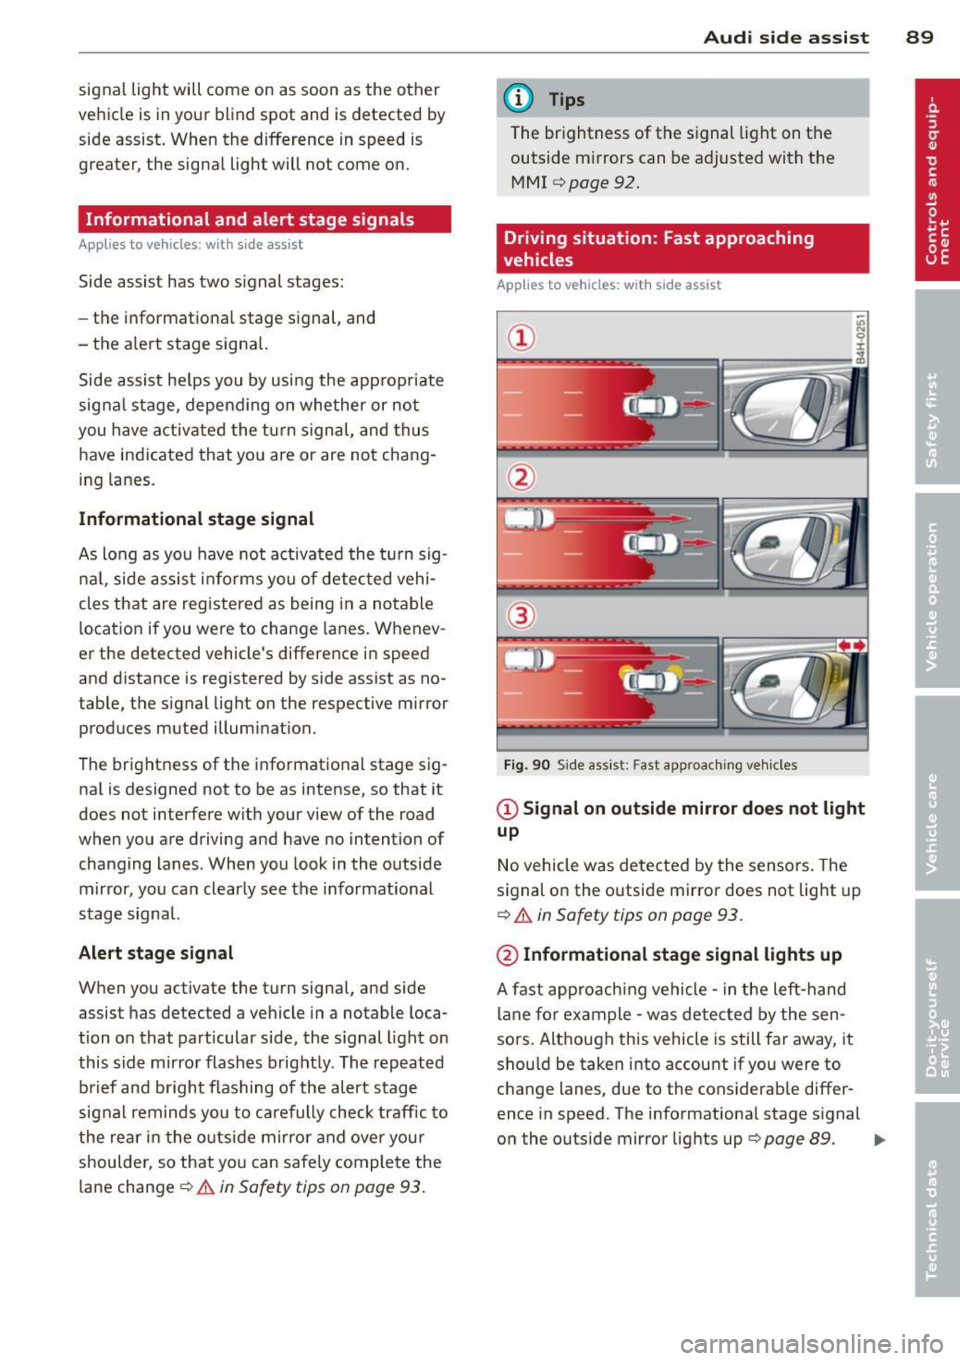
Fig. 9 0 Side as sis t: Fast approac hing ve hicle s
@ Signal on outside mirror does not light
up
No vehicle was detecte d by the sensors . The
s ignal on the o utside mirror does not lig ht up
c:> .&. in Safety tips on page 93 .
@ Informational stage signal lights up
A fast appro ach ing vehicle -in the left-h and
l ane fo r example - was detected by the sen
sors . Although this vehicle is still fa r away, it
sho uld be taken into accou nt if yo u were to
c hange lanes, due to the cons iderab le differ
ence in speed. The informationa l stage s ignal
o n the outside mirror lig hts up
r=> page 89. ..,.