stop start AUDI A6 2012 Owner's Manual
[x] Cancel search | Manufacturer: AUDI, Model Year: 2012, Model line: A6, Model: AUDI A6 2012Pages: 298, PDF Size: 74.43 MB
Page 122 of 298

120 Homelink®
Homelink®
Universal remote
control
General information
Applies to vehicles: with Home link® universal remote
control
The Homelink universal remote control can
be programmed with hand-held transmitters
from existing equipment.
Using the Homelink universal remote control,
you can operate equipment such as garage
doors, property gates and house lights from
ins ide your vehicle .
Using the Homelink universal remote control,
you can replace up to three separate hand
held transmitters for equipment on your
property with just one universal remote con
trol. Most of these transmitters are used to
ope rate ga rage doo rs and property gates. The
individual transmitters are programmed at
the front bumper. That is where the control
module is located.
The transmitters must be programmed first in
order to operate systems using the Homelink
universal remote control.
.&_ WARNING
-
-Never use the Homelink ® transmitter
with any garage door opener that does have not the safety stop and reverse fea
ture as requ ired by federal safety stand
ards. This includes any garage door open
er model manufactured before April 1, 1982.
- A garage door opener which cannot de
tect an object, signa ling the door to stop
and reverse does not meet current feder
al safety standards . Using a garage door
opener witho ut these features increases
risk of serious injury or death.
- For safety reasons never release the
parking brake or start the engine while
anyone is standing in front of the vehicle .
- A garage door or an estate gate may
sometimes be set in motion when the Homelink
® remote control is being pro
grammed. If the device is repeatedly ac
tivated, this can overstrain motor and
damage its electr ical components - an
overheated motor is a fire hazard!
- To avoid possible injuries or property
damage, please always make absolutely
certain that no persons or objects are lo
cated in the range of motion of any
equ ipment being operated.
(D Tips
- If you would like additional information
on the Homelink ® Universal Transceiver,
Homelink compatible products, or to
purchase other accessories such as the
Homelink® Light ing Package, please
contact Homelink at 1-800 -355-3515 o r
on the Internet at www.homelink .com.
- For Declaration of Comp liance to United
States FCC and Industry Canada regula
tions¢
page 281.
Page 193 of 298
@ Tips
-ABS and AS R on ly wor k co rrectly when
a ll fo ur wheels are eq uipped w ith identi
ca l tires . Different tire s izes can lead to a
r educt io n in eng ine power.
- You may hear noises when the sys tems
desc ribed are working.
- If the indicato r light
D] or m (USA
models) ;£1 (Canada models) appea rs,
there may be a malfunctio n ¢
page 19 ,
¢ pag e 19.
Switching on and off
ESP turns on automatically when you start
the engine .
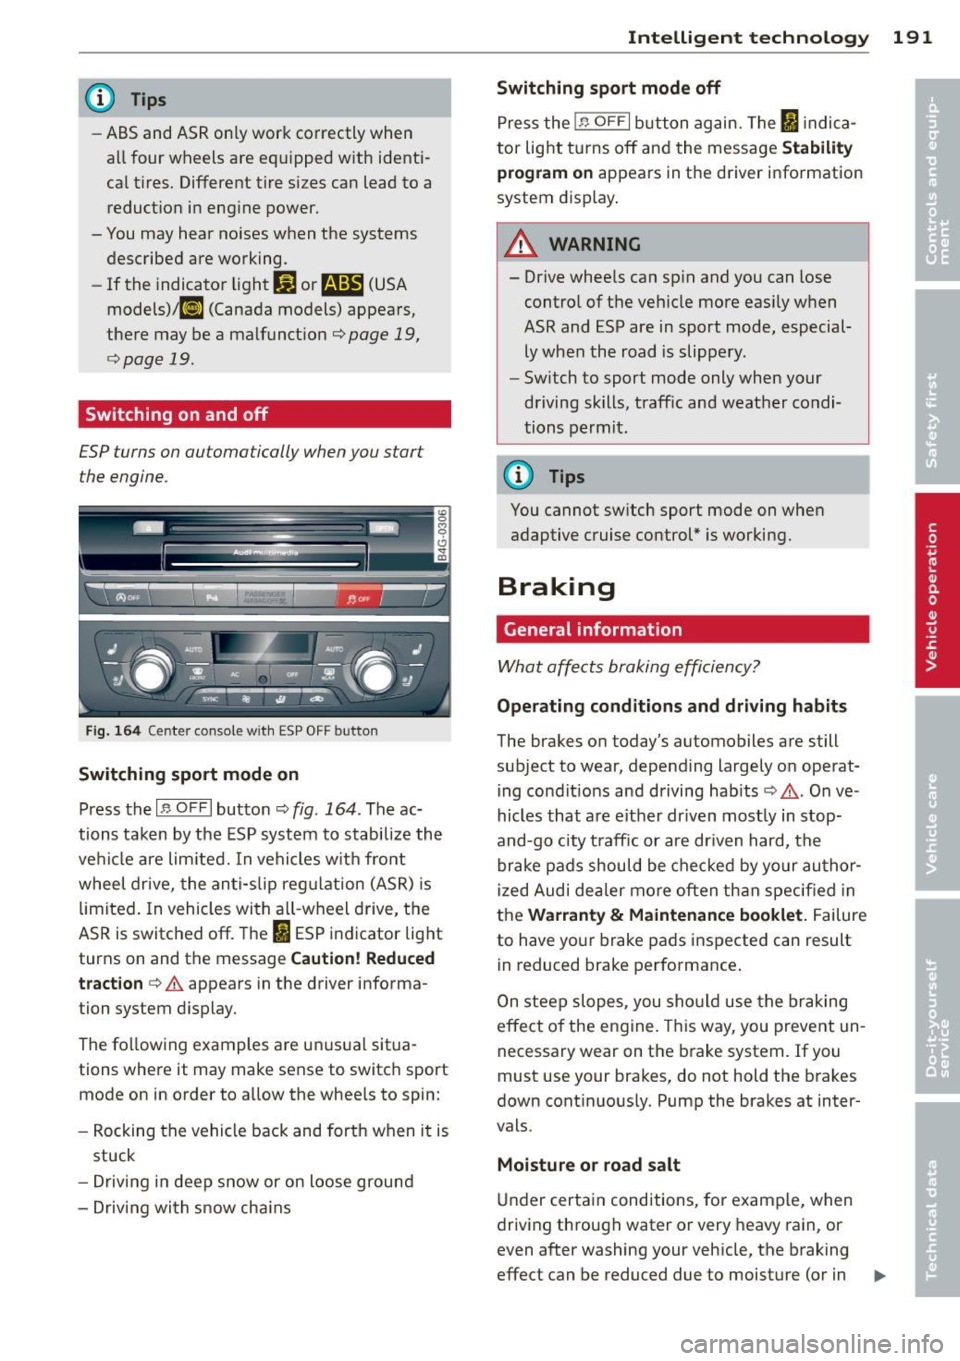
Fig. 1 64 Center co nsole wit h ESP OFF button
Switching sport mode on
Press th e I,$ OF F I button ¢ fig. 164. The ac
tions tak en by the ES P syst em to stabili ze th e
ve hicl e are lim ited. In ve hicl es w it h fro nt
wheel drive, the an ti-s lip reg ulat ion (ASR) is
limited . In vehicles wi th a ll-wheel d rive, t he
AS R is switc hed off. The
I ES P i ndicator lig ht
turns on and the message
Caution! Reduced
tract ion ¢.&
appears in the driver informa
tion system d isplay.
The fo llow ing examples a re u nusua l situa
tions where it may make sense to switc h sport
mode on in order to a llow the whee ls to spin:
- Rocking the vehi cle back and forth when it is
stuck
- D rivin g in d eep snow or on loose groun d
- D riving wi th s now cha ins
Intelligent technology 191
Switching sport mode off
Press the In OF FI but ton ag ain. T he ltJ in dica
tor lig ht tur ns off an d the message
Stability
program on
appears in t he d river info rmation
system display .
&_ WARNING
-- Drive whee ls can sp in and you can lose
contro l of t he ve hicle more eas ily w hen
ASR and ESP are in sport mode, especial
ly whe n th e road is slippery.
- Sw itch to sport mode only when your
driving sk ills, traff ic and weat her co ndi
tions perm it.
@ Tips
You cannot sw itch sport mode on whe n
adaptive c ruise control* is w orki ng.
Braking
General information
Wha t affe cts bra king effici ency?
-
Operating conditions and driving habits
The brakes on today's automobiles a re still
subject to wear, depending largely on operat i ng co nd it io ns and driving habits ¢,& . On ve
hi cles that a re e it h er dr iven most ly in stop
and-go city t raff ic or are dr iven hard, the
br ake pa ds should be check ed by yo ur au thor
iz ed Audi dea ler m ore often th an spec ified in
the
Warranty & Maintenance booklet. Failure
to have yo ur brake pads ins pected can result
in reduced brake performance .
On stee p slopes, you sho uld use the br aking
e ff ect o f the engine. This way, you prevent un
necessary wear on t he brake system. If you
must use your bra kes, do not hold the brakes
down cont in uous ly. Pump the brakes at inter
vals.
Moisture or road salt
U nder certa in conditions, for exam ple, when
driving th roug h water or very heavy rain, or
even after washing your veh icle , the b raking
effect can be reduced due to m oist ure (or in ..,.
Page 205 of 298
different weight distribution. Safety, perform
ance and economy w ill greatly depend on how
carefu lly you load yo ur trailer and operate
your rig.
B efore you actua lly tow your trailer, practice
turning, stopping and backing up in a n area
away from traffic. Keep practicing until you
have become comp letely fam iliar with the way
your veh icle- trailer comb inat ion behaves and
responds .
Backing up is d ifficu lt and requires practice .
Backing up with a tra iler genera lly requires
steer ing action opposite to that when backing
up your vehicle without a trailer .
M aintain a g reater distance between your ve
hi cle and the one in front of you. You will need
more room to stop. To compensate for the
trailer, you will need a larger than norma l
turn ing radius.
When passing, remember that yo u cannot ac
celerate as fast as you normally would be
cause of the added load . Make s ure you have
e nough roo m to pass . After passing, allow
p lenty of room fo r your tra ile r befor e chang
in g la nes aga in.
Avoid jerky sta rts, sharp turns or rapid lane
cha nges.
(D Tips
- Do not tow a tra iler during the break- in
period of you r vehicle.
- If you t ow a trailer, your A udi may re
quire more frequent maintenance due to
the ext ra load
¢ page 2 78 .
Parking on a slope
Do not park on a slope with a trailer. If i t can
not be avoided, do so only after doing the fol
lowing:
When parking:
.. Apply the foot b rake .
.. Have someone place chocks under both the
vehicle and the trailer wheels.
Trailer towin g 203
.. W ith chocks in place, slowly release t he
brakes unt il the whee l choc ks absorb the
load .
.. Turn the whee ls towards t he curb .
.. App ly the parking brake.
.. Select the
P selector lever position .
When restarting after parking:
.. App ly the foot brake.
.. Sta rt the engine .
.. Select the
D/S selector lever position.
.. Release the park ing brake and s low ly pull
out a nd away from the wheel c hocks .
.. Stop and have someone retr ieve the wheel
chocks .
(D Tips
If you move the selector leve r of the auto
matic transmission to
P before applying
the p arking bra ke a nd before blo cking the
whee ls, y o u m ay h ave t o use more fo rce
lat er to move the lever out of the
P p osi
tion .
•
•
Page 223 of 298

-Never smoke or work near heate rs or
open flames. Fluids in the engine com
partment could start a fire.
- Keep an approved fire extinguisher im
mediately ava ilable.
- To avoid elect rical shock and persona l in
jury while the engine is running or be ing
started, never touch:
- I gnition cables
- Othe r components of the high voltage
electronic ignition system.
- If you must pe rform a check or repa ir
with the engine running:
- F irst, fully apply the pa rking brake,
move selector lever to "P" (Park) .
- Always use extreme caution to prevent
clothing, jewelry, or long hai r from get
ting caught in the radiator fan, V-belts
or other moving parts, or from contact ing hot parts. T ie back hair before
starting, and do not wear cloth ing that
will hang or droop into the eng ine.
- Min imize exposure to emission and
c h emical hazards
c:> &,.
A WARNING
California Propos ition 65 Warning:
- Engine exhaust, some of its constituents,
and certai n veh icle components co nta in
or em it chemicals known to the State of
Californ ia to cause cancer a nd b irth d e
fects a nd rep roduct ive ha rm. In addi tion,
c e rta in fluids cont ained in vehicle s and
c ertain p rod ucts of component wear con
tain or emit chemicals known to the
State of Ca lifo rnia to cause cancer and
birth defects or other reproductive harm.
- Battery posts, terminals and re lated ac
cessories contain lead and lead com-
Checkin g and fillin g 221
poun ds, c hemicals known to the State of
California to cause cancer and reproduc
tive harms. Wash hands after handling.
([) Note
When adding fluids, always make su re that
they are poured into the p roper conta iner
or fi ller opening, otherwise serious dam
age to vehicle systems w ill occur .
@ For the sake of the environment
To detect lea ks in time, inspect the vehicle
floor pan from underneath regular ly. If
you see spots from oil or other ve hicle flu
i ds, have you r vehicle inspected by an au
thorized Audi dea ler.
Closing the engine hood
.. Pull the hood down until the pressure from
t he st ruts is reduced.
.. Let the hoo d
drop down and latc h in p lace.
Do not try to push it shut; it may fail to en
gage 9 A_ .
A WARNING
-
A hood that is not completely latched
could fly up and b lock your view while dr iv
i ng.
- When you close the engine hood, chec k it
to make sure t he safety catch has prope r
ly engaged. The hood shou ld be flush
with the surround ing vehicle body parts .
- If you notice while driv ing that the hood
is not secured prope rly, stop at once and
close it. •
•
Page 244 of 298
24 2 T ire s and wheel s
If the pressure in any tire is too low, note the
difference between the pressure in the cold
tire and the pressure you need and add the air
that you need to reach the correct pressure for
the vehicle load (passengers and luggage) for
the tires on your veh icle as listed on the on
your veh icle and in this manual and the k ind
of dr iving you p lan to do.
Ne ver exceed the m aximum inflat ion pres
s ur e liste d on th e tir e si dewall for any r ea
son.
Remember that the vehicle manufacturer, not
the tire manufacturer, determ ines the correct
tire pressure for the tires on your vehicle .
It is important to check the tire pressure when
the tires are cold.
- Read the required ti re p ressure from the tire
pressure label. The tire pressure labe l is lo
cated on the driver's side 8-p illar.
- Turn the valve stem cap counter-clockwise
to remove it from the tire valve.
- Place the air pressu re ga uge on the valve.
- T he tire pressures sho uld on ly be chec ked
and adjusted when the tires are cold. The
slightly raised pressures of warm tires must
not be reduced .
- Adjust the tire pressure to the load you are
carrying .
- Reinsta ll the va lve stem cap on the valve.
When should I ch eck the tire pressur e?
The correct tire pressure is especially impor
tant at high speeds. The pressure should
therefo re be checked at least once a month
and a lways befo re start ing a journey. Do no t
forget to check the tire pressure for the spare
wheel
¢ page 257 .
When should I adju st the tire p res sures?
Adjust the tire p ressu re to the load you are
carry ing. After changing a wheel
or replacing
wheels you have to adjust the tire pressures
on all wheels . In addition, you must then
store the new tire pressures in the tire pres
sure monitoring system*¢
page 253.
_& WARNING
Incorrect tire pressures and/or underinfla
tion can lead sudden tire fa ilure, loss of
control, collision, serious personal injury
or even death.
- When the warn ing symbol
[I) appears in
the instrument cluster, stop and inspect
the t ires.
- Inco rrect tire pressure and/or underinfla
tion can cause increased tire wear and
can affect the hand ling of the vehicle and
s topping abi lity.
- I nco rrect tire pressures and/or unde rin
f lation can a lso lead to sudden t ire fail
ure, including a blowou t and sudden de
flation, ca us ing loss of veh icle contro l.
- The drive r is responsible for the co rrec t
tire pressures for all tires on the veh icle.
The applicable pressure values are loca t
ed on a sticker on the driver's s ide 8 -pil
lar.
- On ly when all tires on the vehicle are fil
led to the correct pressure, the tire pres
sure mon itoring* system can work cor
rectly.
- The use of incorrect tire pressure va lues
can lead to acc idents or other damage.
Therefore it is essential that the driver
observe the spec ified t ire pressure values
for the tires and the correct pressures for
the function of the t i re p ress ure monito r
ing system*.
- Always inflate tires to the recommended
and correct t ire pressure before dr iv ing
off.
- Driving with underinf lated tires bend
mo re, letting them get too hot resulting
in tread separation, s udde n tire f ailure
and loss of cont ro l.
- Excessive speed and/overloading can
cause heat build- up, sudden tire failure
and loss of cont ro l.
- I f the tire pressure is too low or too high,
the t ires will wear prema turely and the
vehicle wi ll not handle well. ..,
Page 255 of 298
In o rder to minimize the occurrence o f impact
damage to the tires of your vehicle, we recom mend that you observe the following precau
tions :
- Always maintain recommended inflation
pressures. Check your tire pressure every
2,000 miles (3,000 km) and add a ir if neces
sary.
- Drive carefu lly on roads with potholes, deep
gullies or ridges. The impact from driving
through or over such obstacles can damage
your tires. Impact with a curb may also cause damage to your tires .
- After any impact, immediately inspect your
tires or have them inspected by the nearest
authorized Aud i dealer . Replace a damaged
t ire as soon as poss ible .
- In spect your t ires every 2,000 miles (3,000
km) for damage and wear . Damage is not al
ways easy to see. Damage can lead to loss of
air and unde rinflation, wh ic h could eventu
ally cause ti re fail ure.
If yo u be lieve that a
ti re may have been damaged , replace the
tire as soon as possible.
- These tires may wear more quick ly than oth
ers.
- Please a lso remembe r that, whi le these t ires
deliver respons ive handling, they may ride
less comfortably and make more noise than
other c hoices.
Reduced p erformance in winter /cold
s ea son condit ion s
All ti res are designed for certain purposes .
The low aspect ratio, ultra hig h performance
tires originally installed on your veh icle are in
tended for max imum dry and wet road per
formance and handling . They are not suitable
for cold, snowy or icy weather cond it ions . If
you dr ive under those circumstances, you
should equip your vehicle with all-season or
winter tires, whi ch offe r better traction under
those cond it ions . We suggest you use the rec
ommended snow or all -season tires specified
for your ve hicle, or their equiva lent .
Refe r to ~
page 250 for mo re deta iled info r
mat io n regarding w in ter t ires.
Tire s an d wheel s 253
Tire pressure
monitoring system
ill General notes
App lies to vehicles : wi th tire p ress ure mo nito rin g system
Each tire, incl uding the spare (if provided),
shou ld be checked monthly when co ld and in
flated to the inflation pressure recommended
by the veh icle manufacturer on the veh icle
placard or tire inflation pressure label. (If your
vehicle has tires of a d ifferent size than the
s iz e indicated on the vehicle placard or tire in
flat io n pressu re labe l, you shou ld dete rmine
the p roper t ire inflation p ress ure fo r those
t i r es).
As an added safety feature, your veh icle has
been equipped with a tire pressure monitoring
system ( TPMS) that illum inates a low ti re
pressure te lltale whe n one or more o f your
ti res is significant ly under -inflated . According
ly, when the low tire pressure te lltale i llumi
nates, you shou ld stop and check your tires as
soon as possib le, and inflate them to the
proper pressure. Driving on a sign ificantly un
der- inflated t ire causes the tire to overheat
and can lead to tire fa ilure . Under-inflation al
so reduces fuel effic iency and tire tread life,
and may affect the vehicle 's hand ling and
stopp ing abil ity.
Please note that the TPMS is not a subst itute
fo r proper tire ma intenanc e, and it is the d riv
er's respo nsibility to maintain co rrect tire
pressure, even if under-inflation has not
reached the leve l to tr igger illum inat ion of the
T PMS low ti re p ressu re tellta le .
You r vehicle has also been equipped with a
T PMS ma lf u nction indicator to ind icate w hen
the sys tem is not operating prope rly . T he
T PMS ma lfunction indicator is combined w ith
the low tire pressure te lltale. When the sys
tem detects a malfunction, the telltale wi ll
flash for approximate ly one min ute and then
rema in con tinuously i llum inated . T hi s se
quence will continue upon subsequent vehicle
start-ups as long as the malfunct ion exists . ..,.
•
•
Page 268 of 298
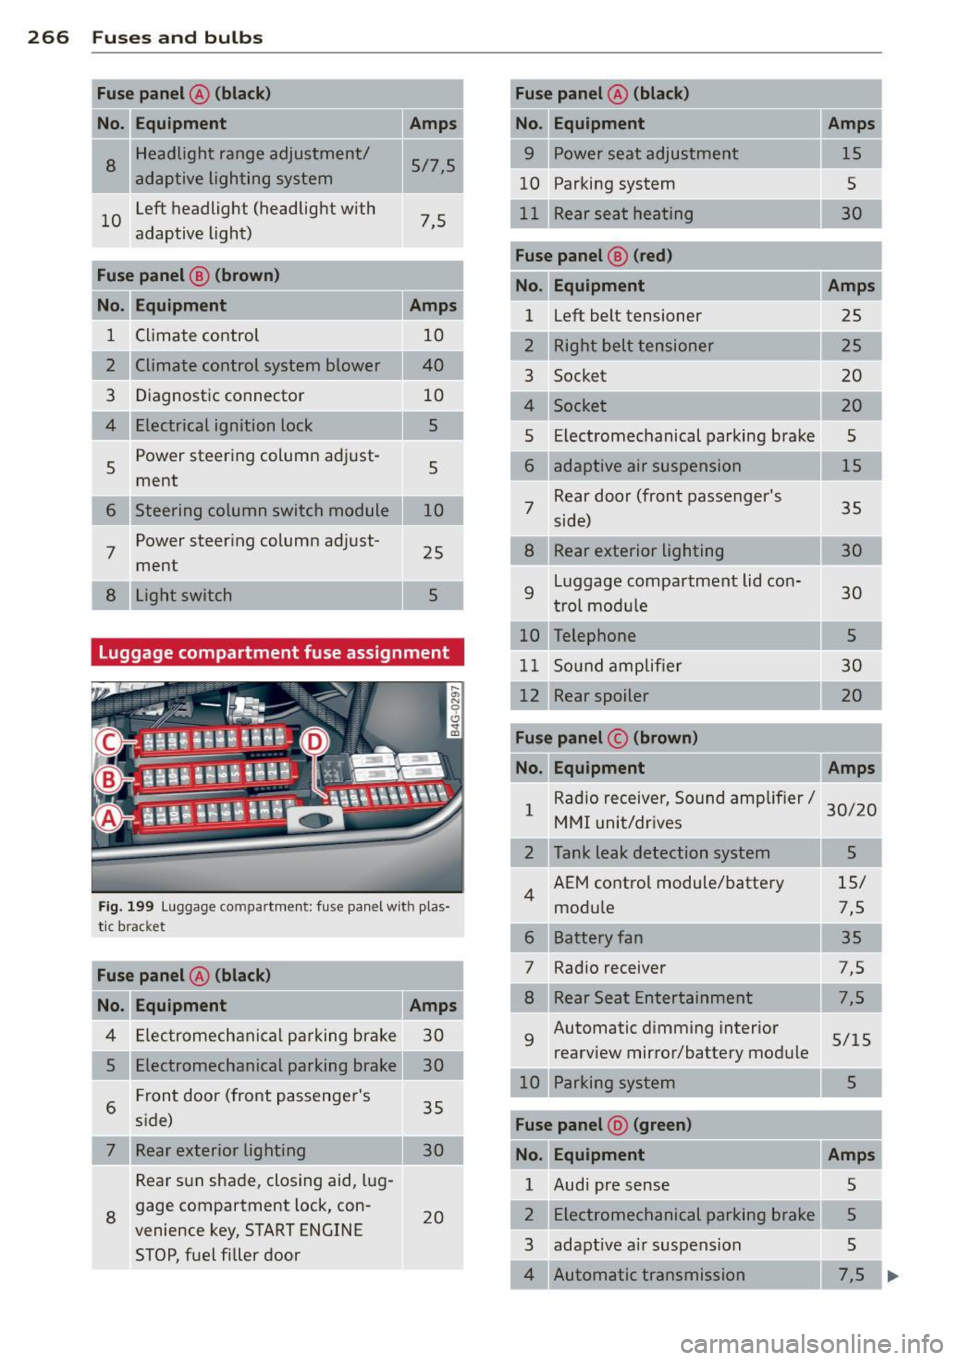
266 Fuses a nd bulb s
Fuse panel @ (black )
No . Equ ipment Amps
=
8
Headlight range adjustment/
5/7,5
adaptive lighting system
10 Left headlight (headlight with
7,5
adaptive light)
Fuse p anel
@ (brown )
No .II Equ ipm ent
II Amp s
1 Climate control 10
2 Climate control system blower 40
3 Diagnostic connector 10
4 Electrical ignition lock 5
5 Power steering column adjust-
ment
5
Steering column switch module 10
7 Power steer
ing column adjust-
ment 25
8 Light switch
Luggage compartment fuse assignment
Fig. 199 Luggage compartment: fuse panel with plas·
tic bracket
Fuse panel @ (bl ack )
No. II Equipment
I[ Amp s
4 E lectromechanical parking brake 30
5 Electromechanical parking brake 30
6 Front door (front passenger's
35
side)
7 Rear exterior lighting Rear sun shade, closing aid, lug
s gage compartment lock, con
venience key, START ENGINE
STOP, fuel filler door 30
20
-Fuse pane
l@ (blac k) I
No. Equipm ent Amps
=· 9 Power seat adjustment 15
10 Parking system
s
30
Fus e pane l
B (red)
No . Equipment Amps
1 Left belt tensioner
25
Right belt tensioner 25
3 Socket 20
20
Electromechanical parking brake
5
adaptive air suspension 15
7 Rear door (front passenger's
35
side)
Rear exterior lighting 30
9
Luggage compartment lid con-
30
t rol module
10 Telephone 5
11 Sound amp lifier 30
12 Rear spoiler 20
Fuse pane l c (b rown )
No. Equipment Amps
1 Rad
io receiver, Sound amplif ier/
30/20
MMI unit/dr ives
2 Tank leak detection system 5
AEM control module/battery 15/
4
module 7,5
6 Battery fan 35
Rad io receiver
7,5
7,5
9
Automatic dimming interior
5/15
rearview mirror/battery module
Parking system 5
Fu se pan el o (gre en)
No. Equipment Amps
1 Audi pre sense 5
2 Electromechanical parking brake 5
3 adaptive a
ir suspension
5
Automatic transmission 7,5
...
Page 288 of 298
286 Index
Homelink ® un iversal remote control .. 281
Remote control key ......... .. .... . 281
DEF
What does this mean when it appea rs in
the trip odometer display? ... .. .... ..
26
Defective light bulb warning ...... ..... 21
Defrosting (windows)
autom atic cl imate control .. .. .. .... ..
6 7
climate control . . . . . . . . . . . . . . . . . . . . . 65
Determining correct load limit ....... . 244
Dimensions .. ... ... ... .... .. .. .. .. .
275
Dimming the rearview mirror . ... .. .. .. 48
Distance . . . . . . . . . . . . . . . . . . . . . . . . . . . 24
Door/re ar lid warning . . . . . . . . . . . . . . . . .
23
Doors
Pow er child safety lock ..... ... .. ... . 37
Driver information system
CD/radio display . . . . . . . . . . . . . . . . . . . .
23
Door/rear lid warning . . . . . . . . . . . . . . . 23
Efficiency program . . . . . . . . . . . . . . . . . . 25
Exterior temperature display ..... .. .. 23
On-board computer ... .... .. .. .... .. 24
Driver seating position .... .. .. .. .. .. .
124
drive select .. .......... ...... ... .. .. 95
Adaptive dampers . . . . . . . . . . . . . . . . . . 95
Cornering light ............... .. ... . 95
Safety belt tensione r ...... .. .. .. .. . . 95
Driving safely . . . . . . . . . . . . . . . . . . . . . . 123
Driving through water ........ .. .... . 198
D .
. t· 24
riving 1me .... ... .... ..... .. .. .. . .
Duplicate key . . . . . . . . . . . . . . . . . . . . . . . 30
Dust filter
refer to Pollutant filter . . . . . . . . . . . . . . 63
E
Easy entry featu re .......... .. .. .. .. .. 70
Efficiency program . . . . . . . . . . . . . . . . . . . 25
Fuel economy messages . . . . . . . . . . . . . 25
Other equipment . . . . . . . . . . . . . . . . . . . 25
Electrical accessories (sockets) . . . . . . . . . 55
Electro-mechanical power assist .. .. ... 193
Elec tromechanical parking brake
Emergency braking ........... .. .. ..
75
Operation . . . . . . . . . . . . . . . . . . . . . . . . . 73
Parking .. .. .... ......... .. .. .. .. ..
74
Releasing and closing ..... .... .... .. 73 Starting
assist . . . . . . . . . . . . . . . . . . . . . 7 4
Starting from rest ..................
74
Starting off w ith a trailer . . . . . . . . . . . . . 7 4
Warning/ind icator lights ........ .... . 16
Electronic differential lock (EDL) ....... 189
Warning/ind icator lights ............. 19
Electronic immob ilizer . . . . . . . . . . . . 26, 31
Electronic power control ( EPC)
warning/indicator ligh t ......... .. .. .
20
Electronic speed limiter .......... ..... 29
Electronic stabilizat ion program (ESP) .. 189
Warning/indicator lights ........... .. 19
Emergency actuation
Doors .... .. .. . .................. .
36
Power sunroof ... .......... ...... .. 40
Emergency braking ................... 75
Emergency flashe r .... ... ... .... .. .. . 42
Warning/indicator lights .......... .. .
22
Emergency release
Selector lever . . . . . . . . . . . . . . . .
106, 112
Emergency starting .......... ..... .. 268
Emergency towing .............. .... 270
Emergency unlock ing
Rear lid .... ... .. .. ... ........... .. 37
Emergency warn ing triangle ..........
256
Energy management . .. ...... ... .. .. 194
Engine
Compar tment .. .. ............. ....
222
Coolant ...... ... .. .............. . 227
Data .... ... .. .. .. ...... ..... .. .. 276
starting . .. .. .. .. .... ... . .. ... .. .. . 70
Starting with jumper cables ....... .. 268
Stopping .... .. .. .. ... .. .. .... .... . 72
Engine compartment ............... . 222
Closing the hood .... ... .... ..... .. 221
Opening the hood ................ . 220
Safety instructions ................. 220
Working in the engine compartment .. 220
Engine coolant .. .. ..... ........... . 22 7
Adding coolant ... ..... ........... .
228
Checking the engine coo lant level ..... 227
Expansion tank ... ... .......... .. .. 227
Malfunction symbol ............ .. .. . 16
Radiator fan ..... .. ........... .. .. 229
Temperature gauge ............. ... . 11
Page 294 of 298
29 2 Index
Seats (number) .... ..... ... .. .. .... . 133
Selective unlock fea ture ...... ... .. .... 33
Selector lever . . . . . . . . . . . . . . . . . 102, 108
Eme rgency release . . . . . . . . . . . . 106, 112
Service and disposal
Safety belt p retens ioner ... .. .. .. .. .
140
Service interval d isplay ....... .... ..... 26
Shift but tons..... .. ... .... .. .. 105, 111
Side airbags
Description .... ......... ... .. .... .
162
How they work ... ......... ... .... . 163
Side assist
Activating and deactivating . . . . . . . . . . . 87
C leaning sensors .. ..... .. .. .. .. .. .
206
Description ............... ... .... .. 87
Informational and alert stage signals ..
89
M essages in instrument cluster disp lay . 93
MMI settings ............ .. .. .. .. .. 92
Opera tion . . . . . . . . . . . . . . . . . . . . . . . . . 88
Safety t ips ........... .... ... .. ....
93
Sensor detection area . . . . . . . . . . . . . . . 88
Side curtain airbags ....... ... .. .... .
165
Description ... ...... ..... .... .. .. . 165
H ow they work . . . . . . . . . . . . . . . . . . . . 166
Safety instructions . ....... .. .. .. .. . 166
Side marker lights . ..... ... .. .. .... .. 41
Ski sack . .. .. ... .. ..... ... .. .. .. .. .. 61
Sliding/tilting sunroof
Emergency closing .......... .. .. .. ..
40
Opening and clos ing ....... ... .. .. .. 39
Snow chains .... .. ..... ... .. .. .... . 251
Socket .. .. .. .. . ... ... .... .. .. .. .. .. 55
Sources of information about ch ild re-
straints and their use ....... .. .. .. .. .
186
Space-saving spare tire . ... .. .. .. .... . 257
Spare tire .. .. ................ ... ... 257
Speedometer . . . . . . . . . . . . . . . . . . . . . . .
26
Speed rating letter code ..... .... .... . 24 7
Speed warn ing system .......... .. .... 75
Star button . . . . . . . . . . . . . . . . . . . . . . . . .
24
S TART ENG IN E STOP button . .... .... .. 70
Starting from res t ............ .. .. .. .. 74
Starting off with a trai ler . ... .. ... ... .. 74
Starting the eng ine ..... .... ... .. .. ..
70
Stee ring
E lectrica lly adjustable steering wheel
69
Manua lly adjustable steering wheel ... . 69
also refer to E lectro-mechan ica l power
ass ist .... .... .. ............. ....
193
Steering wheel
Easy entry feature . . . . . . . . . . . . . . . . . .
70
Indicator light ... ... .. ..... ... .. .. . 18
Steering wheel heat ing ..... .... .. .. . 68
Stee ring wheel column
Adjusting electrically . .. ..... ... .. .. .
69
Adjusting manua lly . . . . . . . . . . . . . . . . . 69
Steps for determin ing cor rect load limit . 244
Stopping the eng ine ............. .... . 72
Storage . ... .... .. .. ... ..... ... .. .. .
55
Su nroof ...... .. .. .. ... .. ... ..... .. . 39
Sun shade
Rear window . .. .. ... .......... .. .. . 45
S ide doors . . . . . . . . . . . . . . . . . . . . . . . . . 45
Sun visors . ..... .. .. ... ..... ... .. .. . 45
Symbols
refer to Warn ing/ indicato r lights . .. .. . 12
T
Tachometer . . . . . . . . . . . . . . . . . . . . . 12, 23
Technical modifications .. ..... ... .. .. 281
Tempera ture display ............. .... . 23
Tether anchors .. .. ............. .... 185
T ether strap . ..... .. ... ..... ... .. .. 185
The first 1,000 miles (1,500 km) and after-
wards .. .... .... .. ............. ....
196
Three- zone climate contro l . . . . . . . . . . . . 64
r d 1e- owns . ..... .. ... .. ..... .. . 61,130
T ips for the environment
Sav ing fuel ...... ................ ..
58
tiptron ic ... .... .. ............. .... 106
Automatic Shift Lock (ASL) .... .. .. .. 109
Driving ..... .. .. ... .. .. ... ..... .. 107
Dynam ic shift program .......... ... 110
Emergency mode . ................ . 111
Kick-down . .. .. .. ... ...... .... .... 109
Manu al shift program ........ .. .. .. 110
Se lector lever . ... .. .... .... ... .. .. 108
r ire pressure ...... .. .............. . 241