sensor AUDI A6 2012 Owners Manual
[x] Cancel search | Manufacturer: AUDI, Model Year: 2012, Model line: A6, Model: AUDI A6 2012Pages: 298, PDF Size: 74.43 MB
Page 16 of 298
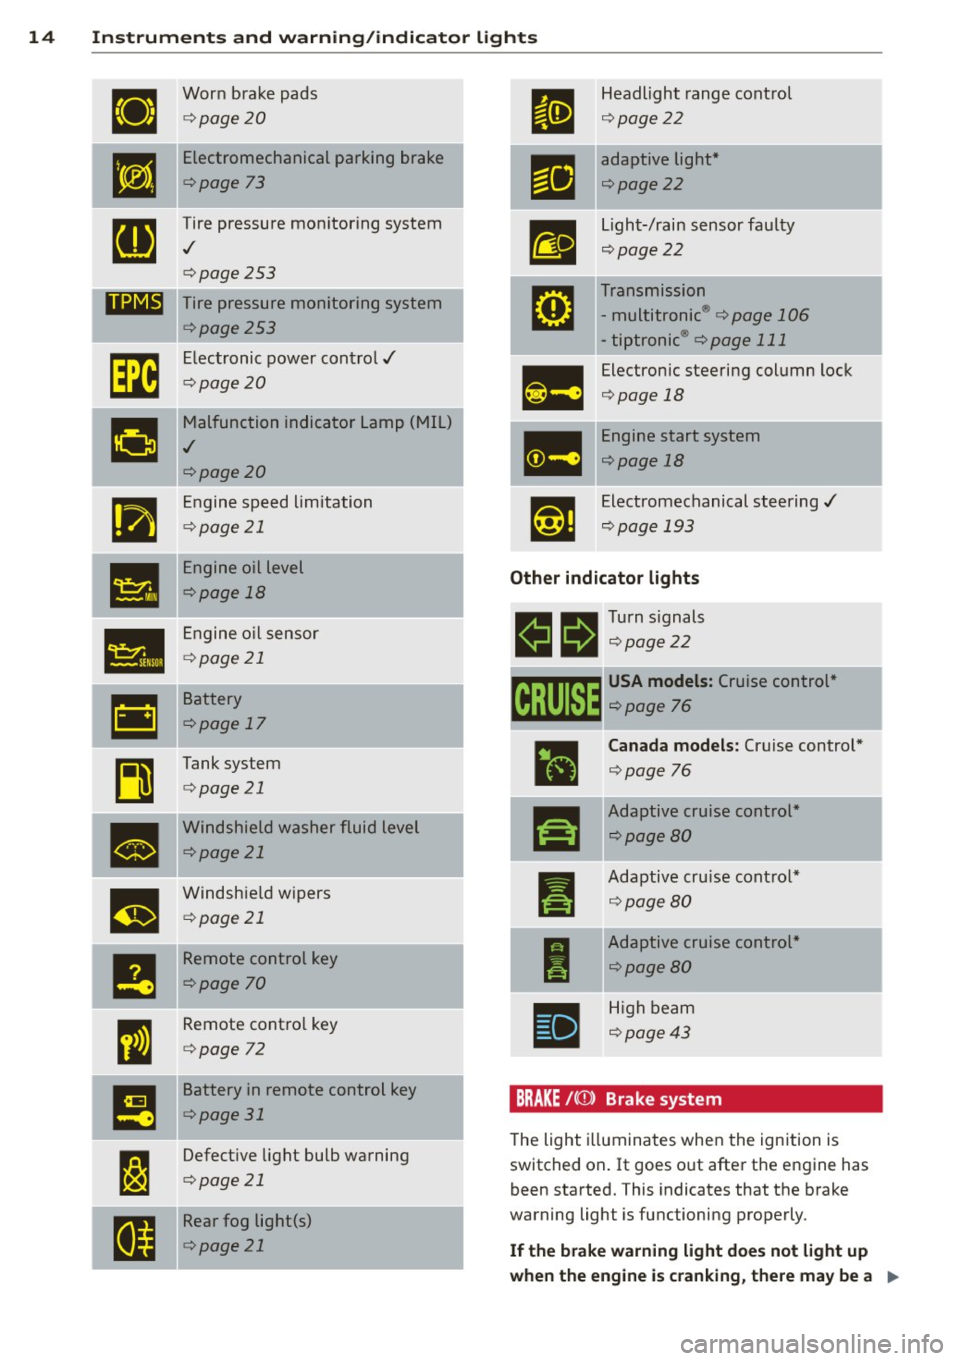
14 Instrum ent s and w arn ing /indic ato r light s
ll
Worn brake pads
¢ page20
•
Electromechanical parking brake
¢page 73
g
Tire pressure monitoring system
./
¢page253
11111 Tire pressure monitoring system
¢page253
rm
Electronic power control./
¢page20
g
Malfunction indicator Lamp (MIL)
./
¢page20
•
Engine speed limitation
¢page 21
•
Engine oil level
¢page 18
•
Engine o il sensor
¢ page 21
•
Battery
¢page 17
~
Tank system
¢page 21
•
Windshield washer fluid level
¢page 21
m
Windshie ld wipers
¢ page 21
--
I!
Remote control key
¢page 70
I
Remote contro l key
¢ page 72
!!
Battery in remote control key
¢page 31
I:~
Defective light bulb warning
¢ page 21
I a
Rear fog light(s)
¢page 21 Headlight range control
¢
page22
adaptive light *
¢page22
-
Light-/rain sensor faulty
¢page22
Transmission
- multitronic ®
¢ page 106
-tiptronic ® ¢page 111
Electronic steering column lock
¢page 18
Engine start system
<=>page 18
Electromechanical steering./
¢page 193
Other indicator lights
11!1 1!11 Turn signals
m 111 <=>page22
~ USA model s: Cruise control "
~ <=> page 76
ra
I
I
•
Canada mod els: Cruise control*
<=> page 76
Adaptive cruise control *
<=>page 80
Adaptive cru ise cont ro l*
¢ page80
Adaptive cruise control *
¢page80
H igh beam
¢page43
BRAKE /( (f) ) Brake system
The light i lluminates when the ignition is
switched on . It goes o ut after the engine has
been started. This indicates that the brake
warning light is functioning properly .
If the brake warn ing light does not light up
when the engine is cranking , there may be a
Ill-
Page 21 of 298
Instruments and warning/indicator lights 19
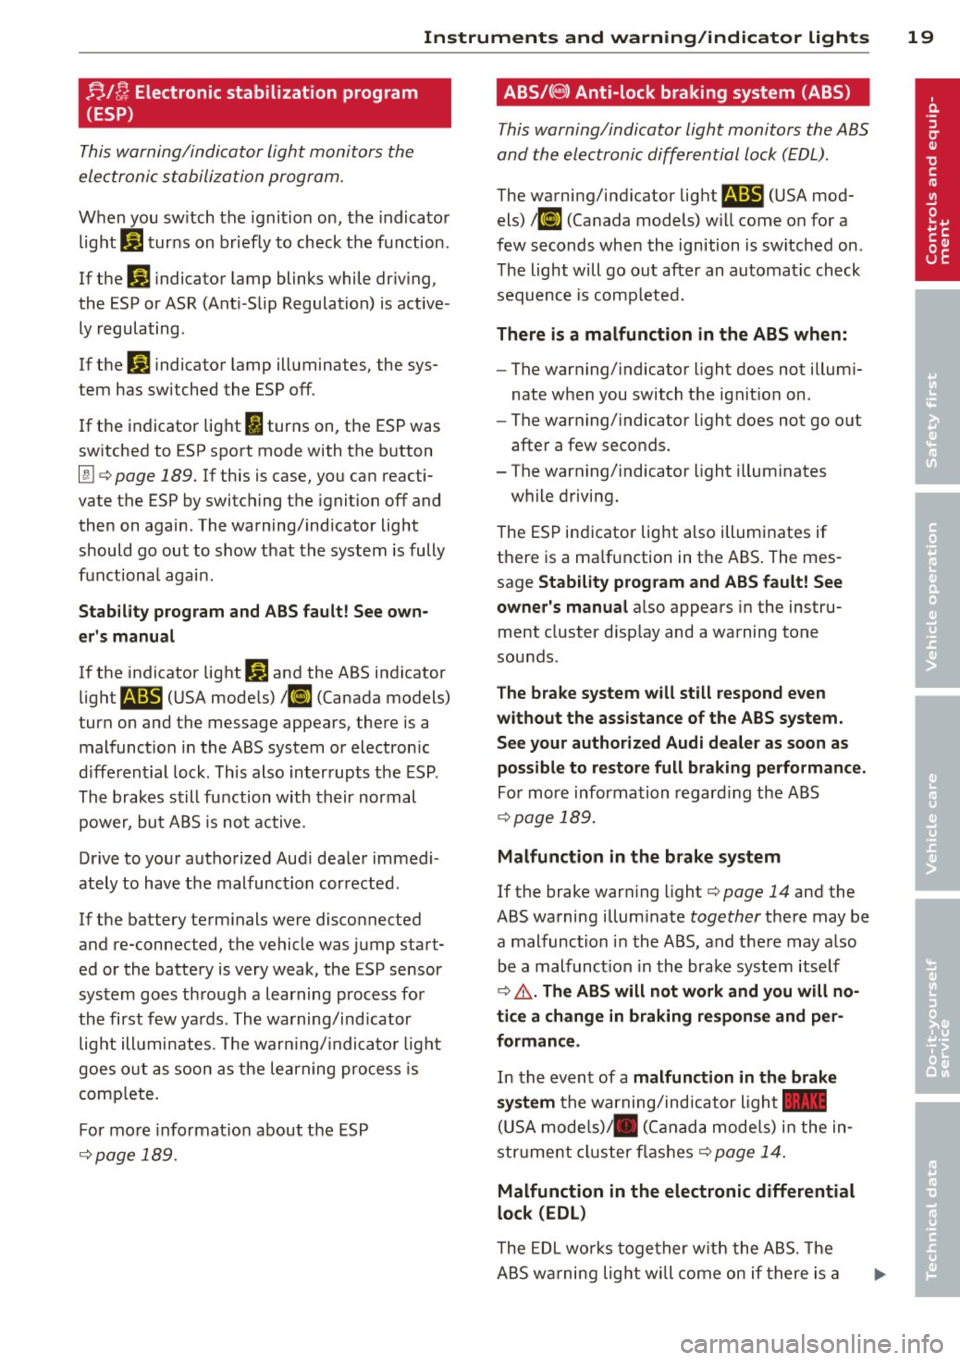
!;.!~ Electronic stabilization program
(ESP)
This warning/indicator light monitors the
electronic stabilization program.
When you sw itch the ignition on, the indicator
light
G1 turns on briefly to check the function .
If thE:
G1 indicator lamp blinks while dr iving,
the ESP or ASR (Ant i- Slip Regulation) is active
ly regulating.
If thE:
hJ indicator lamp illuminates, the sys
tem has switched the ESP off.
If the indicator light
I turns on, the ESP was
switched to ESP sport mode with the button
I!]<=>
page 189. If this is case, you can reacti
vate the ESP by switching the ignition off and
then on again . The warning/indicator light
should go out to show that the system is fully
functiona l again.
Stability program and ABS fault! See own
er's manual
If the indicator light D] and the ABS indicator
light
m (USA mode ls) ;fl] (Canada models)
turn on and the message appears, there is a
malfunct ion in the ABS system or electron ic
differential lock . This also interrupts the ESP.
The brakes still function with their normal
power, but ABS is not active.
Drive to your authorized Aud i dealer immedi
ately to have the malfunction corrected .
If the battery term inals were disconnected
and re-connected, the vehicle was jump start
ed or the battery is very weak, the ESP sensor
system goes through a learning process for
the first few yards . The warning/ind icator
light illuminates . Th e warn ing/ indicator light
goes o ut as soon as the learning process is
comp lete.
For more informat ion about the ESP
<=> page 189. ABS/(
8) Anti-lock braking system (ABS)
This warning/indicator light monitors the ABS
and the electronic differential lock (EDL) .
The warning/indicator light B (USA mod
els)
/ l(O] (Canada models) w ill come on for a
few seconds when the ignition is sw itched on .
The light will go out after an automatic check
sequence is comp leted.
There is a malfunction in the ABS when:
-The warning/indicator light does not illumi·
nate when you switch the ignition on.
- The warning/indicator light does not go out
after a few seconds.
- The warning/indicator light illuminates
while driving.
The ESP indicator light also illuminates if
there is a ma lfunction in the ABS . The mes
sage
Stability program and ABS fault! See
owner's manual
a lso appears in the instru
ment cluster d isp lay and a warning tone
sounds .
The brake system will still respond even
without the assistance of the ABS system.
See your authorized Audi dealer as soon as
possible to restore full braking performance.
Fo r more information regarding the ABS
<=>page 189.
Malfunction in the brake system
If the brake warning light<=> page 14 and the
ABS warning illum inate
together there may be
a malfunction in the ABS, and there may also
be a malfunction in the brake system itself
<=>
&. . The ABS will not work and you will no
tice a change in braking response and per·
formance .
In the event of a malfunction in the brake
system
the warning/indicator light _
(USA models)/ . (Canada models) in the in
strument cluster flashes <=>
page 14.
Malfunction in the electronic differential
lock (EDL)
T he EDL works t ogether w ith the ABS. The
ABS warning light will come on if there is a
Page 23 of 298
Instruments and warning/indicator lights 21
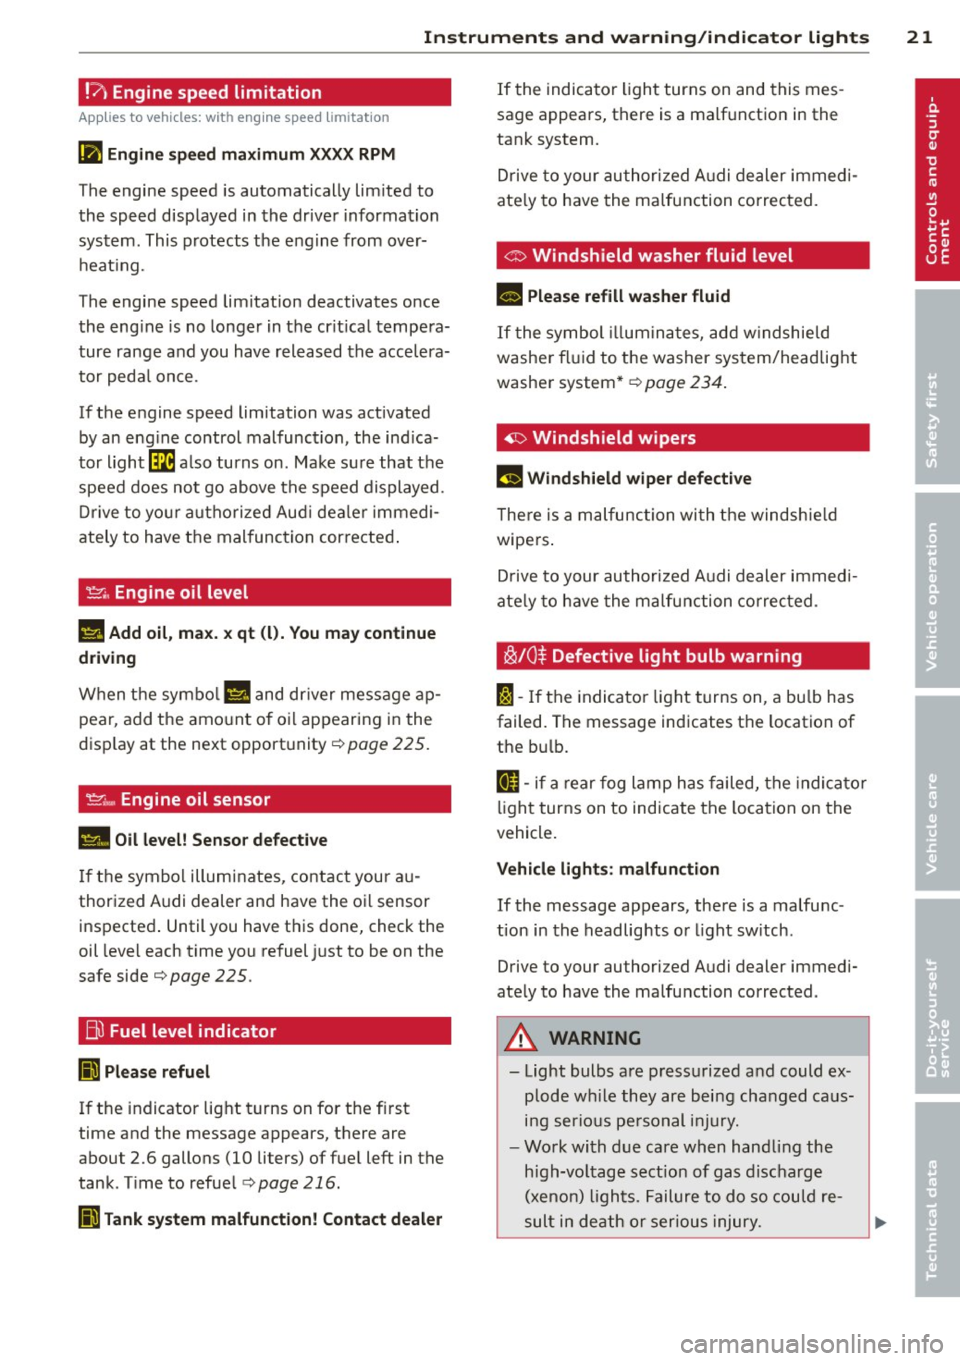
!?i Engine speed limitation
A ppl ies to vehicles: wit h en gin e s pee d l im itat ion
(II Engine speed maximum XXXX RPM
The engine speed is automatically limited to
the speed displayed in the driver information
system. This protects the engine from over heating.
The engine speed limitation deactivates once
the engine is no longer in the critical tempera
ture range and you have released the accelera
tor pedal once.
If the engine speed limitation was activated by an engine control malfunction, the indica
tor light~ also turns on. Make sure that the
speed does not go above the speed displayed.
Drive to your authorized Audi dealer immedi
ately to have the malfunction corrected.
~ . Engine oil level
II Add oil, max. x qt (l). You may continue
driving
When the symbol Ill and driver message ap
pear, add the amount of oil appearing in the
display at the next opportunity ¢
page 225.
~ .... Engine oil sensor
II Oil level! Sensor defective
If the symbol illuminates, contact your au
thorized Audi dealer and have the oil sensor inspected. Until you have this done, check the
oil level each time you refuel just to be on the
safe side¢
page 225.
Bil Fuel level indicator
Ii Please refuel
If the indicator light turns on for the first
time and the message appears, there are
about 2.6 gallons (10 liters) of fuel left in the
tank . Time to refuel
¢ page 216.
Ii Tank system malfunction! Contact dealer
If the indicator light turns on and this mes
sage appears, there is a malfunction in the
tank system.
Drive to your authorized Audi dealer immedi
ately to have the malfunction corrected.
C> Windshield washer fluid level
II Please refill washer fluid
If the symbol illuminates, add windshield
washer fluid to the washer system/headlight
washer system* ¢
page 234.
~ Windshield wipers
rlJ Windshield wiper defective
There is a malfunction with the windshield
wipers.
Drive to your authorized Audi dealer immedi
ately to have the malfunction corrected.
~/0$ Defective light bulb warning
f'a-If the indicator light turns on, a bulb has
failed. The message indicates the location of
the bulb.
IJ-if a rear fog lamp has failed, the indicator
light turns on to indicate the location on the
vehicle.
Vehicle lights: malfunction
If the message appears, there is a malfunc
tion in the headlights or light switch .
Drive to your authorized Audi dealer immedi
ately to have the malfunction corrected.
A WARNING
- Light bulbs are pressurized and could ex
plode while they are being changed caus
ing serious personal injury.
- Work with due care when handling the
high-voltage section of gas discharge
(xenon) lights. Failure to do so could re
sult in death or serious injury.
Page 24 of 298

22 Instruments and warning/indicator lights
Have the bulb replaced or the connection
repaired by you r aut horized Aud i Service
department.
i,lD Headlight range control
II Headlight range control: defective !
If the symbo l illuminates, t he headlight range
contro l is no longer working properly . Have
the system checked and repaired at your Aud i
dealer .
l§O Adaptive Light
Applies to vehicles: with Adapt ive Light
II Audi adaptive light: system fault
If the indicator light t urns on and th is mes
sage appears, there is a malfunction in the
adapt ive light system . The headlights still
f u nction .
Go to an aut hori zed dea lership to have the
h eadlights or the contro l unit for t he Adapt ive
Light repai red .
~D Light/rain sensor
f'al Automatic headlights /automatic wipers:
system fault
I f th e i ndicator lig ht turns on and t his mes
sage appears, t he lig ht/ra in sensor is no t
f u nctioni ng cor rec tly .
For safety reasons the low beams are turned
on permanent ly w ith the switch in
AUTO .
However , you can continue to turn the ligh ts
on an d off using the light swi tc h. Y ou can still
con trol a ll fu nct ions tha t are indepe ndent of
t h e rai n sens or throug h the win dshi eld wipe r
l eve r.
Contact your au thor ized Audi deal er as soon
as poss ible to have the prob le m cor recte d.
¢ Q Turn signals
The indicator light blinks when you use either
turn signal .
Whenever yo u use the left B o r th e right rl
turn s ignal , the indicator light blinks. Whe n
you use the emergency flas he rs, both indica
tor lights flash .
If one of the turn signa l light bulbs b urn o ut,
the turn signal w ill blink twice as fast as nor
mal. Carefu lly dr ive to your aut horized Aud i
dealer immed iate ly to have th e malfu nction
cor rected. The indicator lig ht does not indi
cate a m alfu nction if a tur n signal on t he tra il
er o r on the veh icle fails in trail er t ow ing
mode .
(D Tips
For m ore inf orm ation on the t urn sign als ,
r e fer to ¢
page 43 .
CRUISE/" (-) Cruise control
The warning/in dicator lig ht mIDJm (U SA mod
els)ll'II (Canada models) ill umi nates when
the cr uise c ontrol is activated ¢
page 76 .
Page 35 of 298
-When you leave the vehicle, always take
the ignition key with you. This will pre
vent passengers (children, for example)
from accidentally being locked in the ve hicle should they accidentally press the
power locking switch in the doors .
- Do not leave children inside the vehicle
unsupervised. In an emergency it would
be impossible to open the doors from
the outside without the key.
- Applies to vehicles with power side door
closer*:
- When closing a door, make sure noth
ing can interfere with the door. This
could cause serious personal injury.
- You can stop the door from closing at
any time by pulling on the inside or
outside door handle .
@ Tips
-In the event of a crash with airbag de
ployment all locked doors will be auto
matically unlocked to give access to the
vehicle occupants from the outside.
- If the power locking system should mal
function, you can lock the driver's door
using the mechanical key¢
page 36 .
-If the power locking system should fail,
you can still open the fuel tank flap in an
emergency ¢
page 218.
-You are well advised not to keep valua
bles inside an unattended vehicle, visible
or not . Even a properly locked vehicle
cannot provide the security of a safe .
- If the LED in the upper edge of the driv
er's door panel comes on for about 30
seconds after the vehicle is locked, there
is a malfunction in the power locking or
the anti-theft warning system. Have the
malfunction corrected by an authorized
Audi dealership or qualified repair facili
ty.
Opening and closing 33
Setting power locking
T he driver can determine the functions for
power locking in the MMI .
.,. Select: !CAR !function button> Car systems
control bu tton > Vehicle settings > Central
lo cking .
Unlock doors -
You can decide if All doors or
only the
Dri ver should unlock. The rear lid al
so unlocks when
All is selected . If you select
Driver in a vehicle with a convenience key* ,
only the door whose handle you pull will un
lock.
If you select
Driver , all the doors and rear lid
will unlock if you press the
ffi button on the re
mote control master key twice .
Lock exterior trunk handle -If you selec t On,
the rear lid handle is locked . In this case the
rear lid can be opened with the button
a on
the master key or with the
a button in the
driver's door . In vehicles with a convenience
key* , you can still open the rear lid using the
handle if an authorized master key is near the
proximity sensor .
Fold mirrors* -If you select On, the exterior
rearview mirrors fold in automatically when
you press the
(TI button on the remote contro l
master key or touch the sensor* in the handle .
Lock when driving -If you select On, the vehi
cle locks automatically when driving. All of
the doors and rear lid lock.
Tone when locking -When you select On, a
confirmation tone sounds when you lock the
vehicle.
Page 36 of 298
34 Openin g and clo sing
locking and unlocking the vehicle with
the remote control
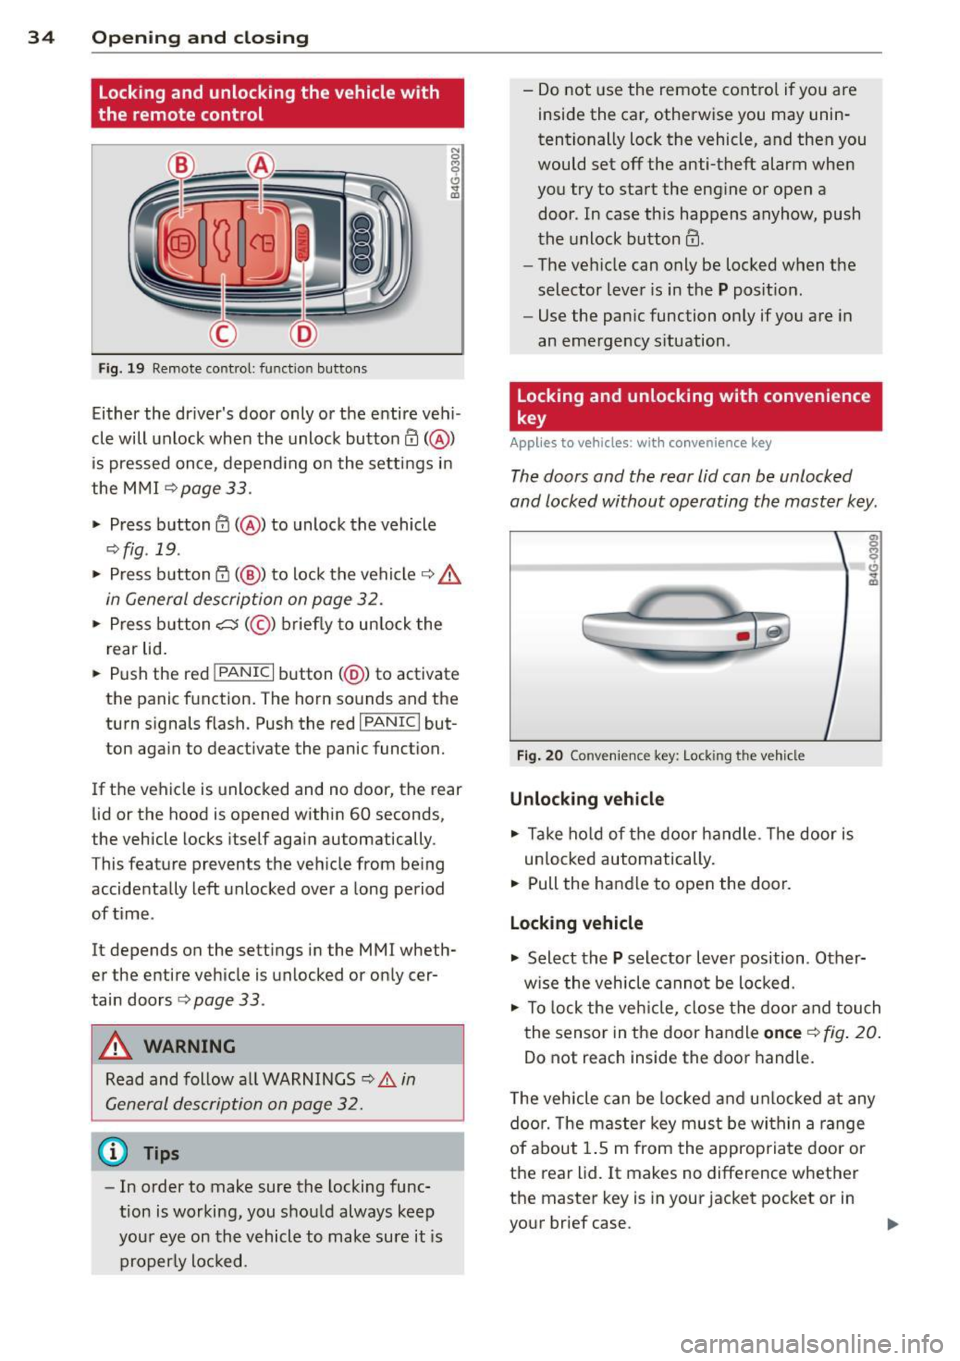
F ig. 19 Remote control: function buttons
N 0
9 (!)
~
Either the driver's door only or the entire veh i
cle will unlock when the unlock button
III( @)
is pressed once, depend ing on the settings in
the MMI
¢page 33.
.. Press button III( @) to unlock the vehicle
¢fig .19 .
.. Press button fij (@ ) to lock the vehicle¢.&,
in General description on page 32 .
.. Press b utton c:s (@ ) briefly to un lock the
rear lid .
.. Push the red
!PANIC I button( @) to activate
the panic f unction. The horn sounds and the
turn signals flash. Push the red
!PANIC I but
ton aga in to deact ivate the panic function.
If the vehicle is unlocked and no door, the rear lid or the hood is opened within 60 seconds,
the vehicle locks itself again automatically.
This feature prevents the vehicle from being
accidentally left unlocked over a long period
of time .
It depends on the settings in the MMI wheth
er the entire vehicle is unlocked or only cer
tain doors
¢ page 33.
A WARNING
Read and follow a ll WARNINGS c:> .&. in
General description on page 32.
@ Tips
- In order to make sure the locking func
tion is working, you should always keep
your eye on the vehicle to make sure it is
properly locked. -
Do not use the remote control if you are
inside the car, otherwise you may unin
tentionally lock the vehicle, and then you
would set off the anti-theft alarm when
you try to start the eng ine or open a
door. In case this happens anyhow, push
the unlock button
III-
- The vehicle can only be locked when the
selector lever is in the
P posit ion.
- Use the panic function only if you are in
an eme rgency s ituation.
locking and unlocking with convenience
key
Applies to vehicles : with convenience key
The doors and the rear lid can be unlocked
and locked without operating the master key .
Fig . 20 Conven ience key: Lock ing the vehicle
Unlocking vehicle
.. Take ho ld of the door handle. The door is
un locked automatically.
.. Pull the handle to open the door.
locking vehicle
.. Select the P selector lever position . Other
w ise the vehicle cannot be lo cked.
.. To lock the veh icle, close the door and touch
the sensor in the door handle
on ce c:> fig . 20 .
Do not reach inside the door handle.
T he veh icle can be locked and unlocked at any
doo r. T he master key must be within a range
of about 1.5 m from the appropriate door or
the rear lid. It makes no difference whether
the master key is in your jacket pocket or in
your brief case.
Page 37 of 298
It is not possible to re-open the door for a
brief period direct ly after closing it. This al
low s you to ensure that the doors are properly
l ocked.
It depends on the settings in the MMI wheth
er the entire vehicle is unlo cked or one of the
doors
¢page 33.
A WARNING
Read and follow all WARNINGS c> ..&. in
General description on page
32.
@ Tips
-
If your vehicle has been standing for an ex
tended period, please note the following:
- The proximity sensors are deactivated af-
ter a few days to save power. You then
have to pull on the door handle once to
unlock the veh icle and a second time to
open the veh icle.
- To prevent the battery from being dis
charged and to preserve your vehicle's
ability to start for as long as possible,
the energy management system gradu
al ly sw itches off unnecessary conven
ience functions.
It is possible that you
will not be able to unlock your vehicle us
ing these convenience functions.
- For Declaration of Compliance to United
States FCC and Industry Canada regula
tions~
page 281.
Operating locks with the key
In the event of a failure of the power locking
system, the driver's door can be locked and
unlocked at the lock cylinder.
•
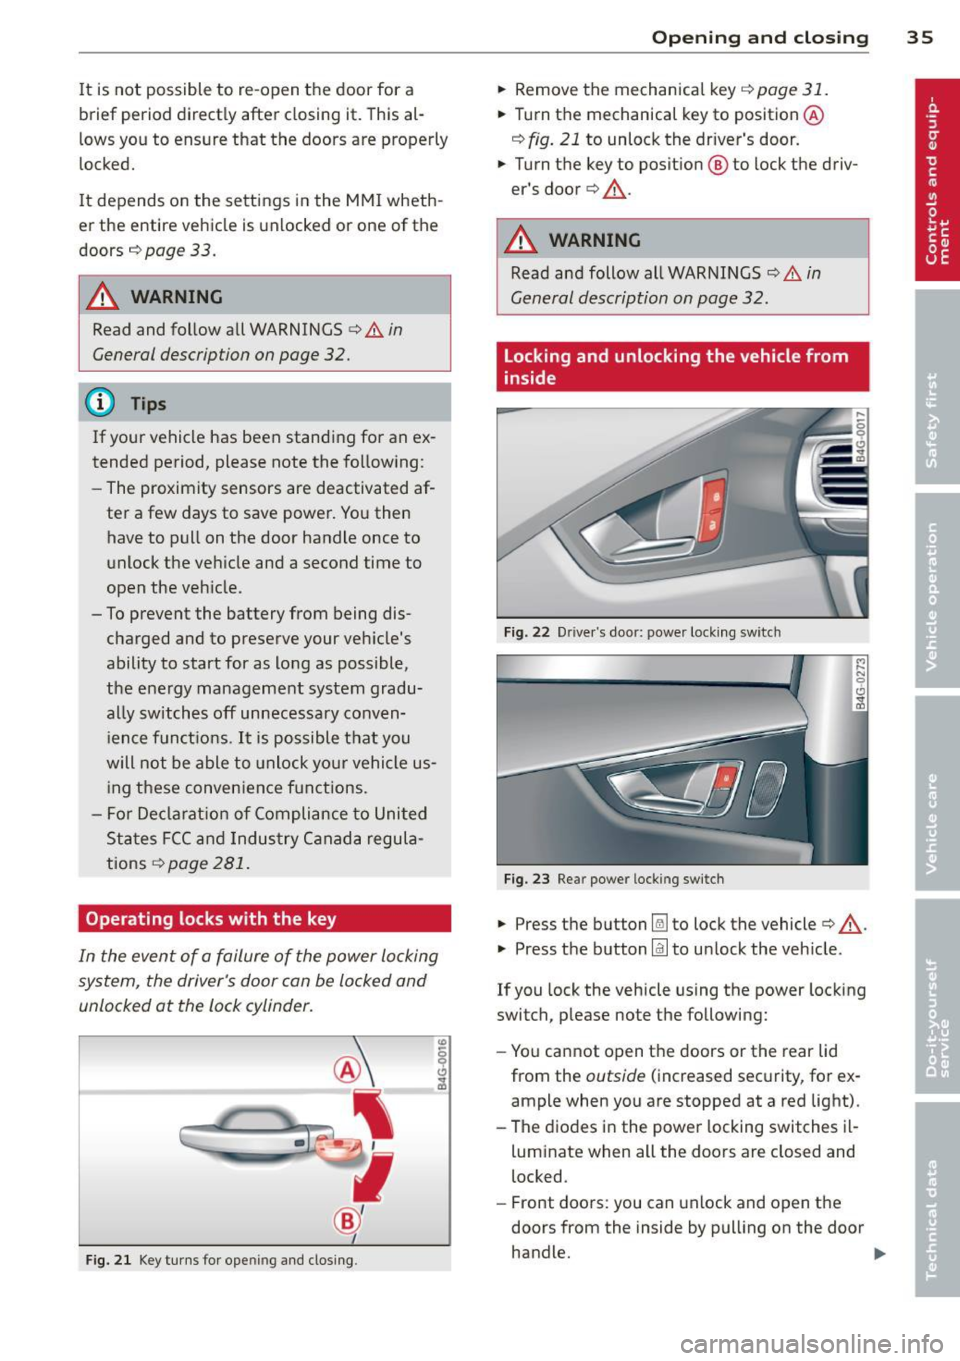
Fig. 21 Key turns for opening and clos ing.
Opening and closing 35
.. Remove the mechanical key Q page 31 .
.. Turn the mechanical key to position @
r::!) fig. 21 to unlock the driver's door .
.. Turn the key to position
@ to lock the d riv
er's door
q ,&. .
A WARNING
Read and follow all WARNINGS Q ..&. in
General description on page
32.
Locking and unlocking the vehicle from
inside
Fig. 22 Drive r's door: power locking switch
Fig. 23 Rear power locking switch
.. Press t he button [ml to lock the vehicle q ,&. .
.. Press the button Im to unlock the veh icle.
If you lock the vehicle using the power locking
switch, please note the following:
- You cannot open the doors or the rear lid
from the
outside (increased security, for ex
ample when you are stopped at a red light).
- The diodes in the power locking switches il-
luminate when all the doors are closed and
locked.
- Front doors: you can unlock and open the
doors from the inside by pulling on the door
handle. ..,.
Page 44 of 298
42 Clear vision
visibility conditions. For example, fog cannot be detected by the light sensors.
So always switch on the headlights
io
under these weather conditions and
when driving in the dark.
- Crashes can happen when you cannot see
the road ahead and when you cannot be
seen by other motorists . Always turn on
the headlights so that you can see ahead and so that others can see your car from
the back.
(D Note
The rear fog lights should only be turned
on in accordance with traffic regulation, as
the lights are bright for following traffic.
@ Tips
-In the event of a light sensor malfunc
tion, the driver is notified in the instru
ment cluster display~
page 22.
- You will hear a warning tone if you open
the driver door when the exterior lights
are switched on.
- Please observe legal regulations when
using the lighting systems described .
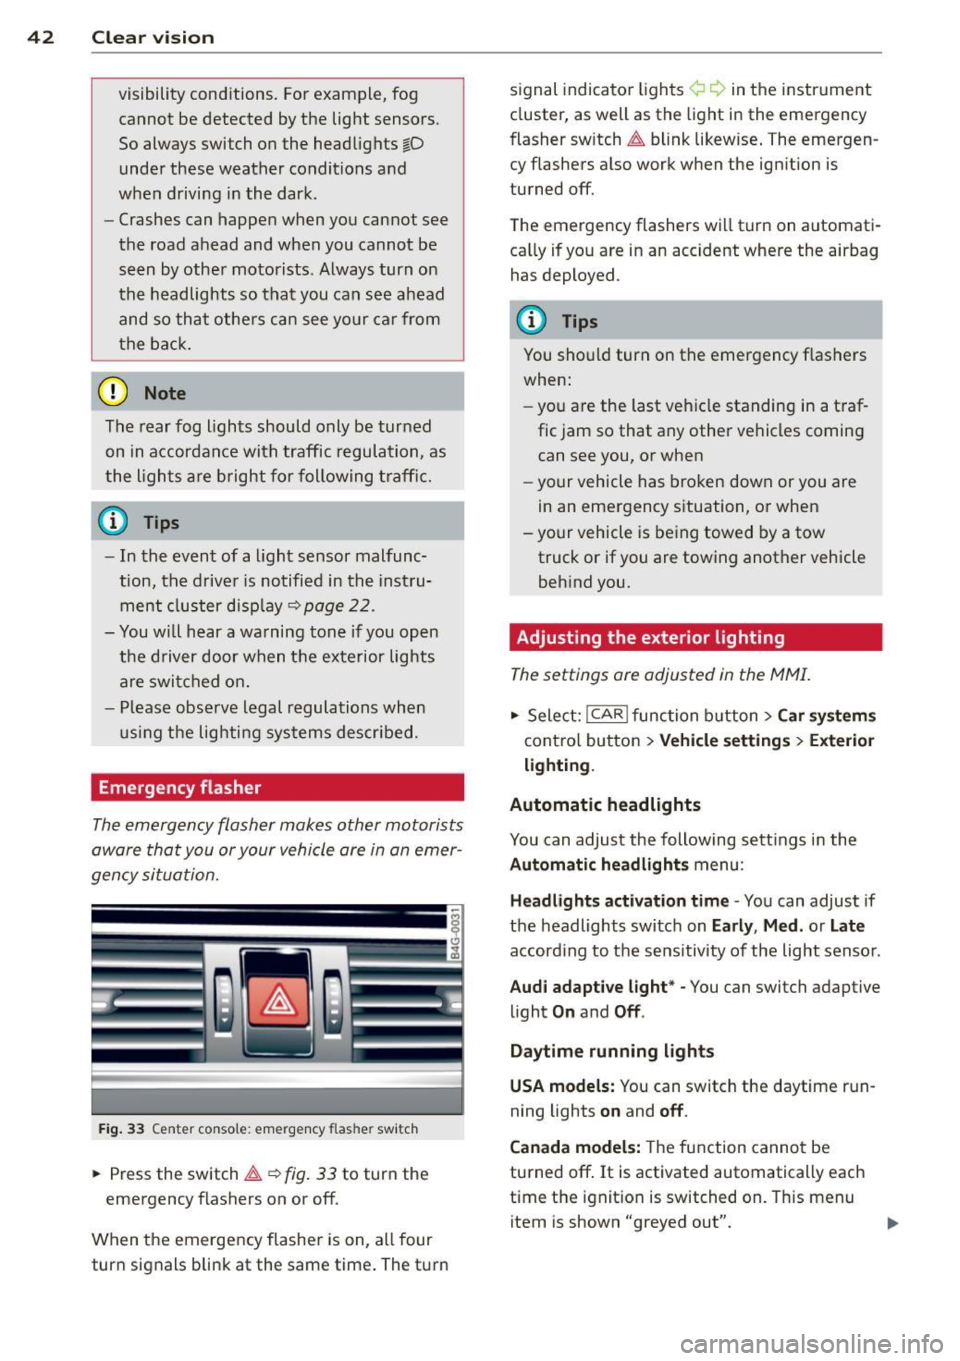
Emergency flasher
The emergency flasher makes other motorists
aware that you or your vehicle are in an emer
gency situation.
Fig. 33 Center console : emerge ncy flasher switch
• Press the switch~~ fig. 33 to turn the
emergency flashers on or off.
When the emergency flasher is on, all four
turn signals blink at the same time. The turn signal
indicato r lights ¢ Q in the instrument
cluster, as well as the light in the emergency
fl asher switch ~ blink likewise. The emergen
cy flashers also work when the ignition is
turned off.
The emergency flashers will turn on automati
cally if you are in an accident where the airbag
has deployed .
(D Tips
You should turn on the emergency flashers
when:
- you are the last vehicle standing in a traf
fic jam so that any other vehicles coming
can see you, or when
- your vehicle has broken down or you are
in an emergency situation, or when
- your vehicle is being towed by a tow
truck or if you are towing another vehicle
behind you.
· Adjusting the exterior lighting
The settings ore adjusted in the MMI.
• Select: I CAR I function button > Car systems
control button > Vehicle settings> Exterior
lighting.
Automatic headlights
You can adjust the following settings in the
Automatic headlights menu :
Headlights activation time -You can adjust if
the headlights switch on
Early , Med. or Late
according to the sensitivity of the light sensor .
Audi adaptive light* -You can switch adaptive
light
On and Off .
Daytime running lights
USA models:
You can switch the daytime run
ning lights
on and off.
Canada models:
The function cannot be
turned off.
It is activated automatically each
time the ignition is switched on. This menu
item is shown "greyed out".
Page 48 of 298
46 Clear vis ion
Wiper and washer
system
Switching the windshield wipers on
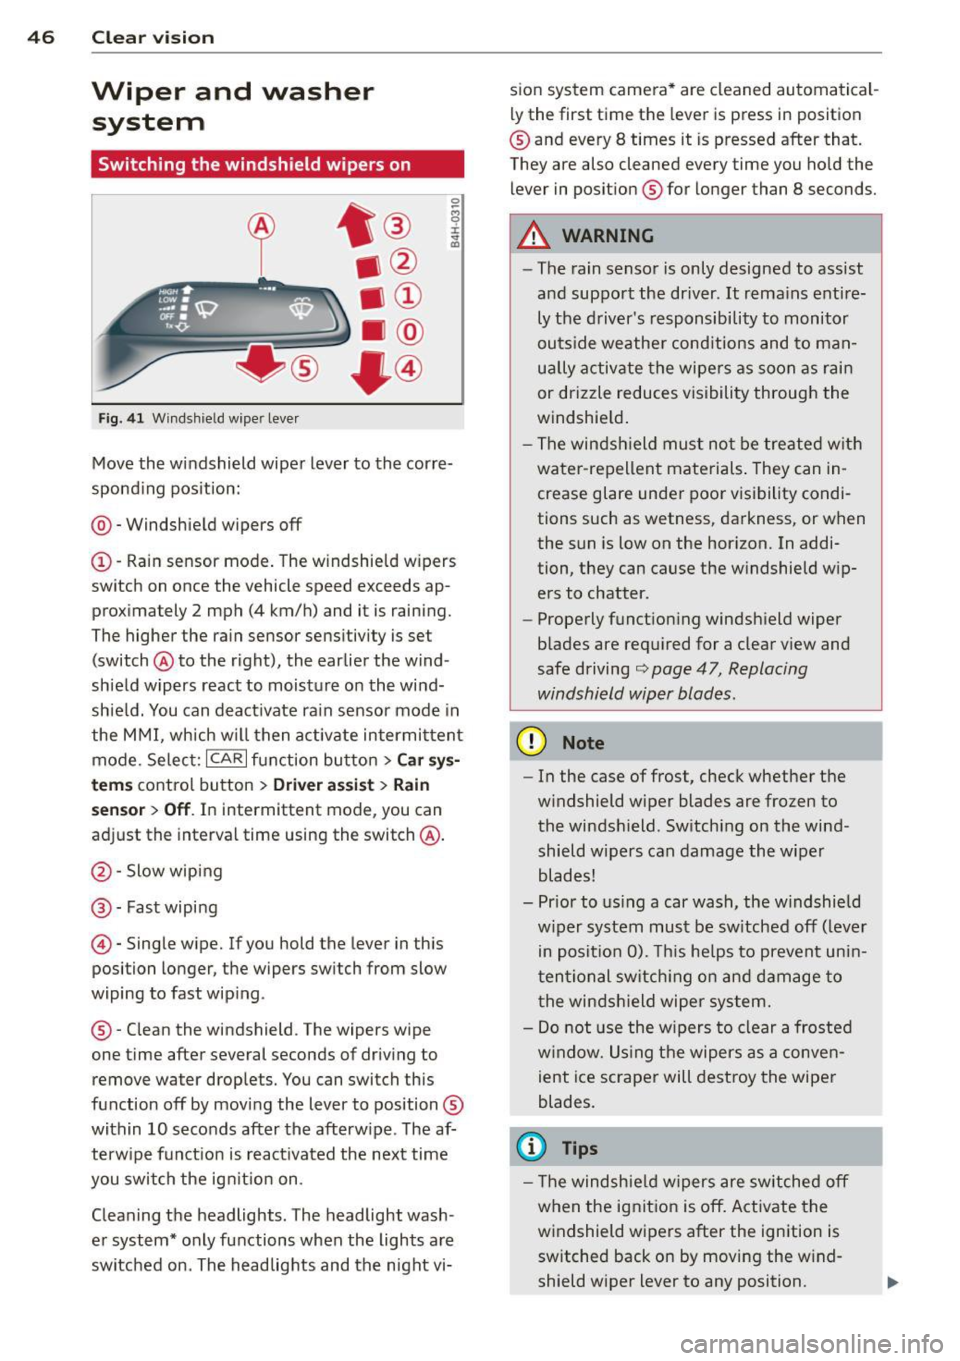
F ig. 4 1 Windsh ie ld wipe r lever
Move the windshield wiper lever to the corre
spond ing pos ition:
@ -Windshie ld wipers off
(I) -Rain sensor mode . The windshield w ipers
switch on once the vehicle speed exceeds ap
proximately 2 mph (4 km/h) and it is raining.
The higher the rain sensor sens it ivity is se t
(switch @to the right), the earlier the wind
shield wipers react to moisture on the wi nd
shie ld. You can deact ivate rain sensor mode in
the MMI, which w ill then activate intermi ttent
mode. Selec t:
ICAR I function bu tton > C ar s ys
t e m s
contro l bu tton > Dri ver a ssis t > Rain
se nsor
> Off . In intermittent mode, you can
adjust the interval time using the switch @.
@-Slow wiping
@-Fast wiping
©-Single wipe. If you hold the lever in this
posi tion longer, the wipers sw itch from slow
wiping to fast wip ing .
® - Clean the windshield . The wipers wipe
one time after several seconds of driv ing to
remove water drop le ts. You can switch this
function off by mov ing the lever to position ®
within 10 seconds after the afterw ipe . The af
terw ipe fun ct ion is react ivated the next time
you swit ch the ig nitio n on .
Clean ing the headlights . The headlight wash
e r system* only functions when the lights are
switched on . The headlights and the night vi- s
ion system camera * are cleaned automatical
ly the first time the lever is press in position
® and every 8 times it is pressed after that.
They a re also cleaned every time you ho ld the
lever in posit ion ® for longer than 8 seconds.
A WARNING
--The rain sensor is only designed to assist
and support the dr iver .
It rema ins enti re
ly the d river's responsibility to monitor
outs ide weather cond itions and to ma n
u a lly activate the wipe rs as soon as rai n
or drizzle reduces visibility through the
windshie ld .
- The windsh ield mu st not b e tre ate d w ith
water -repellent materials . They can in
crease glare under poor v isibility condi
tions such as wetness, da rkness, or when
the sun is low on the hor izon. In addi
tion , they can cause the w indshield w ip
ers to chatter.
- Properly function ing windsh ield wiper
b lades are req uired for a clea r view and
safe driving
i::> page 47, Replacing
windshield wiper blades.
(D Note
- In the case of frost, check whether the
w indshield wiper blades are fr ozen to
the windsh ield . Sw itching on the wind
shield wipers can damage the wiper blades!
- Pr ior to us ing a car wash, the w indshield
w iper system must be sw itched off ( lever
in posit ion 0). This he lps to prevent un in
t en tional switch ing o n and dam age to
t he winds hield wiper system.
- Do not use the w ipers to clear a frosted
w indow. Us ing the wipers as a conve n
ient ice scraper will destroy the wiper
blades.
(D Tips
- T he windshie ld wipers are sw itched off
w hen the ig nit io n is off . Activate the
windshield wipers after the ignition is
switched back o n by moving the w ind
shield wiper lever to any position.
Page 49 of 298
-Worn or dirty windshield wiper blades
result in streaking. This can affect the
rain sensor function. Check your wind
shield wiper blades regularly .
- The washer fluid nozzles of the wind
shield washer system are heated at low
temperatures when the ignition is on.
- When stopping temporarily, e.g. at a
traffic light, the set speed of the wind
shield wipers is automatically reduced by
one speed .
Replacing windshield wiper blades
Wiper blades in good condition help keep the
windshield clear.
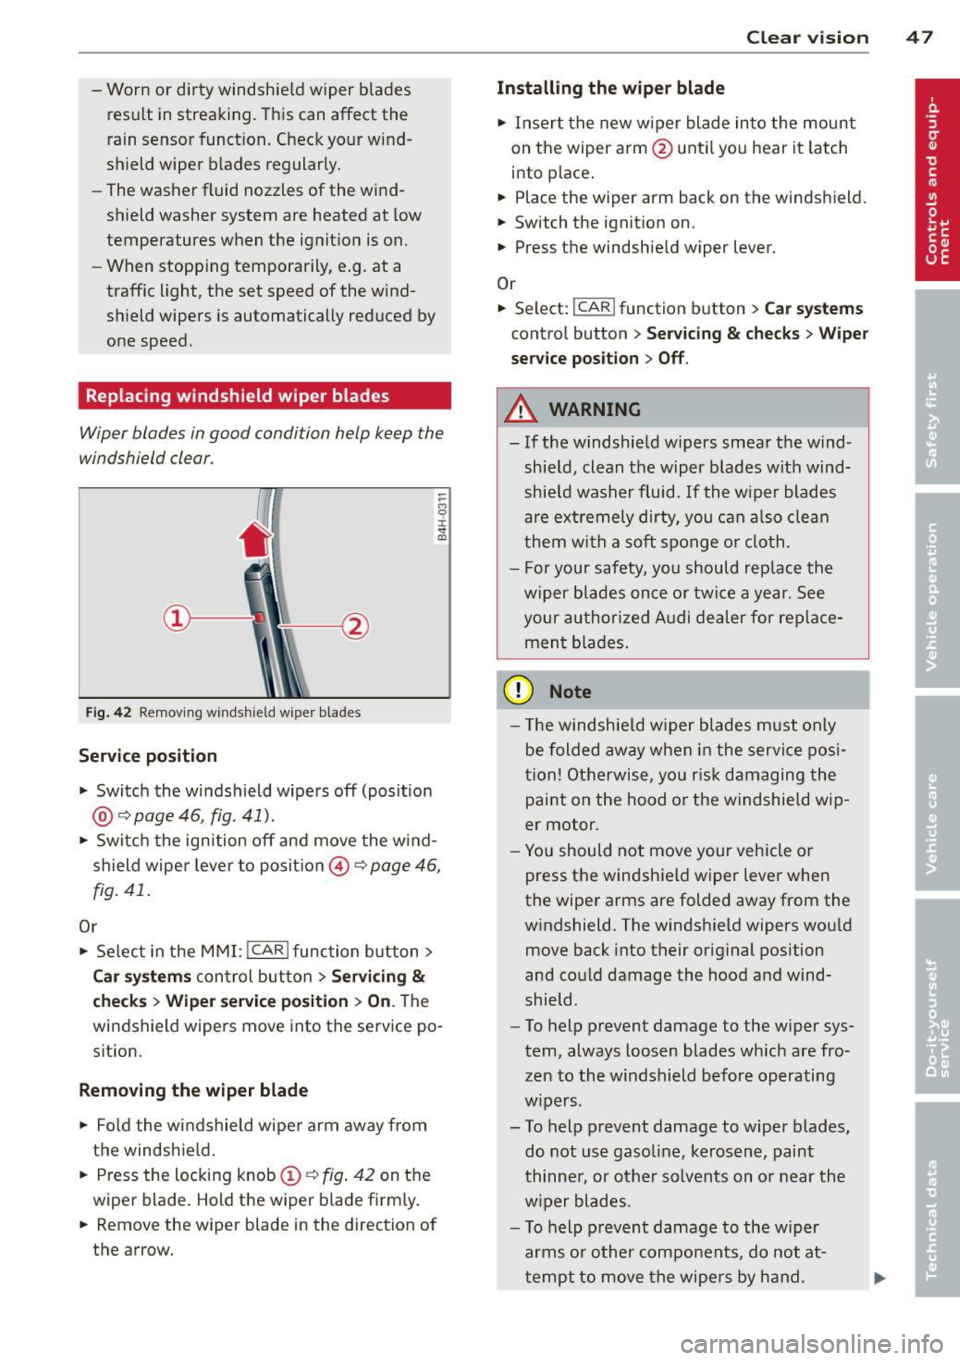
Fig. 42 Removing winds hie ld w iper bla des
Service position
• Switch the windshield wipers
off (position
@ ¢page 46, fig. 41).
• Switch the ignition off and move the wind
shield wiper lever to position @¢
page 46 ,
fig. 41.
Or
• Select in the MMI: !CAR !function button>
Car systems control button > Servicing &
checks > Wiper service position > On. The
windshield wipers move into the service po
sition.
Removing the wiper blade
• Fold the windshield wiper arm away from
the windshield.
• Press the locking knob@¢
fig. 42 on the
wiper blade . Hold the wiper blade firmly.
• Remove the wiper blade in the direction of
the arrow.
Clear vision 4 7
Installing the wiper blade
• Insert the new wiper blade into the mount
on the wiper arm @unti l you hear it latch
into place.
• Place the wiper arm back on the windshield.
• Switch the ignition on.
• Press the windshield wiper lever.
Or • Select:
I CAR ! function button > Car systems
control button > Servicing & checks > Wiper
service position
> Off.
.&_ WARNING
- If the windshield wipers smear the wind
shield, clean the wiper blades with wind
shield washer fluid. If the wiper blades
are extremely dirty, you can also clean
them with a soft sponge or cloth.
- For your safety, you should replace the
wiper blades once or twice a year. See
your authorized Audi dealer for replace
ment blades.
(D Note
-The windshie ld wiper blades must only
be folded away when in the service posi
tion! Otherwise, you risk damaging the
paint on the hood or the windshie ld wip
er motor.
- You should not move your vehicle or
press the windshield wiper lever when
the wiper arms are folded away from the
windshield. The windshield wipers would move back into their original position
and could damage the hood and wind
shield .
- To help prevent damage to the wiper sys
tem, always loosen blades which are fro
zen to the windshield before operating
w ipers.
- To help prevent damage to wiper blades,
do not use gasoline, kerosene, paint
thinner, or other solvents on or near the
wiper blades .
- To help prevent damage to the wiper
arms or other components, do not at
tempt to move the wipe rs by hand.