lumbar support AUDI A6 2013 Owners Manual
[x] Cancel search | Manufacturer: AUDI, Model Year: 2013, Model line: A6, Model: AUDI A6 2013Pages: 306, PDF Size: 76.92 MB
Page 53 of 306

Front passenger's seat
Always move the front passenger seat into the rearmost position .
To avoid contact with the airbag while it is de
ploying, do not sit any closer to the instru
ment panel than necessary and always wear
the three-point safety belt provided adjusted correctly . We recommend that you adjust the
passenger's seat in the following manner:
.. Bring the backrest up to an (almost) upright
pos it ion .
Do not ride with the seat reclined .
.. Adjust the head restra int so the upper edge
i s as even as possib le wit h the top of you r
head.
If that is not possib le, try to adjust
the head restraint so that it is as close to
this position as possible
r::!> page 53.
.. Place your feet on the floor in front of the
passenger's seat.
Front seats
Controls
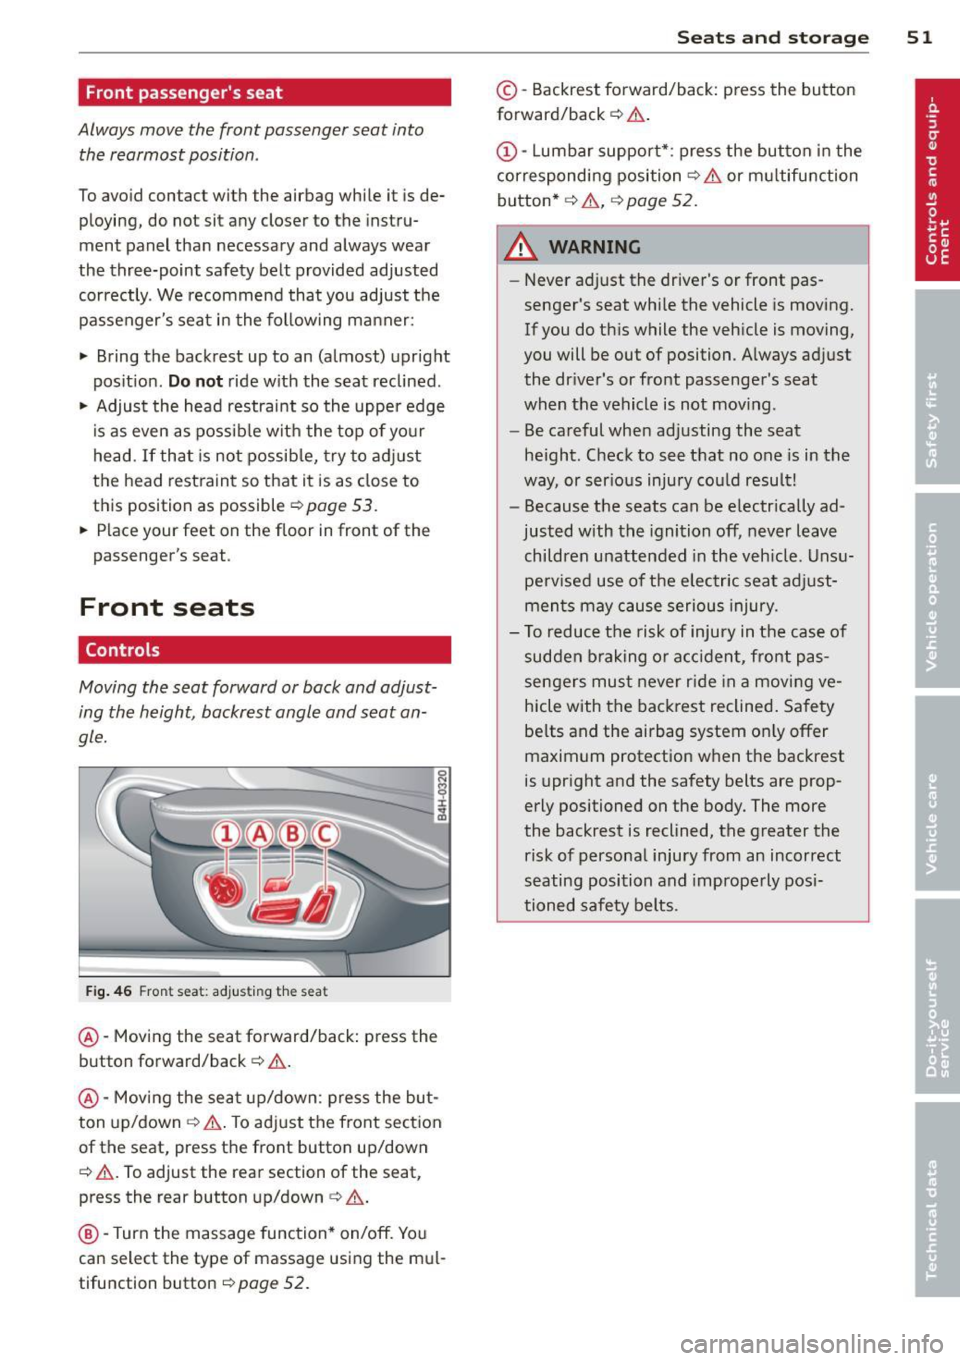
Moving the seat forward or back and adjust
ing the height, backrest angle and seat an
gle.
F ig . 46 Fron t seat: adjus ting the sea t
@-Mov ing the seat forward/back: press the
button forward/back
c::> .&, .
@ -Mov ing the sea t up/down: p ress the but
ton up/down
r::!> ,& . To ad just the front sect ion
of the seat, press the front button up/down
c::> .&, . To adjust the rear section of the seat,
press the rear button up/down
c> ,& .
@ -Turn the massage function* on/off. Yo u
can select the type of massage using the mu l
tifunction button
c> page 52.
S ea ts a nd s to rage 51
© -Backrest forward/back: press the button
forward/back
r::!> .&, .
(!)-Lumbar support* : press the button in the
corresponding position
r::!> .& or multifunction
button*
c::> .& , c::> page 52.
A WARNING
-
-Never adjust the driver's or front pas
senger's seat whi le the vehicle is moving.
If you do this while the veh icle is moving,
you will be out of position. A lways adjust
the dr iver's or front passenger's seat
when the vehicle is not moving .
- Be careful when adjusting the seat
he ight. Check to see that no one is in the
way, or serious injury cou ld result!
- Because the seats can be e lectrically ad
justed with the ignition off, never leave
children unattended in the veh icle. Unsu
perv ised use of the electric sea t ad just
ments may cause serious injury.
- To reduce the risk of injury in the case of
sudden braking or accident, front pas
sengers mus t never r ide in a moving ve
hicle with the backrest reclined. Safety
be lts and the airbag system on ly offer
maximum protection when the backrest
is upright and the safety belts are prop
erly positioned on the body. The more
the backrest is reclined, the greater the risk of personal injury from an incorrect
seating position and improperly posi
tioned safety belts.
Page 54 of 306

52 Seats and st o rag e
Multifunction button
Appl ies to vehicles: with memory function
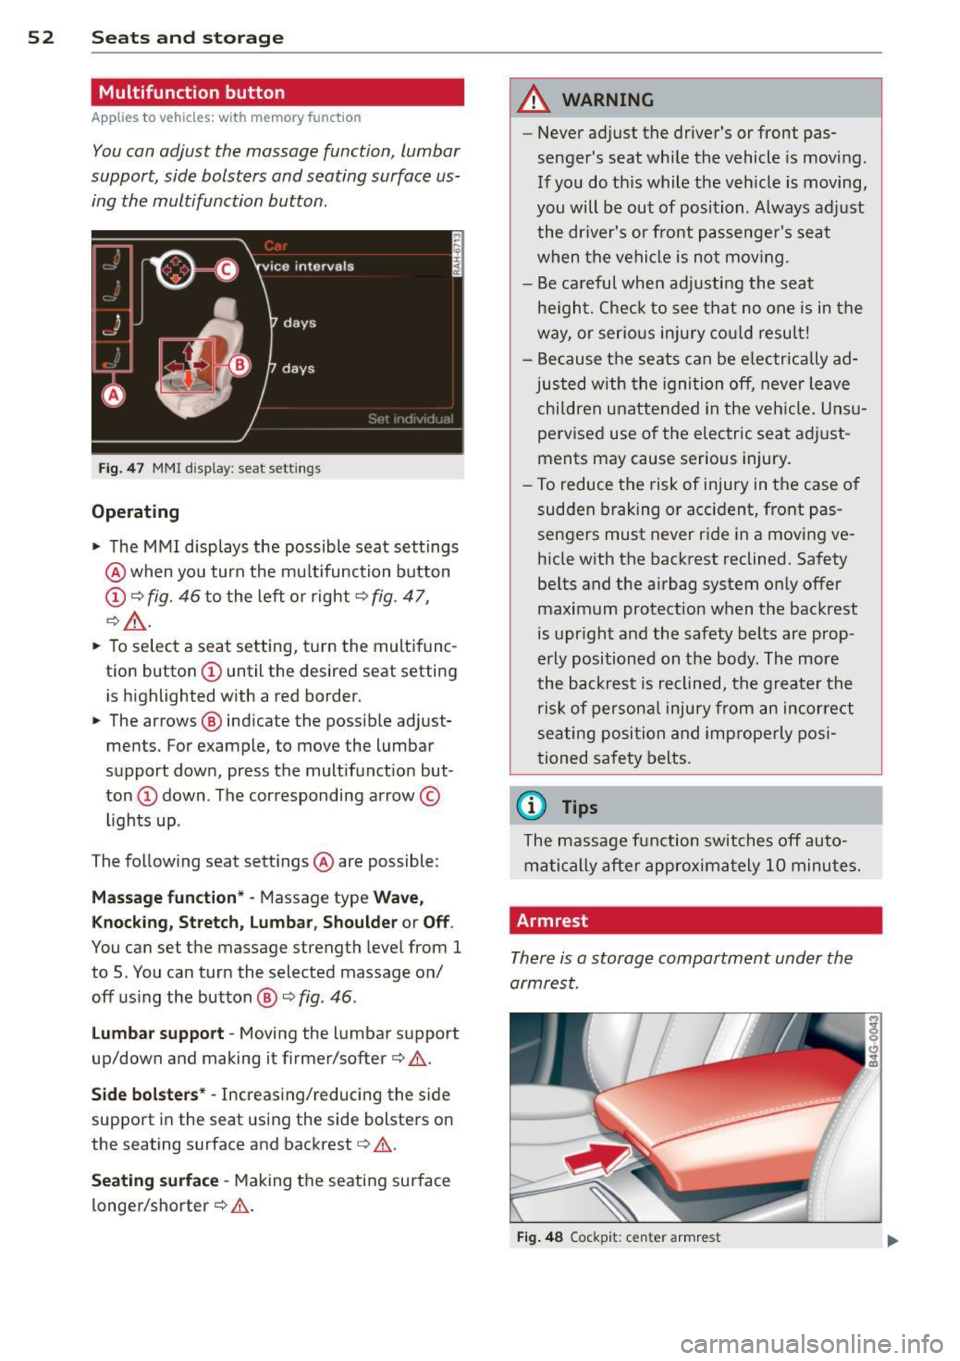
You can adjust the massage function, lumbar
support, side bolsters and seating surface us
ing the multifunction button .
Fig. 4 7 MMI display: seat settings
Operating
• The MMI displays the possible seat settings
@ when you turn the mu ltifunction button
(D ¢ fig. 46 to the left or right¢ fig . 47,
¢ _&. .
• To select a seat setting, t urn the multifunc
tion button
(D until the desired seat setti ng
is highlighted with a red border.
• The arrows @ indicate the possib le adjust
ments. For example, to move the lumbar
support down, press the multifunct ion but·
ton
(D down . The corresponding arrow©
lights up .
The follow ing seat settings @ are possible:
Mas sage fun ct ion* · Massage type Wave,
Knockin g, Stretch, lumbar , Sho ulde r or Off.
You can set the massage strength level from 1
to 5. You can turn the selected massage on/
off using the button@¢
fig. 46.
lu mb ar su pport -Moving the lumbar support
up/down and making it firmer/softer¢ .&..
Side bol ste rs* -Increasing/reducing the side
support in the seat using the side bolsters on
the seating surface and backrest
q &.
Seating surfac e -Making the seating surface
longer/shorter¢ .&..
A WARNING
--Never adjust the driver's or front pas·
senger's seat whi le the vehicle is moving.
If you do th is while the veh icle is moving,
you will be out of position. A lways adj ust
the dr iver's or front passenge r's seat
when the vehicle is no t mov ing.
- Be careful when ad justing the seat
he ight. Check to see that no one is in the
way, or serio us injury co ul d resu lt!
- Because the seats can be e lectrically ad
justed with the igni tion off, never leave
child ren unattended in the veh icle. Uns u
pervised use o f the electric seat adj ust
ments may cause serious injury.
- To reduce the risk of injury in the case of
sudden braking or accident, front pas
sengers must never ride in a moving ve
hicle with the backrest reclined. Safety be lts and the airbag system only offer
maximum protection when the backrest is upr ight and the safety belts are prop·
erly positioned on the body. The more
the backrest is reclined, the greater the
ris k of persona l injury from an incor re ct
seating position and improperly posi
tioned safety belts.
(D Tips
The massage fun ction switches off auto·
matically after approximately 10 minutes.
Armrest
There is a storage compartment under the
armrest.
F ig . 4 8 Cockp it: center armrest
Page 57 of 306

key, switch off the memory function using
the MMI or the
I OFF ! button c::> page 55.
Memory buttons
Applies to vehicles: with memory function
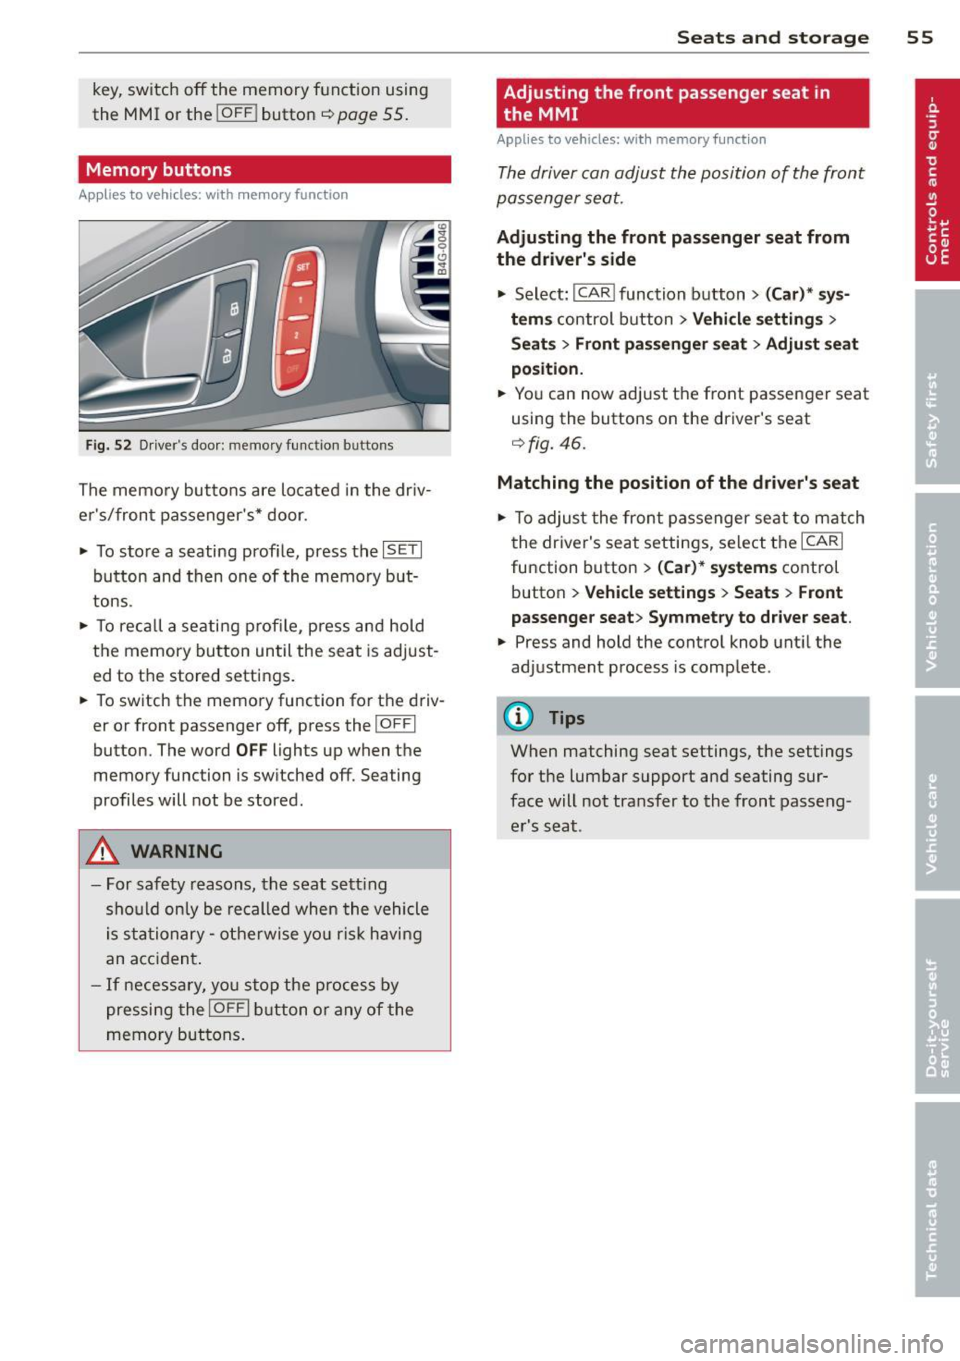
Fig. 52 Driver's door: memory function buttons
The memory buttons are located in the dr iv
e r's/front passenger's* door.
• To store a seating prof ile, press the
IS ETI
button and then one of the memory but
tons.
• To reca ll a se ati ng profile, press and hold
the memory button until the seat is adjust
ed to the stored settings.
• To switch the memory function for the driv
er or front passenger off, press the
I OFFI
button. The word OFF lights up when the
memory function is switched off. Seating
profiles will not be stored.
A WARNING
-For safety reasons, the seat sett ing
should only be recalled when the vehicle
is stationary - otherwise you risk having
an accident .
- If necessary, you stop the process by
pressing the
I OFFI button or any of the
memory buttons.
Seats and storage 55
Adjusting the front passenger seat in
, the MMI
Applies to vehicles: with memory function
The driver can adjust the position of the front
passenger seat.
Adjusting the front passenger seat from
the driver's side
• Select: I CAR I function button > (Car)* sys
tems
control button > Vehicle settings>
Seats> Front passenger seat> Adjust seat
position.
• You can now adjust the front passenger seat
using the buttons on the driver's seat
c::> fig. 46.
Matching the position of the driver's seat
• To adjust the front passenger seat to match
the driver's seat settings, select the
ICARI
function button > (Car)* systems control
button
> Vehicle settings > Seats > Front
passenger seat> Symmetry to driver seat.
• Press and hold the control knob until the
adjustment process is complete .
(!) Tips
When matching seat settings, the settings
for the lumbar support and seating sur
face will not transfer to the front passeng
er's seat.
Page 273 of 306

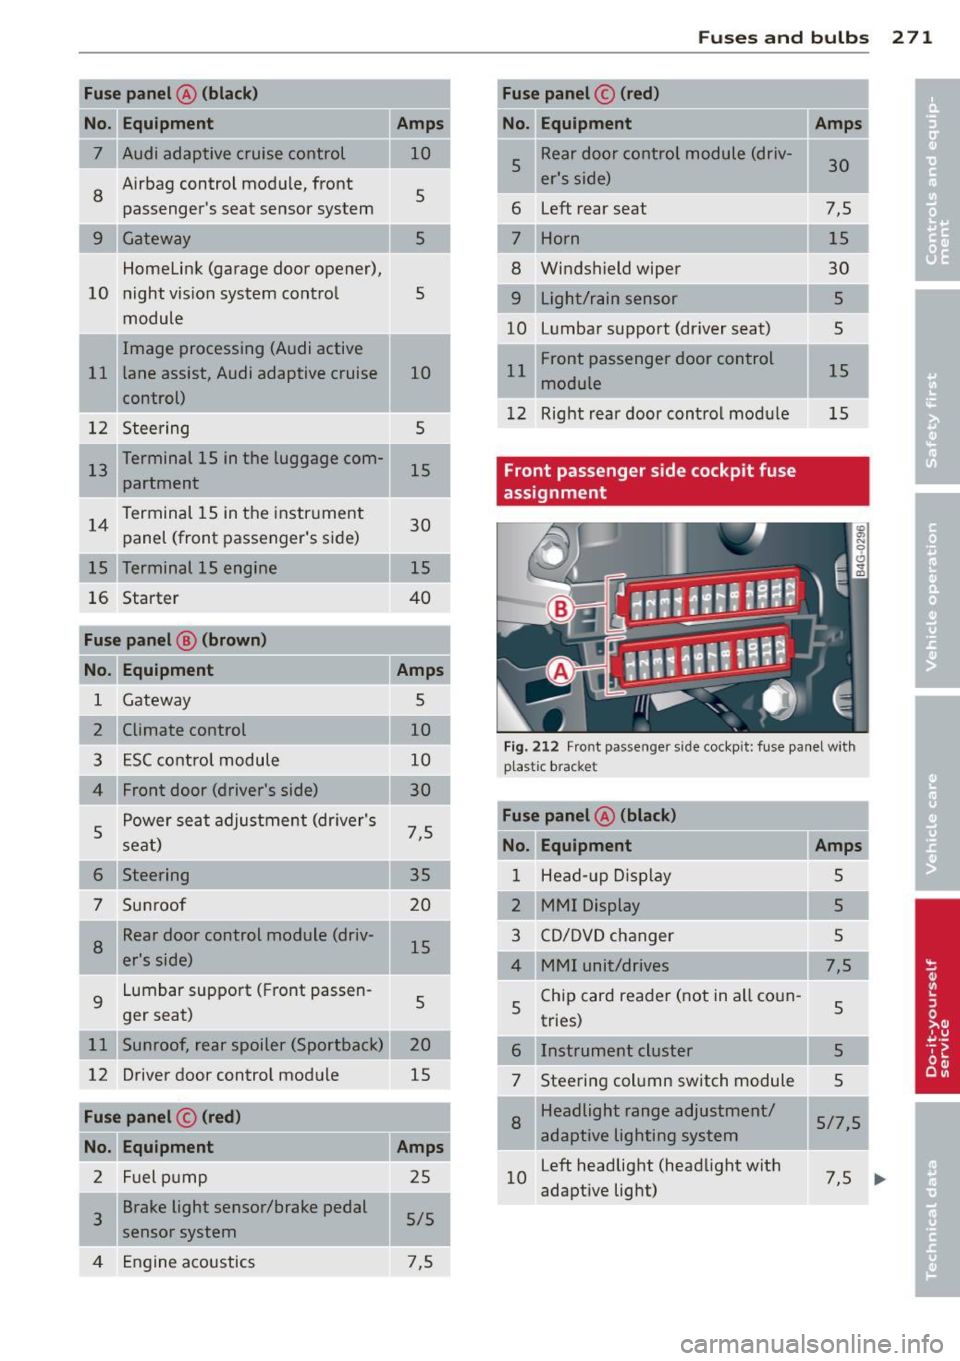
Fuse panel@ (black )
No. Equipment Amps
= = 7 Audi adaptive cruise control 10
8
Airbag control module, front
5
passenger's seat sensor system
Gateway 5
Homelink (garage door opener),
10 night vision system control
5
module
Image processing (Audi active
11 lane assist, Audi adaptive cruise
10
control)
12 Steering 5
1 13 Terminal 15 in the luggage com-
15
partment
14 Terminal 15 in the
instrument
30
panel (front passenger's side)
15 Terminal 15 engine 15
16 Starter 40
Fuse panel
B (brown)
No. Equipment Amps
1 Gateway 5
2 Climate control 10
3 ESC control module 10
Front door (driver's side) 30
s
Power seat adjustment (driver's
7,5
seat)
6 Steering 35
7 Sunroof 20
8
Rear door control module (driv-
15
er's side)
9 Lumbar support (Front passen
-
5
ger seat)
11 Sunroof, rear spoiler (Sportback) 20
12 Driver door control module
15
Fuse panel
c (red)
No. Equipment Amps
2 Fuel pump 25
3 Brake light sensor/brake pedal
sensor system 5/5
4 Engine acoustics 7,5
Fuses and bulbs
-Fuse panel © (red)
No.
u Equipment
5 Rear door
control module (driv-
er's side)
6 Left
rear seat
Horn
Windshield wiper
9 Light/rain sensor
10 L
umbar support (driver seat)
11 Front passenger door control
module
12 Right rear door control modu le
Front passenger side cockpit fuse
assignment Amps
30
7,5 15
30 5
5
15
15
Fig. 212 Front passenger side cockpit: fuse panel wit h
p last ic bracket
Fuse panel A (black)
No. Equipment
Amps
1 Head-up Display 5
2 MMI Display 5
3 CD/DVD changer 5
4 MMI unit/drives
7,5
5 Chip card reader (not in all coun
-
5
tries)
6 Instrument cluster
5
7 Steering column switch module
5
8
Headlight range adjustment/
5/7,5
adaptive lighting system
10 Left
headlight (headlight with
7,5
adaptive light)
I
271
...