wheel AUDI A6 2014 Owners Manual
[x] Cancel search | Manufacturer: AUDI, Model Year: 2014, Model line: A6, Model: AUDI A6 2014Pages: 304, PDF Size: 76.32 MB
Page 269 of 304
-On hard, slippery surface (such as tiles)
use a rubber mat or similar to prevent
the jack from slipping .
- To help prevent injury to yourself and
your passengers:
- Do not raise the vehicle until you are
sure the jack is securely engaged.
- Passengers must not remain in the ve
hicle when it is jacked up.
- Make sure that passengers wait in a
safe place away from the vehicle and
well away from the road and traffic.
- Make sure jack position is correct , ad
just as necessary and then continue to
raise the jack.
- Changes in temperature or load can af
fect the height of the vehicle.
(D Note
Do not lift the vehicle by the sill. Position
the vehicle jack only at the designated lift
ing points on the sill. Otherwise, your vehi
cle will be damaged.
(D Tips
The vehicle jack mode* switches off auto
matically at speeds above 6 mph (10 km/
h).
Removing and installing the sill cover
Applies to vehicles : wit h sill
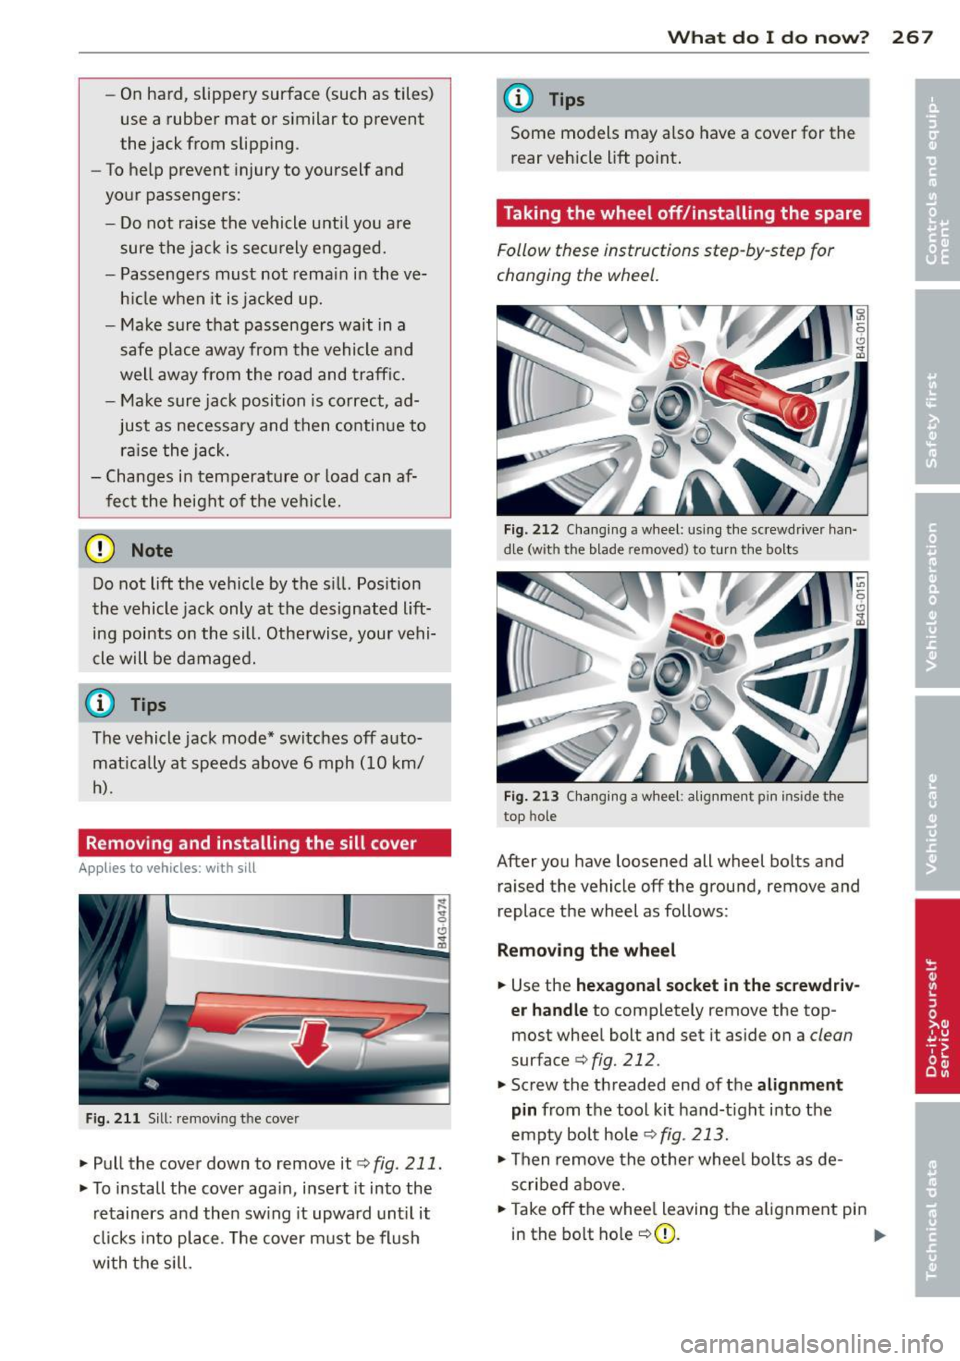
Fig. 211 Sill: remov ing t he cover
.,. Pull the cover down to remove it c'> fig. 211.
.,. To install the cover again, insert it into the
retainers and then swing it upward until it
clicks into place. The cover must be flush
with the sill.
What do I do now? 267
@ Tips
Some models may also have a cover for the
rear vehicle lift point.
Taking the wheel off/installing the spare
Follow these instructions step-by-step for
changing the wheel.
Fig. 212 Changing a wheel: using the screwdrive r han
dle (w it h th e blade re m oved) to turn the bolt s
Fig. 213 Changing a wheel : alignment p in in sid e the
top hole
After you have loosened all wheel bolts and
raised the vehicle
off the ground, remove and
replace the wheel as follows :
Removing the wheel
.,. Use the hexagonal socket in the screwdriv
er handle
to completely remove the top
most wheel bolt and set it aside on a clean
surface c>fig. 212 .
.,. Screw the threaded end of the
alignment
pin
from the tool kit hand-tight into the
empty bolt hole r::;;fig . 213 .
.,. Then remove the other wheel bolts as de
scribed above .
.,. Take
off the wheel leaving the alignment pin
in the bolt hole
r::;; d). ..,.
Page 270 of 304
268 What do I do no w?
P uttin g on the spare wheel
.. Lift the spare wheel and ca refully slide it
over the alignment pin to guide it in place
¢ (D .
.. Use the hexagonal socket in the screwdriver
handle to screw in and tighten all wheel
bolts
slightly.
.. Remove the alignment pin and insert and
t ighten the remaining wheel bolt slightly
l ike the rest .
.. Turn the jack handle counte r-clockw ise to
lower the vehicle unt il the jac k is fully re
leased.
.. Use the wheel bolt wrench to tighten all
wheel bolts firmly¢
page 265 . Tighten
them
crosswise, from one bolt to the (ap
proximately) opposite one, to keep the
wheel centered.
When removing or installing the wheel,
the rim could hit the brake rotor and dam
age the rotor. Work carefully and have a
second person help you .
(j) Tips
Never use the hexagonal socket in the han
dle of the screwdriver to loosen or t ighten
the wheel bolts .
- Pull the reversible blade from the screw
driver before you use the hexagonal
socket in the handle to turn the wheel bo lts.
- When mounting tires with
unid ir ec tional
tread design
make su re the tread pat
tern is pointed the right way
¢ page 268.
-The wheel bolts should be clean and easy
to tu rn . Check for d irt and corrosion on
t h e mat ing s urfaces of both the whee l
and the h ub. Remove al l dirt from these
s ur faces before remo unting the wheel.
Tires with unidirectional tread design
Tires with unidirectional tread design must be
mounted with their tread pattern pointed in the right direction .
Using a sp are t ire w ith a tre ad pattern
intended for use in a specific direction
When using a spare t ire with a tread patter n
intended for use in a spec ific d irection , please
note the following :
- The direct ion of rotation is marked by an ar
row on the side of the ti re .
- If the spare tire has to be installed in the in
correct direct ion, use the spare tire only
temporarily s ince the tire will not be able to
achieve its optim um performance cha racte r
is tic s wit h regard to aquap la ni ng, no ise and
wear .
- We recommend that you pay part icu la r at
t en tion to th is fact d uring wet wea ther and
t ha t you adjust you r speed to match road
conditions .
- Replace the fl at tir e with a new o ne an d
have it insta lled on you r vehicle as soon as
possible to resto re the handling advantages
of a u nidirectional tire .
Notes on wheel changing
Please read the information¢ page 251, New
tires and replacing tires and wheels
if you a re
going to use a spare tire which is different
from the ti res on your vehicle .
After you change a tire:
- Check the tire pre ssure on the spare imme
diately after install ation.
- Have th e whe el bolt tightening torque
c hecked with a torque wrench as soon a s
possible by your author ized Audi dealer or
a qualified service stat ion.
- With steel and alloy wheel rims, the wheel
bolt s are cor re ctl y tightened at a torque of
90 ft lb (120 Nm ).
- If you noti ce that the wheel bolts are cor
roded and diffi cult to turn while changing
a ti re , they should be replaced before you
check the t ightening torque. .,..
Page 271 of 304
-Replace the flat tire with a new one and
have it installed on your vehicle a s soon as
possible. Remount the wheel co ve r.
U ntil th en, driv e with extr a car e and at re
du ced speeds .
~ WARNING
-
-If you are going to equip your vehicle
with t ires or rims wh ich differ from those
wh ich were factory installed, then be
sure to read the informat ion
c:> page 251,
New tires and replacing tires and
wheels.
- Always make sure the damaged wheel or
even a flat tire and the jack and tool k it
are properly secured in th e luggage com·
partment and are not loose in the pas·
senger compartment.
- In an accident o r sudden maneuver they
c ou ld fly forward, inju ring anyone in the
vehicle .
- Always store damaged w heel, jac k and
tools secure ly in the luggage compart
ment. Otherw ise, in an acc iden t or sud
den maneuver they cou ld fly forward,
causing injury to passenge rs i n the vehi·
cle .
What do I do now? 269
•
•
Page 282 of 304
280 Technical data
Technical data
Vehicle identification
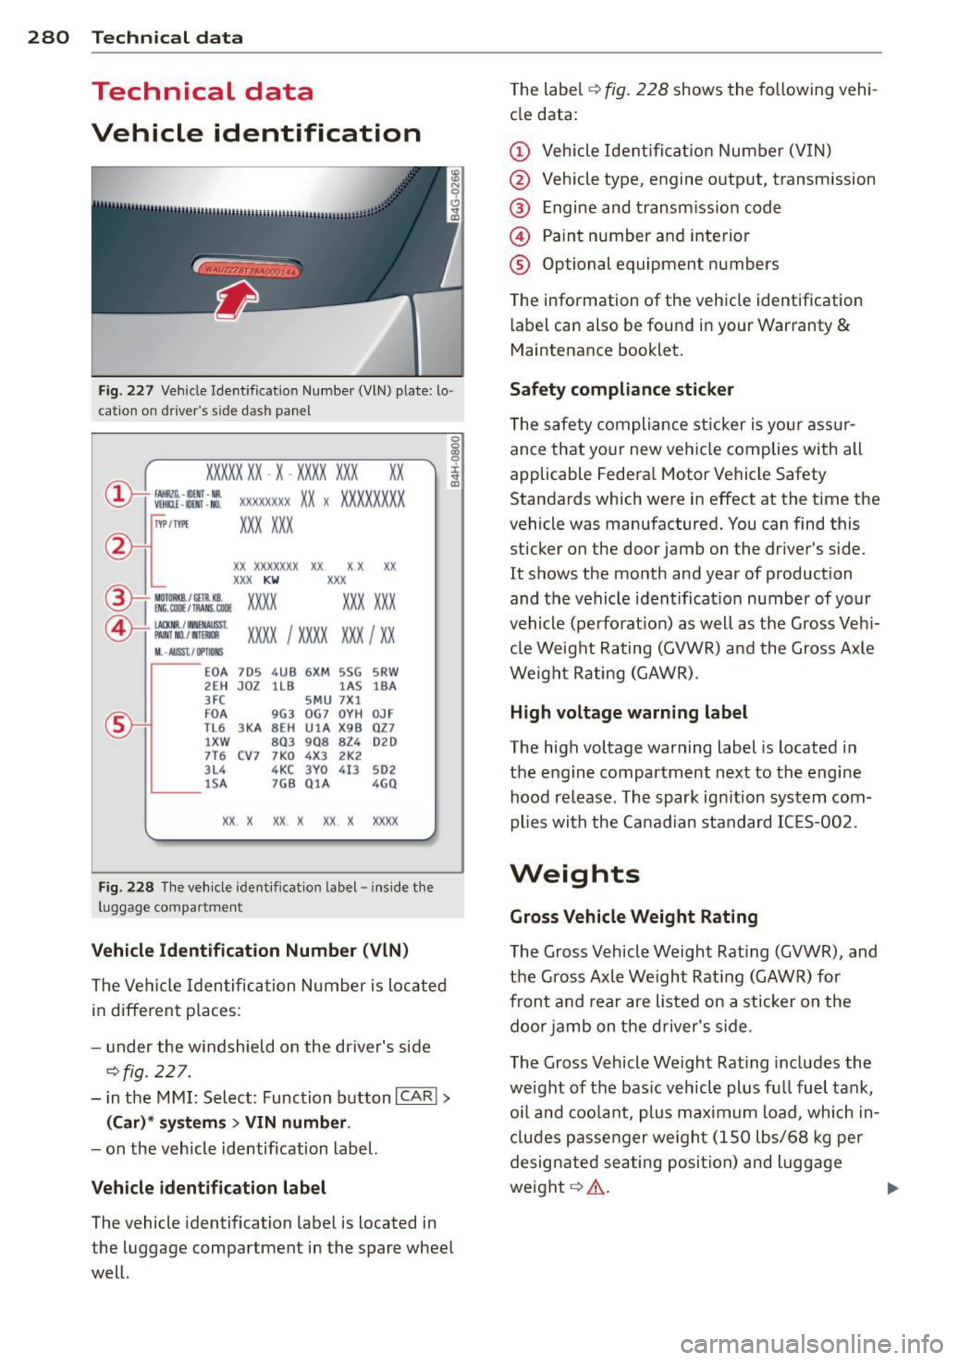
F ig. 227 Vehicle I dent ifica tion Numbe r (VlN) pla te: lo·
cat ion on driver 's side dash pane l
XXXXX XX · X -XXXX XXX xx
r,"\__l f~ -11!111 · NII. ~ V!Hlll -llllll . NO.
IYP IT'fl'E
XXXXXXXX XX X XXXXXXXX
XXX XXX
XX XXXXXXX XX X X XX
XXX
KW XXX
®i ~~:f :l~~ XXXX XXX XXX
@+ ~~r= XXXX I XXXX XXX I XX M ,. AIIISl./ lflllllS
EOA 7D5 4 UB 6XM SSG 5RW
2E H JDZ llB l AS lBA
3FC 5MU 7Xl
FO A
9G3 OG7 O
YH OJF
TL6 3
KA BEH
UlA X9B QZ 7
l XW
8Q3 9Q8 82 4 020
7T6 CV 7 7KO 4X3 2K2
3L4 4 KC 3YO 4I3 502
lS A 7GB Q1A 4GQ
XX X
XX X XX X XXXX
Fig. 228 Th e ve hicle identi ficat ion label -inside the
luggage co mpa rtmen t
Vehicle Id entification Number (VlN )
The Ve hicle Identific ation Number is located
in different p laces:
- under the w indshield on the driver's s ide
~fig . 227.
- in the MMI : Select: Function button ICAR I >
(Car )* systems > VIN number .
-on the veh icle identification label.
Vehicle identification label
The vehicle identification labe l is located in
the luggage compartment in the spare wheel
well. T
he label ~
fig. 228 shows the following vehi
cle data:
(D Vehicle Ident ificat io n Number (V IN)
@ . Vehicle type, engine o utput, transmission
® Engine and transm iss ion code
@ Paint number and inte rior
® Optional equipment numbers
T he information of the vehicle identification
label can also be found i n your Warranty
&
Maintenance booklet.
Safety compliance sticker
The safety compliance sticker is your assur
ance that yo ur new veh icle complies with all
applicable Federa l Motor Vehicle Safety
Standards which were i n effect at the time the
vehicle was manufactured. You can find this
sticker on the door jamb on the driver's side.
It shows the mo nth and year of production
and the vehicle ident ificat io n number of your
vehicle (perfo rat ion) as well as the Gross Ve hi
cl e Weig ht Rating (GVWR) a nd the Gross Ax le
Weig ht Rating (GAWR) .
High voltage warning label
The high voltage warning label is located in
the engine compartment next to the engine
hood re lease . The spar k ign it ion sys tem com·
plies wi th the Ca nadian standard IC ES-002.
Weights
Gross Vehicle Weight Rating
The Gross Vehicle We ight Rat ing (GVWR), and
the Gross Axle Weight Rat ing (GAWR) for
fron t and rear are listed on a sticker on the
doo r jamb on the d river's side .
The Gross Vehicle We ight Rat ing includes the
weight of the bas ic vehicle plus f ull fuel tank,
o il and coo la nt, plus max imum load, which in
cl udes p asse nger we igh t (150 l bs/68 kg per
designate d sea ting posi tion) an d luggage
weight ~&. - .,.
Page 286 of 304
28 4 Con sum er Inf ormation
comp lexity of today's automobi les, have
steadi ly reduced the scope of maintenance
and repairs which can be carried out by vehicle
owners.
Also, s afety an d e nvir onm ent al con
cerns place very strict limits on the nature of repairs and adjustments to engine and trans
miss ion pa rts which an owner can perform .
Maintenance, adjustments and repa irs usua lly
require special tools, testing devices and oth
er equipment avai lab le to specially trained
workshop personnel in order to assure proper
performance, reliab ility and safety of the vehi
cle and its many systems .
Improper ma intenance, adjustments and re
pa irs can impair the operation and reliab ility
of your vehicle and even void your vehicle war ranty. Therefo re , proof of servici ng in accord
ance w it h the ma intenance sched ule may be a
condition for upholding a possible warranty
claim made within the warran ty period.
Above all, operational safety can be adve rsely
affected, c reating unnecessary risks for you
and your passengers.
If in doubt about any serv icing, have it done
by your author ized Audi dealer or any other
p roperly equipped and qualified workshop .
We strong ly urge you to give your authorized
Audi dealer the opportunity to perform all
schedu led maintenance and necessary repairs .
Your dea ler has the facilities, or iginal parts
and tra ined spec ialists to keep your vehicle
running properly .
Performing lim it e d m aint en anc e y ourself
The fo llowing pages describe a limited num
ber of procedures which can be performed on
you r vehicle with ordinary too ls, shou ld the
need arise and trained personnel be unavaila
ble. Before performing any of these proce
dures, always thoroughly read all of the app li
cable text and ca refully follow the instruc
tions given. Always rigorously obse rve the
WARNINGS p rovided .
Before you ch eck anything in th e engin e
compartme nt, alway s read an d heed all WARNINGS
¢ & a
nd ¢ & in Working in the
engine comportment on page 224 .
A WARNING
--Serious personal in jury may occur as a re-
sult of improperly performed mainte nance, adjustments or repa irs.
- Always be extremely careful when work
ing on the vehicle. Always follow com
monly accepted safety pract ices and gen
eral common sense. Never r isk personal
in jur y.
- Do not attempt any of the maintenance,
checks or repairs descr ibed o n the fol
lowing pages if you are not fu lly fam iliar
with these or other procedures with re spect to the ve hicl e, or are uncerta in how
to proceed .
- Do not do any work withou t the proper
too ls and equipment . Have the necessary
work done by your authorized A udi deal
er or anothe r properly equipped and
qualified workshop.
- The engine compar tment o f any motor
vehicle is a potentially hazardous area. Never reach into the area around or
touch the rad iator fan. It is temperature
control led and can sw itch on suddenly -
even when the engine is off . The radiator
fan switches on automatically when the
coo lant reaches a ce rtain temperature
and will cont inue to ru n until the coo lant
tempera ture drops.
- Always sw itch off the ignition before any
one gets under the vehicle.
- Always support your veh icle with safety
s tands if it is necessary to work under
neath the vehicle. The j ack s upp lied with
the vehicle is not adequate for this pur
pose and cou ld co llapse causing serio us
pe rsonal injury .
- If you must work underneath the vehicle
wit h the wheels on the ground, a lways
make sure the vehicle is on leve l ground,
that the wheels are a lways secure ly
blocked and that t he engine cannot be
started .
Page 290 of 304
288 Index
A
Accessories ....... ......... ... .... . 285
Active lane ass ist . . . . . . . . . . . . . . . . . . . . 93
Activating and deactivating . . . . . . . . . . . 94
C leaning the camera area .. .. .. .. .. . 211
Description .............. .. .. .... .. 93
I nstrument cluster indicator light . . . . . 94
Messages . . . . . . . . . . . . . . . . . . . . . . . . . 94
Notes on instrument cluster display . . . . 94
Setting the steering wheel vibration . . . . 95
AC (automatic climate control) . .. .. .. .. 70
AC (climate control) . . . . . . . . . . . . . . . . . . 68
Adaptive air suspension/sport . ... .. .. . 100
Adapt ive cruise control . . . . . . . . . . . . . . . . 84
C leaning the senso r ....... .. .. .... . 211
Messages . . . . . . . . . . . . . . . . . . . . . . . . . 91
Request for driver intervention . . . . . . . . 89
Stop-and-go traffic . . . . . . . . . . . . . . . . . 88
Adapt ive Light (defective) ... .. .. .... .. 23
AdBlue .. .. .. .. . .......... .. .. .... . 220
Filling . .. .. ............... .. .... . 222
Messages in the instrument cluster dis-
play ... .. .. ... .... ...... .. .. .. .. . 22 1
Adding Engine coolant ........... .. .. .. .. . 232
Engine oil ................. .. .... . 229
Windshield washer fluid . ...... .. .. . 238
Additives Engine oil ............... .. .. .... . 229
Adjusting Air distribution (automatic climate con-
trol) . . . . . . . . . . . . . . . . . . . . . . . . . . . . . . 71
air distribution (climate control) ... .. .. 68
Front seats . . . . . . . . . . . . . . . . . . . . . . . . 52
Instrument illumination ..... .. .... .. 46
Steering column electrically .. .. .... .. 73
Steering column manually ... .. .. .. . . 73
Temperature (automat ic climate control) 71
Temperature (climate control) .... .. .. 68
Airbag system . . . . . . . . . . . . . . . . . 147, 168
Advanced Airbag System ... .. .. .... . 151
Advanced Airbag System components . 155
Care ..... .. ................ ... ... 163
Children ... ... .... ...... .. .. .. .. . 175
Ch ild restraints ........... .. .. .. .. . 175
Components (front airbags) .. .. .. .. . 155 Danger of fitting a chi
ld seat on the front
passenger seat ... ................ . 149
Disposa l .. .. .. .. ................ . 163
Front airbags . . . . . . . . . . . . . . . . 151, 153
How do the front airbags work? .. .... 157
How many airbags does my vehicle
have? ...... .. .. .. ...... ....... .. 155
How the Advanced Airbag System com-
ponents work together ......... .. .. 157
Important safety instructions on the
knee airbag system ................ 166
Important things to know ....... .. .. 147
Knee airbags ..... ................ . 164
Monitoring .... .. ............. .... 159
PASSENGER AIR BAG OFF light ... .... 160
Repairs ... .... .. ............. .... 163
Safety instructions ................. 162
S ide airbags ... .. ....... ...... .. .. 167
S ide curtain airbags ... ...... ... .. .. 170
Warning/ind icator lights ........ .. .. . 19
Warning/Indicator lights ....... .. .. 159
When must the system be inspected? 159
Aircraft Transporting your vehicle
Alcantara 278
Cleaning .. .... .. ............. .... 213
All-wheel drive .... ................ . 198
Winter tires ..... ................ . 255
Alternator . . . . . . . . . . . . . . . . . . . . . . . . . . 17
Ambience lighting .............. .... . 46
Anti-freeze
refer to Engine coolant ............ . 231
Anti-lock braking system ............. 194
Warning/indicator lights . . . . . . . . . 19, 20
Anti-slip regulation ............. .. .. 194
Warning/indicator lights ..... ... .. .. . 19
Anti-theft systems Electronic immobilizer ............... 33
Ashtray .... .... ................... . 58
Audi braking guard
refer to brak ing guard ............. .. 84
Audi drive select
refer to drive select ............ .... 100
Audi Serv ice Repair Manuals and Litera-
tu re .............................. 283
Page 291 of 304
Index 289 ____________________________ ...:.:..:.=.:::.::.:
AUTO
automatic climate control . ... .. .. .. .. 71
Automatic headlights .... ... .. .. .. .. 43
climate control . . . . . . . . . . . . . . . . . . . . . 68
Auto Lock . . . . . . . . . . . . . . . . . . . . . . . . . . 34
Automatic belt retracto r ..... ...... .. 141
Automatic climate control Air vents ................ ...... .... 71
A t t· . l . u oma 1c recircu at1on . . . . . . . . . . . . . . 72
Operation . . . . . . . . . . . . . . . . . . . . . . . . . 70
Setup . .. ...................... ... 72
synchron izing ................... ... 71
Automatic Sh ift Lock (ASL) .. .. .. .. .. . 108
Autom atic t ransmission .............. 107
Automatic S hift Lock (ASL) ... .. .. .. . 10 8
D riving .... .. .... .... ... .. .. .. ... 109
Emergency mode . ..... ... .. .. .. .. . 1 12
Emergency release ........ .. .. .. .. . 113
Kick-down .. ............. .... .. ... 112
Manual s hift program .............. 111
Selector lever ..................... 107
Automatic wipe rs ... .... ... .. .. .. .. .. 48
Auto Safety Hotline ........ .. .. .. .. . 136
Average consumption ................. 25
Average speed . . . . . . . . . . . . . . . . . . . . . . . 25
Avo id damag ing the vehicle .. .. .. .. .. . 203
B
Ba ttery . .. .. .. .. .............. ... . 235
Cha rging ......................... 237
Impor tant war nings ...... .. .. .. .. . 235
J ump starting . ........... .. .. .. ... 274
L o cat ion . .. ............. .... .. ... 235
l ow . .. .. .. .... ............. .. .. . 199
Replacing the ba ttery .. ... .. .. .. .. . 238
State of charge . ... .... ... .. .. .. ... 199
Winte r operation . ..... ... .. .. .. .. . 235
Working on the battery ............. 235
B efore dr iving . . . . . . . . . . . . . . . . . . . . . . 128
Blended gasoline . ................ .. 215
Blower (automatic climate contro l) . . . . . . 71
B lower (climate control) . . . . . . . . . . . . . . . 68
Booster seats ............. .... .. ... 182
B rake fl uid
C hanging the brake fluid ... .. .. .. .. . 234
Chec king the brake fluid level ... .. .. . 234 What
is the correct bra ke fluid level? . . 234
What shou ld I do if the brake fluid wa rn -
i ng light comes on? .. .. ..... ... .. .. 234
B ra ke system
An ti-lock b rak ing system ........ .... . 20
B ra ke assis t sys tem .. ... .... ... .. .. 194
B rake booster . ...... .. .. ..... ... .. 197
Brake fluid . ... .. .. .. .. ...... ... .. 234
Brake fluid specifications for refill and re-
placeme nt .. .. .. ................. 234
B rake light defective . . . . . . . . . . . . . . . . 23
B ra ke pads .. .. .. .. . .. .... ...... .. 201
El ectromechan ica l pa rking brake ...... 77
Fl uid reservo ir ... ................. 234
H ow does moist ure or ro ad sal t affec t the
brakes? . . . . . . . . . . . . . . . . . . . . . . . . . . 196
Warning/ind icator lights ..... ... .. .. . 15
Wor n brake pads symbo l ..... ... .. .. . 21
braking gua rd
Settings .......................... 91
B rak ing guard . .. .. .... ....... ....... 84
Messages ......................... 91
Break-in per iod . ..... . .. .. ..... ... .. 201
Brake pads .. .. .. ................. 201
r ires ....... .. ...... ............ .
Bul bs . ... .. .. .... .. . .. .. ..... ... . .
C
201
273
Cali for nia Pr oposition 65 War ning . .. .. 22 S
B attery spe cific .. .... ...... ..... .. 236
Capacities ......................... 281
E ngine oil ... .. .. .. . .. .... ...... .. 226
Carbon parts
Cleaning . . . . . . . . . . . . . . . . . . . . 212, 213
Car car rier
T ranspo rting your vehicle .... ... .. .. 278
Care .......... .... ................ 210
Cargo area . . . . . . . . . . . . . . . . . . . . . . . . . 134
Cargo ne t . . . . . . . . . . . . . . . . . . . . . . . . . . . 6S
Catalytic converter 202
Center armrest
Cockpit ... .. .. .. ................. . 55
Central lo cki ng .. .. .... ............. . 34
E mergen cy lo ckin g ............. .. .. . 38
Ce rtif ication . . . . . . . . . . . . . . . . . . . . . . . 286
Changing a wheel .... . .. ..... ... .. .. 263
•
•
Page 298 of 304
29 6 Index
Q
quattro
refer to All-wheel drive
198
Question What happens to unbe lted occupants? 139
Why safety be lts? . ....... .. .. .. .. . 138
R
Radiato r fan ... ........ ..... .. .. .. . 233
Radio clock .... ........ ..... .. .. .. .. 28
Ra in/light sensor
Headlights ........... ... .. .. .... .. 43
Intermittent (windshield wipers) .. .. . . 48
Senso r defective . . . . . . . . . . . . . . . . . . . . 23
Range (fuel leve l) .......... ...... .. .. 25
Reading lights ... ... .... ... ... ... .. .. 46
Rear fog lights .. .. ..... ... .. .. .... .. 43
Rear lid Emergency release . . . . . . . . . . . . . . . . . . 39
E scape hand le .................... 261
Opening and closing . ... .. .. .. .... .. 38
Rear light Defective . . . . . . . . . . . . . . . . . . . . . . . . . 23
Rear view camera
refer to Parking systems . . . . . . . 115, 116
Rear view mir ror ... ..... ... .. .. .... .. 51
Rear w indow heating (automat ic cl imate
contro l) . . . . . . . . . . . . . . . . . . . . . . . . . . . . 7 1
Rea r window heating (climate control) . . . 69
Recirculation mode (automatic climate
control) . . . . . . . . . . . . . . . . . . . . . . . . . . . . 70
Recirculation mode (climate control) . . . . 68
Refue lling . ...... ........... .. .. .. . 218
Remote control Garage door opener (HomeL ink) ... .. . 126
Unlocking and locking ... .. .. .. .... .. 35
Remote rear lid release ..... .. .. .. .. . . 38
Repair manuals ............ .. .. .. .. . 283
Repai rs
Airbag system . ....... ... .. .. .... . 163
Replacing Fu ses .. .. ............... .... .... . 270
L ight bulbs ... ........... .. .. .. .. . 273
Tires and whee ls .... ... .. .. .. .... . 252
Windshield wiper blades ... .. .. .... .. 49 Reporting Sa
fety Defects . ..... .... . .. 136
Reset button . . . . . . . . . . . . . . . . . . . . . . . . 2 7
Retractor . .. .. .. .. ... .......... .... 141
Rims Cleaning .. .... .. .. ... ..... ... .. .. 211
Roof rack ....... .................. .. 61
Load ing .... ... .................. .. 62
Roof weight ... .. ............. .... . 62
s
SAFE ......... .... ............... .. 27
Safe driving habits .............. .... 128
Safety be lt pos ition . . . . . . . . . . . . . . . . . 142
Sa fe ty be lt height adjus tment ... .. .. 144
Safety be lts worn by pregnant women . 143
Safety be lt pretensioner . . . . . . . . . . . . . . 145
Se rv ice and disposal ........... .. .. 145
Safety belt pretensioners
Pre sense ... .. .. ...... .... ... ... .
Safety be lts ..... .. .. .... .... ... .. . .
Cleaning
Danger to passengers who do not wear a 192
141
212
sa
fety belt .. .. .. ............. .... 139
Fastening ... ... . ... ... .... ... .. .. 141
Height adj ustment ................ . 144
Improperly worn ................. . 144
Not worn . .... .. ............. .... 139
Safety be lt pos ition . . . . . . . . . . . . . . . . 142
Safe ty instr uctions . . . . . . . . . . . . . . . . . 141
Securing child safety seats .. .. .. .. .. 184
Special considerations for pregnant
women . . . . . . . . . . . . . . . . . . . . . . . . . . 143
U nfastening ... ... ................ 143
Warning/ind icator light ............. 138
w . l" h arnmg 19 t . ... .. ... ....... ... .. . 17
WhyYOUMUSTwearthem .......... 138
Worn p roperly 140
Safety belt tens ioner
drive select .... .. ............. .... 100
Sa fety belt warning light .... ... .. .. .. 138
Safety comp liance sticker ........... . 280
Safety eq uipment ............... .... 128
Safety featu res for occ upant rest ra in t and
protection .. .. .. .. ... .......... .... 128
Safety gu idelines
Seat ad justment . . . . . . . . . . . . . . . . . . . . 52
Page 300 of 304

298 Index
Steering
Electrically adjustable steering whee l 73
Manually ad justab le steer ing whee l .. . . 73
also refer to E lectro-mechanical power
assis t ... .... ............. .. .... . 198
Steering whee l
Easy entry feature . . . . . . . . . . . . . . . . . . 7 4
Indicator light . . . . . . . . . . . . . . . . . . . . . 18
Steer ing whee l heating .... .. .. .. .. . . 72
S teer ing whee l co lumn
Adjusting e lectr ica lly . .... ... .. .. ... . 73
Adjusting manually .. ... .. .. .... .. . . 73
Steer ing whee l w ith t ipt ronic . .. .. .. .. . 111
Steps for determining correct load lim it . 249
Stopping the engine ..... ... .. .. .... .. 75
Storage ... .. ... ... ... .. .. .. .. .. .. .. 59
S tronic transmission Launch Contro l Program ... .. .. .. .. . 112
S t ron ic (automatic t ransm ission) . .... . 107
Sunroof ... .. ................ ... ... . 41
Sun shade Rear window ............... .. .... .. 4 7
Side doors ............... .. .. .... .. 47
Sun visors ... ... ... ...... .... ..... .. 47
Symbols
refer to Warning/ind icator lights .. .... 12
T
Tachometer . . . . . . . . . . . . . . . . . . . . . 12, 24
Tail lights Clean ing ... .. ... ..... ... .. .. .. .. . 211
TD ! clean d iese l
refer to Ad Blue ........... .. .. .. .. . 220
Technical data ................ ... ... 280
Tec hnical modifications ... .. .. .. .... . 286
Temperatu re d isplay ........ .. .. .. .. .. 24
Tether anchors ............ .. .. .. .. . 190
Tether strap .. .... ..... ... .. .. .... . 190
Textiles Cleaning . .. ... .......... .. .. .. .. . 213
The first 1,000 miles (1,500 km) and after-
wards . .. .. .. ............... .. .... . 201
Three-zone climate control . ... .. .. ... . 68
Tie-downs . . . . . . . . . . . . . . . . . . . . . 65 , 135
Tips for the env ironment
Saving fue l . . . . . . . . . . . . . . . . . . . . . . . . 62 t
iptron ic (automatic t ransmission) 107, 111
Tire pressure ...... ................ . 246
Tire pressure monitoring system ... .. .. 258
Loss of air pressure ............ .... 259
Malfunction . .. .. .. .. ...... ... .. .. 259
Resetting t ire pressures .... ...... ... 260
Tires .. ... .. .. .. .. .. ... .. ..... ... .. 240
Service life .... .. ............. .... 250
Speed rating let ter code ...... .. .. .. 252
Tire manufacturing date ........ .. .. 252
Tire specif ications .......... ...... . 252
Tread depth . .. .. .......... ...... . 250
Un iform tire quality grading ..... .. .. 254
Winter tires . .. .. .. ........... .. .. 255
Tires and veh icle load limits ....... .. .. 248
Tires and wheels Checking tire pressure .. ... ... .. .. .. 246
Co ld tire inflation pressure ...... .... 244
Dimens ions .... .. ............. .... 251
General notes .. .. ............. .... 240
G lossary of tire and loading terminolo -
gy . .. ... ... .. .. .. ... ... ... .. .. .. 241
Low aspect ratio tires .. ...... ... .. .. 257
New t ires and whee ls ............. .. 251
Replac ing . .. .. .. ... .......... .... 252
Snow cha ins ... .. .. .... .... ... .. .. 256
Tires and vehicle load limits ... ... . .. 248
Whee l bolts ..... .. ... ..... ... .. .. 257
Winte r tires ... .. ............. .... 255
T ire service life .. .. ............. .... 250
Too ls .. ..... ... .. ..... ........... . 262
T orn or frayed safety belts ... ... .. .. .. 141
T owing
T ow t ruck p rocedu res ........... .... 276
TPMS Tire pressure monitoring system ..... 259
Trai ler towing ..... ... .. ..... .... . .. 206
Operating instr uctions ........ .. .. .. 206
Parking system . .. ... .......... .. .. 125
Technical requirements . . . . . . . . 206, 207
Tra iler tow ing tips .......... ...... . 208
T rai n (transporting your vehicle) ... .. .. 278
T ransmission .. .. .. ... .......... .... 10 7
Transmission malfunction ( indicator
li ght) .. ... ... .. .. ... .. .. ... ..... ..
112
Transpo rt Canada . . . . . . . . . . . . . . . . . . . 136
T ranspo rting your vehicle ....... .. .. .. 278
Page 301 of 304
Tread Wear Indicator (TWI) . ... .. .. .. . 250
Trip odometer .................. .... . 27
What does it mean whe n DEF appears in
the trip odometer d isp lay? . .. .. .. .. .. 27
T runk
refer to Luggage compartment . . . . . . . . 63
Trunk escape hand le ..... ... .. .. .. .. . 26 1
Trunk lid
refer to Rear lid . . . . . . . . . . . . . . . . . . . . 38
T urn signa ls .. .................. .... . 45
War ning/ indicator lights . .. .. .. .. .. .. 24
u
Un fasten ing sa fety be lts 143
Unidirectiona l tires . ..... ... .. .. .. ... 240
Uniform t ire quality grading ..... . ... . 254
Unlock ing
Power locking switch . . . . . . . . . . . . . . . . 3 7
Remote control ....... ... ...... .. .. 35
Using the key ............... .... ... 37
V
Va let park ing . .... ......... .... .. .. .. 41
Vanity mirrors . ..... .. .... ... .. .. .... 47
Vehicle care/cleaning . ........... .. .. .. .. . 210
Vehicle electrical system .... .. .. .. .. .. 17
Vehicle ident ificat ion labe l ... .. .. .. .. . 280
Vehicle Identification Number (VIN) .... 280
Vehicle jack . . . . . . . . . . . . . . . . . . . 262, 266
Vehicle literature . . . . . . . . . . . . . . . . . . . . . 5
Vehicle shutt-down ......... .. .. .. .. . 203
Vehicle transport ....... ... .. .. .. .. . 278
Vent ilation .................. .... ... 67
Viny l
C leaning . .. .. .. ......... .. .. .. ... 213
w
Warn ing/ indicator lights .... .. .. .. .. .. 12
A irbag system ........... .... .. .. .. 19
Anti-lock braking system (ABS) .. .. .. .. 20
Brake system .... .. ...... .. .. .. .. .. 15
Cruise control . . . . . . . . . . . . . . . . . . . . . . 24
Elect romechanica l park ing brake ...... 1 6
E lect ronic power co ntro l . . . . . . . . . . . . . 2 1
Inde x 299
Electronic Stabilizat ion Cont ro l (ESC) . .. 19
Generator . . . . . . . . . . . . . . . . . . . . . . . . . 17
G low p lug system . . . . . . . . . . . . . . . . . . 21
Instrument cluster . . . . . . . . . . . . . . . . . . 11
Malfunc tion Ind icator Lamp (MIL) .. .. . 21
Safety be lt . . . . . . . . . . . . . . . . . . . . . . . . 17
T urn signals ... .. .. . .. .... .... .. .. . 24
Warning/I ndicator lights
Airbag system . . . . . . . . . . . . . . . 159, 160
PASSENGER AIR BAG OFF ........... 160
Warranty coverages .. . .. .. ..... ... .. 283
Washe r reservo ir ... ...... .......... 238
Wear indicator .. .. ................. 250
Weights .... .. .. .. .. .. ........... .. 280
What happens if you wear your safety belt
too loose? .. .. .. .. .. . .. .... .... .... 142
What happens to unbe lted occupants? . . 139
Wha t impai rs d riving safety? ...... .. .. 129
What should I do after changing a
whee l? ........ ... .. ............... 247
What shou ld I do after replacing whee ls? 247
Whee l bolts
T o rque .. .. .. .. .. .... ........... .. 257
Wheels ...... .. .... .......... ..... 240
Checking t ire p ressure ......... .... . 246
Cleaning ........ .. ............... 211
Co ld tire inflatio n pressure ...... .. .. 244
General notes .. .. .... ........... .. 240
G loss ary of tire and loading term inolo -
gy .. ... .. .. .... .. . .. .. ..... ... .. 241
New ti res and wheels . .. ..... ... .. .. 251
Tires and veh icle load limits ....... .. 248
When must a safety be lt be replaced? .. 141
When must the a irbag system be inspect-
ed? ........... ... .. ............... 159
When should I adjust the tire pressures? 247
When should I che ck t he ti re p ressu res?. 24 7
Where are lower anchorages located? . .. 188
Where can I find the t ire press ures fo r my
ca r? .. ... .. .. .... .. . .. .. ..... ... .. 246
Why safety belts? . . . . . . . . . . . . . . 138, 139
Windows Cleaning/removing ice . ...... ... .. .. 212
defrosting (automatic climate control) . 71
defros ting (cl imate control) . . . . . . . . . . 69
•
•