AUDI A6 2015 Workshop Manual
Manufacturer: AUDI, Model Year: 2015, Model line: A6, Model: AUDI A6 2015Pages: 314, PDF Size: 77.57 MB
Page 51 of 314
M N
0 <.J 'SI: ,...., \!) 1.1'1 ,...., 1.1'1 ,....,
rain sensor function. Check your
windshield wiper b lades regularly.
- The washer fluid nozzles of the wind
sh ield washer system are heated at low
temperatures when the ignit ion is on .
- When stopping temporarily, e .g . at a
traffic light , the set speed of the wind
shield wipers is automatically red uced by
one speed.
Cleaning windshield wiper blades
Clean the wind shield wiper bl ades when they
begin to leave streaks . Use a soft cloth and
glass cleaner to clean the windsh ield wiper
b lades.
.,. Pl ace the wind shield wiper arm s in the serv
ice position . Refer to ¢
page 49.
.,. Lift the w iper arm away from the front win
dow.
_& WARNING
Dirty w indshie ld w iper blades can imp air
your view. This can lead to accidents.
Replacing windshield wiper blades
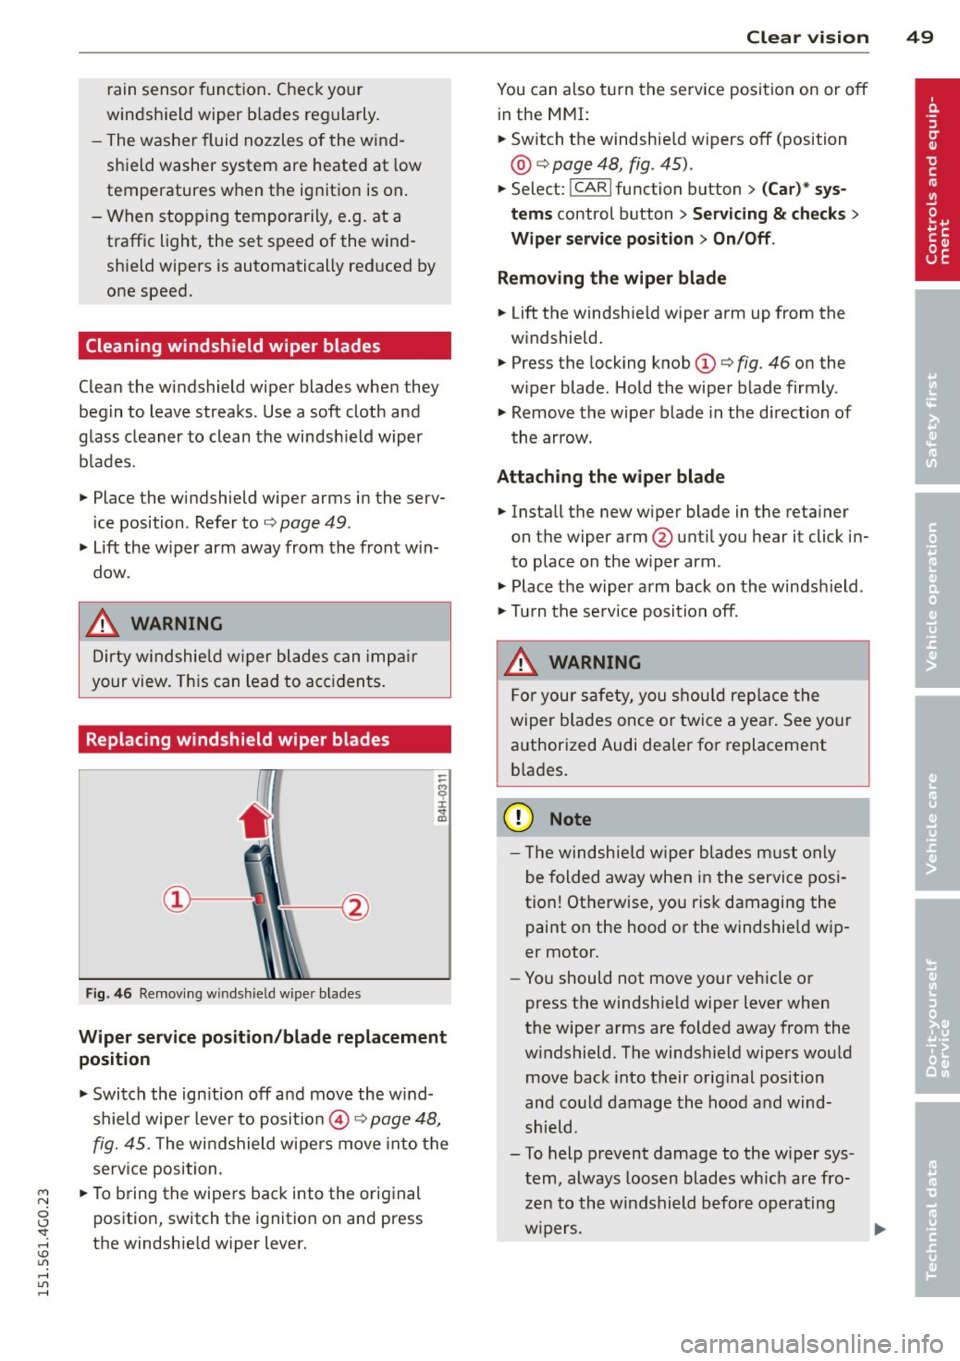
Fig. 46 Re movi ng winds hield w ipe r blade s
-
Wiper ser vice position /blade replacement
position
.,. Switch the ign ition off and move the w ind
shield wipe r lever to posit io n @ ¢
page 48,
fig. 45. The windshield wipers move into the
service position.
.,. To b ring th e wipe rs back into the original
position, switch the ignition on and press
the windshie ld wipe r lever.
Clear v is ion 49
You can also t urn the se rv ice position on or off
in the MMI:
.,. Switch the windsh ie ld wipers off (position
@ ¢ page 48, fig. 45) .
.,. Select: !CAR ! function but ton> (Car )* sy s
tem s control button > Servicing & check s >
Wiper service po sition > On /Off .
Remo ving th e wiper bl ade
.,. Lift the windsh ie ld wipe r arm up from the
w indshield.
.,. Press the locking knob
(D ¢ fig. 46 on the
w iper blade. Hold the wiper blade firmly .
.,. Remove the wiper blade in the direction of
the arrow .
Attaching the wipe r blade
.,. Install the new wiper blade in the reta iner
on the wipe r arm @unti l you hear it click in
to place on the w iper arm .
.,. Place the w iper arm back on the windshield .
.,. Tu rn the se rvice position off.
_& WARNING
-
F or your safety, you s hou ld rep lace the
wiper b lades once or twice a yea r. See your
authorized Audi dea ler for replacement
b la d es .
Q) Note
- Th e windsh ie ld wiper b lades must only
be folded away when in the service posi
tion! Otherwise, yo u ris k damaging the
paint on the hood or the windshie ld wip
er motor.
- Yo u should not move your vehicle or
press the windshield wiper lever when
the wiper arms are folded away from the
w indshield . The windsh ield wipers wou ld
move back into their original position
and could damage the hood a nd wind
shield .
- To help prevent damage to the w iper sys
tem, always loosen blades w hich are fro
zen to the windshield before operating
w ipers. ..,.
Page 52 of 314
50 Clear vision
-To help prevent damage to wiper blades,
do not use gasoline, kerosene, paint
thinner, or other solvents on or near the
wiper blades.
- To help prevent damage to the wiper
arms or other components, do not at
tempt to move the wipers by hand.
@ Tips
- Commercial hot waxes applied by auto
matic car washes affect the cleanability
of the windshield .
- You can also use the service position, for
example, if you want to protect the
windshield from icing by using a cover .
- You cannot activate the service position
when the hood is open.
Mirrors
Adjusting the exterior mirrors
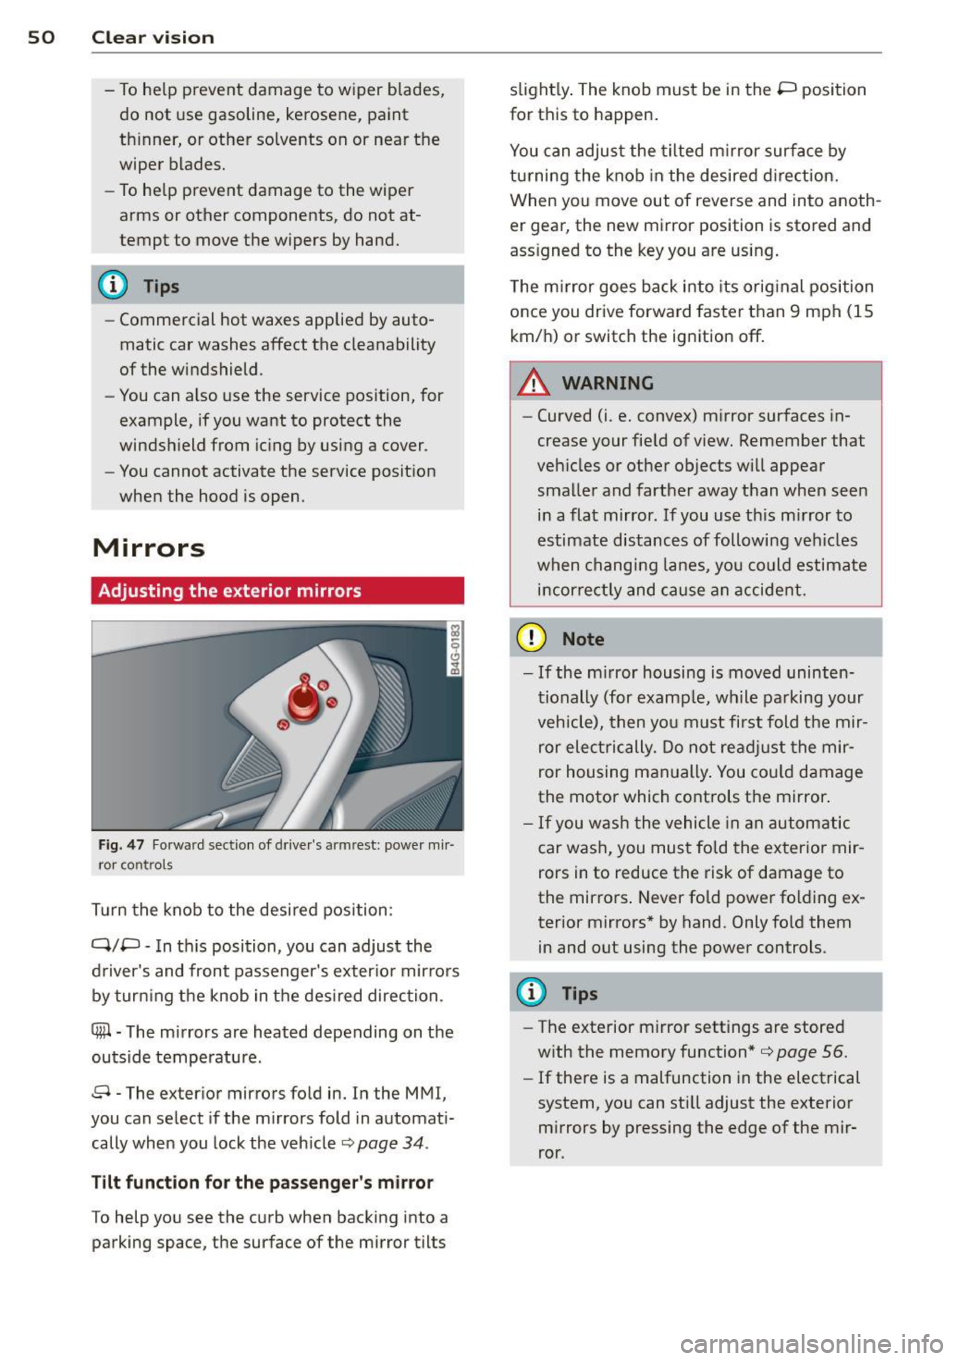
Fig . 47 Fo rw ar d sect ion of driver's a rmrest: power mir
r or co ntrols
Turn the knob to the desired position :
Q/P -In this position, you can adjust the
driver's and front passenger's exterior mirrors
by turning the knob in the desired direction .
4ill-The mirrors are heated depending on the
outside temperature .
8 -The exterior mirrors fold in. In the MMI,
you can select if the mirrors fold in automati
cally when you lock the vehicle ¢
page 34.
Tilt function for the passenger's mirror
To help you see the curb when backing into a
parking space, the surface of the mirror tilts slightly.
The knob must be in the P position
for this to happen.
You can adjust the tilted mirror surface by
turning the knob in the desired direction.
When you move out of reverse and into anoth
er gear, the new mirror posit ion is stored and
assigned to the key you are using.
The mirror goes back into its original position
once you drive forward faster than 9 mph (15
km/h) or switch the ignition
off.
.&_ WARNING
--
-Curved (i.e. convex) mirror surfaces in-
crease your field of view. Remember that
vehicles or other objects will appear
smaller and farther away than when seen in a flat mirror. If you use this mirror to
estimate distances of following vehicles
when changing lanes, you could estimate
incorrectly and cause an accident.
(D Note
-If the mirror housing is moved uninten
tionally (for example, while parking your
vehicle), then you must first fold the mir
ror electrically. Do not readjust the mir
ror housing manually. You could damage
the motor which controls the mirror.
- If you wash the vehicle in an automatic
car wash, you must fold the exterior mir
rors in to reduce the risk of damage to
the mirrors. Never fold power folding ex
terior mirrors* by hand . Only fold them
in and out using the power controls.
(D Tips
- The exterior mirror settings are stored
with the memory function*¢
page 56.
-If there is a malfunction in the electrical
system, you can still adjust the exterior
mirrors by pressing the edge of the mir
ror.
Page 53 of 314
M N
0 I.J "". rl I.O
"' rl
"' rl
Dimming the mirrors
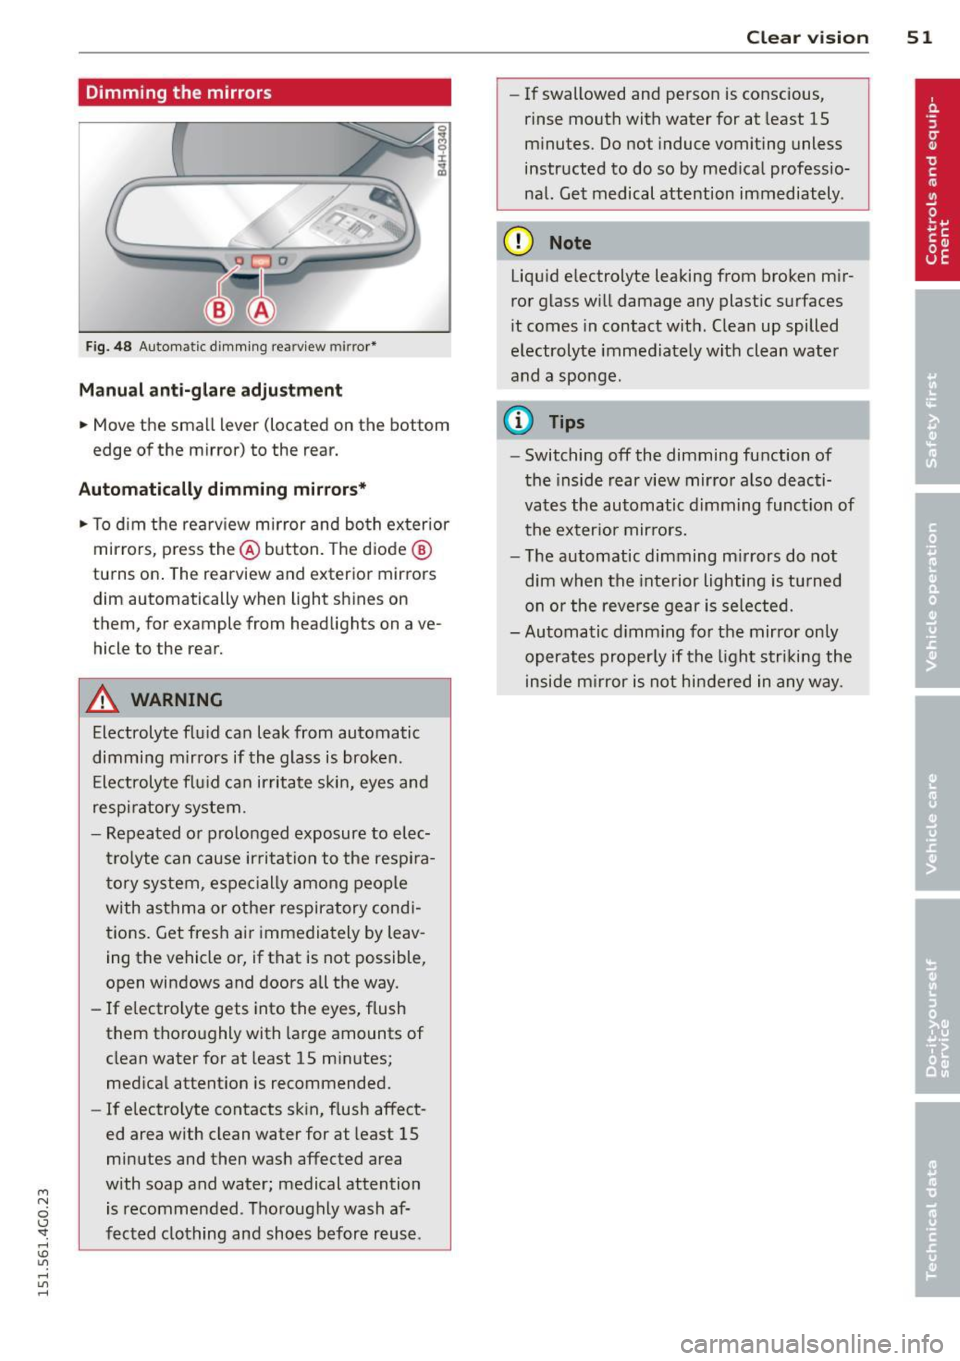
Fig. 48 Automatic dimming rearview mirro r*
Manual anti-glare adjustment
.. Move the small lever (located on the bottom
edge of the mirror) to the rear.
Automatically dimming mirrors* .. To dim the rearview mirror and both exterior
mirrors, press the @button. The diode @
turns on. The rearview and exterior mirrors
dim automatically when light shines on
them, for example from headlights on ave
hicle to the rear.
&_ WARNING
Electrolyte fluid can leak from automatic
dimming mirrors if the glass is broken.
Electrolyte fluid can irritate skin, eyes and
respiratory system.
- Repeated or prolonged exposure to elec
trolyte can cause irritation to the respira
tory system, especially among people
with asthma or other respiratory condi
tions. Get fresh air immediately by leav
ing the vehicle or, if that is not possible,
open windows and doors all the way.
- If electrolyte gets into the eyes, flush
them thoroughly with large amounts of
clean water for at least 15 minutes;
medical attention is recommended.
- If electrolyte contacts skin, flush affect
ed area with clean water for at least 15
minutes and then wash affected area
with soap and water; medical attention
is recommended. Thoroughly wash af
fected clothing and shoes before reuse.
Clear vision 51
- If swallowed and person is conscious,
rinse mouth with water for at least 15
minutes. Do not induce vomiting unless
instructed to do so by medical professio
nal. Get medical attention immediately .
(D Note
Liquid electrolyte leaking from broken mir
ror glass will damage any plastic surfaces
it comes in contact with . Clean up spilled
electrolyte immediately with clean water
and a sponge.
@ Tips
- Switching off the dimming function of
the inside rear view mirror also deacti
vates the automatic dimming function of the exterior mirrors.
- The automatic dimming mirrors do not
dim when the interior lighting is turned
on or the reverse gear is selected.
-Automatic dimming for the mirror only
operates properly if the light striking the
inside mirror is not hindered in any way.
Page 54 of 314
52 Seat s a nd s tor ag e
Seats and storage
General recommen
dations
Why is your seat adjustment so
important?
The safety belts and the airbag system can
only provide maximum protection if the front
seats are correctly adjusted.
There are various ways of adjust ing the front
seats to provide safe and comfortable support
for the driver and the front passenger . Adjust
you r seat prope rly so that :
- you can easily and quick ly reach all the
switches and controls in the instrument
panel
-your body is prope rly supported thus reduc
ing physical stress and fatigue
- the safety be lts and a irbag system can offer
maximum protection
¢ page 145 .
In the following sec tions, you will see exactly
how you can best adjust you r seats .
There are special regulations and instructions
for insta lling a child seat on the front pas
senger's seat. Always fo llow the information
regarding ch ild safety provided in
q page 171, Child Safety .
A WARNING
Incorrect seating position of the dr iver and
all other passengers can result in serious
personal in jury.
- Always keep your feet on the floor when
the vehicle is in motion -never p ut your
feet on top of the instrument panel, out
of the w indow or on top of the seat cush
ion . Th is applies especially to the passen
gers .
If your seating position is incorrect,
yo u increase the r isk of injury in the case
of sudden braking or an a ccident.
If t h e
a ir bag infla tes and the se ating position
is inco rre ct, this could resul t in personal
injury o r even death.
- It is import ant for both the driver an d
front passenger to keep a distance of at least 10 inches (25 cm) between them
selves and the steering wheel and/or in
strument panel. If you're s itting any
closer than th is, the a irbag system can
not protect you properly . In addition, the
front seats and head restraints must be
adjusted to your body height so that they
can give you max imum protect ion.
- Always try to keep as much distance as
possible between yourself and the steer
ing wheel o r inst rument pane l.
- Do not adjust the driver's o r front pas
senger's seat whi le the vehicle is moving.
Your sea t may move unexpected ly, caus
ing sudden loss of vehicle cont rol and
personal injury . If yo u adjust yo ur seat
while the veh icle is moving, yo u are out
of posit ion.
Driver's seat '
The correct seat position is important for safe
and relaxed driving.
We recommend tha t you adjus t the dr iver's
seat in the fo llowing manner :
.,. Adjust t he seat in fore and aft direction so
t ha t you can eas ily push the peda ls to the
floor w hile keeping your knees sl igh tly bent
q A in Why is your seat adjustment so im
portant? on page 52.
.. Adjust the backrest so that when you sit
w ith your back against t he backrest, you can
still grasp the top of the steering wheel.
.. For adjustab le head restra ints: adjust the
head restra int so the upper edge is as eve n
as poss ible with the top of your head. If that
is not possible, try to adjust the head re
s train t so that it is as cl ose to this position
as poss ible
q page 55 . Move the head re
straint so that it is as close to the back of
the head as possib le .
A WARNING
-
Never place any objects in the dr iver's foot-
well. An object could get into the pedal
area and interfere with pedal function . In
Page 55 of 314
case of sudden braking or an accident, you
would not be ab le to brake or accelerate.
Front passenger's seat
Always move the front passenger seat into the r earmost position.
To avo id contact with the airbag whi le it is de
p loying, do not sit a ny closer to the inst ru
ment panel than necessary and always wear
the three-point safety be lt provided adjusted
correctly . We recommend that you adjust the
passenger's seat in the following manner :
• Br ing the backr est up to an (a lmost) upright
position. Do not ride with the seat reclined.
• For adjustable head restraints : adjust the
head restrain t so the upper edge is as even
as possible with the top of your head . If that
is not poss ible, try to adjust the head re
stra int so that it is as close to th is position
as possible ¢
page 55. Move the head re
stra int so that it is as close to the back of
the head as possible.
• Place your feet on the floor in front of the
passenger's seat.
Front seats
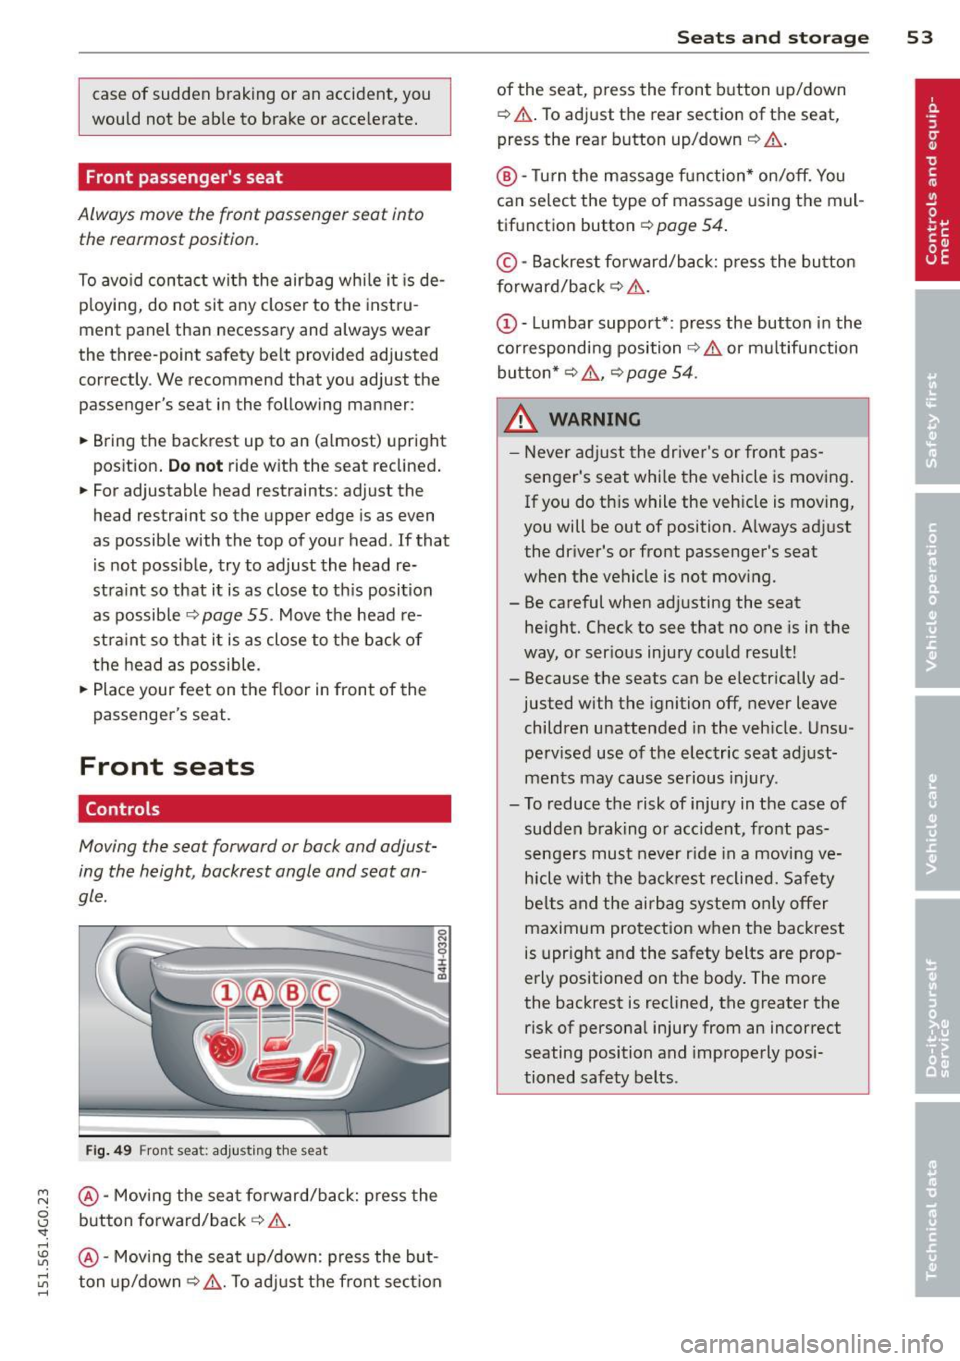
Controls
Moving the seat forward or bock and adjus t
ing the height , backrest angle and seat an
gle .
Fig. 4 9 Fron t seat : adju sting the sea t
~ @-Moving the seat forward/back: press the
0 1.J button fo rward/back ¢ .&. .
"". rl
:5: @-Moving the seat up/down: press the but-
5 ton up/down ¢,&. . To adjust the front sect ion
S ea ts a nd s to rage 53
of the seat, p ress the front b utton up/down
~ .&. .To adjust the rear section of the seat
'
press the rear button up/down~,&. .
®-Tu rn the massage function* on/off. You
can se lect the type of massage using the mul
tif unction button
~ page 54 .
©-Backrest forward/back: press the bu tton
forward/back ¢ .&. .
(D -Lumbar support* : press the button in the
corresponding position¢.&. or multifunction
button* ¢.&. , ¢
page 54 .
.&, WARNING
-Never adjust the drive r's or front pas
senger's seat whi le the vehicle is moving .
If you do th is while the veh icle is moving,
you will be out of position. A lways adjust
the driver's or front passenger's seat
when the vehicle is not mov ing.
- Be careful when ad justing the seat
height. Check to see t hat no one is in the
way, or serious injury cou ld result!
- Because the seats can be e lectrically ad
justed with the ignition off, never leave
children unattended in the veh icle. Unsu
pervised use of the electric seat adjust
ments may cause serious injury .
- To reduce the risk of injury in the case of sudden braking or accident, front pas
sengers must never r ide in a moving ve
hicle with the bac krest reclined. Safety
be lts and the airbag system on ly offer
maximum protection when the backrest
is upr ight and the safety belts are prop
erly positioned on the body . The more
the backrest is reclined, the greater the
risk of personal injury from an incorrect
seating position and improperly posi
tioned safety belts .
Page 56 of 314
54 Seats and storage
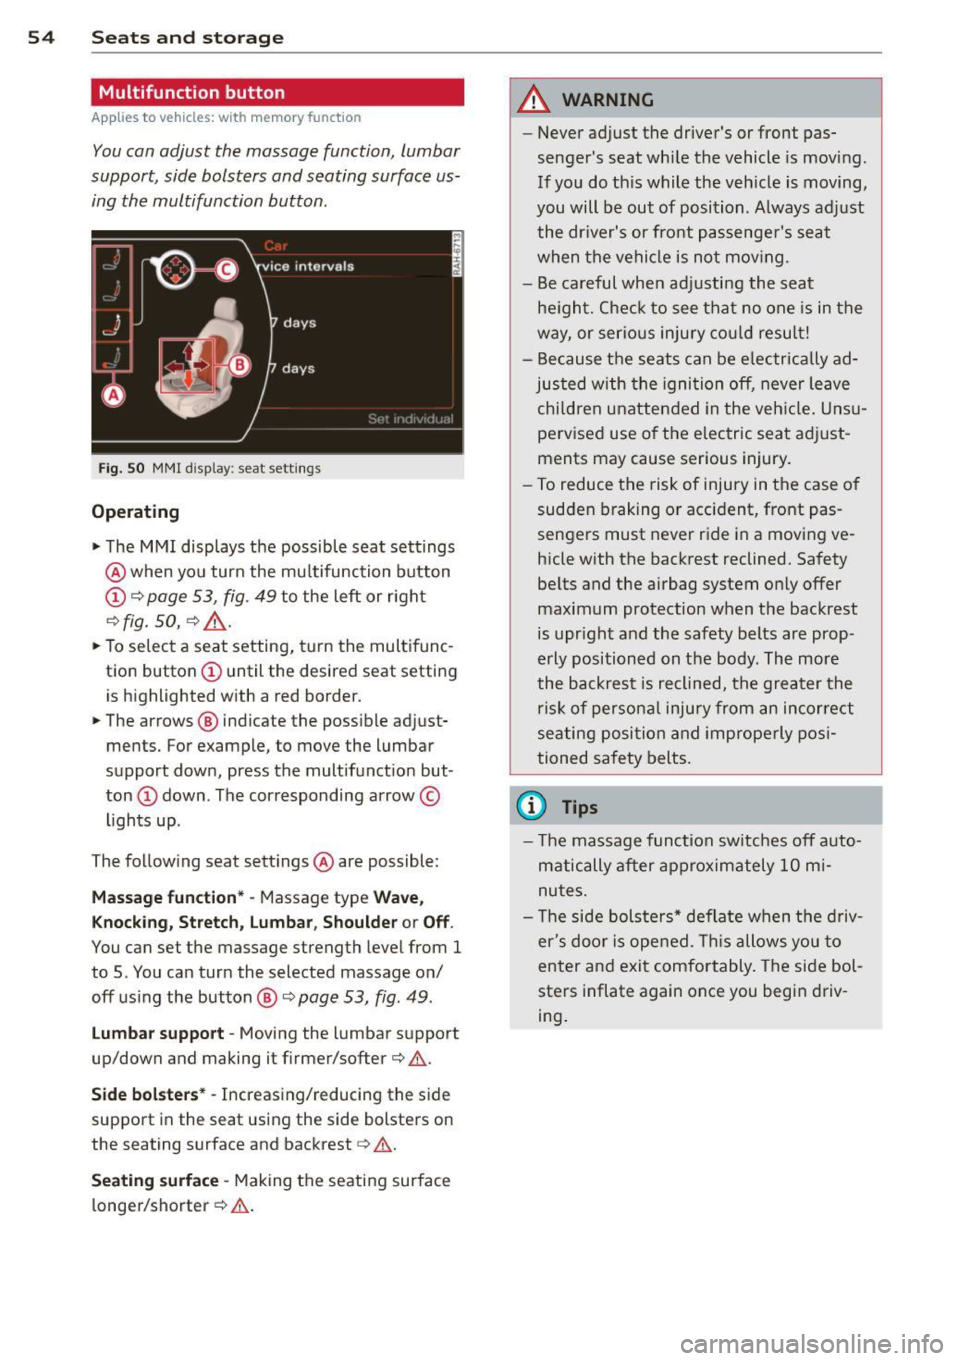
Multifunction button
App lies to vehicles: wit h memory fu nctio n
You can adjust the massage function, lumbar
support, side bolsters and seating surface us
ing the multifunction button .
Fig. 5 0 MMI display: seat settings
Operating
• The MMI displays the possible seat settings
@ when you turn the mu ltifunction button
(D ¢ page 53, fig . 49 to the left or right
¢ fig. 50, ¢ A .
• To select a seat setting, turn the multifunc
tion button
(D until the desired seat setti ng
is highlighted with a red border.
• The arrows @ indicate the possible adjust
ments. For example, to move the lumbar
support down, press the multifunct ion but ·
ton
(D down . The corresponding arrow ©
li ghts up .
The follow ing seat settings @ are possible:
Massage fun ct ion* · Massage type Wave,
Knockin g, Stretch, lumbar , Sho ulde r or Off.
You can set the massage strength level from 1
to 5. You can turn the selected massage on/
off using the button@~
page 53, fig . 49.
lu mb ar support · Moving the lumbar support
up/down and making it firmer/softer¢ .&..
Side bol ste rs* · Increasing/reducing the side
support in the seat using the side bolsters on
the seating surface and backrest
q &.
Seating surface · Making the seating surface
longer/shorter ¢.&. .
A WARNING
-~
-Never adjust the driver's or front pas·
senger 's seat whi le the vehicle is moving.
If you do th is while the veh icle is moving,
you will be out of position . A lways adj ust
the dr iver's or front passenge r's seat
when the vehicle is not mov ing.
- Be careful when ad justing the seat
he ight. Check to see that no one is in the
way, or serio us injury co ul d resu lt!
- Because the seats can be e lectrically ad
justed with the igni tion off, never leave
child ren unattended in the veh icle. Uns u
pervised use o f the electric seat adj ust
ments may cause serious injury.
- To reduce the risk of injury in the case of
sudden braking o r accident, front pas
sengers must never ride in a moving ve
hicle with the backrest reclined. Safety be lts and the airbag system only offer
maximum protection when the backrest is upr ight and the safety belts are prop·
erly positioned on the body. The more
the backrest is reclined, the greater the
ris k of persona l injury from an incor re ct
seating position and improperly pos i
tioned safety belts.
(D Tips
- T he massage function switches off auto
matically after approximately 10 mi
nu tes.
- T he side bolsters* deflate when t he d riv
er's door is opened. This allows you to
enter and exit comfortably. The side bol
sters inflate again once you begin d riv
ing .
Page 57 of 314
M N
0 I.J "". rl I.O
"' rl
"' rl
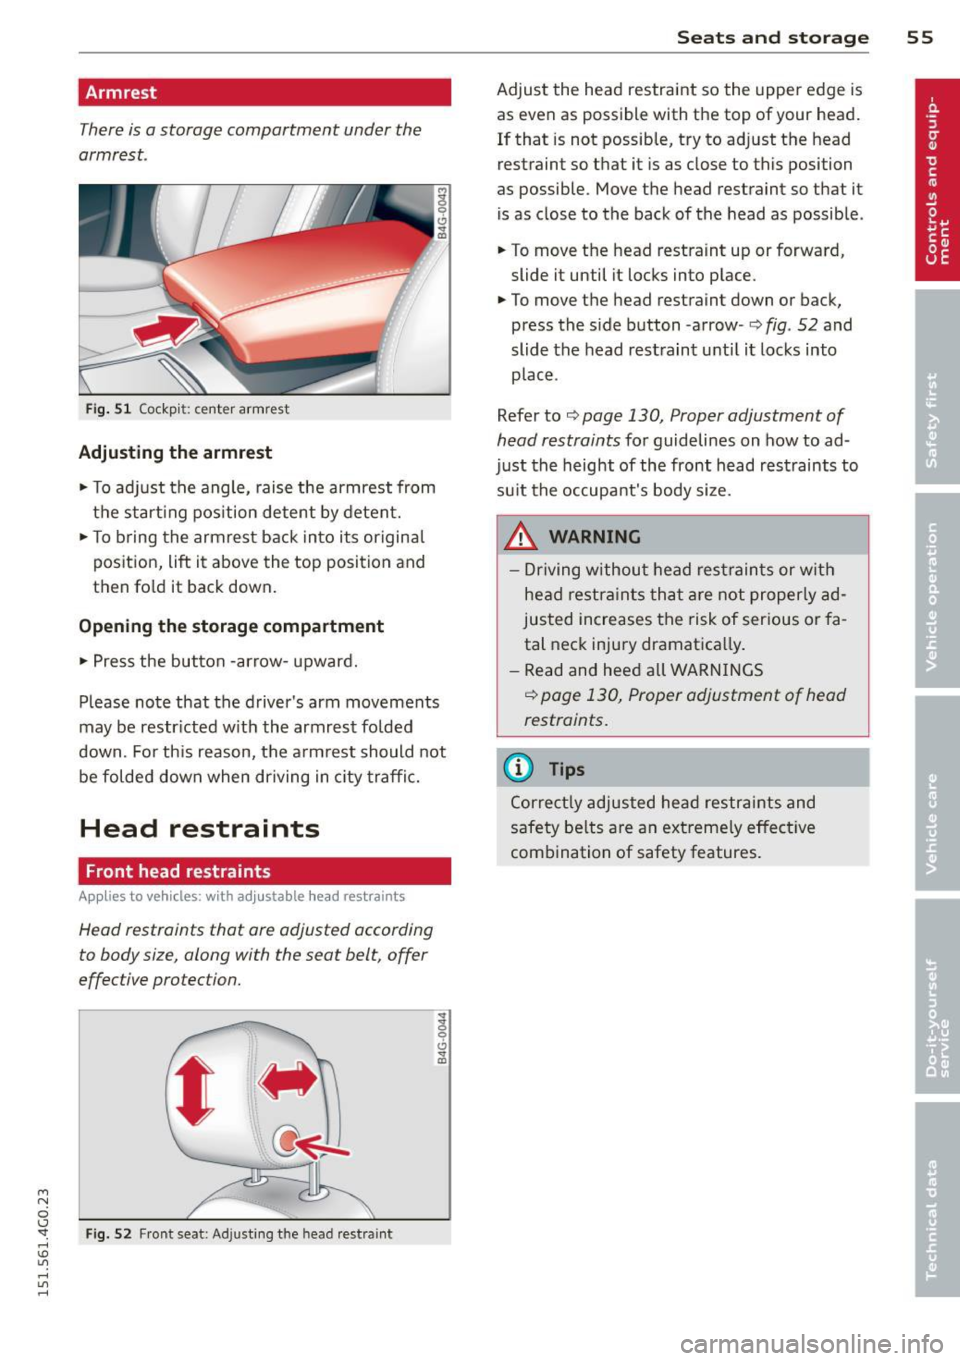
Armrest
There is a storage compartment under the
armrest .
Fig. 51 Cockp it: center armrest
Adjusting th e armrest
.. To adjust the angle, raise the armrest from
the start ing pos ition detent by detent.
.. To b ring the armrest back into its origina l
position, lift it above the top position and
then fold it back down.
Opening th e st orag e co mpartment
.. Press the button -arrow- upward.
Please note that the driver's arm movements
may be restr icted w ith the armrest folded
down. Fo r this reason, the armrest should not
be folded down when driving in c ity traffic.
Head restraints
Front head restraints
Applies to vehicles: with adjustable head restraints
Head restraints that ore adjusted according
to body size, along with the seat belt, offer
effective protection.
F ig. 52 Front seat: Adjusting the head restra int
S ea ts a nd s to rage 55
Adjust the head restraint so the upper edge is
as even as possible with the top of your head.
If that is not possible, try to adjust the head
restraint so that it is as close to this position
as possible. Move the head restraint so that it
is as close to the back of the head as possible .
.. To move the head restra int up or forward,
slide it until it locks into p lace .
.. To move the head restraint down or back,
press the side button -arrow-
c:> fig. 52 and
slide the head rest raint until it locks into
place .
Refer to
c:> page 130, Proper adjustment of
head restraints
for guidelines on how to ad
just the height of the front head restraints to
su it the occupant's body size.
.&_ WARNING
- Driving without head restraints or with
head restra ints that a re not proper ly ad
justed increases the risk of serious or fa
tal neck injury dramatica lly .
- Read and heed all WARN INGS
i=> page 130, Proper adjustment of head
restraints.
(D Tips
Correct ly adjusted head restraints and
safety be lts are an extreme ly effective
combination of safety features.
-
Page 58 of 314
56 Seats and storage
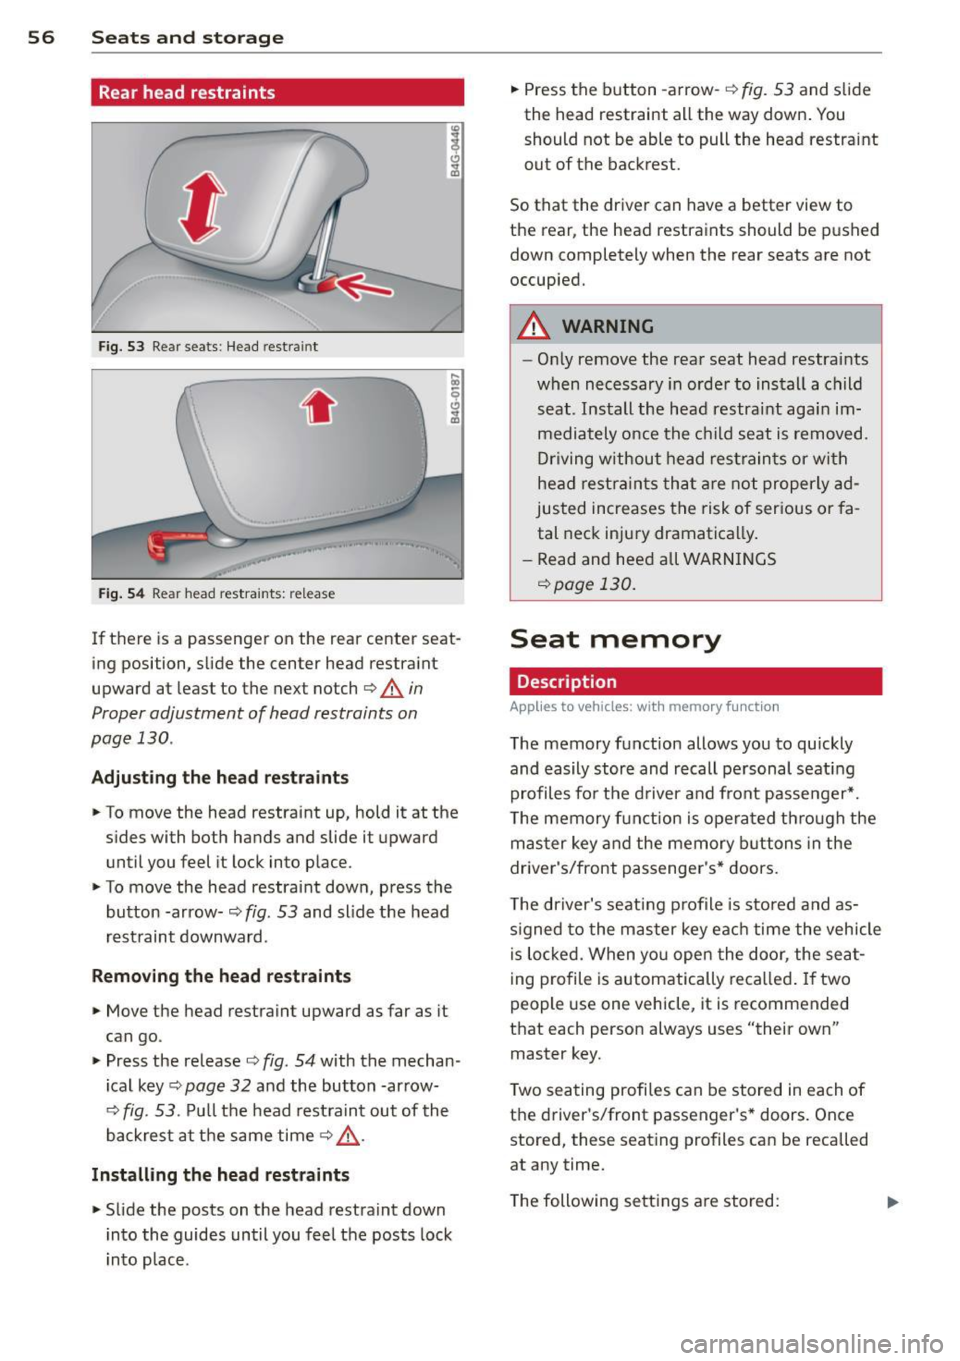
Rear head restraints
Fig. 53 Rear seats: Head restra int
. .
Fig . 54 Rear head restraints: release
If there is a passenger on the rear center seat
ing position, slide the center head restraint
upward at least to the next notch
c::> A in
Proper adjustment of head restraints on
page 130 .
Adjusting the he ad restr aint s
• To move the head restraint up, hold it at the
s ides with both hands and slide it upward
until you feel it lock into place.
• To move the head restraint down, press the
button -ar row-
c::> fig. 53 and slide the head
rest raint downward.
Rem oving the head re straints
• Move the head restraint upward as far as it
can go.
• Press the release
c::> fig. 54 with the mechan
ical key
c::> page 32 and the button -ar row-
c::> fig. 53. Pu ll the head rest raint out of the
backrest at the same time
c::> .,&. .
Install ing th e he ad re str aints
• Slide the posts on the head restraint down
into the guides until you feel the posts lock
i nto place. •
Press the b utton -arrow-
c::> fig. 53 and slide
the head restraint all the way down . You
should not be able to pull the head restraint
out of the backrest.
So that the dr iver can have a better view to
the rear, the head restraints should be p ushed
down completely when the rear seats are not
occupied.
A WARNING
-- On ly remove the rear seat head restraints
when necessary in order to install a child
seat . Install the head restraint agai n im
mediately once the child seat is removed.
Dr iving without head rest rain ts or wi th
head restra ints tha t a re no t properly ad
justed increases the risk of ser ious or fa
tal neck injury dramatically .
- Read and heed all WARN INGS
c::> page 130 .
Seat memory
Description
Applies to vehicles: with memory function
The memory function allows you to quickly
and easily stor e and recall pe rsonal seati ng
profiles for the d river an d front passenger *.
T he memory f un ction is opera ted th ro ugh the
mas ter key and the memory buttons in the
driver's/front passenger's* doors .
T he driver's seat ing profile is stored and as
s igned to the master key ea ch time the vehicle
i s lo cked. When yo u open the door, the sea t
i ng profile is automatically reca lled . If two
people use one vehicle, it is recommended
that each person always uses "their own"
master key.
T wo sea ting profiles can be stored in each of
the d river's/front passenger's * doors. Once
stored, these seating profiles can be recalled
at any time.
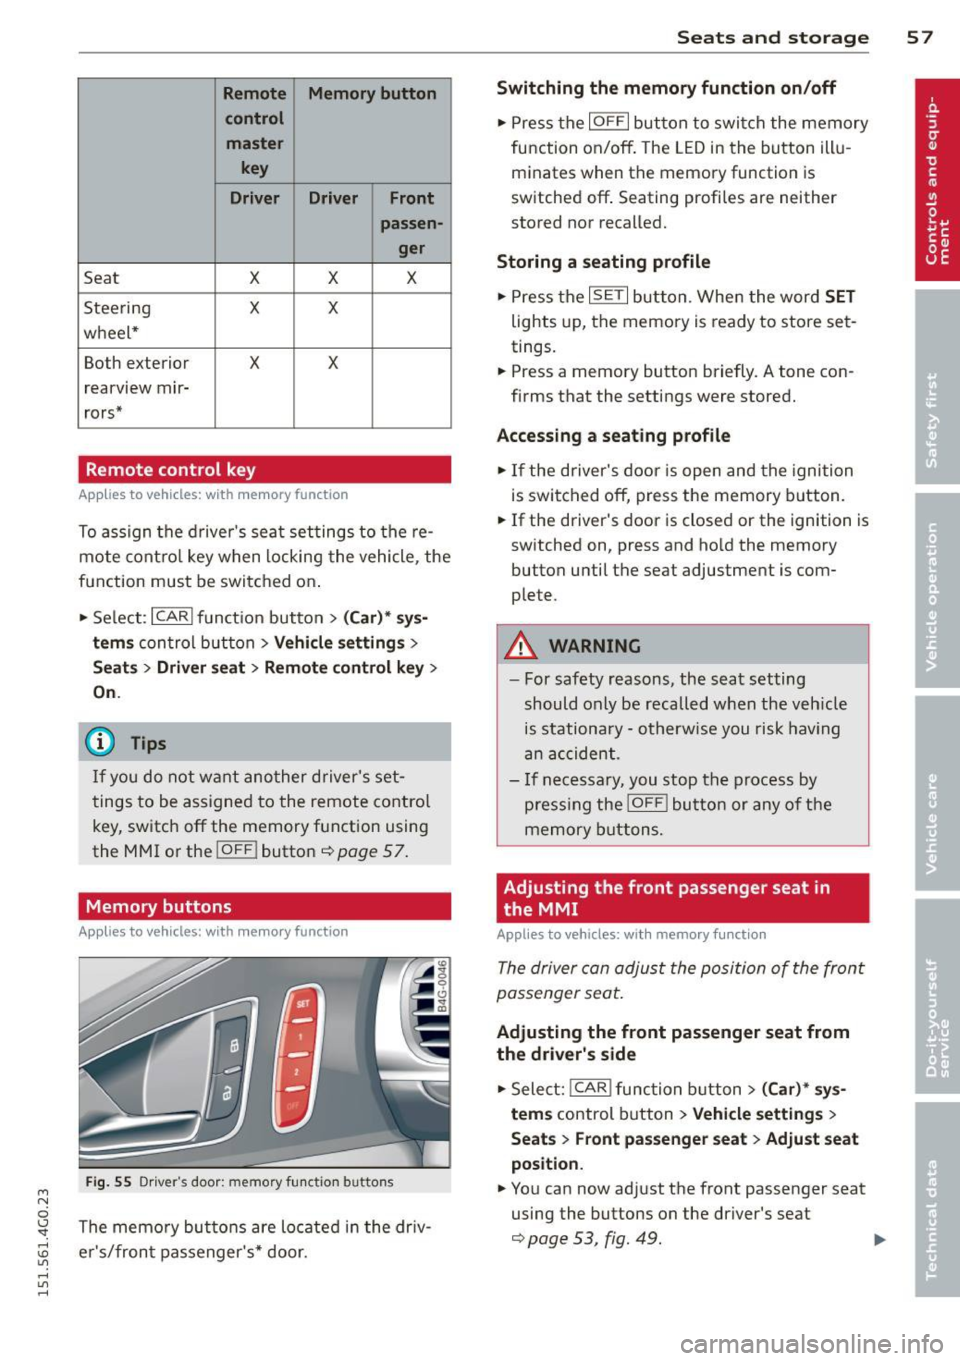
T he following sett ings a re stored:
Page 59 of 314
M N
0 \,J
"". rl I.O
"' rl
"' rl
Remote Memory button control master
key
Driver Driver Front passen-
ger
Seat X X X
Stee ring X X
wheel*
Both exterior
X X
rearview mir-
rors*
Remote control key
Applies to vehicles: with memory function
To assign the d river 's sea t settings to the re
mote cont ro l key w hen locking the vehicle, the
function must be swi tc h ed on .
• Se lect:
I CARI funct io n button > (Car )* sys
tems
con trol button > Vehicle settings >
Seats > Driver seat > Remote control key >
On .
@ Tips
If you do not wa nt ano ther d river' s set
t ings to be a ssigned to the remote control
key, switch off the memory f unction usin g
the MMI or the
! OFF ! button ce:> page 57.
Memory buttons
Applies to vehicles: with memory function
Fig. 55 Dr iver·s door: memory fu n ct io n buttons
The memo ry but tons are located in the dr iv
e r's/fron t passenger 's * door.
Seats and storage 5 7
Switching the memory function on/off
• Press the IOFFI but ton to swi tch the memory
fu nction on/off . The LED in the button ill u
m inates when the memory function is
sw itched off . Seating profiles are neither
stored nor recalled.
Storing a seating profile
• Press the ISET I button. When the word SET
lights up, the memory is ready to store set
tings.
• Press a memory button briefly. A tone con
firms that the settings were stored.
Accessing a seating profile
• If the driver's door is open and the ignition
is swi tched off, press t he memory b utton.
• If the driver's door is closed or the ignition is
sw itched on, press and ho ld the memory
button until the seat adjustment is com
plete.
A WARNING
- For safety reasons, the sea t setting
should only be recalled when the veh icle
is stationary - o therw ise y ou risk hav ing
an acc ident.
- I f necessary, you stop th e process by
press ing the
jOFF ! butt on o r any o f the
memory buttons.
Adjusting the front passenger seat in
the MMI
Applies to veh icles: w ith memory function
The driver con adjus t the posi tion of the front
passenger seat.
Adjusting the front passenger seat from
the driver's side
• Sele ct: !CAR I functio n button> (Car)* sy s
tem s
control button > Vehicle settings >
Seat s > Front passenger seat > Adjust seat
position .
• You can now ad just the front passenger seat
using the buttons on the driver's seat
¢ page 53, fig. 49. .,..
Page 60 of 314
58 Seats and storage
M atching th e pos ition of the driv er' s se at
.,. To adj ust the front passe nger seat to match
the driver 's seat settings, select the
!CARI
function b utton > (C ar)* s ystem s control
button
> V ehicle setting s > Seats > F ront
pa ssenger seat> Sym metr y to d river s eat .
.,. Press and hold the control knob until the ad
justment process is complete.
@ Tips
When matching seat settings, the settings
for the lumbar support and seating sur-
face w ill not transfer to the front passeng
er 's seat .
Ashtray
Applies to vehicles: with ashtray
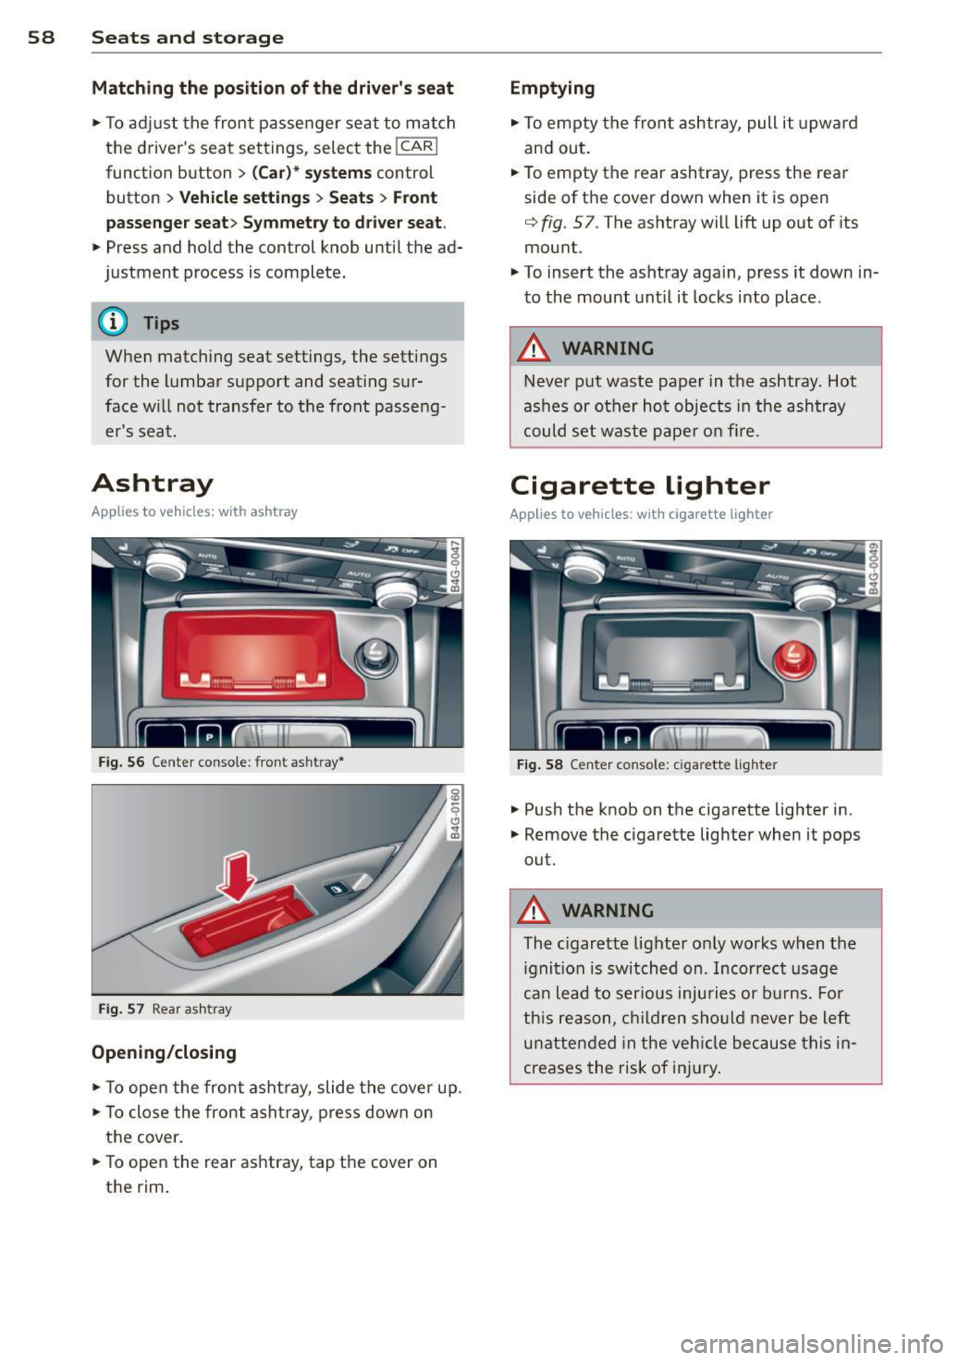
Fig. 56 Center conso le: front ashtray*
Fig . 57 Rear ash tray
Opening /clo sing
.,. To ope n the front asht ray, slide the cover up .
.,. To close the front asht ray, press down on
the cover .
.,. To open the rear ashtray, tap the cover on
the rim.
Emptying
.,. To empty the front ashtray, pull it upward
and out.
.. To empty the rear ashtray, press the rear
side of the cover down when it is open
q fig. 57. The ashtray will lift up out of its
mount .
.,. To insert the ashtray again, press it down in
to the mount unt il it locks into place.
A WARNING
-Never put waste paper in the ashtray. Hot
ashes or ot her ho t objects in the ashtray
could set waste pape r o n fire.
Cigarette lighter
Applies to vehicles: w ith cigarette lighter
Fig . 58 Center console: cigarette lighte r
.,. Push the knob on the cigarette lighter in .
.,. Remove the cigarette lighter when it pops
out.
A WARNING
-The c igarette lighter only works when the
i gnition is sw itched on . Incorrect usage
ca n lead to ser ious injuries or burns. Fo r
this reason, children sho uld never be left
unatten ded in the veh icle because this in
creases the risk of in jury .