engine AUDI A6 2017 User Guide
[x] Cancel search | Manufacturer: AUDI, Model Year: 2017, Model line: A6, Model: AUDI A6 2017Pages: 280, PDF Size: 70.24 MB
Page 25 of 280
co
co
.... N
" N .... 0 0 <.,;) 'SI'
Unlike the short-term memory, the long -term
memory is not erased automatica lly. Yo u can se
l ect the time period for evaluat ing trip informa
tion yourself .
F or some veh icle functions, you can access the
driving information from the short -term memory
i n the
line @¢poge21, fig. 5.
Fuel consumption
The cu rrent fue l co nsu mption c an be shown us
i ng a ba r g rap h
¢fig . 8 . The aver age consum p
tion stored in the short -term memory is also dis
p layed . If the bar is green, your vehicle is saving
fuel throug h one of the following functions:
-Re cuperation : electr ical ene rgy can be store d in
the vehicle battery when t he vehicle is coasting
or driving downhill. The bar will move toward
0 .
-Cylinder on demand system* : the engine auto
matically switches four cylinde rs off when low
er powe r output is required and other condi
tions are met. This change is not noticeab le to
t h e passengers.
(]} Tips
The date, time of day and t ime and date for
mat can be set in the Infotainment system
¢page 24.
Efficiency program
Applies to: ve hicles with effic ie ncy p rogram
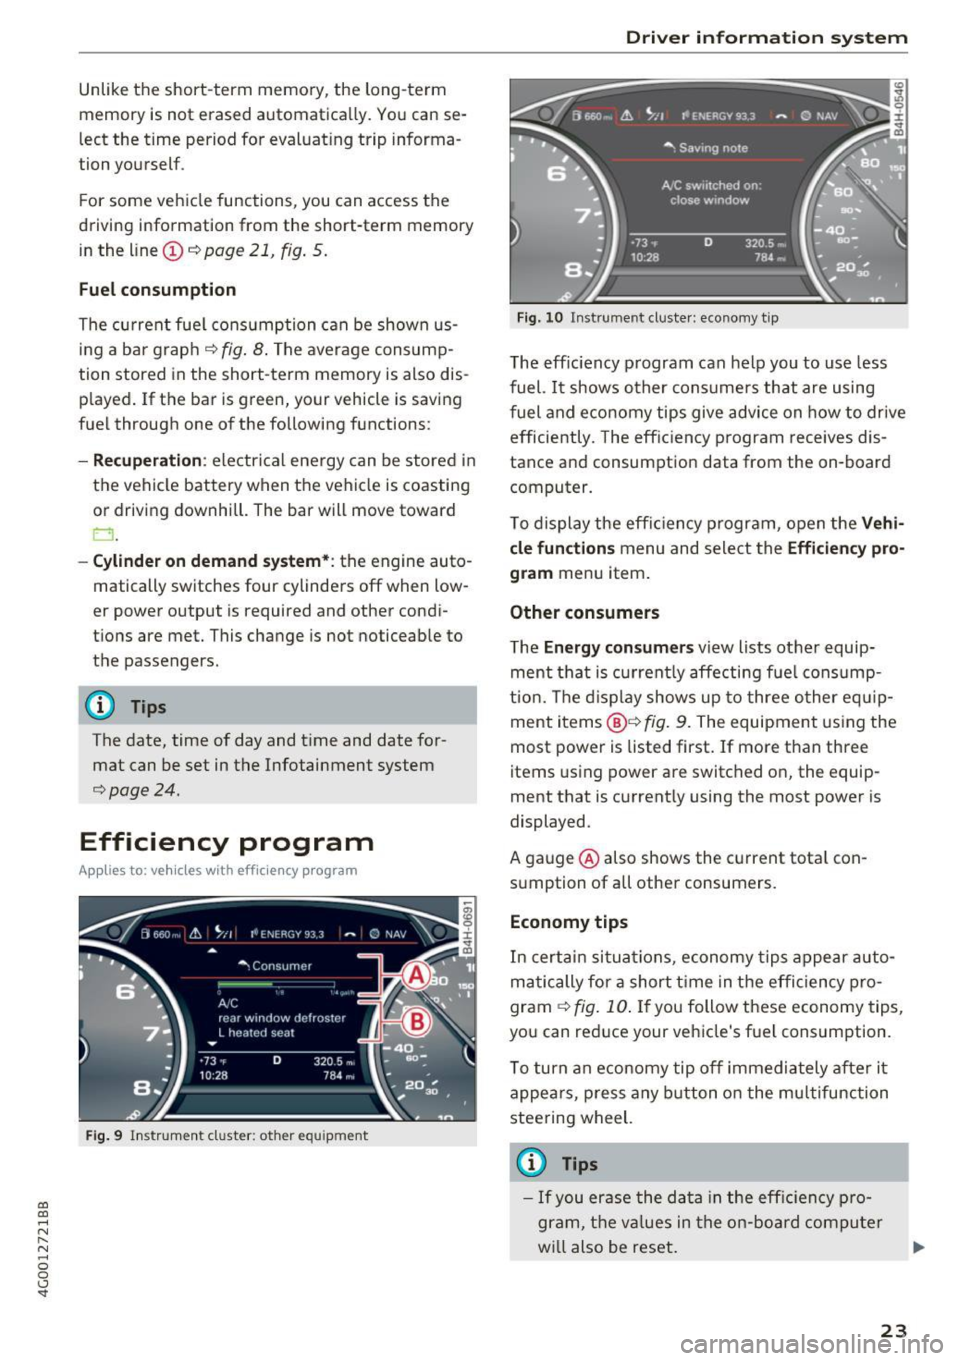
F ig. 9 In str ume nt cluste r: ot her equ ipment
Driver in forma tion system
Fig. 10 Instrument cluster: econo my t ip
T he eff ic iency p rogram can help you to use less
fuel. It shows o ther cons umers th at are using
f uel and e co nomy tip s give a dvice on how to drive
efficie ntly. The eff ic ien cy pr ogr am receives dis
tance and consumption data from the on -board
computer.
To dis play the eff icien cy p rogram, o pen the
Vehi
cle functions
m enu and select the Efficiency pro
gram
menu item.
Other consumers
The Energy con sumers view lists other equip
ment that is c urren tly affe cting f ue l cons ump
tio n. Th e displ ay shows up to three o ther eq uip
ment items @¢
fig. 9. The equipment using the
most power is listed first. If more than three
items using power are switched on, the equip
ment that is current ly using the most power is
displayed.
A ga uge @ also shows the c urrent tota l con
s u mption of all othe r consumers.
Economy tips
In c ertai n sit ua tio ns, economy tips appe ar auto
ma tic ally for a short t ime in the e ffic iency pro
gram
¢ fig . 10 . If you follow these economy tips,
yo u can red uce your vehicle's fuel cons umption.
T o turn an e cono my tip off immedia tely afte r it
appea rs, p ress any button o n the mu ltifun ction
stee ring wheel.
© Tips
- If you era se the d ata in t he eff ic ien cy pr o
gram, t he v alues in the on -boar d compu te r
wi ll also be reset .
23
Page 27 of 280
Hea d-u p di spl ay> Head- up di spla y conten ts or
Displ ay brigh tn ess.
Di spla y content
In the Infotainment system, you can specify
which information should be displayed: For ex
ample, th is can include navigation informat ion *,
Adaptive cruise control* or night vision assist*.
The display of certa in info rmation and some of
the red indicator lights cannot be h idden in the
I nfotainment system.
Displ ay brightness
You can adjust the display br ightness in the Info
tainment system. The display brightness decreas
es automatically as the amount of light decreas
es. The backgro und brightness is adjusted with
the instrument il lumination
c::> page 44 .
(D Note
To prevent scratches on the g lass cove ring the
head- up d isplay, do not place any objects in
the projection opening.
(D Tips
- Sunglasses w ith polar izat ion fi lters and u n
favorab le lighting conditions can have a
negative effect on the display.
- An optim um display depends on the seat
pos ition and the height adjustment of the
head -up display.
- A specia l windshield is needed for the head
up display function.
- Fo r information on cleaning, refer to
c::> ta
ble on page 233.
On Board Diagnostic
System (OBD)
Malfunction Indicator Lamp (MIL)
The Malfunction Ind icator Lamp (MIL) a in the
instr ument cluster is part of the On-Board Diag
nostic (OBD II) system.
~ The warning/indicator light i lluminates when the ....
~ ign it ion is switched on and goes ou t after the en-N .... 0 0 <.,;) 'SI"
Driver info rm atio n sys tem
gine starts and the idle has stab ilized. This indi
cates that the MIL is working properly.
If th e light does not go ou t after the eng ine is
sta rted, or i llum inates while you are driving, a
malfunction may exist in the engine system. If
the light illuminates, the catalytic converter
could be damaged.
Cont inue driving
with redu ced p ower (avoiding
sustained high speeds and/or rapid accelera
tions) and have the condition corrected. Contact
your authorized Audi dealer.
If the ligh t illum ina tes, the electronic speed lim
iter may also be malfunctioning. For more infor
mation
c::> page 26, Electronic speed limiter.
An impro perl y close d fuel fi ller cap may al so
ca use the
MIL li g ht to illuminate c::> page 192.
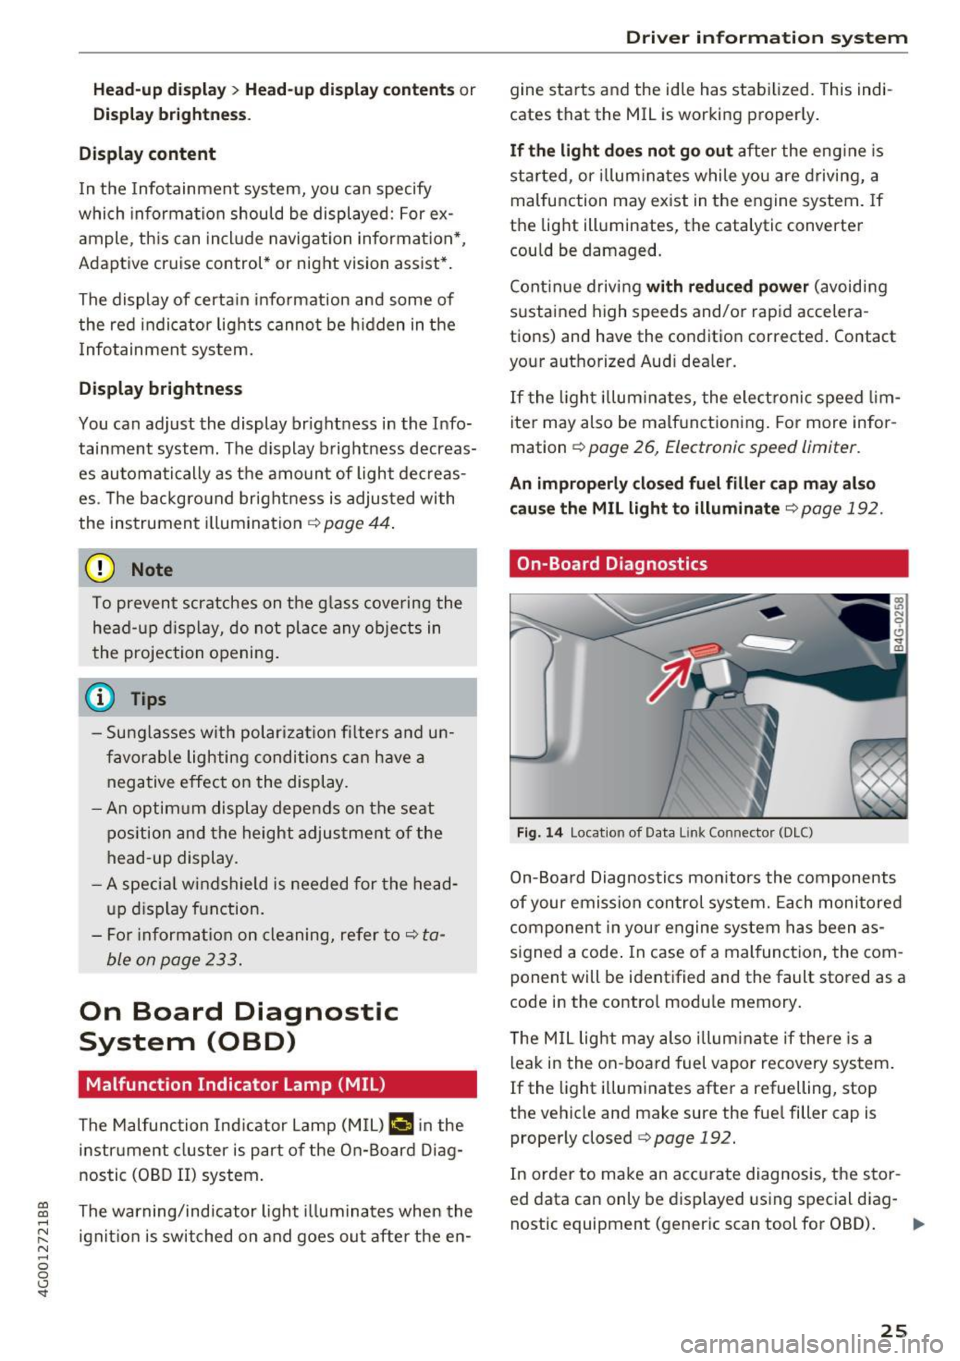
On-Board Diagnostics
Fig. 14 Locat ion of Data L ink Connector (DLC)
On-Board Diagnostics monitors the components
of your emission control system. Each monitored
component in your engine system has been as
s igned a code . In case of a malfunction, the com
ponent will be identified and the fault stored as a
code in the contro l module memory.
T he M IL light may also illum inate if there is a
leak in the on-board fuel vapor recovery system.
If the light i lluminates after a refuelling, stop
the vehicle and make sure the fue l filler cap is
properly closed
c::> page 192.
In order to make an accurate diagnosis, the stor
ed data can only be displayed using special diag-
nostic equipment (generic scan tool for OBD).
IJI,-
25
Page 28 of 280
Driver information s ystem
In order to connect the specia l diagnostic equip
ment, push the plug into the Data Link Connector
(DLC). The DLC is located to the rig ht of the hood
release
c:> fig. 14.
Your author ized Audi dealer or a qualified service
station can interpret the code and perform the necessary repa ir.
A WARNING
Do not use the diagnostic connector for pe r
sonal use. Incorrect usage can cause malfunc
tions, which can increase the risk of a colli
sion!
Electronic speed limiter
-
Your veh icle may be factory equipped wi th t ires
that a re rated for a maximum speed of 130 mph
(2 10 km/h) . This is less than the maxim um speed
of yo ur vehicle. To reduce t he risk of s udden tire
fa ilu re and loss o f control if the veh icle is operat
e d at excessive speeds, yo ur vehicle a lso has an
electronic speed limiter . The electronic speed
lim ite r prevents your veh icle from going faster
than the t ire speed rating. For more information
c:>page 217.
I f the en gine contro l unit receives faulty vehicle
road speed s ignals, the Malfunction Indicator
Lamp (MIL)
II will illuminate. If this occurs,
contact the nearest authorized Aud i dealer for
assis tance .
S models
Your veh icle's top speed is e lectron ica lly limited
to 155 mph (250 km/h).
If th e engine contro l unit receives faul ty vehi cle
roadspeed signa ls, the Malfunct io n Indicator
Lamp (MIL)
¢4 will illuminate. If this occurs,
contact the nearest autho rized Audi dealer for
assistance .
A WARNING
Always observe the posted speed limits and
adjust you r speed to s uit prevailing road, traf
fic and weathe r con ditions. Never driv e you r
vehicle fa ster t han t he maximum spee d rat ing
o f t he ti re s inst alled.
26
-
Page 31 of 280
co
co
.... N
" N .... 0 0 <..:l 'SI'
could start the engine or operate electrical
equipment such as power windows.
(D Tips
- The operation of the remote control key can
be temporarily disrupted by interference
from transmitters near the vehicle working
i n the same frequency range (such as a cell
phone or radio equipment).
- Using the mechanical key, you can:
- Lock/unlock the glove compartment.
- Manually lock/unlock the vehicle
¢ page 32 .
-Mechanically lock the doors¢ page 32.
-For an explanation on conformity with the
FCC regulations in the United States and the
Industry Canada regulations, see
¢ page 262.
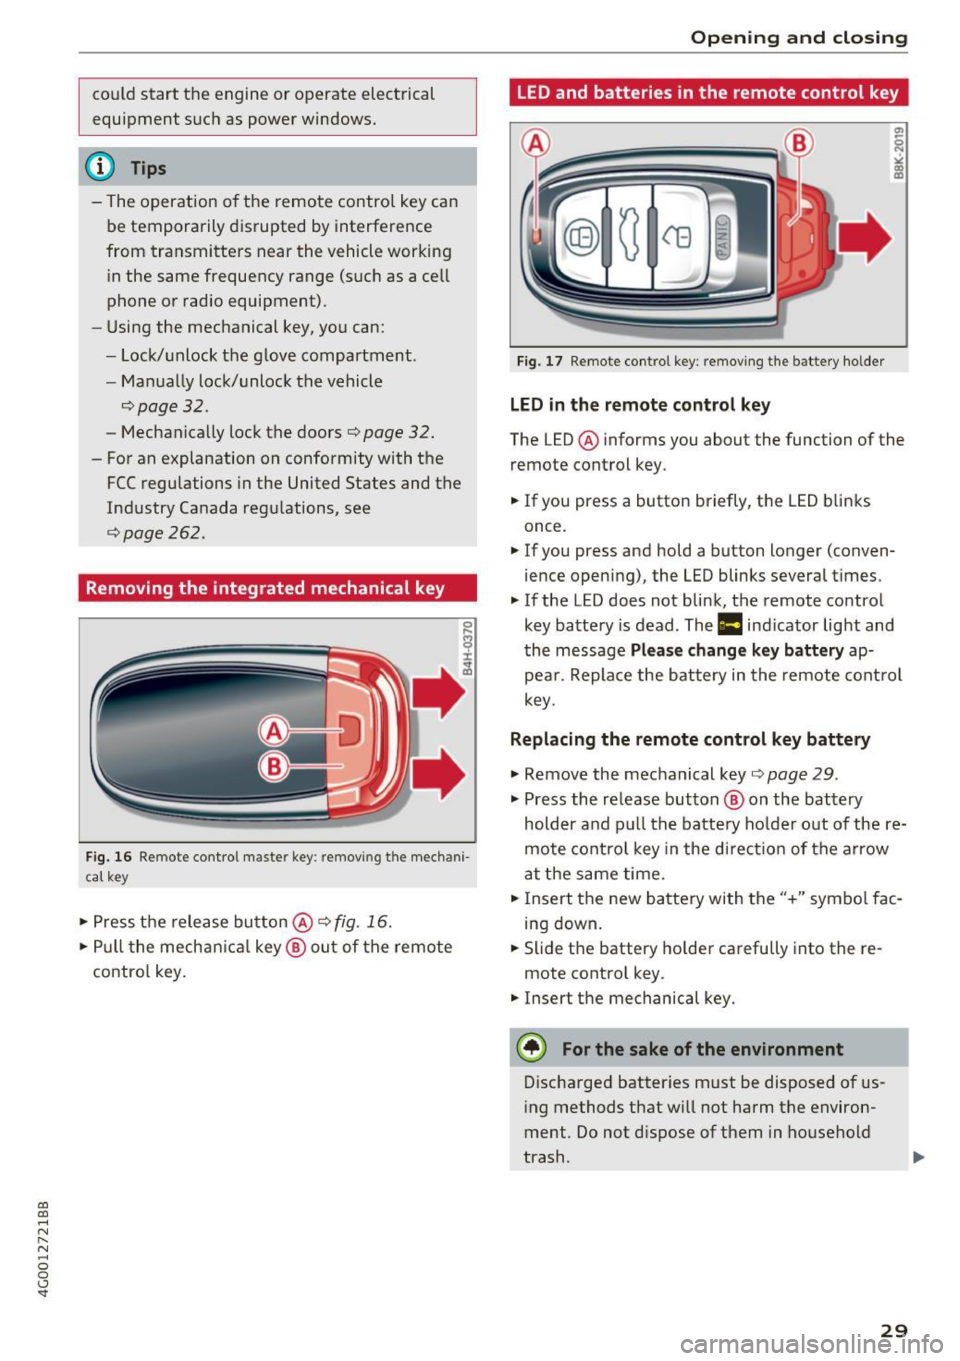
Removing the integrated mechanical key
Fig. 16 Remote contro l maste r key : remov ing t he mech ani
cal key
• Press the release button@¢ fig. 16.
• Pull the mechanica l key @ out of the remote
contro l key.
Open ing and closing
LED and batteries in the remote control key
Fig. 17 Remote control key: removing the battery holder
LED in the remote control key
The LED @ informs you about the function of the
remote control key.
• If you press a button briefly, the LED b links
once .
• If you press and hold a button longer (conven
ience opening), the LED blinks several times.
"' If the LED does not blink, the remote control
key battery is dead . The
1:1 indicator light and
the message
Please change key battery ap
pear . Replace the battery in the remote control
key.
Replacing the remote control key battery
"'Remove the mechanical key ¢page 29 .
"' Press the release button @ on the battery
holder and pull the battery ho lder out of the re
mote control key in the di rect io n of the arrow
at the same time.
• Insert the new battery with the"+" symbol fac
ing down.
• Slide the battery holder carefully into the re
mote control key.
"' Insert the mechanical key.
@) For the sake of the environment
Discharged batter ies must be disposed of us
ing methods that w ill not harm the environ
ment . Do not dispose of them in household
trash.
29
Page 32 of 280
Opening and clo sin g
@ Tips
The replacement battery must meet the same
specifications as the orig inal battery in the re
mote control key.
Unlocking/locking by remote control
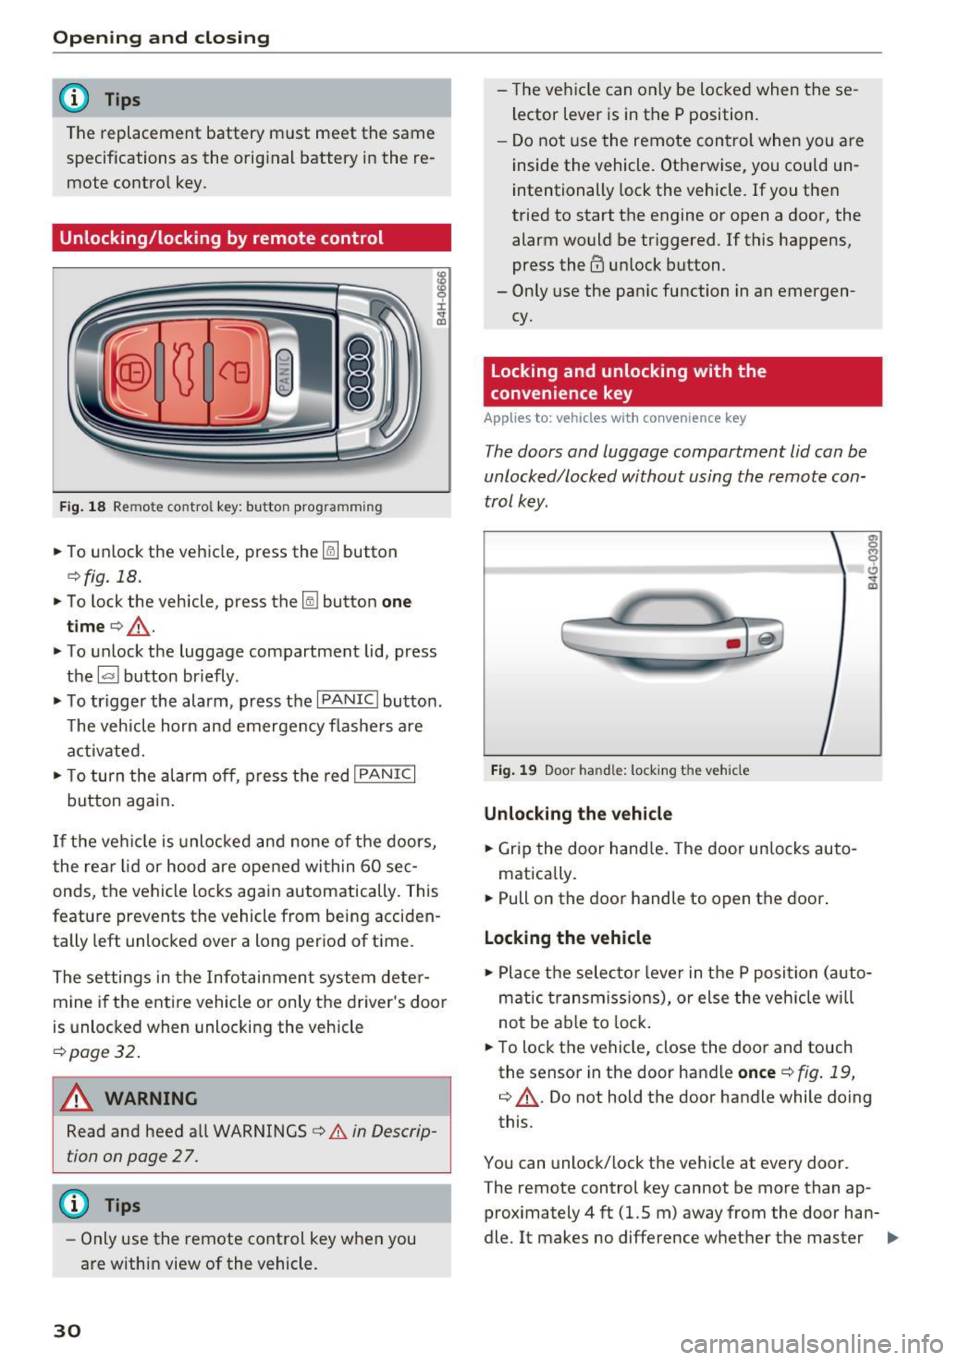
F ig . 18 Rem ote contro l key : bu tton prog ra mmin g
• To unlock the vehicle, press the~ button
¢fig. 18.
• To lock the vehicle, press the lil button one
tim e¢ ,& .
• To unlock the luggage compartment lid, press
the
1£1 button br iefly .
• To trigger the alarm, press the
I PANIC I button.
T he vehicle horn and emergency flashers are
activated.
• To turn the alarm off , press the red
I PANIC I
button again .
If the vehicle is unlocked and none of the doors,
the rear lid or hood are opened within 60 se c
onds, the veh icle locks again automatically. This
feature prevents the vehicle from being acciden
tally left unlocked over a long p eriod of t ime.
The settings in the Infotainment system deter mine if the entire veh icle or only the driver 's door
is unlocked when unlocking the vehicle
¢ page 32.
A WARNING
Read and heed all WARNINGS¢.& in Descrip
tion on page 2
7 .
@ Tips
- Only use the remote control key when you
are within view of the vehicle.
30
- The vehicle can only be locked when the se
lector lever is in the P position.
- Do not use the remote control when you are
inside the vehicle. Otherwise, you could un
intentionally lock the vehicle. If you then
tried to start the engine or open a door, the alarm would be tr iggered. If this happens,
press the@ unlock button.
- Only use the pan ic function in an emergen
cy.
Locking and unlocking with the
convenience key
Applies to: vehicles with convenience key
T he doors and luggage compartment lid can be
unlocked/locked without using the remote con
trol key.
F ig . 19 Door han d le : locking t he vehicle
Unlocking the vehicl e
• Grip the door hand le . T he door un locks auto-
matically.
• Pull on the door handle to open the doo r.
Locking the vehicle
• Place the selec to r l eve r in the P position (auto
matic t ransmiss ions), or else the veh icle wi ll
not be ab le to lock .
• To lock the vehi cle, close the door and touch
the sensor in the door handle
once ¢ fig . 19,
¢ ,& . Do not hold the door handle while doing
this.
You can unlock/lock the ve hicle at every door .
T he remote control key cannot be more than ap
proximately 4 ft (1.5 m) away from the door han
dle. It makes no difference whether the master ..,.
Page 39 of 280
co
co
.... N
" N .... 0 0 <.,;) 'SI"
time. T hi s app lies pa rt icu larly when children
remain in the vehicle. Othe rw ise children
co uld start t he engine or operate elect rical
equipment (such as power windows), which
increases the r is k of an accident .
Power windows
Controls
The driver can control all power window s.
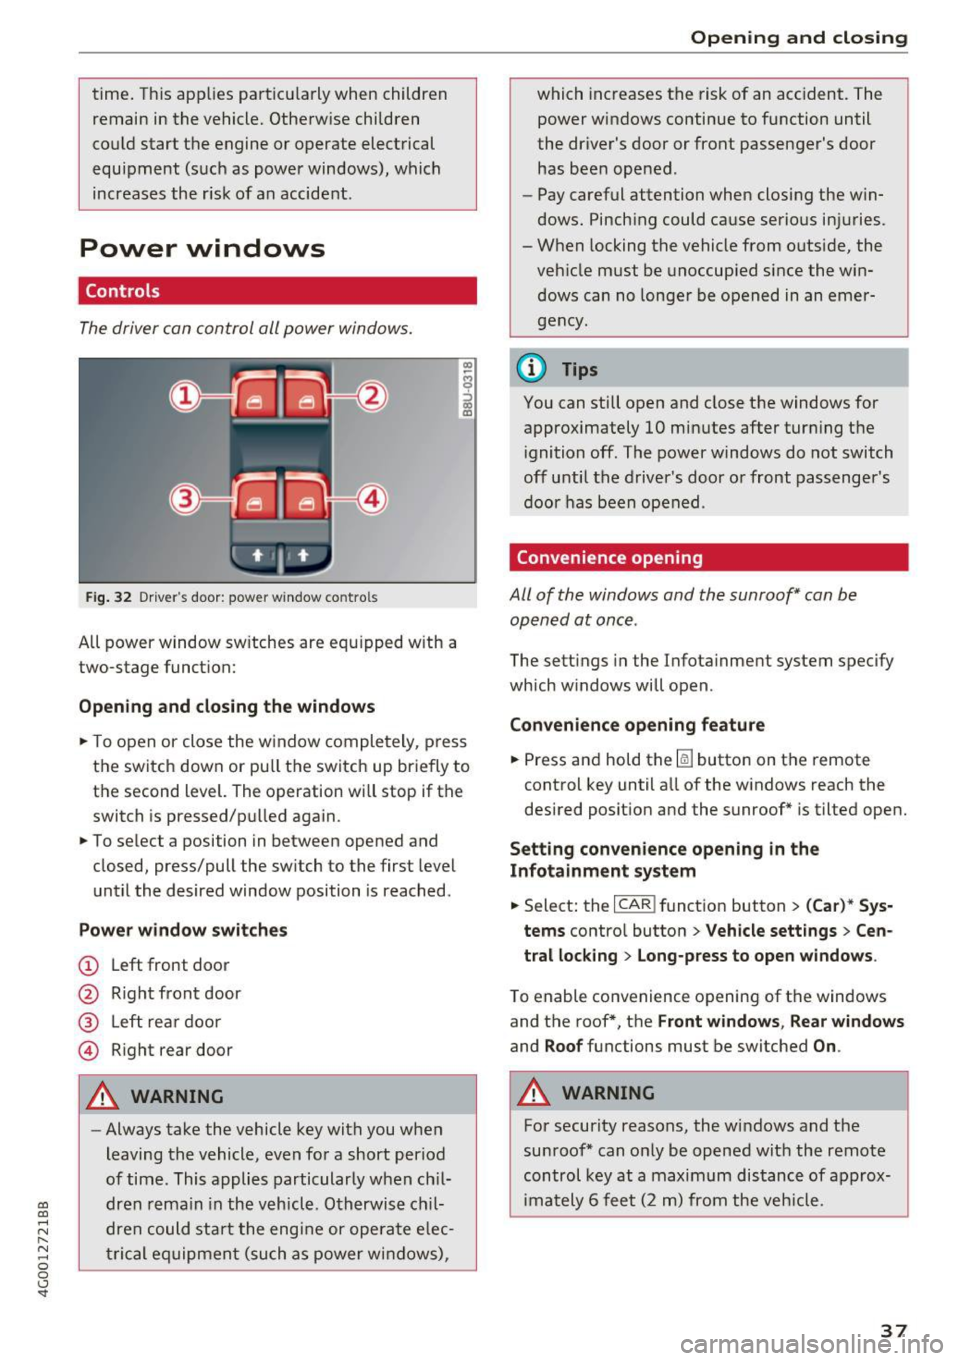
F ig. 32 Dr ive r's door : power w indow co ntro ls
All power window sw itches are eq uipped w ith a
two-stage funct ion:
Opening and closing the windows
"' -$ :,
"' CD
~ T o open or close the w indow completely, p ress
the switch down or pu ll the switch up briefly to
the second level. The operation will stop if the
switch is pressed/pu lled again.
~ To se lect a position in between opened and
closed, press/pull the sw itch to the first level
u nt il the desired window position is reached.
Power window switches
(!) L eft front door
@ R ight front door
® L eft rea r d oor
© Right rear door
A WARNING
- Always take the vehicle key wit h you when
leaving the vehicle, even fo r a short period
of time . This applies particularly w hen ch il
dr en re ma in in the vehicl e. O th erwis e chi l
dre n cou ld st art t he engi ne or ope ra te e lec
t ric al eq uip m ent (such as power wi ndows),
Open ing and closing
which increases the risk of an acc ident. The
power windows continue to function until
the dr iver's door or front passenge r's door
has been opened .
- Pay careful attention when closing the w in
dows . Pinch ing could ca use serio us in juries.
- When locking the vehicle from o utside, the
veh icle must be unoccup ied since the win
d ows can no longe r be o pened in an emer
g e ncy .
@ Tips
You can still o pen and close the windows for
approximately 10 mi nutes after tur ning t he
i gnition off . The power windows do not switch
off until the driver 's door o r front passenger 's
door has been open ed .
Convenience opening
All of the windows and the sunroof* can be
opened at once .
The settings in the Infota inment system specify
which w indows will open .
Convenience opening feature
~ Press and hold the~ button on the remote
control key until a ll of the w indows reach the
desired position and the sunroof* is tilted open.
Setting convenience opening in the
Infotainment system
~ Select: the I CAR I funct io n button > (Car) * Sys
tems
contro l button > Vehicle sett ings > Cen
tral locking
> Long-press to open windows .
To enable convenience openin g of the w indows
and the roof *, th e
Front windows , Rear windows
and Roof functions must be switched On .
A WARNING
For security reasons, the w indows and the
su nroof* can o nly be opened wit h the remote
control key at a maximum distance of a pprox
im ately 6 fee t (2 m ) from the veh icle .
37
Page 62 of 280
Warm and cold
Warm and cold
Climate control system
Description
The climate control system warms, cools and re moves humidity from the air in the vehicle interi
or. It is the most effective when the windows and
sunroof * are closed. If there is a bui ld-up of heat
insid e the vehicle, ventilation can he lp to speed
up the cooling process.
I n all heating mode f unctions, except for defrost,
the blower only switches to a higher speed once
the engine coolant has reach ed a suffici ent tem
perature .
Pollutant filt er
The po llutant filter removes poll utants such as
dust and pollen from the a ir .
Ke y recognit ion
A pp lies to: ve hicles w ith de luxe au toma tic clima te co ntro l
The blower sett ing and air distribut ion are stored
automatically and ass igned to the remote control
key that you are using.
A ppl ies to: ve hicles w ith 4 -zo ne del uxe auto matic c limate
co ntrol
The climate con trol set tings are automatically
stored and assigned to the remote control key
that is in use.
A WARNING
Poor visibility can lead to accidents.
- For safer driving, keep all windows free of
ice, snow and fog .
- Become familiar as quickly as possible with the correct use and function of the cl imate
contro l system, especially with the defrost
ing and defogg ing function.
- When the temperat ure is below freezing,
only use the windsh ield washer system after
60
the windshield has been warmed by the cli
mate control system. The washer fluid could
freeze on the windshie ld and impair visibi li
ty .
Cl) Note
-If you suspect that the cl imate contro l sys
tem is damaged, switch the system
off to
prevent further damage and have it checked
by an authorized Aud i dealer or authorized
Audi Service Facility .
- Repa irs to the Aud i climate control system
requ ire special technical knowledge and
special tools . See an authorized Aud i dea le r
or autho rized Aud i Service Faci lity .
@ For the sake of the environment
- To save fuel, turn off cooling mode by press
ing the
IAJC I button. This w ill also reduce
em issions .
- In veh icles w ith a diesel engine, you ca n
switch the auto supplementary heater off in
the Infotainment system.
(D Tips
- To prevent interference with the heat ing
and cooling output and to prevent the win
dows from fogging over, the a ir intake in
front of the windshie ld must be free of ice ,
snow or leaves.
- Conde nsation from the coo ling system can
dr ip and fo rm a pudd le of water under the
vehicle. This is norma l and does not mean
there is a leak.
- Th e energy managemen t sys tem may tem
porarily switch
off certain functions, such as
t h e seat heating * or rear window defogger.
These systems are ava ilable again as soon
as the ene rgy supply has been restored.
Page 64 of 280
Warm and cold
The maximum amo unt of air flows mainly from
the vents below the windshield. Recircu lat ion
mode switches off . The temperature should be
set to approximately 72
°F (22 °() .
The IAUTO I button switches the defroster off .
IClill REAR I Switching the rear window defogger
on/off
The rear window heater on ly operates when the
engine is running . It switches off automatica lly
after a few minutes, depending on the outs ide
temperature .
To prevent the rear w indow heater from switch
ing off automatically, press and ho ld the
IQijl REARI
button for more than 2 seconds . This is stored
until the ignit ion is switched off.
G'.l Adjusting seat heating*
Pressing the button switches the seat hea ting on
at the highest setting (level 3). The LEDs indicate
the tempera ture level. To reduce the tempera
ture, press the button again. To switch the seat heating off, press the button repeatedly until the
LED turns off.
After 10 minutes, the seat heating automatically
switches from level 3 to level 2 .
4-zone deluxe automatic climate control
A ppl ies to: ve hicles with 4-zo ne deluxe auto matic cl imate cont rol
Air vents
You can open or close the center and rear vents in
the cockpit and the vents in the rear center con
sole using the ridged thumbwheels . The levers
adjust the direction of the airflow from the vents.
A WARNING
- You shou ld not use the recirculation mode
for an extended period of time since no
fresh air is drawn in . W ith the air-condition
ing sw itched off, the windows can fog up,
which increases the risk of an acc ident.
- Individ uals with reduced sensit iv ity to pa in
or temperature could develop burns when
using the seat heating function. To red uce
the risk of injury, these individuals should
not use seat heating.
(D Note
To avoid damage to the heating elements in
the s eats , do not knee l on the seats or place
heavy loads on a small area of the seat.
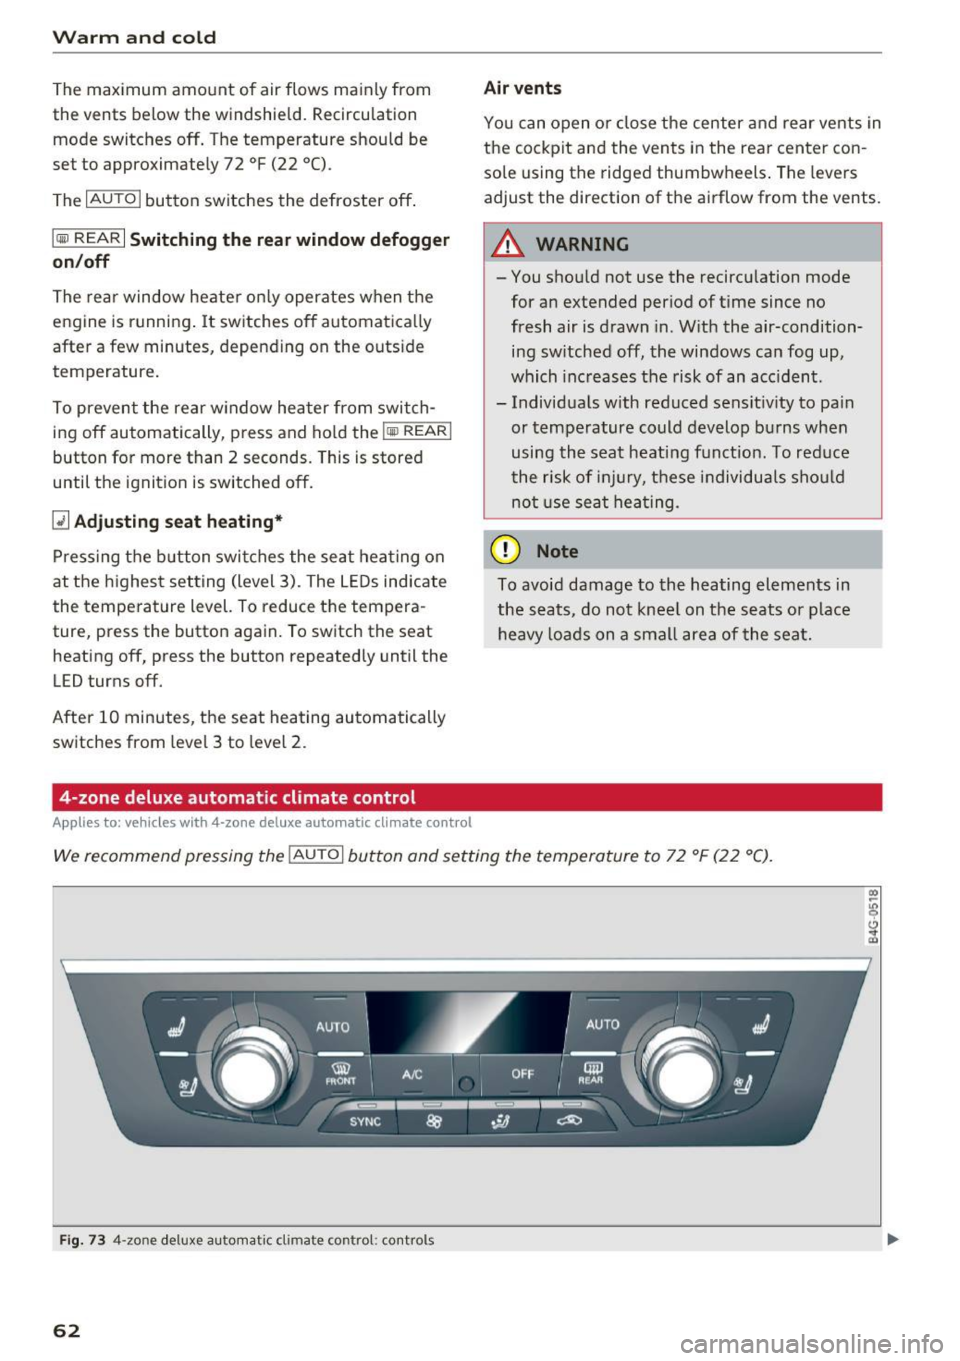
We recommend pressing the IAU TO I button and setting the temperature to 72 °F (22 °C).
Fig. 73 4-zo ne deluxe automat ic climate contro l: controls
62
Page 66 of 280
Warm and cold
mode switches off. The temperature shou ld be
set to approximate ly 72 °F (22 °C).
The
IAUTOI button switches the defroster off.
IQiiJ REARI S witching the re ar window defo gger
o n/off
The rear window heater on ly operates when the
engine is running.
It sw itches off a utomat ica lly
afte r a few minutes, depending on the outs ide
temperature.
To prevent the rear w indow heater from switch
ing off automatically, p ress and ho ld the
l iiiP REAR I
button for more than 2 seconds . This is stored
until the ignition is switched off.
ISYNC I Sy nchronization
When synchronization is switched on, the set
tings for the drive r's side are applied to the front
passenger's side (ex cept for seat heating/ventila
tion*). The settings in the rear are a lso synchron
ized. Synchronization switches off if the settings
are adjusted on the front passenger's side or in
the rear.
You can synch ronize the settings in a row by
pressing and holding a contro l. For example, to
apply the settings for the front passenger's side
to the driver's side, press and ho ld the contro l on
the front passenger's side. The same applies to
the rear .
Res idua l h eat *
With the ignition turned off, you can activate the
residual heat function by pressing the~ button
¢ fig. 73. The residual heat from the coolant is
used to heat the vehicle interior. The residual
heat function switches off automatically after
about 30 m inutes .
Air vents
You can open or close the center and rear vents in
the cockpit and the vents in the rear center con
sole and door pillars using the ridged thumb
wheels . The levers adjust the direction of the air
flow from the vents .
64
A WARNING ,_
- You shou ld not use the recircu lation mode
for an extended period of time since no
fresh air is drawn in. W ith the air-condition
ing sw itched off, the windows can fog up,
which inc reases the risk of an acc ident.
- Individuals w ith reduced sensit iv ity to pa in
or temperature could develop bu rns when
using the sea t heati ng f unct ion. To red uce
the risk of i nju ry, these individuals sho uld
not use seat heating.
(D Note
To avoid damage to the heating elements in
the seats, do no t knee l on the se ats or place
heavy loads on a small area of the seat.
Basic settings
The climate control system basic settings are ac
cessed in the Infotainment system.
"' Select: the I CARI funct ion button > (Car )* Sys-
tems
contro l button > AC .
Rea r seat setting s*
When this function is se lected, all settings for
the rear can be adjusted through the climate con
trol system in the cockpit. The climate control
system settings cannot be adjusted in the rear
seat at the same time. This funct ion sw itches off
after a ce rtain per iod of t ime o r whe n one of the
contro ls in the coc kp it is pressed.
Automatic recirculation*
The sensitivity level of the automatic recircula
t ion mode can be set at various levels from
Off to
Sen siti ve . Reci rculat ion mode is contro lled auto
matically. If the windows fog up, p ress the
I@ FRO NT ! button.
Footwell temperature *
You can adjust the footwell temperature so that
i t is cooler or warme r.
Automat ic au xilia ry heater*
In vehicles with diesel engines*, the auxiliary
heater helps to warm the vehicle interior more
Page 68 of 280

Driving
Driving
General information
Breaking in
A new vehicle must be broken in, and the break i n distance should be 1,000 mi les (1,500 km). Do
no t drive at speeds th at wi ll exceed
2/3 of the
maximum permitted engine speed
(R PM ) for the
fi rst 600 mi les (1,000 km) , and avoid f ull accel
eration d uring this period . You may gradua lly
start increas ing the
RPM and the speed between
600 m iles (1,000 km) and 1,000 m iles (1,500
km).
During the fi rst hou rs of use, the engine has a
h igher internal friction than later on when all
mov ing parts have settled into p lace with each
other.
How the ve hicle is driven d uring the first 1,000
miles (1,500 km) also affects the engine quality.
Drive at moderate engine speeds after the initial
break-in per iod, part icu larly when running a cold
engine . This wi ll reduce eng ine wear and improve
the mi leage .
Do not dr ive at too
low of an engine speed (rpm).
Shift down if the engine stops r unning "smoot h
ly". Extremely high eng ine s peeds are automati
cally reduced .
New tires
If yo ur vehicle is ru nning on new t ires, drive pa r
t icularly c aref ul for the first 350 miles (5 00 kilo
meters) after fi tting .
A WARNING
-
New tires tend to be s lippery and must also
be "broken-in". Be s ure to remember this dur
ing the first 350 miles (500 kilometers).
Brake gently. Avo id following closely behind
other vehicles or other situations that might
require sudden, ha rd brak ing .
Avoid damaging the vehicle
When you are d riving on poo r roads, or over
curbs, steep ramps, etc., make ce rtain that low-
66
lying parts such as spo ilers and exha ust system
parts do not bottom o ut and get damaged.
This is es peci ally true for veh icles with low-s lu ng
c h ass is (sports chass is)* and fully loaded
vehicles .
Warming up/cooling down
Applies to: S models
By warming up/coo ling down t he engine careful
l y, you can he lp reduce unnecessary strain on
yo ur vehicle when dr iving in a sporty style.
The engine speed is limited when the engine is cold -the full engine o utp ut is not availab le.
When the engine is at operat ing temperat ure,
the engine speed limitation moves to a higher
RPM range. The t ires also only reach t he ir full
r oad holding capab ility once they have wa rmed
u p .
You r vehicle a lso has an after-run cooling fea
ture . However, cooling down is still important.
The eng ine and the brakes as well as the e xhaust
system and the tra nsmission become very ho t
whe n driving in a spo rty style . B efo re you shut
t h e ve hicle off, yo u should cool down the vehicle
by drivi ng a few miles at low s peeds with ligh t ac
ce lera tion.
Driving through water on roads
Note the following to reduce the risk of vehicle
damage when driving through water, fo r example
on f looded roads:
- The water must not be any higher than the bot
tom of the vehicle body.
- Do not dr ive faster tha n wal king speed .
A WARNING
-
After driving thro ugh water or m ud, the effec
tiveness o f the b rakes may be red uced due to
mo isture on the brake rotors and brake pads.
A few careful brake applications shou ld dry
off the brakes.
@ Note
- Vehicle components such as the engine,
transmiss ion, suspens ion or elect rical