key AUDI A6 2017 User Guide
[x] Cancel search | Manufacturer: AUDI, Model Year: 2017, Model line: A6, Model: AUDI A6 2017Pages: 280, PDF Size: 70.24 MB
Page 38 of 280
Opening and clo sin g
due to similar movements, such as when you
walk between the rear of th e vehicle and your ga
rage door.
General inform ation
I n some situations, the function may be lim ited
or tempo rar ily unava ilable . This may happen if :
- the luggage compartment lid was closed imme diately before .
-you park close to a hedge and the branches move back and forth under the vehicle for a
long period of time.
- you clean your vehicle , fo r example with a pres
sure washe r or i n a car wash.
- there is heavy rain.
- the bumper is very dirty , for example after driv-
ing on salt-covered roads .
- there is interference to the radio signal from
the ve hicle key, such as from cell phones or re
mote controls .
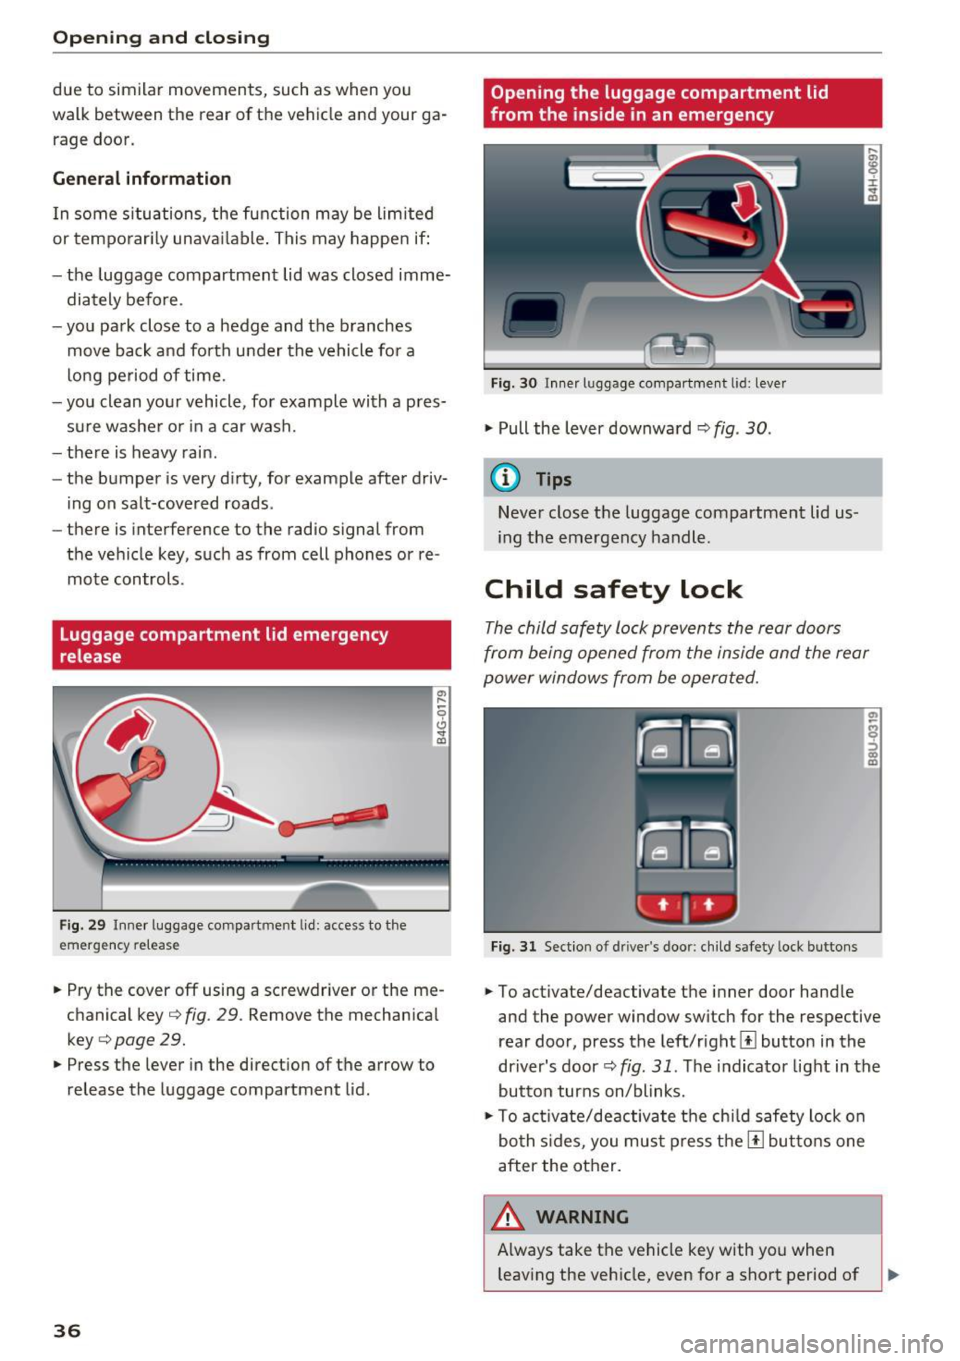
Luggage compartment lid emergency
release
F ig . 29 Inner luggage compart men t lid : access to the
emergen cy re le ase
.,. Pry the cover off using a screwdriver or the me
chan ical key ¢
fig. 29 . Remove the mechan ica l
key ¢
page 29 .
.,. Press the lever in the direct ion of the arrow to
release the luggage compartment lid .
36
Opening the luggage compartment lid
from the ins ide in an emergency
Fig. 30 I nne r luggage compart ment l id : leve r
.,. Pull the lever downward¢ fig. 30 .
(D Tips
Never close t he luggage compartment lid us
i ng the emergency handle .
Child safety lock
The child safety lock prevents the rear doors
from being opened from the inside and the rear
power windows from be operated.
Fig. 31 Sect ion o f dri ver's doo r: ch ild safety loc k bu ttons
.,. To activate/deactivate the inner door hand le
and the power window switch for the respective
rear doo r, press the left/rightl±l button in the
driver's door¢
fig. 31 . The indicator light in the
button turns on/blinks .
.,. To act ivate/deactivate the chi ld safety lock o n
bo th s ides, you mus t press the [!l but tons one
after the other.
A WARNING , ~
A lways take the vehicle key with you when
leaving the veh icle, even for a short period of
Page 39 of 280
co
co
.... N
" N .... 0 0 <.,;) 'SI"
time. T hi s app lies pa rt icu larly when children
remain in the vehicle. Othe rw ise children
co uld start t he engine or operate elect rical
equipment (such as power windows), which
increases the r is k of an accident .
Power windows
Controls
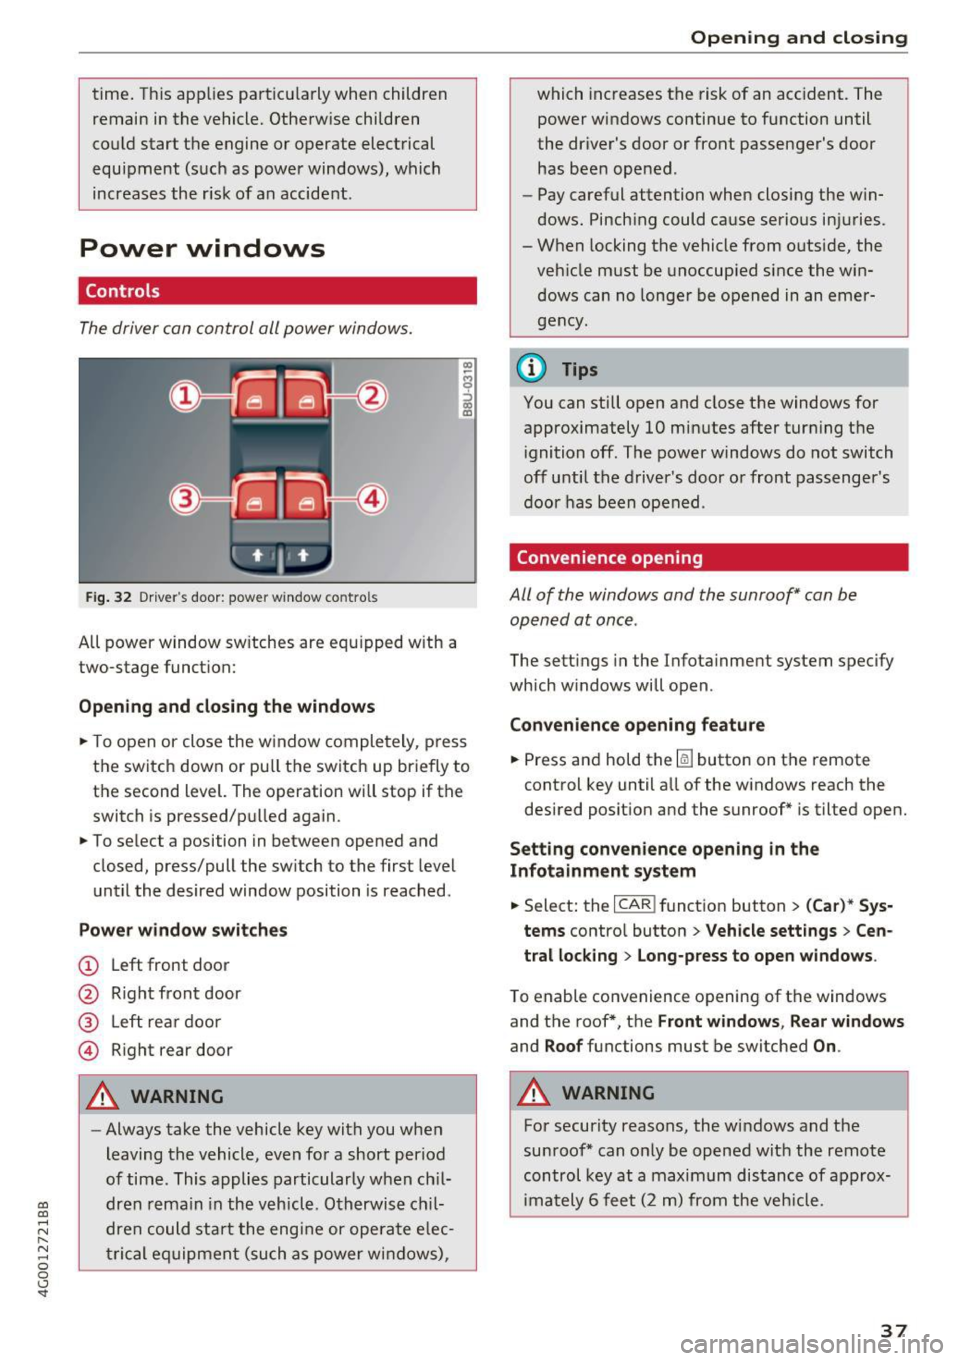
The driver can control all power window s.
F ig. 32 Dr ive r's door : power w indow co ntro ls
All power window sw itches are eq uipped w ith a
two-stage funct ion:
Opening and closing the windows
"' -$ :,
"' CD
~ T o open or close the w indow completely, p ress
the switch down or pu ll the switch up briefly to
the second level. The operation will stop if the
switch is pressed/pu lled again.
~ To se lect a position in between opened and
closed, press/pull the sw itch to the first level
u nt il the desired window position is reached.
Power window switches
(!) L eft front door
@ R ight front door
® L eft rea r d oor
© Right rear door
A WARNING
- Always take the vehicle key wit h you when
leaving the vehicle, even fo r a short period
of time . This applies particularly w hen ch il
dr en re ma in in the vehicl e. O th erwis e chi l
dre n cou ld st art t he engi ne or ope ra te e lec
t ric al eq uip m ent (such as power wi ndows),
Open ing and closing
which increases the risk of an acc ident. The
power windows continue to function until
the dr iver's door or front passenge r's door
has been opened .
- Pay careful attention when closing the w in
dows . Pinch ing could ca use serio us in juries.
- When locking the vehicle from o utside, the
veh icle must be unoccup ied since the win
d ows can no longe r be o pened in an emer
g e ncy .
@ Tips
You can still o pen and close the windows for
approximately 10 mi nutes after tur ning t he
i gnition off . The power windows do not switch
off until the driver 's door o r front passenger 's
door has been open ed .
Convenience opening
All of the windows and the sunroof* can be
opened at once .
The settings in the Infota inment system specify
which w indows will open .
Convenience opening feature
~ Press and hold the~ button on the remote
control key until a ll of the w indows reach the
desired position and the sunroof* is tilted open.
Setting convenience opening in the
Infotainment system
~ Select: the I CAR I funct io n button > (Car) * Sys
tems
contro l button > Vehicle sett ings > Cen
tral locking
> Long-press to open windows .
To enable convenience openin g of the w indows
and the roof *, th e
Front windows , Rear windows
and Roof functions must be switched On .
A WARNING
For security reasons, the w indows and the
su nroof* can o nly be opened wit h the remote
control key at a maximum distance of a pprox
im ately 6 fee t (2 m ) from the veh icle .
37
Page 40 of 280
Opening and clo sin g
Correcting power window malfunctions
You con reactivate the one-touch up/down func
tion if it malfunctions .
• Pull the power window switch up unt il the win
dow is completely raised.
• Release the sw itch and pull it up again for at
least one second.
Sunroof
Description
Applies to: veh icles with slid ing/tilting sunroof
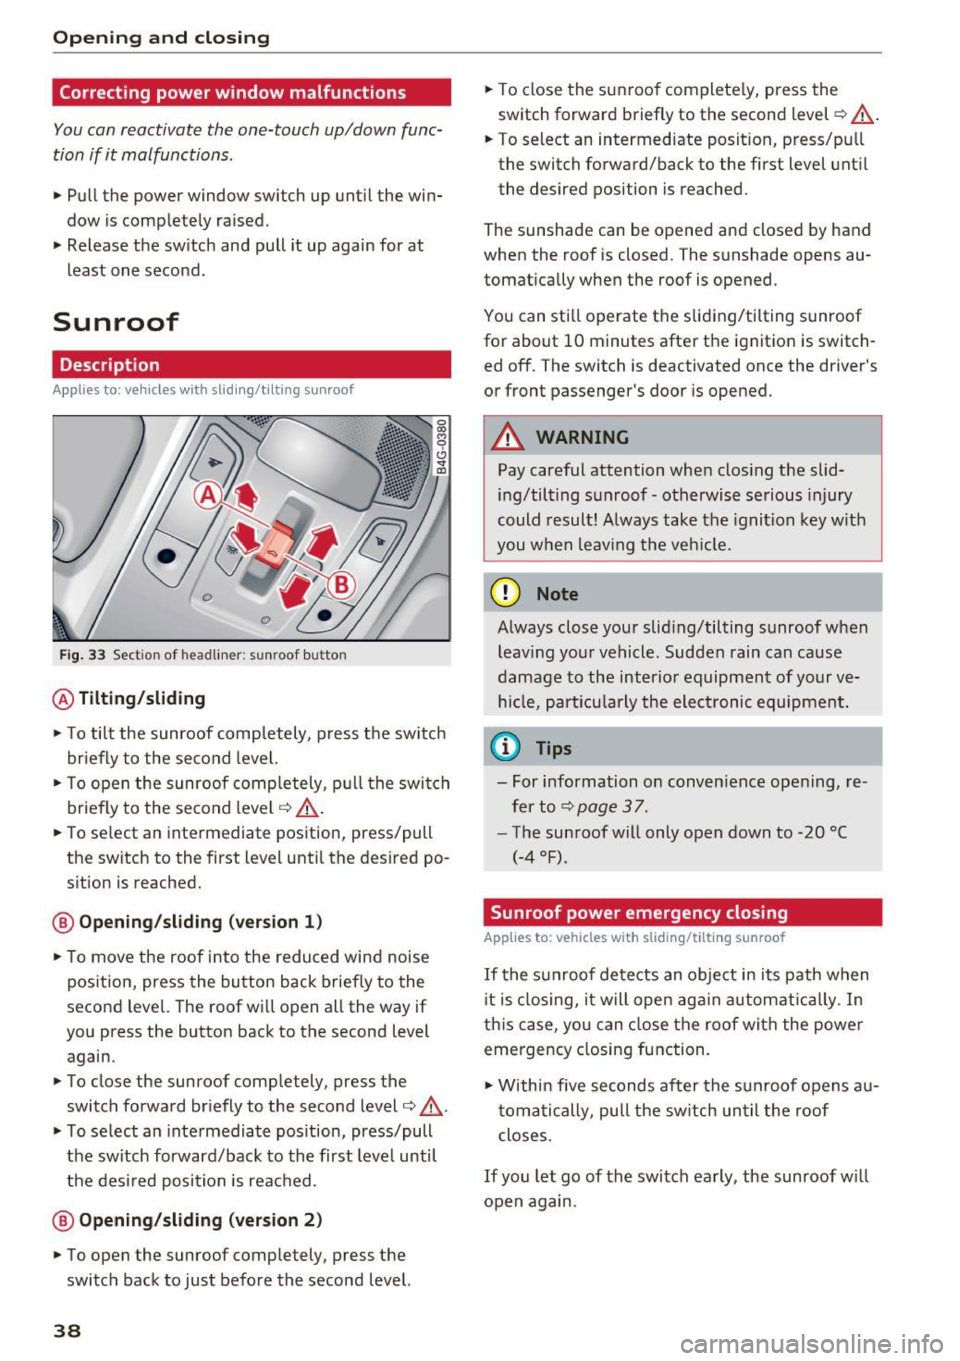
Fig. 33 Sect ion of head liner: sunroof button
@ Tilting /sliding
• To tilt the sunroof comp letely, press t he switch
briefly to the second level.
• To open the sunroof completely, p ull the switch
briefly to the second level
c:::> &_ .
• To select an intermediate position, press/pull
the switch to the first level until the desired po
sition is reached.
@ Openin g/sliding (ver sion 1 )
• To move the roof into the reduced wind noise
position, press the button back brief ly to the
second level. The roof will open all the way if
you press the button back to the second level
again.
• To close the sunroof completely, press the
switch forward br iefly to the second level
c:::> & .
• To select an intermediate pos ition, press/pull
the switch forward/back to the first level until
the des ired position is reached .
@ Opening/sliding (ver sion 2)
• To open the sunroof completely, press the
switch back to just before the second level.
38
• To close the sunroof complete ly, press the
switch forward briefly to the second level
c:::> &_.
• To select an intermediate posit ion, press/pu ll
the switch forward/back to the first level until
the desired position is reached.
The sunshade can be opened and closed by hand
when the roof is closed. The sunshade opens au
tomatically when the roof is opened.
You can sti ll operate the sliding/tilting sunroof
for about 10 minutes after the ignition is switch
ed off. The switch is deactivated once the driver 's
or front passenger's door is opened.
A WARNING
Pay careful attention whe n clos ing the slid
ing/tilting s unroof- otherwise serious injury
could result! A lways take the ignition key w ith
you w hen leav ing the veh icle.
-
(D Note
Always close your slid ing/tilting sunroof when
l eav ing your vehicle. Sudden rain can cause
damage to the inter io r equipment of your ve
h icl e, par ticu larly the elect ronic equipment.
(j) Tips
- For information on conven ience ope ning, re
fer to
c:::> page 3 7 .
- The sunroof will only open down to -20 °C
(-4 °F).
Sunroof power emergency closing
Applies to: vehicles with sliding/tilting sunroof
If the s unroof de tects an object in its path when
i t is closing, i t will open again automatically . In
th is case, you can close the roof with the power
emergency closing function .
• Within five seconds af ter the sunroof opens au
tomatically, pull the sw itch un til the roof
closes.
If you let go of the switch ea rly, the sunroof w ill
open again .
Page 41 of 280
Valet Parking function
Applies to: veh icles wit h Valet Parking function
The valet parking function protects the luggage
comportment from unauthorized access .
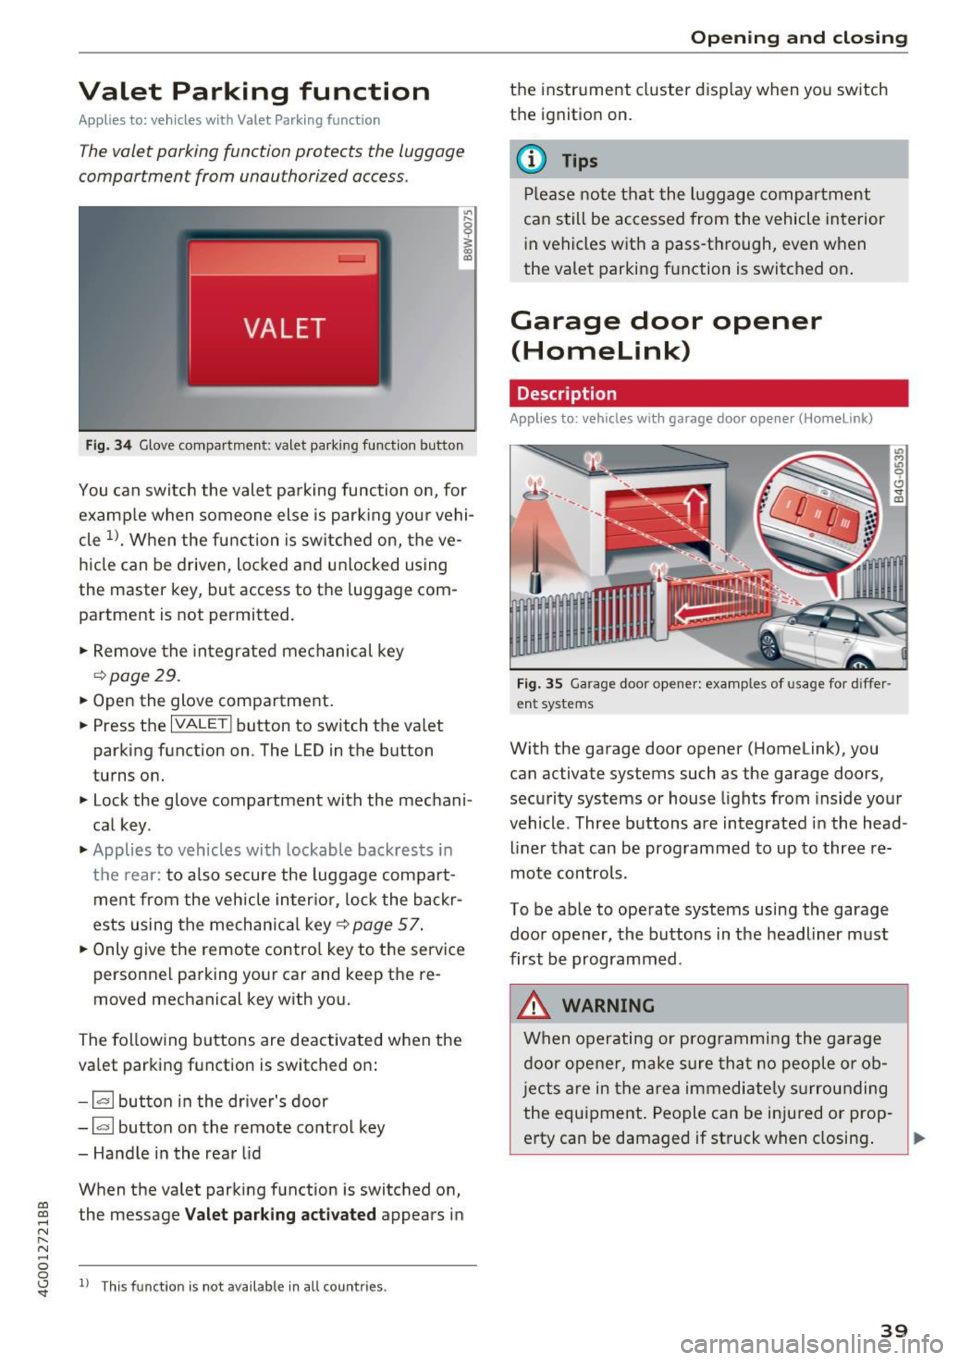
Fig. 34 Glove compartment: valet park ing function button
You can switch the valet parking function on, for
example when someone else is parking your vehi
cle
l)_ When the function is switched on, the ve
hicle can be driven, locked and unlocked using
the master key, but access to the luggage com
partment is not permitted .
.,. Remove the integrated mechanical key
r::!:>poge 29.
.,. Open the glove compartment.
.,. Press the
IVALET I button to switch the valet
parking function on. The LED in the button
turns on.
.,. Lock the glove compartment with the mechani
cal key .
.,. Applies to vehicles with lockable backrests in
t h e rear: to also secure the luggage compart
ment from the vehicle inter ior, lock the backr
ests using the mechanica l key ¢
page 57.
.,. Only giv e the remote control key to the service
personnel parking your car and keep the re
moved mechanical key with you.
The following buttons are deactivated when the
va let parking function is switched on:
- 1""' 1 button in the driver's door
-la l button on the remote control key
- Handle in the rear lid
When the valet parking function is switched on,
co ~ the message Valet parking activated appears in
N
" N .... 0 0
~ ll This func tion is not available in all co untries .
Open ing and closing
the instrument cluster display when you switch
the ignition on.
(D Tips
Please note that the luggage compartment
can still be accessed from the vehicle interior
in vehicles with a pass-through, even when
the valet parking function is switched on .
Garage door opener
(Homelink)
Description
Applies to: veh icles with garage door opener (Home link)
Fig . 35 Garage door opene r: examples of usage for diffe r
ent systems
With the garage door opener (Homelink), you
can activate systems such as the garage doors ,
security systems or house lights from inside your
vehicle. Three buttons a re integrated in the head
liner that can be programmed to up to three re
mote controls.
To be able to operate systems using the garage
door opener, the buttons in the headliner must
first be programmed .
_&. WARNING
When operating or programming the garage
door opener, make sure that no people or ob
j ects are in the area immediate ly surrounding
the equipment. People can be injured or prop-
erty can be damaged if struck when closing. .,.
39
Page 46 of 280
Lights and Vision
turn signal lever . The emergency flashers stop
temporarily .
The emergency flashers also wo rk when the igni
tion is turned off.
Interior lighting
Front and rear interior lighting
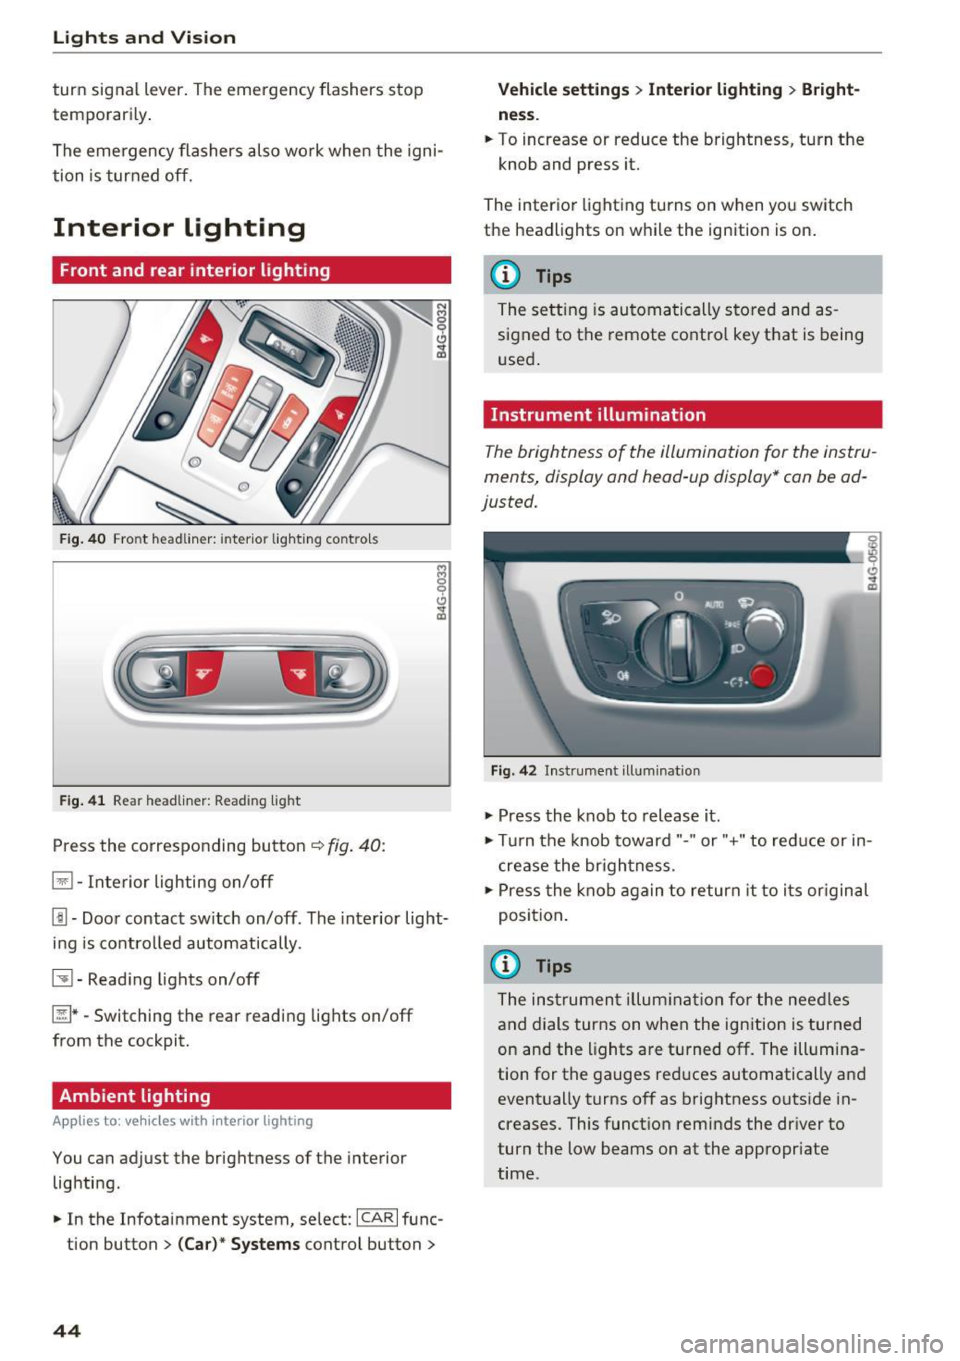
Fig . 4 0 Fro nt headli ner: inter io r lig hting co ntro ls
F ig . 4 1 Rea r headliner: Read ing light
Press the corresponding button ~ fig. 40:
El -Interior lighting on/off
Jjj -Door contact sw itch on/off. The interior light
ing is contro lled automatically.
~ - Read ing lights on/off
~ *·Switching the rear reading lights on/off
from the cockpit.
Ambient lighting
Ap plies to: vehicl es w ith i nterio r lighting
You can adjust the brightness of the interior
lighting .
.. In the Infotainment system , select:
ICAR I func
tion button
> ( Ca r)* Sy stems control button >
44
Vehicle setting s> Interior lighting > Bright
ne ss .
.. To increase or reduce the brightness, turn the
knob and press it.
The inter ior lighting turns on when yo u switch
the headlights on w hile the ignition is on .
(D Tips
The setting is automa tically stored and as
s igned to the remote contro l key that is being
u sed .
Instrument illumination
The brightness of the illumination for the instru
ments, display and head -up display* can be ad
justed.
F ig. 42 In strument illuminat ion
.,. Press the knob to release it .
.,. Tur n the knob toward"." or"+" to reduce or in
c rease the br ightness.
.,. Press the knob again to return it to i ts or iginal
position .
(i} Tips
The ins trumen t illum ina tion for the nee dles
and dials turns on when the ign ition is turned
on and the lights are turned off. The illum ina
tion for the gauges red uces automatically and
event ually turns off as brightness outside in
creases. This funct ion reminds the dr iver to
turn the low beams on at the appropriate
time.
Page 47 of 280
co
co
.... N
" N .... 0 0 <.,;) 'SI"
Vision
Adjusting the exterior mirrors
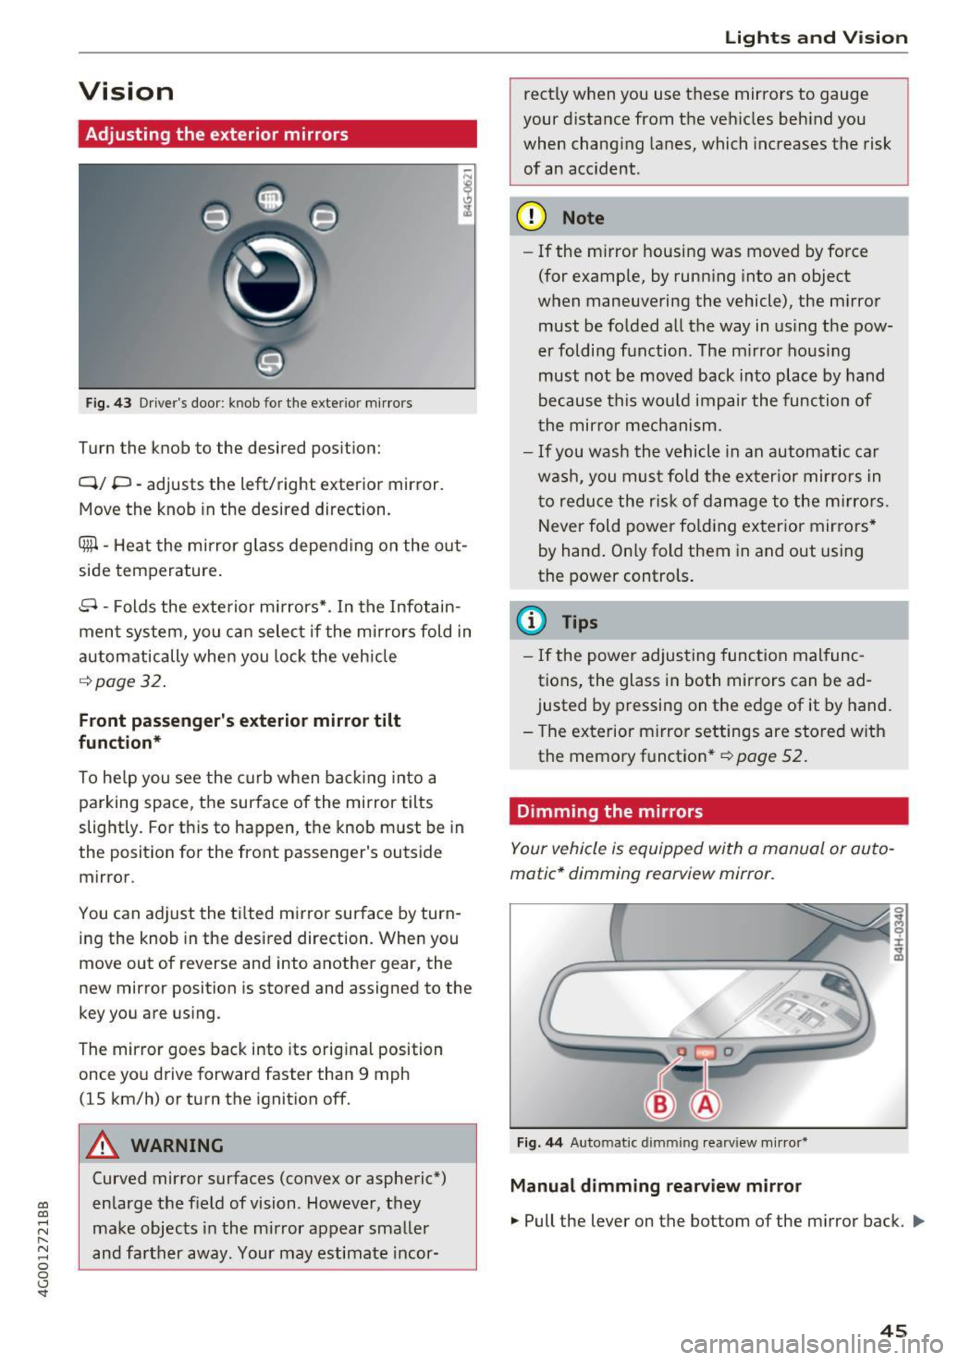
Fig. 43 Driver's door: knob for the exterior mir rors
Turn the knob to the desired pos ition:
Q/ P -adjusts the left/right exterior mirror.
Move the knob in the desired direction.
Cfill -Heat the mirror g lass depen ding on the o ut
side temperature .
8 -Folds the exte rior mi rrors*. In the Infotain
men t system, you ca n selec t if the mirrors fold in
automatically when you lock the veh icle
¢page 32.
Front passenger's exterior mirror tilt
function*
To he lp you see the curb w hen back ing in to a
parking space, the surface of the mirror tilts
slightly . For th is to happen, t he knob must be in
the posit ion for the front passenger's outside
mirror.
You can adjust the t ilted mi rror sur face by turn
i ng the knob in the desired direction. Whe n you
move out of reverse and into anot her gear, the
new mirror position is stored and assigned to the
key you a re using.
The mirror goes back into its orig inal position
once yo u drive forward faster than 9 mph
(15 km/h) or turn the ignition off.
A WARNING
Curved mirror surfaces (convex or aspheric*)
en large the f ield of vision. However, they
make obj ects in the mi rror appear smalle r
and fa rther away. Your may estimate i ncor-
Lights and V ision
rect ly when you use t hese mirrors to gauge
your d istance from the ve hicles beh ind you
when chang ing lanes, which increases the risk
of an acc ident.
(D Note
- If the m irror housing was moved by fo rce
(for example, by runn ing into an object
w hen maneuvering the vehicle) , the m irro r
must be fo lded all the way in us ing t he pow
er foldi ng f unction. The m irro r ho us ing
must not be moved back into plac e by hand
because this wo uld impair the func tion of
t he mir ror mec hanism.
- If you wash the vehicle in an automa tic ca r
w ash , you mus t fo ld the ex ter ior mir ror s in
t o reduce the r isk of d am age to the m irro rs.
N ever fold p ower fo ld ing ex ter ior mir rors *
by hand . On ly fold them in and out using
the power controls .
(D Tips
-If the power adjus ting func tion mal func
tions, the glass in both mirrors can be ad
justed by p ressing on the e dge of it by hand.
- T he exterior m irror settings are store d with
the memo ry functio n*
r=;, page 52.
Dimming the mirrors
Your vehicle is equipped with a manual or au to
matic* dimming rearview mirror.
Fi g. 44 Automatic dimming rearview mirror*
Manual dimming rearview mirror
.,. Pull the lever on the bottom of the mirror back. ll>
45
Page 54 of 280
Sea ts and stor age
Rear head restraints
Applies to: ve hicles w ith adj ustable head restra ints
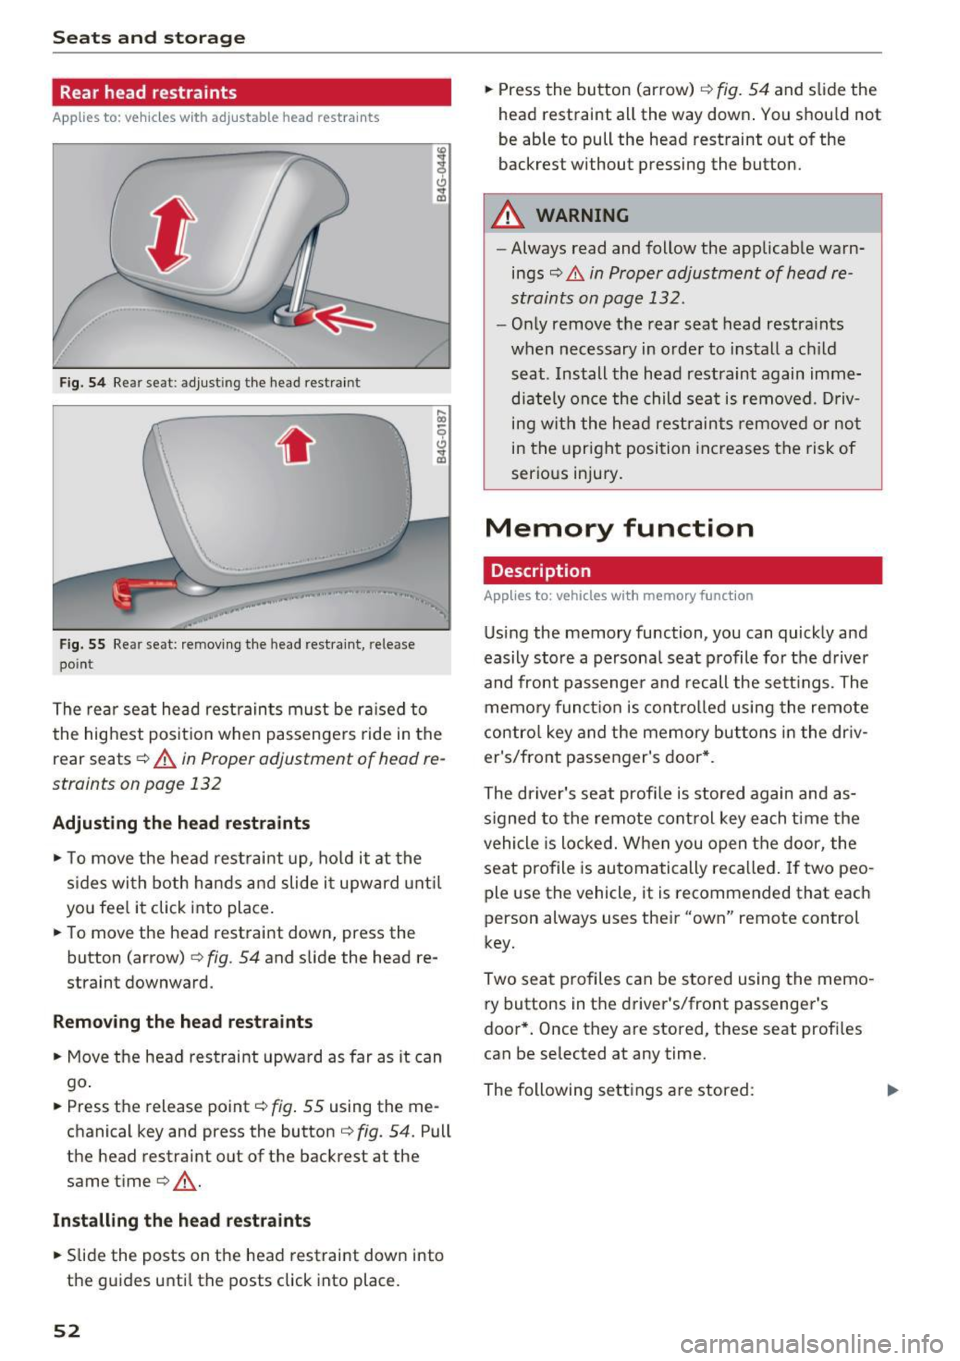
Fig. 54 Re ar seat: adju stin g th e head restra int
.. , ,.
F ig . 5 5 Re ar seat: remov ing the head res traint , rele ase
poin t
The rea r seat head restraints must be ra ised to
the highest posit io n when passenge rs ride in the
r e ar seats ¢
A in Proper adjustment of h ead re
straints on page 132
Adjusting the head rest raints
"' To move the head rest rai nt up, ho ld it at the
s ides wi th both hands a nd slide i t upward unt il
yo u fee l it click into place.
"' To move the head restraint down, press the
button (a rrow)
¢ fig . 54 and slide the head re
straint downward.
Remov ing th e head re st ra ints
"' Move the head restraint upward as far as it can
go .
"' Press the release point¢
fig. 55 using the me
chanical key and p ress the button ¢
fig. 54. Pull
the he ad restraint out of the ba ckrest at the
same time¢,&. .
Install ing the head restra ints
"' Slide the posts on the head restraint dow n into
the guides unti l the posts click into place.
52
"' Press the button (arrow) ¢ fig . 54 and slide the
head restra int all the way down . You should not
be able to pull the head restraint out of the
backres t wi thout pressing the button.
A WARNING
- Always read and follow the applicab le warn
ings
¢ .&. in Proper adjustment of head re
straints on page 132.
- Only remove t he rear seat head restra ints
when necessary in order to install a ch ild
seat . Install the head restraint again imme
dia tely once the child sea t is removed . D riv
ing with the he ad restraints remove d or no t
in the upright posi tion increases the risk of
serious injury.
Memory function
Description
App lies to: vehicles with memory funct ion
Using the memory function, you can quick ly and
easily store a persona l seat profile fo r the d river
and front passenge r and recall the sett ings. The
memory funct ion is contro lled using the remote
contro l key and the memory but tons in the dr iv
er's/front passenger's door *.
The driver's seat profi le is stored again and as
s igned to the remote cont rol key each time the
vehicle is locked. W hen you open the door, the
seat profile is automatically recalled. If two peo
ple use the vehicl e, it is recommend ed that each
person always uses the ir "own" remote control
key.
Two sea t profiles can be s tored using the memo
ry buttons in t he driver's/front passenge r's
door *. Once they are stored, these seat profi les
can be selected at any time.
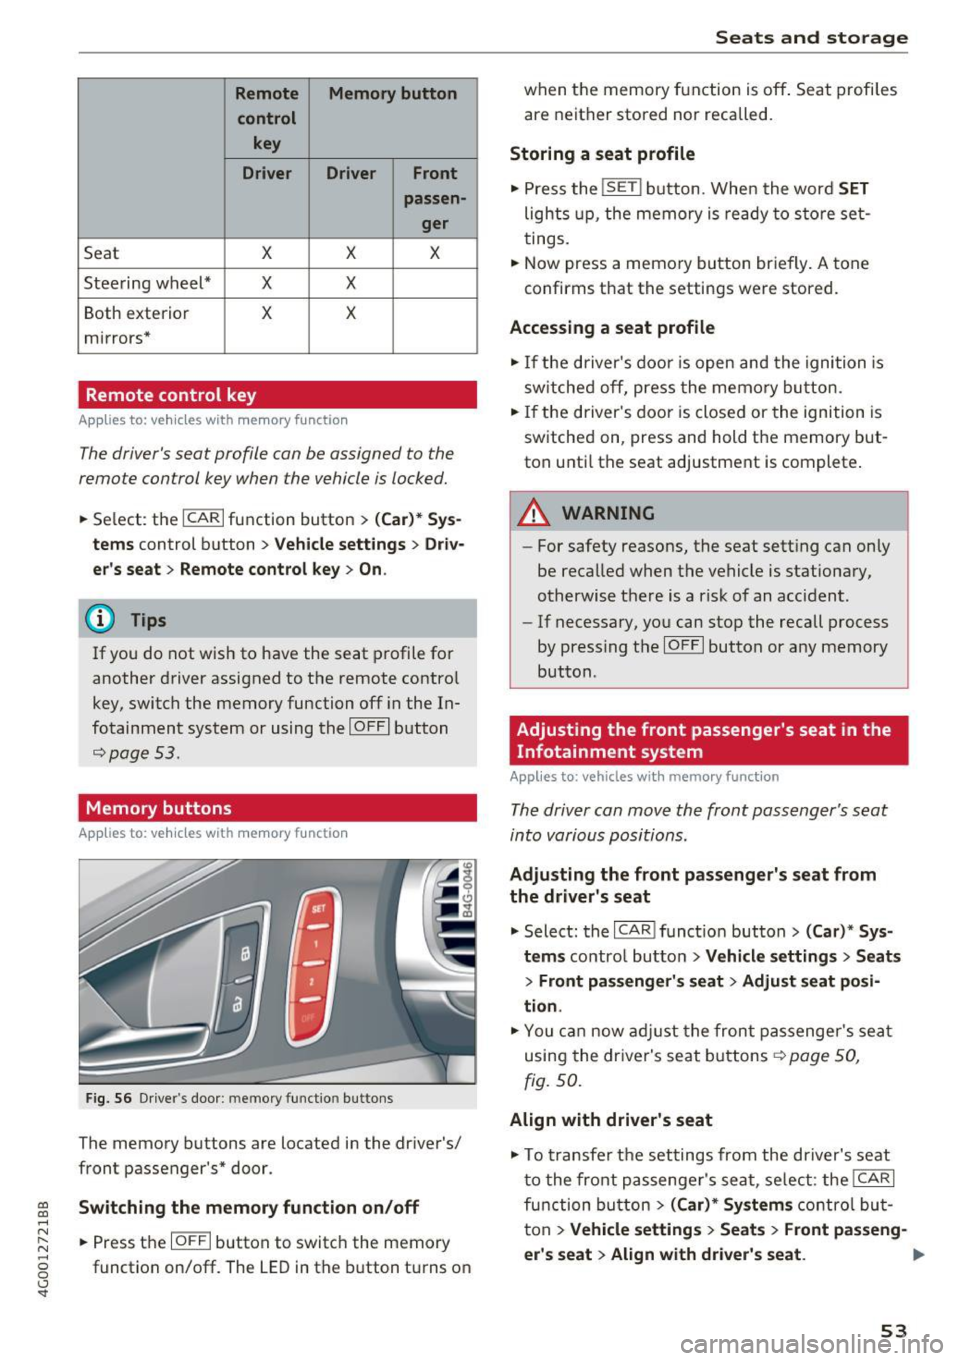
The following se ttings are stored :
Iii>
Page 55 of 280
co
co
.... N
" N .... 0 0 <.,;) 'SI"
Remote Memory button control key
Driver D river Front
passen-ger
Seat X X X
Steering wheel* X X
Both
exterior X X
mirrors*
Remote control key
Applies to: vehicles with memory function
The driver's seat profile can be assigned to the
remote control key when the vehicle is locked.
• Select: the ICARI function button > (Car)* Sys
tems
control button > Vehicle settings > Driv
er's seat
> Remote control key > On .
(D Tips
If you do not wish to have the seat profile for
another driver assigned to the remote control
key, switch the memory function off in the In
fotainment system or using the
IOFFI button
¢page 53.
Memory buttons
Applies to: vehicles with memory function
Fig. S6 Driver 's door: memory function buttons
The memory buttons are located in the driver's/
front passenger's* door.
Switching the memory function on/off
• Press the IOFFI button to switch the memory
function on/off. The LED in the button turns on
Seats and storage
when the memory function is off . Seat profiles
are neither stored nor recalled.
Storing a seat profile
• Press the ISET I button. When the word SET
lights up, the memory is ready to store set
tings .
• Now press a memory button briefly. A tone
confirms that the settings were stored.
Accessing a seat profile
• If the driver's door is open and the ignition is
sw itched off, press the memo ry button.
.. If the driver's door is closed or the ignition is
switched on, press and hold the memory but
ton until the seat adjustment is complete .
A WARNING
-For safety reasons, the seat setting can only
be recalled when the vehicle is stationary,
otherwise the re is a risk of an accident.
- If necessary, you can stop the recall process
by press ing the
IOFFI button or any memory
button.
Adjusting the front passenger's seat in the
Infotainment system
Applies to: vehicles with memory function
The driver can move the front passenger's seat
into various positions.
Adjusting the front passenger's seat from
the driver's seat
• Select: the I CAR I funct ion button > (Car) * Sys
tems
contro l button > Vehicle settings > Seats
> Front passenger's seat > Adjust seat posi
tion .
• You can now adjust the front passenger's seat
using the driver's seat buttons
¢ page SO,
fig.
so.
Align with driver's seat
• To transfer the settings from the driver's seat
to the front passenger's seat, select: the
I CAR I
function button > (Car)* Systems control but
ton
> Vehicle settings> Seats > Front passeng-
er 's seat > Align with driver 's seat. ..,.
53
Page 56 of 280
Sea ts and stor age
.. Press and hold the control knob until the ad
justing process is complete.
@ Tips
The lumbar support and upper th igh support
settings a re not transferred when aligning
the front passenger's seat with the driver's
seat.
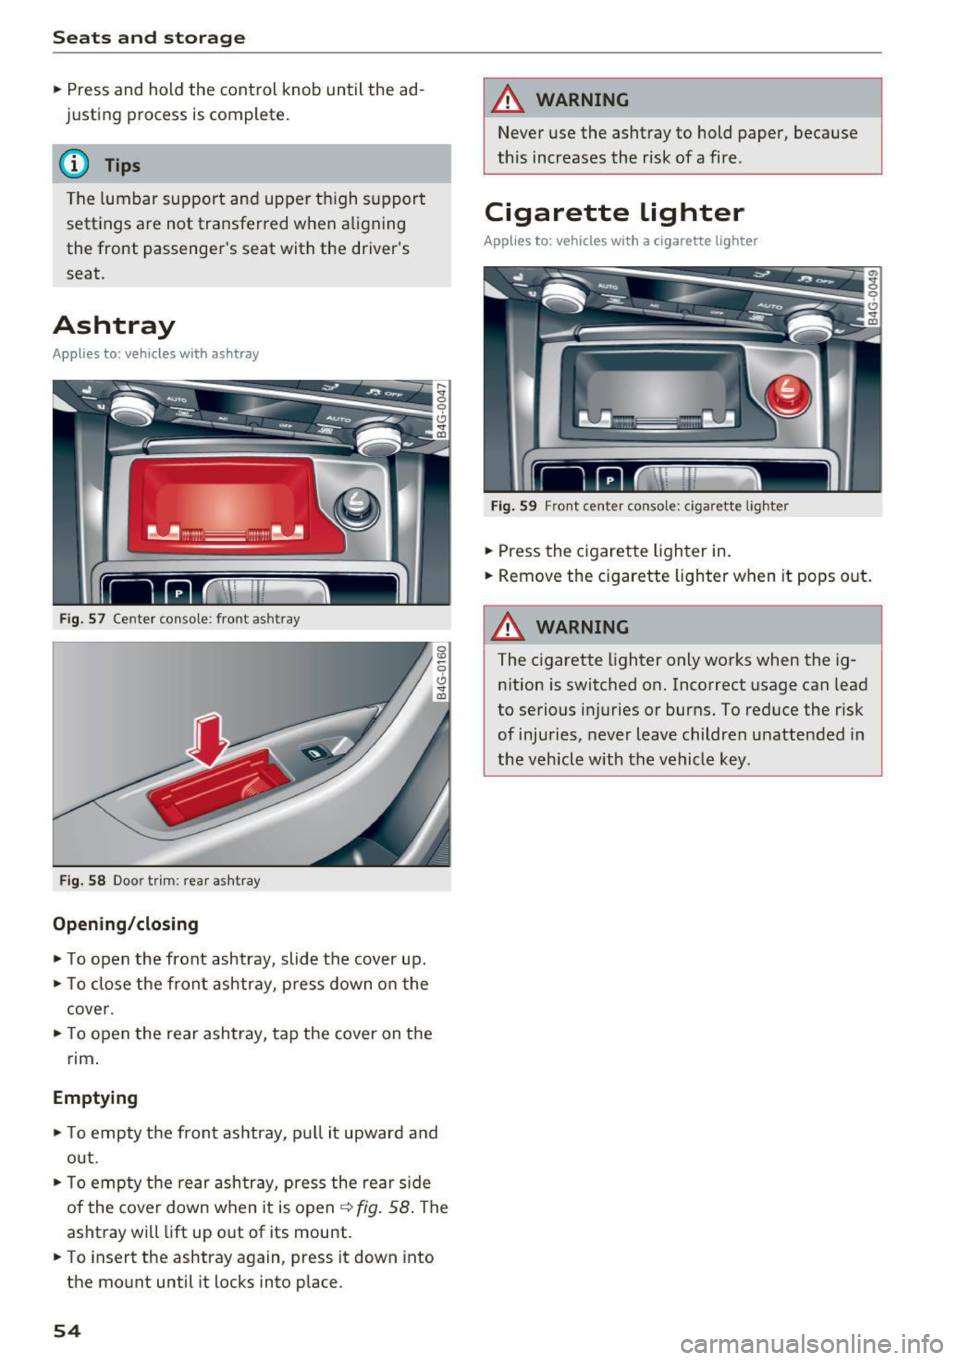
Ashtray
A pp lies to: ve hicles w ith ashtray
F ig . 57 Center conso le : front ashtray
F ig. 58 Doo r tr im: rea r asht ray
Opening /closing
.. To open the front ashtray, slide the cover up .
.. To close the front ashtray, press down on the
cover .
.. To open the rear ashtray, tap the cover on the
rim .
Emptying
.. To empty th e front ashtray, pu ll it upward and
out .
.. To empty the rear ashtray, press the rear side
of the cover down when it is open ¢ fig. 58 . The
ashtray will lift up out of its mount .
.. To insert the ashtray again, press it down into
the mount until it locks into place.
54
A WARNING
Never use the ashtray to hold paper, because
this increases the risk of a fire .
Cigarette lighter
Applies to: vehicles wi th a ci gare tte lighter
F ig . 59 Front center conso le: cigarette lighter
.. Press the c igarette lighter in .
.. Remove the cigarette lighter when it pops out.
A WARNING
The cigarette lighter only works when the ig
n ition is switched on. Incorrect usage can lead
to serious injuries or burns. To reduce the risk
of injuries, never leave children unattended in
the vehicle with the vehicle key.
Page 57 of 280
co
co
.... N
" N .... 0 0 <..:l 'SI'
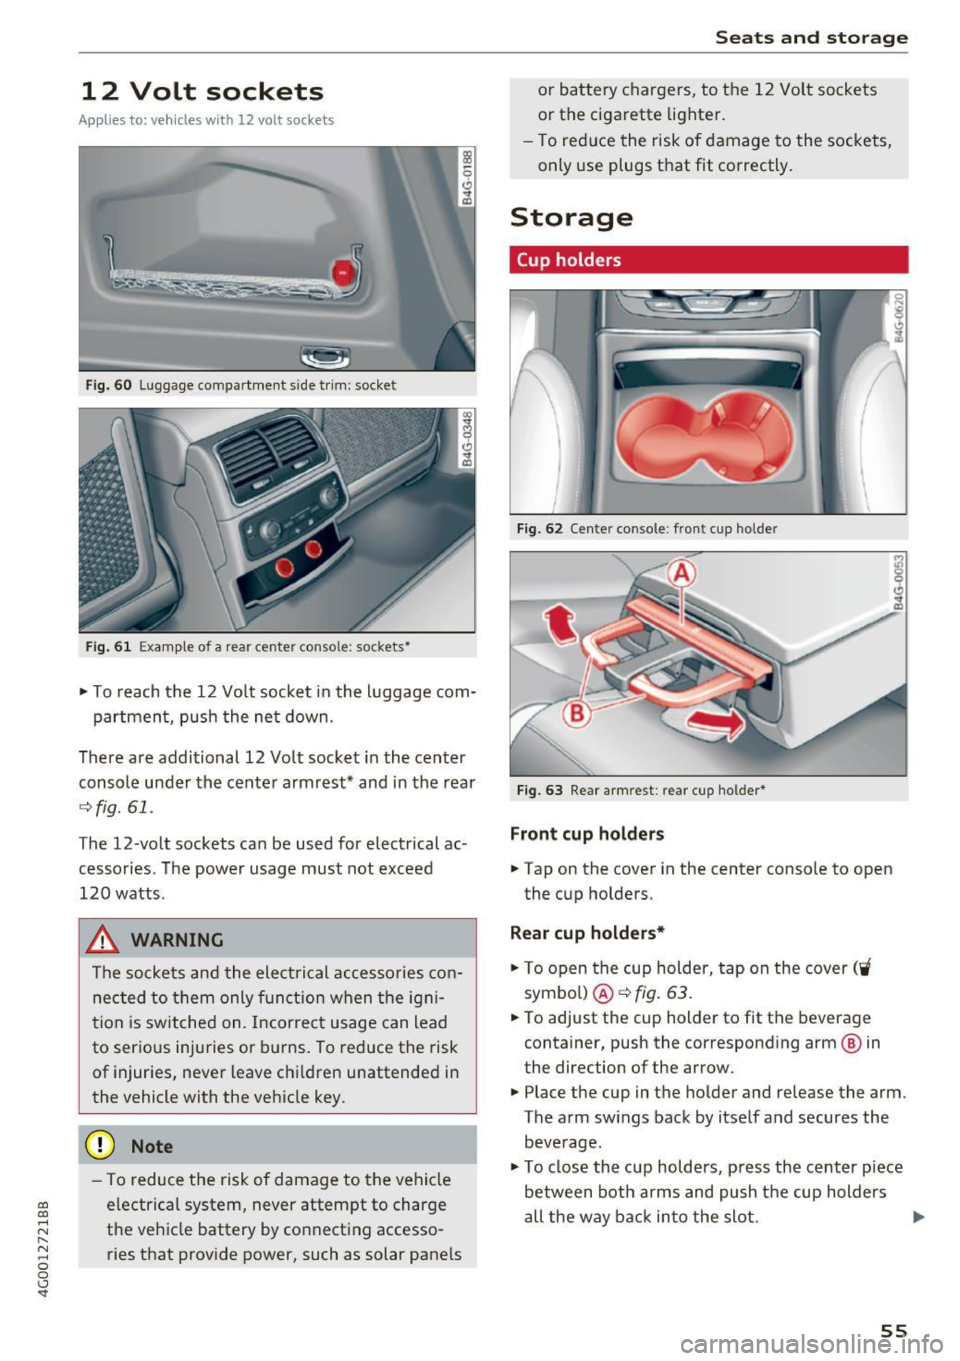
12 Volt sockets
App lies to: ve hicles with 12 volt socke ts
Fi g. 60 Luggage compartment s ide tr im: socket
Fi g. 61 Exa mple of a rear center conso le: sockets•
~ T o reach the 12 Vo lt socket in the luggage com-
partmen t, push the ne t down.
There are additional 12 Volt socket in the center
console under the cente r armrest* and in the rear
¢ fig.61.
The 12-volt sockets can be used for electrical ac
cessories. The power usage must not exceed
120 watts .
_& WARNING
The sockets and the electrical accessories con
nec ted to them only f unction when the ig ni
t ion is switched on. Incorrect usage can lead
to serious injuries or b urns . To reduce the risk
of injur ies, never leave chi ldren unattended in
the vehicle with the vehicle key .
(D Note
-To reduce the risk of damage to t he vehicle
electrica l system, never attempt to charge
t h e veh icle battery by co nnect ing accesso
ries that provide power, such as solar pane ls
Seats and storag e
or battery chargers, to the 12 Vol t sockets
or the cigarette lighter.
- To red uce the risk of damage to the sockets,
only use plugs t hat fit correctly .
Storage
Cup holders
I
I
Fig . 6 2 Cente r console : front cup ho lder
Fi g. 63 Rear a rmrest : rear cup holder•
Front cup holders
~ Tap on the cover in the center conso le to open
the cup holders.
Rear cup holders*
~ To open the cup holder, tap on the cover ('i
symbo l) @ ¢fig . 63.
~ To adjust the cup holder to fit the beverage
container, push the corresponding arm @ in
the direction of the arrow.
~ Place the cup in the holder and release the arm.
The arm sw ings back by itse lf and secures the
beve rage.
~ To close the cup holders, p ress the center piece
between both arms and push t he cup holders
all the way back in to the slot . .,.
55