remote control AUDI A6 2017 User Guide
[x] Cancel search | Manufacturer: AUDI, Model Year: 2017, Model line: A6, Model: AUDI A6 2017Pages: 280, PDF Size: 70.24 MB
Page 41 of 280
Valet Parking function
Applies to: veh icles wit h Valet Parking function
The valet parking function protects the luggage
comportment from unauthorized access .
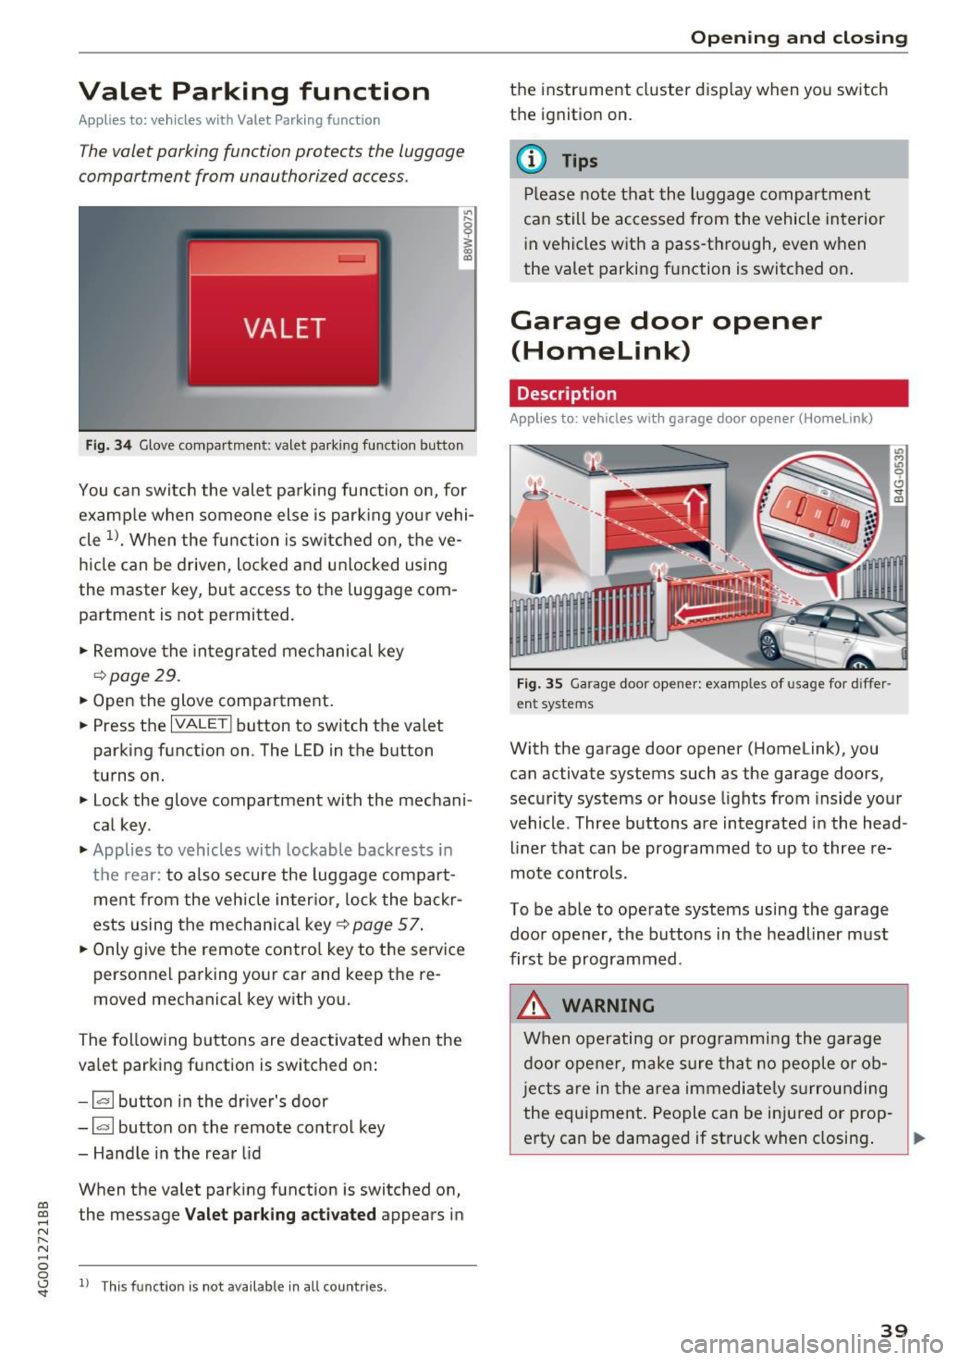
Fig. 34 Glove compartment: valet park ing function button
You can switch the valet parking function on, for
example when someone else is parking your vehi
cle
l)_ When the function is switched on, the ve
hicle can be driven, locked and unlocked using
the master key, but access to the luggage com
partment is not permitted .
.,. Remove the integrated mechanical key
r::!:>poge 29.
.,. Open the glove compartment.
.,. Press the
IVALET I button to switch the valet
parking function on. The LED in the button
turns on.
.,. Lock the glove compartment with the mechani
cal key .
.,. Applies to vehicles with lockable backrests in
t h e rear: to also secure the luggage compart
ment from the vehicle inter ior, lock the backr
ests using the mechanica l key ¢
page 57.
.,. Only giv e the remote control key to the service
personnel parking your car and keep the re
moved mechanical key with you.
The following buttons are deactivated when the
va let parking function is switched on:
- 1""' 1 button in the driver's door
-la l button on the remote control key
- Handle in the rear lid
When the valet parking function is switched on,
co ~ the message Valet parking activated appears in
N
" N .... 0 0
~ ll This func tion is not available in all co untries .
Open ing and closing
the instrument cluster display when you switch
the ignition on.
(D Tips
Please note that the luggage compartment
can still be accessed from the vehicle interior
in vehicles with a pass-through, even when
the valet parking function is switched on .
Garage door opener
(Homelink)
Description
Applies to: veh icles with garage door opener (Home link)
Fig . 35 Garage door opene r: examples of usage for diffe r
ent systems
With the garage door opener (Homelink), you
can activate systems such as the garage doors ,
security systems or house lights from inside your
vehicle. Three buttons a re integrated in the head
liner that can be programmed to up to three re
mote controls.
To be able to operate systems using the garage
door opener, the buttons in the headliner must
first be programmed .
_&. WARNING
When operating or programming the garage
door opener, make sure that no people or ob
j ects are in the area immediate ly surrounding
the equipment. People can be injured or prop-
erty can be damaged if struck when closing. .,.
39
Page 46 of 280
Lights and Vision
turn signal lever . The emergency flashers stop
temporarily .
The emergency flashers also wo rk when the igni
tion is turned off.
Interior lighting
Front and rear interior lighting
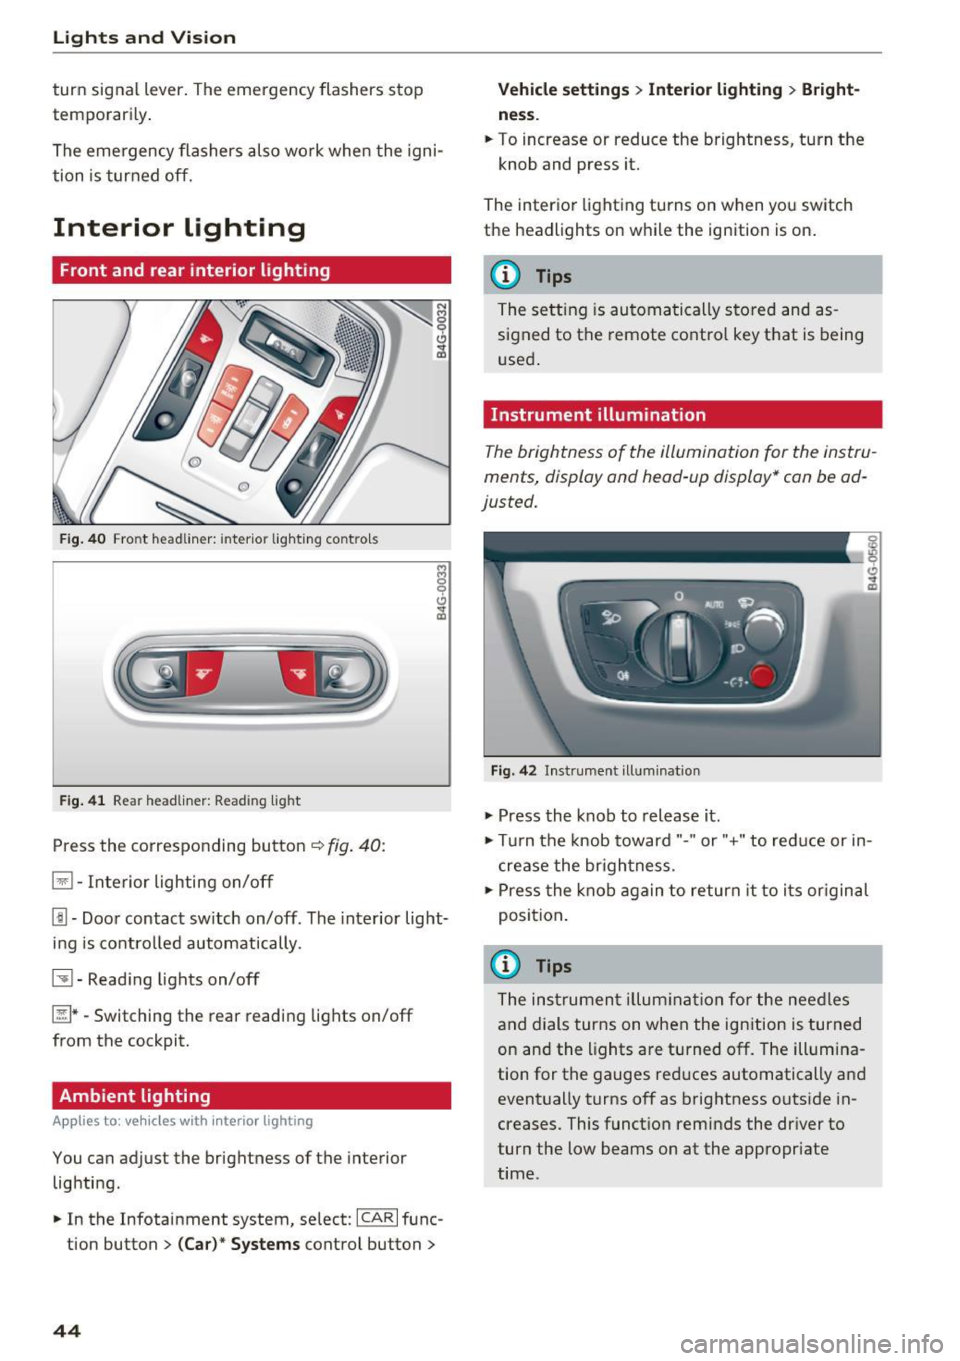
Fig . 4 0 Fro nt headli ner: inter io r lig hting co ntro ls
F ig . 4 1 Rea r headliner: Read ing light
Press the corresponding button ~ fig. 40:
El -Interior lighting on/off
Jjj -Door contact sw itch on/off. The interior light
ing is contro lled automatically.
~ - Read ing lights on/off
~ *·Switching the rear reading lights on/off
from the cockpit.
Ambient lighting
Ap plies to: vehicl es w ith i nterio r lighting
You can adjust the brightness of the interior
lighting .
.. In the Infotainment system , select:
ICAR I func
tion button
> ( Ca r)* Sy stems control button >
44
Vehicle setting s> Interior lighting > Bright
ne ss .
.. To increase or reduce the brightness, turn the
knob and press it.
The inter ior lighting turns on when yo u switch
the headlights on w hile the ignition is on .
(D Tips
The setting is automa tically stored and as
s igned to the remote contro l key that is being
u sed .
Instrument illumination
The brightness of the illumination for the instru
ments, display and head -up display* can be ad
justed.
F ig. 42 In strument illuminat ion
.,. Press the knob to release it .
.,. Tur n the knob toward"." or"+" to reduce or in
c rease the br ightness.
.,. Press the knob again to return it to i ts or iginal
position .
(i} Tips
The ins trumen t illum ina tion for the nee dles
and dials turns on when the ign ition is turned
on and the lights are turned off. The illum ina
tion for the gauges red uces automatically and
event ually turns off as brightness outside in
creases. This funct ion reminds the dr iver to
turn the low beams on at the appropriate
time.
Page 54 of 280
Sea ts and stor age
Rear head restraints
Applies to: ve hicles w ith adj ustable head restra ints
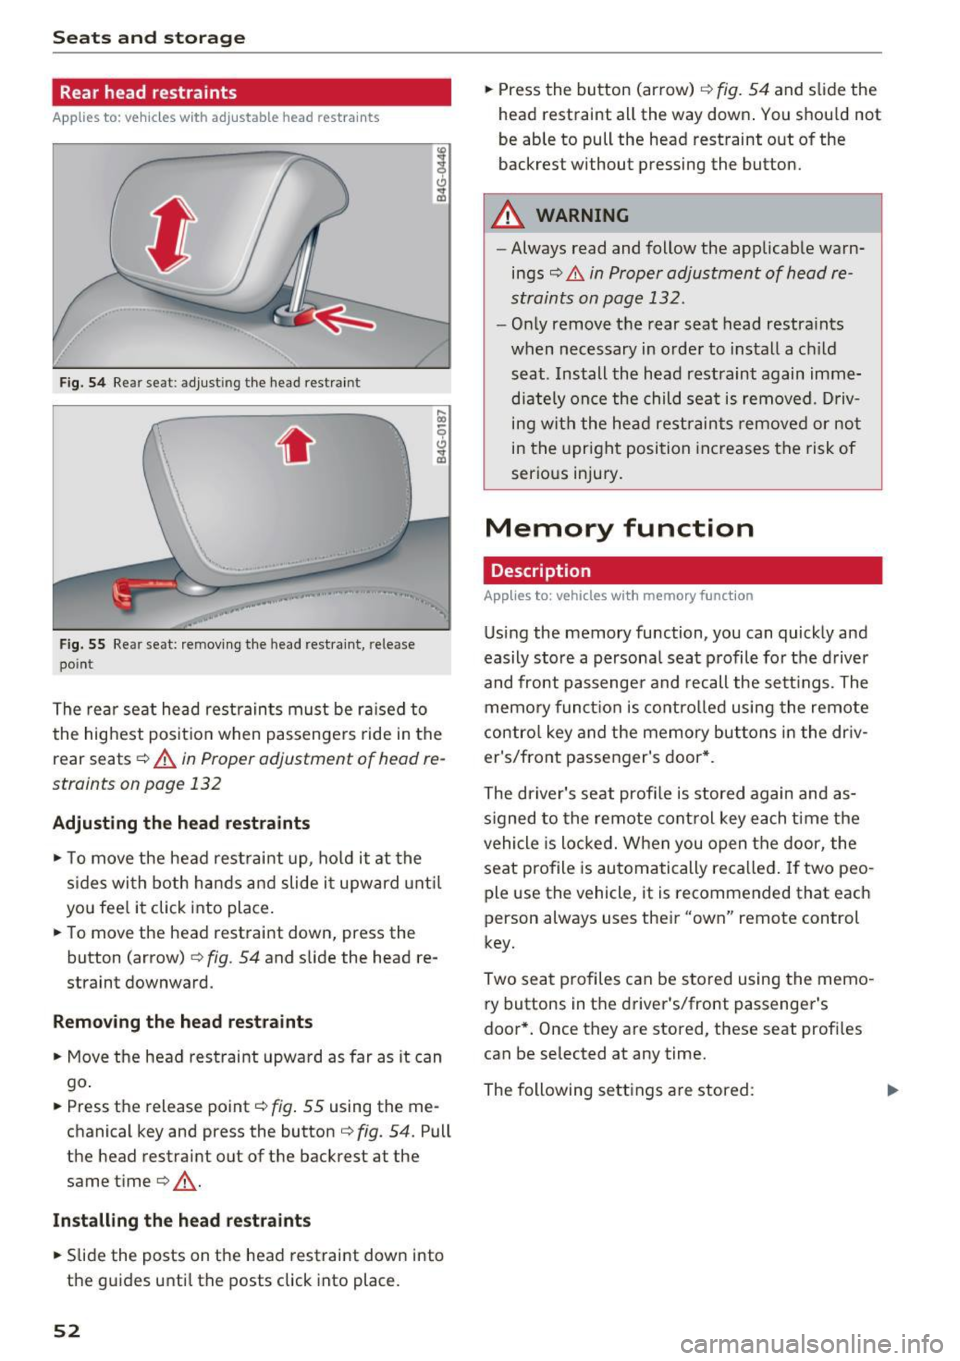
Fig. 54 Re ar seat: adju stin g th e head restra int
.. , ,.
F ig . 5 5 Re ar seat: remov ing the head res traint , rele ase
poin t
The rea r seat head restraints must be ra ised to
the highest posit io n when passenge rs ride in the
r e ar seats ¢
A in Proper adjustment of h ead re
straints on page 132
Adjusting the head rest raints
"' To move the head rest rai nt up, ho ld it at the
s ides wi th both hands a nd slide i t upward unt il
yo u fee l it click into place.
"' To move the head restraint down, press the
button (a rrow)
¢ fig . 54 and slide the head re
straint downward.
Remov ing th e head re st ra ints
"' Move the head restraint upward as far as it can
go .
"' Press the release point¢
fig. 55 using the me
chanical key and p ress the button ¢
fig. 54. Pull
the he ad restraint out of the ba ckrest at the
same time¢,&. .
Install ing the head restra ints
"' Slide the posts on the head restraint dow n into
the guides unti l the posts click into place.
52
"' Press the button (arrow) ¢ fig . 54 and slide the
head restra int all the way down . You should not
be able to pull the head restraint out of the
backres t wi thout pressing the button.
A WARNING
- Always read and follow the applicab le warn
ings
¢ .&. in Proper adjustment of head re
straints on page 132.
- Only remove t he rear seat head restra ints
when necessary in order to install a ch ild
seat . Install the head restraint again imme
dia tely once the child sea t is removed . D riv
ing with the he ad restraints remove d or no t
in the upright posi tion increases the risk of
serious injury.
Memory function
Description
App lies to: vehicles with memory funct ion
Using the memory function, you can quick ly and
easily store a persona l seat profile fo r the d river
and front passenge r and recall the sett ings. The
memory funct ion is contro lled using the remote
contro l key and the memory but tons in the dr iv
er's/front passenger's door *.
The driver's seat profi le is stored again and as
s igned to the remote cont rol key each time the
vehicle is locked. W hen you open the door, the
seat profile is automatically recalled. If two peo
ple use the vehicl e, it is recommend ed that each
person always uses the ir "own" remote control
key.
Two sea t profiles can be s tored using the memo
ry buttons in t he driver's/front passenge r's
door *. Once they are stored, these seat profi les
can be selected at any time.
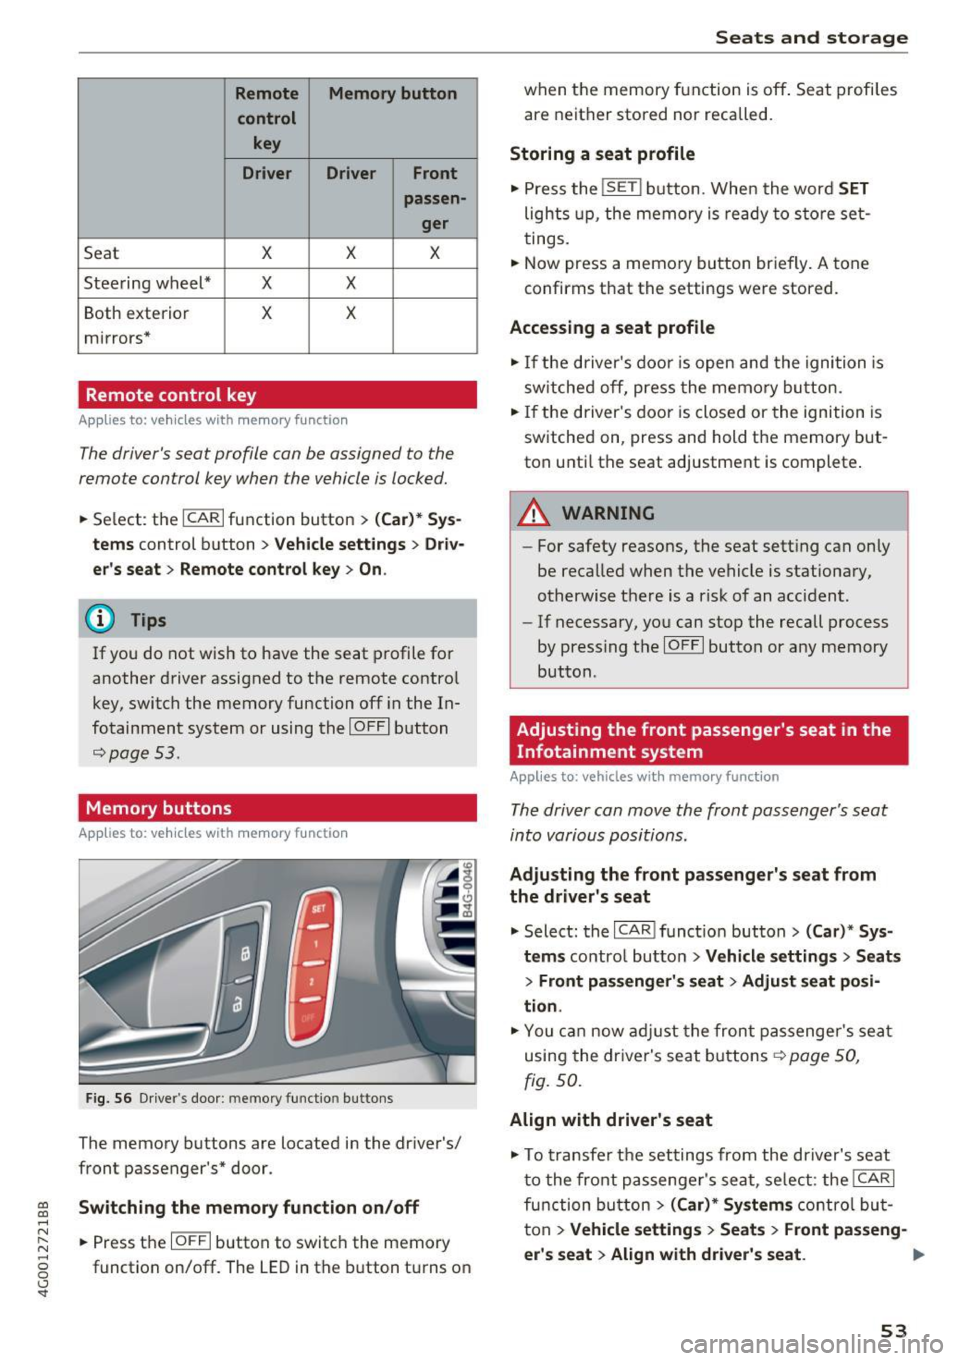
The following se ttings are stored :
Iii>
Page 55 of 280
co
co
.... N
" N .... 0 0 <.,;) 'SI"
Remote Memory button control key
Driver D river Front
passen-ger
Seat X X X
Steering wheel* X X
Both
exterior X X
mirrors*
Remote control key
Applies to: vehicles with memory function
The driver's seat profile can be assigned to the
remote control key when the vehicle is locked.
• Select: the ICARI function button > (Car)* Sys
tems
control button > Vehicle settings > Driv
er's seat
> Remote control key > On .
(D Tips
If you do not wish to have the seat profile for
another driver assigned to the remote control
key, switch the memory function off in the In
fotainment system or using the
IOFFI button
¢page 53.
Memory buttons
Applies to: vehicles with memory function
Fig. S6 Driver 's door: memory function buttons
The memory buttons are located in the driver's/
front passenger's* door.
Switching the memory function on/off
• Press the IOFFI button to switch the memory
function on/off. The LED in the button turns on
Seats and storage
when the memory function is off . Seat profiles
are neither stored nor recalled.
Storing a seat profile
• Press the ISET I button. When the word SET
lights up, the memory is ready to store set
tings .
• Now press a memory button briefly. A tone
confirms that the settings were stored.
Accessing a seat profile
• If the driver's door is open and the ignition is
sw itched off, press the memo ry button.
.. If the driver's door is closed or the ignition is
switched on, press and hold the memory but
ton until the seat adjustment is complete .
A WARNING
-For safety reasons, the seat setting can only
be recalled when the vehicle is stationary,
otherwise the re is a risk of an accident.
- If necessary, you can stop the recall process
by press ing the
IOFFI button or any memory
button.
Adjusting the front passenger's seat in the
Infotainment system
Applies to: vehicles with memory function
The driver can move the front passenger's seat
into various positions.
Adjusting the front passenger's seat from
the driver's seat
• Select: the I CAR I funct ion button > (Car) * Sys
tems
contro l button > Vehicle settings > Seats
> Front passenger's seat > Adjust seat posi
tion .
• You can now adjust the front passenger's seat
using the driver's seat buttons
¢ page SO,
fig.
so.
Align with driver's seat
• To transfer the settings from the driver's seat
to the front passenger's seat, select: the
I CAR I
function button > (Car)* Systems control but
ton
> Vehicle settings> Seats > Front passeng-
er 's seat > Align with driver 's seat. ..,.
53
Page 62 of 280
Warm and cold
Warm and cold
Climate control system
Description
The climate control system warms, cools and re moves humidity from the air in the vehicle interi
or. It is the most effective when the windows and
sunroof * are closed. If there is a bui ld-up of heat
insid e the vehicle, ventilation can he lp to speed
up the cooling process.
I n all heating mode f unctions, except for defrost,
the blower only switches to a higher speed once
the engine coolant has reach ed a suffici ent tem
perature .
Pollutant filt er
The po llutant filter removes poll utants such as
dust and pollen from the a ir .
Ke y recognit ion
A pp lies to: ve hicles w ith de luxe au toma tic clima te co ntro l
The blower sett ing and air distribut ion are stored
automatically and ass igned to the remote control
key that you are using.
A ppl ies to: ve hicles w ith 4 -zo ne del uxe auto matic c limate
co ntrol
The climate con trol set tings are automatically
stored and assigned to the remote control key
that is in use.
A WARNING
Poor visibility can lead to accidents.
- For safer driving, keep all windows free of
ice, snow and fog .
- Become familiar as quickly as possible with the correct use and function of the cl imate
contro l system, especially with the defrost
ing and defogg ing function.
- When the temperat ure is below freezing,
only use the windsh ield washer system after
60
the windshield has been warmed by the cli
mate control system. The washer fluid could
freeze on the windshie ld and impair visibi li
ty .
Cl) Note
-If you suspect that the cl imate contro l sys
tem is damaged, switch the system
off to
prevent further damage and have it checked
by an authorized Aud i dealer or authorized
Audi Service Facility .
- Repa irs to the Aud i climate control system
requ ire special technical knowledge and
special tools . See an authorized Aud i dea le r
or autho rized Aud i Service Faci lity .
@ For the sake of the environment
- To save fuel, turn off cooling mode by press
ing the
IAJC I button. This w ill also reduce
em issions .
- In veh icles w ith a diesel engine, you ca n
switch the auto supplementary heater off in
the Infotainment system.
(D Tips
- To prevent interference with the heat ing
and cooling output and to prevent the win
dows from fogging over, the a ir intake in
front of the windshie ld must be free of ice ,
snow or leaves.
- Conde nsation from the coo ling system can
dr ip and fo rm a pudd le of water under the
vehicle. This is norma l and does not mean
there is a leak.
- Th e energy managemen t sys tem may tem
porarily switch
off certain functions, such as
t h e seat heating * or rear window defogger.
These systems are ava ilable again as soon
as the ene rgy supply has been restored.
Page 67 of 280
co
co
.... N
" N .... 0 0 <..:l 'SI'
quickly. The auxiliary heating activates automati
cally when the when the automatic auxiliary
heater funct ion is act ivated .
Steering wheel heating
App lies to: ve hicles with steering w heel heating
The steering wheel rim can be heated.
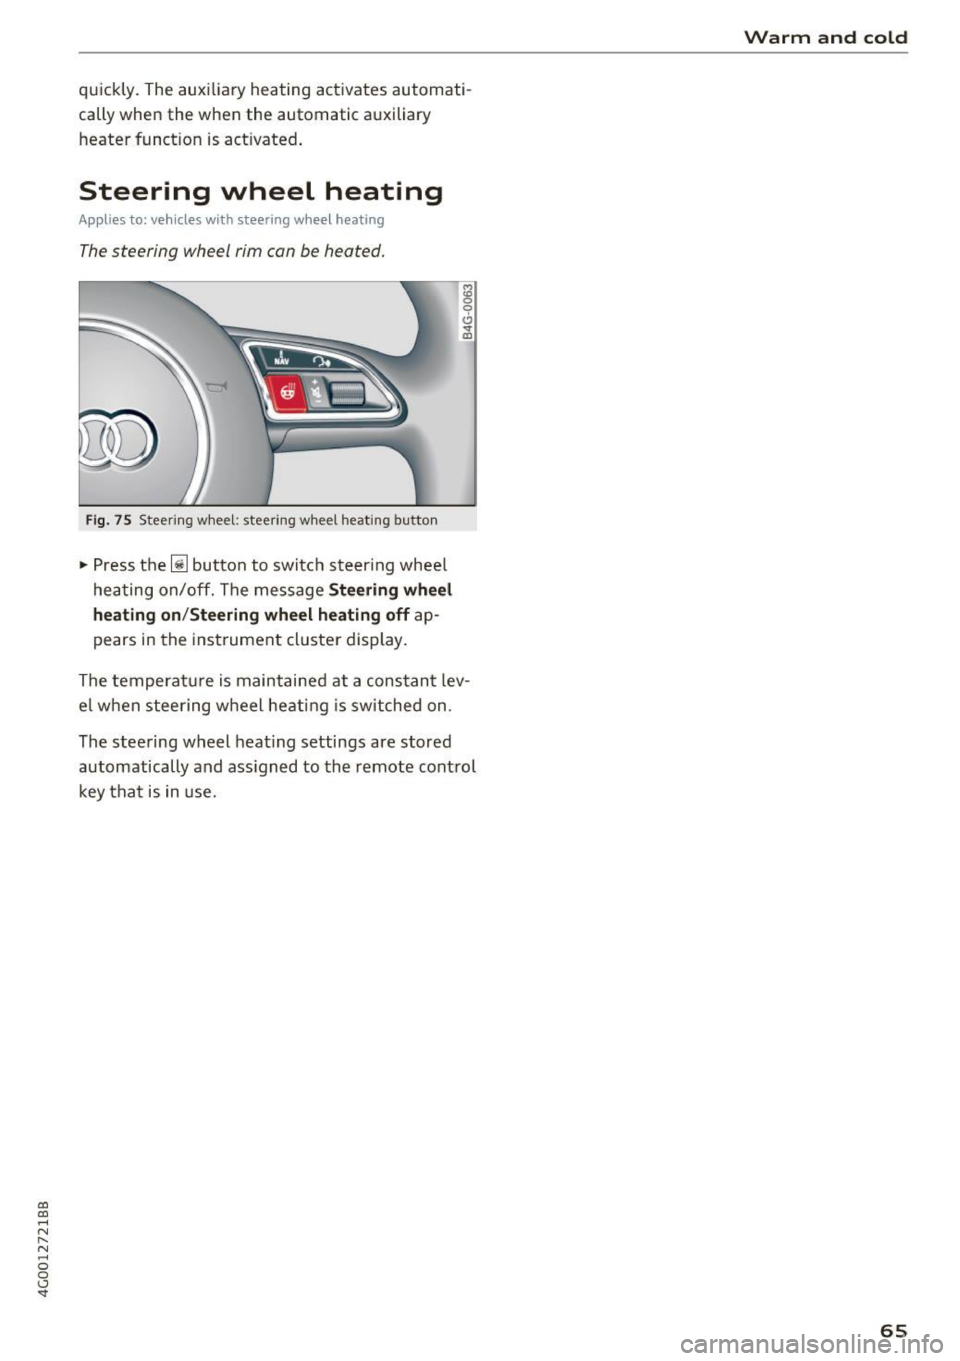
Fig. 75 Steeri ng wheel: steering w heel heating button
"' Press the ljJ button to switc h steering whee l
hea ting on/off. The message
Stee ring wheel
heating on /Steering wheel heating off
ap
pears in the inst rument cluster display.
The temperat ure is maintained at a constant lev
e l w hen steering w heel heat ing is switched on .
The steering wheel heat ing settings are stored
automatically and ass igned to the remote control
key tha t is in use.
Warm and cold
65
Page 74 of 280
Driving
Tur n off igniti on b efore lea ving v ehicle. B atte ry
i s di sch arg ing
This message appea rs if the driver's door is
opened while the ignition is switched on . A lways
switch off the ignition if you are leaving the vehi
cle. A lso see
¢ page 74.
Shift to P and turn off ignition bef ore leaving
ca r, othe rwi se vehicle can ro ll aw ay
This message appea rs if the driver's door is
opened while the ignition is switched on and the
selec to r l ever is not in the P posit io n. Move the
selector lever in to the P position and switch the
ignition off when you exit the vehicle. Otherwise
the vehicle could roll. A lso see
¢ page 74 .
Starting the engine when there is a
malfunction
It may not be possible to start the engine under
certain circums tances, for example if the bat tery
in the vehicle key is drained , if in terference is af
fected the key or if there is a system malfunc
tion.
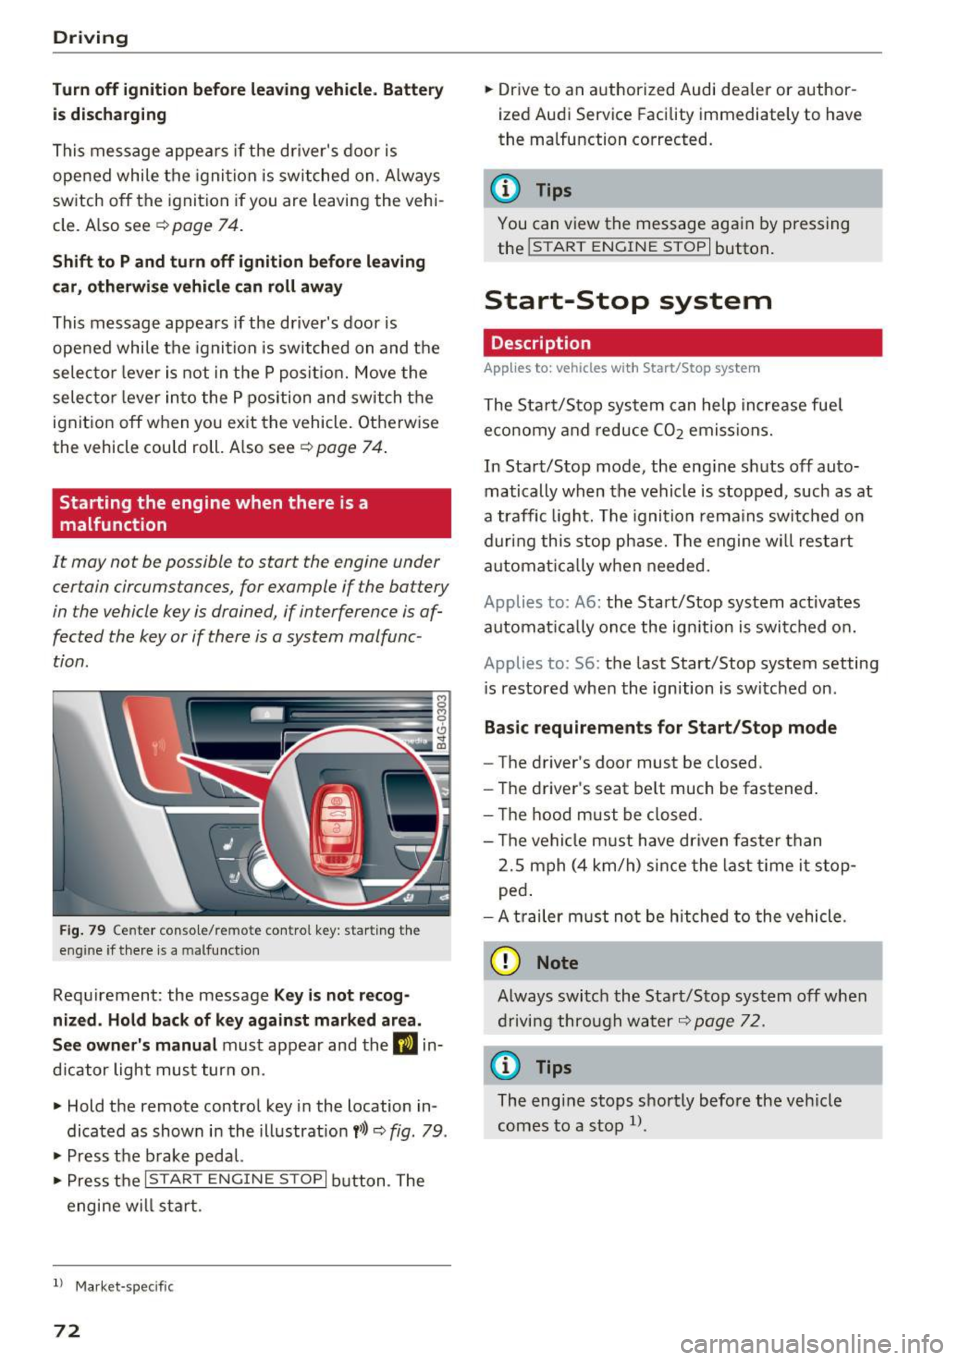
F ig . 79 Ce nter co n so le/ re m ote con tro l key : star ting th e
eng ine if there is a malfunction
Requirement: the message Ke y is not recog
ni zed . Ho ld ba ck of ke y again st mark ed area.
See ow ner's m anual
must appear and the DJ in
d icator light must turn on .
" Hold the remote control key in the location in
dicated as shown in the illustrat ion
f >l) ~ fig. 79 .
" Press t he b rake pedal.
" Press the
I START ENGIN E STOPI button . The
engine w ill start .
l) Market -specifi c
72
"Drive to an authorized Audi dealer or author
ized Audi Service Facility immediately to have
the malfunction corrected.
@ Tips
You can view the message again by p ressing
the
! START ENGINE STOP I button.
Start-Stop system
Description
Applies to: vehicles with Start/Stop system
The Start/Stop system can help increase fue l
eco nomy and reduce
CO2 emissions.
In Start/Stop mode, the eng ine shuts off auto
matically when the vehicle is stopped, such as at
a traffic light. The ignition rema ins swi tched on
during this stop phase. The engine w ill restart
automat ica lly w hen needed.
Applies to: A6: the Start/Stop system act ivates
automa tica lly once the ign ition is swi tched o n.
Applies to: S6: the last Start/Stop system setting
i s restored when the ignition is switched on .
Basic r equir ement s for Start /Stop mod e
-The driver's door must be closed.
- The driver's seat be lt much be fastened.
- T he hood must be closed .
- T he vehicle must have driven faste r than
2.S mph (4 km/h) since the last t ime it stop
ped .
- A t railer m ust not be hitched to the vehicle .
(D Note
Always switch the Sta rt/Stop system off when
driving through water
¢ page 72.
{t) Tips
The eng ine stops shortly before the veh icle
comes to a stop
l) .
Page 95 of 280
co
co
.... N
" N .... 0 0 <.,;) 'SI"
~-- -~ -Di st a nce 3: this setting corresponds
to a distance of 164
ft (SO m) when traveling at
62 mph (100 km/h), for examp le (time between:
1.8 seconds).
~ -- --~ Dist a nce 4: This setting corresponds
to a distance of 210
ft (64 m) when traveling at
62 mph (100 km/h), (time distance of 2.3 sec
onds).
A WARNING
Following other vehicles too closely increases
the risk of coll isions and ser ious personal in
jury.
- Setting short distances to the traffic ahead
reduces the t ime and distance available to
br ing your vehicle to a safe stop and makes
it even mo re necessary to pay close atten
t ion to traffic.
- Always obey applicable traffic laws, use
good j udgment, and select a safe following
distance for the traffic, road and weather
condit ions .
@ Tips
- Di stance
3 is set automatically each time
you switch the ignition on.
- Your settings are automatically stored and
assigned to the remote control key being
used.
Selecting the dr iving mode
Applies to: vehicles with Audi adaptive cruise control
.,. Se lect the des ired driving mode in dr ive se lect
~ page 104.
@ Tips
Your se ttings a re au toma tic al ly s to red and as
signed to the remote contro l key being used.
A ss ist
Request for driv er interv ent ion
Applies to: vehicles with Audi adaptive cruise control
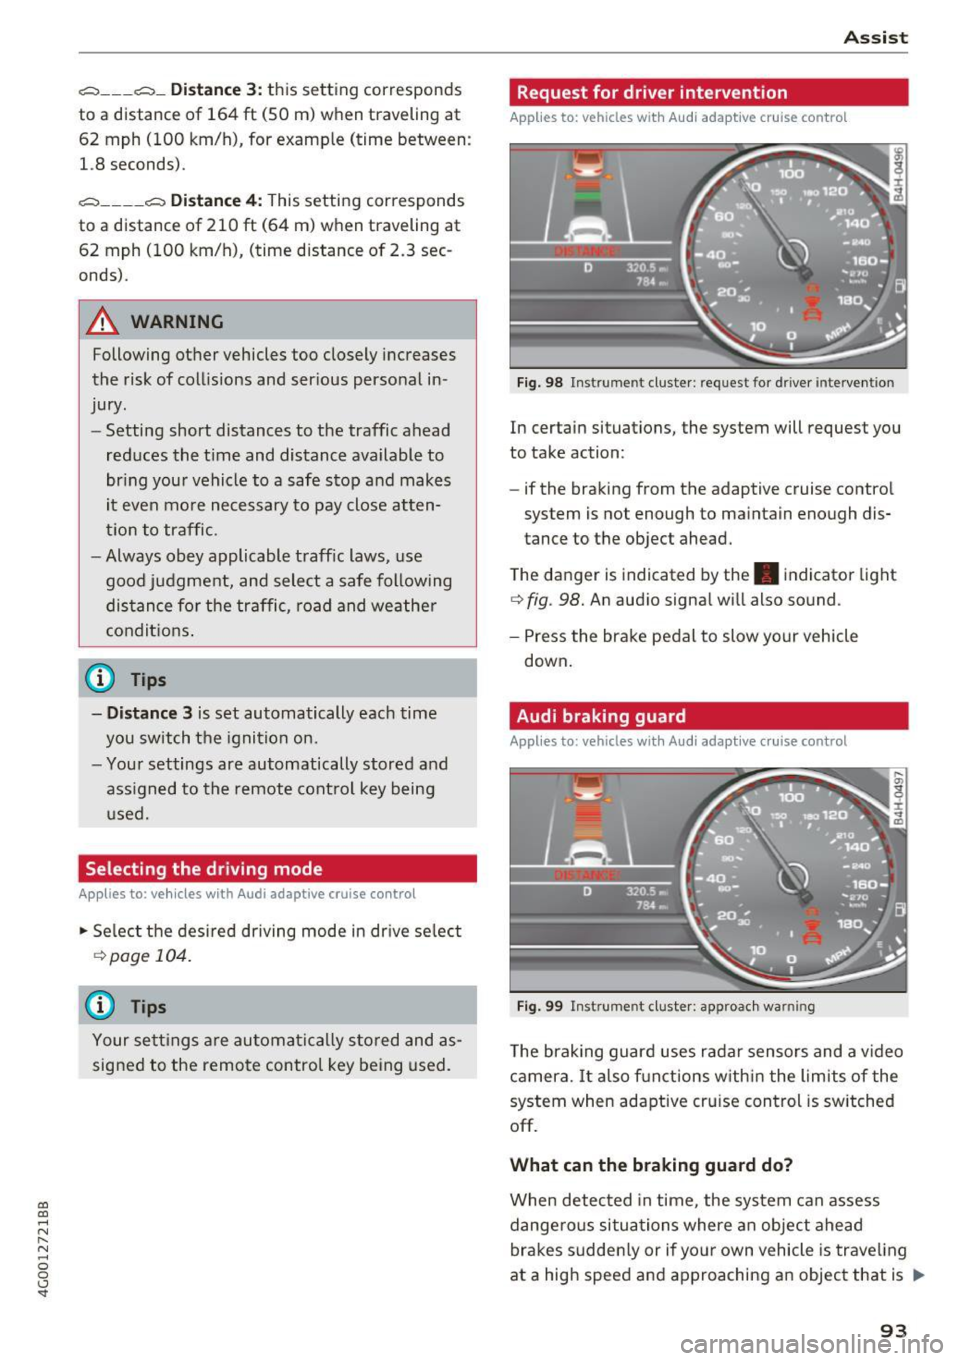
F ig. 98 Instrument c luster: request for driver intervention
In certain situations, the system will request you
to take action:
- if the braking from the adaptive cruise control
system is not enough to maintain enough dis
tance to the object ahead.
T he danger is indicated by the. indicator light
~ fig. 98. An aud io signa l will also sound.
- Press the brake pedal to slow your vehicle down.
Audi braking guard
Applies to: vehicles with Audi adaptive cruise control
Fig . 99 Instrument cluste r: approac h warning
The braking guard uses radar sensors and a v ideo
camera. It also f unctions w ith in t he lim its of the
system when adaptive cru ise control is switched
off.
What can the b raking guard d o?
When detected in time, the system can assess
dange rous situations where an object ahead
brakes sudden ly or if yo ur own vehicle is trave ling
at a high speed and approaching an object that is
II>
93
Page 97 of 280
co
co
.... N
" N .... 0 0 <..:l '
Appl ies to: ve hicles with Audi adaptive cruise co ntro l
.,. Se lect: t he ICAR I fu nction bu tton > ( Car) *Sys
tem s
control button > Driver as sis tance > Audi
braking guard .
System -
Switch the bra kin g g ua rd On/ Off. When
you swit ch the ig nition on, the message
Braking
guard: Off
appears if t he sys tem is switched o ff.
Early warning -The distance and approac h warn
i ngs i n the display can be sw itched
On/ Off.
@ Tips
- Your settings are automatically stored and
ass igned to the remote cont rol key bei ng
used.
- If you restric t or sw itch off the ESC, the
braking gua rd also sw itches itself off
¢ page 12 1.
- Switch braking guard off when yo u are load
i ng t he ve hicle on to a vehicle ca rr ier, t rain,
shi p or other type o f transportation. This
c a n p reven t undesired w arnings from the
br akin g guard system.
Messages
App lies to: ve hicles with Audi adaptive cruise co ntro l
Braking guard: Off
This message appea rs if the sys tem is switc hed
off through the In fota inme nt system . Otherwise ,
if the system is tur ned off, the informa tion ap
pears every time shortly after the start of t he
tr ip.
The message also appears if the system is not
avai la bl e d ue to a ma lfunction or if the ESC is
switched off~
page 121. If this is the case, the
system w ill not prov ide warnings about a possi
b le co llision.
Braking guard : engaged
This message appea rs if a sha rp bra ke press ure
was applied due to an ac ute wa rn ing.
ACC: unavailable
ACC and Audi braking guard: Unavailable
Assist
T he system cannot gua rantee that it will detect
objects co rrectly and is sw itched off . The sensors
have been moved or are faulty. The p re sense
funct ions may a lso be affected . D rive to an au
t h orized Audi dea ler or authorized Audi Service
Facility immed iate ly to have the malfunction cor
rected .
ACC: Currently unavailable. No sensor vis ion
ACC and Audi braking guard: Cu rrently unavail
able. No sensor vision
Th is mess age appears if the senso r view i s ob
str ucted, for examp le by leaves, snow , heavy
spray or dirt. Clean the sensors¢
page 88,
fig. 90 .
ACC : Currently unavailabl e. Gradient too steep
The road exceeds the maximum poss ible angle
fo r safe adaptive c ruise cont rol operat io n. Adap
t ive cr uise control is sw itched off.
ACC: only available in D, Sor M
Se lect the D/S or M selector lever position.
ACC : Currently unavailable. Parking brake ap •
plied
The ad apt ive cr uise cont rol system sw itches off
a utoma tica lly if the parking brake is se t.
ACC: Currently unavailable . Stability control
( ESC) input .
This message appears if the Electronic Stab iliza
t ion Control (ESC) is taking action to stab ilize the
vehicle . In t his case, adaptive cruise control
switches off automatically .
ACC off: Manual control!
This message appears when adaptive cruise con
trol cannot set the parking brake. P ress the brake
pedal to prevent the vehicle from ro lling.
• ••
T h ree white do ts appear if a setting canno t be se
l ecte d w it h t he oper ati ng leve r. For ex ample, this
h appens if a daptive cr uise con trol c annot sta rt
driv ing a utomat ica lly in stop -and -go traff ic be
ca use the dr iver has not fastene d their safety
belt . ..,.
95
Page 100 of 280
Ass is t
Messag es in the instrument cluster display
If the active lane ass ist switches off automatica l
ly, the indicator lig ht in the display turns off and
one of the follow ing messages appears:
Audi acti ve lan e ass ist : Cur rently un availabl e.
No camera vie w
This message appears if the camera is unable to
detect the lines. This co uld happen if :
- The camera field of view
9 page 97, fig . 101 is
dirty or cove red in ice . Clean this area on the
windshield .
- The camera field of v iew is fogged over . Wait
unt il the fog has cleared before sw itch ing the
active lane assist on again .
- The system has been unable to detect the lanes for an extended period of time d ue to road con
ditions . Switch a ctive lane assist back on when
the lines are mo re visible .
Audi acti ve lan e ass ist : Cu rrently un available
There is a temporary active lane assist ma lf u nc
tion . Try sw itching the ac tive lane assist on aga in
la ter.
Audi active lane a ssist : System fault!
Dr ive to an a utho rized Aud i dea le r or a uthorized
Aud i Serv ice Facility immediately to have t he
malfunction corrected.
Audi active lane a ssist : Please take over steering
This message appea rs if you are not steering by
yourself . If th is is the case, active lane assist does
no t swi tch off, but it is "not ready " to provide a
warn ing . The system ca n he lp you keep the veh i
cle in the lane . However, yo u are responsib le for
d riving the vehicle and must steer it yo ursel f.
Adju sting the vibrat ion warning
Applies to: ve hicles with Audi active lane assist
.,. Se lect : th e ICARI function button > (Car )* Sys
tems
control button > Drive r assist ance > Audi
acti ve lane assist .
V ibrat ion warning
You can switch the additional vibration warni ng
in the steer ing wheel o n or off.
98
@ Tips
Your settings are automatically stored and as
signed to the remote contro l key being used.
Audi side assist
Description
App lies to: vehicles with Aud i side ass ist
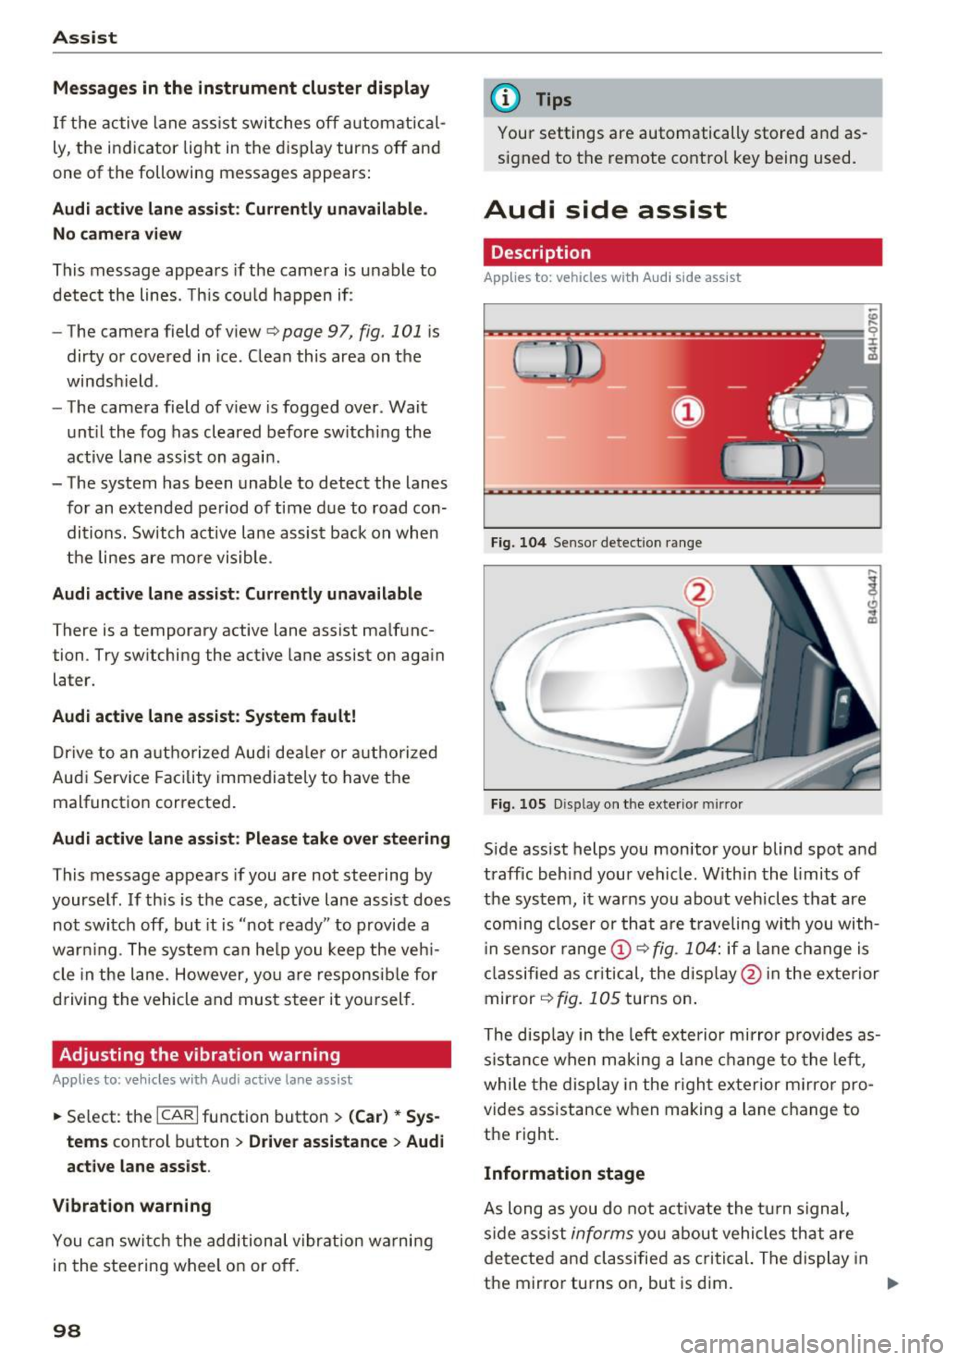
Fi g. 10 4 Senso r detect ion ra nge
Fig. 10 5 Dis pla y on t he exterio r mirr or
Side assist helps you monitor your blind spot and
traffic behind your vehicle. W ithin the limits of
the system, it warns you abo ut vehicles that are
coming closer or th at a re t raveling wit h you with
i n senso r range @
9 fig. 104: if a lane change is
classified as cri tical, the disp lay @ in the exte rior
mirror
9 fig. 105 turns on .
The disp lay in the left exte rio r mirror prov ides as
s ista nce when making a lane change to the left ,
whi le the display in the r igh t exterior m irror pro
vides assistance w hen making a lane c hange to
the right.
Information stage
As long as you do not a ct iva te the t urn signal,
side ass ist
informs yo u about vehicle s th at are
detected a nd classified as c rit ical. The di splay in
t he mirror turns on, but is dim. ""