air condition AUDI A6 2017 Owners Manual
[x] Cancel search | Manufacturer: AUDI, Model Year: 2017, Model line: A6, Model: AUDI A6 2017Pages: 280, PDF Size: 70.24 MB
Page 18 of 280
Instruments and indicator lights
Drive to an autho rized Aud i dea ler or a uth orized
Aud i Service Facility immediately to have t he
malfunct ion corrected .
0 Air suspension
• Air suspension : System fault Driving slowly
at ma ximum 35 mph is possible.
There is a malfunction that can result in restrict
ed driving stability.
Drive to an a utho rized Audi dea ler or authorized
Audi Serv ice Facility immediately at a maximum
speed of 35 mph (60 km/ h) to have the ma lf u nc
tion corrected .
• Air sus pension : Service mode. Vehicle can
onl y be mo ved with restriction s
Carefully drive to your author ized A udi dealer or
author ized Audi Se rvice Facility immed iate ly to
have the serv ice mode deactivated .
II Air su spen sion : Sy stem fault
There is a system malfunct ion that ca n result in
restricted driving stability or reduced gro und
clearance.
Drive to an authori zed Aud i dea ler or authori zed
Aud i Serv ice Facility immediately to have the
malfunct ion corrected.
II Air sus pension : Vehicle is too low . Ground
clearance limited
The ground clearance is very low due to a system malfunctio n. Wait until the air suspension sys
tem has restored norma l ground clearance. Oth
erwise, conditions such as an uneven road surface
can lead to vehicle damage.
0 Clutch
A pp lies to: ve hicles w ith manu al transmiss ion
• Clutch: malfunction! Safely park vehicle
There is an ongoing ma lfunction in the clutch.
Stop the vehicle safely . See an authorized Audi
dealer or a uthorized Aud i Serv ice Facility fo r as
sistance .
[O] Clutch malfunction! Adapt d riving sty le.
Contact Ser vice
16
There is an ongoing ma lf u nct ion in the clutch.
The engine torq ue that can be transfer red is re
duced. You may continue driv ing. Avo id using the
clutch in any way that w ill place a heavy load on
i t. For example, do not let the clutch rub when
start ing o n hills, whe n towing a trai ler or when
maneuveri ng the vehicle . Drive to an author ized
Audi dealer or authorized Audi Service Fac ility im
med iate ly to have the malfu nction corrected.
fiB Clut ch malfunction! You may continue driv
ing
There is a ma lfunction in the clutch. The engine
torque that can be transferred is reduced. You
may contin ue driving . Avoid using the clutch in
t h e future in any way that w ill place a heavy load
o n it. Fo r example , do no t let the clutc h ru b when
starting o n hill s, when towing a trailer or when
mane uve rin g the vehicle . The ind ic a tor light
turns off once the clutch is fully operab le ag ain.
Lt Brake booster
D Brake servo : limited functionality. You can
conti nue d riving. Conta ct w ork shop
There is a m alfu nction in the brake booster. The
bra ke booste r is ava ilable, but its effectiveness is
reduced . Braking behavior may be different from
how it normally f unctions and the bra ke pedal
may vibrate.
Drive to an au thorized A udi dealer or au thorized
Audi Se rvice Facility immediate ly to have the
malfunction corrected.
n/ u Electronic Stabilization Control (ESC)
If the G1 ind icator light blinks while driving, the
ESC or ASR (Anti-Slip Regulation) is act ively regu
lating .
If the
GJ ind icator light turns on, the system has
switched the ESC off. In t his case, yo u can switch
the ignit io n off and then on to switch the ESC on
again . T he i ndicator light t urns off when the sys
tem is functioning fully .
If the
II ind icator light turns on, ESC was
switched off us ing the
I~ OFFI button
<=> page 120 .
Page 48 of 280
Lights and Vision
Automatic dimming rearview mirror*
.. Press the button@~ fig. 44. The indicator
light @ turns on. Interior and exterior mirrors*
will dim when there is incoming light (such as h eadlights from the rear).
A WARNING
If the glass on an automatic dimming mirror
breaks, electrolyte can leak out . This liquid
can irritate the skin, eyes and respiratory sys
tem .
If there is contact with the fluid, flush
immediately with plenty of water . Consult a
physician if necessary.
- Repeated or long-term exposure to electro
lyte fluid can lead to irritation of the air
ways, especially in people with asthma or
other respiratory conditions. Take deep
breaths immediately after leaving the vehi
cle or, if this is not possible, open all of the doors and windows as wide as possible.
- If electrolyte fluid enters the eyes, flush
them thoroughly with a large amount of
clean water for at least 15 minutes and then
seek medical attention.
- If electrolyte fluid comes into contact with
the skin, flush the affected area with clean
water for at least 15 minutes and then clean
with soap and water and seek medical at
tention. Clean affected clothing and shoes
thoroughly before wearing again .
- If the fluid was swallowed and the person is conscious, flush the mouth with water for at
least 15 minutes. Do not induce vomiting
unless this is recommended by medical pro
fessionals. Seek medical attention immedi
ately.
(D Note
If the glass on an automatic dimming mirror
breaks, electrolyte can leak out. This liquid
damages plastic surfaces and paint. Clean
this liquid as quickly as possible, for example
with a wet sponge.
46
@ Tips
- If the light reaching the rearview mirror is
obstructed, the automatic dimming mirror
will not function correctly,
- The automatic dimming mirrors do not dim
when the interior lighting is turned on or
the reverse gear is selected.
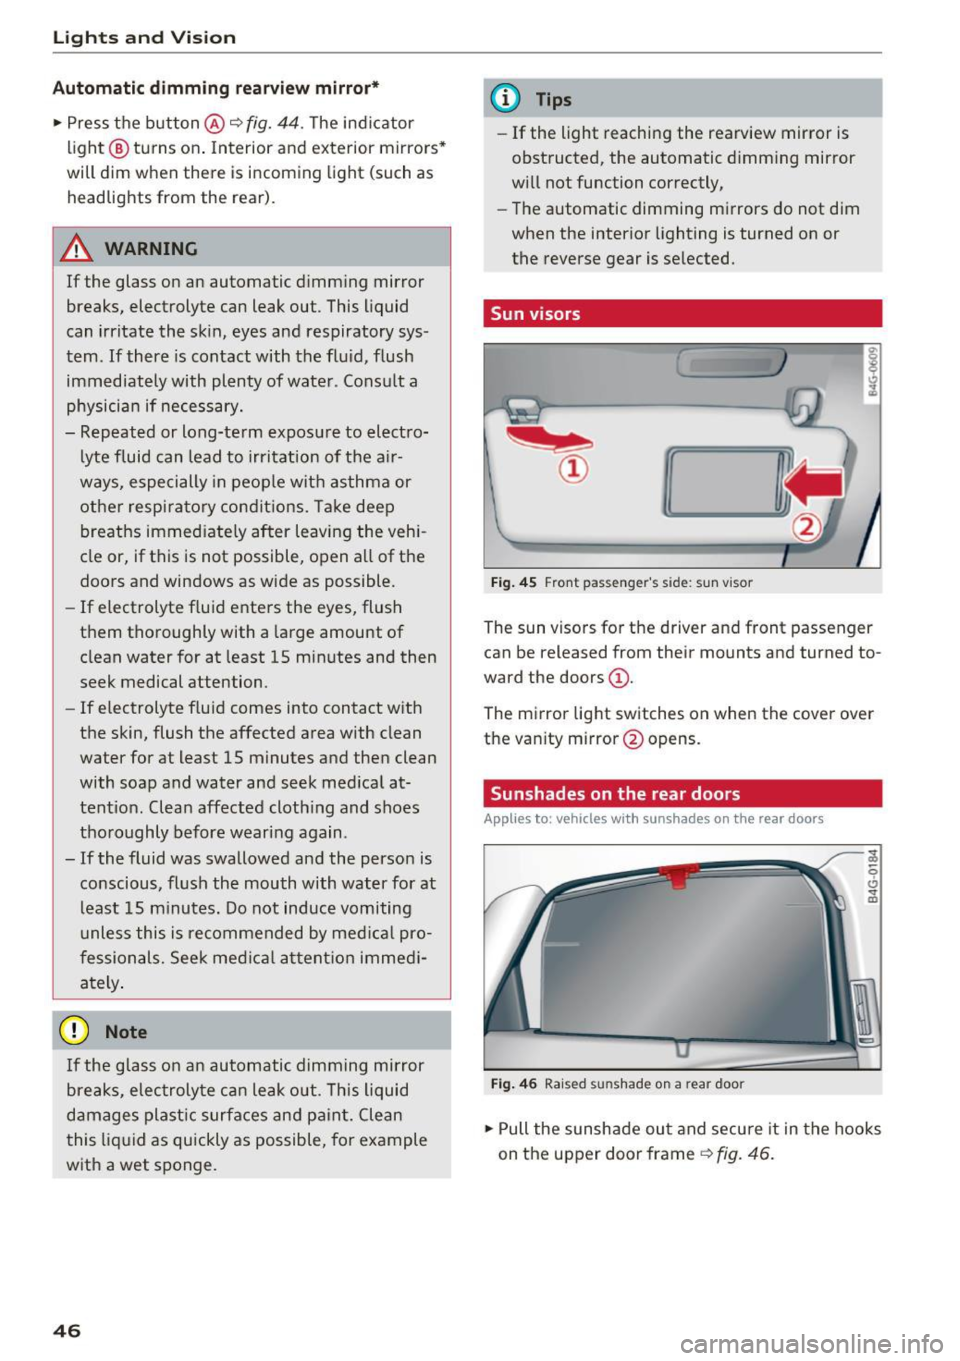
Sun visors
[ __ ____,}
Fig. 45 Front pas seng er's side: sun vis or
The sun visors for the driv er and front passenger
can be released from their mounts and tu rned to
ward the doors
(D .
The mirror light switches on when the cover over
the vanity mirror @opens .
Sunshades on the rear doors
Applies to : vehicles with sunshades on the rear doors
Fig. 46 Rai sed sunshade on a rear doo r
.. Pull the sunshade out and secure it in the hooks
on the upper door frame
~ fig. 46.
Page 64 of 280
Warm and cold
The maximum amo unt of air flows mainly from
the vents below the windshield. Recircu lat ion
mode switches off . The temperature should be
set to approximately 72
°F (22 °() .
The IAUTO I button switches the defroster off .
IClill REAR I Switching the rear window defogger
on/off
The rear window heater on ly operates when the
engine is running . It switches off automatica lly
after a few minutes, depending on the outs ide
temperature .
To prevent the rear w indow heater from switch
ing off automatically, press and ho ld the
IQijl REARI
button for more than 2 seconds . This is stored
until the ignit ion is switched off.
G'.l Adjusting seat heating*
Pressing the button switches the seat hea ting on
at the highest setting (level 3). The LEDs indicate
the tempera ture level. To reduce the tempera
ture, press the button again. To switch the seat heating off, press the button repeatedly until the
LED turns off.
After 10 minutes, the seat heating automatically
switches from level 3 to level 2 .
4-zone deluxe automatic climate control
A ppl ies to: ve hicles with 4-zo ne deluxe auto matic cl imate cont rol
Air vents
You can open or close the center and rear vents in
the cockpit and the vents in the rear center con
sole using the ridged thumbwheels . The levers
adjust the direction of the airflow from the vents.
A WARNING
- You shou ld not use the recirculation mode
for an extended period of time since no
fresh air is drawn in . W ith the air-condition
ing sw itched off, the windows can fog up,
which increases the risk of an acc ident.
- Individ uals with reduced sensit iv ity to pa in
or temperature could develop burns when
using the seat heating function. To red uce
the risk of injury, these individuals should
not use seat heating.
(D Note
To avoid damage to the heating elements in
the s eats , do not knee l on the seats or place
heavy loads on a small area of the seat.
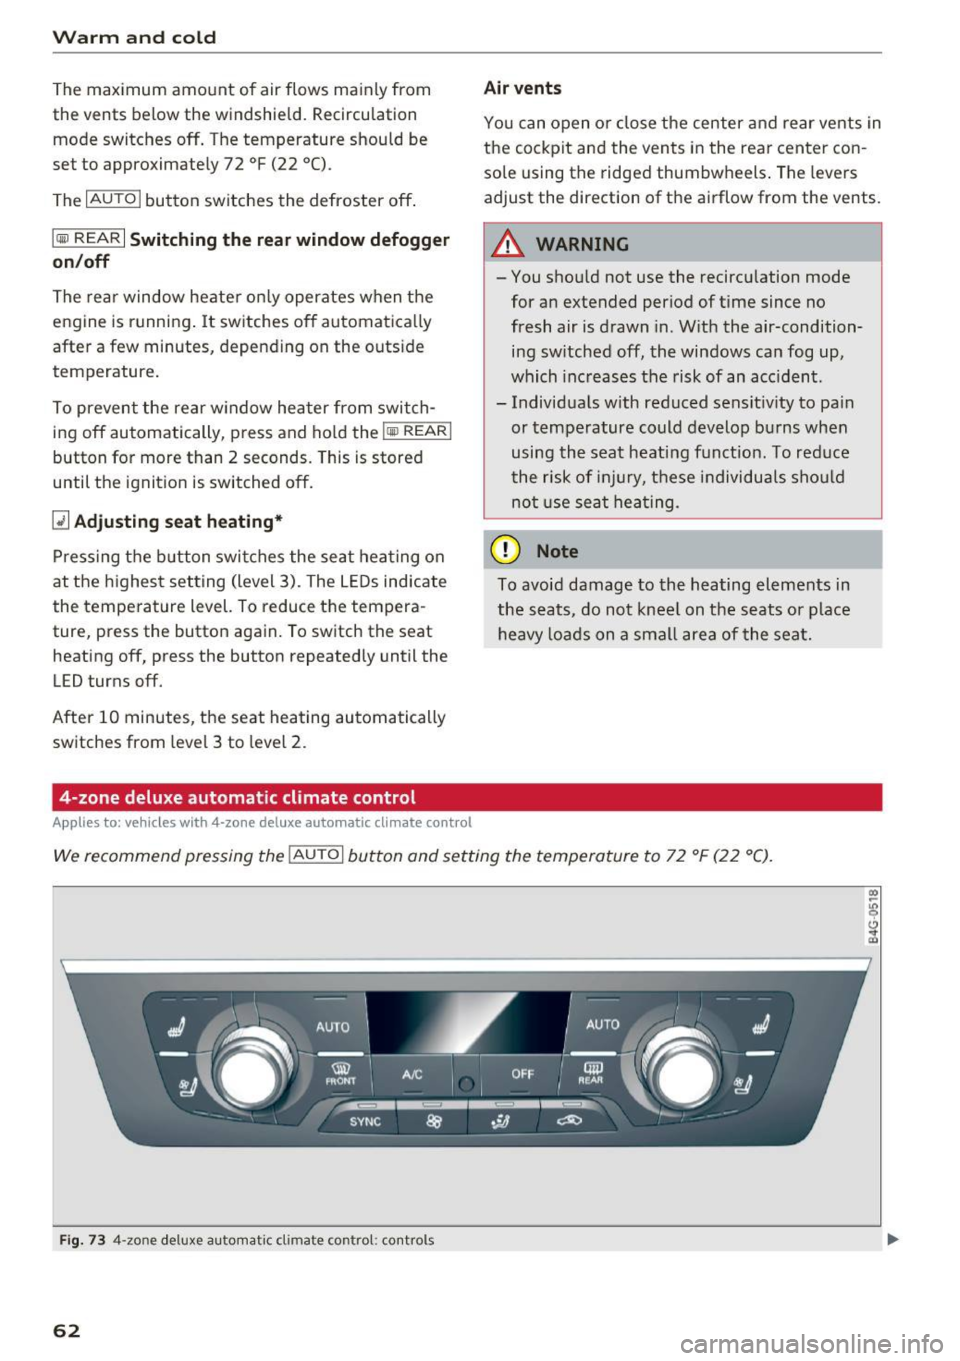
We recommend pressing the IAU TO I button and setting the temperature to 72 °F (22 °C).
Fig. 73 4-zo ne deluxe automat ic climate contro l: controls
62
Page 66 of 280
Warm and cold
mode switches off. The temperature shou ld be
set to approximate ly 72 °F (22 °C).
The
IAUTOI button switches the defroster off.
IQiiJ REARI S witching the re ar window defo gger
o n/off
The rear window heater on ly operates when the
engine is running.
It sw itches off a utomat ica lly
afte r a few minutes, depending on the outs ide
temperature.
To prevent the rear w indow heater from switch
ing off automatically, p ress and ho ld the
l iiiP REAR I
button for more than 2 seconds . This is stored
until the ignition is switched off.
ISYNC I Sy nchronization
When synchronization is switched on, the set
tings for the drive r's side are applied to the front
passenger's side (ex cept for seat heating/ventila
tion*). The settings in the rear are a lso synchron
ized. Synchronization switches off if the settings
are adjusted on the front passenger's side or in
the rear.
You can synch ronize the settings in a row by
pressing and holding a contro l. For example, to
apply the settings for the front passenger's side
to the driver's side, press and ho ld the contro l on
the front passenger's side. The same applies to
the rear .
Res idua l h eat *
With the ignition turned off, you can activate the
residual heat function by pressing the~ button
¢ fig. 73. The residual heat from the coolant is
used to heat the vehicle interior. The residual
heat function switches off automatically after
about 30 m inutes .
Air vents
You can open or close the center and rear vents in
the cockpit and the vents in the rear center con
sole and door pillars using the ridged thumb
wheels . The levers adjust the direction of the air
flow from the vents .
64
A WARNING ,_
- You shou ld not use the recircu lation mode
for an extended period of time since no
fresh air is drawn in. W ith the air-condition
ing sw itched off, the windows can fog up,
which inc reases the risk of an acc ident.
- Individuals w ith reduced sensit iv ity to pa in
or temperature could develop bu rns when
using the sea t heati ng f unct ion. To red uce
the risk of i nju ry, these individuals sho uld
not use seat heating.
(D Note
To avoid damage to the heating elements in
the seats, do no t knee l on the se ats or place
heavy loads on a small area of the seat.
Basic settings
The climate control system basic settings are ac
cessed in the Infotainment system.
"' Select: the I CARI funct ion button > (Car )* Sys-
tems
contro l button > AC .
Rea r seat setting s*
When this function is se lected, all settings for
the rear can be adjusted through the climate con
trol system in the cockpit. The climate control
system settings cannot be adjusted in the rear
seat at the same time. This funct ion sw itches off
after a ce rtain per iod of t ime o r whe n one of the
contro ls in the coc kp it is pressed.
Automatic recirculation*
The sensitivity level of the automatic recircula
t ion mode can be set at various levels from
Off to
Sen siti ve . Reci rculat ion mode is contro lled auto
matically. If the windows fog up, p ress the
I@ FRO NT ! button.
Footwell temperature *
You can adjust the footwell temperature so that
i t is cooler or warme r.
Automat ic au xilia ry heater*
In vehicles with diesel engines*, the auxiliary
heater helps to warm the vehicle interior more
Page 70 of 280
Driving
lead to greater tire wear and will affect driving
behavior.
Do not drive on
winter tires year-round, as this
will consume up to 10% more fuel.
Eliminate unnecessary weight
Since every kilogram of extra
weight increases
fuel consumption, a quick inspection of the lug
gage compartment may be worth it to avoid un
necessary weight.
When not being used, a roof rack should be re moved to decrease the wind resistance of the ve
hicle. You will save approximately 12% of your
fuel when at speeds from 62- 7 5 mph (100-120 km/h) .
Save energy
The engine drives the generator, which generates
electricity; the fuel consumption also increases
with the demand for electricity. Therefore, switch electrical equipment off when you no longer
need it. Examples of equipment that uses a lot of
energy are air blowers at a high setting, the rear
window defogger and seat heating*.
CD Note
Do not leave engine idling unattended after
starting.
If warning lights should come on to
indicate improper operation, they would go
unheeded. Extended idling also produces
heat, which could result in overheating or
other damage to the vehicle or other proper
ty .
CD Note
- Have your vehicle maintained properly and
in accordance with the service recommenda
tions in your Warranty
& Maintenance book
let . Lack of proper maintenance as well as
improper use of the vehicle will impair the
function of the emission control system and
could lead to damage.
- Do not alter or
remove any component of
the Emission Control System unless ap
proved by the manufacturer.
- Do not alter or remove any device, such as
heat shields, switches, ignition wires,
68
valves, which are designed to protect your
vehicle's Emission Control System and other
important vehicle components.
(D Tips
The consumption estimates as published by
ENVIRONMENTAL PROTECTION AGENCY
(EPA) and Transport Canada may not corre
spond to your actual consumption on the
road, which will vary depending upon vehicle
load and speed, road and weather conditions,
trip length, etc.
Steering
Manual steering wheel position adjustment
Applies to: vehicles with manual steering wheel adjustment
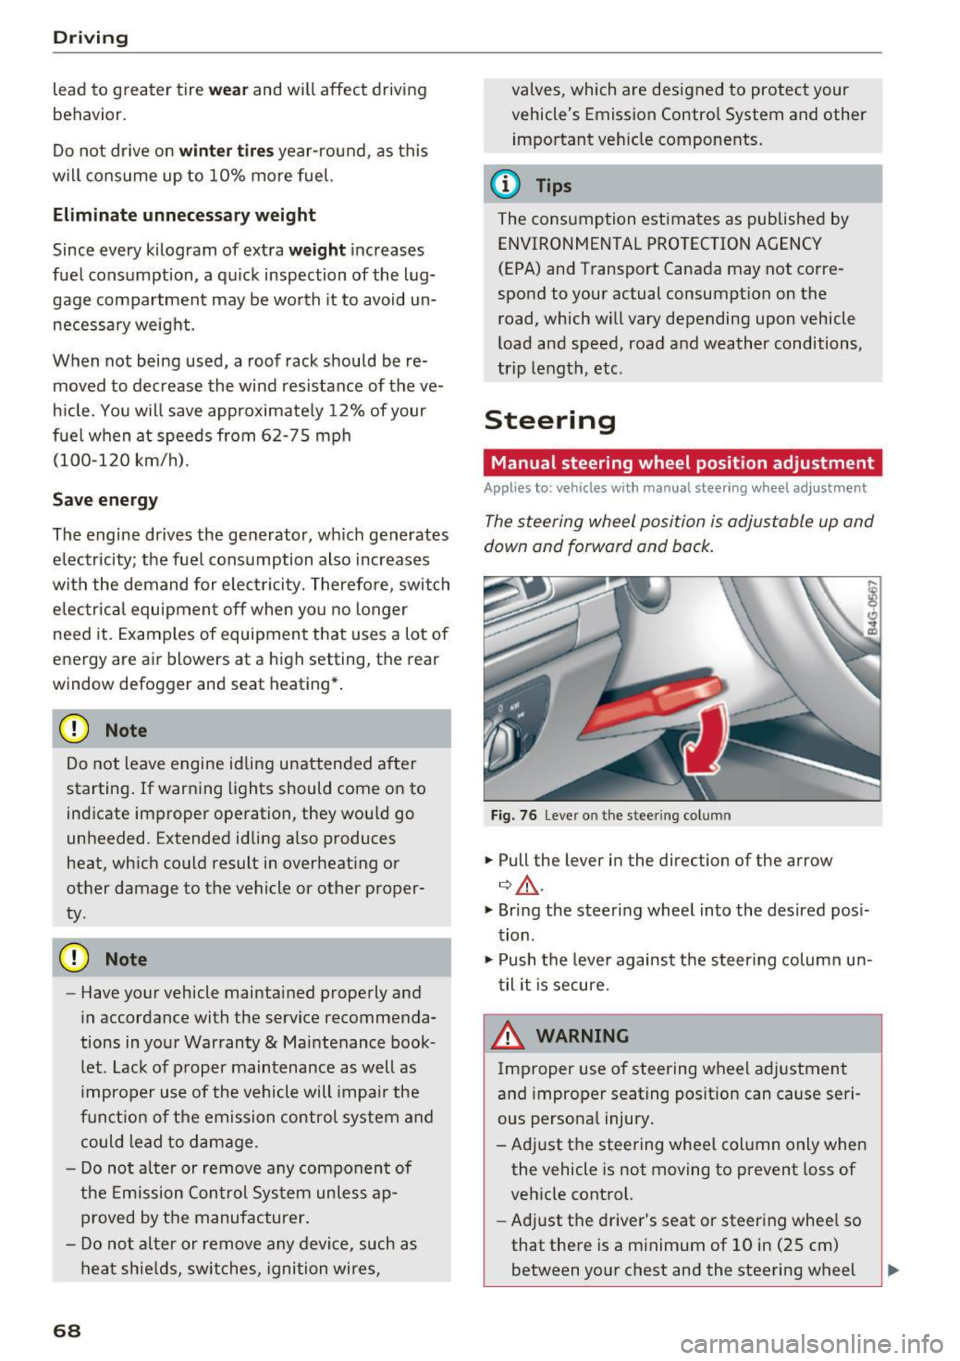
The steering wheel position is adjustable up and
down and forward and back.
Fig. 76 Lever o n the stee ring col umn
.,. Pull the lever in the direction of the arrow
¢ ,&. .
.,. Bring the steering wheel into the desired posi
tion .
.,. Push the lever against the steering column un
til it is secure.
& WARNING
Improper use of steering wheel adjustment
and improper seating position can cause seri
ous personal injury.
- Adjust the steering wheel column only when the vehicle is not moving to prevent loss of
vehicle control.
- Adjust the driver's seat or steering wheel so
that there is a minimum of 10 in (25 cm)
between your chest and the steering wheel -
Page 86 of 280
Trailer towing
Tire pr essure
When tow ing a tra iler, inflate the tires of yo ur
veh icle to the tire pressure listed under " Fu ll
load" on the label¢
page 220. Inflate trai ler
tires to trai ler and tire manufacturers' specifica
tions.
Lights
Check to ma ke sure both vehicle and t railer lights
are working proper ly.
Safety chains
Be sure trailer safety chains are proper ly connect
ed from the traile r to the hitch on the vehicle.
L eave enough slac k in the c ha ins to permi t turn
ing corners. When you install safety chains, make
sure they wi ll not drag on the road when you are
driving.
The chains shou ld cross under the trailer tongue
to prevent it from dropping in case of separation
from the hitch .
Adjusting the Audi drive select
Make sure the veh icle is on a level surface before
h itchi ng up the t railer a nd before adjus ting the
tongue we igh t. The vehicle must be in
auto or
c omfort driving mode and not ra ised
¢page 104, ¢(!) .
Make sure that the vehicle is lowered. In Info
tainmen t, se lect:
ICARI f u nct ion butto n> Lower
con trol b utton.
I f you must dr ive under poo r road conditions, you
can ra ise the vehicle
aft er coup ling the t rai ler or
after adj usting the tongue weight¢ page 106.
@ Note
-Changes in tempe rature or load ca n affect
the he ight of the vehicle.
- Always se lect
auto or comfort mode . Other
wise, the tongue load spec ified for your ve
hi cle w ill no longe r be applicable.
84
· Driving instructions
Driving with a trailer always requires extra care
and consideration.
Weight distribution
Towing a loaded trailer with an empty car results
i n a h ighly unstab le distribut ion of weight. If this
cannot be avoided, drive at very low speeds only
to avoid the risk of losing steering control.
A "balanced" rig is easier to operate and control.
This means that the tow vehicle shou ld be loaded
to the extent possible and permissible, wh ile
keeping the trailer as light as possible under the
c ir cumstances . Wheneve r possible, transfer
some cargo to the luggage compartment of the
tow ve hicle while observing tongue load require
ments and vehicle load ing conside ra tions.
Speed
The higher the speed, the more difficult it be
comes for the dr iver to control the r ig. Do not
drive at the maximum permissible speed. Reduce
yo ur speed even more if load, weather or wind
cond it ions are unfavo rab le -pa rtic ularly whe n
going downh ill.
Reduce vehicle speed
immed iately if the t railer
shows the slightest sign of sway ing.
Do not try
t o stop th e s waying by accelerating.
Observe speed limits. In some areas, speeds fo r
vehicles tow ing traile rs are lower than for regular
vehicles.
Always apply brakes early. When driving down
hill, shift into a lower gear to use the eng ine
braki ng effect to slow the vehicle. Use of the
bra kes alone ca n cause them to overheat a nd fail.
Air suspension*
When dr iving with a trailer, act ivate the trailer
mode of the air suspens io n. Switch the a ir sus
pension trailer mode on w hen you are towing a
trailer. This wi ll limit the regulation by the air
s u spension while dr iv ing. Se lect in the M MI:
I CAR ! funct ion but ton > (Car )* s ystem s contro l
button >
Vehicle setting s > Air su sp .: towing >
On . .,_
Page 102 of 280
Assist
system may have detected a vehicle in another
lane that is
not adjacent to your current lane.
- If you are driving through a curve. Side assist
may react to a vehicle that is one lane over
from the adjacent lane.
- If side assist reacts to other objects (such as
high or displaced guard rails).
- In poor weather conditions. The side assist
functions are limited.
Do not cover the radar sensors <=>
fig. 107 with
stickers, deposits, bicycle wheels or other ob
jects, because they will impair the function. Do not use side assist when towing a trailer. For in
formation on cleaning, see <=>
page 231.
A WARNING
-Always pay attention to traffic and to the
area around your vehicle. Side assist cannot
replace a driver's attention. The driver alone
is always responsible for lane changes and
similar driving maneuvers.
- In some situations, the system may not
function or its function may be limited. For
example:
- If vehicles are approaching or being left
behind very quickly. The display may not
turn on in time.
- In poor weather conditions such as heavy
rain, snow or heavy mist.
- On very wide lanes, in tight curves, or if
there is a rise in the road surface. Vehicles
in the adjacent lane may not be detected
because they are outside of the sensor
range.
- Audi side assist cannot detect all vehicles under all conditions, which can increase the
risk of accidents.
- Please note that side assist only displays ap proaching vehicles or vehicles in your blind
spot if your vehicle is traveling at least
19 mph (30 km/h).
- In certain situations, the system may not
work or its function may be limited. For ex
ample:
- The display may not turn on at the right
time if veh ides are approaching or passing
very quickly.
100
-
-In poor weather conditions, such as heavy
rain, snow or fog.
- In very wide lanes, in tight curves or when
there are slopes in the roadway, vehicles
in the neighboring lanes may not be de
tected because they a re outside of the
sensor range.
(D Note
The sensors can be displaced by impacts or
damage to the bumper, wheel housing and
underbody. This can impair the system. Have
an authorized Audi dealer or authorized Audi
Service Facility check their function .
@ Tips
If the window glass in the driver's door or
front passenger's door has been tinted, the display in the exterior mirror may be incor
rect.
- For an explanation on conformity with the
FCC regulations in the United States and the
Industry Canada regulations, see
~page 262.
Switching on and off
Appl ies to : vehicles wi th Audi side ass ist
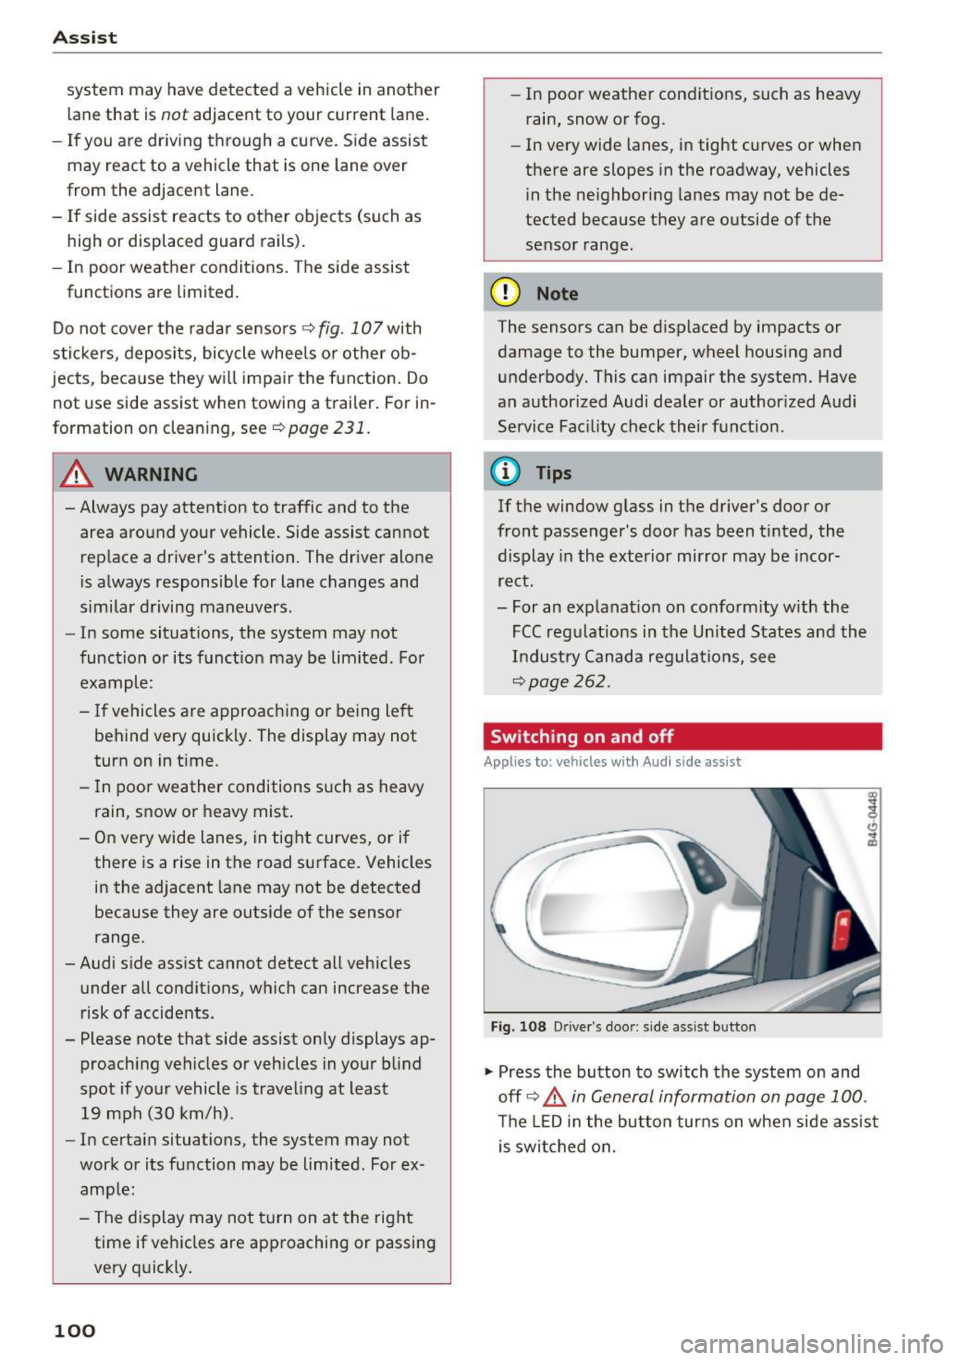
Fig. 108 Driver's door: side assist button
"" Press the button to switch the system on and
off <=>.&
in General information on page 100.
The LED in the button turns on when side assist
is switched on.
Page 106 of 280
Ass is t
Switching on /off
Applies to: vehicles with night vision assist
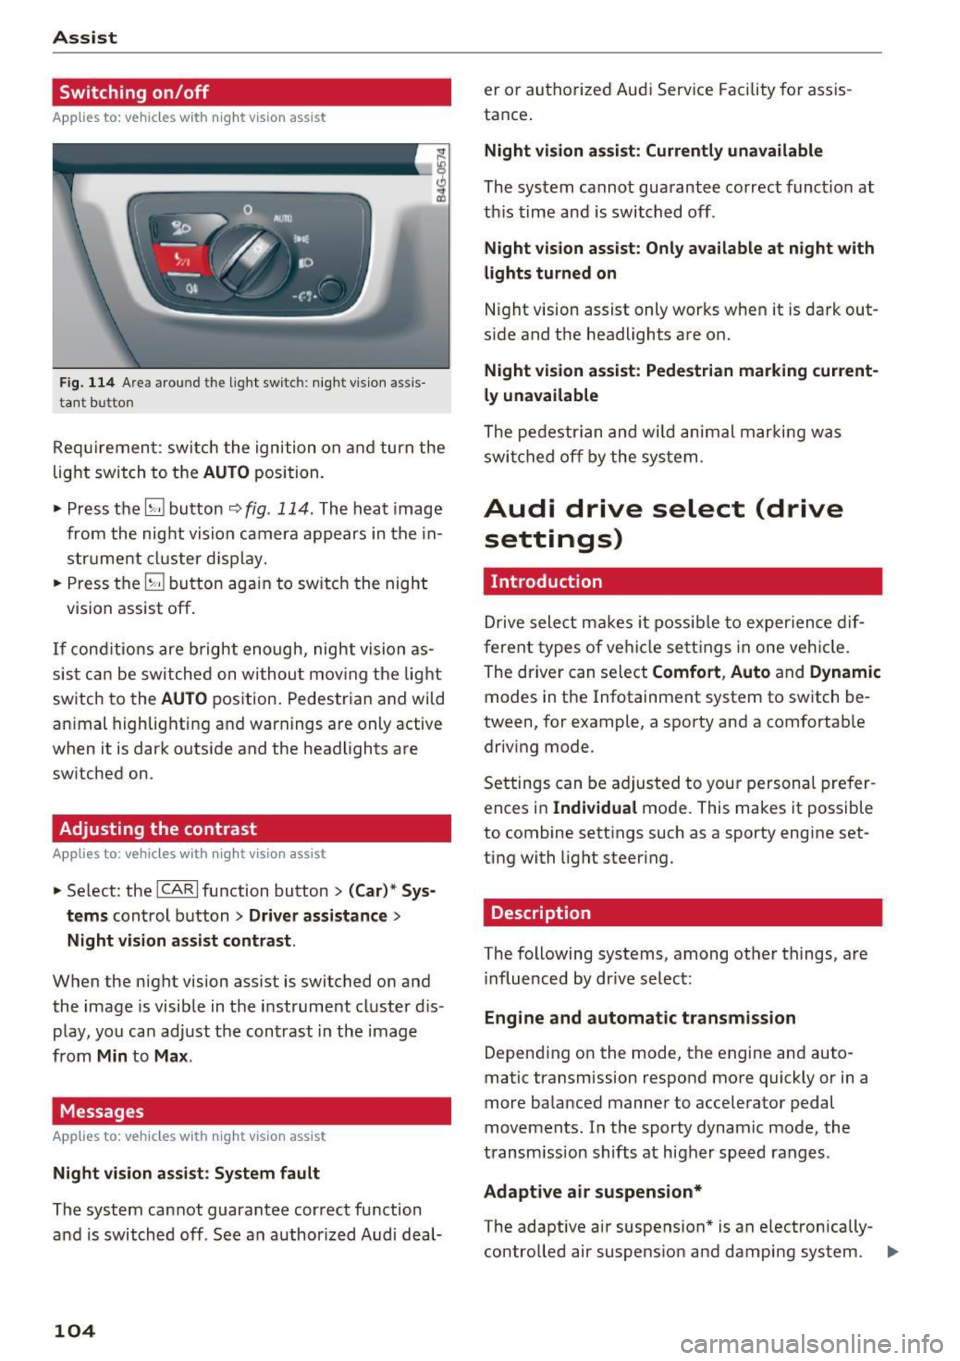
Fig. 114 Are a aro und th e light sw itc h: n ight v is ion assis
ta nt b utto n
Req uiremen t: sw itch the ignition on and turn the
light switch to the
AUTO position.
• Press the
[g button ~ fig. 114 . The heat image
from the nig ht vision camera appears in the in
strume nt cluster d isplay.
• Press the
(g button again to switch the night
vision assist off .
If conditions are b right enough, night vision as
sis t can be switched on withou t mov ing the light
switch to the
AUTO position. Pedestrian and wild
an imal highlighting and warnings are only active
when it is da rk outs ide and the headlights are
sw itched on .
Adjusting the contrast
Applies to: vehicles with night vision assist
• Select : the ICARlfunction button > (C ar)* S ys
t e ms
control button > Dri ver assistance >
Night vi sion a ssis t contrast .
When the night vision assist is switched on and
the image is visible in the instrument cluster d is
p lay, you can adjust the contrast in the image
from
Min to Ma x.
Messages
Applies to: vehicles with night vision assist
Ni ght vision assist : S ystem fau lt
The system cannot guarantee correct function
and is switched off . See an author ized Audi deal-
104
er or authori zed Aud i Service Facility for assis
tance .
Night vi sion a ssis t: Curren tly unavailable
The system cannot guarantee correct funct io n at
th is time and is switched off .
Night vis ion ass ist: O nly ava ilabl e a t n ight with
lights turned on
N ight vision assist only works when it is dark out
s ide and the headlights are on.
Night vis ion a ssist: Pede st ria n marking current
l y unavailab le
The pedestrian and wi ld animal marki ng was
swi tched off by the system .
Audi drive select (drive
settings)
Introduction
D rive select makes it possib le to exper ience dif
ferent types of ve hicle settings in one veh icle .
The dr iver can select
Comfort , Auto and Dynamic
modes in the Infotainment system to switch be
tween, for example, a sporty and a comfortab le
driv ing mode .
Settings can be adjusted to your persona l prefer
ences in
Individua l mode. This makes it possible
to combine settings such as a sporty engine set
ting with light steering.
Description
T he following systems, among other things, are
i nfluenced by dr ive select:
Eng ine and aut om atic transmi ssion
Depend ing on the mode, th e engine and auto
matic transmission respond more quickly or in a
more balanced manner to acceler ator pedal
movements. In the sporty dynamic mode, the
transm ission shifts at higher speed ranges .
Adaptive air su spen sion*
The adaptive a ir suspension * is an e lectronically
controlled air suspens ion and damping system. ..,_
Page 107 of 280
The adjustment depends on the driving mode se
l ected, steering movements, the driver's brak ing
and accelerat ion, and as the road su rface, vehicle
speed and load.
The vehicle ground clearance depends on the mode se lected and the speed . When you are in
the
auto , the highway setting is act ivated when
you dr ive above 75 mph (120 km/h) for more
than 30 seconds. The g round clearance is in
creased automat ica lly if the speed drops below
44 mph (70 km/h) for more than 120 seconds .
Steering
The power steering adapts. Ind irect steering that
moves easily as in comfort mode is especially
sui ted to long drives on a h ighway. The Dynamic
mode provides sporty, direct steering .
Applie s to: vehicles with dynamic steering
The steering ratio changes based on vehicle
speed in order to maintain optimum steering ef
fort for the dr iver at a ll times. This sets the steer
i ng to be less sensit ive at higher speeds in order
to p rovide imp roved vehicle contro l. At reduced
speeds, steer ing is mo re direct in order to keep
t he s teering effo rt as m inima l as poss ib le when
t he dr iver is maneuvering the vehicle . At low and
ave rage speeds, dynamic steering* additionally
p rovides more responsive stee ring performance.
Sport differential *
As a component of the all wheel d rive system
(quattro)
<=? page 124 , the sport diffe rential dis
tr ib utes the dr iv ing power to the rear ax le de
pending on the situation. The distribution o f
power varies from balanced (comfort) to sporty
(dynamic) depending on the selected mode . The
goa l is a high leve l of agility and ab ility to accel
erate on curves. The ve hicle is very respons ive to
steer ing.
Cornering light*
The cornering light adapts the high beams to the
direction of the curve depending on the speed.
The pivot ing action and the light ing also adapt to
~ t he mode . .... N
" N .... 0 0 <..:l -
Adaptive cruise control*
T he behavio r whe n accelerating ca n be adjusted
from comfortable to sporty, depending on the
drive select mode. Adaptive cruise control also
responds to the driving behavior of the vehicle
ahead in a more conservative or sporty manner.
Engine sound *
The eng ine sound adapts to the c urren t mode
and can be subtle to sporty.
(D Note
Applies to: vehicles with adaptive ai r suspension
- Make sure there is enough clearance above
and be low the vehicle when parking. The
height of the vehicle (gro und clearance) can
change once it is parked due to temperature
fluctuations, changes to the load conditions
and changes to the dr iving modes .
- When transporting the vehicle on a car car
r ie r, train, ship or by other means, o nly tie
the vehicle down at the run ning s urface of
the t ires , which is the outer c ircumference.
Se cur ing the vehicle at the axle compo
nents, sus pen sion str uts o r towing eyes is
no t perm itted because the pressure in the
air suspens ion struts can change d uring
transport . The vehicle may not be secured
sufficiently if th is happens .
(D Tips
-In some models, the maximum vehicle
speed can only be reached in the auto and
dynamic modes.
- The S selector lever position automatica lly
engages if the dynamic mode is selected.
- Applies to: vehicles with dynamic steering:
operating noise is heard when starting or
stopping the engine. Th is does not ind icate
a problem.
105
Page 110 of 280
Parking systems
Parking systems
General information
Applies to: vehicles with parking system plus/rearview cam
era/peripheral camera
Depending on your vehicle's equipment , various
parking aids will help you when parking and ma
neuvering.
The
parking system plus assists you when park
ing by audibly and visually indicating objects de
tected
in front of and behind the vehicle
¢page 109.
The
rearview camera shows the area behind the
vehicle in the Infotainment system display. This
display assists you when you are cross or parallel parking
¢ page 110. The parking system plus
functions are also available
¢ page 109.
The
peripheral cameras assist you with parking
and maneuvering. You are aided by various cam
eras depending on the vehicle equipment level
¢ page 113. The parking system plus functions
are also available
¢ page 109.
A WARNING
-Always look for traffic and check the area
around your vehicle by looking at it directly
as well. The parking system cannot replace
the driver's attention. The driver is always responsible when entering or leaving a park
ing space and during similar maneuvers.
- Please note that some surfaces, such as
clothing, are not detected by the system .
-
-Sensors and cameras have blind spots in
which people and objects cannot be detect ed . Be especially cautious of small children
and animals.
- The sensors can be displaced by impacts or
damage to the radiator grille, bumper,
wheel housing and the underbody . The park
ing system may be impaired as a result.
Have an authorized Audi dealer or author
ized Audi Service Facility check their func
tion .
- Make sure the sensors are not obstructed by stickers, deposits or other materials. If they
are, the sensor function could be impaired.
108
For additional information on cleaning, see
¢page 231.
(D Note
-Some objects are not detected or displayed
by the system under certain circumstances:
- Objects such as barrier chains, trailer draw
bars, vertical poles or fences
- Objects above the sensors such as wall ex
tensions
- Objects with certain surfaces or structures
such as chain link fences or powder snow
- If you continue driving closer to a low ob
ject, it may disappear from the sensor range. Note that you will no longer be
warned about th is obstacle .
- Keep enough distance from the curb to re
duce the risk of damage to the rims .
(D Tips
-The system may provide a warning even
though there are no obstacles in the cover
age area in some situations, such as :
- certa in road surfaces or when there is tall
grass.
- external ultrasonic sources such as from
cleaning vehicles .
- in heavy rain, snow, or thick vehicle ex
haust.
- We recommend that you practice parking in
a traffic-free location or parking lot to be
come familiar with the system . When doing
this, there should be good light and weath
er conditions.
- You can change the volume and pitch of the
signals as well as the display
¢ page 118.
- Please refer to the instructions for towing a
trailer located in
¢page 118.
- What appears in the infotainment d isplay is
somewhat time-delayed.
- Th e sensors must be kept clean and free of
snow and ice for park aid to operate .