cooling AUDI A6 2017 Owners Manual
[x] Cancel search | Manufacturer: AUDI, Model Year: 2017, Model line: A6, Model: AUDI A6 2017Pages: 280, PDF Size: 70.24 MB
Page 5 of 280
co
co
.... N
" N .... 0 0 <..:l '
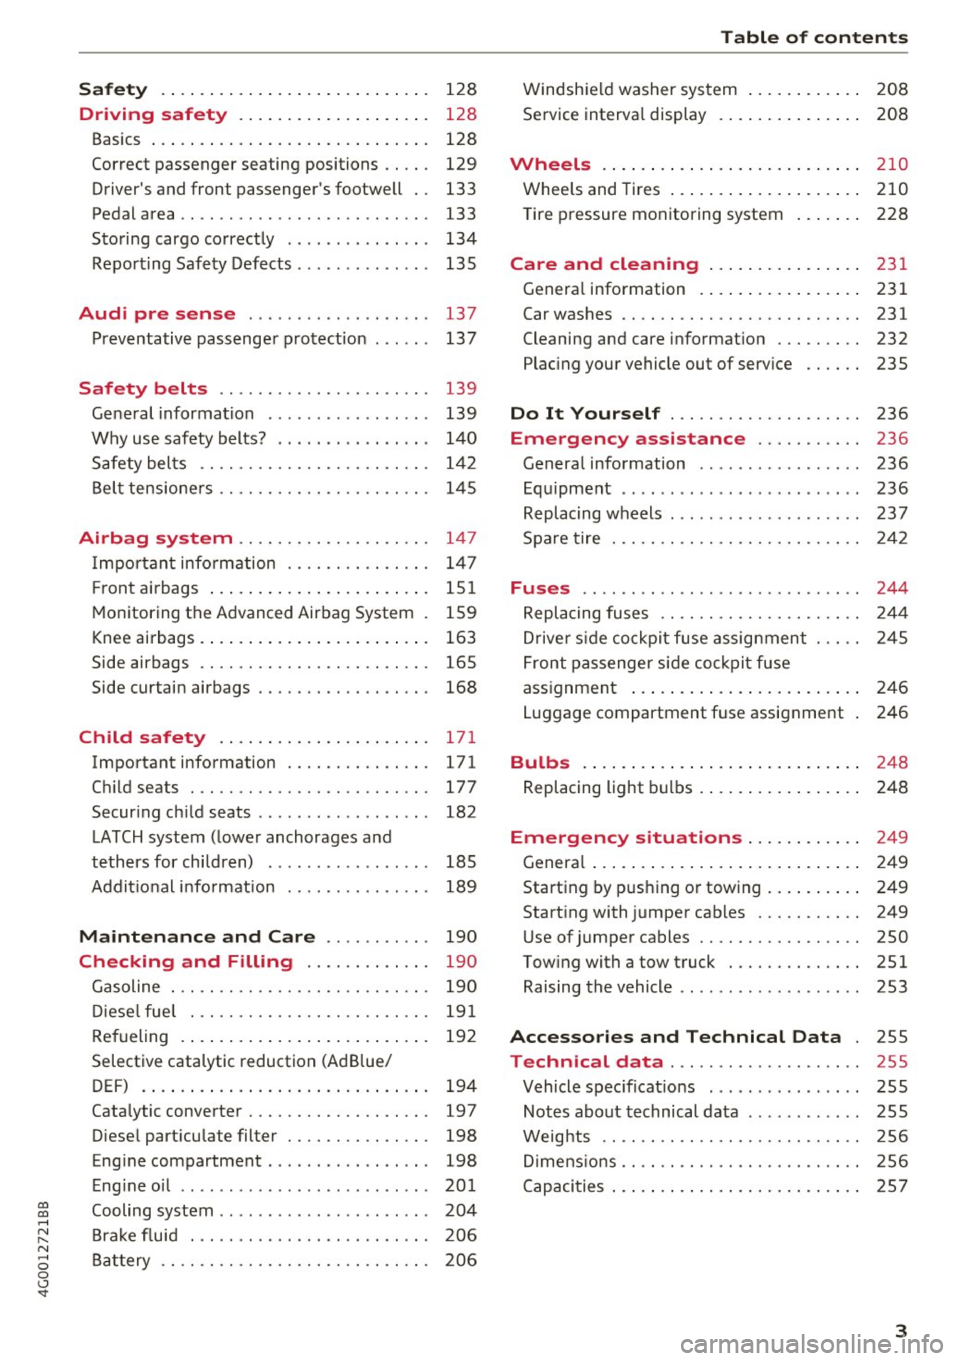
Driving safety . . . . . . . . . . . . . . . . . . . . 128
Basics . . . . . . . . . . . . . . . . . . . . . . . . . . . . . 128
Correct passenger seating positions . . . . . 129
Driver 's and front passenger's footwell . . 133
Pedal area . . . . . . . . . . . . . . . . . . . . . . . . . . 133
Sto ring cargo correctly . . . . . . . . . . . . . . . 134
Repo rting Safe ty Defects . . . . . . . . . . . . . . 13 5
Audi pre sense . . . . . . . . . . . . . . . . . . . 137
P reventative passenge r protect ion . . . . . . 137
Safety b elts . . . . . . . . . . . . . . . . . . . . . . 139
Ge ne ral informa tion . . . . . . . . . . . . . . . . . 139
Why use safety belts? . . . . . . . . . . . . . . . . 14 0
S afety belts . . . . . . . . . . . . . . . . . . . . . . . . 142
B el t tensione rs . . . . . . . . . . . . . . . . . . . . . . 14 5
Airbag system . . . . . . . . . . . . . . . . . . . . 147
I m portan t info rm ation . . . . . . . . . . . . . . . 147
F ront airbags ... .. .. .... .. . .. .. .. .. . 151
M on itor ing the Advanced Airbag System . 159
Knee airbags . . . . . . . . . . . . . . . . . . . . . . . . 163
Side airbags . . . . . . . . . . . . . . . . . . . . . . . . 165
Side curtain airbags . . . . . . . . . . . . . . . . . . 168
Ch ild safety . . . . . . . . . . . . . . . . . . . . . . 171
Important information . . . . . . . . . . . . . . . 171
Ch ild seats . .. ............... .. .. .. . 177
Secur ing ch ild seats . . . . . . . . . . . . . . . . . . 182
L ATCH system ( lower anchorages and
tethers for chi ldren) . . . . . . . . . . . . . . . . . 185
Addit io nal info rmat ion . . . . . . . . . . . . . . . 189
Maintenance and Care . . . . . . . . . . . 190
Checking and Filling . . . . . . . . . . . . . 190
Gasoline . . . . . . . . . . . . . . . . . . . . . . . . . . . 190
Di ese l fue l . . . . . . . . . . . . . . . . . . . . . . . . . 19 1
Refueling . . . . . . . . . . . . . . . . . . . . . . . . . . 192
Selective catalytic reduction (Ad Blue/
DEF) . . . . . . . . . . . . . . . . . . . . . . . . . . . . . . 194
Catalytic converter . . . . . . . . . . . . . . . . . . . 197
Diese l particulate filter . . . . . . . . . . . . . . . 198
E ng ine compartment . . . . . . . . . . . . . . . . . 198
E ng ine oil . . . . . . . . . . . . . . . . . . . . . . . . . . 20 1
Cooling system . . . . . . . . . . . . . . . . . . . . . . 204
B ra ke flu id . . . . . . . . . . . . . . . . . . . . . . . . . 206
Ba ttery . . . . . . . . . . . . . . . . . . . . . . . . . . . . 206
Table of contents
Windsh ield washer sys tem . . . . . . . . . . . . 2 08
Service interva l display . . . . . . . . . . . . . . . 208
Wheels .. .. .. .. .. .... . ..... ... .. .. 210
Wheels and Tires .... .. .. ..... ... .. .. 210
Tire pressure monitoring system . . . . . . . 228
Care and cleaning . . . . . . . . . . . . . . . . 231
Genera l information . . . . . . . . . . . . . . . . . 231
Ca r washes . . . . . . . . . . . . . . . . . . . . . . . . . 231
Cleaning and care information . . . . . . . . . 232
Plac ing your vehicle out of serv ice . . . . . . 235
Do It Yourself . . . . . . . . . . . . . . . . . . . . 236
Emergency assistance . . . . . . . . . . . 236
General information . . . . . . . . . . . . . . . . . 236
E q uipment . . . . . . . . . . . . . . . . . . . . . . . . . 236
Replacing wheels . . . . . . . . . . . . . . . . . . . . 237
Spa re tire 242
Fuses . . . . . . . . . . . . . . . . . . . . . . . . . . . . . 244
Repla cing fuses . . . . . . . . . . . . . . . . . . . . . 24 4
Dr ive r sid e co ckpit fuse assignment . . . . . 245
F ront passenger si de co ckpit fuse
ass ignment . . . . . . . . . . . . . . . . . . . . . . . . 2 46
Luggage compartment fuse assignment 246
Bulbs . . . . . . . . . . . . . . . . . . . . . . . . . . . . . 248
Replacing light b ulbs . . . . . . . . . . . . . . . . . 248
Emergency situations . . . . . . . . . . . . 249
Genera l . . . . . . . . . . . . . . . . . . . . . . . . . . . . 249
Starting by p ush ing o r towing . . . . . . . . . . 249
Start ing with jumper cab les . . . . . . . . . . . 249
U se of jumpe r cables . . . . . . . . . . . . . . . . . 250
Tow ing with a tow truck . . . . . . . . . . . . . . 251
Raising the vehicle . . . . . . . . . . . . . . . . . . . 253
Accessories and Technical Data . 255
Technical data . . . . . . . . . . . . . . . . . . . . 255
Vehicle spec ificat io ns . . . . . . . . . . . . . . . . 255
Notes about technical data . . . . . . . . . . . . 255
Weig hts . . . . . . . . . . . . . . . . . . . . . . . . . . . 256
Di mens ions . . . . . . . . . . . . . . . . . . . . . . . . . 256
C apaci ties . . . . . . . . . . . . . . . . . . . . . . . . . . 2 57
3
Page 11 of 280
Instruments and indicator lights
Instruments and indicator lights
Instruments
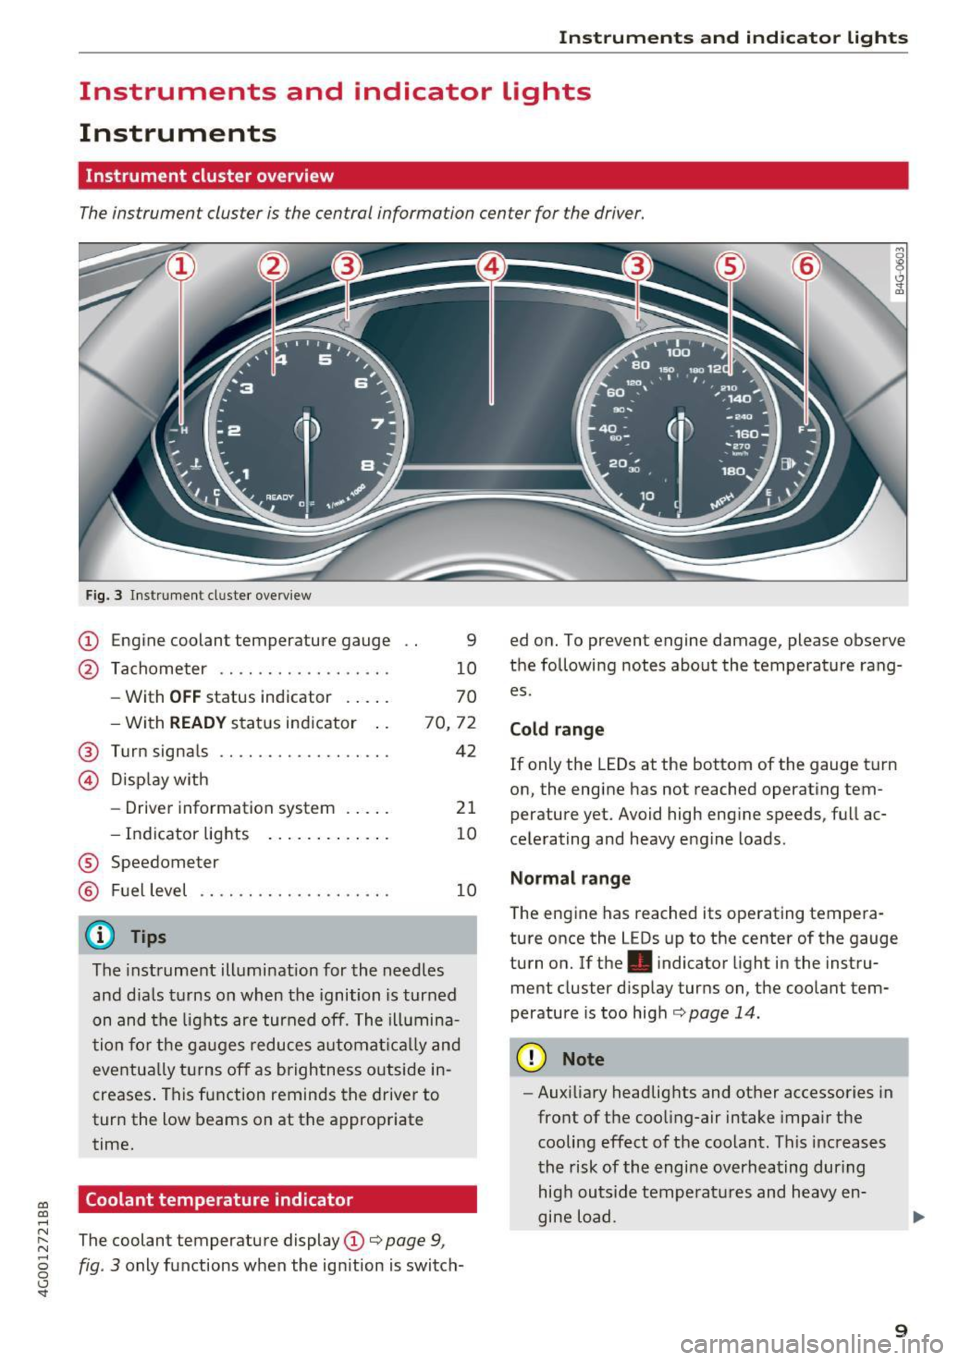
Instrument cluster overview
The instrument cluster is the central information center for the driver.
co
co
....
Fig . 3 Instru ment cl uste r overview
CD Engine coolant temperature gauge
@ Tachometer ...... .... ...... . .
- With
OFF status indicator . .. . .
- With
READY status ind icator ..
@ Turn signals ...... .... ....... .
© Dis p lay w ith
- Drive r information system . .. . .
- Indicator lig hts ..... .. . .. .. .
® Speedometer
® Fuel level
(D Tips
9
1 0
70
70, 72
42
21
10
1 0
The instrument illumination for the needles
and d ia ls t urns on when the ignition is turned
on and the lights are turned off. The ill umina
t ion fo r the g auges reduces aut omat ically and
eve ntu ally t urns off as brigh tness outside in
creases . This f unction reminds the drive r to
tur n the low beams on at the approp riate
time.
Coolant temperature indicator
~ The coolant temperature display CD¢ page 9,
g fig. 3 only functions when the ignition is switch
<..:> 'SI"
ed o n. To prevent engine damage, please observe
the following notes about the temperature rang
es.
Cold range
If only the LEDs at the bottom of the gauge t urn
on, the engine has not reached operating tem
perature yet. Avoid high eng ine speeds, full ac
ce le rating and heavy e ngine loads.
Normal range
T he eng ine has reached its operating tempera
ture once the L EDs up to the center of the gauge
turn on.
If the. indicator light in the inst ru
ment cluster d isp lay turns on, the coolant tem
perature is too high¢
page 14.
(D Note
-Aux iliary headlig hts and ot her accessories in
front of the coo ling-air intake impa ir th e
cooling effect o f th e coolant . This increases
t he risk of th e engi ne overheating dur ing
hig h ou tsid e tempera tures and heavy en
gine load.
9
Page 12 of 280
Instruments and indicator lights
-The front spoiler also he lps to distr ib ute
cooling air while driving . If the spoiler is
damaged, the cooling effect w ill be im
paired and the risk of the engine overheat
i ng will increase. See an author ized Audi
dealer or authorized Audi Service Fac ility for
ass istance.
(D Tips
Applies to: ve hicles w ith d iese l engines
Due to the high eff ic iency of these engines,
the engine may not always reac h opera ting
t em perature i n cold outside tempe ra tur es.
This is normal and not a cause for con cern .
Tachometer
The tachometer displays the engine speed in rev
olutions per minute (RPM).
You shou ld shift to the next lowest gea r whe n
the speed is below 1,S00 R PM. T he begin ning of
the re d zone in the tachome ter ind icates the
maximum permissible engine speed fo r all gea rs
once the engine has been bro ken in and when it is
warmed up to operating temperature . Before
reaching the red zone, you should shift into the
next h igher gea r, c hoose the Dor S selecto r lever
position, or remove your foot from the accelera
tor pedal.
CD Note
The needle in the tachometer @ c> page 9,
fig. 3
may only be in the red area of the gauge
for a short time or the re is a r isk of engine
damage.
@ For the sake of the environment
Upshifting early helps you to save fuel and re
duce operating no ise.
(D Tips
Applies to: S models
The engine speed is limi ted when the eng ine
is cold -the full e ngine o utp ut is not availa
ble. When the engi ne is at ope rating temper
at ure, the re d a rea i n the ta chome ter move s
t o a higher RPM range.
10
· Fuel level
The display @ only wor ks w hen the ig nition is
swi tched on.
If th e fue l level drops below 2.6 g al
(1 0
L), a red L ED w ill tu rn on and t he HJ indica
tor light wi ll turn o n
i=>page 18. The LED b links
red when the fue l level is very low .
The poss ible range base d on the cu rrent fue l lev
e l is shown in tab@¢
page 21, fig . 4.
For th e tank capacity i n your veh icle, refe r to the
Techn ica l Da ta
c> page 257.
CD Note
Neve r drive until t he tank is complete ly em p
ty. The irregu la r su pply of fuel that res ults
from tha t can cause engine misfires. Un co m
b uste d fue l w ill th en en ter the exhaust sys
tem . This c an cause overheating and damage
to the ca talyt ic converter .
Indicator Lights
· Description
The ind icator lights in the instrument cluster
bl ink or tur n on. They ind icate fu nctions or mal
funct io ns.
Messages may appear w ith some indicator lights.
A war ning s ignal will sound at the same time.
The ind icator lights and messages i n the instru
ment clus ter d isp lay can be cove red by ot he r dis
plays. To show them ag ai n, se lec t t he tab for in
dicator lights and messages using the mu ltifu nc
tion steering whee l
c> page 21. If there are sev
eral ma lfunctions, you can display them one at a
time us ing the thumbwheel.
Some indicator lights in the d isplay can disp lay in
severa l co lors .
Central indicator light
App lies to: vehicles wit h monochrome d isplay
If a message appears together with a central in
dicator light . or
U. the centra l ind icator light
will indicate the priority of the warning. If a
white indicator light also appea rs, the centra l in
dica tor light w ill have its ow n colo r. Fo r example, ..,.
Page 13 of 280
co
co
.... N
" N .... 0 0 <..:l '
description for •.
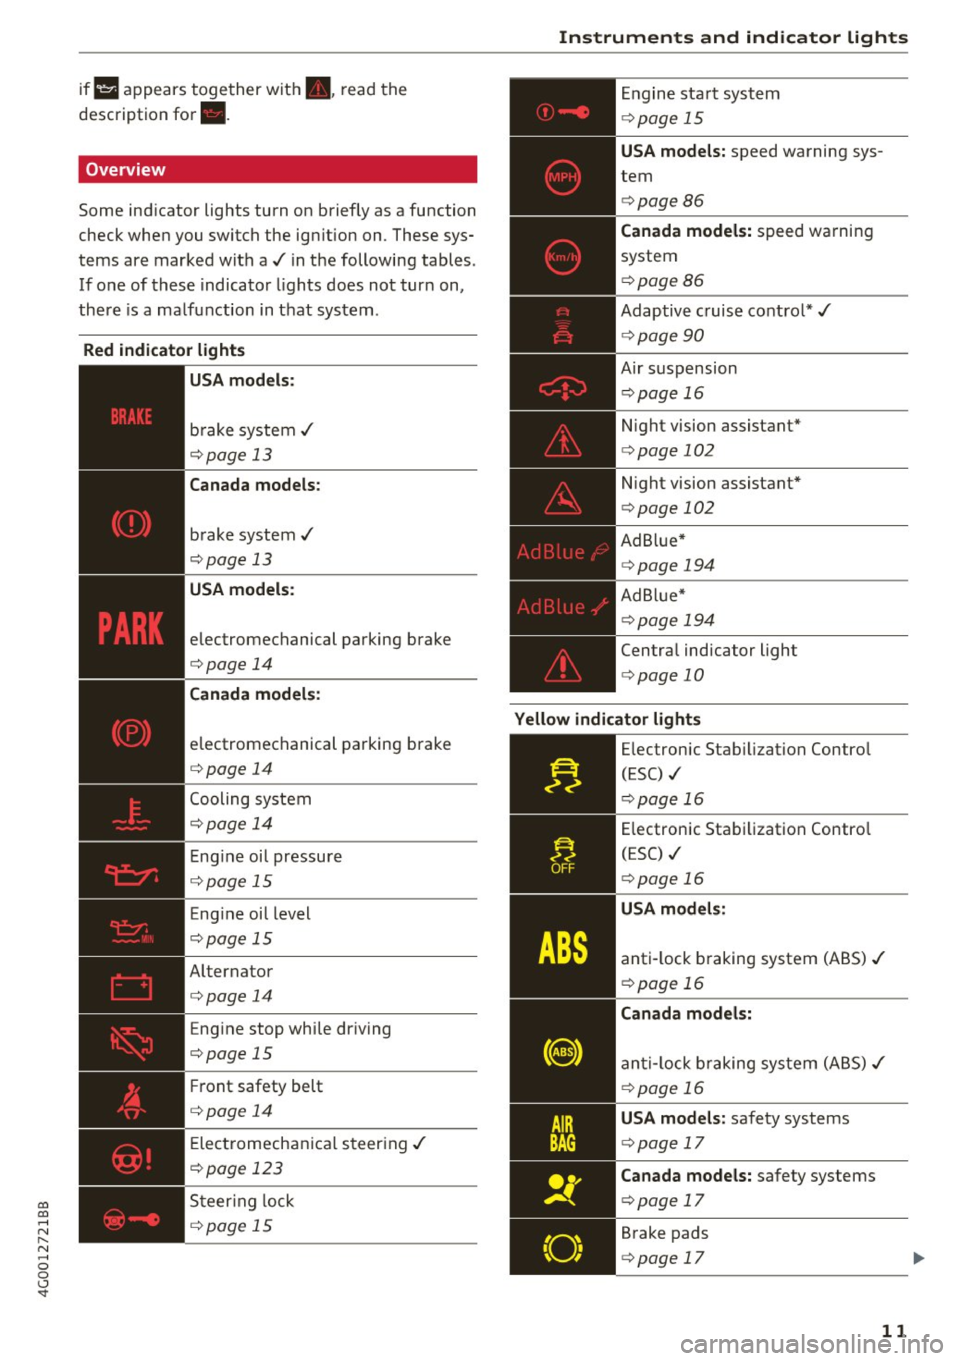
Overview
Some ind icator lights turn on briefly as a function
check whe n you switch the ig nition on . These sys
tems are marked with a../ in the following tables .
If o ne of these indicator lights does not turn on,
there is a ma lfu nction in t hat sys tem .
Red indicator lights
--------------
US A models:
brake syste m ../
¢page 13
Canada models:
brake system ../
¢pag e 13
USA models:
electromechanical parking brake
¢page 14
Canada models:
electromechanical parking brake
¢ page 14
Cooling system
¢page 1 4
Eng ine oi l pressure
¢ page 15
Eng ine oil level
¢ page 15
Alternator
¢page 14
Eng ine stop while dr iv ing
¢page 15
Fr ont safety belt
¢page 14
Ele ct romechani ca l st eer ing ../
¢page 123
Steer ing lock
¢ page 15
Instruments and ind icator lights
En gine sta rt syste m
¢page 15
USA models: speed warning sys
tem
¢ page 86
Canada model s: spee d wa rni ng
system
¢ page 86
Adap tive c ruise contro l* ../
¢ page 90
A ir suspension
¢ page 16
Night vision assistant*
¢ page 102
Night vision assistant *
¢page 102
Ad B lue*
¢ page 194
Ad Blu e*
¢page 19 4
Centra l indicator light
i=> page 10
Yellow indicator lights
.....
.,.I._
"O~ I I
" 1
--------------
Electronic Stab ilization Contro l
(ESC) ./
¢page 16
Electronic Sta bilization Contro l
(ESC) ../
¢page 16
USA models :
anti-lock braking system (ABS) ../
¢page 16
Canada models:
an ti-lock braking sys tem (A BS) ../
¢page 16
USA models: safety systems
¢ page 17
Canada models: safety systems
¢page 17
Brake pads
¢ page 17
11
Page 16 of 280
Instruments and indicator lights
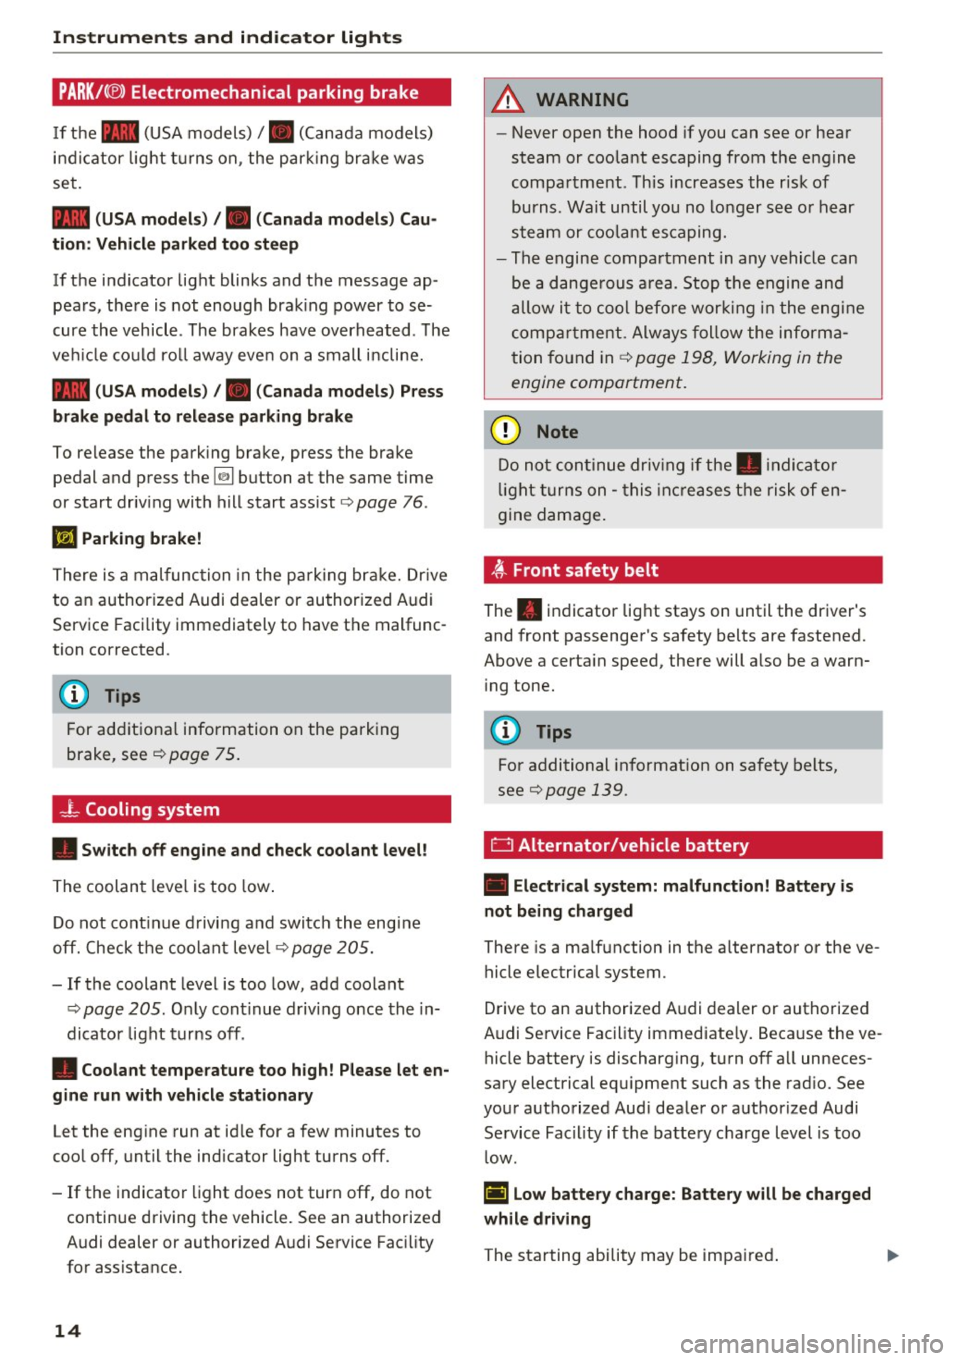
PARK/(®) Electromechanical parking brake
If the - (USA models) /. (Canada models)
i n dicator light t urns on , the par king bra ke was
set.
- (USA model s) /. (Cana da models) Cau
tion: Vehi cle parked too ste ep
If the indicator light blinks and the message ap
pears, the re is not enough brak ing power to se
cure the vehicle . The bra kes have overheated. The
ve hicl e co uld ro ll away eve n on a small incline.
- (USA mod els) /. (Canada models) Pr ess
brake pedal to rel ease parking brake
To release the park ing brake, press the brake
pedal and press the
[21 button at the same time
or start driv ing with hill start ass ist
r=> page 76.
II Parking brake!
There is a malfunc tion in the park ing bra ke. Dr ive
to an author ized Audi dealer or author ized Audi
Service Facility immediately to have the malfunc
tion corrected .
(D Tips
For additional information on the parking
brake, see
r=:> page 75.
-L Cooling system
• Switch off engine and check coolant level!
The coolan t leve l is too low .
Do not cont inue d rivin g and switch the engi ne
off. Check the coolant leve l
r=>page 205.
-If the coolant level is too low, add coolant
r=:> page 205 . Only cont inue driving once the in
dicator light turns off .
• Coolant temperature too high! P lease let en
gine run with vehicle st a tionary
Let the eng ine run at id le for a few minutes to
coo l off, until the indicator light turns off.
- If the indicator light does not turn off, do not
continue driving the vehicle. See an authorized
Audi dealer or authorized A udi Service Fac ility
for assistance.
14
A WARNING
-
- Never ope n the hood if you can see or hear
steam or coola nt escaping from t he engine
compar tment . This increases the risk of
burns. Wa it until you no longer see o r hear
stea m or coola nt es caping.
- The engine compartment in any vehicle can
be a dange rous a rea. Stop t he engine and
allow it to cool befo re wor king i n the e ng in e
comp artme nt. Always follow the informa
tion fo und in
r=:> page 198, Working in the
engine compartment.
Q) Note
D o not con tinue driv ing if the . indi ca to r
li ght turn s on -this in cr eases the risk of en
gine damage.
~ , Front safety belt
The . indicator lig ht stays on until the driver 's
and front passenger's safety belts are fastened.
Above a certa in speed, there will a lso be a warn
i ng tone.
(D Tips
For additional informat ion on sa fety belts,
seer=;,
page 139.
D Alternator/vehicle battery
• Electrical system: m alfunction! Battery is
not being charged
There is a ma lfunction in the a lternato r or the ve
hicle electrical system.
D rive to an authorized A udi dealer or authorized
Audi Se rvice Facility immediate ly. Beca use the ve
hicle battery is discharging, turn off a ll unneces
sa ry electrical equ ipment such as the rad io. See
your authorized Audi dea ler or authorized Audi
Service Facility if the batte ry charge level is too
l ow .
(•) Low battery charge: Battery will be charged
while driving
The starting ability may be impa ired . ...
Page 58 of 280
Seats and storage
_& WARNING
-Do not put any hot beverages in the cup
holder while the vehicle is moving. Hot bev
erages could spill, which can cause injury.
- Do not use any breakable beverage contain
ers (for example, made out of glass or por
celain) . You could be injured by them in the
event of an accident.
0 Note
Beverage containers in the cup holders should
always have a lid . If not, beverages could spill
and cause damage to vehicle equipment, such
electronics or seat covers .
Cooled glove compartment
Applies to: veh icles with cooled glove compartment
The cooled glove compartment only functions
when the
AIC system is switched on.
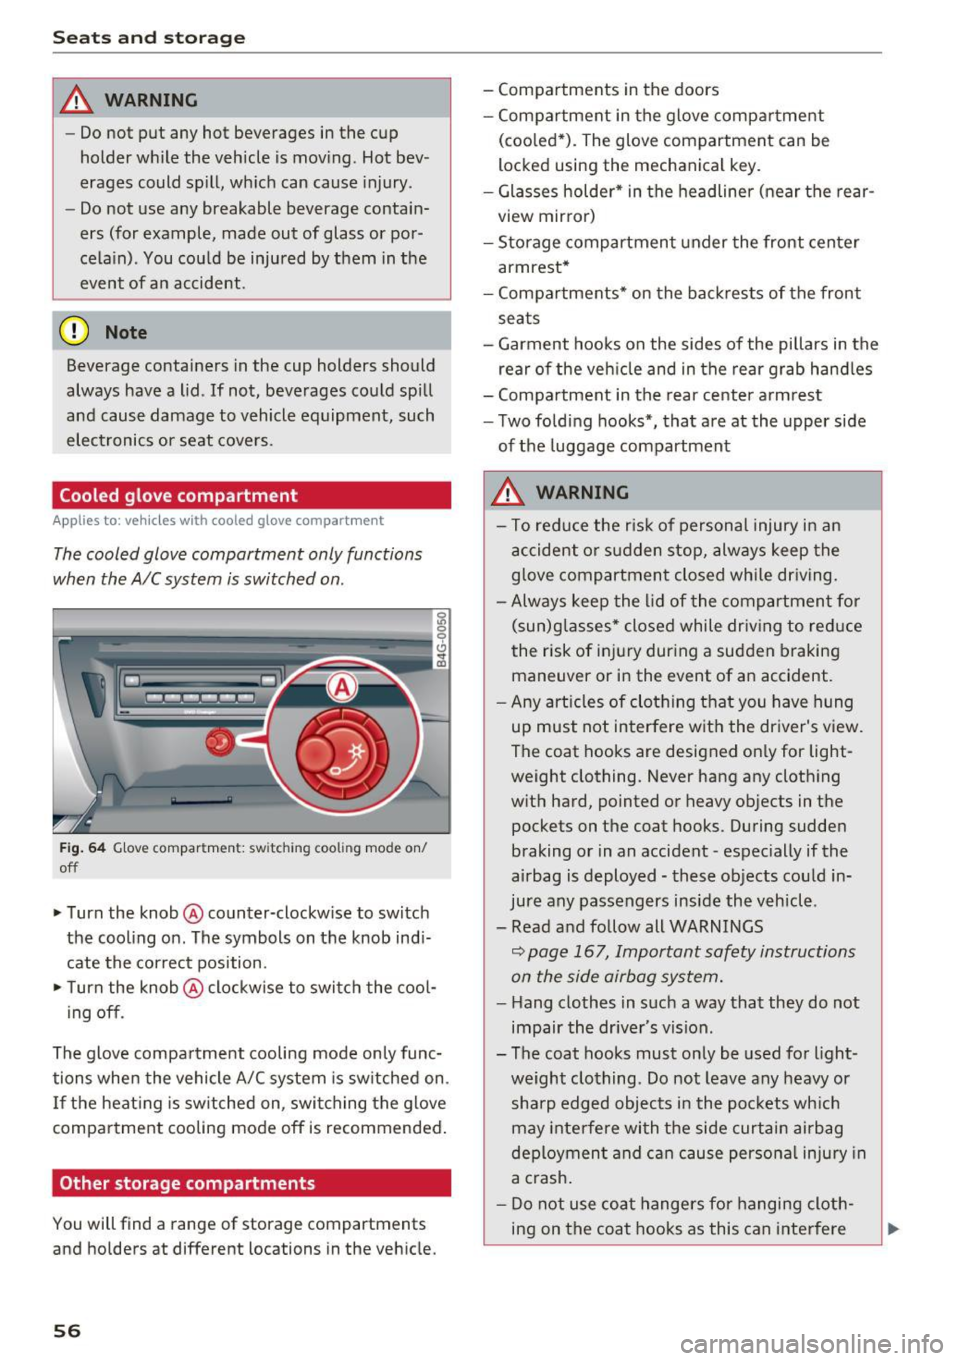
Fig. 64 Glove compar tm ent: s witch in g coo ling mode on/
off
~ Turn the knob@ counter-clockwise to switch
the cooling on . The symbols on the knob indi
cate the correct position.
~ Turn the knob @ clockwise to switch the cool-
ing off .
The glove compartment cooling mode only func
tions when the vehicle A/C system is switched on .
If the heating is switched on, switching the glove
compartment cooling mode off is recommended.
Other storage compartments
You will find a range of storage compartments
and holders at different locations in the vehicle.
56
- Compartments in the doors
-Compartment in the glove compartment
(cooled*) . The glove compartment can be
locked using the mechanical key.
- Glasses holder* in the headliner (near the rear
view mirror)
- Storage compartment under the front center
armrest*
- Compartments* on the backrests of the front
seats
- Garment hooks on the sides of the pillars in the
rear of the vehicle and in the rear grab handles
- Compartment in the rear center armrest
- Two folding hooks*, that are at the upper side
of the luggage compartment
_& WARNING
- To reduce the risk of personal injury in an
accident or sudden stop, always keep the
glove compartment closed while driving.
- Always keep the lid of the compartment for
(sun)glasses* closed while driving to reduce
the risk of injury during a sudden braking
maneuver or in the event of an accident .
- Any articles of clothing that you have hung
up must not interfere with the driver's view.
The coat hooks are designed only for light
weight clothing. Never hang any clothing
with hard, pointed or heavy objects in the pockets on the coat hooks. During sudden
braking or in an accident -especially if the
airbag is deployed - these objects could in
jure any passengers inside the vehicle .
- Read and follow all WARNINGS
c::> page 167, Important safety instructions
on the side airbag system.
- Hang clothes in such a way that they do not
impair the driver 's vision .
-
- The coat hooks must only be used for light
weight clothing . Do not leave any heavy or
sharp edged objects in the pockets which
may interfere with the side curtain airbag
deployment and can cause personal injury in
a crash.
- Do not use coat hangers for hanging cloth
ing on the coat hooks as this can interfere
Page 62 of 280
Warm and cold
Warm and cold
Climate control system
Description
The climate control system warms, cools and re moves humidity from the air in the vehicle interi
or. It is the most effective when the windows and
sunroof * are closed. If there is a bui ld-up of heat
insid e the vehicle, ventilation can he lp to speed
up the cooling process.
I n all heating mode f unctions, except for defrost,
the blower only switches to a higher speed once
the engine coolant has reach ed a suffici ent tem
perature .
Pollutant filt er
The po llutant filter removes poll utants such as
dust and pollen from the a ir .
Ke y recognit ion
A pp lies to: ve hicles w ith de luxe au toma tic clima te co ntro l
The blower sett ing and air distribut ion are stored
automatically and ass igned to the remote control
key that you are using.
A ppl ies to: ve hicles w ith 4 -zo ne del uxe auto matic c limate
co ntrol
The climate con trol set tings are automatically
stored and assigned to the remote control key
that is in use.
A WARNING
Poor visibility can lead to accidents.
- For safer driving, keep all windows free of
ice, snow and fog .
- Become familiar as quickly as possible with the correct use and function of the cl imate
contro l system, especially with the defrost
ing and defogg ing function.
- When the temperat ure is below freezing,
only use the windsh ield washer system after
60
the windshield has been warmed by the cli
mate control system. The washer fluid could
freeze on the windshie ld and impair visibi li
ty .
Cl) Note
-If you suspect that the cl imate contro l sys
tem is damaged, switch the system
off to
prevent further damage and have it checked
by an authorized Aud i dealer or authorized
Audi Service Facility .
- Repa irs to the Aud i climate control system
requ ire special technical knowledge and
special tools . See an authorized Aud i dea le r
or autho rized Aud i Service Faci lity .
@ For the sake of the environment
- To save fuel, turn off cooling mode by press
ing the
IAJC I button. This w ill also reduce
em issions .
- In veh icles w ith a diesel engine, you ca n
switch the auto supplementary heater off in
the Infotainment system.
(D Tips
- To prevent interference with the heat ing
and cooling output and to prevent the win
dows from fogging over, the a ir intake in
front of the windshie ld must be free of ice ,
snow or leaves.
- Conde nsation from the coo ling system can
dr ip and fo rm a pudd le of water under the
vehicle. This is norma l and does not mean
there is a leak.
- Th e energy managemen t sys tem may tem
porarily switch
off certain functions, such as
t h e seat heating * or rear window defogger.
These systems are ava ilable again as soon
as the ene rgy supply has been restored.
Page 63 of 280

co
co
.... N
" N .... 0 0 <.,;) 'SI"
Warm and cold
Automatic climate control
Applies to: vehicles with deluxe automatic climate contro l
We recommend pressing the !AUTO I button and setting the temperature to 72 °F (22 °C) .
Fig. 72 Deluxe automatic cl imate con trol: contro ls
Press the buttons to turn the functions on or off .
The dial adjusts the temperature and the blower .
The LED in a button will light up when the func
tion is sw itched on .
IAUTOI Switching automatic mode on
Automatic mode maintains a constant tempera
ture inside the vehicle. Air temperature, airflow
and air distribution are controlled automatically .
Adjusting the temperature
The temperat ure can be adjusted individually for
the driver and front passenger using the dials@
and @.
Adjusting the blower~
Using the dial @, you can manually adjust the
amount of air generated by the blower to suit
your preferences. The blower should always run
at a low setting to prevent the windows from
fogging and to ensure a continuous exchange of air inside the vehicle. To have the blower regulat
ed automatically, press the
IAUTO I button.
~. [m , ~ Adjusting air distribution
You can manua lly se lect the vents where the air
will flow. To have the air distribution regulated
automatically, press the
IAUTO ! button.
1-1 Switching recirculation mode on/off
In recirculation mode, the air inside the vehicle is
cir culated and filtered . This prevents the unf il
tered air outside the vehicle from entering the
vehicle interior . We recommend sw itching recir
culation mode on when driving through a tunnel
or when sitting in traffic ~&_ .
The
! AUTO I button or I
recirculation mode off .
IOFFI Switching the climate control system
on/off
The ! OF F! button sw itches the climate control
system on or off .
It also switches on when you
press the blower control. Airflow from outside is
blocked when the climate cont rol system is
switched off.
IA/Cl Switching cooling mode on/off
The air is not cooled and humidity is not removed
when cooling mode is switched off. This can
cause fog on the windows . The cooling mode
switches off automatically when there are cold
outside temperatures.
is;,i, FRONT I Switching the defroster on/off
The w indshield and side windows are defrosted
or cleared of condensat ion as quickly as poss ible . .,,_
61
Page 65 of 280
co
co
.... N
" N .... 0 0 <.:l '
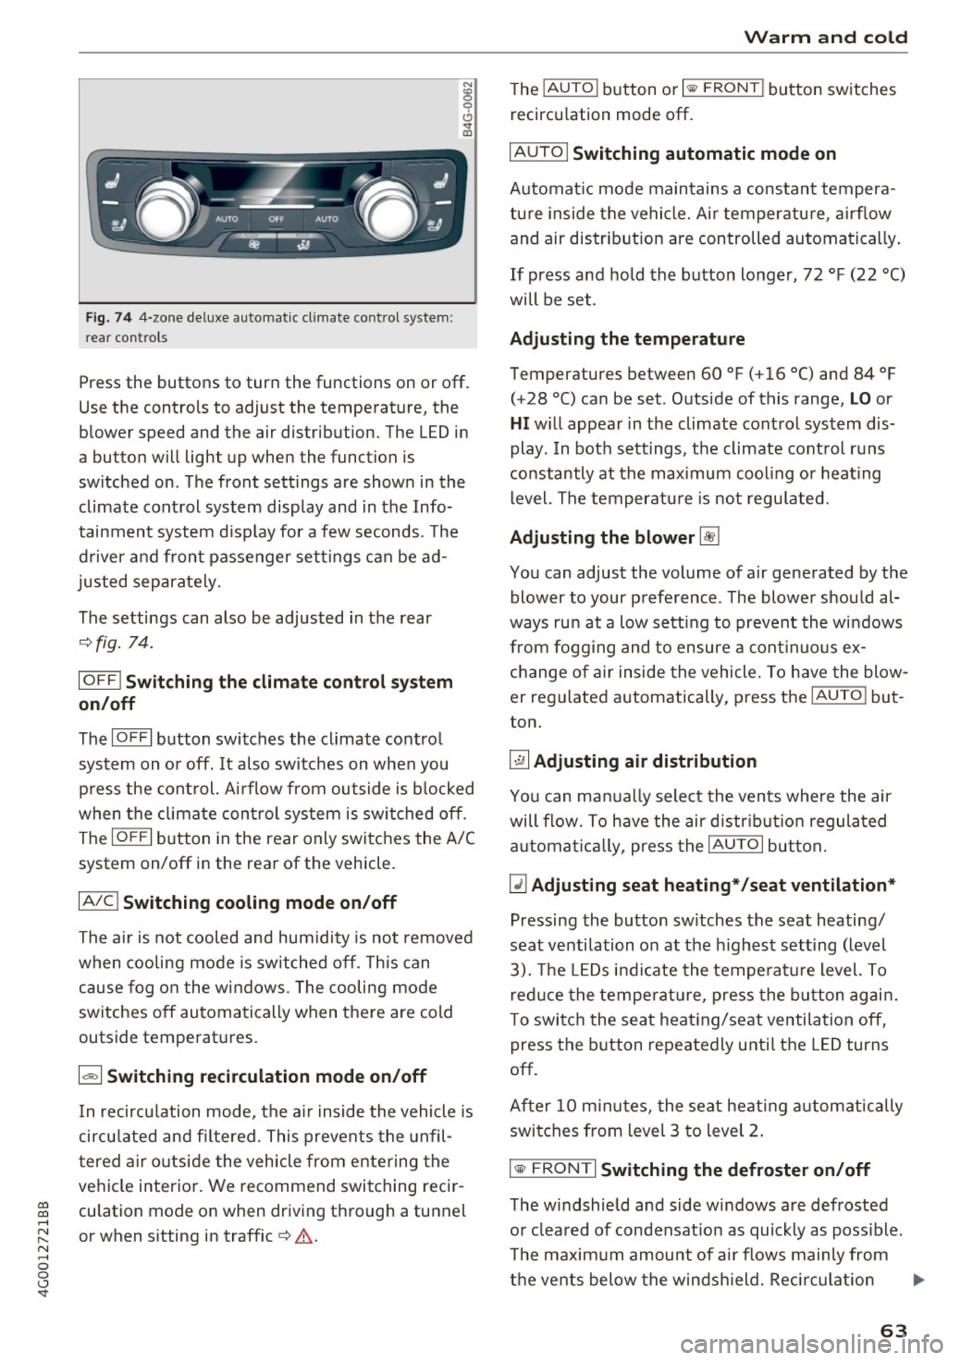
re ar con tro ls
Press the buttons to turn the functions on or off .
Use the controls to adjust the temperature, the
blower speed and the air distribution. The LED in
a button will light up when the function is
sw itched on . T he front settings are shown in the
climate control system display and in the Info
tainment system d isp lay for a few seconds. The
d river and front passenger settings can be ad
justed separately.
The settings can also be adjusted in the rear
~ fig. 74.
IO FF I Sw itchin g the clim ate cont rol s ystem
on /off
The IO FFI button switches the climate control
system on or off.
It also sw itches on when you
press the control. Ai rflow from outside is b locked
when the climate control system is switched off .
The
IO FF I button in the rear only switc hes the A/C
system on/off in the rear of the vehicle .
IA/Cl Switching cooling mod e on /off
The air is not cooled and humidity is not removed
when cooling mode is switched off. This can
cause fog o n the windows . The cooling mode
switches off automatically when there are cold
outside temperatures.
1 6<) 1 Sw itching recirculation m ode on /off
In recircu lation mode, the a ir inside the vehicle is
circu lated and fi ltered. This prevents the unfil
tered a ir o utside the vehicle from entering the
vehicle interior. We recommend switching recir
culation mode on when driving through a tunnel
or when sitting in traffic~&. .
Warm and c old
The !AU TO I button or lllill F RON TI button switches
recircu lation mode off.
I AUTO I Switching automatic mode on
Automat ic mode main tains a cons tant tempera
ture inside the vehicle. Air temperatu re , airf low
and air distr ib ution are controlled automatically.
If press and hold the button longer, 72 °F (22 °C)
will be set .
Adju stin g the temperature
Temperatures between 60 °F ( +16 °() and 84 °F
(+28 °() ca n be set . Outside of this range,
LO or
HI w ill appear in the climate control system dis
play . In both settings, the climate control runs
constantly at the max imum cool ing or heat ing
level. The temperature is not regu lated.
Ad ju sting the blower~
You can adjust the volume of a ir generated by the
blower to your preference . The blower shou ld al
ways run at a low sett ing to prevent the windows
from fogging and to ensure a cont inuo us ex
change of air inside the vehicle , To have the blow
er regu lated automatically , press the
IAU TO ! but
ton .
~ Adju sting air distribution
You can ma nually select the vents where the air
will flow. To h ave the air d istr ibut ion regulated
a utomat ica lly, press the
IAUTOI but ton.
~ Adjusting seat he ating* /seat v entilation *
Pressing the button sw itches the seat heating/
seat ventilation on at the h ighest setting (level
3). The LEDs indicate the tempe rature level. To
reduce the temperat ure, press the b utton again.
To switc h the seat heat ing/seat ventilation off,
press the button repeatedly until the LED turns
off.
After 10 m inutes, the seat heat ing a utomatically
swi tches from level 3 to level 2.
l
The w indshield and side windows a re defrosted
or clea red of condensat ion as quickly as poss ible.
T he maxim um amount of air flows mainly from
the vents below the windsh ield. Reci rc u lat ion
Ill>-
63
Page 68 of 280

Driving
Driving
General information
Breaking in
A new vehicle must be broken in, and the break i n distance should be 1,000 mi les (1,500 km). Do
no t drive at speeds th at wi ll exceed
2/3 of the
maximum permitted engine speed
(R PM ) for the
fi rst 600 mi les (1,000 km) , and avoid f ull accel
eration d uring this period . You may gradua lly
start increas ing the
RPM and the speed between
600 m iles (1,000 km) and 1,000 m iles (1,500
km).
During the fi rst hou rs of use, the engine has a
h igher internal friction than later on when all
mov ing parts have settled into p lace with each
other.
How the ve hicle is driven d uring the first 1,000
miles (1,500 km) also affects the engine quality.
Drive at moderate engine speeds after the initial
break-in per iod, part icu larly when running a cold
engine . This wi ll reduce eng ine wear and improve
the mi leage .
Do not dr ive at too
low of an engine speed (rpm).
Shift down if the engine stops r unning "smoot h
ly". Extremely high eng ine s peeds are automati
cally reduced .
New tires
If yo ur vehicle is ru nning on new t ires, drive pa r
t icularly c aref ul for the first 350 miles (5 00 kilo
meters) after fi tting .
A WARNING
-
New tires tend to be s lippery and must also
be "broken-in". Be s ure to remember this dur
ing the first 350 miles (500 kilometers).
Brake gently. Avo id following closely behind
other vehicles or other situations that might
require sudden, ha rd brak ing .
Avoid damaging the vehicle
When you are d riving on poo r roads, or over
curbs, steep ramps, etc., make ce rtain that low-
66
lying parts such as spo ilers and exha ust system
parts do not bottom o ut and get damaged.
This is es peci ally true for veh icles with low-s lu ng
c h ass is (sports chass is)* and fully loaded
vehicles .
Warming up/cooling down
Applies to: S models
By warming up/coo ling down t he engine careful
l y, you can he lp reduce unnecessary strain on
yo ur vehicle when dr iving in a sporty style.
The engine speed is limited when the engine is cold -the full engine o utp ut is not availab le.
When the engine is at operat ing temperat ure,
the engine speed limitation moves to a higher
RPM range. The t ires also only reach t he ir full
r oad holding capab ility once they have wa rmed
u p .
You r vehicle a lso has an after-run cooling fea
ture . However, cooling down is still important.
The eng ine and the brakes as well as the e xhaust
system and the tra nsmission become very ho t
whe n driving in a spo rty style . B efo re you shut
t h e ve hicle off, yo u should cool down the vehicle
by drivi ng a few miles at low s peeds with ligh t ac
ce lera tion.
Driving through water on roads
Note the following to reduce the risk of vehicle
damage when driving through water, fo r example
on f looded roads:
- The water must not be any higher than the bot
tom of the vehicle body.
- Do not dr ive faster tha n wal king speed .
A WARNING
-
After driving thro ugh water or m ud, the effec
tiveness o f the b rakes may be red uced due to
mo isture on the brake rotors and brake pads.
A few careful brake applications shou ld dry
off the brakes.
@ Note
- Vehicle components such as the engine,
transmiss ion, suspens ion or elect rical