stop start AUDI A6 2017 Owners Manual
[x] Cancel search | Manufacturer: AUDI, Model Year: 2017, Model line: A6, Model: AUDI A6 2017Pages: 280, PDF Size: 70.24 MB
Page 4 of 280
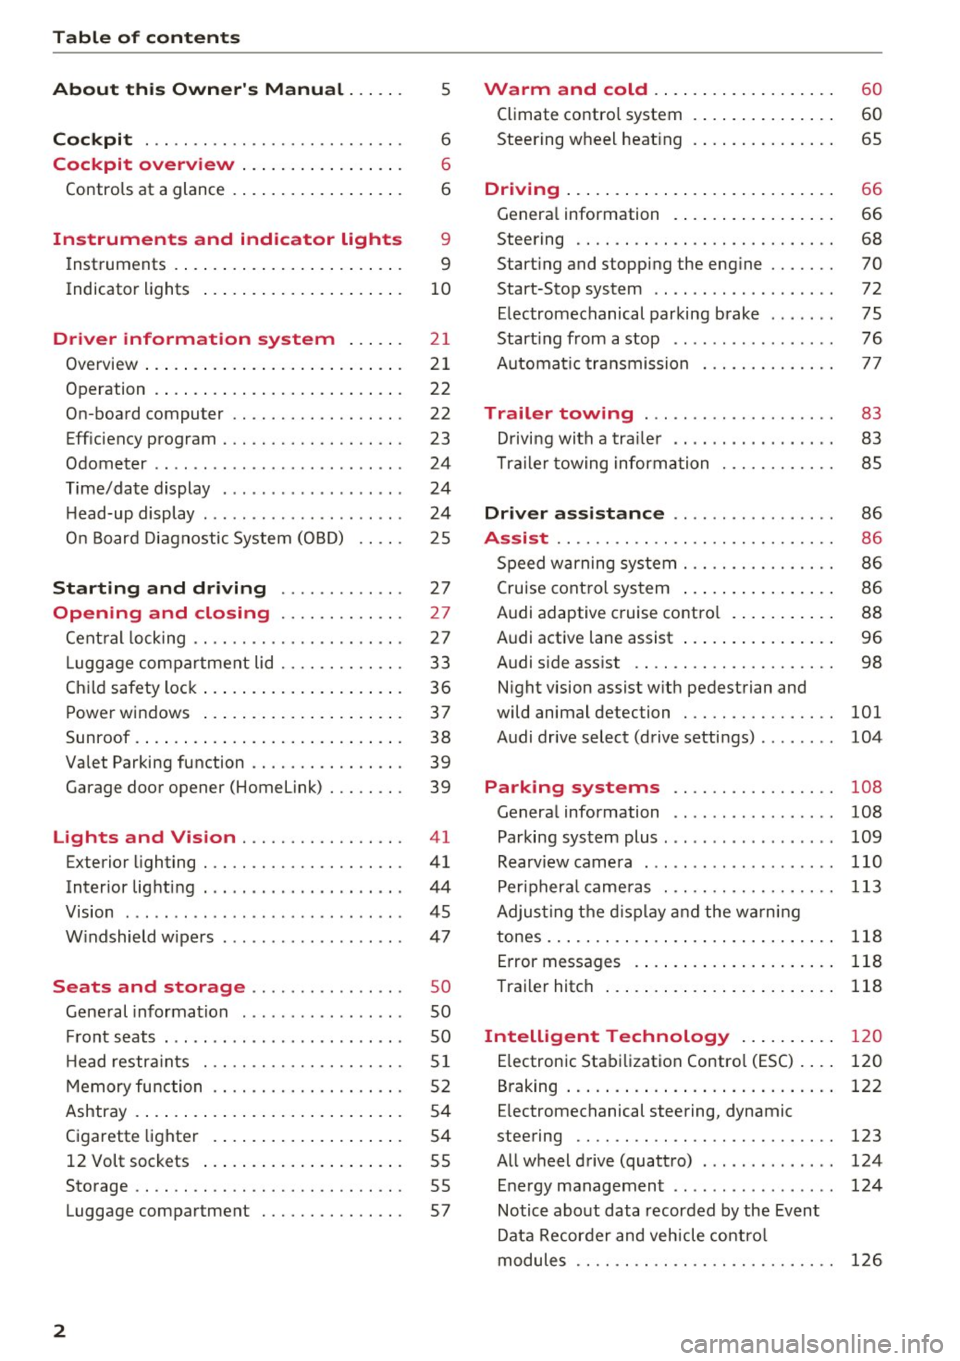
Table of contents
About this Owner's Manual ... .. .
Cockpit ... .. ............... .... .. .
Cockpit overview ................ .
Controls at a glance ... .......... .. .. .
Instruments and indicator lights
Instruments .... ... .......... .. .. .. .
Indicator lights .. .. .......... .. .. .. .
Driver information system ... .. .
Overview ... .... ... .......... ...... .
Operation .... .. ... .......... .. .. .. .
On-board computer ........... .... .. .
Eff iciency program . ........... .. .. .. .
Odometer .. .. .. ............ .... ... .
T ime/date display ........... .... ... .
He ad-up display .... .. .. ..... ... .. .. .
On Board Diagnostic System (OBD) .. .. .
Starting and driving ...... .. .. .. .
Opening and closing .......... .. .
Central locking ... ............ .... .. .
L uggage compartment lid ...... .... .. .
Child safety lock .... .......... .. .. .. .
Power windows ...... ..... ... .. .. .. .
Sunroof . ... .... .. ........... .. .. .. . 5
6
6
6
9
9
10
2 1
21
22
22
23
24
24
24
25
27
27
27
33
36
37
38
Valet Parking function . . . . . . . . . . . . . . . . 39
Garage door opener (Home link) . . . . . . . . 39
Lights and Vision . . . . . . . . . . . . . . . . . 41
Exterior lighting . . . . . . . . . . . . . . . . . . . . . 41
Interior lighting . . . . . . . . . . . . . . . . . . . . . 44
V1s1on . . . . . . . . . . . . . . . . . . . . . . . . . . . . . 45
Windshield wipers . . . . . . . . . . . . . . . . . . . 47
S eats and storage . . . . . . . . . . . . . . . . 50
Gene ral information . . . . . . . . . . . . . . . . . 50
Fro nt seats . . . . . . . . . . . . . . . . . . . . . . . . . 50
H ead restraints . . . . . . . . . . . . . . . . . . . . .
51
Memory function . . . . . . . . . . . . . . . . . . . . 52
Ashtray . . . . . . . . . . . . . . . . . . . . . . . . . . . . 54
Cigarette lighter . . . . . . . . . . . . . . . . . . . . 54
12 Volt sockets . . . . . . . . . . . . . . . . . . . . . 55
Storage . . . . . . . . . . . . . . . . . . . . . . . . . . . . 55
Luggage compartment . . . . . . . . . . . . . . . 57
2
Warm and cold .. .. ... .......... . .
Climate contro l system . ............ . .
Steering wheel heating .. . .......... . .
Driving ..... .. .. .. .. ... .......... . .
General information . .... .......... . .
Steering .. .. .. .. .. .. ............. . .
Start ing and stopping the eng ine ..... . .
Start-Stop system .. .. ... .. ..... ... . .
E le ctromechanical parking brake ..... . .
Start ing from a stop .. .............. .
Automatic transmission
Trailer towing ..... .............. .
Driving with a trailer .. ... .. ... ... .. . .
T ra iler towing information .......... . .
Driver assistance .. ........ ..... . .
Assist ...... .. .. .. .. .. ........... . .
Speed warning system . ............. . .
Cruise control system ... ........... . .
Audi adaptive c ruise contro l .......... .
Audi active lane assist ... ........... . .
Audi s ide ass ist .. .. .. ............. . .
Night vision assist w ith pedestrian and
wild animal detection ............... .
Audi drive select (drive settings) ....... .
60
60
65
66
66
68
70
72
75
76
77
83
83
85
86
86
86
86
88
96
98
101
104
Park ing systems . . . . . . . . . . . . . . . . . 108
Genera l information . . . . . . . . . . . . . . . . . 108
Parking system plus . . . . . . . . . . . . . . . . . . 109
Rearviewcamera . ......... ....... ... 110
Peripheral cameras . . . . . . . . . . . . . . . . . . 113
Adjus ting the display and the warning
tones..............................
118
Error messages . . . . . . . . . . . . . . . . . . . . . 118
Trailer hitch . . . . . . . . . . . . . . . . . . . . . . . . 118
Intelligent Technology . . . . . . . . . . 120
E lectronic Stabilization Control (ESC) . . . . 120
B raking . . . . . . . . . . . . . . . . . . . . . . . . . . . . 122
E lectromechanical steering, dynamic
steering . . . . . . . . . . . . . . . . . . . . . . . . . . .
123
All wheel drive (quattro) . . . . . . . . . . . . . . 124
Energy management . . . . . . . . . . . . . . . . . 124
Notice about data recorded by the Event
Data Recorder and vehicle control
modules . . . . . . . . . . . . . . . . . . . . . . . . . . .
126
Page 9 of 280
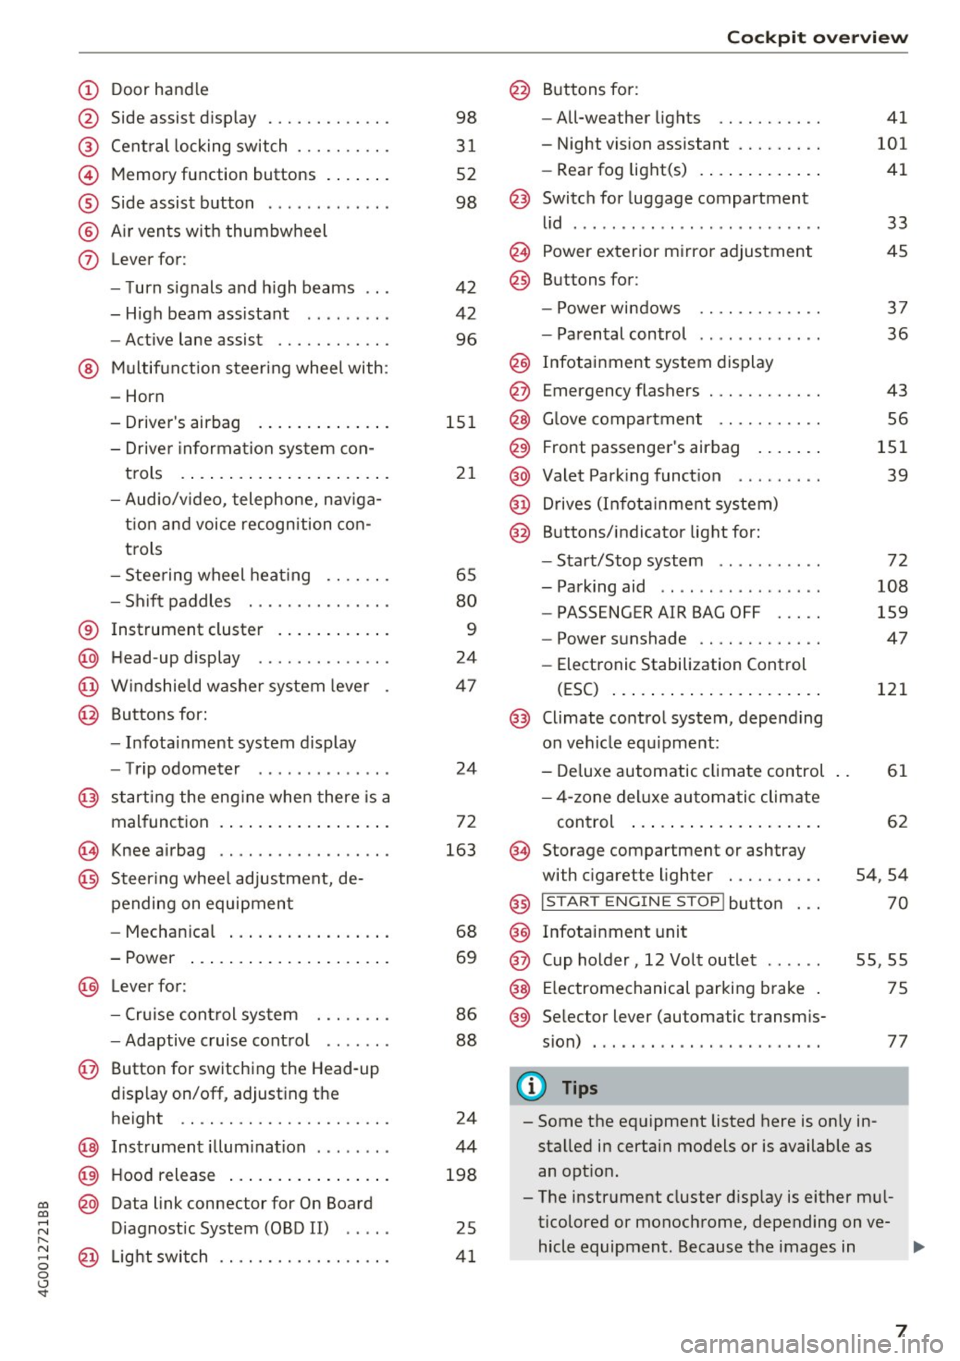
(!) Door handle
@
®
©
®
®
(j)
Side assist display
Cent ral locking switch ....... .. .
Memory function buttons . ... .. .
Side assist button ... ..... ... . .
A ir ven ts wit h thumbwheel
Lever for:
- T urn s ignals and h igh beams
- H igh beam assistant .. .. ... . .
- Active lane assist ......... .. .
@ M ultifunction steer ing wheel with:
- Horn
- Drive r's airbag . ..... ... .. .. .
- Drive r informa tion sys tem con-
t rols . ... ... .. ..... ... .. .. .
- Audio/v ideo, telephone, nav iga
t ion an d voice recognition con
trols
- Stee ring wheel heat ing .... .. .
- Sh ift paddles ............ .. .
® Instrument cluster .... ... .. .. .
@ H ead-up display ............. .
@ W indshield w ashe r system leve r
@ Buttons for:
- Infota inment system display
- Trip odometer ............. .
@ starting the eng ine when there is a
malfunc tion . ... .. .... ... .. .. .
~ Knee airbag .. ............. .. .
@ Steer ing whee l adjustment, de
pending on equipment
- Mechan ica l . ... ..... ... .. .. .
- Power ... .. .. .. .... ... .. .. .
@ Lever for:
- Cruise cont rol system ... .. .. .
- Adaptive c ruise cont rol ...... .
@ Button for switching the Head-up
d isplay on/off , adjust ing the
height .. .. ............... .. .
@ Instrument illum ination ....... .
@ Hood release .. .. ..... ... .. .. .
~ @ Data link connector for On Board
;:::: Diagnostic System (OBD II) .....
,..._
8 @ Light switch ............. .. .. .
0 <..:l -
3 1
52
98
42
42 96
15 1
21
65
80
9
24
47
24
72
163
68
69
86
88
24
44
198
25
4 1
Coc kpit o ve rv iew
@ Buttons for :
- All-weather lights
- Night vision assistant ........ .
- Rea r fog light(s) . ... . ..... .. .
@ Switch for luggage compartment
li d ...... ... .. .. ... ......... .
@ Power exterior m irro r adjustment
@ Buttons for :
- P owe r wi ndows
- Parental control
@ Infotai nment system display
@ Emergency flashers ........... .
@ G love compartment .......... .
@) Front passenger's airbag .... .. .
@ Valet Park ing funct ion .. ..... . .
@ Drives (Infot ainment system)
@ Buttons/ indicator light for:
- Start/Stop system .......... .
- Parking aid .. .. .... .. ... .. . .
- PASSENGER AIR BAG OFF .... .
- Power s unshade ............ .
- Elect ronic Stabilization Control
(ESC) ... .. .. .. .... . ..... .. .
@) Climate control system, depending
on vehicle equ ipment:
- De luxe automatic climate control
- 4-zone del uxe au tomatic climate
con trol ... .. ... .. .. ..... .. .
@ Storage compartment or ashtray
with c igarette lighter ... ...... .
@ I S TAR T EN GINE ST OP I butto n
@ Infotainment unit
@ Cup holder, 12 Vo lt outlet
41
101 41
33
45
3 7
36
43
56
151 39
72
108
159
47
121
61
62
54,54
70
55,55
@ E lectromechanical parking b rake 75
@ Se lector lever (automatic transm is-
sion) . . . . . . . . . . . . . . . . . . . . . . . .
77
(!) Tips
- Some the eq uipment listed here is on ly in
sta lled in certain models or is available as
an opt io n.
- The instr ument cluster d isp lay is either m ul
ticolored or monochrome, depending on ve-
hicle equipment. Because t he images in .,..
7
Page 15 of 280
D
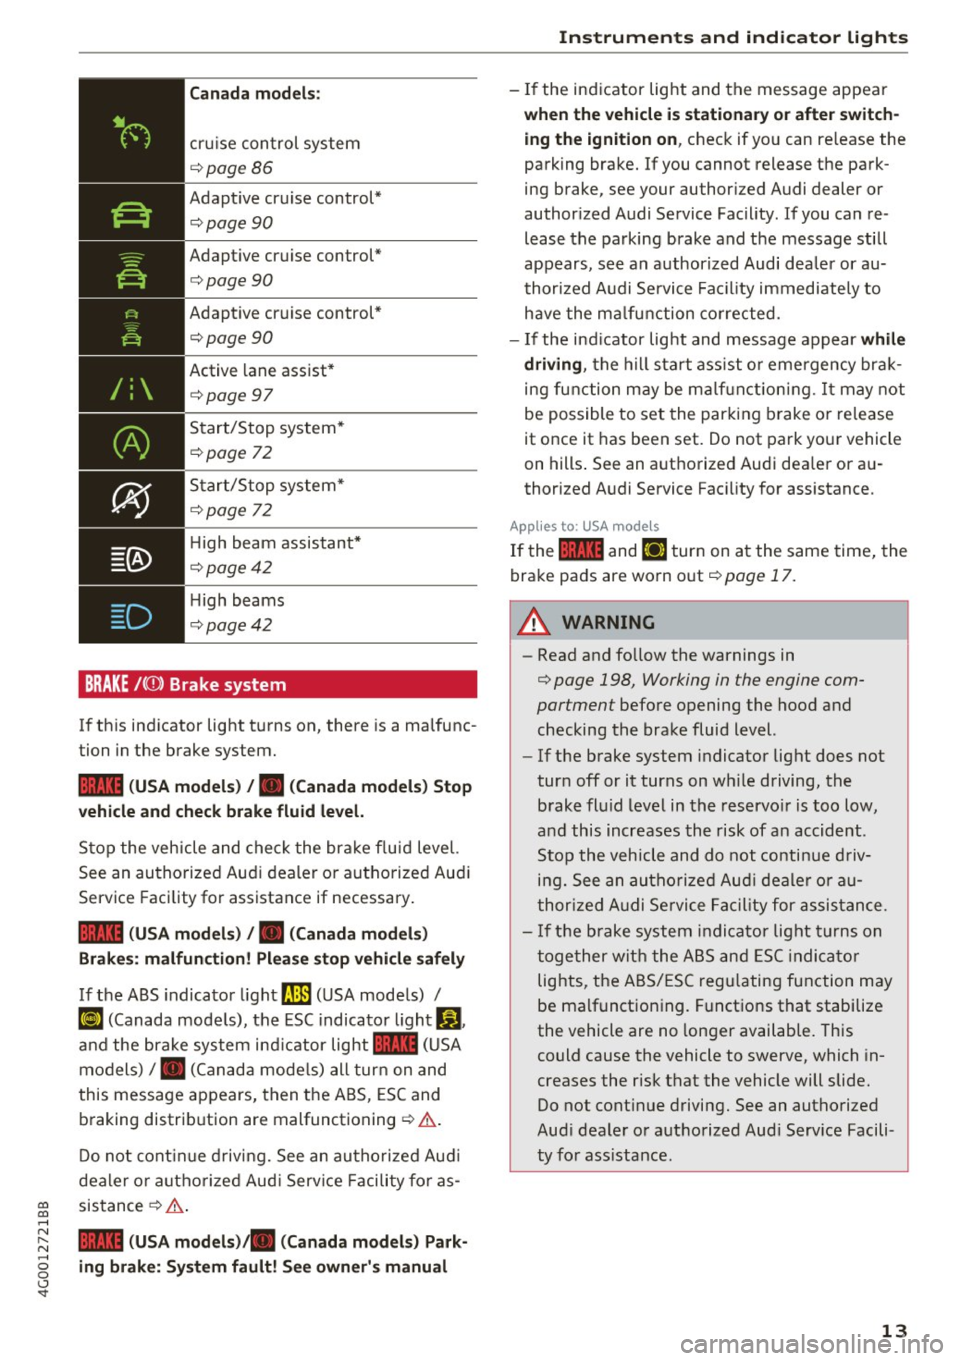
Canada models:
cruise control system
c:::>page86
Adaptive cruise control*
c:::>page90
Adaptive cruise control*
c:::> page 90
Adaptive cruise control*
c:::> page 90
Active lane assist*
c:::>page 97
Start/Stop system*
c:::> page 7 2
Start/Stop system*
c:::> page 72
High beam assistant*
c:::> page 42
High beams
c:::> page 42
BRAKE /(0 ) Brake system
If this indicator light turns on, there is a malfunc
tion in the brake system.
1111 (USA models) /. (Canada models) Stop
vehicle and check brake fluid level.
Stop the vehicle and check the brake fluid level.
See an authorized Audi dealer or authorized Audi
Service Facility for assistance if necessary.
1111 (USA models) /. (Canada models)
Brakes: malfunction! Please stop vehicle safely
If the ABS indicator light
rJ]l (USA models) /
Ke) (Canada models), the ESC indicator light Dl.
and the brake system indicator light 1111 (USA
models) /. (Canada models) all turn on and
this message appears, then the ABS, ESC and
braking distribution are malfunctioning
c:::> ,& .
Do not continue driving. See an authorized Audi
dealer or authorized Audi Service Facility for as-
~ sistance c:::> ,& .
.....
~ 1111 (USA models)/ . (Canada models) Park· .....
g ing brake: System fault! See owner's manual
<..:l '
- If the indicator light and the message appear
when the vehicle is stationary or after switch
ing the ignition on, check if you can release the
parking brake. If you cannot release the park
ing brake, see your authorized Audi dealer or
authorized Audi Service Facility . If you can re
lease the parking brake and the message still
appears, see an authorized Audi dealer or au
thorized Audi Service Facility immediately to
have the malfunction corrected.
- If the indicator light and message appear while
driving, the hill start assist or emergency brak
ing function may be malfunctioning.
It may not
be possible to set the parking brake or release
it once it has been set. Do not park your vehicle
on hills. See an authorized Audi dealer or au
thorized Audi Service Facility for assistance.
Applies to USA mode ls
If the 1111 and l'IJ turn on at the same time, the
brake pads are worn out
c:::> poge 17.
_8 WARNING
-Read and follow the warnings in
~ page 198, Working in the engine com
partment before opening the hood and
checking the brake fluid level.
- If the brake system indicator light does not
turn off or it turns on while driving, the brake fluid level in the reservoir is too low,
and this increases the risk of an accident.
Stop the vehicle and do not continue driv
ing. See an authorized Audi dealer or au
thorized Audi Service Facility for assistance.
- If the brake system indicator light turns on
together with the ABS and ESC indicator
lights, the ABS/ESC regulating function may
be malfunctioning. Functions that stabilize
the vehicle are no longer available. This
could cause the vehicle to swerve, which in
creases the risk that the vehicle will slide.
Do not continue driving. See an authorized
Audi dealer or authorized Audi Service Facili
ty for assistance.
13
Page 16 of 280
Instruments and indicator lights
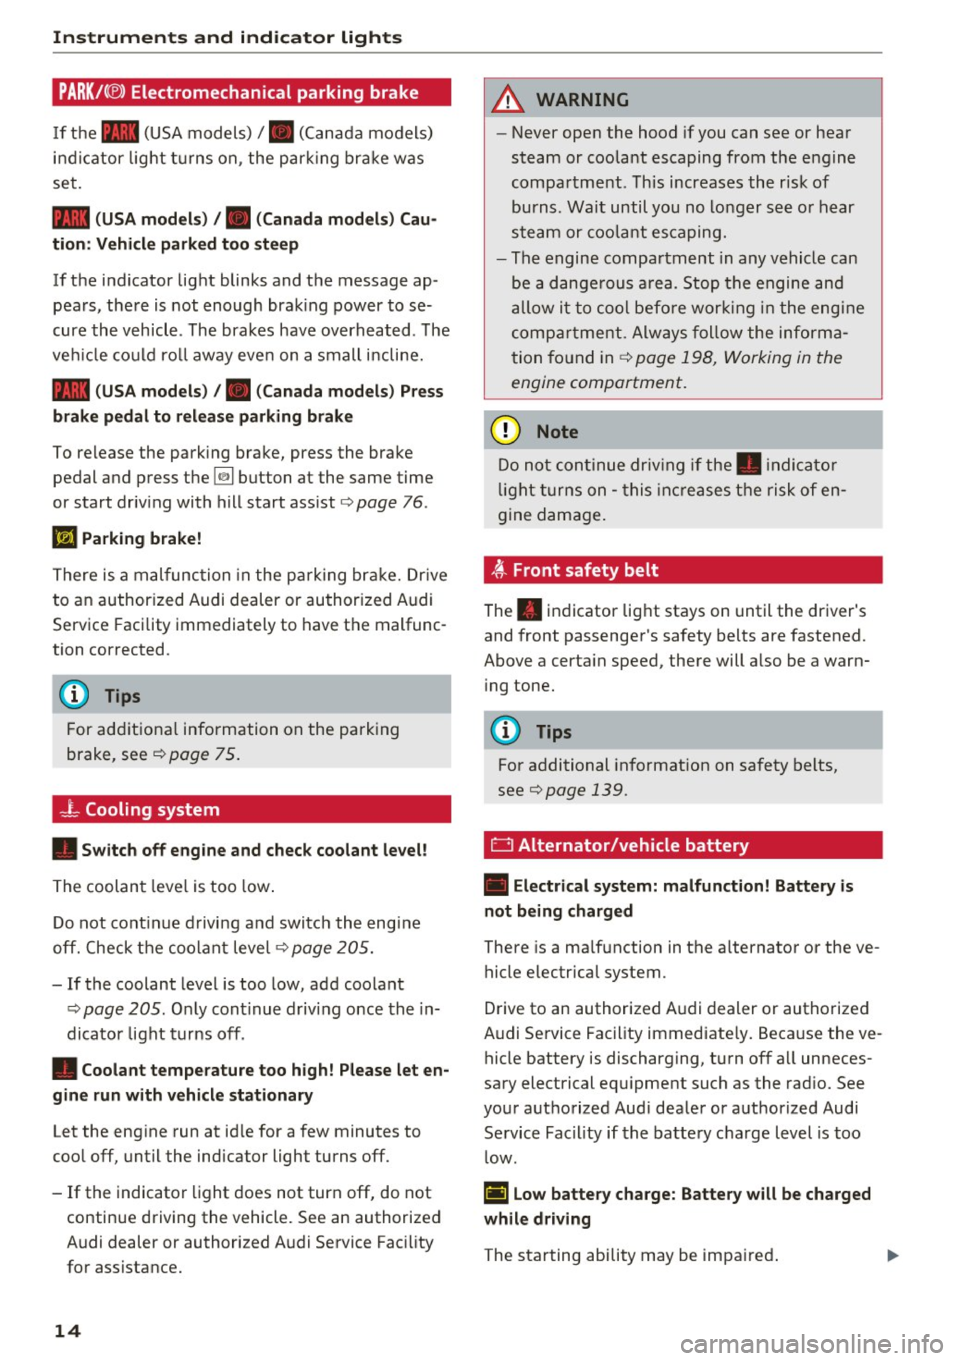
PARK/(®) Electromechanical parking brake
If the - (USA models) /. (Canada models)
i n dicator light t urns on , the par king bra ke was
set.
- (USA model s) /. (Cana da models) Cau
tion: Vehi cle parked too ste ep
If the indicator light blinks and the message ap
pears, the re is not enough brak ing power to se
cure the vehicle . The bra kes have overheated. The
ve hicl e co uld ro ll away eve n on a small incline.
- (USA mod els) /. (Canada models) Pr ess
brake pedal to rel ease parking brake
To release the park ing brake, press the brake
pedal and press the
[21 button at the same time
or start driv ing with hill start ass ist
r=> page 76.
II Parking brake!
There is a malfunc tion in the park ing bra ke. Dr ive
to an author ized Audi dealer or author ized Audi
Service Facility immediately to have the malfunc
tion corrected .
(D Tips
For additional information on the parking
brake, see
r=:> page 75.
-L Cooling system
• Switch off engine and check coolant level!
The coolan t leve l is too low .
Do not cont inue d rivin g and switch the engi ne
off. Check the coolant leve l
r=>page 205.
-If the coolant level is too low, add coolant
r=:> page 205 . Only cont inue driving once the in
dicator light turns off .
• Coolant temperature too high! P lease let en
gine run with vehicle st a tionary
Let the eng ine run at id le for a few minutes to
coo l off, until the indicator light turns off.
- If the indicator light does not turn off, do not
continue driving the vehicle. See an authorized
Audi dealer or authorized A udi Service Fac ility
for assistance.
14
A WARNING
-
- Never ope n the hood if you can see or hear
steam or coola nt escaping from t he engine
compar tment . This increases the risk of
burns. Wa it until you no longer see o r hear
stea m or coola nt es caping.
- The engine compartment in any vehicle can
be a dange rous a rea. Stop t he engine and
allow it to cool befo re wor king i n the e ng in e
comp artme nt. Always follow the informa
tion fo und in
r=:> page 198, Working in the
engine compartment.
Q) Note
D o not con tinue driv ing if the . indi ca to r
li ght turn s on -this in cr eases the risk of en
gine damage.
~ , Front safety belt
The . indicator lig ht stays on until the driver 's
and front passenger's safety belts are fastened.
Above a certa in speed, there will a lso be a warn
i ng tone.
(D Tips
For additional informat ion on sa fety belts,
seer=;,
page 139.
D Alternator/vehicle battery
• Electrical system: m alfunction! Battery is
not being charged
There is a ma lfunction in the a lternato r or the ve
hicle electrical system.
D rive to an authorized A udi dealer or authorized
Audi Se rvice Facility immediate ly. Beca use the ve
hicle battery is discharging, turn off a ll unneces
sa ry electrical equ ipment such as the rad io. See
your authorized Audi dea ler or authorized Audi
Service Facility if the batte ry charge level is too
l ow .
(•) Low battery charge: Battery will be charged
while driving
The starting ability may be impa ired . ...
Page 17 of 280
co
co
..... N
" N ..... 0 0 <..:l -
vehicle battery charged enough while driving.
If the message does not turn off , have an author
ized Audi dealer or authorized Audi Service Facili
ty repair the malfunction.
~ Engine stop while driving
• Engine stopped: No power steering and
brake support.
There is a malfunction in the engine or in the fuel
supply system.
More force is needed to steer and brake the mov
ing vehicle when the engine is stopped. If the ve
hicle is rolling , try to bring it to a stop off to the
side from moving traffic. See an authorized Audi
dealer or authorized Audi Service Facility for as
sistance .
A WARNING
If the engine stops while driving, you will
need to use more force to brake the vehicle.
This increases the risk of an accident . There
will still be power steering if the ignition is
switched on while the vehicle is rolling and
there is sufficient battery charge. Otherwise,
you must use greater force when steering .
~ Engine oil pressure
• Turn off engine and check oil level
Stop the engine and do not continue driving .
Check the engine oil level
Q page 203.
-If the engine oil level is too low, add engine oil
¢page 203 . Only continue driving once the in
dicator light turns off.
- If the engine oil level is correct and the indica
tor light still turns on, turn the engine off and
do not continue driving. See an authorized Audi
dealer or authorized Audi Service Facility for as
sistance.
@ Tips
The oil pressure warning is not an oil level in
dicator. Always check the oil level regularly .
Instruments and indicator lights
~ Engine oil level
• Please add oil immediately.
Add oil immediately qpage 201 .
II Add oil max. x qt (l). You may continue driv·
ing
Add the displayed amount of oil immediately
¢page 201.
@ -Steering lock
• Do not drive vehicle: Steering defective
There is a malfunction in the electronic steering
lock. You cannot turn the ignition on.
Do
not tow your vehicle because it cannot be
steered. See an authorized Audi dealer or author
ized Audi Service Facility for assistance.
Em Steering lock: System fault Please contact
dealer
There is a malfunction in the electronic steering
lock.
Drive to an authorized Audi dealer or authorized
Audi Service Facility immediately to have the
malfunction corrected .
A WARNING
-
Do not tow your vehicle when there is a mal-
function in the electronic steering lock -this
increases the risk of an accident.
©-Engine start system
• Engine start system fault. Please contact
dealer
Do not switch the ignition off because you may
not be able to switch it on again.
Drive to an authorized Audi dealer or authorized
Audi Service Facility immediately to have the
malfunction corrected .
1111 Engine start system fault. Please contact
dealer
-
There is a malfunction in the engine starting sys-
tem.
~
15
Page 18 of 280
Instruments and indicator lights
Drive to an autho rized Aud i dea ler or a uth orized
Aud i Service Facility immediately to have t he
malfunct ion corrected .
0 Air suspension
• Air suspension : System fault Driving slowly
at ma ximum 35 mph is possible.
There is a malfunction that can result in restrict
ed driving stability.
Drive to an a utho rized Audi dea ler or authorized
Audi Serv ice Facility immediately at a maximum
speed of 35 mph (60 km/ h) to have the ma lf u nc
tion corrected .
• Air sus pension : Service mode. Vehicle can
onl y be mo ved with restriction s
Carefully drive to your author ized A udi dealer or
author ized Audi Se rvice Facility immed iate ly to
have the serv ice mode deactivated .
II Air su spen sion : Sy stem fault
There is a system malfunct ion that ca n result in
restricted driving stability or reduced gro und
clearance.
Drive to an authori zed Aud i dea ler or authori zed
Aud i Serv ice Facility immediately to have the
malfunct ion corrected.
II Air sus pension : Vehicle is too low . Ground
clearance limited
The ground clearance is very low due to a system malfunctio n. Wait until the air suspension sys
tem has restored norma l ground clearance. Oth
erwise, conditions such as an uneven road surface
can lead to vehicle damage.
0 Clutch
A pp lies to: ve hicles w ith manu al transmiss ion
• Clutch: malfunction! Safely park vehicle
There is an ongoing ma lfunction in the clutch.
Stop the vehicle safely . See an authorized Audi
dealer or a uthorized Aud i Serv ice Facility fo r as
sistance .
[O] Clutch malfunction! Adapt d riving sty le.
Contact Ser vice
16
There is an ongoing ma lf u nct ion in the clutch.
The engine torq ue that can be transfer red is re
duced. You may continue driv ing. Avo id using the
clutch in any way that w ill place a heavy load on
i t. For example, do not let the clutch rub when
start ing o n hills, whe n towing a trai ler or when
maneuveri ng the vehicle . Drive to an author ized
Audi dealer or authorized Audi Service Fac ility im
med iate ly to have the malfu nction corrected.
fiB Clut ch malfunction! You may continue driv
ing
There is a ma lfunction in the clutch. The engine
torque that can be transferred is reduced. You
may contin ue driving . Avoid using the clutch in
t h e future in any way that w ill place a heavy load
o n it. Fo r example , do no t let the clutc h ru b when
starting o n hill s, when towing a trailer or when
mane uve rin g the vehicle . The ind ic a tor light
turns off once the clutch is fully operab le ag ain.
Lt Brake booster
D Brake servo : limited functionality. You can
conti nue d riving. Conta ct w ork shop
There is a m alfu nction in the brake booster. The
bra ke booste r is ava ilable, but its effectiveness is
reduced . Braking behavior may be different from
how it normally f unctions and the bra ke pedal
may vibrate.
Drive to an au thorized A udi dealer or au thorized
Audi Se rvice Facility immediate ly to have the
malfunction corrected.
n/ u Electronic Stabilization Control (ESC)
If the G1 ind icator light blinks while driving, the
ESC or ASR (Anti-Slip Regulation) is act ively regu
lating .
If the
GJ ind icator light turns on, the system has
switched the ESC off. In t his case, yo u can switch
the ignit io n off and then on to switch the ESC on
again . T he i ndicator light t urns off when the sys
tem is functioning fully .
If the
II ind icator light turns on, ESC was
switched off us ing the
I~ OFFI button
<=> page 120 .
Page 27 of 280
Hea d-u p di spl ay> Head- up di spla y conten ts or
Displ ay brigh tn ess.
Di spla y content
In the Infotainment system, you can specify
which information should be displayed: For ex
ample, th is can include navigation informat ion *,
Adaptive cruise control* or night vision assist*.
The display of certa in info rmation and some of
the red indicator lights cannot be h idden in the
I nfotainment system.
Displ ay brightness
You can adjust the display br ightness in the Info
tainment system. The display brightness decreas
es automatically as the amount of light decreas
es. The backgro und brightness is adjusted with
the instrument il lumination
c::> page 44 .
(D Note
To prevent scratches on the g lass cove ring the
head- up d isplay, do not place any objects in
the projection opening.
(D Tips
- Sunglasses w ith polar izat ion fi lters and u n
favorab le lighting conditions can have a
negative effect on the display.
- An optim um display depends on the seat
pos ition and the height adjustment of the
head -up display.
- A specia l windshield is needed for the head
up display function.
- Fo r information on cleaning, refer to
c::> ta
ble on page 233.
On Board Diagnostic
System (OBD)
Malfunction Indicator Lamp (MIL)
The Malfunction Ind icator Lamp (MIL) a in the
instr ument cluster is part of the On-Board Diag
nostic (OBD II) system.
~ The warning/indicator light i lluminates when the ....
~ ign it ion is switched on and goes ou t after the en-N .... 0 0 <.,;) 'SI"
Driver info rm atio n sys tem
gine starts and the idle has stab ilized. This indi
cates that the MIL is working properly.
If th e light does not go ou t after the eng ine is
sta rted, or i llum inates while you are driving, a
malfunction may exist in the engine system. If
the light illuminates, the catalytic converter
could be damaged.
Cont inue driving
with redu ced p ower (avoiding
sustained high speeds and/or rapid accelera
tions) and have the condition corrected. Contact
your authorized Audi dealer.
If the ligh t illum ina tes, the electronic speed lim
iter may also be malfunctioning. For more infor
mation
c::> page 26, Electronic speed limiter.
An impro perl y close d fuel fi ller cap may al so
ca use the
MIL li g ht to illuminate c::> page 192.
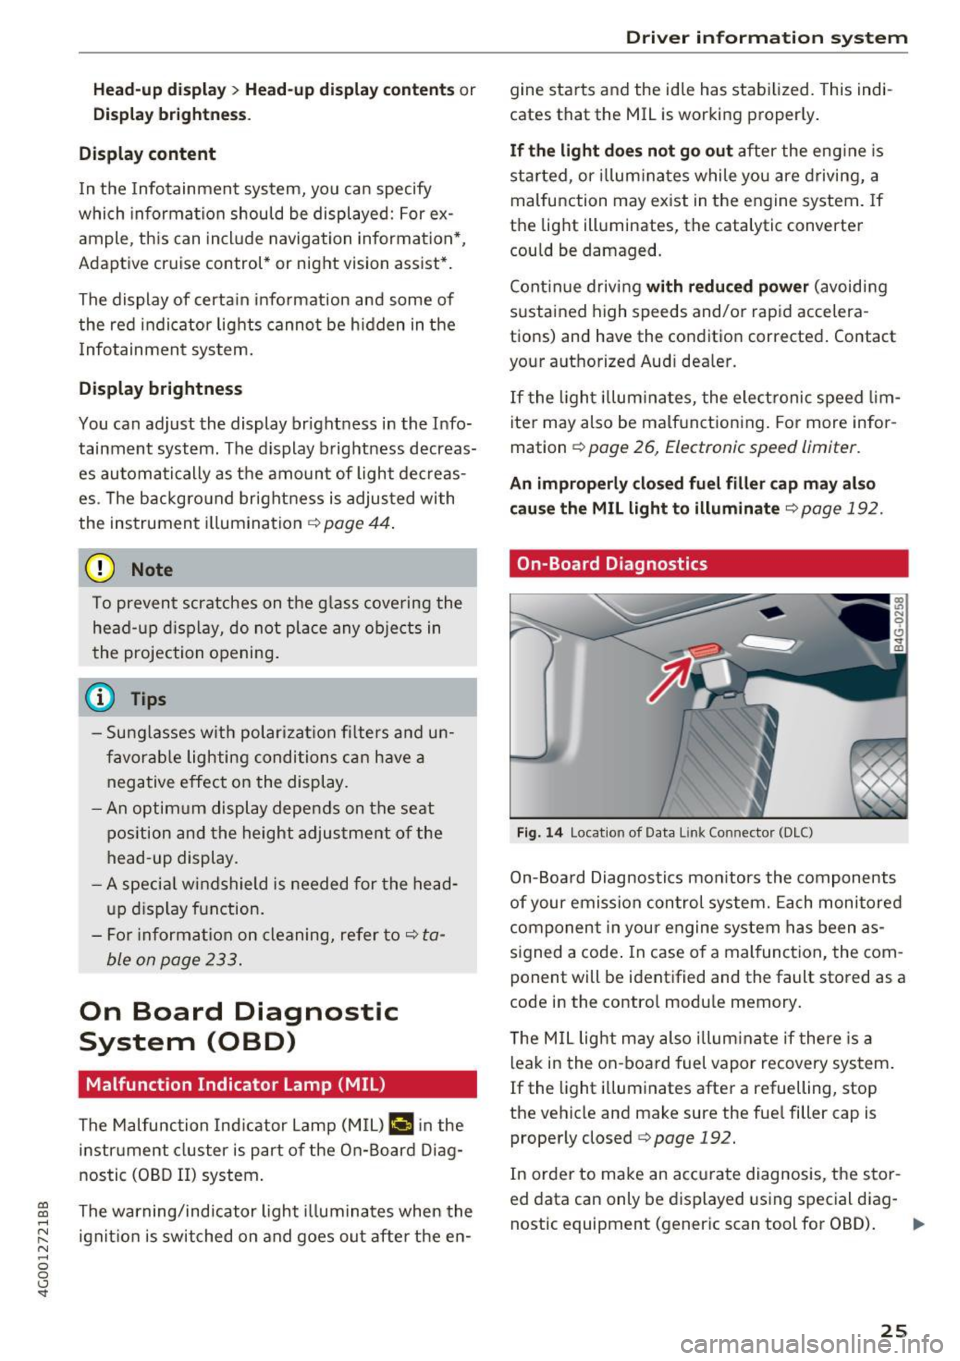
On-Board Diagnostics
Fig. 14 Locat ion of Data L ink Connector (DLC)
On-Board Diagnostics monitors the components
of your emission control system. Each monitored
component in your engine system has been as
s igned a code . In case of a malfunction, the com
ponent will be identified and the fault stored as a
code in the contro l module memory.
T he M IL light may also illum inate if there is a
leak in the on-board fuel vapor recovery system.
If the light i lluminates after a refuelling, stop
the vehicle and make sure the fue l filler cap is
properly closed
c::> page 192.
In order to make an accurate diagnosis, the stor
ed data can only be displayed using special diag-
nostic equipment (generic scan tool for OBD).
IJI,-
25
Page 33 of 280
co
co
.... N
" N .... 0 0 <.,;) 'SI"
key is in your jacket pocket or in your briefcase,
for example .
The door ca nnot be opened for a br ief period di
rect ly after loc king it. This way you have the op
portunity to check if the doors locked correctly.
The settings in the Infotainment system deter mine if the entire vehicle or only one of the doors
is unlocked when unlocking the vehicle
¢page 32.
WARNING .1!!!!!!!!!. !!..-
Read and heed a ll WARNINGS ~.& in Descrip
tion on page
2 7.
@ Tips
If your vehicle is left stand ing for a long peri
od of time, note the following:
- The proximity senso r switches off after a
few days to save energy. You then have to
pull once on the door handle to unlock the
vehicle and a second time to open it .
- The energy management system gradually
turns off unnecessary convenience functions
to prevent the vehicle battery from draining
and to maintain the vehicle 's abi lity to start
for as long as possible. You may not be able to unlock your vehicle using the convenience
key.
- For an explanation on conformity with the
FCC regulations in the United States and the
Industry Canada regulations, see
¢page 262.
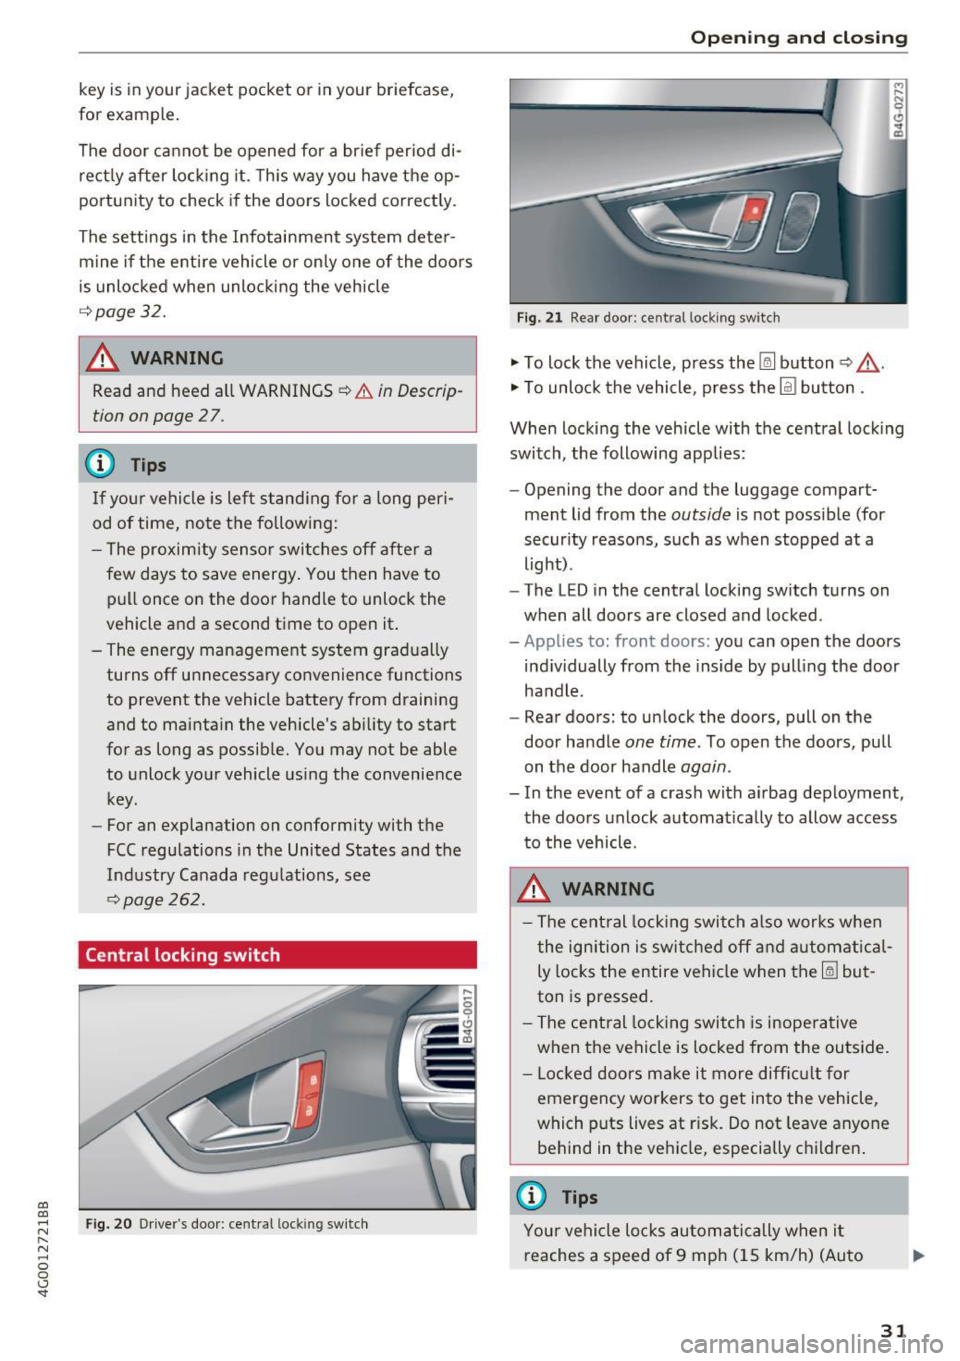
Central locking switch
Fig. 20 Drive r's door: central loc king switch
Open ing and closing
Fig. 21 Rear doo r: ce ntra l locking sw it c h
"' To lock the vehicle, press the~ button ~,&. .
"' To unlock the vehicle, p ress the @l button .
When locking the vehicle with the central locking
switch, the following app lies:
- Opening the door and the luggage compart
ment lid from the
outside is not possible (for
security reasons, such as when stopped at a
light) .
- The L ED in the central locking switch turns on
when all doors are closed and locked.
-Applies to: front doors: you can open the doors
ind ividually from the inside by pulling the door
handle .
- Rear doors: to unlock the doors, pull on the
door ha ndle
one time . To open the doors, pull
on the door handle
again .
- In the event of a crash with a irbag deployment,
the doors unlock automat ically to allow access
to the vehicle.
A WARNING
-The central locking switch also works when
the ignition is switched off and automatical
ly locks the entire vehicle when the~ but
ton is pressed.
- The central locking switch is inoperative
when the vehicle is locked from the outside.
- Locked doors make it more difficult for
emergency workers to get into the vehicle,
which puts lives at r isk. Do not leave anyone
behind in the vehicle, especially c hildren .
@ Tips
Your vehicle locks automatically when it
reaches a speed of 9 mph (15 km/h) (Auto
31
Page 39 of 280
co
co
.... N
" N .... 0 0 <.,;) 'SI"
time. T hi s app lies pa rt icu larly when children
remain in the vehicle. Othe rw ise children
co uld start t he engine or operate elect rical
equipment (such as power windows), which
increases the r is k of an accident .
Power windows
Controls
The driver can control all power window s.
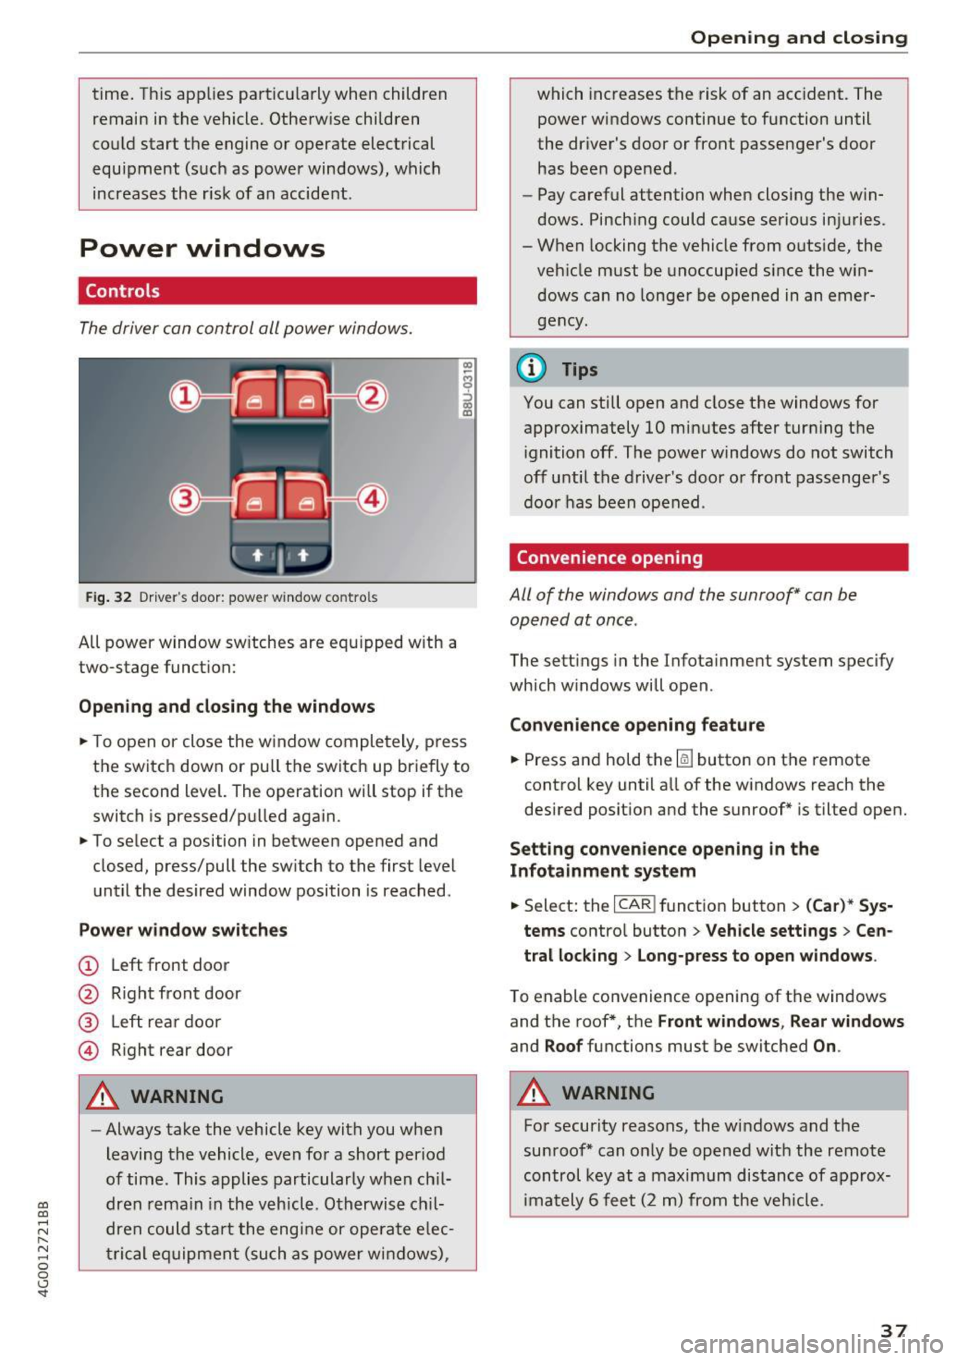
F ig. 32 Dr ive r's door : power w indow co ntro ls
All power window sw itches are eq uipped w ith a
two-stage funct ion:
Opening and closing the windows
"' -$ :,
"' CD
~ T o open or close the w indow completely, p ress
the switch down or pu ll the switch up briefly to
the second level. The operation will stop if the
switch is pressed/pu lled again.
~ To se lect a position in between opened and
closed, press/pull the sw itch to the first level
u nt il the desired window position is reached.
Power window switches
(!) L eft front door
@ R ight front door
® L eft rea r d oor
© Right rear door
A WARNING
- Always take the vehicle key wit h you when
leaving the vehicle, even fo r a short period
of time . This applies particularly w hen ch il
dr en re ma in in the vehicl e. O th erwis e chi l
dre n cou ld st art t he engi ne or ope ra te e lec
t ric al eq uip m ent (such as power wi ndows),
Open ing and closing
which increases the risk of an acc ident. The
power windows continue to function until
the dr iver's door or front passenge r's door
has been opened .
- Pay careful attention when closing the w in
dows . Pinch ing could ca use serio us in juries.
- When locking the vehicle from o utside, the
veh icle must be unoccup ied since the win
d ows can no longe r be o pened in an emer
g e ncy .
@ Tips
You can still o pen and close the windows for
approximately 10 mi nutes after tur ning t he
i gnition off . The power windows do not switch
off until the driver 's door o r front passenger 's
door has been open ed .
Convenience opening
All of the windows and the sunroof* can be
opened at once .
The settings in the Infota inment system specify
which w indows will open .
Convenience opening feature
~ Press and hold the~ button on the remote
control key until a ll of the w indows reach the
desired position and the sunroof* is tilted open.
Setting convenience opening in the
Infotainment system
~ Select: the I CAR I funct io n button > (Car) * Sys
tems
contro l button > Vehicle sett ings > Cen
tral locking
> Long-press to open windows .
To enable convenience openin g of the w indows
and the roof *, th e
Front windows , Rear windows
and Roof functions must be switched On .
A WARNING
For security reasons, the w indows and the
su nroof* can o nly be opened wit h the remote
control key at a maximum distance of a pprox
im ately 6 fee t (2 m ) from the veh icle .
37
Page 68 of 280

Driving
Driving
General information
Breaking in
A new vehicle must be broken in, and the break i n distance should be 1,000 mi les (1,500 km). Do
no t drive at speeds th at wi ll exceed
2/3 of the
maximum permitted engine speed
(R PM ) for the
fi rst 600 mi les (1,000 km) , and avoid f ull accel
eration d uring this period . You may gradua lly
start increas ing the
RPM and the speed between
600 m iles (1,000 km) and 1,000 m iles (1,500
km).
During the fi rst hou rs of use, the engine has a
h igher internal friction than later on when all
mov ing parts have settled into p lace with each
other.
How the ve hicle is driven d uring the first 1,000
miles (1,500 km) also affects the engine quality.
Drive at moderate engine speeds after the initial
break-in per iod, part icu larly when running a cold
engine . This wi ll reduce eng ine wear and improve
the mi leage .
Do not dr ive at too
low of an engine speed (rpm).
Shift down if the engine stops r unning "smoot h
ly". Extremely high eng ine s peeds are automati
cally reduced .
New tires
If yo ur vehicle is ru nning on new t ires, drive pa r
t icularly c aref ul for the first 350 miles (5 00 kilo
meters) after fi tting .
A WARNING
-
New tires tend to be s lippery and must also
be "broken-in". Be s ure to remember this dur
ing the first 350 miles (500 kilometers).
Brake gently. Avo id following closely behind
other vehicles or other situations that might
require sudden, ha rd brak ing .
Avoid damaging the vehicle
When you are d riving on poo r roads, or over
curbs, steep ramps, etc., make ce rtain that low-
66
lying parts such as spo ilers and exha ust system
parts do not bottom o ut and get damaged.
This is es peci ally true for veh icles with low-s lu ng
c h ass is (sports chass is)* and fully loaded
vehicles .
Warming up/cooling down
Applies to: S models
By warming up/coo ling down t he engine careful
l y, you can he lp reduce unnecessary strain on
yo ur vehicle when dr iving in a sporty style.
The engine speed is limited when the engine is cold -the full engine o utp ut is not availab le.
When the engine is at operat ing temperat ure,
the engine speed limitation moves to a higher
RPM range. The t ires also only reach t he ir full
r oad holding capab ility once they have wa rmed
u p .
You r vehicle a lso has an after-run cooling fea
ture . However, cooling down is still important.
The eng ine and the brakes as well as the e xhaust
system and the tra nsmission become very ho t
whe n driving in a spo rty style . B efo re you shut
t h e ve hicle off, yo u should cool down the vehicle
by drivi ng a few miles at low s peeds with ligh t ac
ce lera tion.
Driving through water on roads
Note the following to reduce the risk of vehicle
damage when driving through water, fo r example
on f looded roads:
- The water must not be any higher than the bot
tom of the vehicle body.
- Do not dr ive faster tha n wal king speed .
A WARNING
-
After driving thro ugh water or m ud, the effec
tiveness o f the b rakes may be red uced due to
mo isture on the brake rotors and brake pads.
A few careful brake applications shou ld dry
off the brakes.
@ Note
- Vehicle components such as the engine,
transmiss ion, suspens ion or elect rical