headlight control AUDI A7 2012 Owners Manual
[x] Cancel search | Manufacturer: AUDI, Model Year: 2012, Model line: A7, Model: AUDI A7 2012Pages: 294, PDF Size: 73.33 MB
Page 5 of 294
Driver and passenger side footwell . . . 123
Pedal area . . . . . . . . . . . . . . . . . . . . . . . 123
Stowing luggage . ..... ... .. .. .. .. 124
Report ing Safety Defects . . . . . . . . . . . 126
Safety belts ... ..... ... .. .. .. . .
General notes ............ .... .. . .
Why safety belts? ........ .... .. . .
Safety belts ............ .... ... . .
Safety belt pretens ioners ...... .. . . 128
128
129
131
135
Airbag system ................. 137
Important things to know . . . . . . . . . . 137
F ront airbags . . . . . . . . . . . . . . . . . . . . 141
Mo nitoring the Advanced Airbag
System . . . . . . . . . . . . . . . . . . . . . . . . . 149
Knee airbags . . . . . . . . . . . . . . . . . . . . . 154
Side airbags . . . . . . . . . . . . . . . . . . . . . 157
Side curtain airbags . . . . . . . . . . . . . . . 160
Child Safety .. .. .... ... .. .. ... .
Important things to know . ... .. .. . .
C hild safety seats . ..... ... .. .. .. . .
Instal ling a child safety seat .. .. .. . .
LATCH Lower anchorages and tethers
for chi ldren . ............. .... .. . .
Addit ional Information 163
163
169
174
177
181
Audi pre sense . . . . . . . . . . . . . . . . 182
Preventat ive passenger protection 182
Vehicle operat ion . . . . . . . . . . . . . 184
Intelligent technology . . . . . . . . 184
Not ice about data recorded by veh icle
control modules . . . . . . . . . . . . . . . . . . 184
E lect ron ic stabilization program ( ESP) 184
Rear spoiler . . . . . . . . . . . . . . . . . . . . . 186
Braki ng . . . . . . . . . . . . . . . . . . . . . . . . . 18 7
E lect ro-mechanical power assist . . . . . 189
Driving with your quattro ® . . . . . . . . . 189
Energy management . . . . . . . . . . . . . . 190
Driving and environment . . . . . 19 2
The first 1,000 miles (1 ,500 km) and
afterwards . . . . . . . . . . . . . . . . . . . . . . 192
Catalytic converter . . . . . . . . . . . . . . . . 193
Avoid damaging the vehicle. . . . . . . . . 193
Table of contents 3
Driving through wate r on roads . . . . . 194
Operate yo ur vehicle economically and
min imize poll ution. .. .. ... .... ... . 194
Trailer towing . . . . . . . . . . . . . . . . . 197
Driving with a trailer . .. ..... ... .. .
Trai ler tow ing tips
Vehicle care ...... .. .. ..... ... .
Cleaning and protection ..... .
197
198
200
200
General information . . . . . . . . . . . . . . 200
Care of exterior . . . . . . . . . . . . . . . . . . 200
Care of interior . . . . . . . . . . . . . . . . . . . 206
Fuel supply and filling your
fuel tank .............. .........
211
Gasoline . . . . . . . . . . . . . . . . . . . . . . . . 211
Fuel tank .. .. .. .. .. . .. .... ...... . 212
Checking and filling . . . . . . . . . . . 216
En gine hood . . . . . . . . . . . . . . . . . . . . . 216
E ngine compartment........... ... 218
E ngine o il . . . . . . . . . . . . . . . . . . . . . . . 218
E ngine cooling sys tem . . . . . . . . . . . . . 223
Brake fluid . . . . . . . . . . . . . . . . . . . . . . 225
Battery . . . . . . . . . . . . . . . . . . . . . . . . . 226
Windsh ie ld/headlight washer
container . . . . . . . . . . . . . . . . . . . . . . . 230
Tires and wheels . . . . . . . . . . . . . . 231
Tires . . . . . . . . . . . . . . . . . . . . . . . . . . . 231
Tire pressure monitoring system 249
Do-it-yourself service . . . . . . . . . 252
What do I do now? . . . . . . . . . . . . 2S2
Emergency warn ing triangle . . . . . . . . 252
Vehicle tool kit . . . . . . . . . . . . . . . . . . . 252
Chang ing a wheel . . . . . . . . . . . . . . . . . 254
Fuses and bulbs . . . . . . . . . . . . . . . 260
Fuses ........ ... .. .............. 260
Bul bs. . . . . . . . . . . . . . . . . . . . . . . . . . . 263
Emergency situations . . . . . . . . . 264
General . . . . . . . . . . . . . . . . . . . . . . . . . 264
Star ting by pushing or towing . . . . . . . 264
Starting with jumpe r cable s . . . . . . . . 264
U se o f ju mpe r cables . . . . . . . . . . . . . . 265
•
•
Page 12 of 294
10 Instruments and warning/indicator lights
Instruments and warning/indicator Lights
Instruments
Instrument cluster and controls
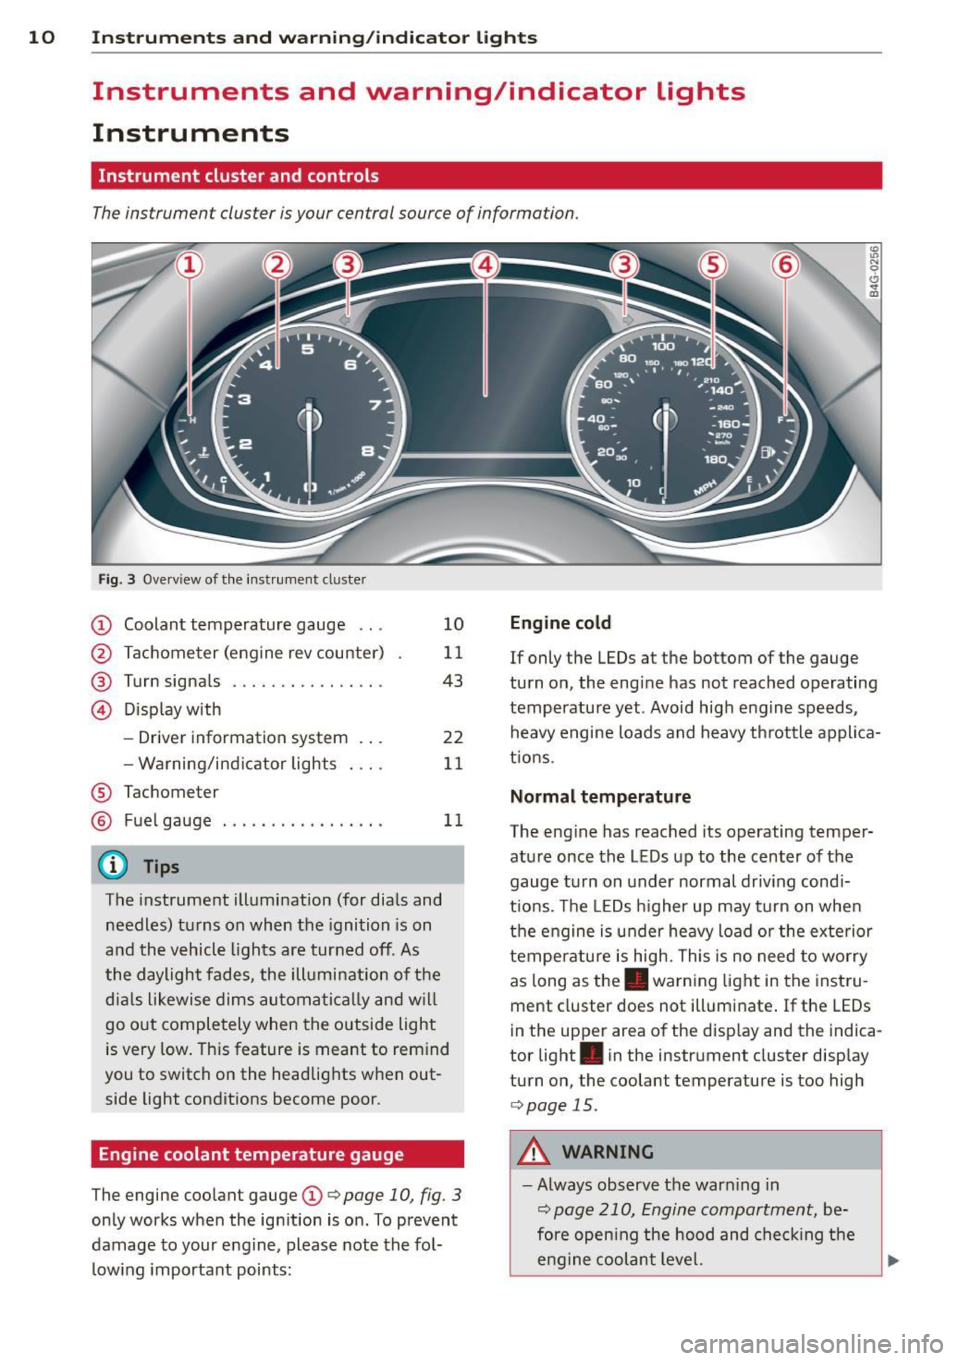
The instrument cluster is your central source of information.
Fig. 3 Overv iew of the inst rument cluster
CD Coolant temperature gauge ...
@ Tachometer (engine rev counter)
@ Turn signals ........... .. .. .
© Display with
- Driver information system .. .
- Warning/ind icator lights
® Tachometer 10
11
43
22
11
@ Fuel
gauge . . . . . . . . . . . . . . . . . 11
@ Tips
The instrument illumination (for dials and
needles) turns on when the ignition is on
and the vehicle lights are turned off . As
the daylight fades, the illumination of the
dia ls likewise dims automatically and will
go out completely when the outside light
is very low. This feature is meant to rem ind
you to switch on the headlights when out
side light conditions become poor.
Engine coolant temperature gauge
The engine coolant gauge CD c:> page 10, fig. 3
only works when the ignition is on . To prevent
damage to your engine, please note the fol
l owing important points:
Engine cold
If only the LEDs at the bottom of the gauge
turn on, the engine has not reached operating
temperature yet. Avoid high engine speeds, heavy engine loads and heavy th rottle applica
t ions.
Normal temperature
The engine has reached its operating temper
ature once the LEDs up to the center of the
gauge turn on unde r normal driv ing cond i
t ions . Th e LEDs higher up may turn on when
the engine is under heavy load or the exterior
temperature is high. This is no need to worry
as long as the . warning light in the instru
ment cluster does not illuminate . If the LEDs
in the upper area of the disp lay and the indica
tor light . in the instr ument cluster display
turn on, the coolant temperature is too high
c:> page 15.
A WARNING
-Always observe the warn ing in
c:> page 210, Engine compartment, be
fore open ing the hood and checking the
engine coolant level.
Page 15 of 294
Instrument s and warnin g/indic ator ligh ts 13
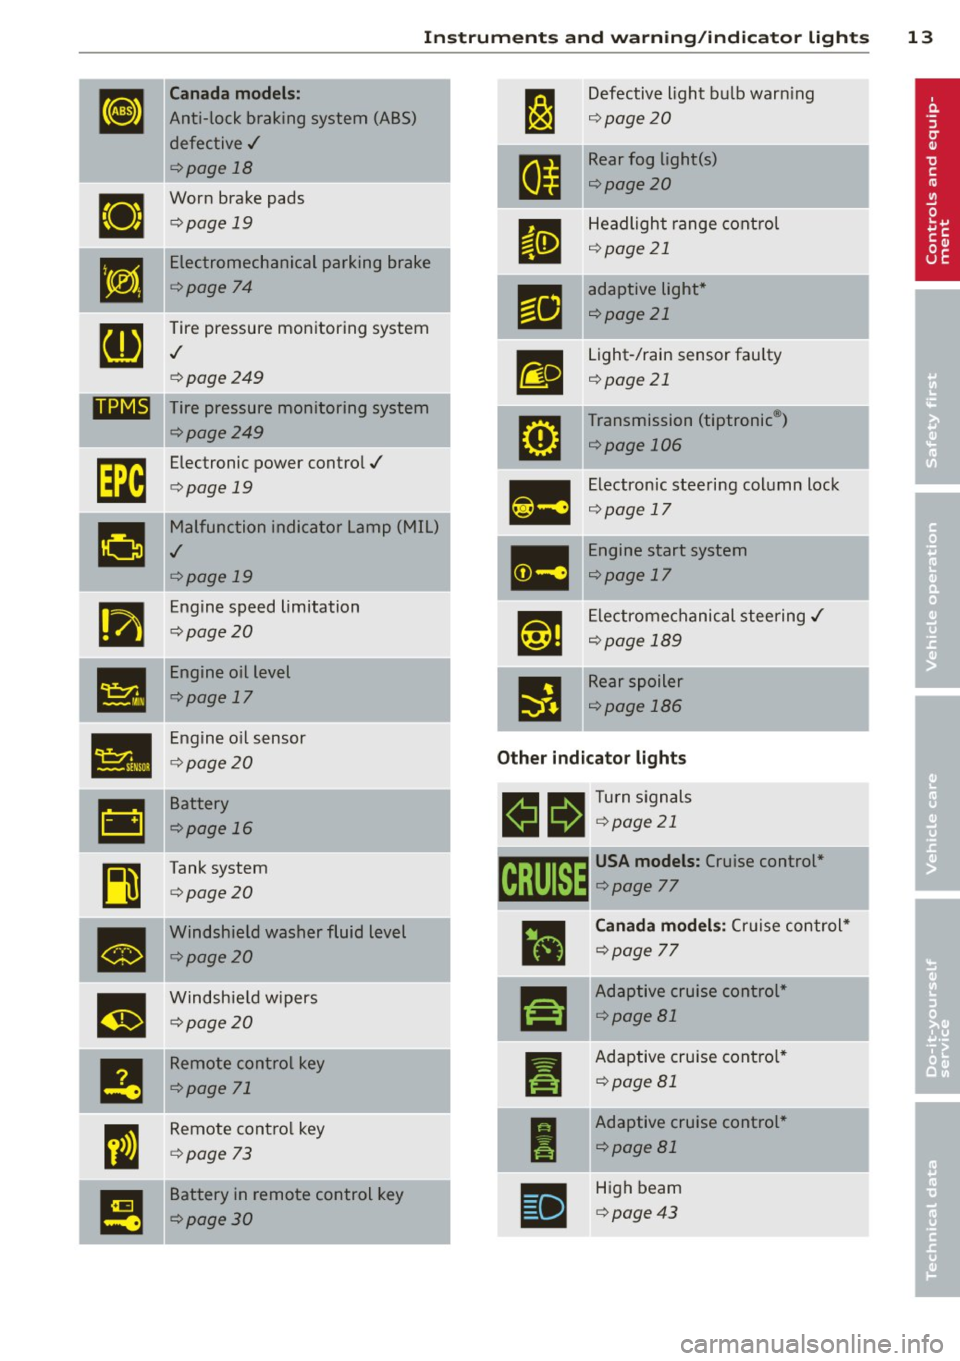
Canada models:
Anti-lock braking system (ABS)
defective ./
c:>page 18
Worn brake pads
c:>page 19
Electromechanical parking brake
c:>page 74
Tire pressure mon itoring system
./
c:> page249
-pa ....,.,.. -,,
ll@l@t Tire pressure monitoring system
-
•
•
-
•
•
m
-
I!
c:>page2 49
Electronic power contro l ./
c:> page 19
Malfunction indicator Lamp (MIL)
./
c:>page19
Engine speed limitation
c:>page 20
Engine oil level
c:>page 17
Engine o il sensor
c:> page20
Battery
c:>page 16
Tank system
c:>page20
Windshield washer fluid level
c:>page20
Windshie ld w ipers
c:>page20
Remote control key
c:>page 71
Remote cont ro l key
c:> page 73
Battery in remote control key
c:>page30
-
Defective light bu lb warn ing
9 page20
Rear fog light(s)
c:>page20
Headlight range cont rol
9 page 21
-
adaptive lig ht*
¢page 21
Light-/rain sensor faulty
¢page 21
Transmission (tiptronic®)
c:>page 106
Electronic steering col umn lock
9page 17
Engine start system
c:>page 17
Ele ctrome chanical steering ./
¢page 189
-
Rear spoiler
c:>page 186
Other indicator light s
11!1 a Turn s ignals
Iii !!!9':ii ¢ page 21
~ USA models: Cruise con trol*
~ c:> page 77
• -
r!I
I
I
Canada models : Cruis e control*
¢page 77
-
Adaptive cruise control *
c:>page Bl
Adaptive cruise cont ro l*
¢page Bl
Adaptive cruise control *
¢page 81
High beam
c:>page43
Page 22 of 294
20 Instruments and warning/indicator lights
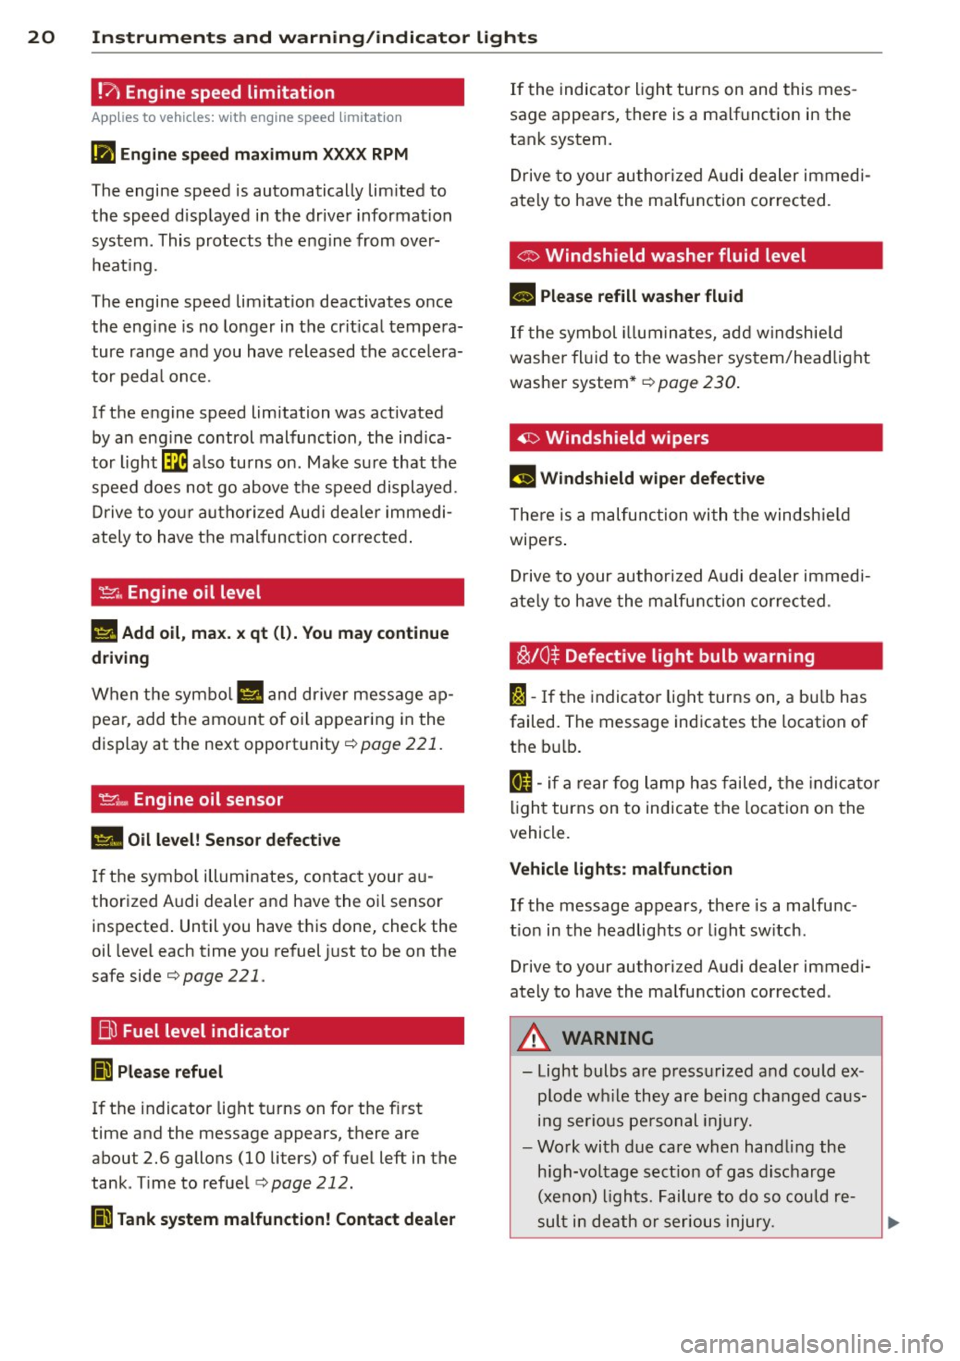
!?' Engine speed limitation
Ap plies to vehicles: wit h eng ine spee d limi tation
(ii Engine speed maximum XXXX RPM
The engine speed is automatically limited to
the speed displayed in the driver information
system. This protects the engine from over
heating.
The engine speed limitation deactivates once
the engine is no longer in the critical tempera
ture range and you have released the accelera
tor pedal once.
If the engine speed limitation was activated by an engine control malfunction, the indica
tor light~ also turns on. Make sure that the
speed does not go above the speed displayed .
Drive to your authorized Audi dealer immedi
ately to have the malfunction corrected.
~ . Engine oil level
II! Add oil, max. x qt (l) . You may continue
driving
When the symbol II and driver message ap
pear, add the amount of oil appearing in the
display at the next opportunity
c:> page 221.
~ .... Engine oil sensor
• Oil level! Sensor defective
If the symbol illuminates, contact your au
thorized Audi dealer and have the oil sensor inspected. Until you have this done, check the
oil level each time you refuel just to be on the
safe side<=>
page 221.
Bil Fuel level indicator
Ji Please refuel
If the indicator light turns on for the first
time and the message appears, there are
about 2.6 gallons (10 liters) of fuel left in the
tank . Time to refuel
<=> page 212.
Ji Tank system malfunction! Contact dealer
If the indicator light turns on and this mes
sage appears, there is a malfunction in the
tank system.
Drive to your authorized Audi dealer immedi
ately to have the malfunction corrected.
o Windshield washer fluid level
B Please refill washer fluid
If the symbol illuminates, add windshield
washer fluid to the washer system/headlight
washer system*
c:> page 230.
~ Windshield wipers
,,., Windshield wiper defective
There is a malfunction with the windshield
wipers.
Drive to your authorized Audi dealer immedi
ately to have the malfunction corrected .
~/0$ Defective light bulb warning
fa-If the indicator light turns on, a bulb has
failed. The message indicates the location of
the bulb.
[I-if a rear fog lamp has failed, the indicator
light turns on to indicate the location on the
vehicle .
Vehicle lights: malfunction
If the message appears, there is a malfunc
tion in the headlights or light switch .
Drive to your authorized Audi dealer immedi
ately to have the malfunction corrected .
A WARNING
-
-Light bulbs are pressurized and could ex-
plode while they are being changed caus
ing serious personal injury.
- Work with due care when handling the
high-voltage section of gas discharge
(xenon) lights. Failure to do so could re
sult in death or serious injury.
Page 23 of 294
Instruments and warning/indicator lights 21
@ Tips
Have the bulb replaced or the connection
repaired by your authorized Audi Service
department.
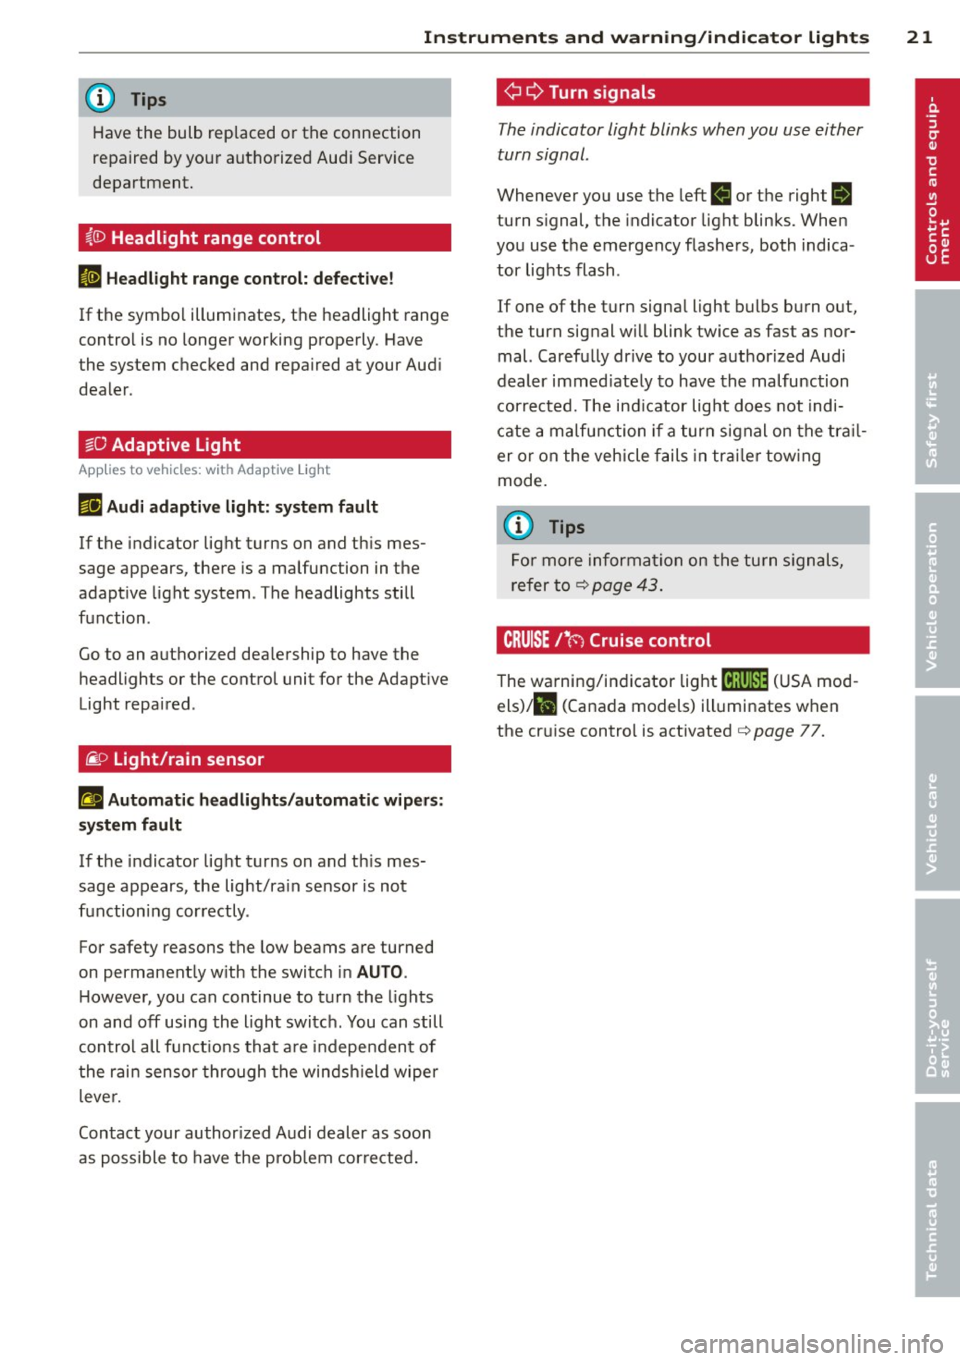
~()) Headlight range control
II Headlight range control: defective!
If
the symbol illuminates, the headlight range
contro l is no longer working properly . Have
the system checked and repa ired at your Aud i
dealer .
l§O Adaptive Light
Applies to vehicles: with Adapt ive Light
rlJ Audi adaptive light: system fault
If the indicator light turns on and this mes
sage appears, there is a malfunction in the
adapt ive light system. The headlights still
function .
Go to an authori zed dea lership to have the
headlights or the control unit for the Adapt ive
Light repaired .
~D Light/rain sensor
f'al Automatic headlights/automatic wipers:
system fault
If
the indicator light turns on and th is mes
sage appears, the light/ra in sensor is not
functioning correctly .
For safety reasons the low beams are turned
on permanent ly w ith the switch in
AUTO.
However, you can continue to turn the lights
on and off using the light switch. You can still
control all funct ions that are independent of
the rain sensor through the windshield wiper
l eve r.
Contact your author ized Audi dealer as soon
as possible to have the prob lem cor rected.
¢ Q Turn signals
The indicator light blinks when you use either
turn signal .
Whenever you use the left II or the right rl
turn signal, the indicator light blinks. When
you use the emergency flashers, both indica
tor lights flash .
If one of the turn signa l light bulbs burn out,
the turn signal will blink twice as fast as nor
mal. Carefully dr ive to your authorized Audi
dealer immed iately to have the malfunction
corrected. The ind icator light does not indi
cate a malfunction if a turn signal on the tra il
er or on the vehicle fails in trailer towing
mode.
(D Tips
For more information on the turn signals,
refer to
¢ page 43.
CRUISE/' (-) Cruise control
The warning/indicator light mi1'lm (USA mod
els)/ll (Canada models) illuminates when
the cruise control is activated¢
page 77.
Page 44 of 294
42 Clear vision
visibility conditions. For example, fog cannot be detected by the light sensors.
So always switch on the headlights
io
under these weather conditions and
when driving in the dark.
- Crashes can happen when you cannot see
the road ahead and when you cannot be
seen by other motorists . Always turn on
the headlights so that you can see ahead and so that others can see your car from
the back.
(D Note
The rear fog lights should only be turned
on in accordance with traffic regulation, as
the lights are bright for following traffic.
@ Tips
-In the event of a light sensor malfunc
tion, the driver is notified in the instru
ment cluster display~
page 21.
-You will hear a warning tone if you open
the driver door when the exterior lights
are switched on.
- Please observe legal regulations when
using the lighting systems described .
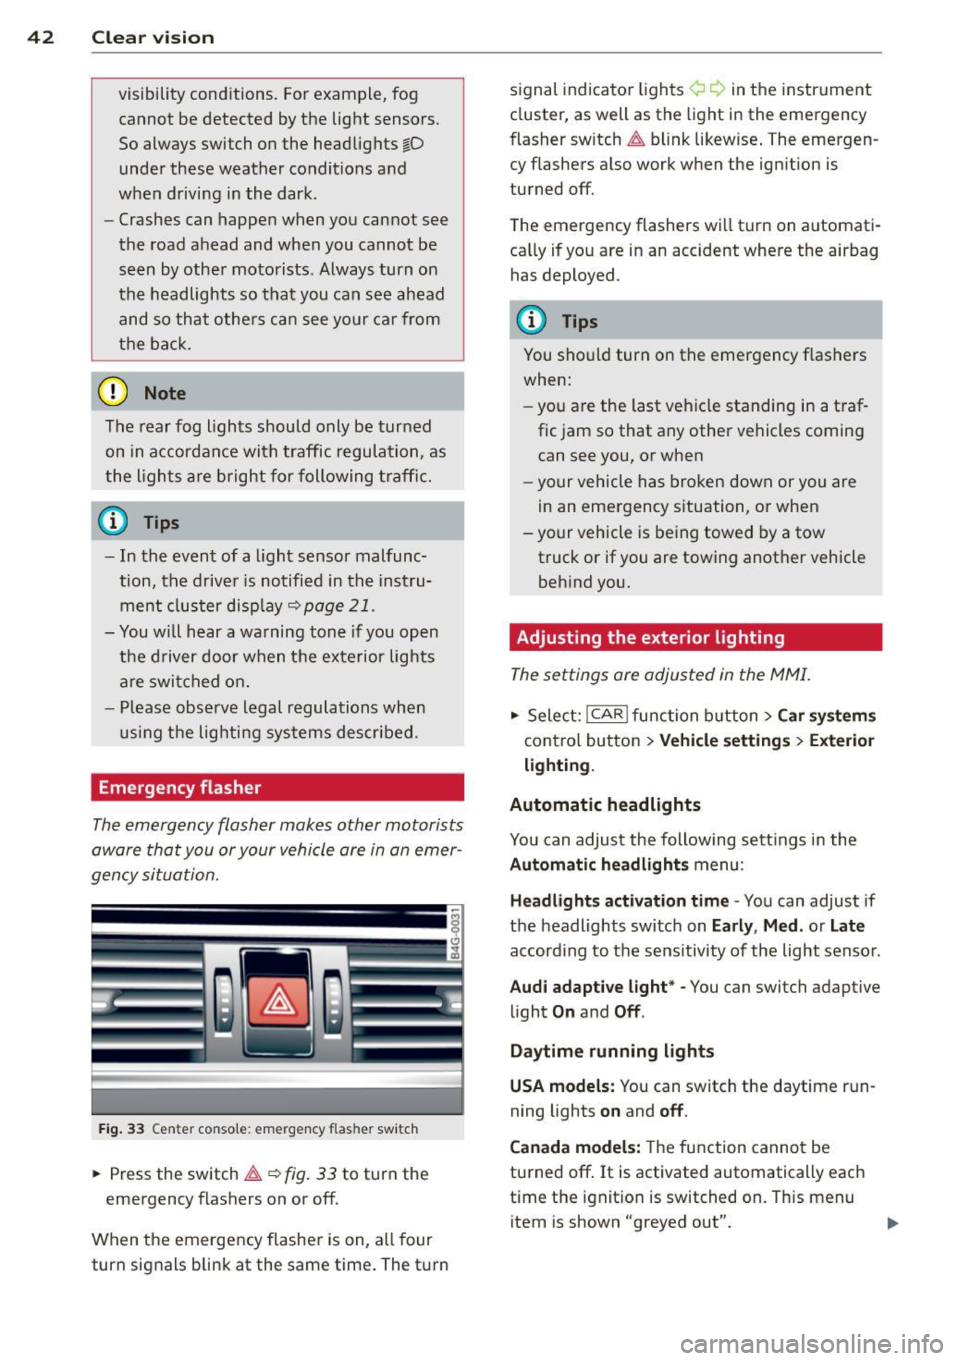
Emergency flasher
The emergency flasher makes other motorists
aware that you or your vehicle are in an emer
gency situation.
Fig. 33 Center console : emerge ncy flasher switch
• Press the switch~~ fig. 33 to turn the
emergency flashers on or off.
When the emergency flasher is on, all four
turn signals blink at the same time. The turn signal
indicato r lights ¢ Q in the instrument
cluster, as well as the light in the emergency
fl asher switch ~ blink likewise. The emergen
cy flashers also work when the ignition is
turned off.
The emergency flashers will turn on automati
cally if you are in an accident where the airbag
has deployed .
(D Tips
You should turn on the emergency flashers
when:
- you are the last vehicle standing in a traf
fic jam so that any other vehicles coming
can see you, or when
- your vehicle has broken down or you are
in an emergency situation, or when
- your vehicle is being towed by a tow
truck or if you are towing another vehicle
behind you.
· Adjusting the exterior lighting
The settings ore adjusted in the MMI.
• Select: I CAR I function button > Car systems
control button > Vehicle settings> Exterior
lighting.
Automatic headlights
You can adjust the following settings in the
Automatic headlights menu :
Headlights activation time -You can adjust if
the headlights switch on
Early , Med. or Late
according to the sensitivity of the light sensor .
Audi adaptive light* -You can switch adaptive
light
On and Off .
Daytime running lights
USA models:
You can switch the daytime run
ning lights
on and off.
Canada models:
The function cannot be
turned off.
It is activated automatically each
time the ignition is switched on. This menu
item is shown "greyed out".
Page 46 of 294
44 Clear vis ion
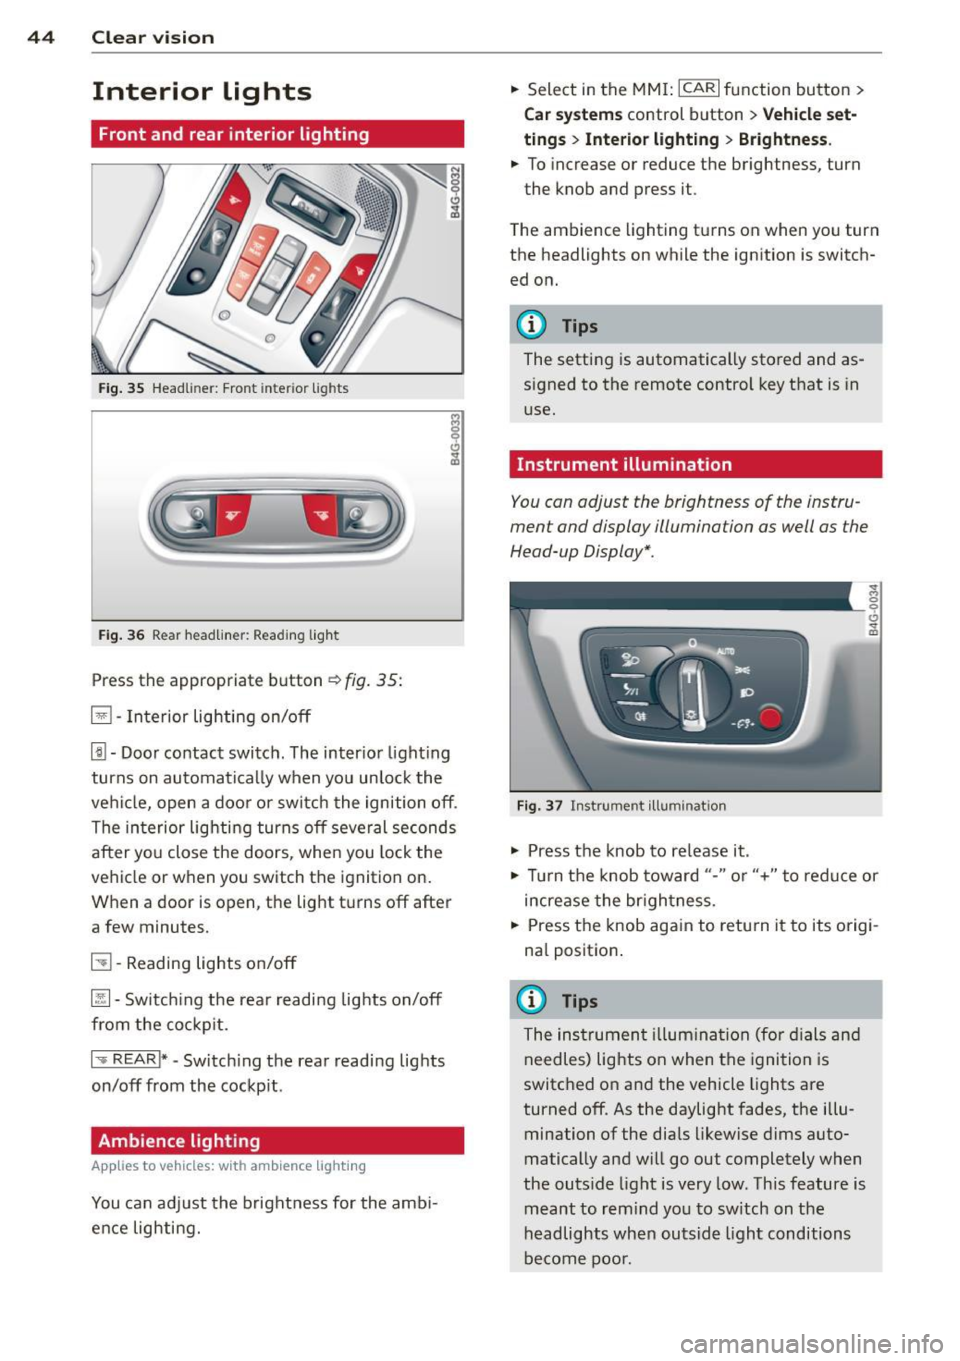
Interior lights
Front and rear interior lighting
Fig. 35 Head liner: Fron t int eri or ligh ts
Fig. 36 Rear headlin er: R ead in g light
Press the appropriate b utton ~ fig. 35:
El -Interior lighting on/off
[j) -Door contact switch . The inter io r l ight ing
turns on automatically when you unlock the
vehi cle, open a doo r or switch the ignition off .
The interior lighting turns off several seconds
after you close the doors , when you lock the
vehicle or when you switch the ignition on.
When a door is open, the light t urns off after
a few minutes.
51 -Reading lights o n/off
~ -Sw itch ing the rear readi ng lights on/off
from the co ckpit.
I .,.. REAR !* -Switch ing the rear reading lights
on/off from the cockp it .
Ambience lighting
Appl ies to vehicles: wit h ambience lighting
You can adj ust the brightness for the amb i
ence lighting. .,.
Select in the MM I: ICARlfunction button>
C ar sys tem s control button > Vehicle set
ting s
> Interio r light ing > Brightne ss .
.,. To increase or reduce the brightness, turn
the knob and press it .
T he ambience lighting turns on when you turn
the headlights on while the ignition is switch ed on.
@ Tips
The setting is automatically stored and as
signed to the remote control key that is in
use.
Instrument illumination
You can adjust the brightness of the instru
ment and display illumination as well as the
Head-up Display *.
F ig. 37 In strume nt ill umin ation
.,. Press the knob to re lease it .
~ 0
"'
.,. Tur n the knob toward "-" or"+" to redu ce or
increase the br ightness.
.,. Press the knob aga in to retu rn it to its origi
na l position .
(I} Tips
The instrumen t illum ina tion (for dials and
needles) lights on when the ignition is
switc hed o n and the vehicle lights are
turned off . As the daylight fades, the illu
mination of the dia ls likewise d ims auto
matically and will g o out completely when
the outs ide light is very low. This feature is
meant to rem ind yo u to sw itch on the
headlights when outsid e light conditions
be come poo r.
Page 204 of 294

202 Cleaning and protec tio n
directly at locks, or at door or hatch
openings -they can freeze shut.
- Never use sponges designed to remove insects, or any kitchen scouring sponges
or similar products . They can damage
your paint finish.
- Never use a dry cloth or sponge to clean
the headlights . Only use wet cloths or
sponges to prevent scratches. It is best
to use soapy water.
- You should remove debris (such as in
sects) from the headl ight lenses on a
regular basis, for example when refuel
i ng your vehicle. Never clean the head
li ghts w ith a dry cloth or sponge. Use a
wet cloth or sponge.
It is best to use
soapy wa ter.
@ For the sake of the environment
In the interest of the envi ronment, the ve
hicle sho uld only be washed i n special
was h bays.
Washing your vehicle with a power
washer
Cleaning the exterior of your car with a high
pressure power washer is safe as long as you
observe a few simple rules.
.. Befo re using the power washer , make sure
yo u have read and understood the WARN
INGS¢
A in General information on
page 200.
.. Always fo llow the operating instructions for
the power washer .
.. Make sure that the jet o n the spray hose
produces a "fan shaped spray" .
.. Do
not hold the spray nozzle too close to
soft materia ls .
When cleaning the veh icle with a power wash
er
always follow the operating instructions .
This applies particularly to the
op erating
pr essure
a nd the s pray ing di stance . Keep a
d ista nce from soft materials such as rubber
hoses o r insulat ing ma ter ial as well as sensors
and camera lenses . Do not use a jet which sprays water in a
d
ir ect
stream
or one t hat has a rotating jet .
Water temper ature sho uld not ex ceed 140 °F
(60 °().
A WARNING ~ -
Neve r wash tires with a jet that sprays wa
ter i n a direct stream. This could cause in
vis ib le damage to the t ires and weaken
them, even if the spray is from a re lative ly
l ong distance and for a short time. Dam
aged and weakened tires can fail and cause
accidents and personal inj ury.
'
([) Note
To avoid damaging your vehicle, a lways
make sure that there is suffic ient d istance
between the spray head and soft materia ls
like rubber hoses, plast ic pa rts and sound
deaden ing mater ials as w ell as sensors
and camera lenses. Neve r aim t he sp ray
head at the same point for a long time.
This also applies to cleaning headligh ts
and painted bumpers. Remembe r: the
closer the nozzle is to the surface of the
materia l, the greater the stress on the ma
terial.
Sensors and camera lenses
- Remove snow with a hand br ush and remove
ice with a de- ic ing spray that does not con
tain so lvents .
- Clea n the sensors (adaptive cruise control*,
pa rk ing system*) w ith a cleaning so lution
that does not contain so lvents and a soft
cloth .
- The camera lens or the area in front of the
came ra le ns is no rmally cleaned by the
w indshie ld w ipers o r he adlig ht wipers (night
vision system *).
If the lens or the area is ex
ceptionally di rty, clean the area wit h glass
cleaner and a soft, dry cloth .
(D Note
-If you was h your veh icle with a pres sure
washer,
Page 264 of 294

262 Fuses and bulb s
Fuse panel @ (black )
No . Equ ipment Amps
=
8
Headlight range adjustment/
5/7,5
adaptive lighting system
10 Left headlight (headlight with
7,5
adaptive light)
Fuse panel
@ ( brown )
No .II Equ ipm ent
II Amp s
1 Climate control 10
2 Climate control system blower 40
3 Diagnostic connector 10
4 Electrical ignition lock 5
5 Power steering column adjust-
ment
5
Steering column switch module 10
7 Power steer
ing column adjust-
ment 25
8 Light switch
Luggage compartment fuse assignment
Fig. 196 Luggage compartment: fuse panel with plas·
tic bracket
Fuse panel @ (bl ack )
No. II Equipment
I[ Amp s
4 E lectromechanical parking brake 30
5 Electromechanical parking brake 30
6 Front door (front passenger's
35
side)
7 Rear exterior lighting Rear sun shade, closing aid, lug
s gage compartment lock, con
venience key, START ENGINE
STOP, fuel filler door 30
20
-Fuse pane
l@ (blac k) I
No. Equipm ent Amps
=· 9 Power seat adjustment 15
10 Parking system
s
30
Fus e pane l
B (red)
No . Equipment Amps
1 Left belt tensioner
25
Right belt tensioner 25
3 Socket 20
20
Electromechanical parking brake
5
adaptive air suspension 15
7 Rear door (front passenger's
35
side)
Rear exterior lighting 30
9
Luggage compartment lid con-
30
t rol module
10 Telephone 5
11 Sound amp lifier 30
12 Rear spoiler 20
Fuse pane l c (b rown )
No. Equipment Amps
1 Rad
io receiver, Sound amplif ier/
30/20
MMI unit/dr ives
2 Tank leak detection system 5
AEM control module/battery 15/
4
module 7,5
6 Battery fan 35
Rad io receiver
7,5
7,5
9
Automatic dimming interior
5/15
rearview mirror/battery module
Parking system 5
Fu se panel o (gre en)
No. Equipment Amps
1 Audi pre sense 5
2 Electromechanical parking brake 5
3 adaptive a
ir suspension
5
Automatic transmission 7,5
...
Page 265 of 294

Fuse panel @ (green )
Equipment Amps
Parking system 5
Rear Seat Entertainment s
8 Audi side ass ist 5
9
Gateway, Vehicle electrical sys-
5 tern control module 1
10 Sport d ifferential 5
Bulbs
Replacing light bulbs
For your safety, we recommend that you have
your authorized Audi dealer replace burned
out bulbs for you .
It is becoming increasingly more and more
difficult to replace vehicle light bulbs since in
many cases, other parts of the car must first
be removed before you are able to get to the
bu lb. Th is applies especia lly to the light bu lbs
i n the front of your car which you can only
reach through the engine compartment ,
Sheet metal and bulb holders can have sharp
edges that can cause ser ious cuts, and parts
must be correctly taken apart and then prop
e rly p ut back together to help prevent break
age of parts and long term damage from wa
ter that can enter housings that have not been properly resealed.
F or your safety, we recommend that you have
your authorized Audi dealer replace any bu lbs
for you, since your dealer has the proper tools, the correct b ulbs and the expertise.
Gas disc harge la mp s (X enon li ght s):
Due to the high electrical voltage, have the
bu lbs rep laced by a qualified technician.
H eadlights with Xenon l ight can be identified
by the high voltage stic ke r.
LED headlights* requ ire no ma intenance .
Please contact your autho rized Aud i deale r if a
bu lb needs to be replaced.
Fu ses and bulb s
A WARNING
Contact with h igh-vo ltage components of
the electrical system and improper re
placement of gas discharge (Xenon) head
light bulbs can cause ser ious personal in
jury and death.
- Xenon bulbs are pressur ized and can ex
plode when being changed.
- Changing Xenon lamps requ ires the spe
cial tra ining, instructions and equip
ment.
- On ly an authorized Audi dealer or other
qualified wor kshop should change the
bu lbs in gas discharge lamps .
A WARNING
There are parts with sharp edges on the
openings and on the bulb holders tha t can
cause serious c uts.
- If you are uncertain abo ut what to do,
have the work performed by an author
ized Audi dealer or other qualified work
shop . Ser ious personal inj ury may result
from improperly performed work.
(D Tips
- If you must replace the light bulbs your
sel f, a lways remember that the engine
compartment of any vehicle is a hazard
ous area to work in. A lways read and
heed all WARNINGS
¢ page 210, Engine
compartment¢ ,&..
- It is best to ask your authorized Audi
dealer whenever yo u need to change a
bulb.
-
263
•
•