spare AUDI A7 2013 User Guide
[x] Cancel search | Manufacturer: AUDI, Model Year: 2013, Model line: A7, Model: AUDI A7 2013Pages: 310, PDF Size: 77.45 MB
Page 275 of 310
Taking the wheel off/installing the spare
Follow these instructions step-by-step for
changing the wheel.
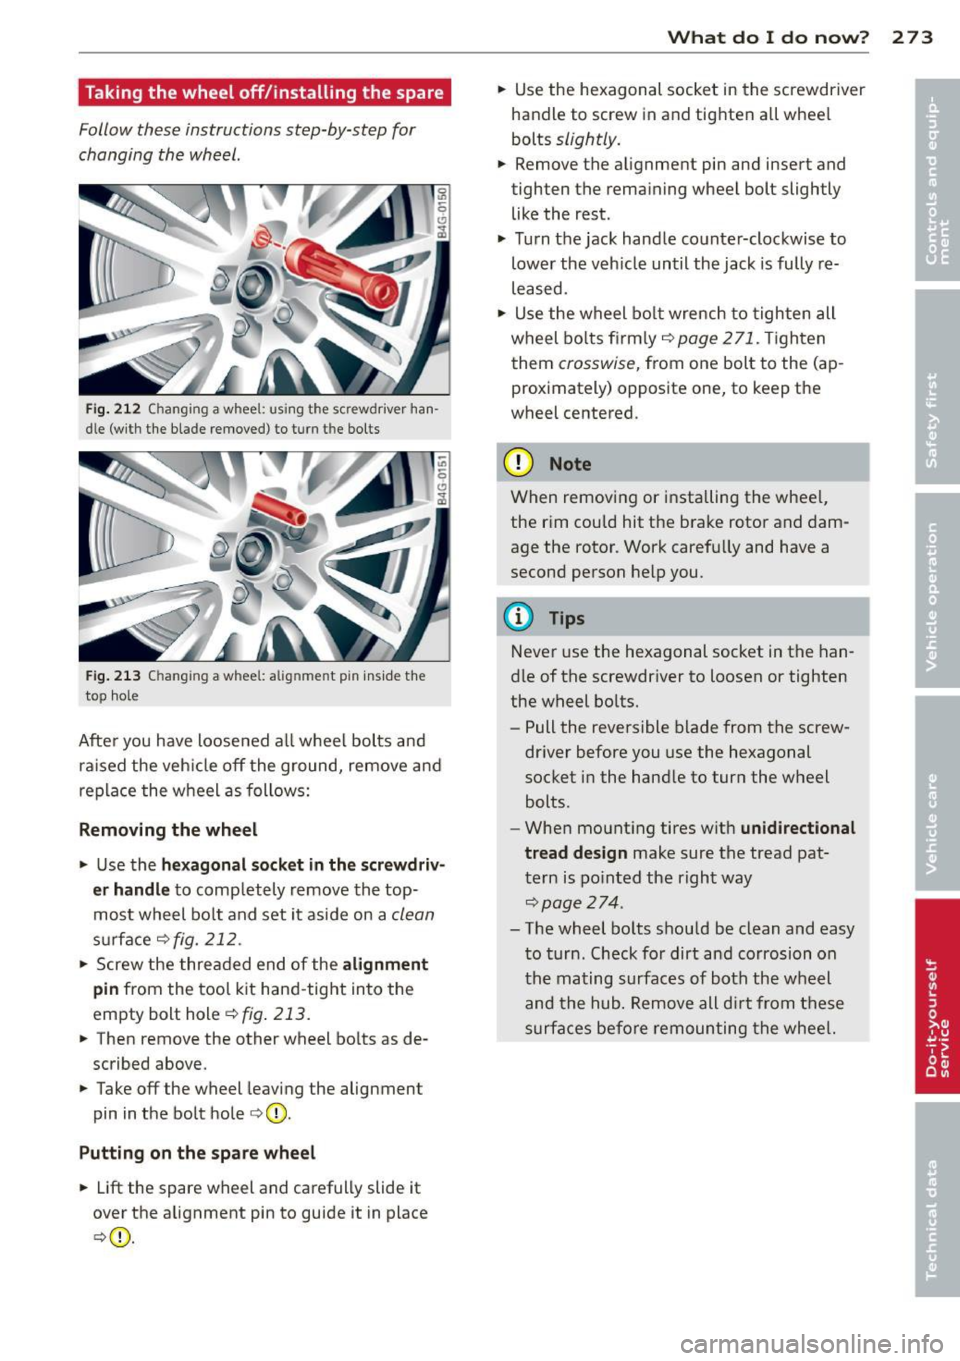
Fig. 2 12 Changing a wheel: using the screwdriver han
dle (with the blade removed} to turn t he bo lts
F ig . 2 13 Changing a wheel: alignm en t pin ins ide the
top hole
After you have loosened a ll wheel bolts and
ra ised the veh icle off the ground, remove and
replace the wheel as follows:
R emoving the wheel
.. Use the hex agon al so ck et in th e scr ew dr iv
e r handle
to comp letely remove the top
most wheel bo lt and set it aside on a
clean
s u rface Q fig. 212 .
.. Screw the threaded end of the alignm ent
pin from the tool k it hand -tight into the
empty bolt hole
Qfig . 213.
.. Then remove the other wheel bo lts as de
scribed above .
.. Take off the wheel leaving the alignment
pin in the bolt hole
Q (D.
Putting on the spar e wheel
.. Lift the spare wheel and carefully slide it
over the alignment pin to guide it in place
Q (D.
What do I d o now ? 273
.. Use the hexagonal socket in the screwdriver
handle to screw in and tighten all wheel
bolts
slightly.
.. Remove the alignment pin and insert and
tighten the remaining wheel bolt slightly like the rest.
.. Turn the jack handle counter-clockwise to
lower the veh icle until the jack is fully re
leased .
.. Use the wheel bo lt wrench to tighten all
wheel bo lts firm ly
Q page 271. Tighten
them
crosswise, from one bolt to the (ap
proximately) opposite one, to keep the
wheel centered.
(D Note
When removing or installing the whee l,
the rim could hit the brake rotor and dam
age the rotor. Work carefully and have a
second person help you.
@ Tips
Never use the hexagonal socket in the han
dle of the screwdriver to loosen or tighten
the w heel bolts.
- Pull the reversible blade from the screw
dr iver before you use the hexagonal
socket in the hand le to turn the wheel
bolts.
- When mounting tires w ith
unidi rectional
tread design
make sure the tread pat
tern is po inted the right way
~page 274.
-The wheel bo lts shou ld be clean and easy
to turn . Check for dirt and corrosion on
the mating surfaces of both the wheel
and the hub. Remove all d irt from these
surfaces before remounting the whee l.
Page 276 of 310
274 What do I do now? Tires with unidirectional tread design
Tires with unidirectional tread design must be
mounted with their tread pattern pointed in the right direction .
Using a spare tire w ith a tread pattern
intended for use in a specific direction
When using a spa re tire w ith a t read patte rn
i n tended fo r use in a specific direction, please
note t he followi ng:
- The direction of rotation is marked by a n ar
r ow on the side of the tire.
- If the spare t ire has to be installed in the in
correct direction, use the spare tire only
tempora rily si nce the t ire will not be a ble to
achi eve its optimum perfo rm anc e cha racter
i st ics w ith reg ard t o aqu aplani ng, noise and
we ar.
- W e reco mmend t hat you pay pa rticular at
te nti on t o this fact d uring wet we ather and
t h at you a dju st yo ur spee d to m atc h ro ad
con ditions.
- R epl ace the fla t tire w ith a n ew one an d
have it ins talled o n your ve hicle as soon as
p oss ible to restore the handlin g ad vantages
of a uni direct io na l tire .
Notes on wheel changing
Please rea d the informati on c> page 257 , New
t ires and replacing tires and wheels
if you are
go ing t o u se a spare tire which is d ifferent
from the tires on your ve hicle.
Afte r you chan ge a t ire :
-Check the tire pressure on the spare imme
diately after installation.
- Have the wheel bolt tightening torque
checked with a torque wrench as soon as possible by your authorized Audi dealer or
a qualified service station.
- With steel and alloy wheel rims , the wheel
bolts are correctly tightened at a torque of
90 ft lb (120 Nm ).
- If you notice that the wheel bolts are cor
roded and difficult to turn while changing
a tire, they should be replaced before you
check the tightening torque . -
Replace the flat tire with a new one and
have it installed on your vehicle as soon as
possible. Remount the wheel cover .
Until then , drive with extra care and at re
duced speeds.
A WARNING
-
- If you are going to e quip your ve hicl e
with tires or rims which differ from those
which were facto ry installed, then be
sure to rea d the informati on
9 page 257,
New tir es and replacing tires and
w he els .
- Always ma ke sure the damag ed wheel o r
even a flat tire and the jack a nd tool ki t
ar e prop erly s ecu red in the luggage co m
p artm ent and are not lo ose in the pas
s e ng er c ompa rtm ent .
- I n an acci dent or sudd en man euve r they
could fly forwa rd, inju ring anyon e in the
v eh icle.
- Always store d amag ed wh eel, jack and
too ls secur ely in the lugg age c ompart
ment. Otherwi se, in an accident or su d
de n maneuve r they co uld fly forw ard,
causing inj ury to passe ngers i n the ve hi
cle.
Page 287 of 310
General information Explanation of
technical data
Som e of t he technical data listed in this man
ual requires further explanation .
The technical data for your vehicle is listed in
the charts starting on
Q page 287 . This sec
tion provides general information, notes and r estr ictions wh ich app ly to this data.
Vehicle identification
The key data is given on the vehicle identifi ca
tion number ( VIN) plate and the vehicle data
sti cker .
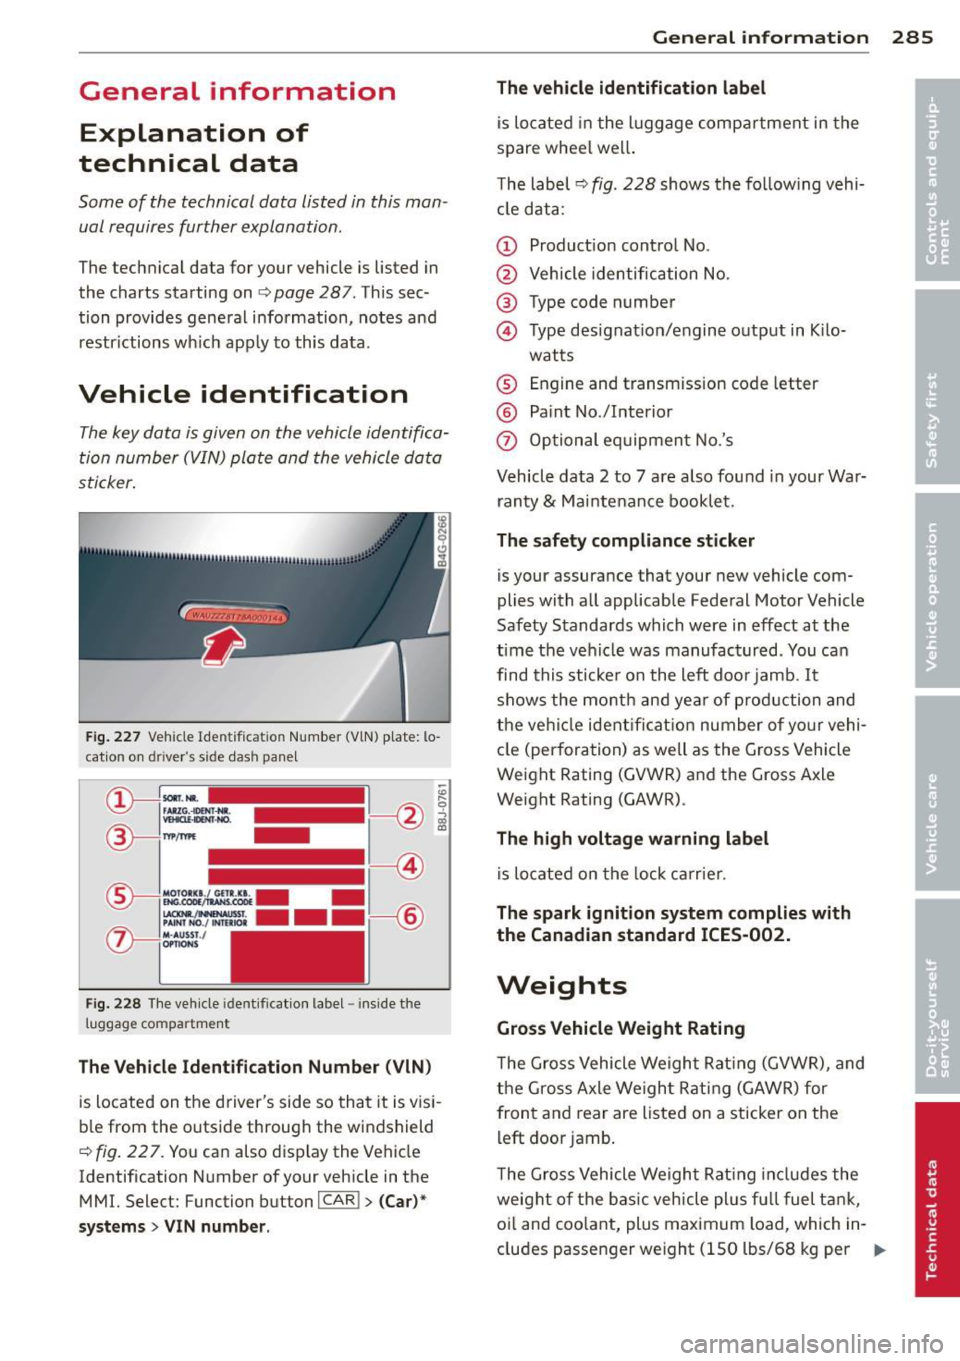
Fig. 22 7 Vehicle Ident ific atio n Num ber (V lN) p la te: lo
cation o n dri ve r"s s ide das h pa nel
Fi g. 2 28 The ve hicle iden tifi cat ion label -inside the
l u ggage co mpartme nt
The Vehicle Identification Number (VlN)
is located on the d river's side so tha t it is v is i
b le from the outside throug h the windshield
Q fig . 22 7. You can also d isplay the Vehicle
Identification N umber of your vehicle in the
MMI. Select: Function button
!CAR I> (Car )*
systems
> VIN number .
General inform ation 285
The vehicle identification label
is lo cated in the l uggage comp artment in the
spare whee l we ll.
T he label
r:::> fig. 228 shows th e fo llow ing vehi
cl e data :
(D Product ion cont ro l No.
@ Vehicle identific ation No.
@ Type code number
© Type designat ion/e ngine o utput in K ilo-
wat ts
® Engine and transm ission code letter
® Pa int No ./lnterior
0 Op tio nal eq uipment No.'s
Vehicle data 2 to 7 are a lso found in your War
ranty
& Mai nte nance bookle t.
The safety compliance sticker
is your assurance that your new vehicle com
plies with a ll applicab le Fede ral Motor Vehicle
Safety Standards which were in effect at the
time the ve hicle was manufactur ed . You can
find this sticke r o n the left doo r jamb.
It
sh ows the month an d ye ar of pro duction and
t he ve hicl e ident ificat io n number of yo ur vehi
cle (perforation) as well as the G ross Vehicle
Weight Rating (GVW R) and the Gross Axle
Weight Rating (GAWR) .
The high voltage warning label
is lo cate d on the lock ca rrie r.
The spark ignition system complies with
the Canadian standard ICES-002.
Weights
Gross Vehicle Weight Rating
T he Gro ss Vehicle Weigh t Rat ing (GVWR), and
t he Gross Axle We igh t Rati ng (GAWR) for
fron t and rear are listed on a sticker on the
l eft door jamb .
T he Gro ss Vehicle Weigh t Rat ing incl udes the
weight of the bas ic vehicle plus f ull fuel t ank,
oi l and coo lant, plus maximum load, which in
cludes passen ger we ight (150 lbs/68 kg per ..,.
Page 293 of 310
-Always make sure the transm ission se
lector lever (automatic transmiss io n) is
in P (Park position) and the park bra ke is
applied.
@) For the sake of the environment
- Changing t he eng ine settings w ill ad
versely affect em ission levels. This is det
rimental to the environment and increas
es fuel consumption .
- Always observe env ironmental regula
tions when d isposing of old engine oil,
used brake fluid, dirty engine coolant,
spent batter ies or worn out t ires.
- Undeployed airbag modules and preten
s ioners might be classified as Perchlo
r ate Mate rial -spec ia l hand ling may ap
ply, see www.dts c.ca .gov/haza rdous
was te/perch lorate. When the veh icle or
parts of the res traint system in cl ud ing
a irbag modules safety be lts wit h preten
sioners are scrapped, all applicable laws
and regulations must be observed. Your
a uthorized Audi dea ler is familiar w ith
these requirements and we recommend
that you have your dea ler perform this
se rv ice for you .
Additional accessories,
modifications and
parts replacement
Additional accessories and parts
replacement
Always consult an authorized Audi dealer be
fore purchasing acce ssories.
Your veh icle inco rporates the latest safety de
sig n featu res e nsu ring a high standard of ac
tive and passive safe ty .
This safety could be comp romised by non-ap
p roved changes to the ve hicle. For this reason ,
if pa rts have to be replaced, please observe
t he following points when ins tall ing addition
a l accessories:
Con sumer In formation 29 1
Approved Audi accesso ries and genuine Aud i
parts are available from authorized A udi deal
ers.
T hese de alers a lso have the necessary facili
ties, tools and tra ined spec ialists to install the
parts and accessories proper ly .
A WARNING
Using the wrong spare pa rts or using non
approved accessories can cause damage to
the vehicle and ser ious persona l injury.
- Use on ly accessories express ly approved
by Audi and ge nuine Audi spare parts
- These parts and accessories have been
specially designed to be used on yo ur ve
hicle.
- Never install accessor ies such as tele
phone crad les or beverage ho lders o n air
bag covers or withi n the airbag deploy
ment zones . Do ing so will increase t he
ris k of injury if a irbags are triggered in an
accide nt!
- Before you check anything in the engine
compa rtment, always r ead and heed a ll
W ARNINGS ~
page 224.
(D Note
-If items other than genu ine A udi spare
par ts, add-on equipmen t and accessory
items are used o r if repair wo rk is not
performed a ccord ing to spe cified met h
ods, this ca n resu lt in s evere damage to
yo ur vehicle's engine and body (s uch as
co rrosion) and adversely affect yo ur vehi
cle's warranty .
- If emergency repairs mus t be performed
elsewhere, have the veh icle examined by
an authorized Aud i dealer as soon as
possible.
- The manufacturer cannot be held liable
for damage wh ich occ urs due to failure
to comply with these stipu lations.
•
•
Page 298 of 310

296 Index
Checking Engine coolant level ................ 237
Tire pressure . ............. ... .... . 252
Ch ild restra ints
Danger of using child restra ints in the
front seat . ................. ..... . 151
Where can I get additional information
about child restraints and their use? .. 193
Child restraint system anchors ... .... . 189
Child safety .. .. . .......... .. .. .... . 175
Convertible locking retractor .. .. .. .. . 186
Important safety instructions for using
chi ld safety seats ......... .. .. .... . 179
I mportant things to know when dr iving
with chi ldren . ............... .... . 175
Tether anchors ............ ... .... . 192
Tether straps ..................... 192
Child safety lock Rear doors .............. .. .. .... .. 40
Child safety seats .......... .... .... . 181
Booster seats . .......... ... .. .. ... 184
Convertible ch ild seats .... .. .. .. .. . 182
Convertible locking retractor .. .. .. ... 186
H ow do I proper ly install a child safety
seat in my vehicle? ...... .. .. .. .. .. . 179
I nfant seats .............. ... .... . 181
I nstalling . ............... ... .... . 186
Installing a child restraint using the
LATCH system ................ .... . 191
LATCH system ............ .... ..... 191
Lower anchorages ............ ..... 190
Mounting and releasing the anchorage
hook .. .. .. ... .... ...... ... ... .. . 191
Safety instructions . . . . . . . . . . . . . . . . . 179
Unused safety belts on the rear seat .. 181
Cigarette lighter . . . . . . . . . . . . . . . . . . . . . 58
C leaning
Head-up Display .............. .... . 220
Matte finish paint ............ .... . 215
C leaning and protection ..... .. .. .. .. . 213
A lcantara (synthet ic suede) .......... 223
Engine compartment ....... .... ... . 224
Exhaust tail pipes .......... ... .... . 219
Fabrics and fabric coverings .. .. ..... 220
Instrument panel ............. ..... 221
Interior . . . . . . . . . . . . . . . . . . . . . . . . . . 219
Leather .. .. ... .... ...... ... ... .. . 222
MMI display/controls .. ... ... .. .. ... 219 Plastic
and vinyl . . . . . . . . . . . . . . . . . . . 217
Plastic parts . . . . . . . . . . . . . . . . . . . . . . 221
Safety be lts ... .. ................ . 223
trim strips ................... .... 217
Trim strips ................... .... 217
Cleaning the Head-up Display ......... 220
Climate control Air vents .. .. .. .. ............. .. .. . 70
Climate controls . .. ............. .. .. . 68
Climate control (four-zone)
Operation ..... .. .. .............. .. 71
Climate control (three-zone) Operation . . . . . . . . . . . . . . . . . . . . . . . . . 69
Clock ...... .... .................... 27
Closing Rear lid . . . . . . . . . . . . . . . . . . . . . . . . . . . 38
Sliding/ti lting sunroof ............ .. . 42
Co ld tire inflation pressure .......... .. 250
Coming home . .. .. ............. .... . 45
Compact spare tire .............. .... 268
Compartments . . . . . . . . . . . . . . . . . . . . . . 59
Compliance . .. .. .. ............. .... 292
Consumer Information . . . . . . . . . . 138, 289
Consumption (fuel) ... ........... ... . 25
Contacting NHTSA ................. . 138
Convenience key . . . . . . . . . . . . . . . . . . . . . 36
Starting the engine ............ .... . 75
Stopping the engine (START ENG INE
STOP button) . . . . . . . . . . . . . . . . . . . . . . 77
Switching the ignition on ....... .. .. . 75
Unlocking and locking vehicle .. .. .. .. . 36
Convertib le child safety seats ... .... .. 182
Convertible locking retractor Activating ..... .. .. ........ ... .. .. 188
Deactivating . .. .. ... ....... ... .. .. 188
Using to secure a child safety seat 1.86, 188
Coolant
refer to Eng ine coolant .... ..... .. .. 237
Cooling mode (automatic climate control) 71
Cooling mode (climate control) . . . . . . . . . 69
Cruise control Changing speed ................... . 84
Presetting your speed . ...... ... .. .. . 84
Switching off . . . . . . . . . . . . . . . . . . . . . . 84
Switching on . . . . . . . . . . . . . . . . . . . . . . . 83
Warning/indicator lights ............ . 23
Page 305 of 310

for using safety belts ..... ... .. .. .. . 143
Mo nitoring the Advanced Airbag Sys-
tem ... .. .. .. ... ....... ... .. .. .. . 164
Safety systems Warn ing/ indica to r li ghts ... .. .. .. .. .. 19
Seat adjustment Controls . . . . . . . . . . . . . . . . . . . . . . . . . . 53
Dr iver's seat ............. .... .. .. .. 52
F ront passenger's seat . . . . . . . . . . . . . . . 53
Fr ont sea ts . . . . . . . . . . . . . . . . . . . . . . . . 52
H ead rest raints . . . . . . . . . . . . . . . 55, 134
Safety guide lines . ..... ... .. .. .. .. .. 52
Seat belts Why YOU MUST wear them . .. .. .. .. . 140
Seat heating/venti lation (automatic cli-
mate control) . . . . . . . . . . . . . . . . . . . . . . . 72
Seat heating (climate control) . . . . . . . . . . 70
Seating position Driver . .. .. .... ........... .. .. ... 13 1
Fr ont passenger ....... ... .. .. .. .. . 132
How to adjus t the front seats . . . . . . . . 132
Incorrect seat position .. ... .. .. .. .. . 134
Occupants .. ............. .... .. .. . 131
Rear passengers .......... .... .. ... 133
Seat memo ry . . . . . . . . . . . . . . . . . . . . . . . 56
Seats Comfort seat side view .. ..... .... ... 57
S eat symmetry ........... .... .. .. .. 57
Seats (number) . . . . . . . . . . . . . . . . . . . . . 140
Select ive unlock feat ure .. ... .. .. .. .. .. 35
Selector leve r . . . . . . . . . . . . . . . . . . . . . . 109
Selector lever emergency release
115
Service and disposal Safety belt pre tens ioner ... .. .. .. .. . 14 7
Service interval disp lay . . . . . . . . . . . . . . . . 28
Shift buttons ..... .. .... ... .. .. .. ... 113
Ship (t ransporti ng your ve hicle) . .. .. .. . 283
Side airbags Descr ipt ion .... ........... ... ... .. 169
H owtheywork .................... 170
side assist . . . . . . . . . . . . . . . . . . . . . . . . . . 98
Ad justing the brightness ... .. .. .. .. . 100
Sensor range ............ .... .. .. .. 99
Side assist Activating and deactivating ... .. .. .. . 100
C lea ning sensors . ..... ... .. .. .. .. . 216
Inde x 303
Side curtain airbags . . . . . . . . . . . . . . . . . 172
Description . ... .... . ... ...... ... .. 172
How they wor k . . . . . . . . . . . . . . . . . . . . 173
Safety instr uctions ................. 173
S ide mar ker lights . ............. .... . 43
Ski sack ...... .. .... .......... ...... 66
also refer to Trunk pass-through ...... 67
Slid ing/tilting s unroof
Emergency clos ing .. ........... .... . 42
Open ing and closing ........... .. .. . 42
Snow chains . ..... .. . .. .. ..... ... .. 262
Socket ........ ... .. ..... ........... 58
Sources of information abo ut child re-
stra ints and their use ................ 193
Space -saving spare tire . .. ..... ... .. .. 268
Spare tire ......... .. ..... .......... 268
Speed limiter . .. .. ................. . 30
Speedometer . . . . . . . . . . . . . . . . . . . . . . . 27
Speed rat ing letter code ............. . 258
Speed warning system . .. ..... ... .. .. . 83
Sport d iffe rential .. ............. .. .. 102
Ind icator light . .. .. .. ........... .. . 23
Star button . .. .. .. ............... .. . 25
Start -S top -System .... .. ..... ... .. .. . 80
Engine does not switched off . ... .. .. . 82
Engine starts a utomat ica lly ..... .. .. . 82
Ind icator lights .. ................. . 81
Messages . .. .. .. ................. . 83
Starting/stopp ing the engine ......... 81
switching off/on .. .. . .. .. .. ... ... .. . 82
S TAR T ENGIN E STOP button ...... .. .. . 75
Star ting from res t . . . . . . . . . . . . . . . . . . . . 79
Starting off w ith a trailer . .. .. ... ... .. . 80
Starting the engine . .. .. ..... ... .. .. . 75
Steering El ectr ica lly adjus table stee ring wheel . . 74
M anu ally adjus table steering wheel . .. . 74
also refer to E lectro -mechan ica l powe r
ass ist . ... .. .... ... .. .. ..... ... .. 201
Steering wheel Easy entry fea ture ................. . 75
Ind icator lig ht . .. ................. . 18
Steering wheel heat ing . ..... ... .. .. . 73
Steering wheel column Adjusting electrically . . . . . . . . . . . . . . . . 7 4
Adjus ting manu ally ............ .. .. . 74
•
•