stop start AUDI A7 2013 Owners Manual
[x] Cancel search | Manufacturer: AUDI, Model Year: 2013, Model line: A7, Model: AUDI A7 2013Pages: 310, PDF Size: 77.45 MB
Page 4 of 310
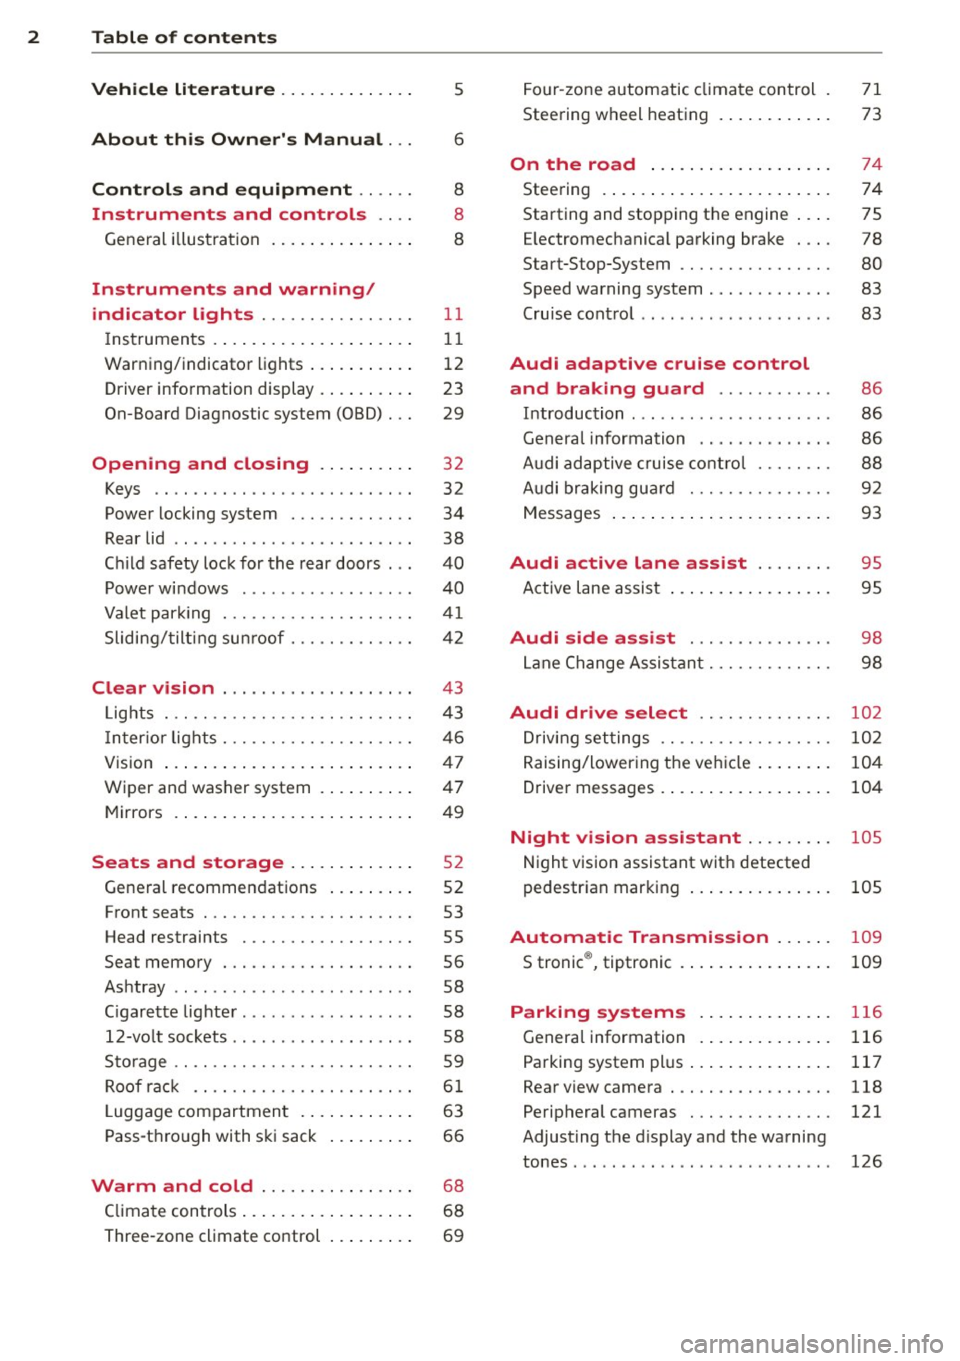
2 Table of contents Vehicle literature .. .. .. .. .. ... .
5
About this Owner's Manual . . . 6
Controls and equipment .. ... .
Instruments and controls .. . .
General illustration ......... .. ... .
Instruments and warning/
indicator lights ........ .. .. .. . .
Instruments ............ ... .. ... .
Warning/indicator lights .......... .
Driver information display .. .. .. ... .
On-Board Diagnostic system (OBD) . . .
Opening and closing .. .. .... . .
Keys .. ...... ........... .. .. ... .
Power locking system ..... .. .. .. . .
Rear lid .. .. ........ ..... .. ..... .
Child safety lock for the rear doors .. .
Power windows . .......... ... .. . .
Valet park ing . ........... .. .. ... .
Sliding/tilting sun roof ... .. .. .. .. . .
Clear vision .. ....... ... .. .. ... .
Lights . .. .. .. . .......... .. .. .. . .
I nter ior lights ............ .. .. .. . .
V1s 1on .......... ......... ... ... .
Wiper and washer system ... .... .. . 8
8
8
11
11
12
23
29
32
32
34
38
40
40
41
42
43
43
46
47
47
Mirrors . . . . . . . . . . . . . . . . . . . . . . . . . 49
Seats and storage ......... ... .
General recommendations ... .... . .
Front seats .............. .. .. ... .
Head restraints .............. ... .
Seat memory . ........... .... ... .
Ashtray .. .. ... .... ...... .. .. .. . .
C igarette lighter .............. .. . .
12-vo lt sockets ... ..... ... .. .. .. . .
Storage ................. .. .. ... .
Roof rack ............... .. .. .. . .
L uggage compartment ........... .
Pass-through with ski sack ... .. ... . 52
52
53
55
56
58
58
58
59
61
63
66
Warm and cold . . . . . . . . . . . . . . . . 68
Climate controls . . . . . . . . . . . . . . . . . . 68
Three-zone climate control . . . . . . . . . 69 Four-zone
automatic climate control
Steering wheel heating ........... . 71
73
On the road
. . . . . . . . . . . . . . . . . . . 74
Steering . . . . . . . . . . . . . . . . . . . . . . . . 74
Starting and stopping the engine . . . . 75
E lectromechanical parking brake . . . . 78
Start-Stop-System . . . . . . . . . . . . . . . . 80
Speed warning system . . . . . . . . . . . . . 83
Cruise control . . . . . . . . . . . . . . . . . . . . 83
Audi adaptive cruise control
and braking guard . . . . . . . . . . . .
86
Introduction . . . . . . . . . . . . . . . . . . . . . 86
Genera l information . . . . . . . . . . . . . . 86
Audi adaptive cruise control . . . . . . . . 88
Audi braking gua rd . . . . . . . . . . . . . . . 92
Messages . . . . . . . . . . . . . . . . . . . . . . . 93
Audi active lane assist . . . . . . . . 95
Active lane assist . . . . . . . . . . . . . . . . . 95
Audi side assist . . . . . . . . . . . . . . . 98
Lane Change Assistant. . . . . . . . . . . . . 98
Audi drive select . . . . . . . . . . . . . . 102
Driving settings . . . . . . . . . . . . . . . . . . 102
Raising/lowering the vehicle . . . . . . . . 104
Driver messages . . . . . . . . . . . . . . . . . . 104
Night vision assistant . . . . . . . . . 105
Night vision assistant with detected
pedestrian marking . . . . . . . . . . . . . . . 105
Automatic Transmission . . . . . . 109
S tronic ®, tiptronic . . . . . . . . . . . . . . . . 109
Parking systems . . . . . . . . . . . . . . 116
General information . . . . . . . . . . . . . . 116
Parking system plus . . . . . . . . . . . . . . . 117
Rear view camera . . . . . . . . . . . . . . . . . 118
Peripheral cameras . . . . . . . . . . . . . . . 121
Adjusting the d isplay and the warning
tones. . . . . . . . . . . . . . . . . . . . . . . . . . . 126
Page 11 of 310
CD
@
®
©
®
®
(j)
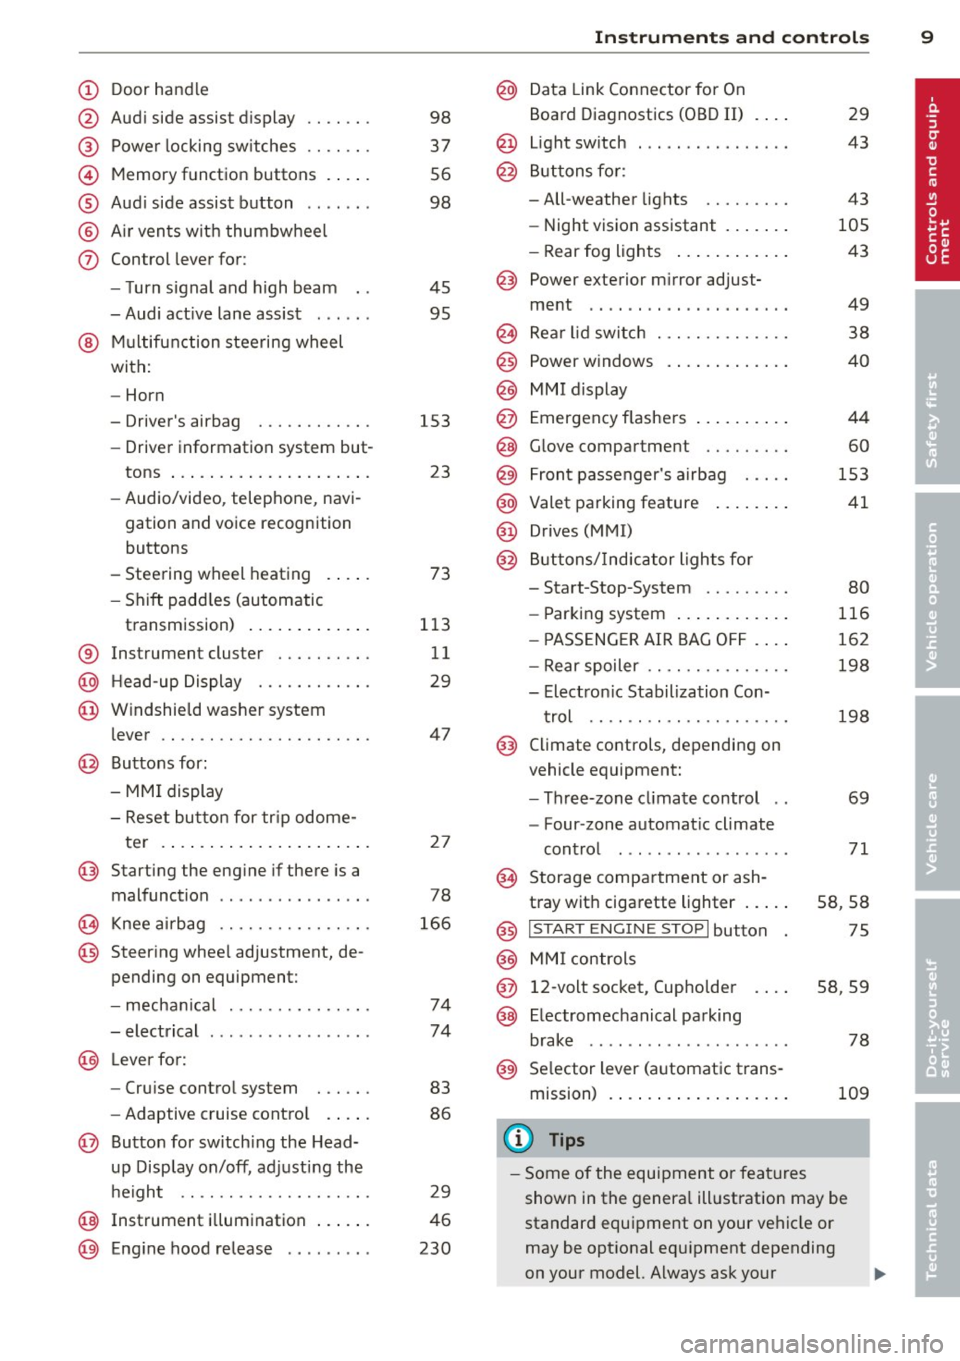
Door handle
Audi side assist display
Power locking sw itches
Memory function buttons .. .. .
Aud i side assist button ...... .
A ir vents with thumbwheel
Control lever for:
- T urn signal and high beam
- Audi act ive lane assist . .. .. .
@ Mu ltifunction steering wheel
with:
- Horn
- Driver's airbag
- Driver information system but-
tons ... ..... ....... ... .. .
- Audio/video , telephone, navi
gation and voice recognition
buttons
- Steering wheel heating . ... .
- Shift padd les (automatic
transmission) ..... ... ... . .
® Instrument cluster ......... .
@ Head-up Display ........... .
@ Windshield washer system
lever ..................... .
@ Buttons for:
- MMI display
- Reset bu tton for tr ip odome-
te r .. .. ... .. ..... ... .. .. .
@ Starting the engine if there is a
malfunction ............... .
~ Knee airbag ........... .. .. .
@ Steer ing whee l adjustment, de
pending on equipment:
- mechan ical .......... .. .. .
- electrical .... .. ..... ... .. .
@ Leve r for:
- Cru ise control system ... .. .
- Adaptive cruise contro l .. .. .
@ Button for sw itch ing the Head
up Disp lay on/off, adjusting the
h eight .. ............. .. .. .
@ Instrument illumination ... .. .
@ Eng ine hood release ........ . 98
37
56
98
45 95
153 23
73
113 11
29
47
2 7
78
166
74
74
83
86
29
46
230
In strument s and control s 9
@ Data Link Connector for On
Board Diagnostics (OBD II)
@ Light switch ... .. . .. .... ... .
@ Buttons for :
- All-weather lights
- Night vision assistant .... .. .
- Rear fog lights .. .. .. ..... .
@ Power exterior m irror adjust-
ment ...... .. .. ..... ..... . 29
43
43
105 43
49
@ Rea r lid switch . . . . . . . . . . . . . . 38
@ Power w indows . . . . . . . . . . . . . 40
@ MMI display
@ Emergency flashe rs . . . . . . . . . . 44
@ Glove compartment . . . . . . . . . 60
@) Front passenger's airbag . . . . . 153
@ Valet parking feature . . . . . . . . 41
@ Drives (MMI)
@ Buttons/Indicator lights fo r
- Start-Stop-System . . . . . . . . . 80
- Parking system . . . . . . . . . . . . 116
- PASSENG ER AIR BAG OF F . . . . 162
- Rear spoiler . . . . . . . . . . . . . . . 198
- Electron ic Stabilization Con-
t rol . . . . . . . . . . . . . . . . . . . . . 198
@ Climate controls, depending on
vehicle equipment:
- Three-zone cl imate control . . 69
- F our-zone automatic climate
cont rol . . . . . . . . . . . . . . . . . . 71
@ Storage compartment or ash-
t ray wit h cigarette lighter . . . . . S8, 58
@ I S T ART ENGINE STOPI button 75
@ MM I controls
@ 12-volt socket, (upho lder 58, 59
@ E lectromechanical parking
brake . . . . . . . . . . . . . . . . . . . . . 78
@ Selector lever (a utomatic trans-
mission) 109
(D Tips
-Some of the equipment or fea tures
show n in the genera l ill ustration may be
standard equipment on your vehicle or
may be opt ional eq uipment depending
on your model. Always ask your
ll>
Page 15 of 310
Instrument s and warnin g/indic ator ligh ts 13
compartment, stop the engine and let it
cool down. Always exercise extreme cau
t ion when working under the hood
<=> page 224, Engine compartment
@ Tips
Ma lf u nctions or faults wi ll be identified ei
ther with a red symbo l (pr iority 1 -Dan
ger!) or with a yellow symbol (pr iority
2 -
Warn ing).
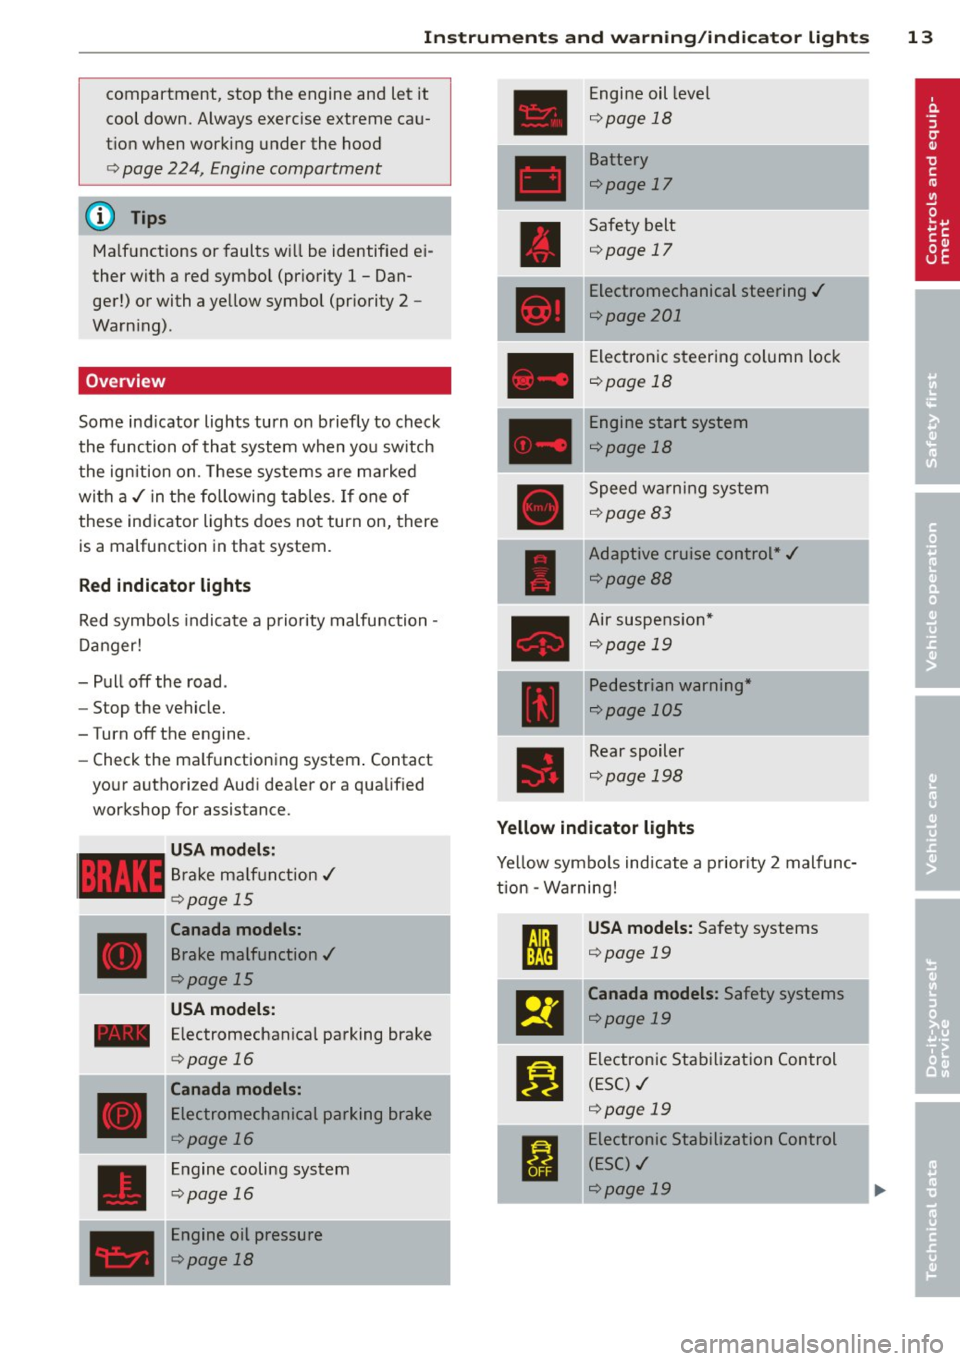
Overview
Some ind icator lights turn on briefly to check
the function of that system when you switch
the ignition on. These systems are ma rked
with a ,/ in the following tables. If one of
these indicator lights does not turn on, there
is a malfunction in that system.
Red indicator lights
Red symbols indicate a prio rity malfunction -
D anger!
- Pull off the road.
- Stop the vehicle.
-Turn off the engine.
- Check the ma lf u nctioning system . Contact
your authorized Audi dea ler or a qualified
workshop for assistance.
USA mode ls:
Brake ma lf u nction,/
c::>page 15
Canada models:
Brake malfunction,/
c::>page 15
USA models:
- Electromechanical parking brake
____ ,
D
<=> page 16
Canada models:
Electromechanical parking brake
<=>page 16
Engine cooling system
c::> page 16
Engine oil pressure
c::> page 18
Engine oil level
Q page 18
Battery
<=>page 17
Safety belt
<=>page 17
Electromechanical steering ,/
<=> page 201
Electronic steering column lock
<=>page 18
Engine start system
<=>page 18
Speed warning system
<=>page 83
Adaptive cruise control*,/
<=>page88
Air suspe nsion*
Qpage 19
Pedestrian warning*
Qpage 105
Rear spoiler
c::>page 198
Yellow indicator lights
Yellow symbo ls indicate a prior ity 2 malfunc
tion - Wa rning!
m
l:ml
El
fl
USA models: Safety systems
<=> page 19
Canada models: Safety systems
c::> page 19
Electronic Stabilization Control
(ESC) ,/
<=>page 19
Electronic Stabilization Control
( E SC) ,/
c::> page 19
Page 17 of 310
Instruments and warning/indicator lights 15
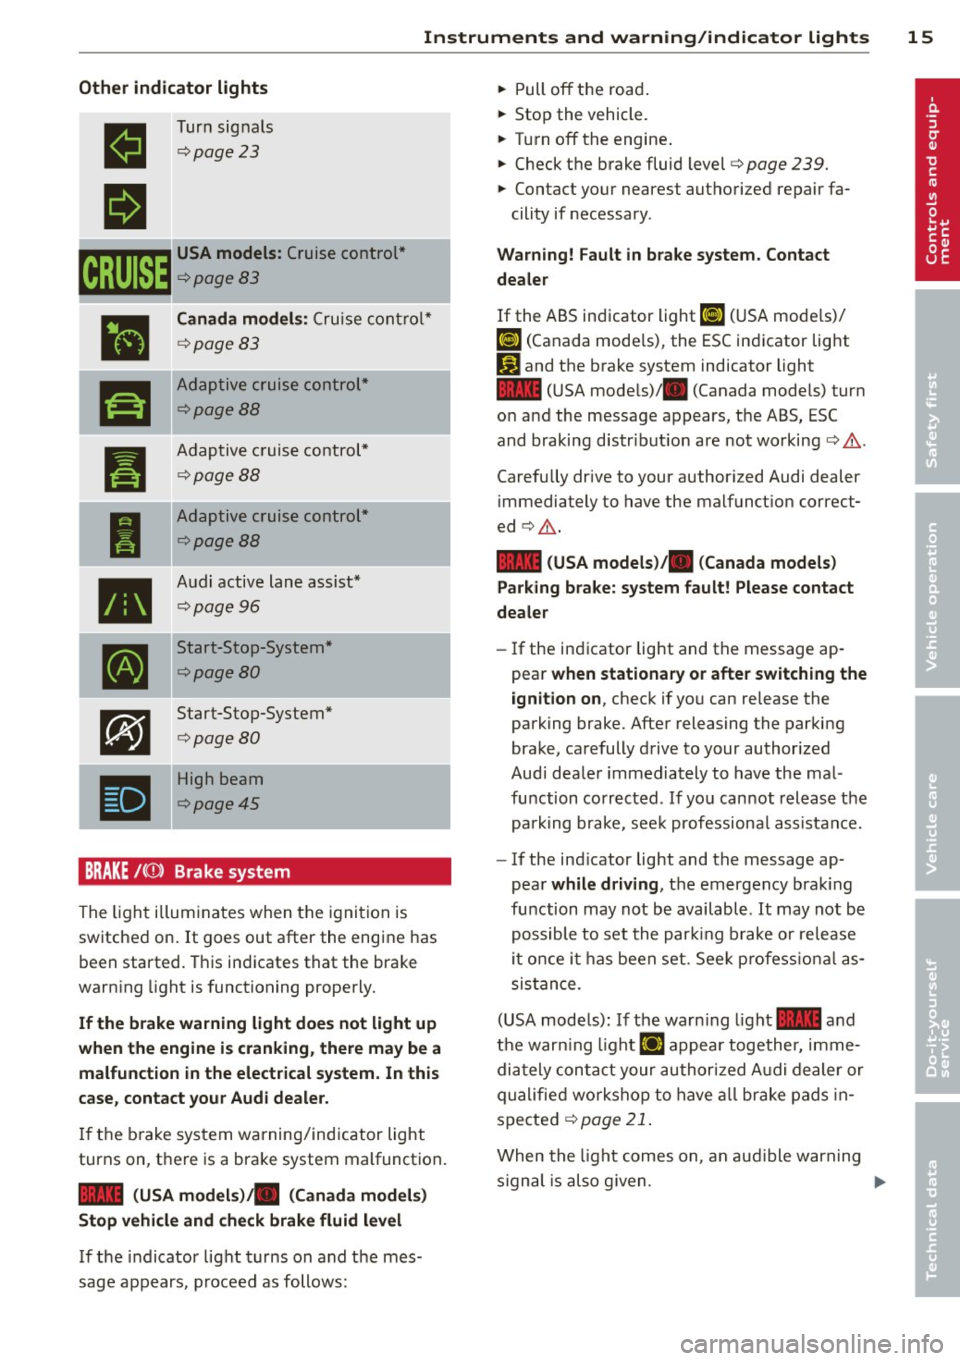
Other indicator lights
II
II
Turn signals
¢page23
r.r;TJm USA models: Cruise control*
~¢page83
•
ra
Canada models: Cruise control*
¢page83
Adaptive cruise control*
¢page BB
_,. .... _
Pl
I
--
•
[I]
Adaptive c ruise control*
¢page BB
Adaptive cruise control*
¢page BB
Audi active lane assist*
¢page 96
Start-Stop-System*
¢page BO
Start-Stop-System*
¢page BO
High beam
¢poge45
BRAKE /((f) ) Brake system
The light i lluminates when the ignition is
switched on.
It goes out after the engine has
been started. This indicates that the brake
warning light is functioning properly.
If the brake warning light does not light up
when the engine is cranking , there may be a
malfunction in the electrical system. In this
case, contact your Audi dealer.
If the brake system warning/indicator light
turns on, there is a brake system malfunction .
1111 (USA models)ta (Canada models)
Stop vehicle and check brake fluid level
If the indicator light turns on and the mes
sage appears, proceed as follows: ""
Pull off the road .
... Stop the vehicle.
... Turn off the engine .
"" Check the brake fluid level¢
page 239.
"" Contact your nearest authorized repair fa-
cility if necessary .
Warning! Fault in brake system. Contact
dealer
If the ABS indicator light Ii] (USA mode ls)/
¢0)
1111 (USA mode ls)/ . (Canada models) turn
on and the message appears, the ABS, ESC
and braking distr ibut ion are not working¢.&, .
Carefully drive to your authorized Audi dealer
immediately to have the malfunct ion correct
ed ¢.&, .
1111 (USA models )/. (Canada models)
Parking brake: system fault! Please contact
dealer
- If the indicator light and the message ap
pear when stationary or after switching the
ignition on ,
check if you can release the
parking brake. After releasing the parking
brake, carefully drive to your authorized
Audi dealer immediately to have the mal
function corrected . If you cannot release the
park ing brake , see k professiona l assistance.
- If the ind icator light and the message ap
pear
while driving , the emergency braking
function may not be available . It may not be
possible to set the parking brake or release
it once it has been set . Seek profess ional as
sis tan ce.
(USA models): If the warn ing light
1111 and
the warn ing light
IJ appear together, imme
diately contact your authorized Audi dealer or
qualified workshop to have all brake pads in
spected ¢
page 21.
When the light comes on , an aud ible warn ing
s ignal is also g iven . ...,
Page 18 of 310
16 Instrum ent s and w arn ing /indic ato r light s
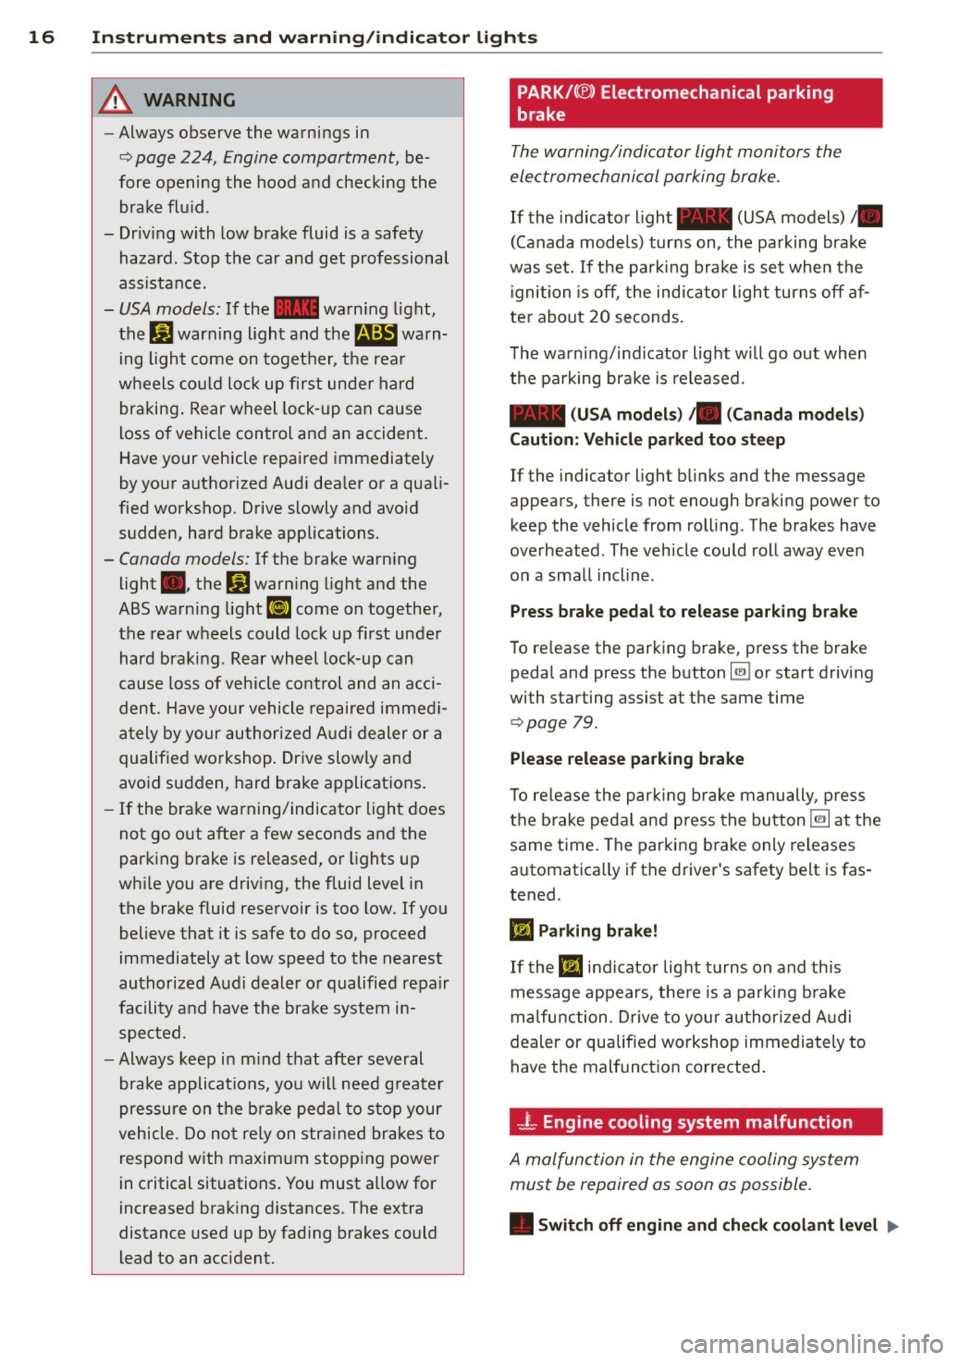
&_ WARNING
-Always observe the warnings in
i=> page 224, Engine compartment, be
fore opening the hood and checking the brake flu id.
- Driv ing with low brake fluid is a safety
hazard. Stop the car and get professional
assistance.
- USA models: If the 1111 warn ing light,
the
G1 warning light and the m:11 warn
ing light come on together, the rea r
wheels co uld lock up first unde r hard
braking . Rear wheel lock-up can cause
loss of vehicle control and an accident.
Have your vehicle repaired immediately
by your authorized Aud i dea ler or a quali
fied workshop. Drive slowly and avoid
sudden, hard brake applications.
- Canada models: If the brake warn ing
light ., the
DJ warn ing light and the
ABS warning light
ii] come on together,
the rear wheels could lock up first unde r
hard bra king. Rear wheel lock-up can
cause loss of vehicle co ntrol and an acci
dent. Have yo ur vehicle repaired immed i
a tely by your authori zed A udi dealer or a
qualified workshop . Dr ive slowly and
avoid sudden, hard brake applicat ions.
- If the brake warning/indicator ligh t does
not go out afte r a few secon ds an d the
parking brake is released, or lights up
whi le you are driving, the fluid level in
the brake fluid reservoir is too low. If you believe that it is safe to do so, proceed
immediately at low speed to the nearest
authorized Audi dealer o r qualified repair
facility and have the brake system in
s pected.
- Always kee p in m ind that afte r several
brake applicat ions, yo u will need g reater
pressure on the b rake peda l to s top your
vehicle. Do no t re ly on stra ined brakes to
respond with maxim um stopping power
in critical situations . You must allow for
increased brak ing distances. The extra
distance used up by fad ing brakes could
lead to an acc ident.
PARK/( ®) Electromechanical parking
brake
The warning/indicator light monitors the
electromechanical parking brake .
If the indicato r light - (USA models)/ .
(Canada mode ls) turns on, the pa rking brake
was set. If the pa rking brake is set when the
igni tion is off, the indicator light turns off a f
te r abo ut 20 seconds .
The wa rning/i nd icator lig ht wi ll go out when
the pa rking bra ke is re leased.
- (USA models ) /. (Canada mod els)
Caution: Vehicle park ed too steep
If the indicator light b links and the message
appea rs, there is not enough braki ng power to
keep the vehicle from roll ing . The brakes have
overheated . The veh icle cou ld roll away eve n
on a sma ll incline .
Press brake pedal to release parking brake
To release the parking b rake, press the brake
peda l and press the button~ or start driving
with starting assist at the same time
i=> page 79.
Plea se relea se parking brake
T o re lease the p arki ng brake manually, p re ss
t h e brake peda l and press the button ~ at the
same time. The parki ng b rake only releases
automatica lly if the driver's safety belt is fas
tened .
Iii Parking brake!
If the Iii indicator lig ht tur ns on and th is
message appears, the re is a parki ng b rake
m alfunction . D rive to your au thori zed A udi
dealer or qualified workshop immediately to
have t he malfunction corrected .
-L Engine cooling system malfunction
A malfunction in the engine cooling system
must be repaired as soon as possible.
• Switch off engin e and check coolant level ..,.
Page 19 of 310
Instruments and warning/indicator lights 17
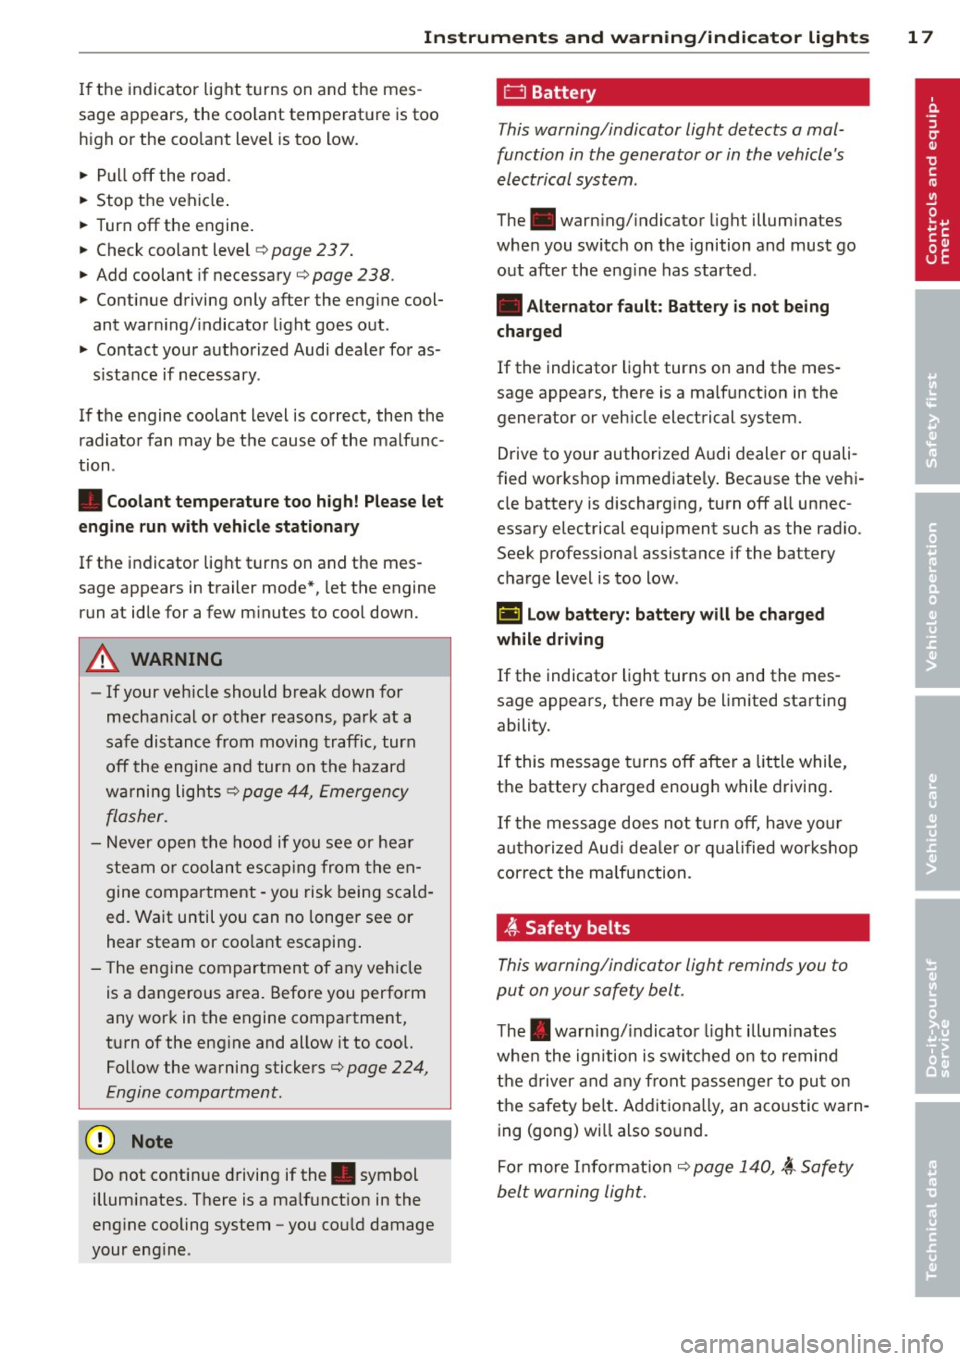
If the indicator light turns on and the mes
sage appears , the coo lant temperature is too
high or the coo lant level is too low.
.,. Pull
off the road.
.,. Stop the vehicle .
.,. Turn
off the engine.
.,. Check coo lant level
¢ page 23 7.
.,. Add coolant if necessary¢
page 238 .
.,. Continue driving only after the engine cool
ant warning/indicator light goes out .
.,. Contact your authorized Aud i dealer for as-
s istance if necessary .
If the engine coolant level is correct, then the radiator fan may be the cause of the malfunc
tion .
• Coolant temperature too high! Please let
engine run with vehicle stationary
If the indicator light turns on and the mes
sage appears in trailer mode*, let the engine
run at idle for a few m inutes to cool down.
A WARNING
- If your veh icle should break down for
mechanical or other reasons, park at a
safe distance from moving traffic, turn
off the engine and turn on the hazard
warning lights ¢
page 44, Emergency
flasher.
-
- Never open the hood if you see or hear
steam or coolant escaping from the en
gine compartment - you risk being scald
ed. Wait until you can no longe r see or
hear steam or coo lant escaping .
- The engine compartment of any vehicle
is a dangerous area. Before you perform
any work in the engine compartment,
turn of the engine and allow it to cool.
Follow the warning stickers¢
page 224,
Engine compartment.
Do not continue driving if the . symbol
illuminates. There is a ma lfunct ion in the
eng ine cooling system -you cou ld damage
your eng ine .
0 Battery
This warning/indicator light detects a mal
function in the generator or in the vehicle's
electrical system .
The .warning/ indicator light illuminates
when you switch on the ignition and must go
out after the engine has started .
• Alternator fault: Battery is not being
charged
If the indicator light turns on and the mes
sage appears, there is a malfunction in the generator or veh icle electrical system.
Drive to your authorized A udi dealer or quali
fied workshop immediate ly . Because the vehi
cle battery is discharg ing, turn
off all unnec
essary electrical equipment such as the rad io.
Seek professional assistance if the battery
charge level is too low.
t•i low battery: battery will be charged
while driving
If the indicator light turns on and the mes
sage appears, there may be limited starting
ability.
If this message turns
off after a little while,
the battery charged enough while driving.
If the message does not turn off, have your
a uthor ized Aud i dealer or qualified workshop
correct the malfunction.
~-Safety belts
This warning/indicator light reminds you to
put on your safety belt.
The . warn ing/ indicato r light illum inates
when the ignition is switched on to remind
the driver and any front passenger to put on
the safety be lt. Additiona lly, an acoustic warn
ing (gong) wi ll also sound.
For more Info rmation ¢
page 140, ~ Safety
belt warning light.
Page 20 of 310

18 Instruments and warning/indicator lights
9:::r. Engine oil pressure malfunction
The re d engin e oil pr essure warning symbol
require s immediat e ser vice or repair . Driving
with a low-oil- pre ssure indicat ion is lik ely to
inflic t seve re damage to the engine .
• Switch off engine and check oil level
If the indicator light turns on and the mes
sage appears , the oil pressure is too low.
,,. Pull
off the road.
"' Stop t he ve hicl e.
,,. Turn
off the engine.
"' Check the engine oil level¢ page 235 .
• If the engi ne oil leve l is to o low, add engine
o il ¢
page 235 . Make sure that the oil p res
s ur e warning symbol. appea rs no longe r
i n t he d is pl ay before y ou sta rt driving again .
• If the engi ne oil leve l is c orre ct and t he ind i
cat or lig ht still t urn s on, tur n t he eng ine
off
and do not conti nue d riving . Seek p ro fessio
nal assistance .
(D Tips
- The engine oil pressure symbol. is
not an indicator for a low engine oil lev
el. Do not rely on it. Instead, check the
oil level in your engine at regular inter
vals, preferably each time you refuel,
and always before going on a long trip.
- The yellow oil level warning indication
II requires oil refill or workshop serv
ice without delay . Do not wait until the
red oil pressure warning. starts to
flash before you respond to the low oil level warning
11-By then, your engine
may already have suffered serious dam
age.
~ . Engine oil level
• WARNING: Please add oil immediately
When the sy mbo l and t he dr ive r message a p
pear, the oil has to be reple nis he d rig ht no w
¢page 232.
If t he in dicator light and the message appear,
a dd engine oil imme diate ly
¢ page 235 .
II Add oil, max. x qt (l). You may continue
driving
W hen the sy mb ol an d the d river message a p
pear, add the amoun t of oil appe aring in the
display at the nex t op port unity ¢
page 232.
® -e Steering column lock
• Do not drive veh icle: Steering defective
If t he indic ato r ligh t turns on an d the mes
sage a ppears, there is an e lec tronic stee ring
co lumn lock malfunct io n. You cannot switc h
t h e i gnit io n on.
Do
not tow yo ur vehicle becau se it c annot b e
stee red. See k professiona l assistance .
!Ill Steering lock: system fault. Please con
tact dealer
If th e indicato r light turns on and the mes
sage appears, there is an e lectronic steering
co lu mn l ock malfunct io n.
Drive to y our auth orized A udi dealer immedi
ately to hav e th e malfunction corr ecte d.
A WARNING
-~
Yo ur v ehicl e m ust no t be tow ed in t he
event of a malfu nction in the elec tronic
stee ring colum n lock be cau se it ca nno t be
s teere d due to th e l ock ed steeri ng. If it is
towe d wit h the s teeri ng locke d, there is
the r isk o f an accide nt.
© -e Engine start system
• Engine start system fault . Please con
tact dealer
If the indica to r ligh t turns on and the mes
sage appears, do
not switch the ig nition off
because you may not be a ble to sw itch it on
again.
Dr ive to your au thor ized A udi dea ler immed i
ate ly to have the ma lfunction corrected.
Ill Engine start system fault . Please con
tact dealer
Page 32 of 310

30 Instruments and warning/indicator lights
the engine starts and the idle has stabilized.
This indicates that the MIL is working proper
ly.
If the light does not go out after the engine
i s started, or illuminates whi le you are driv
ing, a ma lfunction may exist in the engine sys
tem .
If the light illuminates, the catalytic con
verter could be damaged.
Continue driving
with reduced power (avoid
ing susta ined high speeds and/or rapid accel
erat ions) and have the condition corrected.
Contact your authori zed Audi dealer .
If the light illuminates, the electronic speed
limiter may also be ma lfunctioning. For more
information
Q page 30, Electronic speed
limiter.
An improperly closed fuel filler cap may also
cause the MIL light to illuminate
Qpage227.
On-Board Diagnostics
Fig . 16 Locat io n of Data Link Co nnector (D LC)
On-Board Diagnostics monitors the compo
nents o f your emission control system. Each
monitored component in your engine system
has been assigned a code. In case of a mal
function, the component will be identified
and the fault stored as a code in the control module memory.
The MIL light may a lso illuminate if there is a
leak in the on-board fue l vapor recovery sys
tem. If the light illuminates after a refuelling,
stop the veh icle and make sure the fuel filler
cap is properly closed
Q page 22 7. In order to make an accurate diagnosis, the
stored data can on
ly be displayed using spe
c ial diagnostic equipment (generic scan tool
for OBD).
In order to connect the special diagnostic
equipment, push the plug into the Data Link
Connector (D LC). The DLC is located to the
right of the hood release~
fig. 16.
Your authorized Audi dea ler or a qualified
service station can interpret the code and per
form the necessary repair.
A WARNING
-Do not use the diagnostic connector for
personal use. Incorrect usage can cause
malfunctions, which can increase the risk
of a collision!
Electronic speed limiter
-
Your vehicle may be factory equipped w ith
t ir es that are rated for a maximum speed of
130 mph (210 km/h). This is less than the
maximum speed of your vehicle. To reduce the
risk of sudden tire fai lure and loss of control if
the vehicle is operated at excessive speeds,
your vehicle also has an e lectronic speed limit
er . The electronic speed limiter prevents your
vehicle from going faster than the tire speed
rating . For more information
Q page 257.
If the engine control unit receives faulty vehi
cle road speed signals, the Malfunction Indi
cator Lamp (MIL)
¢fj will illuminate . If this
occurs, contact the nearest authorized Audi
dealer for assistance.
S models
Your vehicle's top speed is electronica lly limit
ed to 155 mph (250 km/h).
If the engine control unit receives faulty vehi
cle roadspeed signals, the Malfunction Indica
tor Lamp (MIU¢.§ will illuminate . If this oc
curs, contact the nearest authorized Audi
dealer for assistance.
Page 39 of 310
@ Tips
If your vehicle has been standing for an ex
tended period, please note the follow ing:
- The proximity sensors are deactivated af-
ter a few days to save power. You then
have to pull on the door handle once to
unlock the vehicle and a second time to
open the veh icle.
- To prevent the battery from being dis
charged and to preserve your veh icle's
ability to start for as long as possible,
the energy management system gradu
ally switches off unnecessary conven i ence funct ions. It is possible that you
will not be able to unlock your vehicle us
i ng these conven ien ce f unctions.
- Fo r De clarat ion of Compliance to United
Sta tes FCC and Indus try Canada regula
tions
¢page 292.
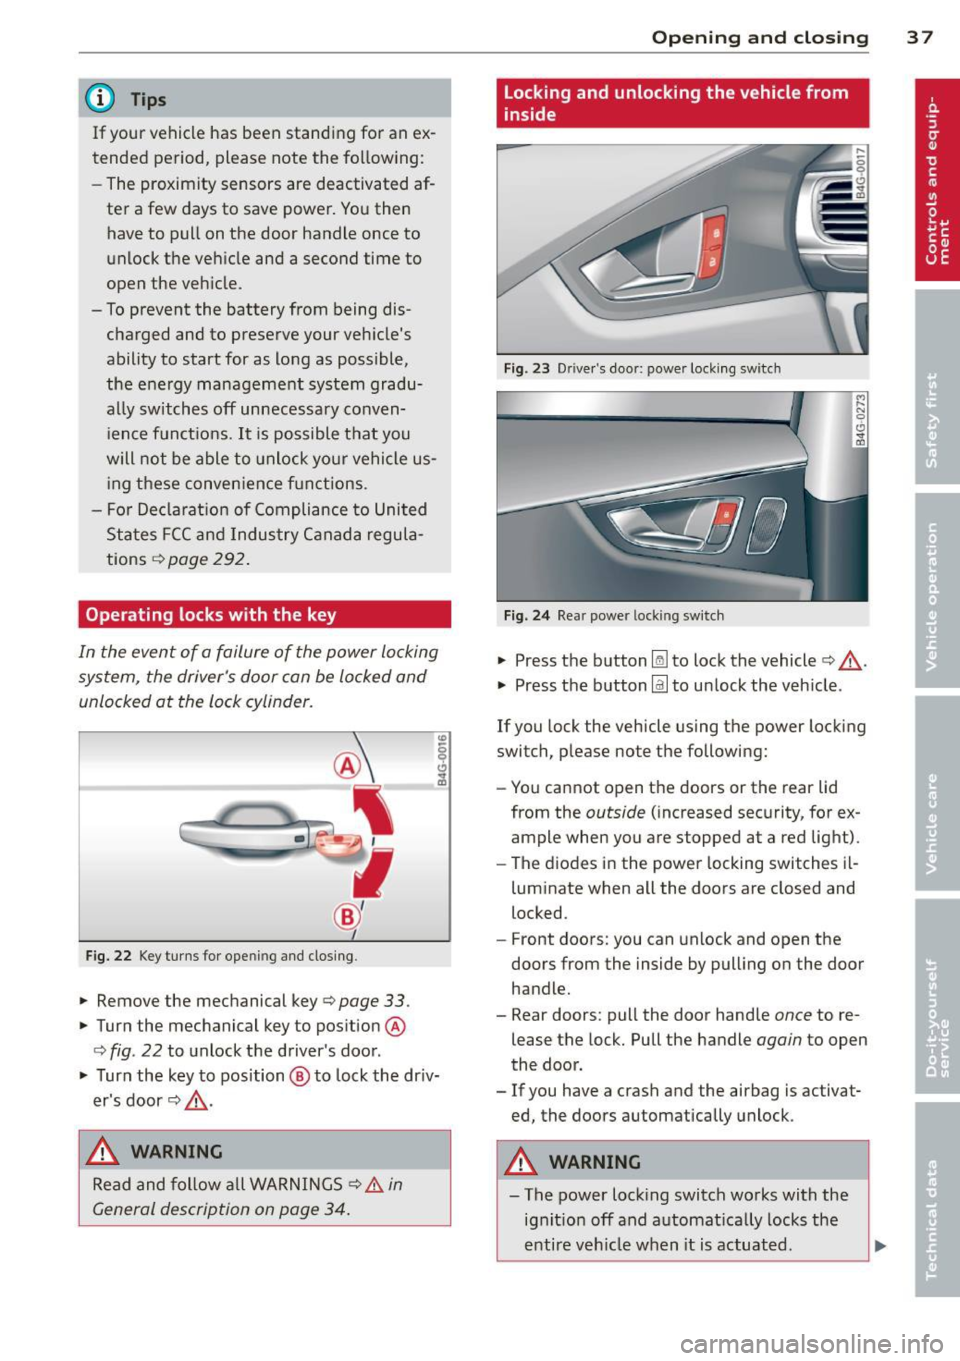
Operating locks with the key
In the event of a failure of the power locking
system, the driver's door can be locked and unlocked at the lock cylinder.
Fig. 2 2 Key turns for opening and clos ing .
"' Remove the mechanical key¢ page 33 .
"' Turn the mechanical key to position @
q fig. 22 to unlock the driver's door .
"' Turn the key to position ® to lock the dr iv
er's door¢ &,.
,& WARNING
Read and follow a ll WARNINGS ¢ & in
General description on page 34.
Op enin g an d clos ing
Locking and unlocking the vehicle from
inside
Fig . 23 Drive r's door: power locking switch
Fi g. 2 4 Rear power locking switch
"' Press the button l@J to lock the vehicle¢&, .
"' Press the button
@:I to unlock the veh icle .
If you lock the vehicle using the power locking
switch, p lease note the following:
- You cannot open the doors or the rear lid
from the
outside ( increased security, for ex
ample when you are stopped at a red light).
- The d iodes in the power locking switches il-
luminate when all the doors are closed and
locked.
- Front doors: you can unlock and open the
doors from the inside by pulling on the door
handle.
- Rear doors: pull the door handle
once to re
lease the lock. Pull the handle
again to open
the door.
- If you have a crash and the airbag is activat
ed the doors automatically unlock .
,
A WARNING
-The power lock ing switch works with the
ig nit ion off and automat ica lly locks the
enti re veh icle when it is actuated.
3 7
Page 77 of 310

steering column will continue moving as long as you are pressing the switch.
There must be at least
10 inches (25 cm) be
tween your chest and the cente r of the steer
ing wheel. If you cannot sit more than
10 in
ches (25 cm) from the steering wheel, see if
adaptive equipment is available to help you
reach the pedals and increase the distance
from the steer ing wheel.
F or detailed information on how to adjust the
driver's seat, see
r::> page 53 .
In vehicles with the memory f unction* , the
steering column settings are stored together
with the seat position.
A WARNING
Improper use of steering wheel adjust
ment and improper seating position can
cause serious personal injury .
- Adjust the steering wheel column only
when the vehicle is not moving to pre
vent loss of veh icle control.
-
- Adjust the driver's seat or steering wheel
so that there is a min imum of
10 inches
(25 cm) between your chest and the
steering wheel ¢
fig. 147. If you cannot
mainta in this min imum d istance, the a ir
bag system cannot protect you properly.
- If physica l limitations prevent you from
sitting
10 i nches (25 cm) or more from
the steering wheel, check with yo ur au
thorized Aud i dea ler to see if adaptive
equipment is availab le.
- If the steering wheel is aligned with you r
f ace, the supp lemental driver's airbag
cannot provide as much protection in an
accident. A lways make sure that the
steering wheel is aligned with your
chest.
- Always hold the steering wheel with your
hands at the 9 o'clock and 3 o'clock posi
t ions to reduce the risk of personal injury
if the driver's airbag deploys.
- Never hold the steering wheel at the 12
o'clock posit ion or with your hands inside
the steering wheel rim or on the steer ing
On th e road 7 5
wheel hub. Holding the steering wheel
the wrong way can cause serious injuries
to the hands, arms and head if the driv
er's airbag deploys.
Easy entry feature
App lies to vehicles: with electrically adj ustable steer ing
wheel
The easy entry feature makes it easier to en
ter and exit the vehicle by automatically ad
justing the steering wheel.
.,. Select in the MMI: ICAR lfunction bu tton>
(C ar)* sys tems control button > Vehicle set
t ing s > Se ats
> Drive r's sea t > Easy entry >
On.
When the easy entry feature is turned on, the
steering wheel moves up to the park position
when you switch off the ignition . After you en
ter the vehicle, the steering wheel moves to
the stored posit ion as soon as you switch on
the ignition.
Starting and stopping
the engine
Starting the engine
This button switches on the ignition and
starts the engine.
F ig. 78 Center console: S TART ENGINE S TOP button
.,. Step on the brake pedal and move the selec
tor lever to
P or N ¢ £..
.,. Press on the ...., , s=T ""'A --=R=T ,..., E= N~ G-::,I N:-:-= E-=s= T::-::0 :-:: Pc-i l button
c::> fig. 78 -the engine will start. ..,.